8 Servicing PCIe Risers (CRU)

This section describes how to service PCIe risers. PCIe risers are customer-replaceable units (CRUs) that require you to power off the server. For more information about CRUs, see Illustrated Parts Breakdown and Customer-Replaceable Units.

PCIe cards in all slots are installed on vertical risers. You must remove the associated riser to remove and replace a PCIe card. You must remove all three PCIe risers when replacing the motherboard.

Caution:

These procedures require that you handle components that are sensitive to electrostatic discharge. This sensitivity can cause the components to fail. To avoid damage, ensure that you follow antistatic practices as described in Electrostatic Discharge Safety.

Caution:

Ensure that all power is removed from the server before removing or installing PCIe risers, or damage to the PCIe cards installed in the risers might occur. You must disconnect all power cables from the system before performing these procedures.

The following sections provide information to assist you in servicing PCIe risers:

PCIe Riser Locations

There are three PCIe risers available for PCIe cards. The following figure shows the PCIe riser numbers and locations.
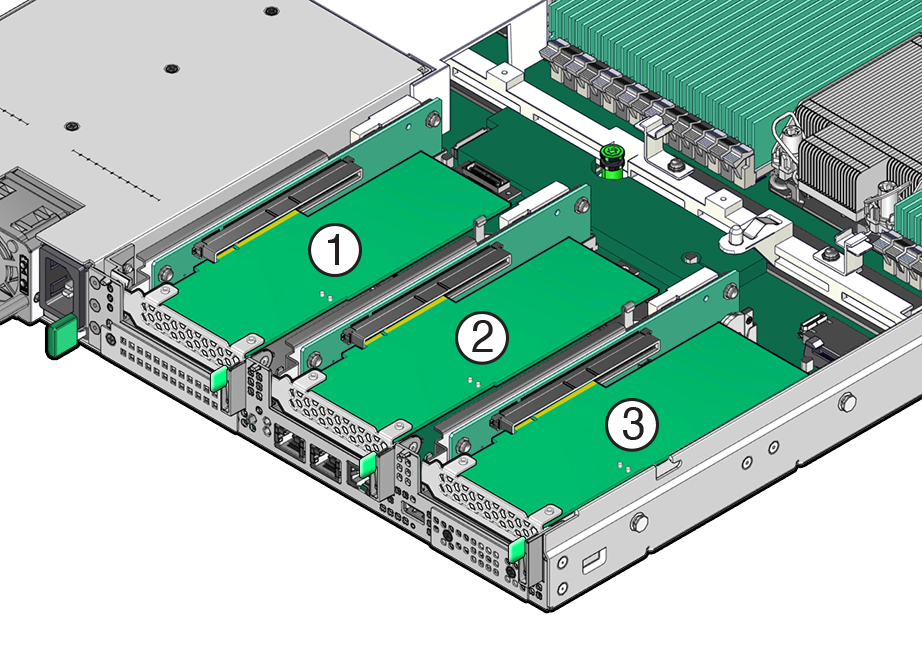

Figure showing the location of PCIe risers installed in the system.
Callout Description

1

PCIe riser with installed PCIe card in slot 1 (This slot is nonfunctional in single-processor systems.)

2

PCIe riser with installed PCIe card in slot 2

3

PCIe riser with installed PCIe card in slot 3.

Remove a PCIe Riser

Note:

PCIe slot 1 is nonfunctional in single-processor systems.
  1. Prepare the server for service.
    1. Power off the server and disconnect the power cords from the power supplies.
    2. Extend the server to the maintenance position.
    3. Attach an antistatic wrist strap to your wrist and then to a metal area on the chassis.
    4. Remove the server top cover.
  2. Select the PCIe riser that you want to remove.
  3. If a PCIe card is installed in the riser, disconnect any external cables from the card.
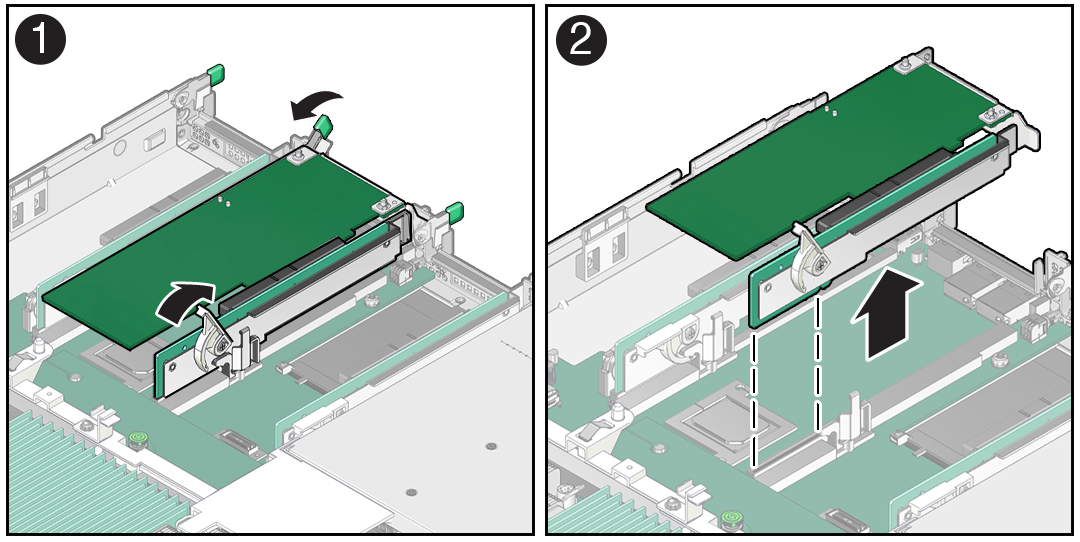
  4. Lift the green-tabbed latch on the rear of the server chassis next to the applicable PCIe slot to release the rear bracket on the PCIe card [1].

    Figure showing how to remove a PCIe riser.

    Note:

    If the riser does not have a PCIe card installed, lift the latch to release the PCIe slot filler panel.
  5. Lift the green-tabbed riser release lever on the PCIe riser with one hand and use your other hand to remove the riser from the motherboard connector [1, 2].
  6. If there is a PCIe card installed in the riser, place the riser on an antistatic mat and note the slot in which the PCIe riser was originally installed; otherwise, set the PCIe riser aside.

Install a PCIe Riser

Note:

PCIe slot 1 is nonfunctional in single-processor systems.
  1. Determine into which slot you will install the PCIe riser.
  2. Retrieve the PCIe riser and any PCIe cards attached to it.
  3. Raise the green-tabbed release lever on the PCIe riser to the open (up) position [1].
  4. Gently press the riser into the motherboard connector until it is seated, and then press the green-tabbed release lever on the PCIe riser to the closed (down) position [1, 2].

    Figure showing how to install a PCIe riser in slots 1 and 2.
  5. Close the green-tabbed latch on the rear of the server chassis next to the applicable PCIe slot to secure the rear bracket on the PCIe card to the server chassis [2].

    Note:

    If the riser does not have a PCIe card installed, install a PCIe slot filler panel and close the green-tabbed latch to secure the filler panel.
  6. If there were any external cables connected to the PCIe card, reconnect them.
  7. Return the server to operation.
    1. Install the server top cover.
    2. Return the server to the normal rack position.
    3. Reconnect the power cords to the server power supplies and reconnect the data cables.
    4. Power on the server.
    5. Verify that the System OK status indicator is steady on.
  8. Use Oracle ILOM to clear the server PCIe riser fault.

    If the PCIe riser fault message in Oracle ILOM is not cleared under Open Problems, you must manually clear the fault in Oracle ILOM. Refer to "Clear Faults for Undetected Replaced or Repaired Hardware Components" in the Oracle ILOM User's Guide for System Monitoring and Diagnostics Firmware Release 5.0.x at Oracle Integrated Lights Out Manager (ILOM) 5.0 Documentation.