13 Servicing the Disk Backplane (FRU)

The following section describes how to service the disk backplane. The disk backplane is a field-replaceable unit (FRU). For more information about FRUs, see Illustrated Parts Breakdown and Field-Replaceable Units.

Caution:

The disk backplane must be removed and replaced only by authorized Oracle Service personnel.

Caution:

Ensure that all power is removed from the server before removing or installing the disk backplane. You must disconnect the power cables before performing this procedure.

Caution:

These procedures require that you handle components that are sensitive to electrostatic discharge. This sensitivity can cause the component to fail. To avoid damage, ensure that you follow electrostatic discharge safety measures and antistatic practices. See Electrostatic Discharge Safety.

To remove and install the disk backplane, follow these procedures:
Remove the Disk Backplane

  1. Prepare the server for service.
    1. Power off the server and disconnect the power cords from the power supplies.
    2. Extend the server to the maintenance position.
    3. Attach an antistatic wrist strap to your wrist, and then to a metal area on the chassis.
    4. Remove the server top cover.
  2. Pull all storage drives out far enough to disengage them from the disk backplane.

    See Remove a Storage Drive.

    Note:

    It is not necessary to completely remove the storage drives from the server; simply pull them out far enough to disengage them from the disk backplane. If you do remove the storage drives from the server, record their locations so that you can reinstall them in the same locations.
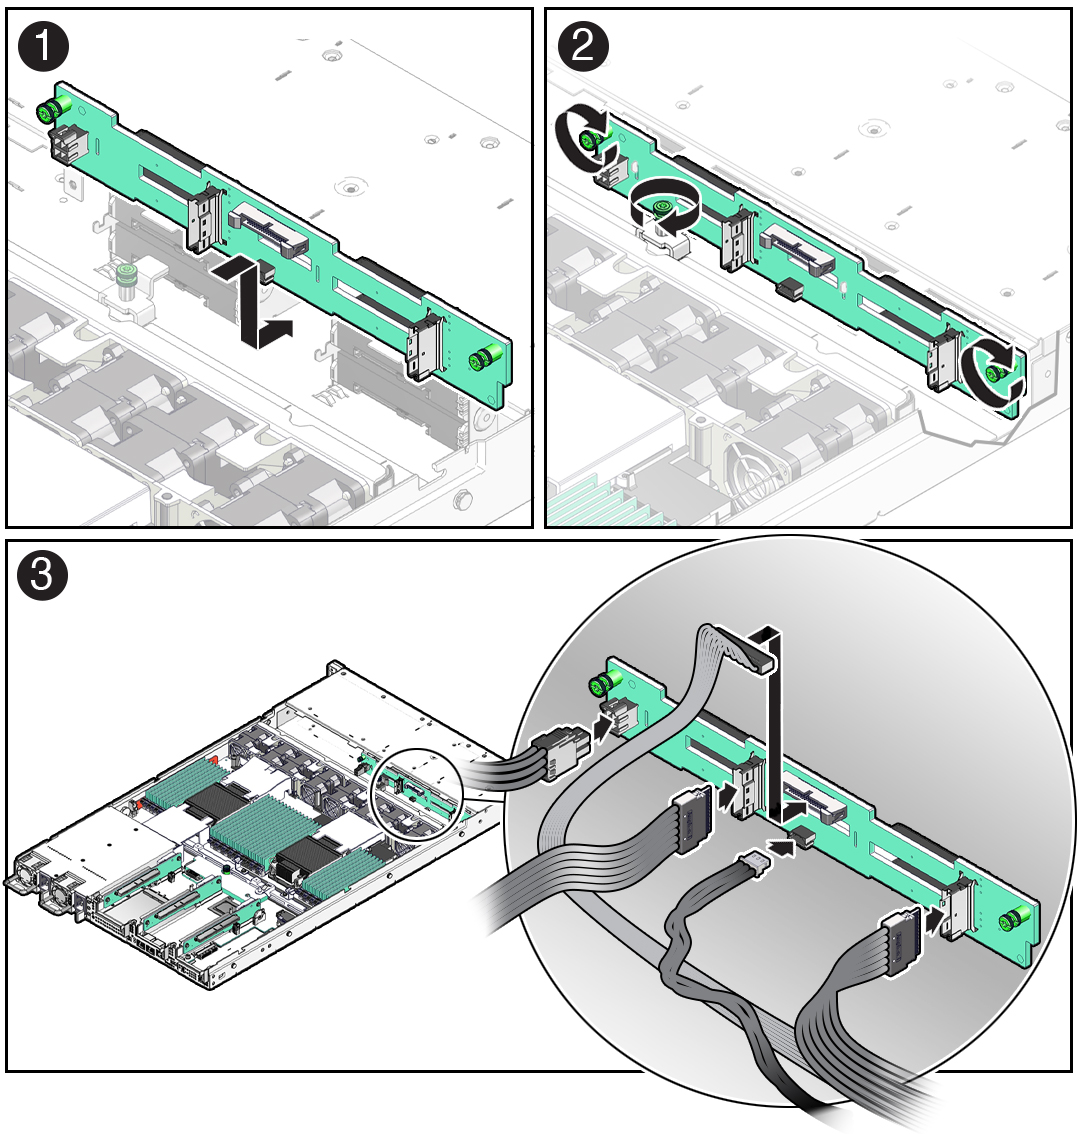
  3. Disconnect the following cables from the disk backplane [1]:
    • NVMe cables

    • Disk backplane data cable

    • Temperature sensor cable

    • Disk backplane power cable


    Figure showing how to remove the disk backplane from the server.
  4. Using a Torx T15 screwdriver, loosen the three captive screws that secure the disk backplane to the chassis [2].
  5. Lift the backplane up and tilt it toward the rear of the server to free it from the hooks, and lift it out of the server [3].
  6. Place the disk backplane on an antistatic mat.

Install the Disk Backplane

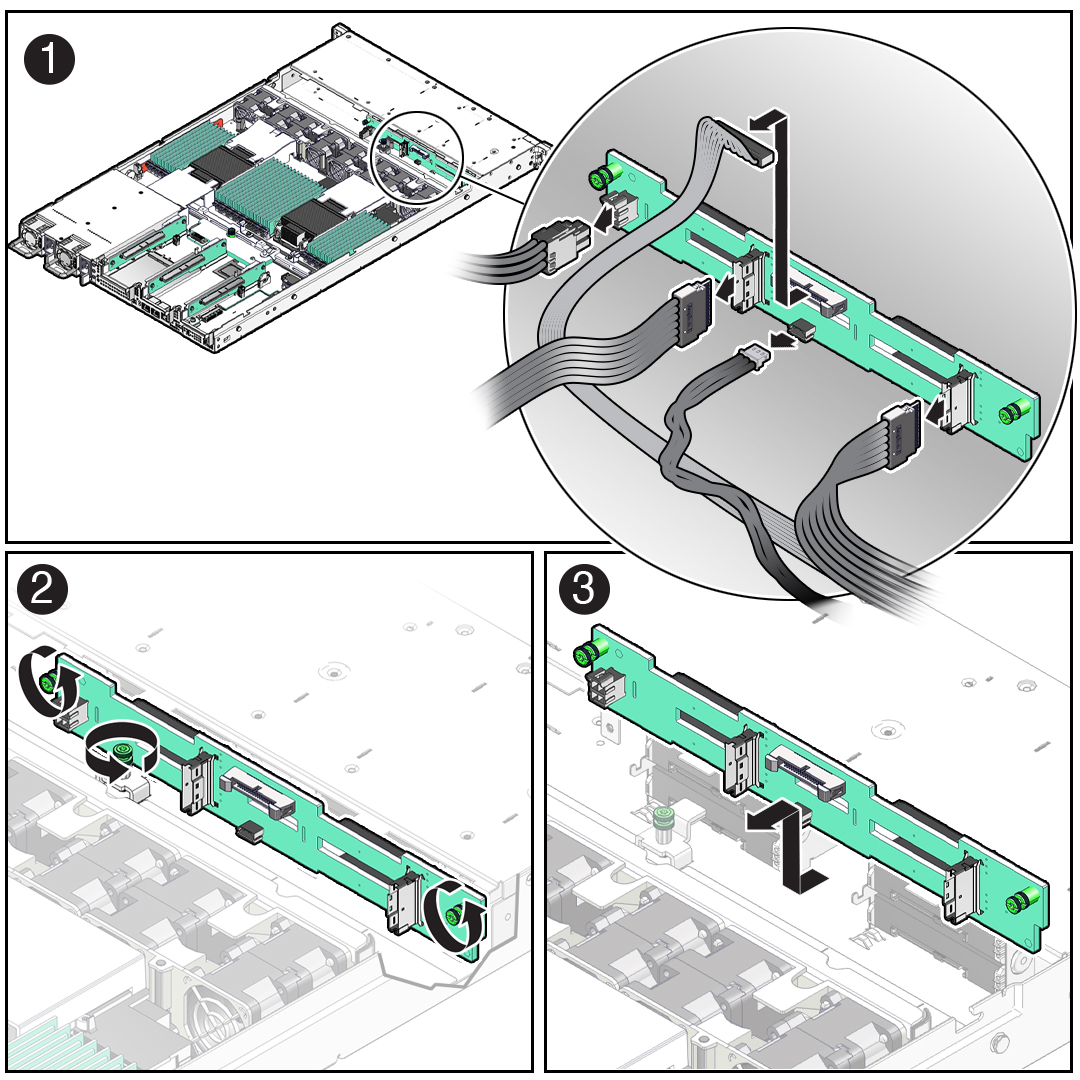
  1. Install the disk backplane into the server so that it engages the two metal hooks and also sits behind the metal tabs located on the chassis bottom [1].

    Figure showing how to install the disk backplane in to the server.
  2. Using a Torx T15 screwdriver, tighten the three storage drive backplane captive screws clockwise until the disk backplane is secure [2].
  3. Reconnect the following cables to the disk backplane [3]:
    • Disk backplane data cable

    • Temperature sensor cable

    • Disk backplane power cable

    • NVMe cables

  4. Reinstall all of the storage drives into the server.
  5. Return the server to operation.
    1. Install the server top cover.
    2. Return the server to the normal rack position.
    3. Reconnect the power cords to the power supplies, and power on the server.
    4. Verify that the System OK status indicator is lit.

    Note:

    IMPORTANT: When the disk backplane is replaced, the key identity properties (KIP) of the backplane is programmed by Oracle ILOM to contain the same KIP as the other quorum member components. If you removed other quorum member components, you might need to manually program the product serial number (PSN) into the new backplane. For more information, see FRU Key Identity Properties (KIP) Automated Update.