10 Servicing the Internal M.2 Flash SSDs (CRU)

This section describes how to service M.2 flash solid-state drives (SSDs). M.2 flash SSDs are customer-replaceable units (CRUs) that require you to power off the server. For more information about CRUs, see Illustrated Parts Breakdown and Customer-Replaceable Units.

Caution:

These procedures require that you handle components that are sensitive to electrostatic discharge. This sensitivity can cause the component to fail. To avoid damage, ensure that you follow antistatic practices as described in Electrostatic Discharge Safety.

Caution:

Ensure that all power is removed from the server before removing or installing M.2 flash SSDs. You must disconnect all power cables from the system before performing these procedures.

This section covers the following procedures:

Remove an M.2 Mezzanine

  1. Prepare the server for service.
    1. Power off the server and disconnect the power cords from the power supplies.
    2. Extend the server to the maintenance position.
    3. Attach an antistatic wrist strap to your wrist and then to a metal area on the chassis.
    4. Remove the server top cover.
  2. Remove the M.2 mezzanine containing the M.2 flash SSDs from the server.
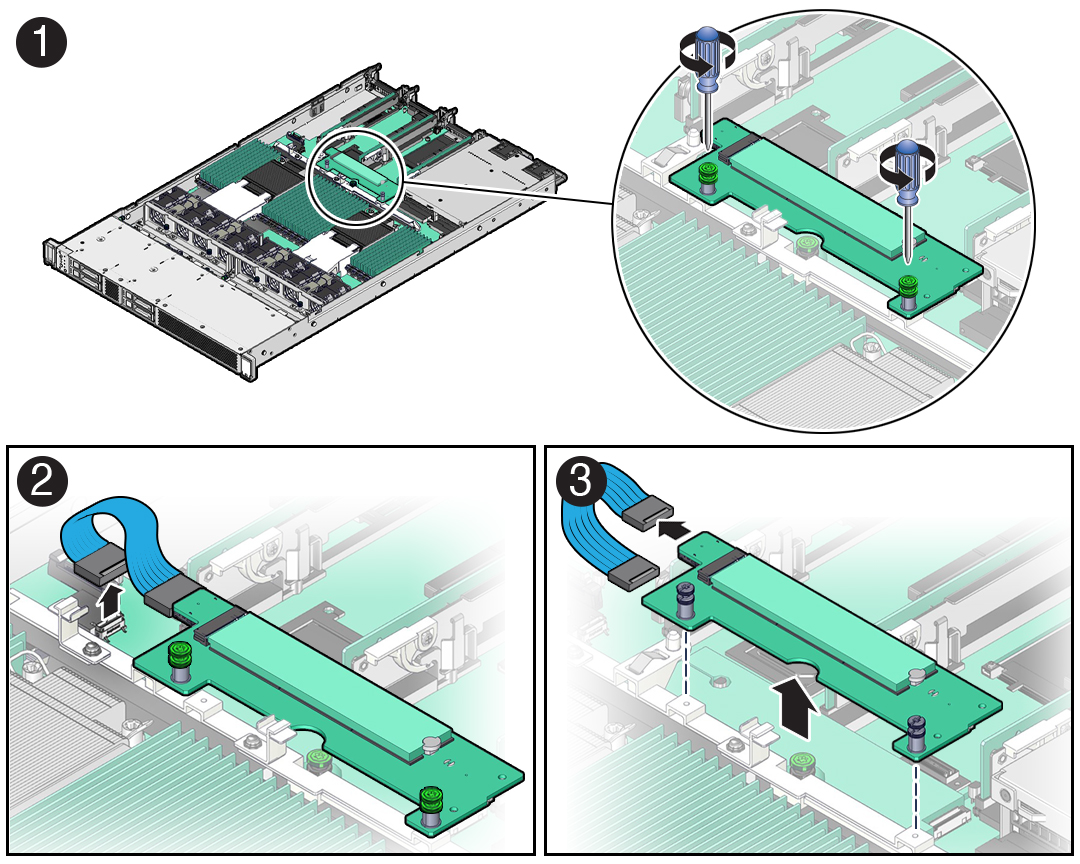
    1. Using a T15 Torx screwdriver, loosen the two captive SSDR screws that secure the M.2 mezzanine to the mid wall chassis stiffener [1].

      Figure showing how to remove the M.2 mezzanine from the server chassis.
    2. Disconnect the SATA/PCIe data cable from the motherboard [2].
    3. Lift the M.2 mezzanine straight up and out of the server to disconnect the mezzanine SSDR power connector from the motherboard SSDR power connector [3].
    4. (Optional) Disconnect the SATA/PCIe data cable from the M.2 mezzanine [3].

      Note:

      You do not need to disconnect the SATA/PCIe data cable from the mezzanine if you are servicing only the M.2 flash SSDs.
    5. Place the M.2 mezzanine on an antistatic mat. If required, perform the procedures for removing the M.2 flash SSDs from the mezzanine.

Install an M.2 Mezzanine

  1. Unpack the replacement M.2 mezzanine and place it on an antistatic mat.

    If required, ensure that you have installed the M.2 flash SSDs on to the M.2 mezzanine before installing the mezzanine in the server. See Install an M.2 Flash SSD.

  2. Install the M.2 mezzanine containing the M.2 flash SSDs in the server.
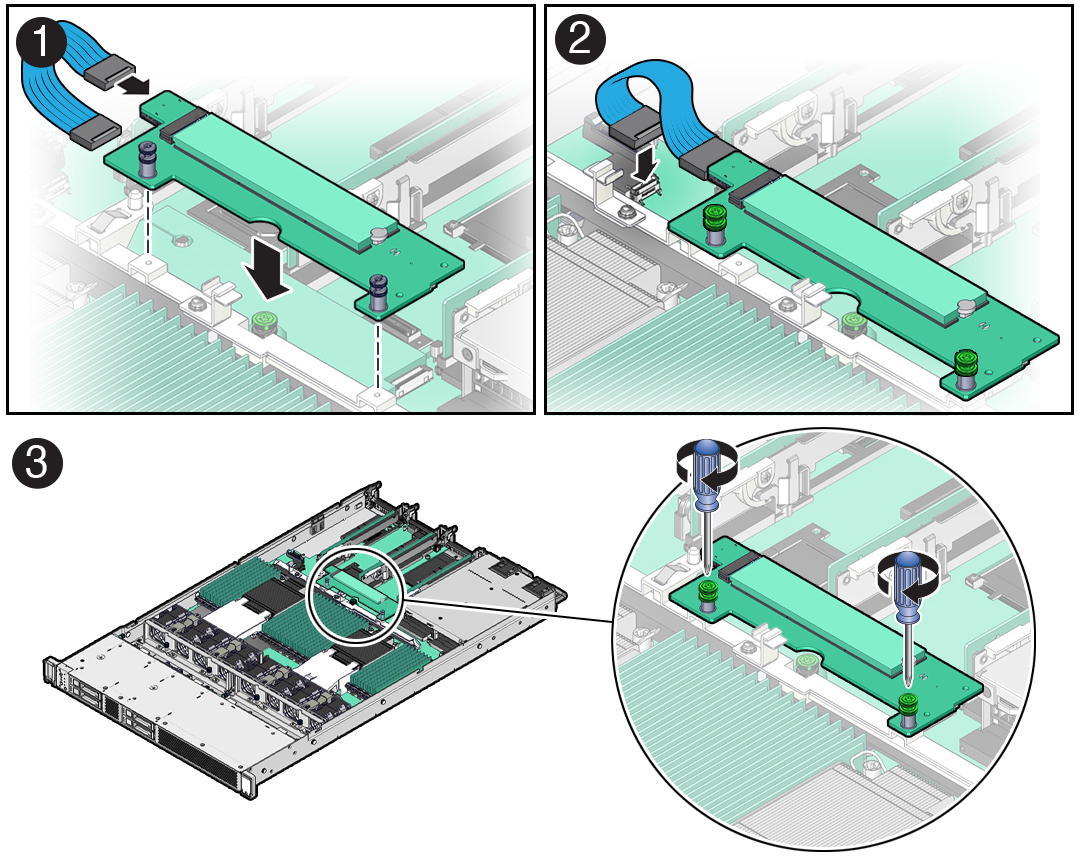
    1. (Optional) Reconnect the SATA/PCIe data cable to the M.2 mezzanine [1].

      Figure showing how to install the M.2 mezzanine into the server chassis.
    2. Align the M.2 mezzanine with the SSDR screw holds and the motherboard SSDR power connector, then lower the M.2 mezzanine straight down in to the server to connect the mezzanine and motherboard SSDR power connectors [2].
    3. Reconnect the SATA/PCIe data cable to the motherboard [2].
    4. Using a T15 Torx screwdriver, tighten the two captive SSDR screws to secure the M.2 mezzanine to the chassis mid wall [3].
  3. Return the server to operation.
    1. Install the server top cover.
    2. Return the server to the normal rack position.
    3. Reconnect the power cords to the server power supplies and reconnect the data cables.
    4. Power on the server.
    5. Verify that the System OK status indicator is steady on.

Remove an M.2 Flash SSD

  1. Perform the steps to remove the M.2 mezzanine containing the M.2 flash SSDs.

    See Remove an M.2 Mezzanine. Place the M.2 mezzanine on an antistatic mat.

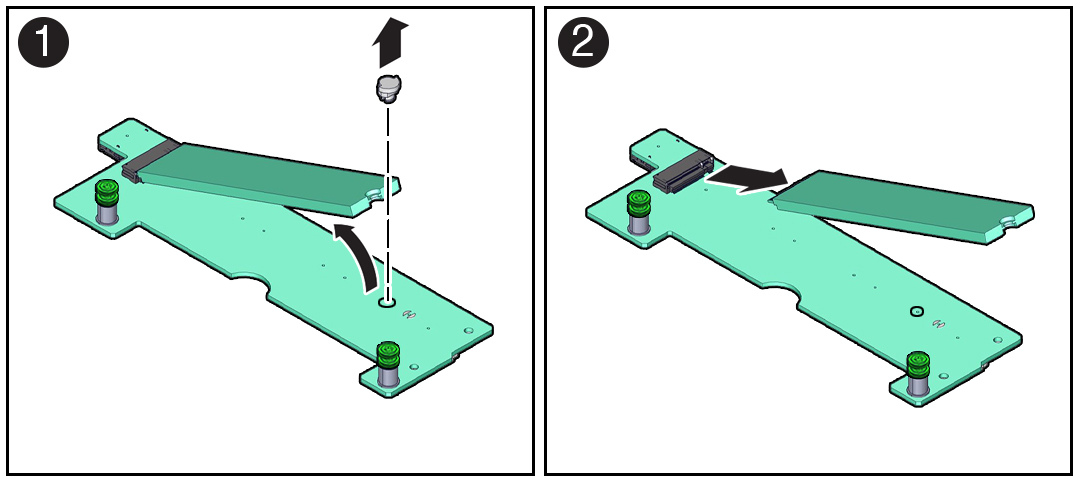
  2. Using your fingers, push the plastic retainer clip through the M.2 mezzanine to release the M.2 flash SSD from the mezzanine. [1].

    Figure showing how to remove an M.2 flash SSD from the M.2 mezzanine.
  3. Remove the plastic retainer clip from the M.2 flash SSD.
  4. Remove the M.2 flash SSD from the mezzanine [2].
    1. Lift up on the end of the M.2 flash SSD where the plastic retainer clip was removed by one-half to one inch.
    2. Gently slide the M.2 flash SSD card rearward and out of the connector to disengage the SSD contacts from the mezzanine socket.
    3. Place the M.2 flash SSD on an antistatic mat.
  5. Repeat Step 2 through Step 4 to remove the second M.2 flash SSD from the opposite side of the M.2 mezzanine.

Install an M.2 Flash SSD

Note:

The M.2 mezzanine contains two M.2 flash SSD sockets (labeled SSD0 and SSD1). If you are installing a single M.2 flash SSD on to the mezzanine, install the M.2 flash SSD into socket SSD0.
  1. Unpack the replacement M.2 flash SSD.
  2. Install the M.2 flash SSD.
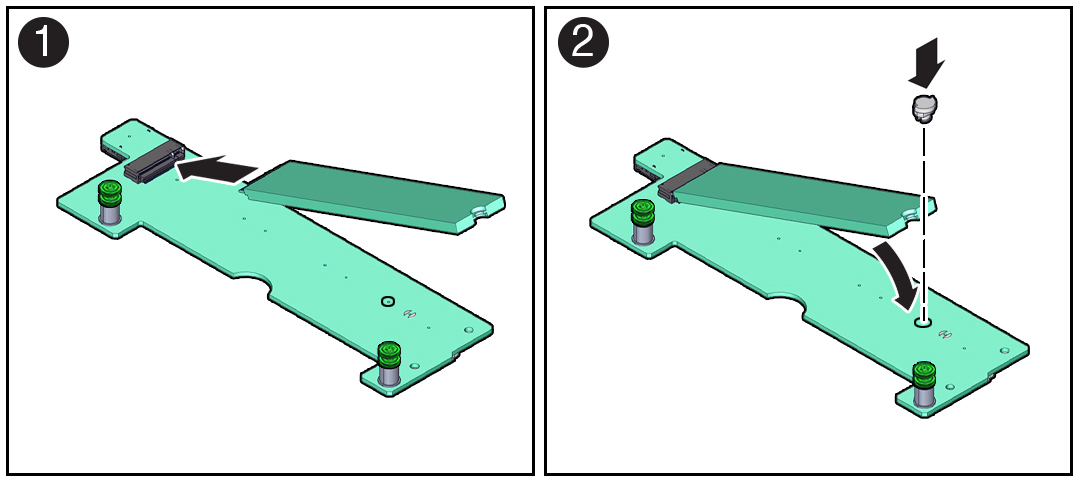
    1. Align and then insert the plastic retainer clip into the slot on the M.2 flash SSD.
    2. Hold the M.2 flash SSD so that the end of the card containing the plastic retainer clip is approximately one-half to one inch above the M.2 mezzanine and the other end is adjacent to the mezzanine SSD socket [1].

      Figure showing how to install an M.2 flash SSD on to the M.2 mezzanine.
    3. Gently slide the M.2 flash SSD forward and into the connector to engage the flash SSD contacts with the M.2 mezzanine socket [2].
    4. Using your fingers, push down on the end of the card containing the plastic retainer clip until the M.2 flash SSD snaps into place on the mezzanine [2].

      You will hear an audible click when the M.2 flash SSD is secured to the mezzanine.

  3. Repeat Step 2 to install the second M.2 flash SSD on to the opposite side of the M.2 mezzanine.
  4. Perform the steps to install the M.2 mezzanine with the replacement M.2 flash SSDs in the server.