Deploy the SDDC to the Cloud

Oracle Cloud VMware Solution is deployed according to best practices recommended by VMware. All VMware components are distributed across Oracle Cloud Infrastructure fault domains in a given region’s availability domain.

Prepare Your Deployment

To get started with Oracle Cloud VMware Solution, you need to create a VCN or use an existing VCN to deploy the SDDC. If you plan to use an existing VCN, we recommend using one with an IP address CIDR size of /22 or larger available for running the SDDC. This CIDR is divided into eight segments to use for the provisioning subnet and seven VLANs.

As a part of SDDC provisioning, the following network segments are created for various VMware functionalities. These network segments ensure appropriate traffic segregation.

Deploy the SDDC

When you request a new VMware SDDC on Oracle Cloud Infrastructure, Oracle Cloud VMware Solution performs the steps shown in the following diagram.
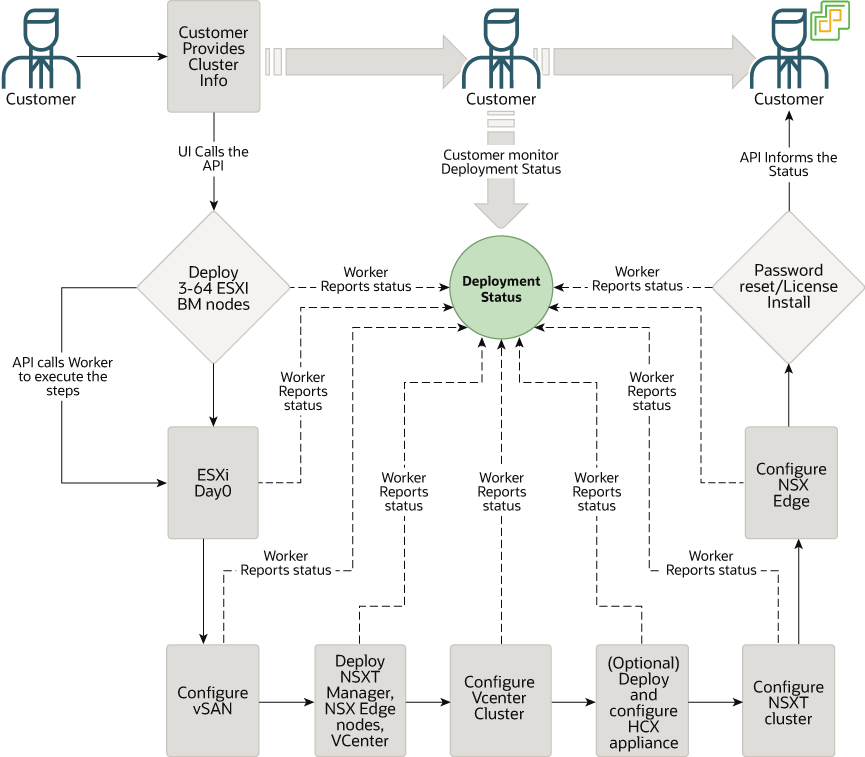
Description of ovcs_cluster_creation.png follows
Description of the illustration ovcs_cluster_creation.png

To create an SDDC, follow these steps:

  1. Sign in to the Oracle Cloud Infrastructure Console.
  2. Open the navigation menu. Under Solutions and Platform, click VMware Solution.
  3. Click Create SDDC.
  4. On the Basic Information page, provide the following values for the SDDC:
    • SDDC Name: A descriptive name for the SDDC. This name must be unique among all SDDCs in the creating, active, or updating state across all compartments in the region. The name must be from 1 to 16 characters long, must start with a letter, can contain only alphanumeric characters and hyphens (-), and is not case-sensitive.
    • SDDC Compartment: The compartment in which to create the SDDC. All ESXi hosts for this SDDC are placed in this compartment.
    • VMware Software Version: The version of bundled VMware software to install on the ESXi hosts. The software bundle includes vSphere, vSAN, and NSX components.
    • Number of ESXi Hosts: The initial number of ESXi hosts to create in the SDDC. Specify at least 3 and at most 64 hosts. You can start small and scale as needed. Oracle Cloud VMware Solution supports both adding and deleting ESXi host capacity in the SDDC as needed.
    • Prefix for ESXi Hosts: (Optional) Enter a prefix to use for the names of the ESXi hosts to help identify them. This string has the same criteria as the SDDC name. It must be from 1 to 16 characters long, must start with a letter, and can contain only alphanumeric characters and hyphens.
    • SSH Key: Provide the public key portion of the SSH key. This key is required for remote connections to the ESXi hosts.
    • Availability Domain: The availability domain in which to create the SDDC and the ESXi hosts. The management subnet and VLANs for this SDDC must be in this same availability domain. ESXi hosts are uniformly distributed across fault domains within the availability domain.
  5. Click Next.
  6. On the SDDC Networks page, provide the following values:
    • Virtual Cloud Network (VCN): Choose a VCN for the SDDC. The VCN can be in a different compartment than the SDDC and its ESXi hosts. The VCN represents the underlying data center network that hosts the SDDC.
    • Create New Subnet and VLAN: Select this option to have the provisioning process create the network resources for this SDDC.
    • SDDC Management CIDR: Enter an available CIDR block in your selected VCN for the SDDC management CIDR. This CIDR is divided into eight segments to use for the provisioning subnet and seven VLANs (as listed in the “Before You Begin” section). The size must be at least /22 to allow the maximum of 64 ESXi hosts to each have their own IP address. Click Check Availability to ensure that the CIDR block is available in the VCN.
    • NSX Network: Enter the SDDC workload CIDR block. This CIDR block provides the IP addresses that VMware VMs in the SDDC use to run workloads. The value must be /30 or larger and must not overlap with the VCN CIDR block.
  7. Click Next to review the summary of settings for creating the SDDC. When you are satisfied with the summary information, click Create SDDC.
    The summary page tells you that the SDDC creation request was successfully initiated and shows the provisioning status of each resource. Successful provisioning takes about 2 hours and 30 minutes to complete.
  8. To monitor the progress of the SDDC creation, click the URL at the top of the summary page. The SDDC details page appears.

Monitor the SDDC Creation Process

To monitor the progress of the SDDC creation, click the URL at the top of the summary page. The SDDC details page opens. From here, you can:
  1. Verify the SDDC information. Click Work Requests to check the status of the provisioning.
  2. The work request details page shows the progress of the provisioning and detailed log messages.
  3. After the SDDC is successfully created, the percentage shows 100 and the log messages verify completion.

Access the SDDC

After the SDDC is successfully created, all the information about it is listed on the SDDC details page. The provisioning process creates vCenter and NSX Manager URLs and administrative login credentials for the SDDC. These are provided on the SDDC details page.
To access the vCenter Server and NSX Manager consoles, you can create a Windows instance in the public subnet of the VCN. Alternatively, you can use an existing Windows instance that’s already running on the VCN. After you create the Windows instance, you can connect to it from a Remote Desktop client. Then, access the vCenter and NSX Manager consoles by using the URLs and credentials provided in the SDDC details page:
  • Use the vSphere Client URL to access vCenter Server.
  • Use the NSX Manager URL to access NSX Manager.
  • Use SSH to connect as an admin user to the ESXi hosts by using the private SSH key:
    ssh -i id_rsa opc@ my-sddc-1-1 
    Warning: Permanently added '10.0.2.3' (RSA) to the list of known hosts. 
    The time and date of this login have been sent to the system logs.  
    
    WARNING:    
    	All commands run on the ESXi shell are logged and may be included in    
    	support bundles. Do not provide passwords directly on the command line.    
    	Most tools can prompt for secrets or accept them from standard input.  
    
    VMware offers supported, powerful system administration tools.  
    Please see www.vmware.com/go/sysadmintools for details.  
    
    The ESXi Shell can be disabled by an administrative user. See the 
    vSphere Security documentation for more information. 
    [opc@my-sddc-1-1:~]  
    [opc@my-sddc-1-1:~]  
    [opc@my-sddc-1-1:~]