Configure Chat Queues in Oracle Service Cloud
Oracle Service Cloud Chat uses queues, chat rules, and agent profiles to route chats to the appropriate agents automatically. Chat rules define which queue to route a chat to and agent profiles identify which agents can accept chats from a queue.
Companies can choose to route all Oracle Service Cloud Chat requests to a default queue, but they typically create several chat queues and route each queue to the agents with expertise in that area. If your company hasn't configured a queue for your skill bot requests, an Oracle Service Cloud administrator can configure one.
For example, if you want all incoming skill bot chats about orders routed to an Order Support queue, then you create a chat rule that routes chats to the Order Support queue whenever a certain field value is set to order. Next, you add the Order Support queue to the agent profile that's associated with the agents who can handle those chats.
Here's an overview of the steps to configure a chat queue:
- Configure a chat queue (for example, Order Support).
- Configure the custom fields. The values in these fields are used to identify the chat requests that are routed to the queue.
- Configure a chat rule. The rule specifies the conditions for assigning a request to the queue.
- Configure the agent profile, and add the queue. Enable Agent Browser User Interface and Public SOAP API access.
- Ensure that the agents who have the necessary expertise are associated with the agent profile.
Before You Begin
You must download the Agent Desktop console to your local system to install the components that you need to configure the Oracle Service Cloud interface.
Create a Chat Queue
If your interface doesn't have the chat queue that you need, then use the Agent Desktop console to create one.
Before you begin, ensure that your profile enables you to configure queues.
Add a Custom Field
When you transfer a chat session from a skill bot to Oracle Service Cloud Chat, you can use Chat Customer Information and custom fields of the Incident type to pass information that enables the chat rule base to route the chat session to a specific queue.
The WSDL at https://<hostname><domain>/services/soap/connect/chat_soap?wsdl=server describes the Chat Customer Information.
Identify the values that you want to use to indicate which queue to route a skill bot's chat sessions to. If there isn't an existing Chat Customer Information or Incident field for a value, then you can add an Incident custom field to store it. For example, you can create an Incident custom field named botsubject and use it in a chat rule to route a chat request to the Order Support queue whenever that field's value contains order.
Before you begin, ensure that your profile enables you to configure custom fields.
Create a Chat Rule
When used with chat rules and profiles, queues enable automatic sorting of incoming skill bot conversations based on Chat Customer Information and Incident custom field values.
If your interface doesn't have a chat rule for routing the transferred skill bot conversations to the knowledgeable agents, then use the Agent Desktop console to create one.
Before you begin, ensure that your profile lets you access and configure chat rules.
- In the Agent Desktop console, click Configuration
 to display the Configuration menu in the Navigation pane.
 - Expand Site Configuration, and then double-click Rules.
- On the Home tab, click Chat to display the chat states, and then click Edit to add rules to the states.
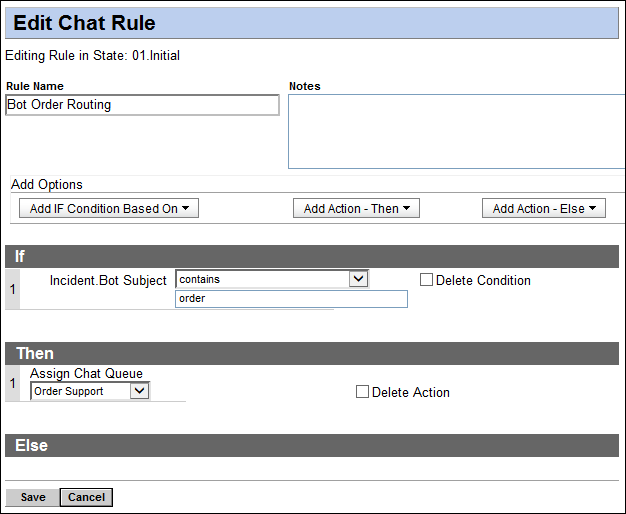
- Right-click 01.Initial and select New Rule.
- On the Edit Chat Rule page, enter a rule name (for example
Bot Order Routing). - In the Add Options section, click Add IF Condition Based On, and then do one of the following:,
- Select Incident and select an Incident custom field (for example,
Bot Subject). - Select Contact and select one of these fields:
- Last Name
- First Name
- Email - Primary
- Select Incident and select an Incident custom field (for example,
- Select an operator such as contains or equals, and then enter the condition value (for example,
order). - Click Add Action - Then and select Chat Queue ID.
- Select the chat queue to assign the conversation to. For example,
Order Support. - (Optional) Add an else action.
- Click Save.
- Click Compile.
- Click Activate.
Configure an Agent Profile
After a chat queue is set up, configure the agent profile that is best able to handle the incoming requests.
To route a skill bot's conversation to the appropriate agents, use the Agent Desktop console to add its queue to the associated profile. Ensure that the profile enables browser interface access and chat permissions. Agents also need Public SOAP access so that they can see chat requests from the skill bot.
Before you begin, ensure that your profile enables you to access and configure profiles.
Assign an Agent to an Agent Profile
To route a skill bot's request to an agent, the agent must be assigned to a profile that includes the skill bot's queue.
You use the Staff Management tools in the Agent Desktop console to assign an agent to an agent profile.
Before you begin, ensure that your profile enables you to access and configure staff accounts.
- From the Agent Desktop console, click Configuration
 to display the Configuration menu in the Navigation pane.
 - Expand Staff Management, and then click either Staff Accounts by Group or Staff Accounts by Manager.
- Select the agent's group or manager, right-click the agent, and then click Open.
- On the Agent Details - Edit page, select the appropriate profile.
- Click Save & Close.
