Complete Non-Downtime Activities

First, perform preperatory steps that do not require downtime. This is primarily setup of the new standby environment.

Provision the Standby Environment

Provision the standby environment with the following procedure:

  1. On the Oracle E-Business Suite Oracle Cloud Infrastructure Process Automation Environments page, click Provision Environment and select Standby.
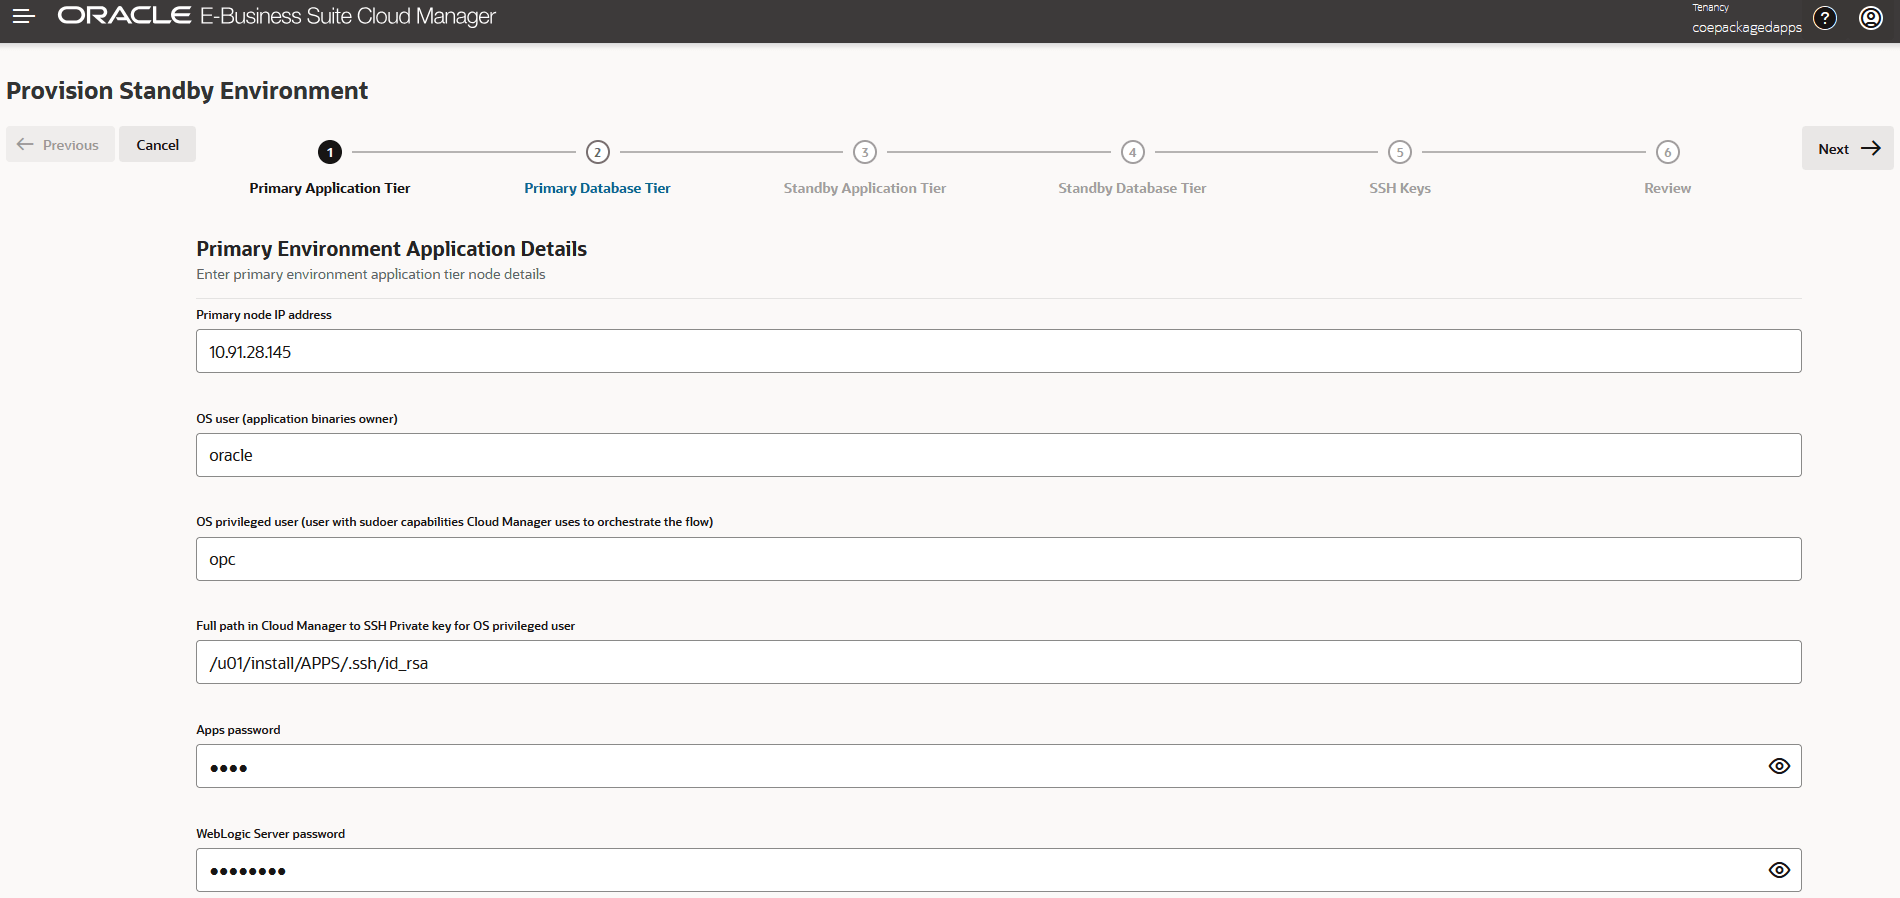
  2. In the Primary Environment Application Details page, begin by entering the Primary (on-premises) node IP address.
  3. Enter the admin application tier node IP address from the primary environment accessible from the Oracle E-Business Suite Cloud Manager VM or bastion server.

    Note:

    Oracle E-Business Suite Cloud Manager expects SSH connectivity on port 22.
  4. Enter the OS user (application binaries owner).
  5. Enter the OS privileged user (a user with sudoer capabilities Cloud Manager uses to orchestrate the flow).
  6. Enter the Full path in Cloud Manager to SSH private key for OS privileged user.
    The full path to the private key in the Oracle E-Business Suite Cloud Manager VM is used to establish a connection to the source application tier host. If a bastion server is used, the key will be used to connect from the bastion server; otherwise it will be used from the Cloud Manager VM. A private key configured with a passphrase is not supported.
  7. Enter the APPS password for the source environment.
    This password must conform to Oracle E-Business Suite Cloud Manager security requirements and contain alphanumeric characters only. This entry is validated after you click Next.
  8. Enter the WebLogic Server password for the source environment.

    Note:

    This password must conform to Oracle E-Business Suite Cloud Manager security requirements. It must be at least eight characters, and it must contain at least one alphabetic character plus at least one of these special characters: ! " # $ % & ( ) * + , - . / : ; = < > ? @ ][ ^ _ ` { | } ~; or at least one numeric character. This entry is validated after you click Next.
  9. Enter the full path to the Run file system context file.
    The value of this field must include the full path to the run file system context file; for example: /u01/install/APPS/fs1/inst/apps/mypdb_app01/appl/admin/mypdb_app01.xml
  10. Enter the Stage directory (OS privileged user writable directory).
    This temporary directory is used by the standby creation process and must be writeable by the OS privileged user.
  11. If applicable, enable Use Bastion Server to connect to App Tier Node from Cloud Manager.
  12. If you are using a bastion server, enter the following:
    • Bastion IP address.
    • Bastion OS User
    • Path in Cloud Manager to SSH private key for Bastion OS user
  13. Click Next.

Enter the Primary (On-Premises) Database Node Details

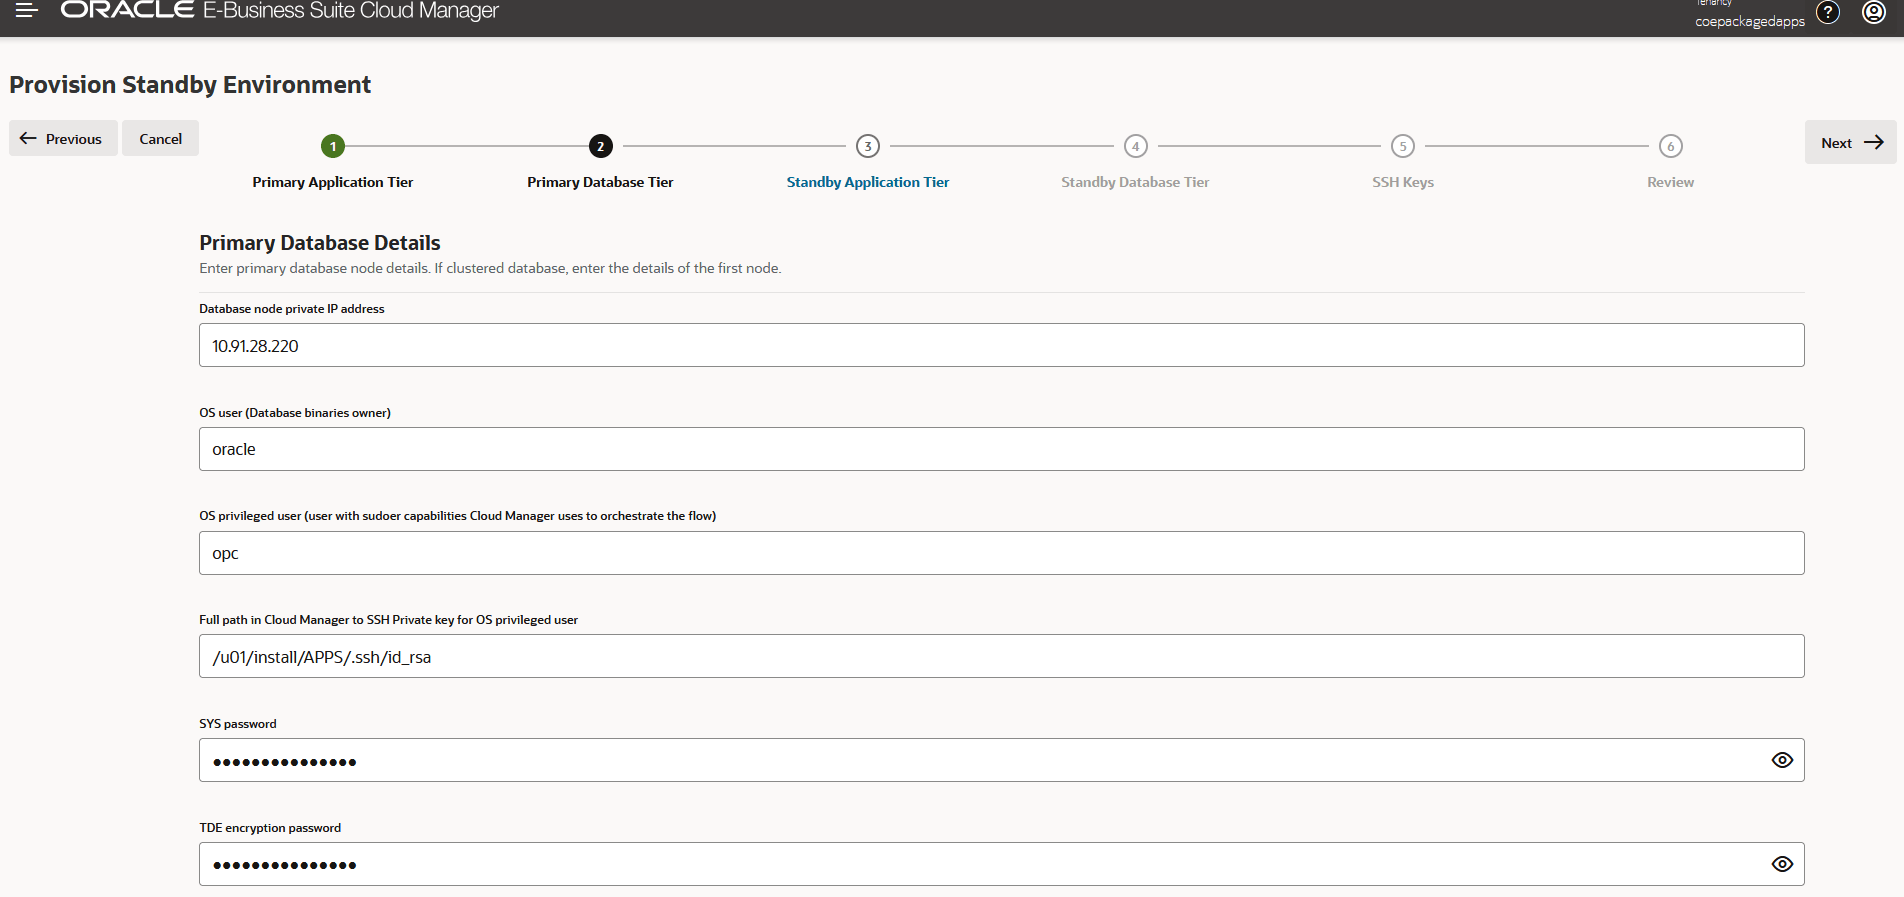
Next, enter the primary database node details for the on-premises database. If you are using a clustered database, enter the details for the first node.

Complete the following steps on the Primary Database Tier page:
  1. Enter the Database node private IP address.
  2. Enter the OS user (Database binaries owner).
  3. Enter the OS privileged user (user with sudoer capabilities that Cloud Manager uses to orchestrate the flow) .
  4. Enter the full path in Cloud Manager to the SSH Private key for the OS privileged user.
    The value of this field must be the full path to the private key in Oracle E-Business Suite Cloud Manager VM that is used to establish a connection to the source database tier host. If a bastion server is used, the key will be used from the bastion server; otherwise it will be used from the Cloud Manager VM. A private key configured with a passphrase is not supported.
  5. Enter the SYS password.
    The password for the source environment must meet Oracle E-Business Suite Cloud Manager security requirements. The password must not contain the username 'SYS'. The password must be 9 to 30 characters and contain at least two uppercase, two lowercase, two special, and two numeric characters. The special characters can either be underscores (_), hash marks (#), or hyphens (-). The same password will be used as the standby database admin password.
  6. Enter the TDE encryption password.
    This password can be different from the SYS password but it must also conform to Oracle E-Business Suite Cloud Manager security requirements. The same password will be used as the standby TDE encryption password.
  7. Enter the full path to the pluggable database context file.
    The database context file name here must include the full path for the file; for example, /u01/install/APPS/db19/appsutil/db/context.xml.
  8. Enter the Stage directory.
    The standby creation process uses this temporary directory and it must be writable by the OS privileged user.
  9. If applicable, click toggle Use Bastion Server to connect to Database Node from Cloud Manager.
  10. If you are using a bastion server, enter the following:
    • Bastion IP address
    • Bastion OS User.
    • Path in Cloud Manager to SSH Private key for Bastion OS user
  11. Click Next.

Enter Standby Application Tier Details

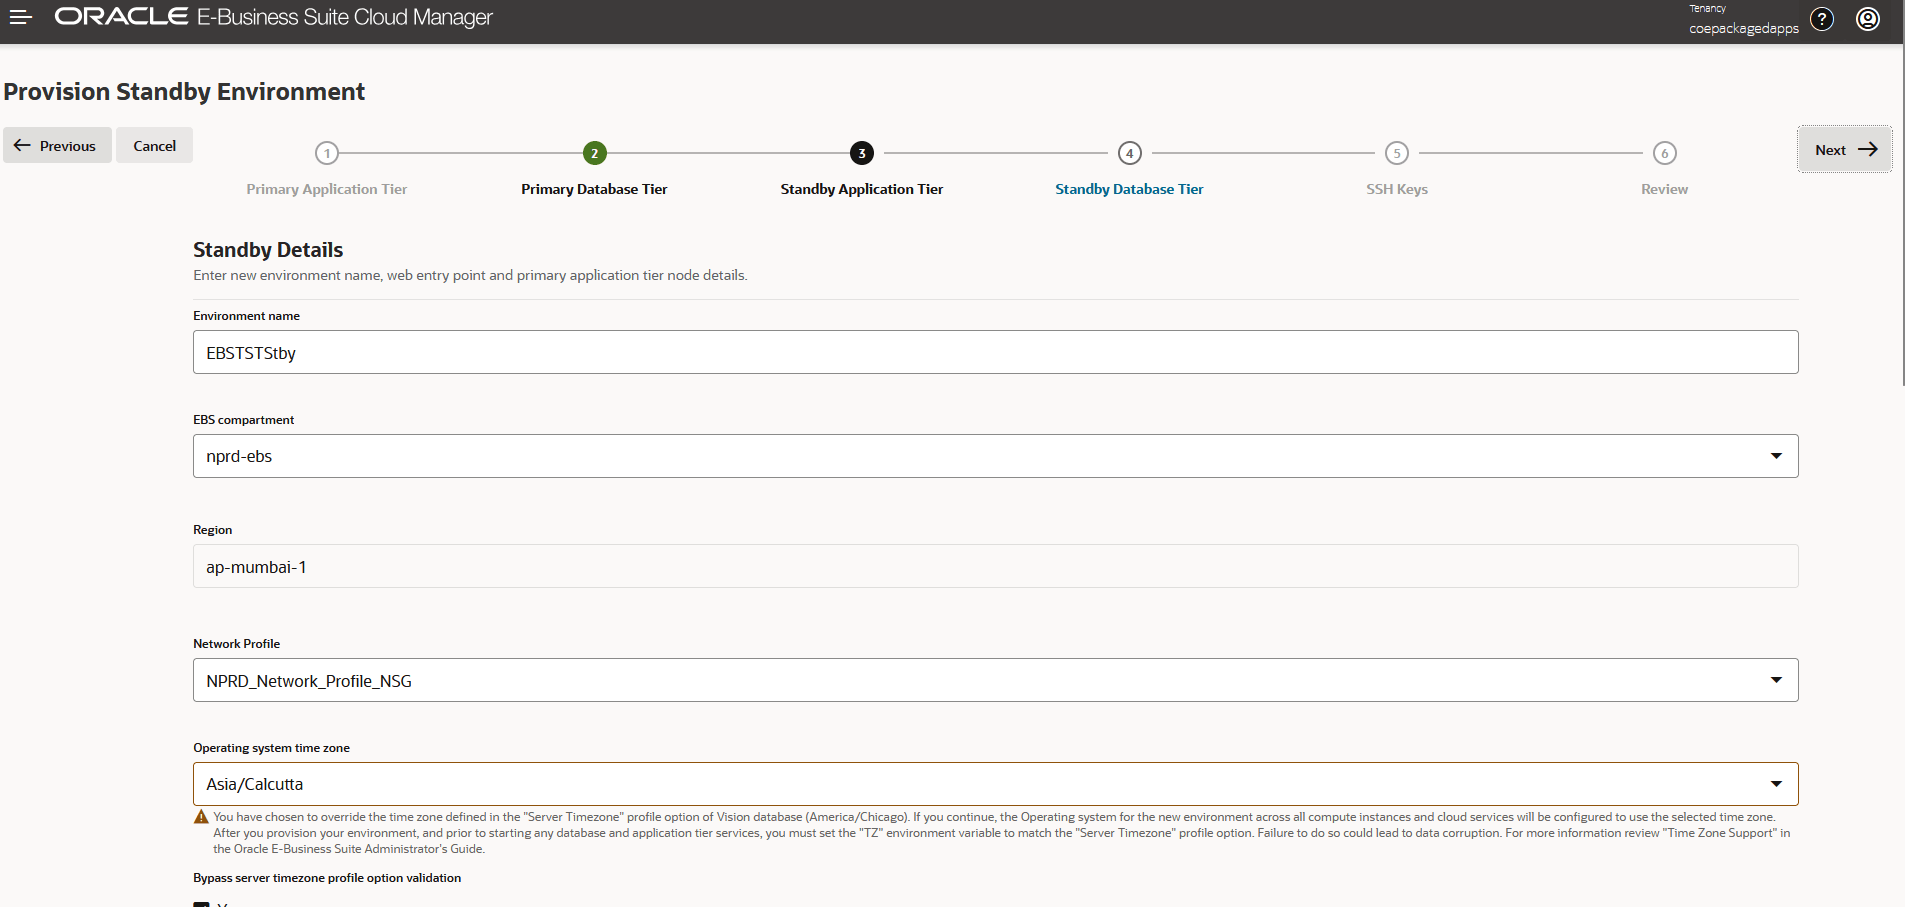
Enter information for the new environment, including name, web entry point, and primary application tier node details.

While still on the Standby Environment page, provide the following details:
  1. Enter the Environment Name for your environment.
    For example: EBSTSTStby.
  2. Select the EBS Compartment. Only Oracle E-Business Suite compartments that you have access to are available in the list. The default is your root compartment.
  3. The Region field is display-only.
  4. Select the Network Profile that contains the network resources you want to use to provision your environment.
    For example: DEFAULT_PROFILE_ADVANCED.

    Note:

    If you plan to provision an environment which contains a multinode application tier with a shared file system, your network profile must support FSS and therefore you cannot use the default profile.
    Click the information icon to view the Network Profile Details. You might want to capture this information for use later in the interview.
  5. Optionally, select your operating system time zone.
    This is the operating system time zone for your application and database tier nodes. For more information on time zone support, see "Time Zone Support in Oracle E-Business Suite Cloud Manager", which you can access from "Explore More," elsewhere in this playbook. Oracle E-Business Suite Cloud Manager will validate your selection for the server time zone, unless you check Bypass Server Timezone Profile Validation.
  6. Under Admin Node Details, select the shape.

    Note:

    For an Oracle RAC environment, you must select a shape that supports it. For example: VM Standard2.2 (2 OCPU, 30GB RAM).
    You can choose VM.Standard.E4.Flex or VM.Standard3.Flex based on the availability in the OCI region. With these choices, you can choose the number of OCPUs and the amount of memory. For VM.Standard.E4.Flex, the default number of OCPUs is 4 and the default amount of memory is 64 GB.
  7. Select the Fusion Middleware license type.
  8. Choose the File System Type: Non-Shared or Shared.
    • If you choose Shared, then you are prompted for the File Storage Mount Target. If the File Storage Mount Target for the network profile specified earlier matches any of the Mount Targets in the network compartment created on the Oracle Cloud Infrastructure, then that Mount Target appears in the list.
    • For a Shared File System Type, you can also specify Mount Options. Default parameters are shown. You can edit these options, but specifying a mount option or parameter that is not supported or recommended for a shared storage file system deployment may result in a provisioning failure.

      Caution:

      Exercise extreme caution when editing Mount Options and parameters, as options are not validated in this page.
    • If you choose Non-Shared, you must specify a value for the Block Volume Storage field for every node in the Application Tier Nodes field.

      WARNING:

      You must ensure you specify enough storage for your nodes.

      See the Oracle E-Business Suite Installation Guide: Using Rapid Install, which you can access from "Explore More," elsewhere in this playbook, for guidelines on space usage.

  9. Select the fault domain. Refer to Fault Domains for more information.
  10. Optionally, enter tagging information in the Tags region.
    • Tag Namespace: Select a predefined tag namespace or select None (add a freeform tag).
    • Tag Key: Enter the name you use to refer to the tag.
    • Value: Enter the value for the tag key.
  11. Click Next.

Enter Standby Environment Database Details

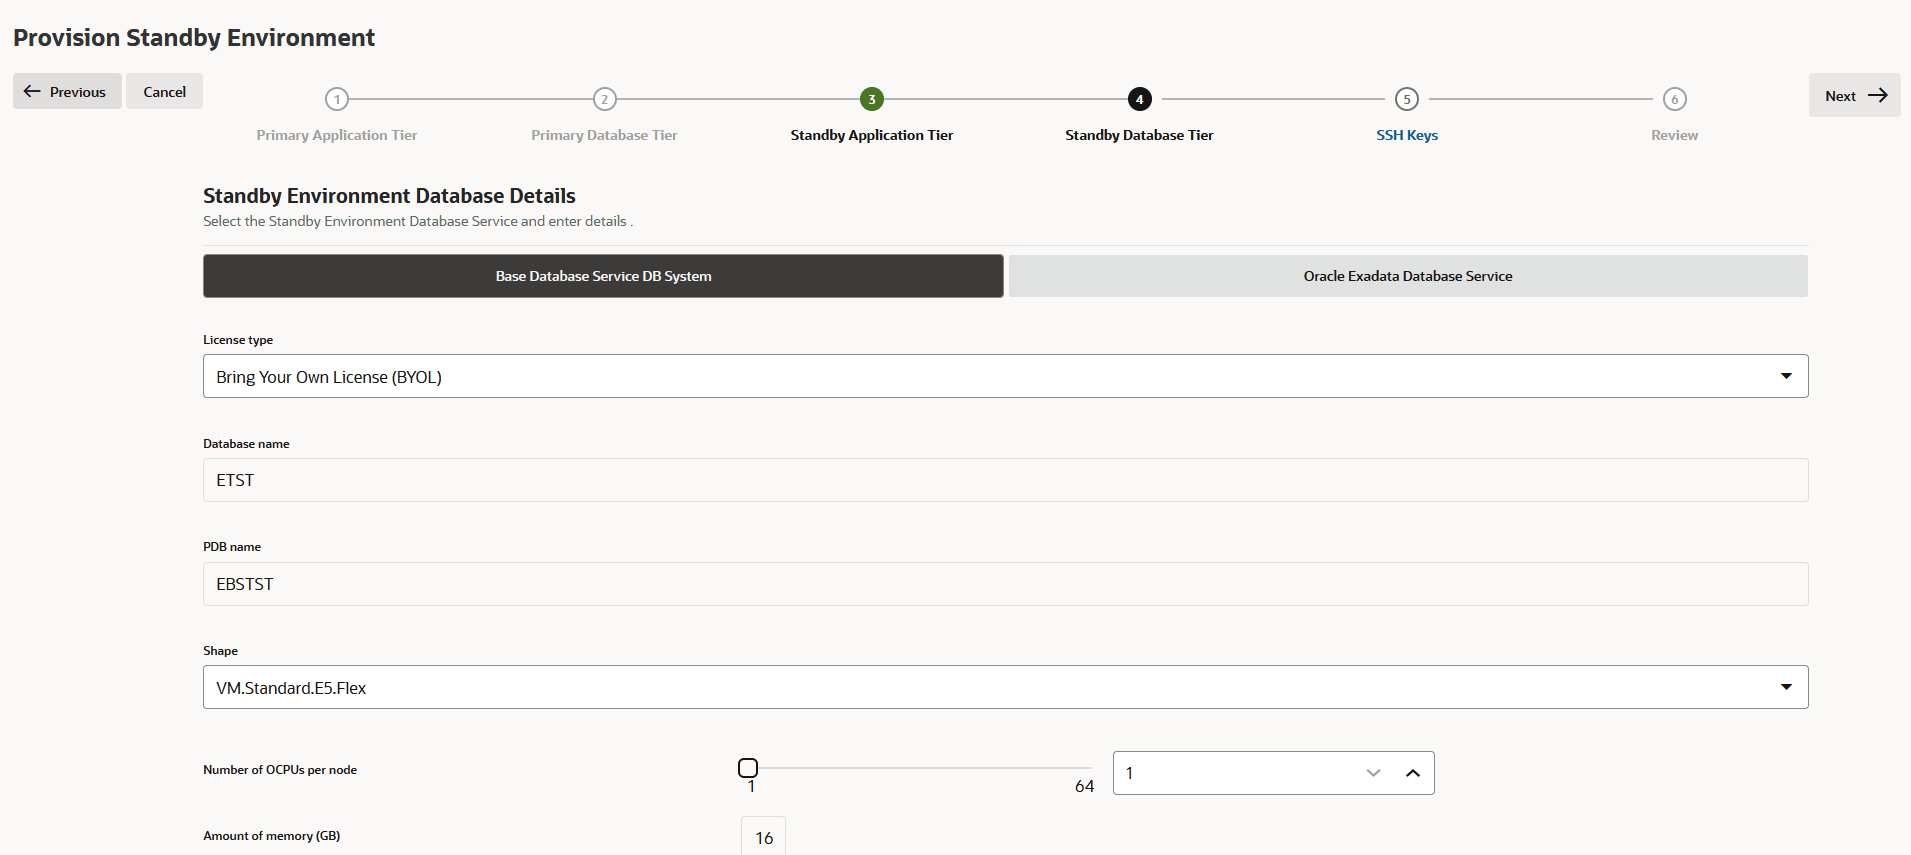
Next, select Standby Environment Database Service and enter details for it. You will need to enter these details for either Oracle Base Database Service DB System or for Oracle Exadata Database Service.

Enter Standby Environment Database Details for the Oracle Base Database Service System

If the target database service is Oracle Base Database Service, follow these steps to set the Standby Environment Details. If you are using Oracle Exadata Database Service, skip this topic and follow the instructions in the next topic in this playbook instead.

To enter Standby Environment Database details for the Oracle Base Database Service Database System, open the Base Database Service Database System tab and complete these steps:

Note:

On the Base Database Service Database System tab, these fields are display-only: the database name, the PDB name, and the DB patch level.
  1. Select the License Type. Select:
    • License Included if you want to obtain a new license.
    • Bring Your Own License (BYOL) if you want to use a license you already own.
  2. Select the shape.
  3. Select the number of nodes.
  4. Select the DB software edition. You can select one of:
    • Enterprise Edition
    • Enterprise Edition High Performance
    • Enterprise Edition Extreme Performance
  5. Select the fault domain.
    Refer to "Fault Domains" for more information (use the link in "Explore More").
  6. Under Advanced Options, you can set RMAN_CHANNEL_COUNT. Specify the number of Recovery Manager (RMAN) staging channels to allocate for the standby environment.
    The default value used by RMAN is 100% of the number of OCPUs, and the minimum value is one channel. The maximum value is 255, irrespective of shape.
  7. Click Next.

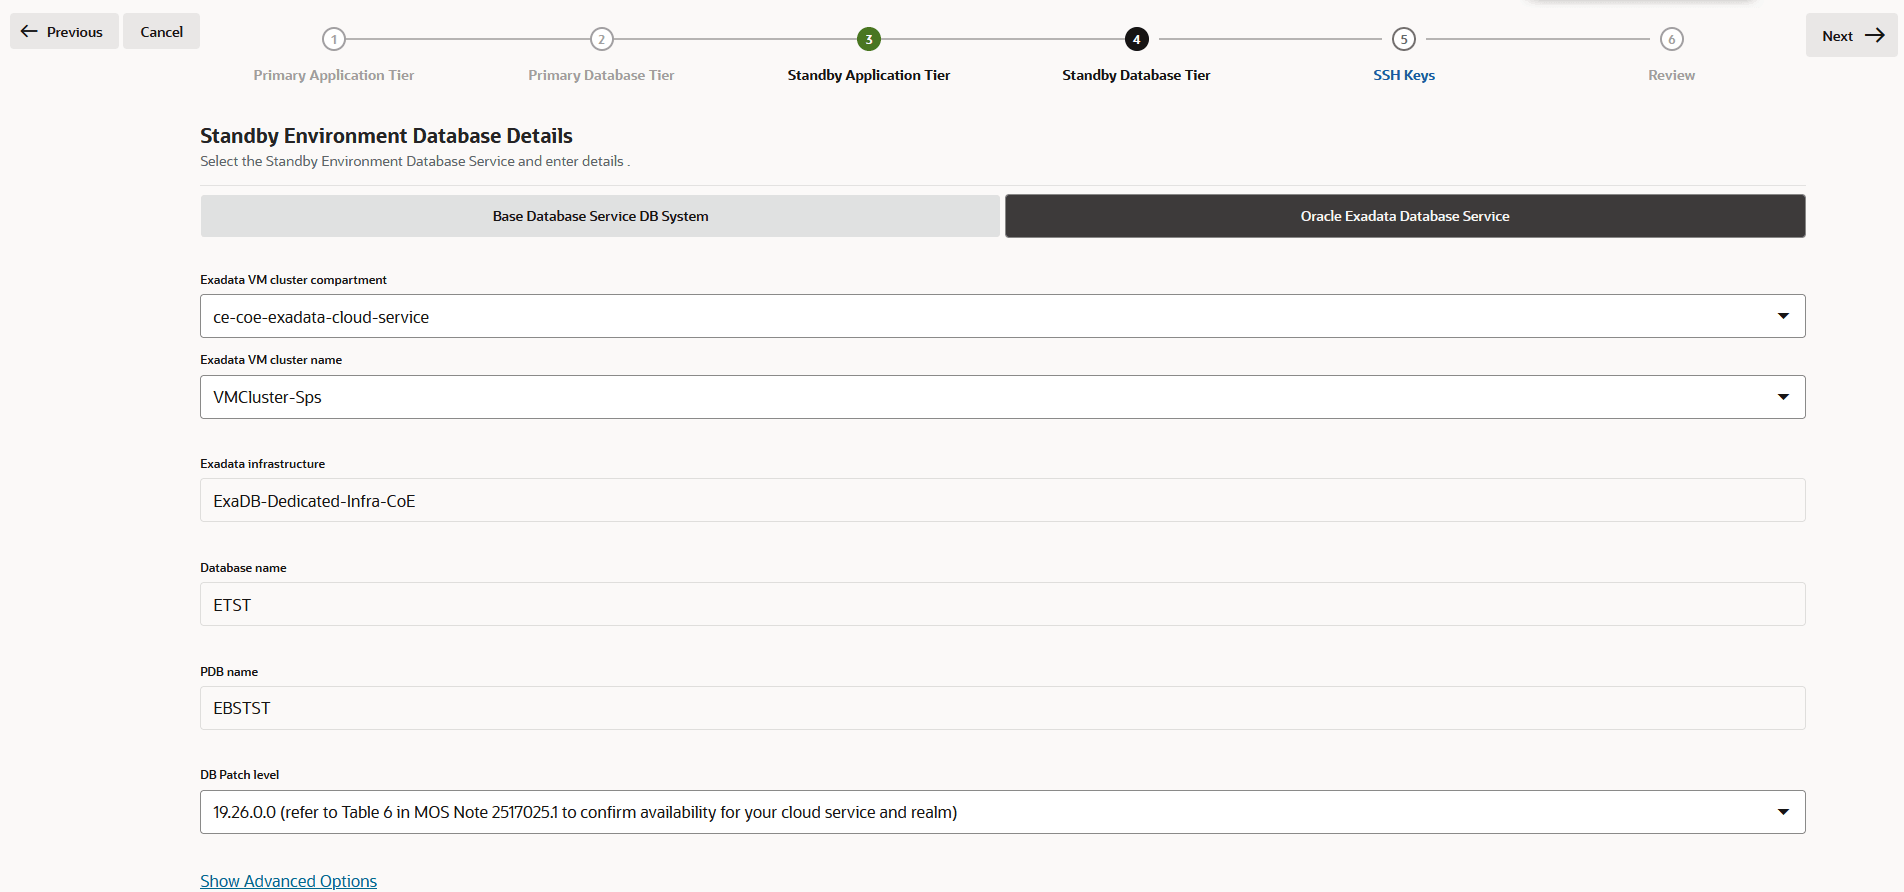
Enter Standby Environment Database Details for the Oracle Exadata Database Service System

If the target database service is Oracle Exadata Database Service, follow these steps to set the Standby Environment Details. If you are using Oracle Base Database Service, skip this topic (you should follow the instructions in the previous topic in this playbook instead).

To enter Standby Environment Database details for the Oracle Exadata Database Service System, open the Oracle Exadata Database System tab and complete these steps:

Note:

On the Oracle Exadata Database System tab, these fields are display-only: the Exadata infrsastructure, database name, and the PDB name.
  1. Select the Exadata VM cluster compartment.
  2. Select the Exadata VM cluster name.
    As you select the VM cluster name, values are automatically populated for the Exadata infrastructure, Database name, and PDB name.
  3. Optionally, set a desired DB Patch level.
  4. Click Next.

Enter SSH Keys

If necessary, you can now enter SSH key information by using this procedure. This step is optional.

In this step you may enter your public key to be added to the compute host that will be created, allowing you to connect later via SSH with your private key.

Note:

You can add keys to the application tier only.
Click the SSH Keys step on the process bar and do the following:
  1. Click Add Key.
  2. Specify the tiers for the SSH key. Choose one of:
    • All Tiers
    • Application Tier
    • Database Tier
  3. Specify the pertinent OS User type. Choose one of:
    • All Users
    • Operating System Administrator
    • Application Administrator
  4. Upload the SSH key file. The file name will appear by default.
    The system will validate the SSH key.
  5. Click Next to continue.

Review Standby Environment Details

Click Review on the process bar and review the details for your standby environment on this page.

  1. Review the environment details.
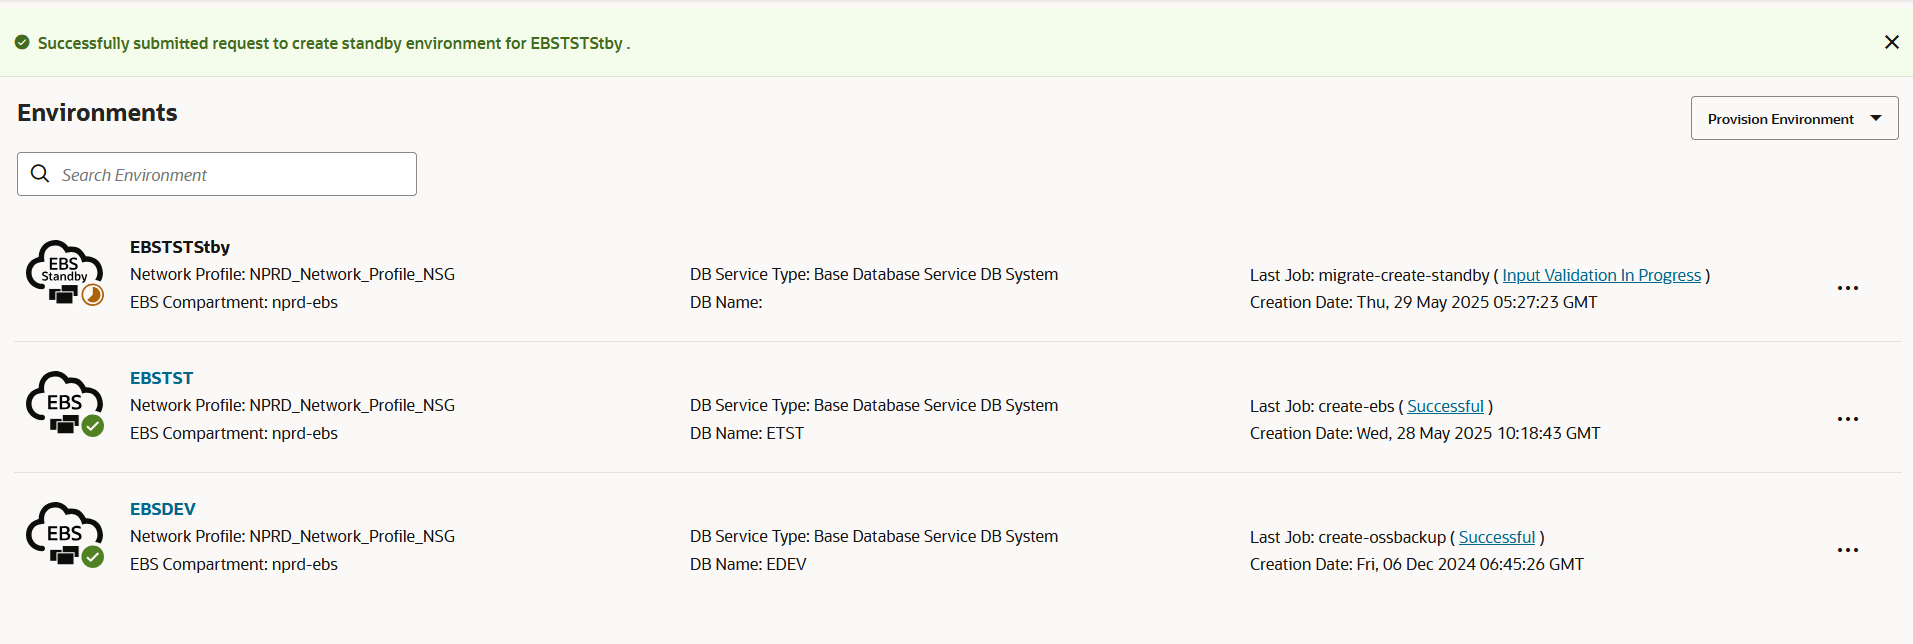
  2. If you are satisfied with the details, create the standby environment by clicking Submit. The Environments page shows a success message and a list of environments including your new standby environment. For example:

Monitor Standby Environment Creation Job

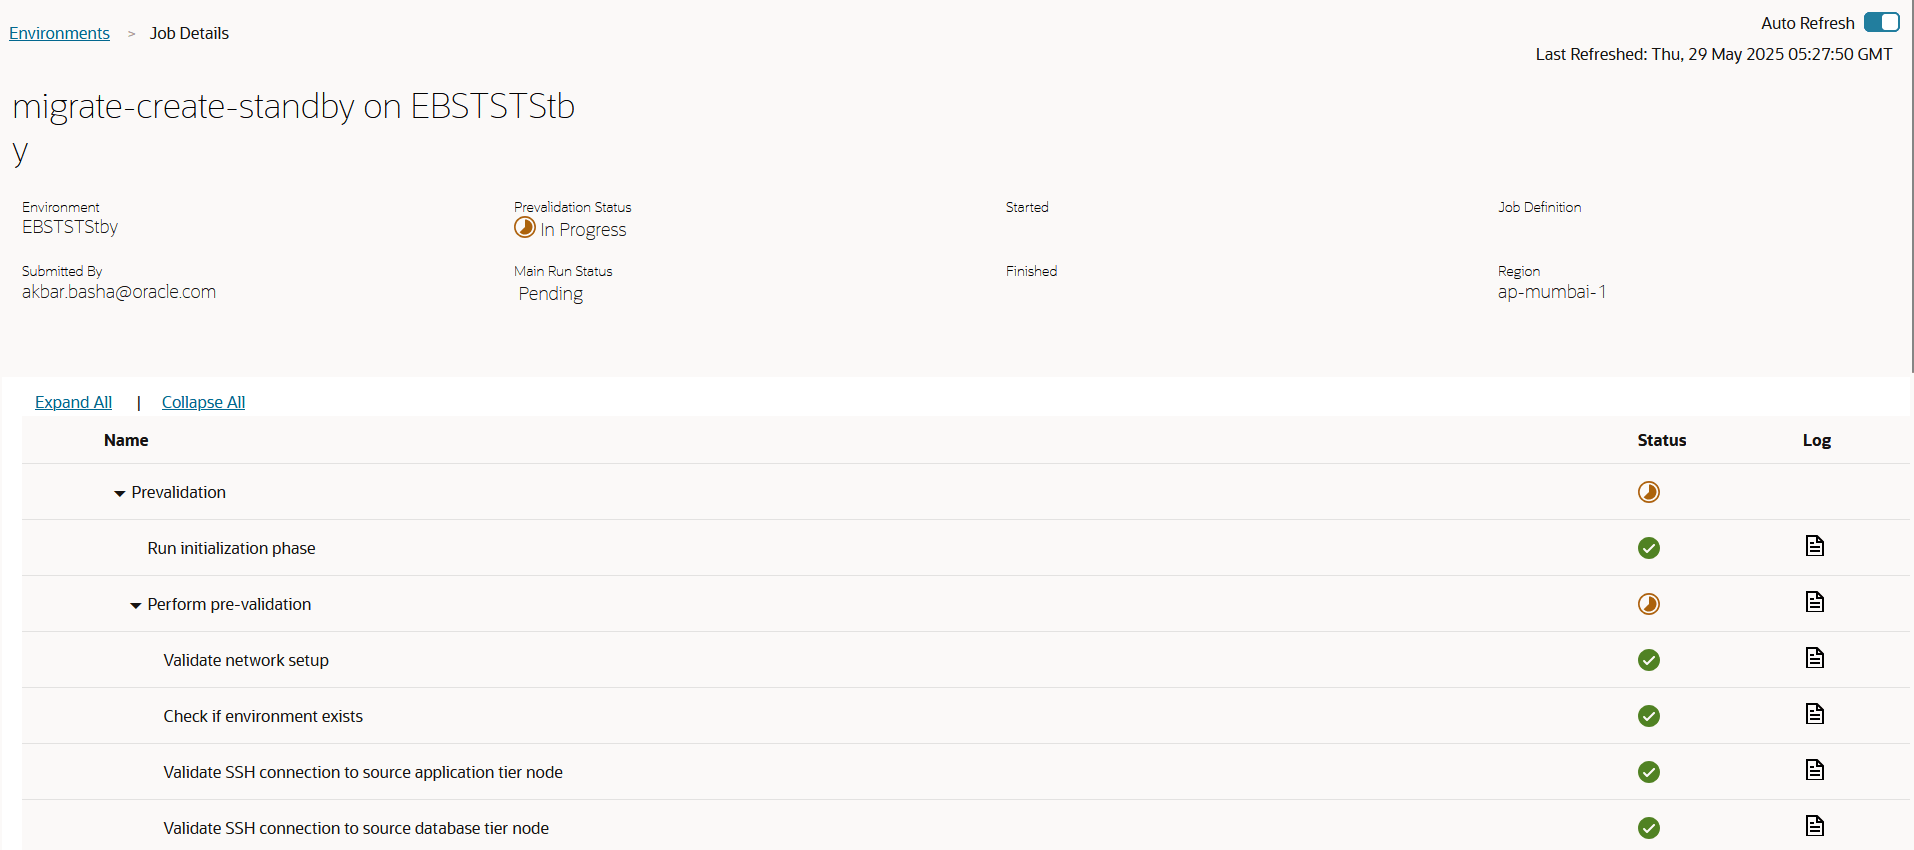
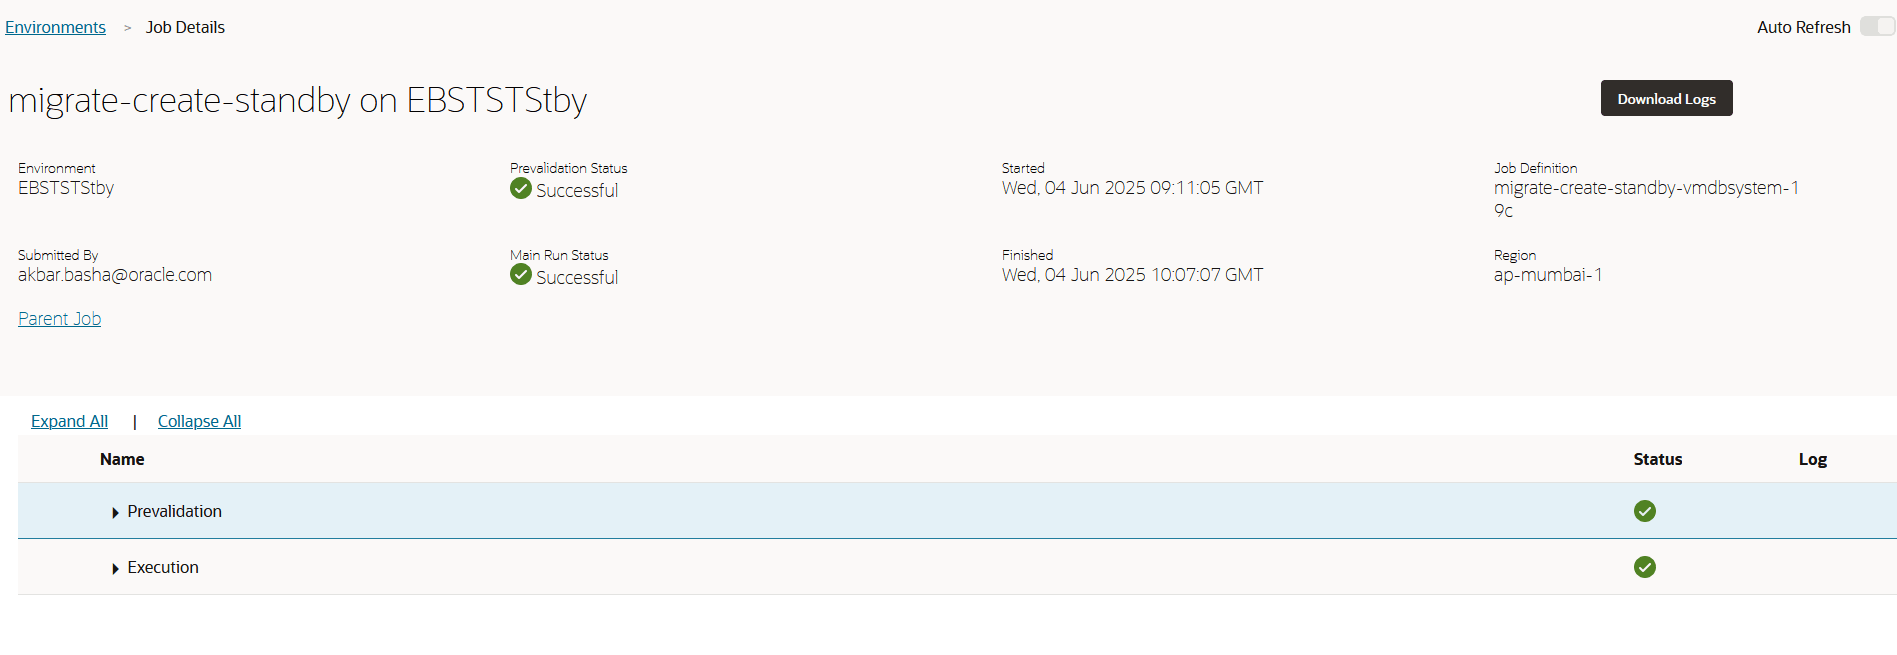
You can monitor the system as it creates the standby environment.

Select the environment and view the job details. Optionally, enable Auto Refresh. You can review the various sub-tasks and check logs as needed. For example:

Monitor Application and Database Sync Between On-Premises and OCI Using EBS Cloud Manager

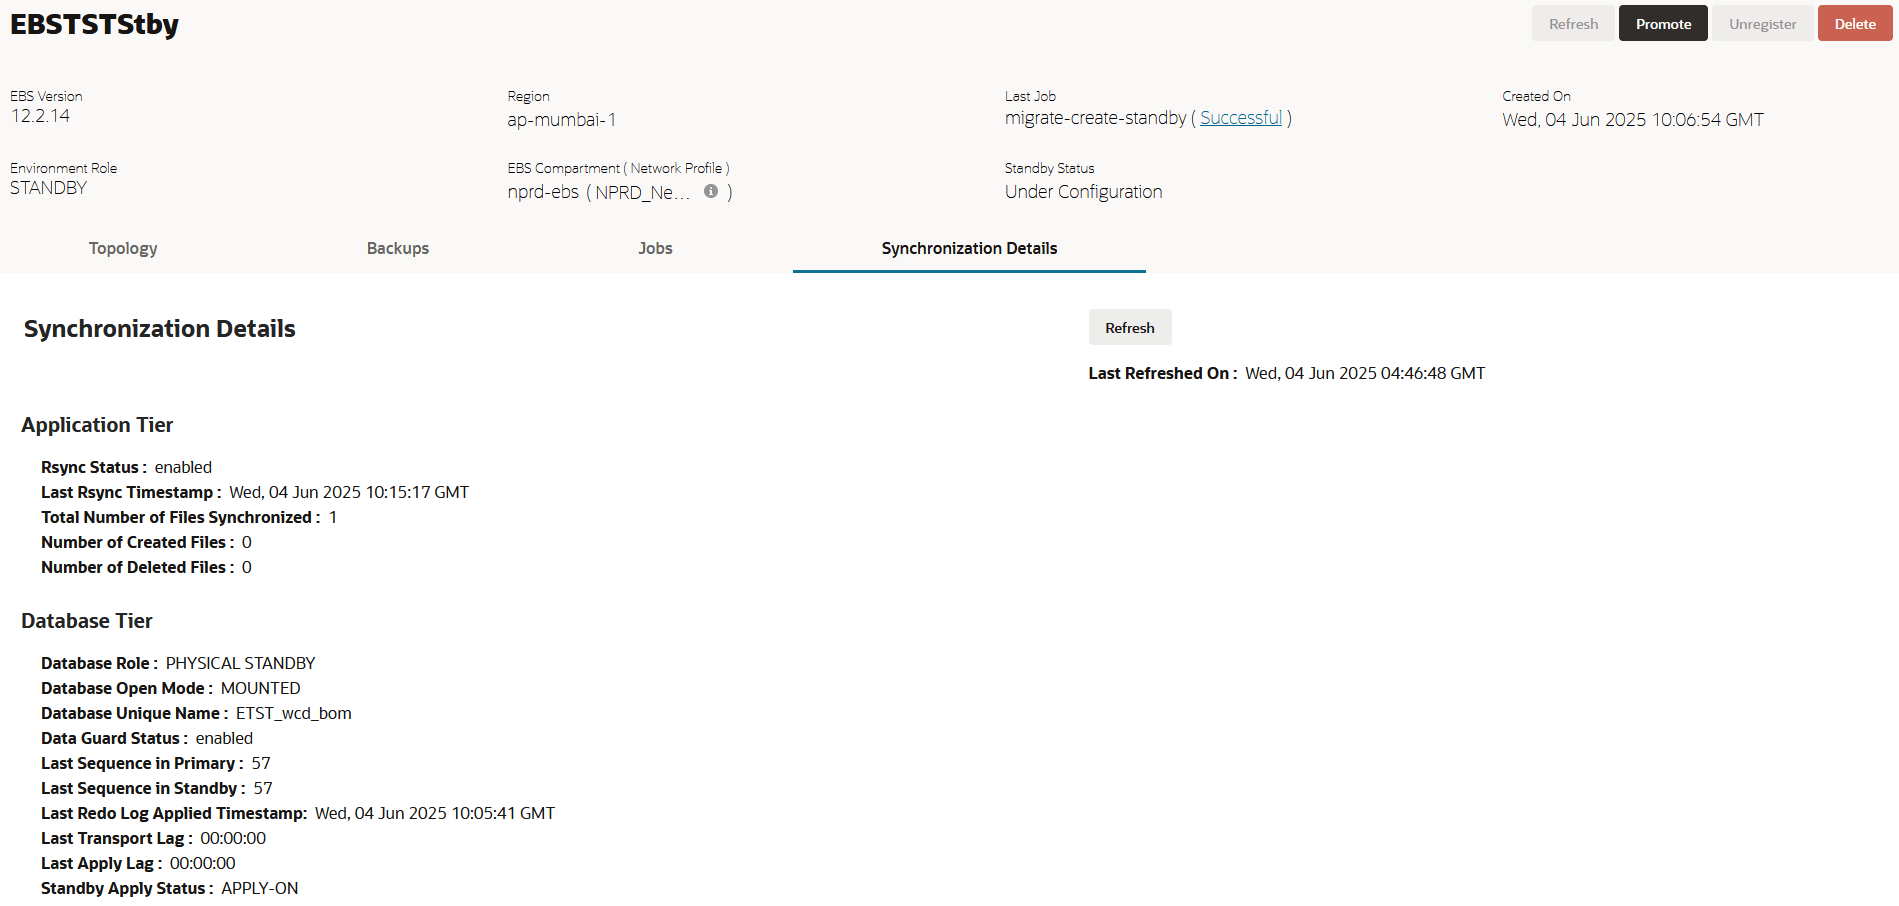
To monitor application-to-database sync by using EBS Cloud Manager, access the Cloud Manager and, from the Environments page, select the Standby environment, then click the Synchronization Details tab. This page presents the latest details of when the last application sync occured and the database sync gap between source and target database.

For example: