Review and Configure VMware HCX

Review HCX architecture and configure site pairing, interconnect and network extension.

Review HCX Architecture

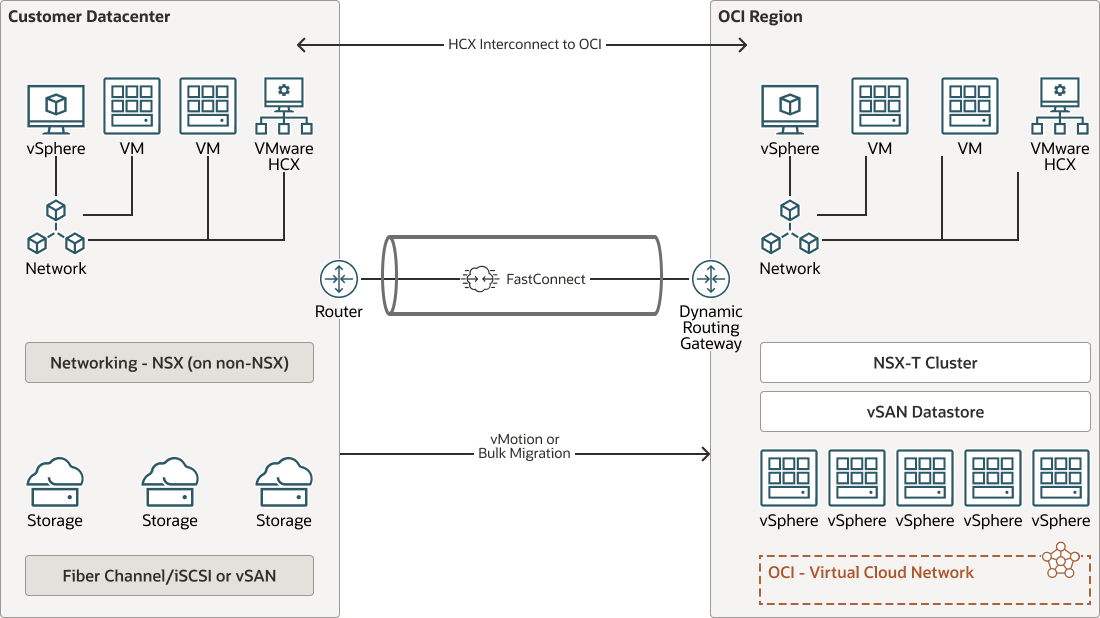
This architecture shows how site-to-site connectivity and HCX components are deployed on premises and in Oracle Cloud VMware Solution.

Description of v1_ocvs_hcx_arch.png follows
Description of the illustration v1_ocvs_hcx_arch.png

v1_ocvs_hcx_arch.zip

Create an On-Premises Compute Profile in the HCX Connector

Create an on-premises compute profile in the HCX connector.

  1. Log into the on-premises HCX connector by using the plugin in the on-premises vCenter server menu.
  2. In the Infrastructure section, click Interconnect.
  3. Click Compute Profile.
  4. Click Create Compute Profile and create the profile, as described in "Creating a Compute Profile" in the VMware’s User Guide, referenced in the "Before You Begin" topic of this Playbook.

Configure Site Pairing

Use this procedure to configure the site pairing.

  1. Log in to vCenter Server. From the Menu, select HCX.
  2. Under Infrastructure, select Site Pairing.
  3. Click Add a Site Pairing and enter the required details.
    The local site is provided, and you need to provide remote site details to establish pairing between the two sites (on-premises SDDC and Oracle Cloud VMware Solution). A different user interface might appear, depending on the HCX version. Be sure to provide vCenter SSO credentials.

Configure the Interconnect

Next, configure the service mesh and interconnects, which results in the appliances required for HCX-IX, HCX-WAN-OPT, and HCX-NET-EXT.

This is a two-step process wherein you create a compute profile and then the service mesh.

  1. Create the compute profile by using the following procedure.
    1. Log in to vCenter Server. From the Menu, select HCX.
    2. Under Infrastructure, select Interconnect.
    3. Select the Network Profiles tab.
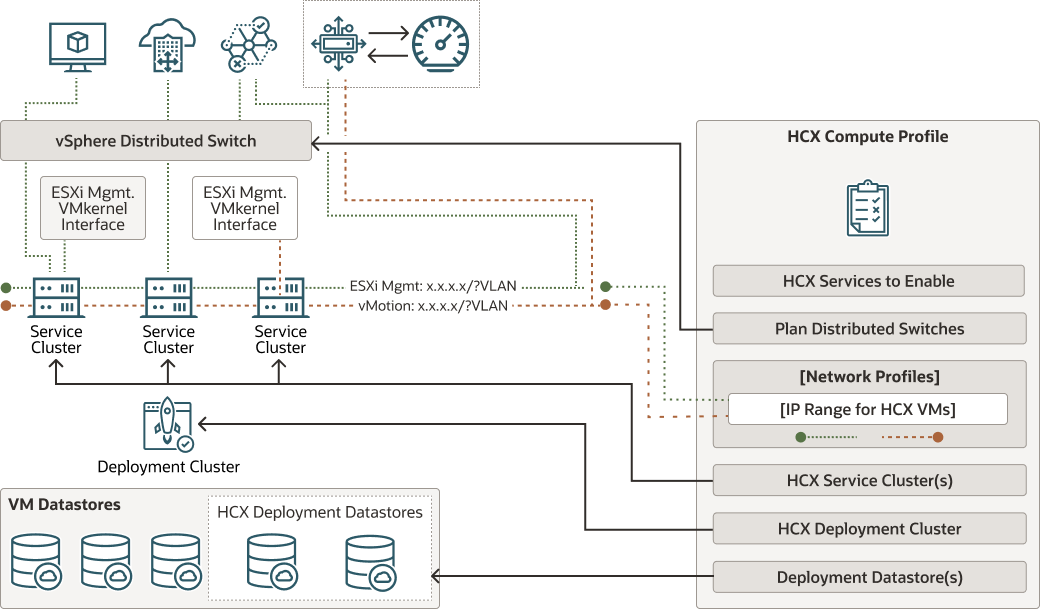
      Create network profiles for HCX-Management, HCX-vMotion, HCX-Replication, and HCX-Uplink. These are port groups directly referred from distributed switches (DVS) or standard switches (VSS). If NSX is part of the design, then you can refer the networks from NSX but ensure that they are reachable to all HCX management networks and ESXi networks. You refer to these network profiles when creating the compute profile.Description of hcx_compute_profile.png follows
      Description of the illustration hcx_compute_profile.png

      hcx_compute_profile.zip

    4. Click the Compute Profiles tab, and then click Create Compute Profile.
    5. Follow the wizard according to the environment for compute, storage, and network.
      On the network extension for DVS, use Overlay-TZ for the NSX network extension. Based on the DVS network extension switches, several HCX-IX, HCX-WAN-OPT, and HCX-NET-EXT appliances are deployed and require a free pool of IP address ranges. As a result, it’s necessary to calculate the required IP addresses needed for this deployment.
    6. Repeat the process to create a compute profile for the other site’s HCX.
  2. Create the service mesh. Note that Sentinel management is out of the scope of this Solutions Playbook. All the required appliances are deployed at the source and destination sites. For example, the appliances for HCX-IX, HCX-WAN-OPT, and HCX-NET-EXT are deployed based on the features you selected when creating the compute profile.
    1. Click the Service Mesh tab, and then click Create Service Mesh.
    2. Follow the wizard and select the source and destination compute profiles to create the service mesh.
      Validate the creation progress in the Tasks section. Don’t override the uplink interface unless there’s a requirement to do so. The rest of the configuration details depend on your advanced networking requirements, such as traffic shaping.

      If any errors occur, troubleshoot to fix them and repeat the process to create the service mesh.

Configure the Network Extension

Now that the service mesh is successfully created, extend the required networks from the on-premises SDDC to Oracle Cloud VMware Solution.

  1. Under Services, navigate to Network Extension and click Extend Network.
  2. Follow the wizard and select the network and gateway details for extension.
  3. Verify that the network extension jobs complete successfully.