Mount the Base Module

The Base Module mounts to the rails and secures to the rack.

Engage the Base Module with the Rail

The Base Module has tabs on each side that engage with the rails.

Figure 2-9 Tab and Rail Engagement
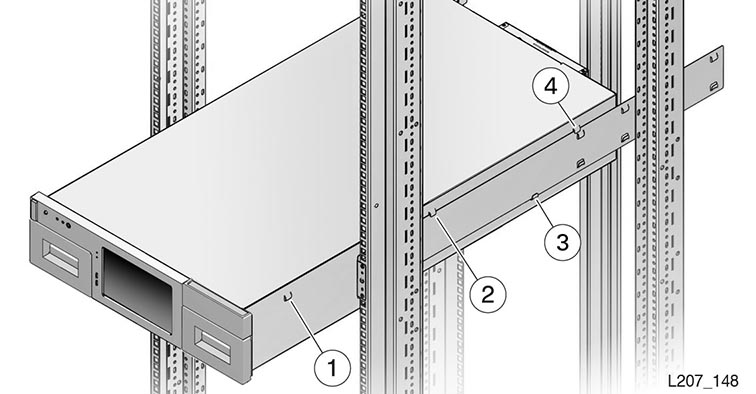
Base Module on rails in rack
  • Illustration Legend:
  • 1 - Front Tab
  • 2 - Center Tab
  • 3 - Bottom Tab
  • 4 - Rear Tab
  1. Grasp the module along the sides and lift the back above the rack rails. Never lift the module by the front control panel or the tape drive. Always lift the module from the side.
  2. Guide the module into the rack and set the rear side-tabs on the rack rails (see figure above).

    Note:

    If the module does not fit properly, remove it from the rack. Adjust the rail spacing as necessary. Never bend the Base Module side tabs.

  3. Push the module into the rack to engage the bottom and center side tabs.
  4. Push the module into the rack until the front side-tabs approach the front of the rack rails.
  5. Lift the module up slightly, push it into the rack, and set the front tabs down on the rack rail.

Remove the Cartridge Magazine with the Hex Key

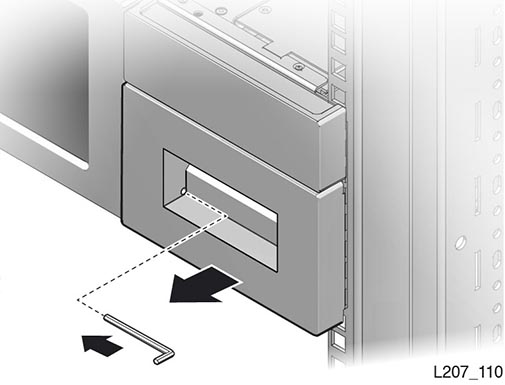
A specialized hex key tool allows you to remove the cartridge magazine.

  1. Insert the hex key in the hole at the lower inside corner of the cartridge magazine.
    Hex tool inserted into cartridge magazine
  2. Align the hex key shaft parallel with the magazine face.
  3. Push the tool slowly into the hole to release the latch located behind the touch screen, and hold the hex key in place.
  4. Pull the magazine a short distance out of the library.
  5. Remove the hex key and store it for future use.
  6. Support the bottom of the magazine with your other hand during removal.
  7. Pull the magazine out of the module, and set it aside. Note the orientation of the magazine. The left and right side magazines are different.

Remove the Cable Clip in the Base Module

A clip secures the cable for shipping. You must remove it during installation.
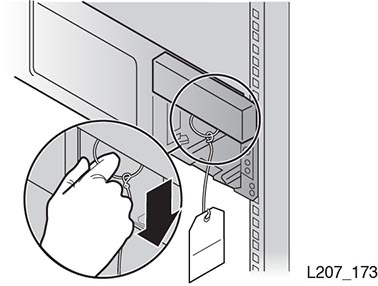
  1. Remove both cartridge magazines from the Base Module.
  2. Locate the tag in the right cartridge magazine opening.
  3. Grasp the ring and pull down.
  4. Discard the cable clip unless you intend to reship the library after rack installation.

    Figure 2-10 Cable Clip Removal

    Cable clip in cartridge magazine slot

Secure the Base Module to the Rack

Two screws secure the module frame to the rack.

  1. Obtain the correct screws for your rack (either 10-32, M5, or M6). Use the 10-32 screw when the rack has square mounting holes (this screw mates with the clip nut).
  2. Insert a screw through each bottom hole of the Base Module frame and thread each a few full turns.
  3. Fully tighten both screws.
  4. Reinsert the magazines if you are not installing Expansion Modules. Do not put cartridges in the magazine slots.

    Note:

    Left and right magazines are unique. Orient the magazine so the cartridge openings face the Front Control Panel.