2 Upgrading Oracle GoldenGate Veridata
This chapter describes the tasks you perform to upgrade Oracle GoldenGate Veridata.
This chapter includes the following sections:
2.1 Choosing an Upgrade Path and Upgrading
To upgrade your existing Oracle GoldenGate Veridata release to the Veridata 12c (12.2.1) release, choose the appropriate upgrade path for your environment and use the steps in that section to proceed with your upgrade:
-
Section 2.1.2, "Upgrading a Veridata 12.1.3 Compact Domain to 12.2.1"
-
Section 2.1.3, "Upgrading a Veridata 12.1.3 Expanded Domain to Veridata 12.2.1"
-
Section 2.1.4, "Migrating a MySQL Repository Configuration to Veridata 12.2.1"
2.1.1 Upgrading Veridata 11g to Veridata 12.2.1
The Oracle GoldenGate Veridata 11g release was based on the use of the Apache Tomcat Application Server. Oracle GoldenGate Veridata 12.2.1 uses Oracle WebLogic Servers and is dependent on other Oracle Fusion Middleware products.
Note:
All of your User Preferences will be lost as a result of the upgrade because of the product changes in the Oracle GoldenGate Veridata 12c release.To upgrade from 11.2.1.0.0 and greater to 12.2.1, use these steps:
-
Run RCU to create OPSS schemas and Service Table (STB) with Section 2.2.1, "Creating Repository Schemas using Repository Creation Utility".
-
Run the Upgrade Assistant to upgrade your Veridata schema to 12.2.1 with Section 2.2.3, "Upgrading Veridata Schemas".
-
Run the Oracle WebLogic Server Configuration Wizard to create a new Veridata domain using the previously upgraded Veridata database and newly created OPSS and STB schemas with Section 2.2.2, "Creating the Veridata Domain using the Upgraded Schema".
-
Run Upgrade Assistant to perform the Veridata configuration upgrade to 12.2.1, which includes wallet and
veridata.cfgmigration with Section 2.2.4, "Upgrading Your Veridata Configuration" -
Start your Veridata WebLogic Server and domain. See "Starting the Servers" in Installing and Configuring Oracle GoldenGate Veridata.
-
Run the
agent.configutility to upgrade your Veridata configuration with Section 2.2.4, "Upgrading Your Veridata Configuration". -
Run the Upgrade Assistant to upgrade your Veridata Agent with Section 2.2.5, "Upgrading the Veridata Agent".
-
Go to Chapter 3 and perform the post-installation tasks.
2.1.2 Upgrading a Veridata 12.1.3 Compact Domain to 12.2.1
The Oracle GoldenGate Veridata 12.1.3 domain with a SQL Server database as repository was a compact domain, which does not use an OPSS schema. The compact domain support was removed in the Oracle GoldenGate Veridata 12.2.1 release and only Expanded domain is supported.
To upgrade from a compact domain 12.1.3 to Veridata 12.2.1, use these steps:
-
Run RCU to create OPSS schemas using the same prefix that you used in 12.1.3 with Section 2.2.1, "Creating Repository Schemas using Repository Creation Utility".
-
Run the Upgrade Assistant to upgrade your Veridata schema and STB to 12.2.1 with Section 2.2.3, "Upgrading Veridata Schemas".
-
Run the Oracle WebLogic Server Configuration Wizard to create a new Veridata domain using the previously upgraded Veridata and STB databases and newly created OPSS with Section 2.2.2, "Creating the Veridata Domain using the Upgraded Schema".
-
Run Upgrade Assistant to perform the Veridata configuration upgrade to 12.2.1 including wallet migration and
veridata.cfgmigration with Section 2.2.4, "Upgrading Your Veridata Configuration" -
Start your Veridata WebLogic Server and domain. See "Starting the Servers" in Installing and Configuring Oracle GoldenGate Veridata.
-
Run the
agent.configutility to upgrade your Veridata configuration with Section 2.2.4, "Upgrading Your Veridata Configuration". -
Run the Upgrade Assistant to upgrade your Veridata Agent with Section 2.2.5, "Upgrading the Veridata Agent".
-
Go to Chapter 3 and perform the post-installation tasks.
2.1.3 Upgrading a Veridata 12.1.3 Expanded Domain to Veridata 12.2.1
To upgrade from a 12.1.3 expanded domain to Veridata 12.2.1, use these steps:
-
Run the Upgrade Assistant to upgrade your Veridata and OPSS schemas to 12.2.1 with Section 2.2.3, "Upgrading Veridata Schemas" or using the Domain Assisted Schema Upgrade (DASU), which is the recommended way to upgrade.
-
Run the Oracle WebLogic Server Reconfiguration Wizard to reconfigure your existing 12.1.3 expanded domain to a 12.2.1 domain with this command.
ORACLE_HOME/oracle_common/common/bin/reconfig.sh -log=logFileName.log -log_priority=FINE"
-
Run the Upgrade Assistant to upgrade your Veridata schema to 12.2.1 with Section 2.2.4, "Upgrading Your Veridata Configuration".
-
Start your Veridata WebLogic Server and domain. See "Starting the Servers" in Installing and Configuring Oracle GoldenGate Veridata.
-
Run the
agent.configutility to upgrade your Veridata configuration with Section 2.2.4, "Upgrading Your Veridata Configuration". -
Run the Upgrade Assistant to upgrade your Veridata Agent with Section 2.2.5, "Upgrading the Veridata Agent".
-
Go to Chapter 3 and perform the post-installation tasks.
2.1.4 Migrating a MySQL Repository Configuration to Veridata 12.2.1
Support for MySQL was removed in Oracle GoldenGate Veridata 12.2.1 so you must migrate to any of the supported databases for this release using the following steps:
To migrate existing configuration like connections, groups, jobs and profiles, use the Veridata export and import utilities. For more information, see Administering Oracle GoldenGate Veridata.
-
Go to the
DOMAIN_HOME/veridata/bindirectory. -
Use the export utility to export all the configured objects from MySQL repository to a XML file. This utility exports Connections (including passwords), Groups, Jobs, and Profiles. It does not export the User Preferences or Job Run history. If your new Veridata Agents use different host or port, update this connection information in the exported XML file.
The syntax for running the export script is:
veridata_export[.sh | .bat] -export filePath -wluser commandlineUusername [-wlport portNo] [–jobs jobName | - groups groupName | -connections connName | -profiles profileName | -all | -exportPassword] [[-repoUrl jdbc_url] [-u username>][-schema schema_name][-vdtPath VERIDATA_PRODUCT_HOME]]
For example:
./veridata_export.sh -wluser vdtUser -wlport 8830 -export /scratch/mysqlRepo.xml -all -exportPassword -repoUrl jdbc:mysql://localhost:3306/DEV_VERIDATA -username DEV_VERIDATA -schema DEV_VERIDATA -vdtPath /scratch/fmwHome/user_projects/domains/mysqlDomain/
where: -
repoUrl, -username, -schema, -vdtPathcorresponds to your MySQL configuration.The
wlusermust have Veridata Command Line privilege and Veridata Admin/ Veridata Power User privilege.Note:
(Optional) The export operation exports all of the data in the repository to XML file without validation. If your environment has some compare pairs for which the Validation Status is not successful, then the import operation will fail with the XML file generated by the export operation. To prevent failure of the import operation, you have the option to disable the compare pair validation. You can do this by updating the generated XML with these steps:-
Open the generated XML file.
-
Search for the
configurationtag. This tag has thevalidationattribute, which is set torequired, by default. -
Set the
validationattribute to one of the following values:omit-failures— Indicates that all successfully validated compare pairs will be added to the repository and other specified compare pairs will be ignored.none— Indicates that no compare pair validation is done before adding the compare pairs to the repository. You and then use the Veridata GUI to review and fix the validation problems. For example:Old tag:
<configuration operation="update" validation="required">Updated tag:
<configuration operation="update" validation="omit-failures">
-
-
Use the import utility to import all the configured objects you just exported.
The syntax for running the import utility is:
veridata_import[.sh | .bat] [-wlport portNo] -wluser commandlineUusername [-create | -update | -delete | -replace] configuration.xml
For example:
veridatadomain/veridata/bin/veridata_import.sh -wluser vdtUser -wlport 8830 -update /scratch/mysqlRepo.xml
2.2 Upgrade Utilities
This section contains explanations of how to use each of the upgrade utilities for the various upgrade paths that are identified in Section 2.1, "Choosing an Upgrade Path and Upgrading". You are directed to use these utilities with the steps in your chosen upgrade path:
-
Section 2.2.1, "Creating Repository Schemas using Repository Creation Utility"
-
Section 2.2.2, "Creating the Veridata Domain using the Upgraded Schema"
2.2.1 Creating Repository Schemas using Repository Creation Utility
Oracle GoldenGate Veridata Server requires a database to serve as a repository for objects that store the information and environment preferences that users create when using Oracle GoldenGate Veridata Web User Interface. You can use the following databases as a repository:
-
Oracle
-
Microsoft SQL Server
After installing Oracle GoldenGate Veridata 12c (12.2.1) and configuring your database, create the necessary schema for your repository database by using RCU. Navigate to the ORACLE_HOME/oracle_common/bin directory and start RCU.
RCU creates the schema_version_registry table in the database and it is used by Veridata and Upgrade Assistant. Following sections explain how to create schema for various databases:
Note:
In the RCU pages, when you create the Service Table (STB), specify a unique prefix for the schema for all databases. You need to provide this prefix while running the Upgrade Assistant for upgrading Veridata schema.To drop the Veridata repository, you should use the same prefix.
-
Section 2.2.1.1, "Creating Schema for an 11g to 12.2.1 Upgrade"
-
Section 2.2.1.2, "Creating Schema for a 12.1.3 Compact Domain SQL Server to 12.2.1 Upgrade"
2.2.1.1 Creating Schema for an 11g to 12.2.1 Upgrade
For all supported databases, create the Oracle Platform Security Services (OPSS) schema using RCU. Select Create new prefix then provide unique prefix. In the Select Components page, select Oracle Platform Security Services; the common Infrastructure Services" (STB) is selected by default as in the following:
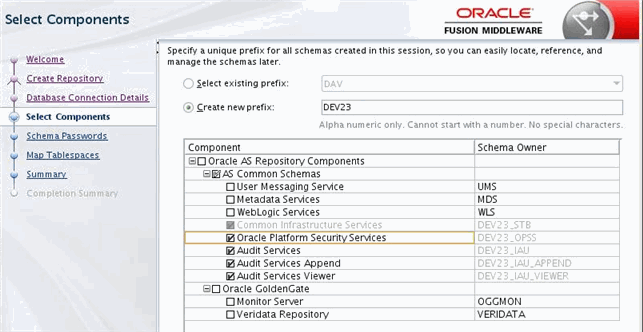
See Creating Schemas with the Repository Creation Utility for more information.
2.2.1.2 Creating Schema for a 12.1.3 Compact Domain SQL Server to 12.2.1 Upgrade
For upgrading to version 12.2.1, SQL Server you should run RCU to create the Oracle Platform Security Services (OPSS) schema using the same prefix which was used for 12.1.3. Select only Service Table in the Select Components page:
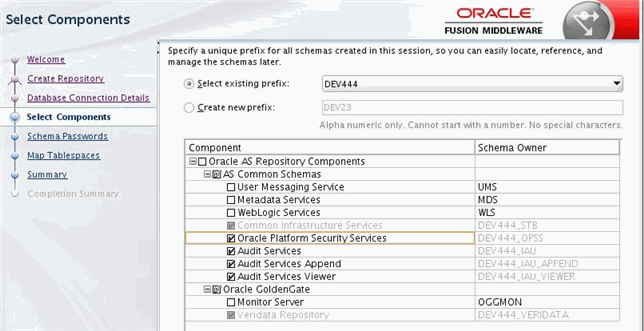
See Creating Schemas with the Repository Creation Utility for more information.
2.2.2 Creating the Veridata Domain using the Upgraded Schema
To create a WebLogic Server domain for Veridata, follow the procedure described in "Configure a Domain for Oracle GoldenGate Veridata" in Installing and Configuring Oracle GoldenGate Veridata.
Note:
Provide the upgraded Veridata schema details on the JDBC Component Schema page of the Configuration Wizard as shown in Figure 2-3.Figure 2-3 Schema Selection in the Configuration Wizard
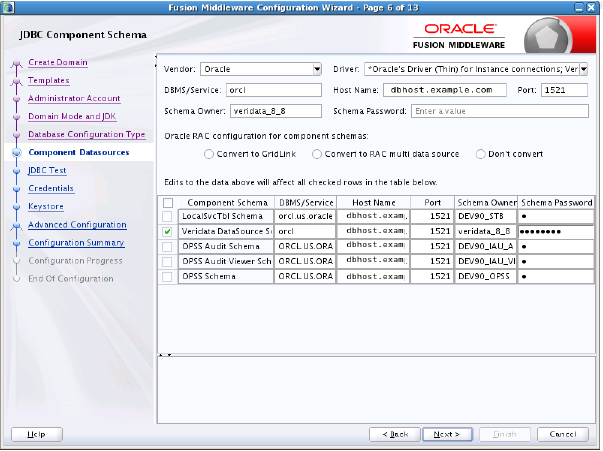
Description of ''Figure 2-3 Schema Selection in the Configuration Wizard''
2.2.3 Upgrading Veridata Schemas
The Oracle Fusion Middleware Upgrade Assistant upgrades your Oracle GoldenGate Veridata schema to 12c (12.2.1). For more information about the features of Upgrade Assistant, see Upgrading with the Upgrade Assistant.
To upgrade the Veridata repository schema follow the instructions below:
-
To start Upgrade Assistant, go to the
ORACLE_HOME/oracle_common/upgrade/bindirectory, and enter the following command:On UNIX:
./uaOn Windows:
ua.batThe Welcome screen of the Upgrade Assistant appears. Click Next.
-
Select Individually Selected Schemas as the upgrade type. Click Next.

-
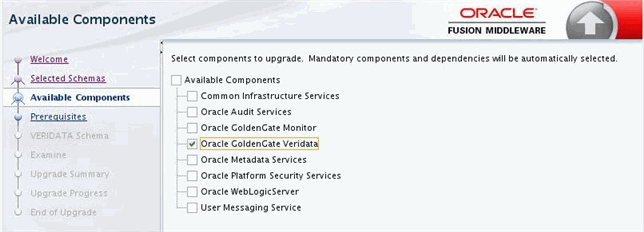
The Upgrade Assistant lists all schemas available for upgrade. Select only Oracle GoldenGate Veridata. Ensure that no other schemas are selected for upgrade.
-
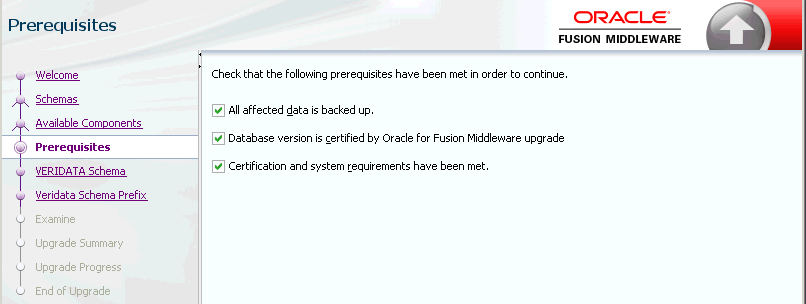
You must select all three checkboxes to continue. The Upgrade Assistant will not verify that the prerequisites have been met.
-
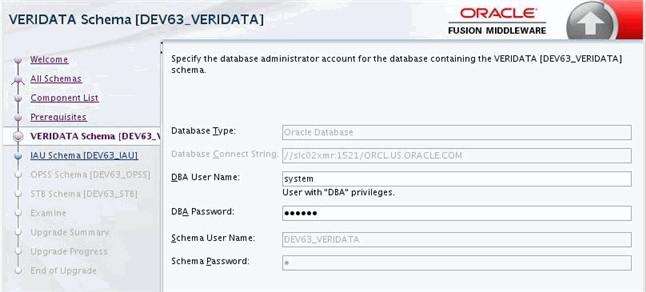
On the VERIDATA Schema page, enter the connection credentials for the database containing the schema you want to upgrade.
-
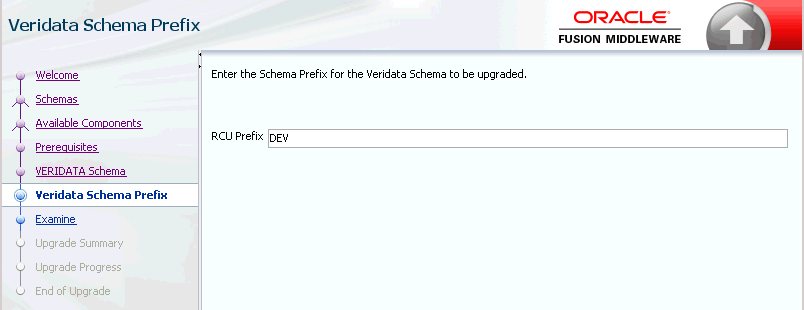
On the Veridata Schema Prefix page, enter the prefix that was entered while creating the schema using RCU. See Section 2.2.1, "Creating Repository Schemas using Repository Creation Utility".
-
On the Examine screen, the Upgrade Assistant performs a series of validations before upgrading the selected components. Ensure that all validations have succeeded. Click Next.
-
Click Upgrade on the Upgrade Summary screen to begin the upgrade. The Upgrade Progress screens shows information about the progress of the upgrade, and the Upgrade Success screen summarizes the upgrade.
To verify the schema upgrade, follow the procedure as described in Section 3.1, "Verifying the Schema Upgrade".
To troubleshoot issues that might occur during schema upgrade, review the logs as described in Section 3.5, "Troubleshooting your Upgrade".
2.2.4 Upgrading Your Veridata Configuration
The Oracle Fusion Middleware Upgrade Assistant is also used to upgrade your Veridata repository schema using the following steps:
-
To start the Upgrade Assistant, go to the
ORACLE_HOME/oracle_common/upgrade/bindirectory, and enter the following command:On UNIX:
./uaOn Windows:
ua.bat -
Select All Configurations Used by a Domain on the All Configurations page and enter the domain directory path, then click Next.
-
Select the Veridata domain to be upgraded. See Section 2.2.2, "Creating the Veridata Domain using the Upgraded Schema".
-
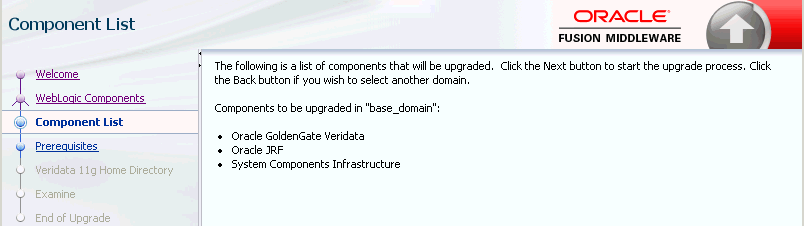
The Component List page displays a list of components that will be upgraded. Review the list and click Next to start the upgrade process.
-
The Prerequisites screen lists items that you must check and verify before you can proceed.
You must check the boxes before you can continue. The Upgrade Assistant will not verify that the prerequisites have been met.
-
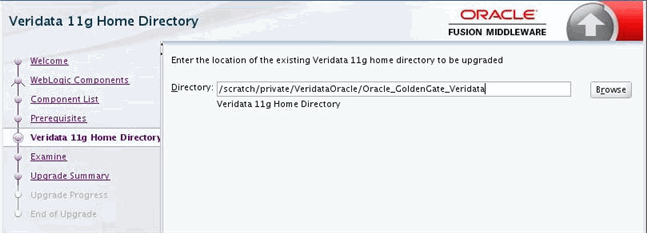
On the Veridata 12c Home Directory page, specify the location of the Veridata 12.2.1 installation.
-
On the Examine screen, the Upgrade Assistant performs a series of validations before upgrading the selected components. Ensure that all validations have succeeded. Click Next to start the upgrade process.
-
Click Upgrade on the Upgrade Summary screen to begin the upgrade. The Upgrade Progress screens shows information about the progress of the upgrade, and the Upgrade Success screen summarizes the upgrade.
2.2.5 Upgrading the Veridata Agent
-
Upgrade your existing Veridata Agent the new 12c (12.2.1) agent using one of the following commands:
Upgrading from 11g
Deploy the Oracle GoldenGate Veridata Agent to a directory outside
ORACLE_HOME.ORACLE_HOME/veridata/agent/bin/agent_config.shNEW_AGENT_ORACLE_HOMEUpgrading from 12c (12.1.3)
Deploy the Veridata Agent to the same location used in 12.1.3 setup.
ORACLE_HOME/veridata/agent/bin/agent_config.shOLD_AGENT_ORACLE_HOMEEither command replaces the following files with the new 12.2.1 files:
On Unix:
agent.properties.sample
config/agent-jps-config.xml
config/certs/serverIdentity.jks
config/certs/serverTrust.jks
config/odl.xml;
agent.sh
configure_agent_ssl.sh
On Windows:
agent.bat
agent.properties.sample
config/agent-jps-config.xml
config/certs/serverIdentity.jks
config/certs/serverTrust.jks
config/odl.xml
configure_agent_ssl.bat
service/Install_Veridata_Agent.bat
service/README.txtservice/Start_Veridata_Agent.batservice/Stop_Veridata_Agent.batservice/Uninstall_Veridata_Agent.batservice/agent_service.properties
-
(Optional) If you have changed any of the files listed in step 1in the previous release, then use your backup files to replace these changed files.If your Veridata Agent is installed as a service in Windows machine, then update the
service/agent_service.propertiesproperty with the same service name that you used in the previous release. -
(Optional) To configure SSL communication between the Veridata Agent and the Server, set the SSL properties for the agent and follow the procedure as described in "Configuring Oracle GoldenGate Veridata Security" chapter in Administering Oracle GoldenGate Veridata.
-
Start your Veridata Agent.