12 Work with Incremental ETL in ODI Studio
This chapter describes the steps required to administer the ETL process using the Oracle Data Integrator Studio (ODI Studio).
12.1 Schedule an Incremental ETL
The AM.zip file contains pre-configured ETL scheduling in Inactive mode.
The Incremental ETL is used to load the delta data. You can execute an Incremental ETL either by executing Load Plan LP_INC_AM, or scheduling an ETL to run at the configured time interval.
To schedule a Load Plan, execute the following steps:
-
In the Designer tab, navigate to Load Plans and Scenarios section and expand LP_INC_AM (Load Plan for Incremental ETL).
-
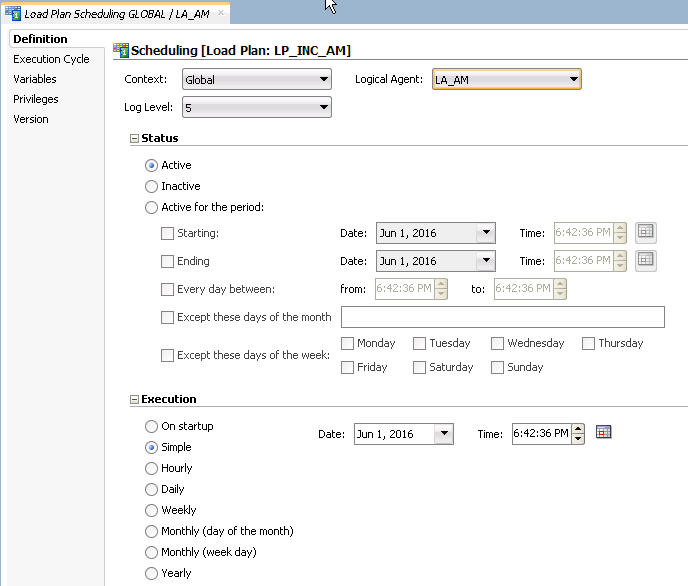
Right-click Scheduling and select New Scheduling.
The Load Plan Scheduling dialog box appears.

You can set options given in the Status and Execution sections, according to the requirements to schedule the Load Plan.
12.2 Monitor the Incremental ETL Process
The process of monitoring the Incremental ETL using the Oracle Database Integrator Studio is same as the process of monitoring the Initial ETL.
For step-by-step information related to monitoring the Incremental ETL process using the ODI Studio, see Section 7.2, "Monitor Initial ETL Process: ODI Studio."
12.3 Manage the Incremental ETL Process
This section describes the steps required to manage the Incremental ETL process using the Oracle Database Integrator Studio.
12.3.1 Run the Incremental ETL
-
Open the Oracle Data Integrator Studio, and click Connect to Repository.
The Oracle Data Integrator Login dialog box appears.
-
In the Oracle Data Integrator Login window:
-
From the Login Name drop-down list, select the ODI Work Repository name.
-
In the User field, enter the name of the ODI user.
-
In the Password field, enter the password for the ODI user.
-
Click OK.
The Oracle Data Integrator screen.
-
-
From the left pane, select the Operator tab.
-
Expand the Load Plans and Scenarios section.
The LP_INC_AM option represents the load plan for the Incremental ETL process for Argus Mart.
-
Right-click the LP_INC_AM option, and from the drop-down menu, click Run.
The Start Load Plan dialog box appears.
-
Click Run.
-
In the Start Load Plan screen:
-
From the Context drop-down list., select CTX_ARGUSMART.
-
From the Logical Agent drop-down list, select LA_AM.
-
From the Log Level drop-down list, select a user session task log level.
-
Click OK.
The Information dialog box with the Load Plan Started confirmation message appears.
-
-
Click OK.
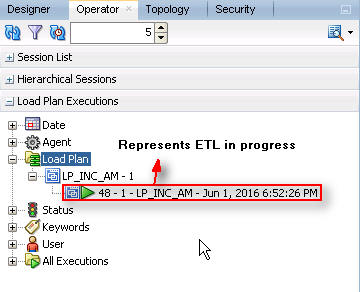
You can verify the status of the ETL process by navigating to the Load Plan Executions section and expanding the Load Plan folder. You can view the status of the Load Plan in Green color with tilted s, which signifies that the ETL session is in progress.

12.3.2 Run the Incremental ETL with Clear Cache
Note:
-
Execute this procedure only if you require the OBIEE Clear Cache option.
-
OBIEE Clear Cache option works only when OBIEE and ODI are installed on the same machine.
-
Import the file AM.zip as per the steps specified in section 'Import Argus Mart Schema Objects' of section 4.2
-
Refresh the Designer tab and verify that:
-
A new load plan named LP_INC_AM_with_ClearCache is available.
-
PKG_BI_CLEAR_CACHE component is added to this new Load Plan.
-
The following new variables are available:
-
VAR_ALN_BI_DOMAIN_PATH
-
VAR_ALN_BI_SQL_PATH
-
VAR_ALN_BI_USER
-
VAR_ALN_BI_PWD
-
-
-
Set up the bi_clear_cache.sql.
-
Copy the bi_clear_cache.sql from the ODI folder.
-
Place the file to a location from where OBIEE can access it. For example:
- Linux: /u01/obieecache/bi_clear_cache.sql
- Windows c:\obieecache\bi_clear_cache.sql
-
Make sure the OS user that installs OBIEE has the required permissions for the bi_clear_cache.sql file.
-
Edit the SQL file as required:
To... Add Clear the entire cache call SAPurgeAllCache(); Purge the cache of OPVA_DWH database call SAPurgeCachebyDatabase('OPVA_DWH'); Purge the cache of AI80_SRC database call SAPurgeCachebyDatabase('AI80_SRC'); Purge the cache of multiple databases call SAPurgeCachebyDatabase('OPVA_DWH');call SAPurgeCachebyDatabase('AI80_SRC'); Note:
Here, the OPVA_DWH and AI80_SRC are the database names in the physical architecture inside OBIEE RPD.
-
-
Configure ODI for OBIEE Clear Cache.
-
Login to ODI Studio.
-
Connect to Argus Mart Work Repository.
-
Navigate to the Designer tab.
-
Open the package PKG_BI_CACHE.
-
Navigate to the Diagram sub-tab, and select odiOSCommand_ClearCache.
-
Configure the following based on your environment:
Parameter Action Command To Execute (Only for Windows)
Update the command to have relative folder paths as per the Windows OS convention. For example:
#ARGUSMART.VAR_ALN_BI_DOMAIN_PATH/bitools/bin/nqcmd.cmd
-d AnalyticsWeb
-u #ARGUSMART.VAR_ALN_BI_USER
-p #ARGUSMART.VAR_ALN_BI_PWD
-s #ARGUSMART.VAR_ALN_BI_SQL_PATH\bi_clear_cache.sql
Output File Update the file location. Error File Update the file location. -
Save the changes.
-
Navigate to Overview > Scenarios tab, right-click the PKG_BI_CACHE Version 001 scenario, and select Regenerate.
-
In the Regenerate Scenario pop-up window, click OK.
-
In the Scenario Variables window, click OK.
-
-
Login to ODI Studio.
-
Connect to Argus Mart Work Repository.
-
Navigate to the Operator tab.
-
Go to Load Plan and Scenarios > LP_ARGUSMART82 and right-click the load plan LP_INC_AM_with_ClearCache.
-
Enter the values for following variables:
Variable Description Sample Value VAR_ALN_BI_DOMAIN_PATH: Defines OBIEE Domain Home Path. /u01/app/oracle/Middleware/user_projects/domains/bi VAR_ALN_BI_SQL_PATH: Defines complete directory path where bi_clear_cache.sql is available. /u01/obieecache VAR_ALN_BI_USER: Defines the Login ID of the OBIEE admin user. weblogic VAR_ALN_BI_PWD: Defines password of the OBIEE admin user. — -
To start the load plan execution click OK.
12.3.3 Stop the Incremental ETL
-
Right-click the Load Plan, which you want to stop, in the Load Plan folder of the Load Plan Executions section.
-
From the drop-down menu, select Stop Normal.
The Stop Load Plan dialog box appears.
-
Select PA_AM from the Physical Agent drop-down list.
-
Click OK. This stops the execution of the Load Plan.
You can verify the status of the ETL process by navigating to the Load Plan Executions section and expanding the Load Plan folder. You can view the status of the Load Plan in Red color with the X symbol, which signifies that the ETL session is not in progress.
Note:
You must verify in Argus Mart database if the ETL session has been successfully ended after this step.
12.3.4 Restart the Incremental ETL
Restarting the Incremental ETL process enables you to start the ETL process from the last execution step where it was stopped or failed.
-
Right-click the Load Plan, which you want to restart, in the Load Plan folder of the Load Plan Executions section.
-
From the drop-down menu, click Restart.
The Restart Load Plan dialog box appears.
-
Select PA_AM from the Physical Agent drop-down list.
-
Select the required log level from the Log Level drop-down list.
-
Click OK. This displays the Information dialog box with the Load Plan restarted message.
-
Click OK.
This adds another Load Plan, with the same name as that of the stopped ETL, in the Load Plan folder of the Load Plan Executions section. However, this instance of the ETL Process is in Green color, which signifies that the ETL is in progress.
Once the ETL process is complete, the Load Plan is displayed in Green color with a check mark.
12.3.5 Process a Stopped or a Failed ETL
The complete ETL process is divided into two major phases: Staging and Mart. The Mart phase starts only when the Staging phase is complete.
If an ETL process fails, you have the option of continuing the process from the failed step or executing it again from the beginning of ETL.
This section explains the steps to resume a failed ETL from the failed step and to execute it again from the beginning of ETL.
This section comprises the following sub-sections:
12.3.5.1 Continue the Failed Incremental ETL
If the last execution step of the failed or stopped ETL belongs to the Staging phase, the ETL resumes from the failed or stopped point, as shown in the following figure:
If the last execution step of the failed or stopped ETL belongs to the Mart phase, the ETL resumes from the first step of the Mart phase and not from the failed or stopped point.
The process to continue the failed Incremental ETL from the failed step is exactly the same as that of the process of restarting the Incremental ETL after stopping it.
See the Restart the Incremental ETL section for the step-by-step procedure to continue the failed Incremental ETL from the failed step.
12.3.5.2 Restart the Failed Incremental ETL
The process to restart the failed Incremental ETL from the beginning is exactly the same as that of the process of running the Incremental ETL.
However, before restarting the ETL, you must log on to the Oracle SQL Developer or SQLPlus (or SQL Prompt) using the Argus ETL User credentials and execute the following statements:
EXEC pkg_sm_stage_util.p_set_cmn_profile_value ('DATABASE', 'ODI_ETL_STATUS', '0');EXEC pkg_sm_stage_util.p_set_cmn_profile_value ('DATABASE', 'ETL_SM_ITERATION_NUMBER', NULL);
COMMIT;
To verify the successful execution of these statements, you can execute the following Select statements:
-
SELECT * FROM rm_cmn_profile_global WHERE KEY = 'ODI_ETL_STATUS';
The entry for the Value column must be 0 after executing this statement.
-
SELECT * FROM rm_cmn_profile_global WHERE KEY = 'ETL_SM_ITERATION_NUMBER';
The entry for the Value column must be blank after executing this statement.
See the Run the Incremental ETL section for the step-by-step procedure to restart the failed Incremental ETL from the beginning of ETL.


