Defining breakdown by individual values
In this section ShowHide
In the Breakdown Details dialog box, if you click Individual Values, the report includes a column or row for every value that you select. This option results in a static list of breakdown values that does not automatically adjust to changing source data.
Note: If there are more than 20,000 available values for the breakdown variable, you cannot use a breakdown by individual values.
1. In the Breakdown Details dialog box, click Individual Values.
2. To include a column or row to represent null (missing) values for the variable, check Include a category for Null values.
3. To include a column or row in the report to represent all selected values for the variable (including null values if Include a category for Null values is checked), check Include a category for ALL selected values. . For reports that display percentages, the report must include a row or column for All.
Note: If a case is counted in multiple columns or rows, a count in the All column or row is not necessarily the same as the total of counts in other columns or rows of the report. Also, percentages in the columns or rows may add up to greater than 100 percent.
4. To include a column or row for values that are not represented by any other columns, check Include a category for all unselected values.
5. From the All Values list, select values for the variable.
- To find a value, you can type a string into the Find field, then click Find. All values containing that string appear. The matching does not distinguish between cases (upper, lower, mixed). To list all values again, you can click Show All.
- To search for the following special characters, you must precede each special character with a backslash (\): + * ? . \ ( ) [ ]
Note: When a value is highlighted in the list, you can go to the next occurrence of a value starting with a character that you type. For example, you can highlight the first value in the list and type H to go to the first value starting with H.
6. Highlight one or more values in the list of all values. You can also do the following:
- To highlight multiple non-contiguous values, hold down the Ctrl key while clicking each value.
- To highlight multiple contiguous values, click a value, hold down the Shift key, and click another value. Values between and including those values are highlighted.
- To remove highlighting from a value, hold down the Ctrl key while clicking the selected value.
- To move values back and forth between the list of all values and the list of selected values, you can double-click a highlighted value or use the arrow keys as follows:
|
|
|
|

|
Move highlighted values from the list of all values to the list of selected entries.
|
|

|
Move all values from the list of all values to the list of selected values.
|
|

|
Removes highlighted values from the list of selected values.
|
|

|
Removes all values from the list of selected values.
|
- If Clear is available, you can click it to clear out the list of selected values.
- If up and down arrows are available for the list of selected values, you can use them to order the selected values as you want them to appear in the report.
7. From the Breakdown values order field, select the breakdown values order.
- To sort the values in ascending order, click Sorted.
- To show values in the order in which they appear in the Selected Values list, click Listed order.
8. When you are satisfied with the Selected Values list, click OK.
The Edit Report Columns page shows the selected values. Click Save to save your report definition so far.
9. To edit value labels for breakdown values, in the Breakdown Details section, click Edit Labels.
The Edit Labels dialog box appears. For more information, see Editing individual value labels.
10. Click OK.
Example
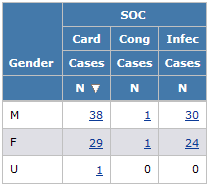
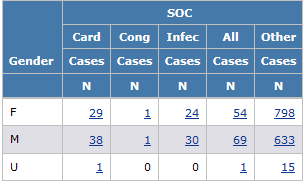
The following example shows a report in which three different SOCs were selected:
In the following example, the All row shows the number of cases with any of the Gender values for each SOC. The All column shows the number of cases with any of the SOCs for each Gender. The Null column shows the number of cases (in this example, none) with no SOC for each Gender. All SOCs that are not any of the three selected SOCs are represented by the Other column:
Note: See Specifying content details for information about the behavior of the All row when unique counts are shown for column variables.