12 Generating CRF Reports
All reports are PDF files. You can use any application that opens PDF files, such as Adobe Reader, to print the report or save a copy of the report to your PC.
You can use these reports for electronic submissions and as a printout for offline discussion and review. In addition, you can use the reports to track your progress during the clinical study.
This chapter includes the following topics:
Working with the Reports Page
To open the Reports page, click the Reports tab.
When you open the Reports page, RDC Onsite displays all the report jobs, if any, that you have submitted for processing. Figure 12-1 shows a sample Reports page.
RDC Onsite lists the reports in a table format of rows and columns. You can search for a specific report by job name. In addition, you can click a column heading to sort the reports by that column. Clicking the column heading again toggles the sort from ascending to descending order. Both searching and sorting can help you find a report that you want to view or print.
From the Reports page, you can:
-
Generate a new Patient Data Report
-
Generate a Blank Casebook Report for the study or for a single patient
-
Search for reports that have already been generated
-
Monitor reports currently in progress
-
View reports
-
Print reports
Tip:
Some reports may require an extended time to run. You can continue to work in RDC Onsite while a report generates in the background. You can return to the Reports page at any time to view and print your report.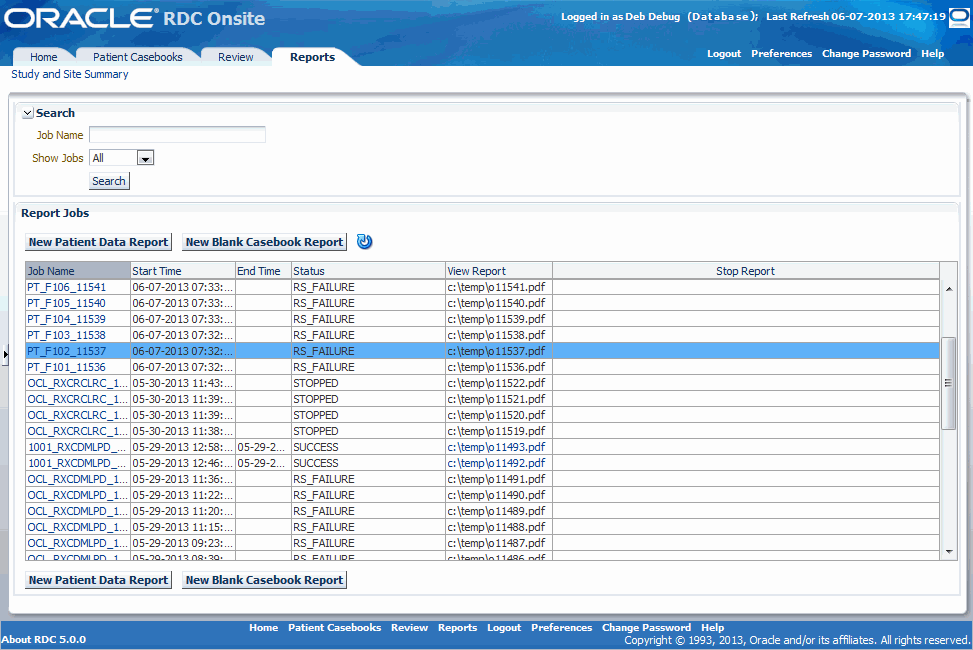
The Refresh of Status button ![]() is turned off by default. This button allows the user to toggle the auto-refresh status. Click once to start auto-refresh. Click again to turn it off.
is turned off by default. This button allows the user to toggle the auto-refresh status. Click once to start auto-refresh. Click again to turn it off.
CRF Report Content
You can generate three types of CRF reports in RDC Onsite: the Patient Data Report and the Blank Casebook Report.
This section includes the following topics:
Content of a Patient Data Report
A Patient Data Report can include any or all of the following sections, depending on the RDC page you use to request the report, which options and filters you specify, if any, and the nature of the entered data.
-
A cover page
-
A CRF section, including both the form and the entered data
-
Ancillary pages if the CRF has any response overflow, audit, discrepancy, or investigator comment information
-
A Deleted CRFs section
-
An Appendix listing CRFs not included in the report. This applies to a true PDR, which is generated from the Home, Casebooks or Reports pages for a selected patient.
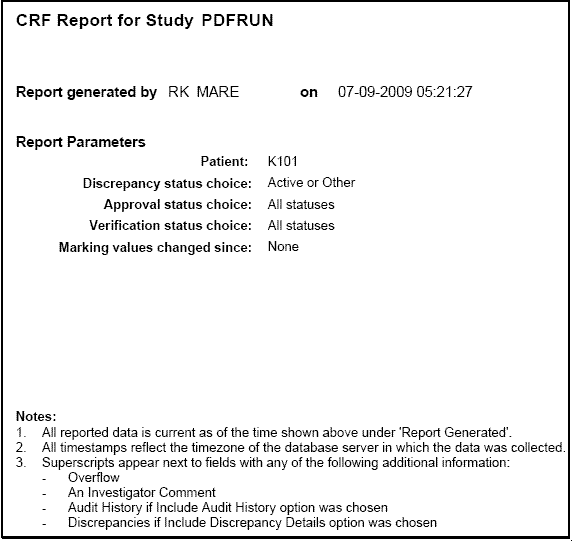
Cover Page in a Patient Data Report
-
Title — The title of the report. The title uses the format
CRF Report for Studystudy-name.. -
Report generated by — The full name of the user who initiated the report.
-
On — The date and time the report was generated.
-
Report Parameters — A list of the selected parameters for the report, including:
-
The patient ID for which the report was run.
-
The search criteria in effect on the Home or Casebooks page when the report was run.
-
-
Legends — An explanation of the time stamps and the superscripts shown in the report.
Every Patient Data Report, except the CRF History Report from the Data Entry Window, has a cover page that lists the following basic information:
Figure 12-2 shows a sample cover page for a Patient Data Report.
CRF Section
The CRFs presented in a Patient Data Report are a PDF rendering of the HTML form that was used to enter data in the RDC Data Entry Window. The PDF rendering of the form is almost exactly the same as the HTML rendering, but there can be differences of a few pixels in the placement of text and graphics. Also, in the PDR, one or more fields in the CRF may be marked with a superscript number. Superscript numbers are assigned sequentially in a CRF, based on the order of the fields.
The superscript indicates that there is additional data associated with the field, based on one of the following conditions:
-
Overflow — The entered text is too large for the field.
-
Investigator Comment — The field has an investigator's comment associated with the response.
-
Discrepancies — The field is associated with one or more discrepancies. A section discrepancy is associated with the first field in the section.
-
Audit History — The field has undergone modification since originally entered.
If a superscript appears for a field, the associated data appears in the Footnotes subsection of the Ancillary Data page(s) immediately following each CRF in the report. The CRF section appears in all reports except for the CRF History Report.
Ancillary Data Pages in a Patient Data Report
The Ancillary section can include a number of subsections, depending upon options selected for the report and the data associated with the CRF. The included subsections are listed under Content. Each subsection that can appear in a report is described below.
CRF Created Information
The Ancillary Data page includes the user name (ID) of the individual who created the CRF, and the date and time the CRF was created. For example:
Created by: RAVIKUMAR RANGARAJU
Role: DM
On: 01-31-2013 01:37:58
This subsection appears in all patient data reports.
Note:
The creation date and time marks when the CRF was first saved, regardless of whether it was saved as complete or incomplete. Unless audit history for a field indicates otherwise, this information represents the time when data was originally entered for each field and who entered it.Approval Information
If the CRF is approved and if Patient Data Reports are configured to show Approval information, all reports except for the CRF History report include the name of the individual who approved the CRF, and the date and time the CRF was approved. For example:
Approved by: JOHN SMITH
Role: RXC_SITE
On: 02-02-2013 03:46:09
Approval information appears in all patient data reports except for the CRF History Report.
Content
The Content subsection provides hyperlinks to each of the remaining subsections in the Ancillary pages and may include any or all of the following:
-
Footnotes
-
Audit History for Fields Not Displayed
-
Deleted Rows for CRF abc
-
Approval History
-
Extended Text or Extended Text Audit History
-
Deleted CRF History or Deleted CRFs Report
The Content subsection is included in all patient data reports if there is content to be listed.
Footnotes
The Footnotes subsection lists each superscript number found in a CRF and outputs any additional information belonging to the corresponding field. The additional information may include any overflow text, investigator comments, discrepancy details, and audit history associated with the field. Figure 12-3 shows a sample Ancillary Data page.
This subsection is not included in the CRF History report.
Figure 12-3 Sample Ancillary Data Page in a Patient Data Report
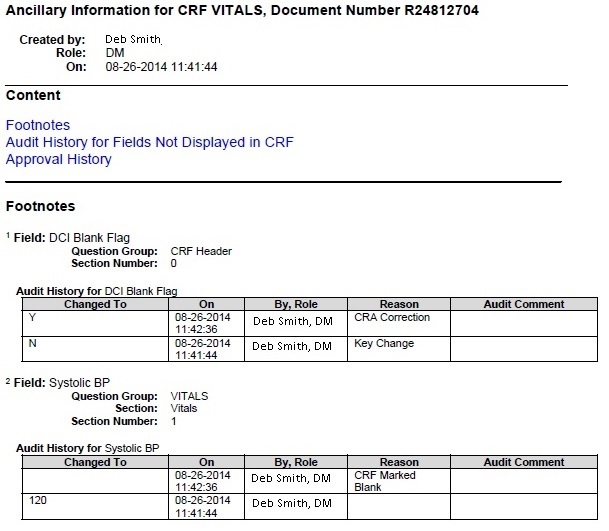
Description of ''Figure 12-3 Sample Ancillary Data Page in a Patient Data Report''
Deleted Rows
When an entire row of data is deleted from a CRF, the CRF image does not include a superscript indicating that the row has audit history. Instead, assuming audit history is included in the report, this is reported in the Deleted Rows subsection, which includes all previous values for fields in the deleted row.
If relevant to the CRF, this subsection is included in all patient data reports.
Extended Text or Extended Text History
In the CRF image itself, each extended text field displays the ATTACHMENT prefix and the truncated response text. The extended text field does not use a superscript in the CRF to indicate an overflow of text. Instead, for each extended field in the CRF that has data, the ancillary pages include a special Extended Text subsection to show the full content of the field.
If the report includes audit history, and the extended text field has been updated, this subsection is called Extended Text Audit History and includes the complete, extended content of the current and previous values for the field. Also, data for the field is presented as follows:
-
A superscript does appear with the field displayed in the CRF
-
Audit history appears in the Footnotes subsection as well, the same as for standard text fields. However, this audit history presents only the ATTACHMENT prefix with the truncated responses for the field.
Deleted CRF History or Deleted CRFs Report
This subsection appears in all patient data reports if audit history is to be included and if it is relevant to the data.
In the reports generated from the data entry window, the CRF Report and CRF History Report, the subsection is called Deleted CRF History and is included if the CRF was ever deleted and re-entered.
In patient data reports generated for a selected patient, this section appears as an appendix at the end of the entire report. It is called Deleted CRFs Report and includes the history of any CRF that was ever deleted for the patient, whether it was subsequently re-entered or not.
In both cases described above, the section presents all CRF history prior to the delete action.
CRFs Not Included in the Report
If relevant to the patient data, this section appears in patient data reports generated for a selected patient. It appears as an appendix at the end of the full report and lists the CRFs that exist for the patient but cannot be included. A CRF may not be included either because no form exists, or the data has not been migrated to a form and the option to Include CRFs entered in classic data entry is not checked. In either case, data may have been entered via Oracle Clinical data entry, Oracle Clinical Batch Data Load, or via RDC Classic.
Bookmarks in a Patient Data Report
Every Patient Data Report includes a table of contents with bookmarks to the various topics and pages in the report. See Figure 12-4. You can click the bookmarks to access pages in the report.
The report also includes two sets of bookmarks:
-
The first set is organized by Visit and within the visit, the Data Domain.
-
The second set is organized by Data Domain and within a Data Domain, by Visit.
For example, if an Adverse Events CRF is entered for Visit 1 and Visit 2, the report has two AE pages in the report. A bookmark would exist under Visit 1, AE as well as under AE, Visit 1. You can click either of the bookmarks to open the first AE page entered for Visit 1.
You can navigate to the cover page of the report by clicking on the Contents bookmark.
Figure 12-4 Bookmarks for Reviewing the Patient Data Report
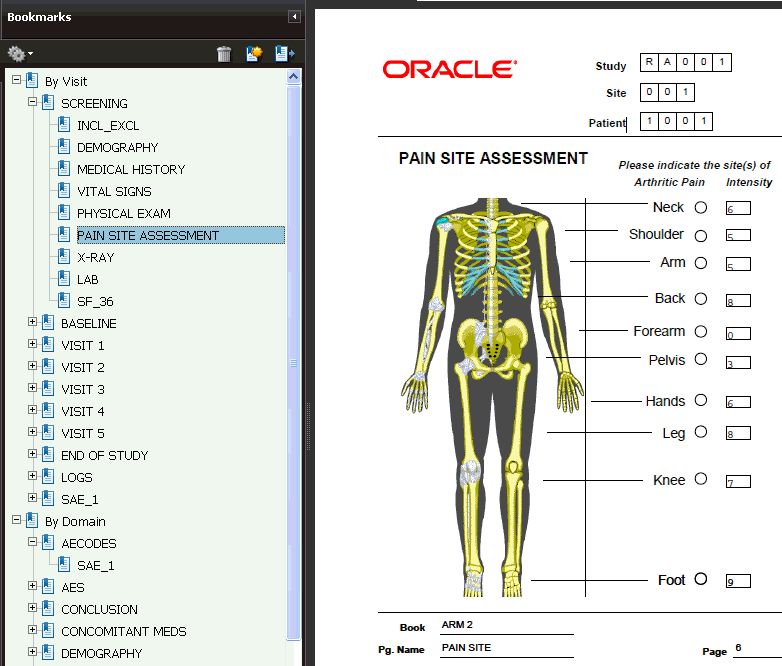
Description of ''Figure 12-4 Bookmarks for Reviewing the Patient Data Report''
Page Numbering in a Patient Data Report
RDC Onsite numbers CRFs according to visits. Within a visit, RDC Onsite numbers the CRFs according to their assigned casebook.
If you add an unplanned page in the casebook, RDC Onsite assigns it the page number of the last expected CRF for the particular visit, appended with U, as well as a unique number for the unplanned page for that visit. For example, if Visit 2 includes pages 3 through 10, the second unplanned CRF entered for Visit 2 receives the number 10.U.2.
Content of a Blank Casebook Report
The Blank Casebook Report consists of a blank copy of all the planned CRFs in the casebook. Generating and printing a blank casebook is useful for sites still doing paper data entry.
Note:
When you generate a Blank Casebook Report for a flexible study, the report may be quite large because it includes all CRFS defined in the casebook even though for a given patient not all CRFs and visits will be expected.Cover Page in a Blank Casebook Report
Each generated Blank Casebook Report has a cover page that lists the following basic information about the report:
-
Title — The title of the report. The title uses the following format:
CRF Report for Study study-name.
-
Casebook — The name of the casebook designated for the report.
-
Report generated by — The full name of the user who initiated the report.
-
On — The date and time the report was generated.
-
Legends — An explanation of the time stamps and the superscripts shown in the report.
If you specified a patient number when you generated the report, the cover page also includes the patient number (ID) for which the report was run.
CRF Data Section in a Blank Casebook Report
Most fields in the Blank Casebook Report are empty so you can hand write patient responses into the blank form. However, RDC Onsite automatically fills in the following fields when generating the report:
-
Study Name
-
Visit Name
-
Visit Number
-
CRF Name
-
Short Name
In addition, RDC Onsite displays the Patient ID, Site ID, and Investigator ID on the Blank Casebook Report.
Generating a Patient Data Report
Generally, a Patient Data Report includes all the CRFs and data entered for a single patient. However, there are variations depending on the RDC page you use to request the report, which options and filters you specify, if any, and the nature of the entered data, as follows:
-
If you request the report from the Reports, Home or Patient Casebook pages, you can request a report for multiple patients simultaneously. However, RDC Onsite will generate a separate report for each patient.
-
If you request the report from the CRF Review page, you can select multiple CRFs that may or may not be for a single patient, but which will all be included in the same report.
-
If you request the report from the Reports tab, you have options available that are not available when you request the report from other pages. You can include discrepancy details and audit history or include only certain CRFs based on report parameters such as visit date, casebook, and CRF status. If you request the report from the Home, Patient Casebooks, or Review pages, Discrepancy Details and Audit History are not included.
-
The Single CRF Report is generated from the data entry window for the current CRF and includes all ancillary data associated with the CRF: discrepancy details, audit history, investigator comments and approval history.
-
The CRF History Report is generated from the data entry window and includes all audit history for the CRF that is not otherwise available in the data entry window, including initial CRF creation data, inserted and deleted rows, and prior history if the CRF was previously deleted.
The Patient Data Report has always footnoted individual CRF fields with open discrepancies, audit history, overflow, or investigator comments. As of release 5.2, superscripts marking those fields are hyperlinked to the corresponding footnote in the Ancillary Data section, improving navigation.
To enable this feature on existing DCI forms, run the forms regeneration utility. From release 5.2 onward, new forms will automatically generate these hyperlinks. For more information, see Regenerating Forms Utility.
Generating a Patient Data Report from the Reports Page
A Patient Data Report includes all the CRFs and data entered against a patient. You can generate a Patient Data Report for one or more patients. For each patient that you select, RDC Onsite submits a separate job request and generates a separate report.
Optionally, you can include discrepancy details and an audit history in the report. You can also choose to include only certain CRFs in the report based on parameters such as visit date, casebook, and CRF status.
You can use Patient Data Reports for electronic submissions and as a printout for off-line discussion and review.
Note:
CRFs are included in the Patient Data Report that satisfy the criteria you specify in the Report Parameters. Any CRFs that are hidden based on your user role are excluded.To generate a Patient Data Report from the Reports page:
-
Click the Reports tab to open the Reports page.
-
Click New Patient Data Report.
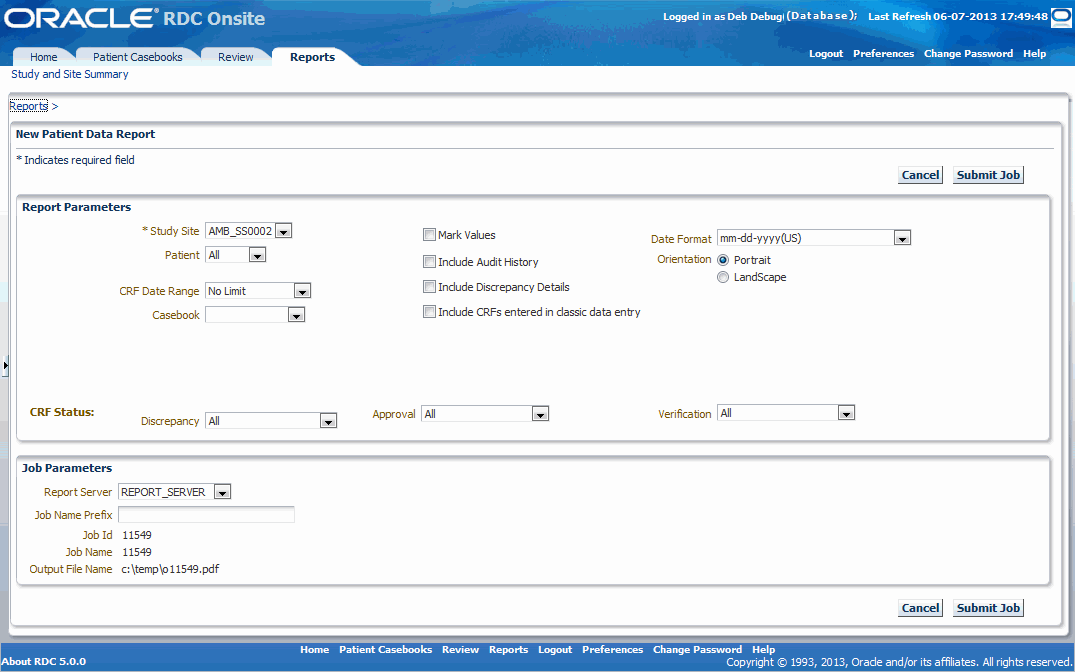
Description of the illustration ''reports_sum_pdr_p1.gif''
-
Select the report parameters that RDC Onsite uses to generate the Patient Data Report.
You must select a Study Site, which is a required parameter. The other report parameters are optional. You can use the other parameters to include or exclude information in the Patient Data Report. See Table 12-1 for a description of each report parameter.
-
Select the job parameters for the report.
-
Select the name of the Report Server.
-
Enter up to 8 characters for the Job Name Prefix. RDC Onsite automatically uses a unique number as the name of a report job, and then adds your specified prefix to the beginning of the job name. You can use the prefix value to easily search for your reports in the list on the Reports page.
RDC Onsite displays the Job Id, Job Name, and the Output File Name for your reference.
-
-
Click Submit Job to continue. RDC Onsite prompts for confirmation that you want to generate the report.
-
Click Yes to generate the Patient Data Reports.
Once you submit your request to generate the Patient Data Report, you can return to the Reports page to monitor the progress of your report job. You can also stop a job in progress or check error details if the report generation failed. See "Monitoring the Status and Progress of Your Report Jobs" for more information.
After RDC Onsite successfully generates the report, you can click the link in the View Report column on the Reports page to open and print your report. See "Printing a Report" for more information.
Alternate Ways to Generate a Patient Data Report
In addition to the Reports page, you can generate a Patient Data Report from the Home page, the Patient Casebooks page, the Review CRFs page and the Data Entry window.
Generating a Patient Data Report from the Home or Patient Casebooks Page
When you generate a Patient Data Report from the Home page or the Patient Casebooks page, RDC Onsite:
-
Submits a separate report job and generates a separate report for each patient that you select
-
Orders the report by casebook visit
-
Does not include audit history or discrepancy details
-
Uses the following format to add a prefix to the report job name: PT_patient_
Note that if you specify CRF search criteria on the Patient Casebooks page, the report includes only the CRFs that satisfy the search criteria.
To generate a Patient Data Report from the Home page or the Patient Casebooks page:
-
Open the Home page or the Patient Casebooks page.
-
Select one or more patients. RDC Onsite submits a separate report job and generates a separate report for each patient that you select.
-
Click the Action menu and then select Generate Patient Data Report from the list to submit your request to generate the report. RDC Onsite confirms that the report job was submitted. You can click the Reports tab to view the status of your request.
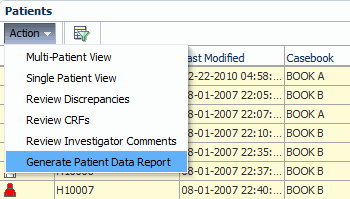
Description of the illustration ''reports_pdr_hme_pg.gif''
After RDC Onsite successfully generates the report, you can click the link in the View Report column on the Reports page to open and print your report.
Generating a Patient Data Report from the Review CRFs Page
When you generate a Patient Data Report from the Review CRFs page, RDC Onsite:
-
Includes only the CRFs that you select in the report
-
Generates a single report; the report may be across patients
-
Places the CRFs in the same order as displayed on the Review CRFs page
-
Does not include audit history or discrepancy details
-
Uses the following format to add a prefix to the report job name: CRFS_
The key difference in generating a report from the Review CRFs page is that you must select each CRF to include in the report. The report orders your selected CRFs according to how they are ordered on the Review CRFs page. Although the CRFs do not follow the order of the casebook they were entered against, they do reflect the page numbers from the casebook.
To generate a Patient Data Report from the Review CRFs page:
-
Open the Review CRFs page.
-
Select one or more CRFs that you want to include in the report.
-
Click the Action menu and then select Generate Patient Data Report from the list to submit your request to generate the report. RDC Onsite confirms that the report job was submitted. You can click the Reports tab to view the status of your request.
-
After RDC Onsite successfully generates the report, you can click the link in the View Report column on the Reports page to open and print your report.
Generating a Report from the Data Entry Window
When you generate a Patient Data Report from the Data Entry window, RDC Onsite:
-
Includes only the current CRF
-
Uses the following format to add a prefix to the report job name: HTMLDE
You can generate a CRF History Report and a complete PDR for the current CRF, called CRF Report, by choosing the corresponding icons in the toolbar. See "Using the Toolbar Icons in the Data Entry Window" for details.
Any reports generated from the Data Entry window also appear in the Reports tab, so you can view the associated log file there.
Regenerating Forms Utility
Any DCI form you generate on an ad hoc basis will be enabled for CRF field hyperlinks. However, it is also important to regenerate pre-existing DCI form versions for any study where you expect PDRs to be generated for formal use. Otherwise, PDR results are mixed, as described below. By (re)generating DCI forms, you enable the PDR to create field-level hyperlinks as needed for any CRF using that form.
You do not have to regenerate DCI Form Versions for one DCI at a time. Instead, you can use Oracle Clinical's utility to regenerate all forms for a study, following the instructions below.
PDR Results When DCI Forms Do Not Have Field Hyperlinks Enabled
If you generate a PDR with a mix of forms with and without field hyperlinks enabled:
-
For CRFs against DCI forms without field hyperlinks enabled, superscripts in the CRF section will appear to be hyperlinked (with blue text), but, in fact, hyperlinks will not be enabled.
-
For CRFs whose DCI Forms have field hyperlinks enabled, one-way hyperlinks will be enabled from the CRF Page to footnotes in the ancillary page.
-
Superscripts in the footnotes sections are not enabled for ANY CRF page in the report–whether the DCI form is hyperlink-enabled or not.
If you generate a PDR where no forms have hyperlinks enabled, then no superscripts are enabled with hyperlinks, either in the CRF or ancillary page sections.
The PDR generates warning messages for each CRF that does not have a form with field hyperlinks enabled. The following message appears in both the PDR Log file and the Ancillary page for each affected CRF:
WARNING: Form Version <n> for DCI <dci_name> requires migration/regeneration to enable hyperlinks on superscripts in the CRF. (Note: if the DCI form version for any CRF in the report requires regeneration, return hyperlinks in the Footnotes section are disabled for all CRFs.)
Instructions for Regenerating DCI Forms to Enable Field Hyperlinks
Refer to Appendix B in the Oracle Clinical Remote Data Capture Administrator's Guide for instructions to regenerate PDR and Data Entry templates for all form versions in a study.
Note:
When you use the form generation utility to regenerate form versions, the form is updated in place. No new form version number is created. Therefore, there is no need to migrate existing patient data to a new form version.When you generate a new form version using Oracle Clinical's Maintain DCIs form, the DCI form version is updated and you need to migrate existing CRFs to use the new form. (Use the Oracle Clinical menu option, Migrate Form Version by Book.)
In most circumstances, you should execute the utility in FULL mode, but there may be circumstances where you should use INCREMENTAL mode, as described below.
Issue with Studies Having Many DCI Form Versions
When there are many, many DCI Form versions in a study, the utility may hang without completing all form regenerations. To provide a recovery mechanism:
-
Before executing the ocdcitemplate utility in FULL mode, mark all existing form versions by setting NUM_PAGES = NULL:
-
Connect to SQL*Plus as
rxcuser:sqlplus rxc/password -
Execute the following update statement, responding to the prompt with the study for which you are about to regenerate form versions:
update dci_form_versions
  set NUM_PAGES = NULL
  where clinical_study_id in (select clinical_study_id
      from clinical_studies
      where upper(study) like upper ('&&StudyName%'));
  commit;
-
-
Using the ocdcitemplate utility, regenerate all forms in FULL mode for your study. The utility will populate the NUM_PAGES field for each regenerated DCI Form version.
-
If you suspect the process may be hung, check the log file, l<job_id>.log; for example l19736.log. If there is an error message of the form, ORA-29516 Aurora assertion failure, contact Oracle Support. Otherwise, proceed with the next step.If processing has hung with no error message in the log file, run the utility in INCREMENTAL mode. In incremental mode, forms are regenerated only for those DCI Form versions with NUM_PAGES still null. To run in INCREMENTAL mode:
-
In Oracle Clinical, navigate to Admin, Reference Codelists, Local Codelists, and find the OCL_STATE codelist.
-
Find the Short Value UPD_FV_INCREM and set its Long Value to
N. -
Don't forget to reset the value when you complete the study.
-
Generating a Blank Casebook Report
A Blank Casebook Report lets you create hard copies of all the planned CRFs in the casebook you specify. You can generate a Blank Casebook Report from the Reports page.
When you generate a Blank Casebook Report, you have two options:
-
You can generate a generic blank casebook. The CRFs in the report include no CRF header information and no response data.
-
You can generate a patient-specific blank casebook.
In this case, the CRFs in the report include header information specific to the selected patient, but do not include response data. In addition, if the selected casebook is for a flexible study, the report includes all CRFs, whether they are expected for the patient or not.
With this option, you can print a casebook for a particular patient.
To generate a Blank Casebook Report:
-
Click the Reports tab to open the Reports page.
-
Click New Blank Casebook Report.
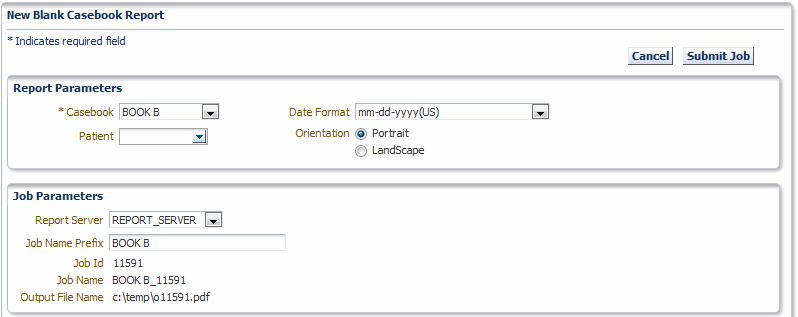
Description of the illustration ''reports_sum_bcr_p1.gif''
-
Click the Casebook field, and then select a casebook from the list. You must select a casebook. The Blank Casebook Report consists of all the planned CRFs for the selected casebook.
-
Specify whether you want to create a generic or a patient-specific Blank Casebook Report as follows:
-
To generate a generic blank casebook, do not specify a value in the Patient field. The CRFs in the report include no header data and no response data.
-
To generate a patient-specific blank casebook, click the Patient field and enter the ID of the patient. Alternatively, you can click the down arrow and select a patient ID from the list.
In this case, the CRFs in the report include header data specific to the selected patient, but do not include response data. In addition, if the selected casebook is for a flexible study, the report includes all CRFs, whether they are expected for the patient or not.
-
-
Select the Date Format to use. Your options are US, Standard, European, Swedish, and Same as in Log-In header.
-
Select the Orientation of the report. Your options are Portrait or Landscape. This value affects only the cover page of the report. The orientation of a CRF is always defined by its layout regardless of your selection.
-
Select the job parameters for the report.
-
Select the name of the Report Server.
-
Enter up to 8 characters for the Job Name Prefix. RDC Onsite automatically uses a unique number as the name of a report job, and then adds your specified prefix to the beginning of the job name. You can use the prefix value to easily search for your reports in the list on the Reports page.
RDC Onsite displays the Job Id, Job Name, and the Output File Name for your reference.
-
-
Click Submit Job. RDC Onsite prompts for confirmation before continuing.
-
Click Yes to generate the Blank Casebook Report.
Once you submit your request to generate the Blank Casebook Report, you can return to the Reports page to monitor the progress of your report job. You can also stop a job in progress or check error details if the report generation failed. See "Monitoring the Status and Progress of Your Report Jobs" for more information.
After RDC Onsite successfully generates the report, you can click the link in the View Report column on the Reports page to open and print your report. See "Printing a Report" for more information.
Generating a Standalone Deleted CRFs Report
The Deleted CRFs Report lists the details and audit history for those CRFs of the selected patients that were deleted, but not re-entered. If a CRF was deleted but later re-entered, it is excluded from this report, as opposed to the deleted CRFs information provided in the Patient Data Report, CRF History Report, or CRF Report.
The Deleted CRFs Report is patient-specific and can be invoked from the Home page or from the Single or Multi-Patient Casebooks page
To generate the Deleted CRFs Report:
-
On the Home page or the Multi-Patient Casebooks page, select one or more patients for which you want to review deleted but not re-entered CRFs. See Verifying Deleted but Not Re-entered CRFs for instructions on identifying patients with such CRFs.
-
From the Actions list, select Generate Deleted CRFs Report.
-
Go to the Reports page to open the report.
Searching for Report Jobs
You can search for a report job by name, search for report jobs currently in progress, search for report jobs already completed, or search for all report jobs. RDC Onsite displays the results of your search on the Reports page.
Note:
RDC Onsite searches for and displays only the report jobs that you have submitted. These jobs include jobs you submitted from Oracle Clinical. In addition, the Reports page only lists report jobs. It does not list print jobs, scheduled jobs, or jobs under preview.By default, RDC Onsite displays the most recent report job at the top of the list. You can click a column heading to re-sort the list based on the text in the column. You can click the column heading again to toggle between an ascending and descending sort.
To search for one or more report jobs:
-
Click the Reports tab to open the Reports page.
-
Search for the report job you want to view.
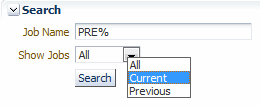
Description of the illustration ''reports_page_srch2.gif''
Using the options in the Search pane, you can:
-
Click Job Name and then type the name of the report job. You can use the percent sign (%) as a wildcard character in the search.
-
Click Show Jobs and then select one of the following options from the list:
-
Click All to search for both current and previous jobs.
-
Click Current to search only for the jobs currently being run.
-
Click Previous to search only for the jobs that already finished running.
-
-
Specify no additional search information. In this case, RDC Onsite searches for all the report jobs that you have submitted (the default).
-
-
Click Search to execute the search. RDC Onsite refreshes the Reports Jobs list 5.0: and displays the results of your search.
For each report job, RDC Onsite displays valuable information about each job including its name, start time, end time, and status.

Description of the illustration ''reports_monitor01.gif''
You can use this information to monitor jobs currently in progress. See "Monitoring the Status and Progress of Your Report Jobs" for more information.
Your other options include:
-
To view details about the job, click its link in the Job Name column. See "Viewing the Details of a Report Job" for more information.
-
To stop a job currently in progress, click the Stop icon in the Stop Report column. The icon appears only if the job is still running. See "Stopping a Report Job in Progress" for more information.
-
To open and view the report, click its link in the View Report column. The link is active only if RDC Onsite successfully generated the report. Once you open the report, you have options to print the report and save the report to your computer. See "Printing a Report" for more information.
-
Monitoring the Status and Progress of Your Report Jobs
Certain reports may require extended time to run. You can continue to work in RDC Onsite while the report runs in the background.
In addition, you can monitor the progress of report jobs, stop a report job currently in progress, or display details about the report job.
To monitor the status and progress of report jobs:
-
Click the Reports tab to open the Reports page. RDC Onsite lists all the report jobs that you have submitted starting with the most recent jobs.
-
Search the list to find the report jobs you want to monitor. For each report job, RDC Onsite displays the following information:
-
Job Name — Displays the name of the report job. You can click the link to view additional details for the job.
-
Start Time — Displays the date and time that RDC Onsite started to generate the report. No time is listed if you stopped the generation of the report.
-
End Time — Displays the date and time that RDC Onsite finished generating the report. No time is listed if RDC Onsite failed to generate the report or you stopped the generation of the report.
-
Status — Displays the progress of the report generation:
-
RS_FAILURE: The report server failed to generate the report.
-
RS_SUBMITFAILED: The submit request to the report server failed.
-
SCHEDULED: Your request to generate the report has been scheduled for a specific day, date, and time.
-
STARTED: The report server has started to generate the report.
-
STOPPED: You stopped the generation of the report.
-
SUBMIT_TO_RS: Your request to generate a report was submitted to the report server.
-
SUCCESS: The report was successfully generated.
-
-
View Report — Displays the path name of the report file. You can click the link to open, view, and print the report. The link is active only if the report generated successfully.
-
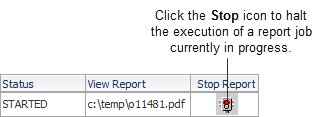
Stop Report — Displays a Stop icon that you can click to halt the execution of a report job currently in progress. The Stop icon does not display if the job is complete.
-
Stopping a Report Job in Progress
You can stop the execution of a report job currently in progress. You cannot stop a job after it is complete.
Description of the illustration ''reports_page_stop_a.gif''
To stop a report job currently in progress:
-
Click the Reports tab to open the Reports page.
-
Search for all report jobs that are currently running.
-
Click Show Jobs and then select Current.
-
Click Search.
-
-
Click the Stop icon in the Stop Report column for the job you want to stop. The Stop Job confirmation dialog box opens.
-
Click Yes to stop the job. RDC Onsite confirms the action in the confirmation dialog box.
Alternatively, you can click a Job Name link to open another page and view details about the selected report job. If the report job is currently in progress, the page includes a Stop button so you can cancel the generation of the report.
Viewing the Details of a Report Job
There may be times when you need additional information on the status or progress of a report job. You may need to troubleshoot why RDC Onsite did not generate the report or why the process failed.
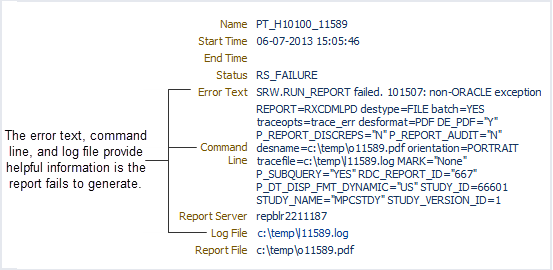
The Reports: Job Details page, as shown in Figure 12-5, provides a summary of the job executed. By viewing the details for a report job, you can:
-
View the command line that RDC Onsite sent to the report server.
-
Click a link to open the log file for the report job. Note that RDC Onsite:
-
Creates the log file and provides an active link to the file only after the status of the job has changed to STARTED.
-
Does not create the log file if the job is still being submitted to the report server (Status = SUBMIT_TO_RS) or if the submit request to the report server failed (Status = RS_SUBMITFAILED).
-
To view additional details about a report job:
-
Click the Reports tab to open the Reports page.
-
Click a link in the Job Name column. As shown in Figure 12-5, the Reports: Job Details page displays the following information for the selected job:
-
The job name, and the starting time, ending time, and status of the report generation. The Reports page displays the same information.
-
The error text, the command line executed, and the path name of the log file. You can click the active link to open the log file for the job. This information is helpful when troubleshooting why a report failed to generate.
Note that RDC Onsite provides an active link to the log file only after the status of the job has changed to STARTED. In addition, RDC Onsite does not create the log file if the job is still being submitted to the report server (Status = SUBMIT_TO_RS) or if the submit request to the report server failed (Status = RS_SUBMITFAILED).
-
The name of the report server.
-
The path name of the report file. You can click the link to open, view, and print the report. The link is active only if the report generated successfully.
-
A Stop button, if the job is currently running. You can click the button to halt the execution of a report job currently in progress. The Stop icon does not display if the job is complete.
-
Printing a Report
The Patient Data Reports and the Blank Casebook Reports are PDF files. You can view a report using any application that opens PDF files, such as Adobe Reader. In addition, you can print the report or save a copy of the report to your PC.
To print a report:
-
Click the Reports tab to open the Reports page.
-
Search for the report you want print.
-
Click the link in the View Report column to open and print the report.