3 Data Lineage Extensibility
This chapter explains how to set up the Data Lineage Dashboard to work with customized reports or BI metadata RPD files:
Refresh the RPD Lineage Metadata
If the OHF SSA RPD files has been extended, follow the instructions below to refresh the RPD lineage metadata:
-
Open the extended RPD file in the Oracle BI Administration Tool.
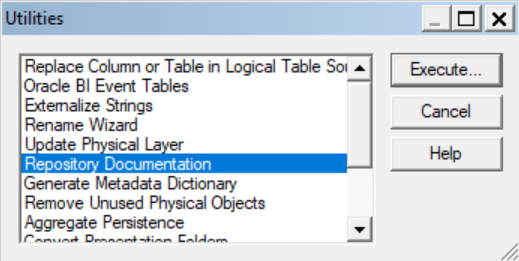
-
Go to Tools and select Utilities.
-
Select Repository Documentation and click Execute.
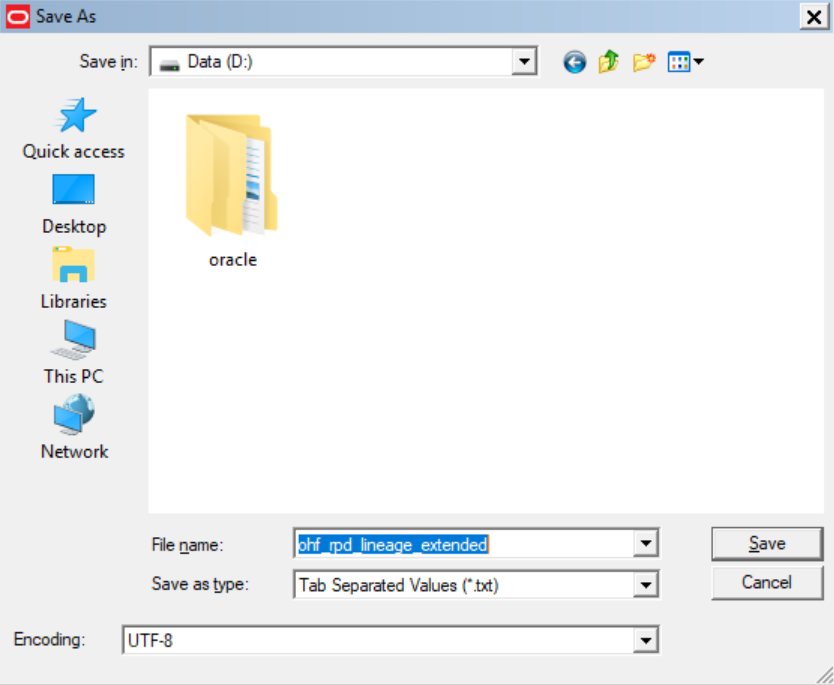
-
Navigate to a directory where you want to save the repository metadata.
-
In the Save as type: selection box, choose Tab Separated Values (*.txt).
-
Enter a name for the file and click Save.
-
After the export completes, change the file's extension from .txt to .tsv.
-
Open SQL Developer.
-
Connect to the OHF Exterprise Schema where the OHF_RPD_LINEAGE table is installed.
-
Expand the Tables Section.
-
Right click on the OHF_RPD_LINEAGE table and select Import Data.
-
In the file browser, navigate to the location where you exported the RPD metadata file.
-
Choose the *.tsv file type and select the exported RPD metadata file.
-
Click Open.
-
When prompted to Import Data Record Terminator, click OK.
-
When prompted to Import Data Field Format, click OK.
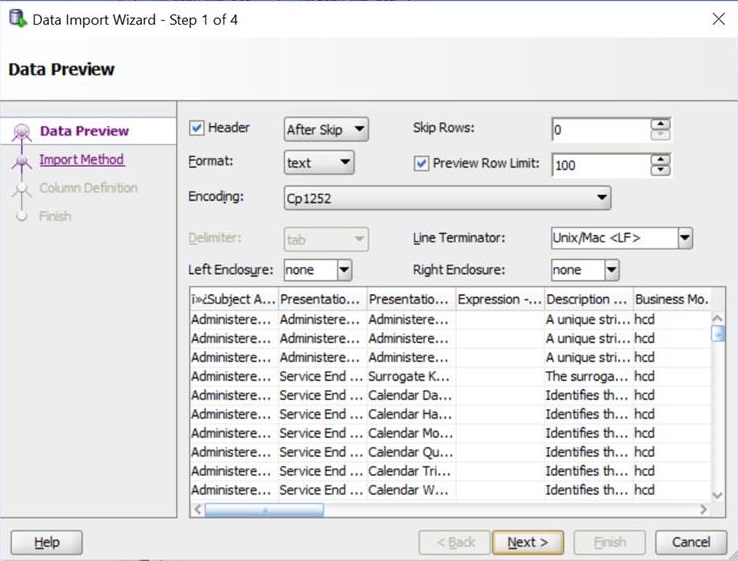
-
In the Data Preview screen of the Data Import Wizard, set the Left Enclosure to none.
-
In the Import Data Field Format screen, click OK.
-
Click Next.
-
In the Import Method screen, click Next.
-
In the Selected Columns panel, make sure all columns are listed and click Next.
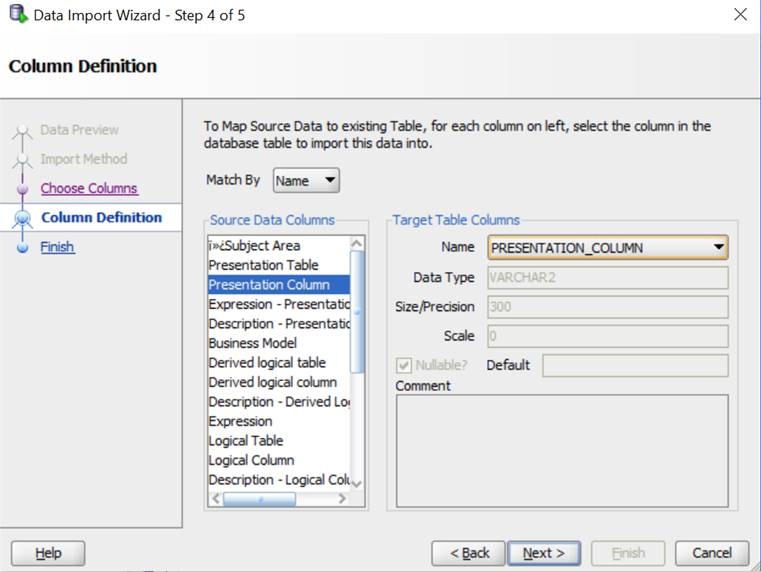
-
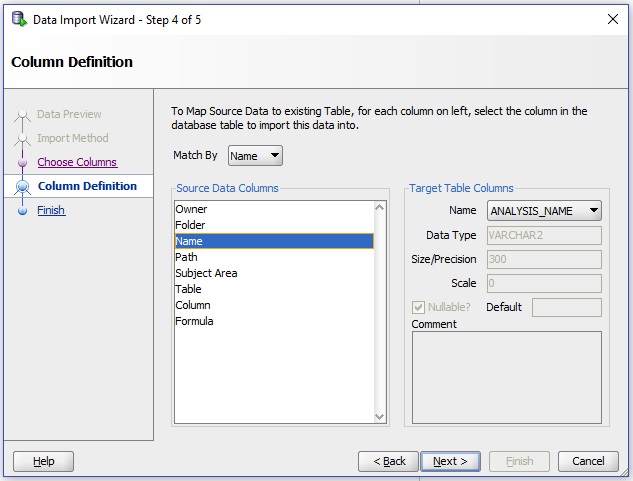
In the Column Definition screen, map all the source data columns to the target table columns. The source and target columns have similar names and can be matched either by name or by order.
-
After you map all the columns, click Next.
-
Clisk Finish.
-
A data import progress screen is displayed.
-
After the import is complete, a success message is displayed. Click OK.
-
Query the
OHF_RPD_LINEAGEtable to retrieve the record count and compare it with the row count in the RPD Metadata file:Select count(*) from OHF_RPD_LINEAGE;
Refresh the Catalog Lineage Metadata
If the OHF SSA Dashboards have been extended, follow the instructions below to refresh the RPD lineage metadata:
-
Open the Command Prompt.
-
Navigate to the to
bi\bitools\binsubdirectory in the Oracle BI Client Tool installation directory. For example:cd C:\Install\middleware\BI_Home\bi\bitools\bin -
Create a .txt file with the WebLogic credentials in the following format:
login=<username>

pwd=<password> -
Execute the following command:
runcat.cmd -cmd report -online <BI Analytics URL where the dashboard catalog contents reside> -credentials <Path to the credentials file containing the weblogic user name and password> -outputFile <Path to the output file with extension .csv where the catalog metadata contents have to be stored> -folder <Location of the OBI Catalog Folder> -delimiter "|~" -type "Analysis" -fields "Owner:Folder:Name:Path:Subject Area:Table:Column:Formula"For example:
runcat.cmd -cmd report -online http://obixxx.mycompany.com:9504/analytics/saw.dll? -credentials D:/login.txt -outputFile D:/ohf_hcd_catalog.csv -folder "/shared/Oracle Healthcare Foundation" -delimiter "|~" -type "Analysis" -fields "Owner:Folder:Name:Path:Subject Area:Table:Column:Formula" -
After completion, a success message is displayed:
Making SOAP connection to http://obixxx.mycompany.com:9504/analytics/saw.dll?

Running Report..4..3..2..1..0..Done! -
Open SQL Developer.
-
Connect to the OHF Enterprise Schema where the
OHF_CATALOG_LINEAGEtable is installed. -
Expand the Tables section.
-
Right click on the
OHF_CATALOG_LINEAGEtable and select Import Data. -
In the File browser, navigate to the location where the Catalog Metadata File is saved.
-
Choose the .csv file type and select the Catalog Metadata file.
-
Click Open.
-
When prompted to Import Data Record Terminator, click OK.
-
When prompted to Import Data Field Format, click OK.
-
In the Data Import Wizard, select the delimited format.
-
Set the Delimiter to |~.
-
Set the Left Enclosure to none.
-
When prompted to Import Data Field Format, click OK.
-
Click Next.
-
In the Import Method screen, click Next.
-
In the Selected Columns pane, make sure all columns are listed and click Next.
-
In the Column Definition screen, map all the source data columns to the target table columns. The source and target columns have similar names and can be matched either by name or by order.
-
After you map all the columns, click Next.
-
Click Finish.
-
A data import progress screen is displayed.
-
After the import is complete, a success message is displayed. Click OK.
-
Query the
OHF_CATALOG_LINEAGEtable to retrieve the record count and compare it with the row count in the Catalog Metadata file:Select count(*) from OHF_CATALOG_LINEAGE;

Refresh the OBIEE Dashboards
To view the updated data lineage information in the Data Lineage Dashboard, purge the OBIEE cache by following the instructions below:
-
Log in to the Oracle BI Analytics page. For example:
http://obixxx.mycompany.com:9704/analytics -
Go to Administration.
-
In the Session Management section, select Manage Sessions.
-
Click Close All Cursors.
-
Go to Administration.
-
In the Maintenance and Troubleshooting section, select Issue SQL.
-
In the Issue SQL screen, type the following command in the text box:
Call sapurgeallcache() -
Click Issue SQL.
-
After purging the cache, the following success message is displayed.
[59118] Operation SAPurgeAllCache succeeded!
Now, the custom reports will be visible in the Data Lineage Dashboard.