When you are investigating the inferences that are made by setting particular attribute values, you need to set values for the base level attributes directly.
To set the value of a base level attribute directly:
Select the attribute in the Data view. It is handy to filter the attributes list by Base Level attributes to ensure you are selecting a base level attribute.
Right-click and select from any of the following Set options from the menu: Set Value - this opens the Set Attribute Value dialog box where you can enter a value or set the value to 'uncertain' or 'unknown'. When setting variable values directly in the Data view, values must be entered in the correct format: see Formatting of variable values. You can also specify change points for the attribute. Set to True - this option is only available for boolean attributes Set to False - this option is only available for boolean attributes Set to <value> - this option is only available for non-boolean text attributes. The values that appear here will be the values used in the rules or on screens. Set to Unknown - this option is used to clear the value of the attribute Set to Uncertain Alternatively, you can double-click the selected attribute to open the Set Attribute Value dialog box and then select or set the appropriate value, ensuring that it is entered in the correct format.
The Data view will be updated to show the new attribute value you have set, and any attribute values inferred as a result. TIP: You can sort the attributes in each grouping in the Data view by clicking on any of the column headings (Name, Value or Text).
Set up entities and containment relationships
If you have entities in your rulebase, you will need to create entity and relationship instances in order to investigate any rules which use those entities/relationships. For example, if you have a rulebase containing the entity "the child" and you are assessing a family with 3 children then you will need to create 3 instances of "the child" in the debugger. It is easiest to set these up before you start to investigate goals or to observe the effects of setting values for attributes.
Add entity instances
Entity instances are added via their containment relationships. To create an entity instance for an entity in the Data view:
Select the containment relationship for the entity in the left hand pane. TIP: Containment relationships are indicated by a green multi-cube icon.
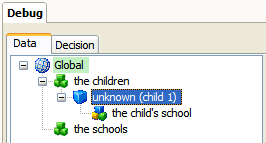
Right-click and select Add Instance: An entity instance (eg child 1) will appear below the containment relationship. The containing relationship for that entity has now also been set. Any containment or reference relationships that are associated with that entity are also shown under the entity instance (eg the child's school).
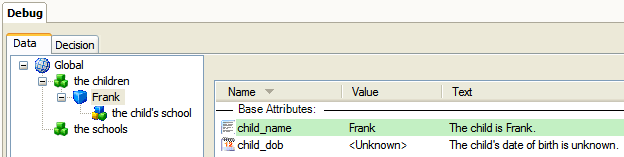
TIP: At this point it can be useful to provide a value for the identifying attribute for each of the entity instances. This will make it easier to distinguish between the entity instances when debugging. In the example above, the child's name attribute is the identifying attribute for the child entity. Following the steps above for setting the value for a base level attribute, you would set the value of the child's name attribute for each of the entity instances you have added. This value (eg Frank) then replaces the generic entity label (eg child 1) in the Data view:
You can also add a new entity instance by selecting the containment relationship and using the Add Instance button in the relationship editor:
For entities contained within other entities, instances are created in the same way as above, using the containment relationships within the existing instances.
Delete entity instances
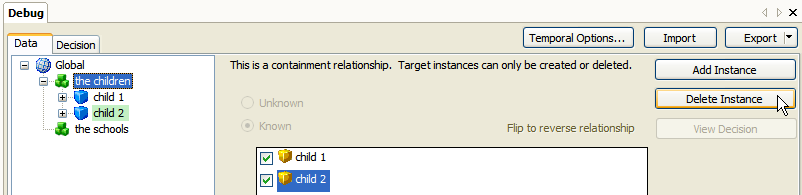
To delete an entity instance:
Select the entity instance in the Data view.
Right-click and select Delete Instance:
The selected entity instance will be removed from the list of entity instances for that entity.
TIP: You can also delete an entity instance by selecting the containment relationship in the Data view, and then selecting the entity instance to be deleted in the relationship editor and using the Delete Instance button:
Set reference relationships
Once entity instances have been created within their containment relationships, you may set up any reference relationships between the entity instances.
Set reference relationships between entity instances
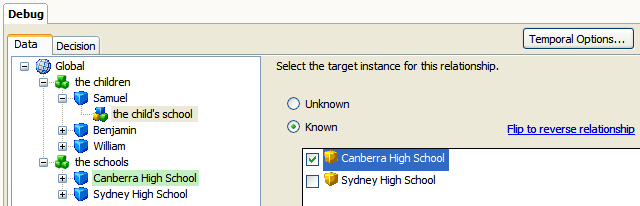
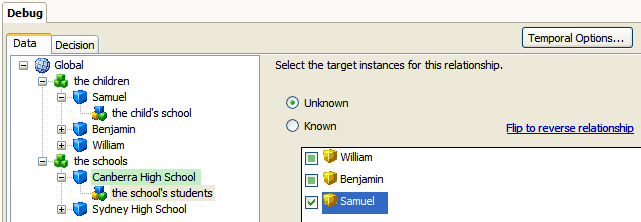
Reference relationships are shown underneath the entity instance in the Data view, and can be set once the relevant entity instances have been created via their containment relationships. For example, having created three children Samuel, Benjamin and William, and an instance of "the school" entity, Canberra High School, you might set that one of the children attends the school. To do this:
Select the relationship in the left hand pane of the Data view (in this case, "the child’s school" under the child Samuel).
The relationship is currently unknown.
In the relationship editor, check the check box for the existing entity instance Canberra High School, to set the child's school for Samuel.
The relationship now becomes known.
NOTE: When you set targets for static relationships, the relationship will become known - it is not possible to leave the relationship as unknown.
Remove the association between a target instance and the relationship
To remove the association between a target entity instance and the relationship:
Select the relationship in the left hand pane of the Data view.
In the relationship editor in the right hand pane, deselect the check box for any entity instances that you no longer want associated with that relationship.
Navigate reverse relationships
Using the relationship editor in the right hand pane of the Data view, you can switch from viewing a relationship (from the direction of the source entity) to viewing the reverse relationship (from the direction of the target entity). Note here that the 'source' and 'target' entities of a relationship are relative, and the entities referred to by these terms depend on which relationship direction is being considered.
For example, you may have a many-to-one relationship between child and school entities called 'the child's school', with a reverse relationship 'the school's students'. If you have already set the school for one child, you could easily navigate between these entity instances to view and set the reverse relationship, for other children who attend the school. To do this:
Click on the child's school relationship to display it in the relationship editor, then click on the Flip to reverse relationship link to edit the reverse relationship.
The Data view now shows the reverse relationship 'the school's students', for the relevant instance of the school (Canberra High School). Additional child instances can now be set as targets for this relationship as appropriate.