A test script is a file which contains test cases and the set of outcome attributes (both global and entity attributes, including defined tolerances) that will be used by the test cases. Oracle Policy Modeling has an integrated regression tester which can be used to create test scripts so as to compare outcomes from a rulebase with another set of outcomes.
Test scripts use the runtime model of the rulebase so if you make any changes to your rulebase while regression testing you will need to close and re-open your test script for those changes to be reflected in your test script file.
In Oracle Policy Modeling, select the Test Scripts folder in the Project Explorer.
Right-click and select Add New Test Script File from the pop-up menu. A new test script file will be added to your project. The new file will be selected and highlighted in the list.
Type a name for your test script file, for example, "Test Scripts".
Save your project by selecting File | Save All.
TIP: Multiple test scripts can exist in a project. Using a single test script on a large project may present problems if the project is under source control since, generally speaking, only one person can edit a file at a time. To ameliorate this problem multiple test scripts can be defined so that each can be edited separately. Multiple test scripts may also be defined to enable different reports to be created for a given set of test cases and/or to enable the use of different outcome sets for a test script.
Create new test cases
A test case is a combination of an input data set and expected results.
The input data is the set of data from which the actual results (outcome values) of the test case are generated.
The expected results is the data set which is matched against the actual results.
Test cases can be created, edited and deleted in Oracle Policy Modeling.
To add a new test case to your test script:
In Oracle Policy Modeling, open your test script file by double-clicking it in the Project Explorer.
Select the test script file in the Test Cases tab, right-click and select New Test Case from the pop-up menu. A new test case will be added to your test script. The new test case will be selected and highlighted in the list.
Type a name for your test case (see Tips below), then press Enter.
Tips for naming test cases
Each project should have a unique naming convention to be used when creating test cases. Some guidelines for establishing a naming convention are given below. The names used for test cases should contain:
A prefix indicating the origin of the test case, and
A unique identifier for the test case.
Suggested prefixes are given in the table below:
Prefix
Purpose
unit_
Unit test cases to be used by developers.
formal_
Test cases that are derived from the formal test case script set up for the project.
client_
Test cases or use cases specifically requested by the client.
Other project specific prefixes may be used if required.
The unique identifier for each file will be dependent on the origin of the test case. The suggested approach to creating the unique identifier is:
Origin
Unique identifier
Unit
The unique identifier is to include:
The creating developer’s initials
An abbreviation to identify the section of the rulebase being tested
A sequential number.
For example, the tenth unit test case created by John Smith for Retirement Pensions Category C would be called unit_JSRPC10.xml.
This format allows developers to readily identify their own test cases.
Formal Test Script
The formal test script is to be maintained by the testing team.
Use the unique identifier assigned to the test case in the formal test script.
If a test case that is identified as necessary for regression testing has not been previous recorded in the test script, it should be recorded there and assigned an identifier before being added to the regression testing script.
This will help to maintain a database of test case IDs and descriptions.
The unique identifier obtained from the formal test script will reflect the benefit type/general area of the rulebase that it being tested. For example, RPA01 is the first test case for Retirements Pension Category A.
Client
As for unit testing. These cases should have their own identifier, like the unit test cases. Instead of initials, use a unique identifier for the client eg client_DWPRPC02.xml.
Business Development/Partners
As for Client.
TIP: When you open your test case, you can add a description of the test case in the Notes field.
To create a copy of an existing test case in your test script:
In Oracle Policy Modeling, open your test script file by double-clicking it in the Project Explorer.
Select the test case you wish to copy in the Test Cases tab, right-click and select Copy from the pop-up menu. The test case will be copied to a new test case called "Copy (1) of <original test case name>".
Rename the new test case as required.
Create input data
Once you have created your new test case, you need to set up the input data for your test case. The input data is the set of data from which the actual results (outcome values) of the test case are generated. The input data contains attribute instances and entity instances, along with the values that should be assigned to them.
The test case editor is used to investigate goals, infer relationships and set values for base level attributes in Oracle Policy Modeling. The test case editor can be accessed by double-clicking a test case on the Test Cases tab in the test script. (The test case editor is very similar to the debugger with a Data view and a Decision view.)
Investigate a goal
To investigate a goal in the test case editor:
In the Data view select the goal you want to investigate.
Right-click and select Investigate. This will open the Decision view with the attribute you have selected in the Attribute field. All of the relevant paths to the goal are shown in the text box below. Entities for which no instances have been created yet will be shown just by the relationship icon and the entity text.
Work your way through the list of questions, setting answers (see below). In order to investigate any attributes which belong to an entity, you will need to add instances of that entity. (See Set up entities and containment relationships for more information.) Add your entity instances and continue investigating attributes until a value for the goal is known.
Investigate an inferred relationship
After you have added any entity instances in the test case editor, you can investigate an inferred relationship. To do this:
In the Data view select the inferred relationship that you want to investigate.
In the right hand pane, click the Investigate button. This will switch to the Decision view.
Set the values for any base level attributes (see below). The Decision view will be updated as you go to show which entity instances have been inferred for this relationship, and the attributes contributing to this conclusion.
In the case of existing entity instances that have been inferred as members of a relationship (ie using IsMemberOf rules), these will be shown as selected items in the right hand pane of the Data view. (These entity instances will not be shown under the inferred relationship in the left hand pane as they have not inferred a containment relationship).
In the case of entity instances that have been created as members of a relationship (ie using InferInstance rules), these are also shown in the left hand pane of the Data view under the containment relationship that they have inferred.
Set the value for an attribute
To set the value of an attribute in the test case editor:
Select the attribute in the Data view or in the Decision view.
Right-click and select from any of the following Set options from the menu: Set Value - this opens the Set Attribute Value dialog box where you can enter a value or set the value to 'uncertain' or 'unknown'. Variable values must be entered in the correct format: See Formatting of variable values. You can also specify change points for the attribute. Set to True - this option is only available for boolean attributes Set to False - this option is only available for boolean attributes Set to <value> - this option is only available for non-boolean text attributes. The values that appear here will be the values used in the rules or on screens. Set to Unknown - this option is used to clear the value of the attribute Set to Uncertain
Alternatively, you can double-click the selected attribute to open the Set Attribute Value dialog box and then select the appropriate value, ensuring that it is entered in the correct format.
After setting a value, the list of attribute values in the Data and Decision views will be updated with the value you specified, as well as the values for any other attributes which have been inferred as a result.
Create input data in an interview
Input data can also be created by setting values for attributes in the debugger or Web Determinations and then saving/exporting this data as an XDS file which can then be imported into a test case in Oracle Policy Modeling.
Once you have created the input data for your test case, you need to specify the expected results for the test case. The expected results is the data set which is matched against the actual results when the input data is loaded into the rulebase. The expected results contains instances of the attributes and entities found in the outcome set. When attributes are added to or deleted from the outcome set, all the expected results of the test cases in that test script will be updated accordingly.
To specify the expected result for an attribute:
In the Data view for the test case, select the inferred attribute that you want to add an expected result for. NOTE: The attribute must already be in the outcome set. If it is not, add it to the outcome set (see below). Attributes of inferred entity instances can be selected.
Right-click and select from the following options:
Option
Behavior
Set Expected Value...
Opens the Edit Expected Result dialog box where you can specify a particular value for the expected result, an expected result of uncertain, or an expected result of unknown. You can also specify change points for the expected result.
Set Expected Value to Default (<default expected result value>)
Defaults the expected result to the value specified as the default value in the Edit Outcome dialog box.
Set Expected Value to Current Value
Sets the expected value to the current value of the attribute instance. The current value of the attribute instance is shown in angle brackets in the Value column in the Inferred Attributes list.
Set Expected Value to true
Sets the expected value to 'true'. (This option is only available for boolean attributes.)
Set Expected Value to false
Sets the expected value to 'false'. (This option is only available for boolean attributes.)
Set Expected Value to Unknown
Sets the expected value to 'unknown'.
Set Expected Value to Uncertain
Sets the expected value to 'uncertain'.
The expected value is shown in square brackets after the current value of the attribute in the Value column in the Inferred Attributes list.
To do a bulk import of expected results:
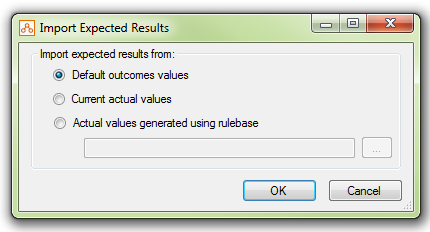
Right-click the test case on the Test Cases tab in your test script file and select Import Expected Results...
In the Import Expected Results dialog, select where you want to import the expected results from. The options are:
Default outcomes values
Current actual values
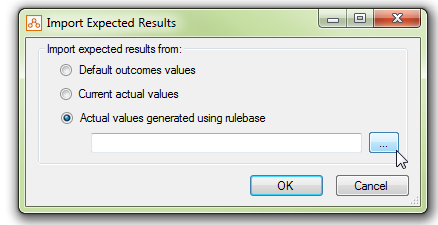
Actual values generated using rulebase
(Optional) If you select Actual values generated using rulebase, you need to specify the location of the rulebase you want to import expected results from ('your target rulebase'). Tip: the expected file format for your target rulebase is a .zip file. You will find this file in the output folder of your target rulebase project. Alternatively, if you have saved a copy of the file to another location, you can specify that location.
To specify the location of your target rulebase, in the Import Expected Results dialog, either:
type the path to the target rulebase .zip file into the text entry field, or
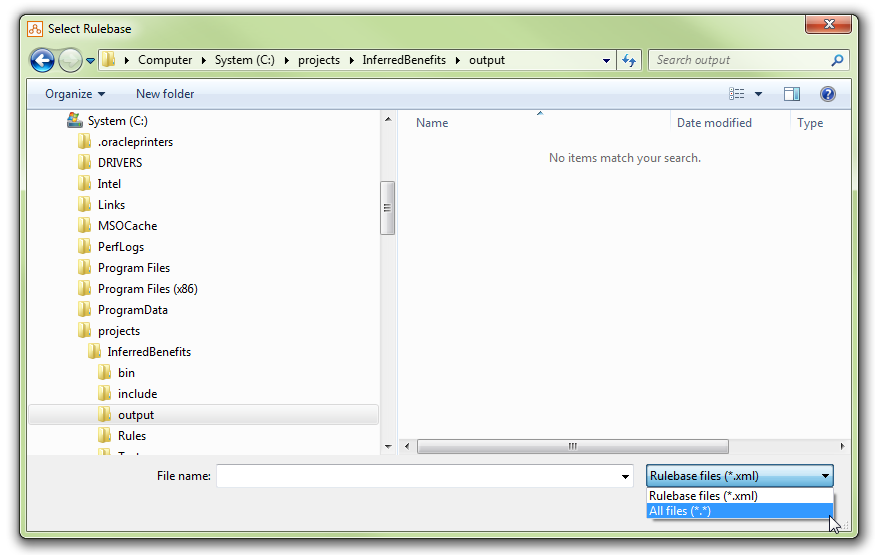
browse to the target rulebase .zip file using the ... button adjacent to the text entry field.
This will open the Select Rulebase dialog. Note: by default, the Select Rulebase dialog searches for an .xml file rather than a .zip file. This means that the dialog will not actually display any .zip rulebase files, even if they are present in the relevant folder. To fix this problem, click the drop-down menu adjacent to the File name: text entry field and select All files (*.*).
Locate and select your target rulebase .zip file and click Open. This will return you to the Import Expected Results dialog, with the file path to your target rulebase displayed in the text entry field.
In the Import Expected Results dialog, click OK.
Create an outcome set
A test script will have an outcome set for its test cases and this should contain all the inferred attributes that will be used for the comparisons to determine if the rulebase produces the correct results.
The following types of attributes would be appropriate outcome attributes:
Inferred attributes that are displayed on the summary screen (eg goal attributes).
Inferred attributes that are included in any generated documents.
Any interim determinations or inferred attributes that may be useful for tracking the cause of failures.
TIP: Too many outcome attributes increases initial start-up time and maintenance overheads, and can make the reports less manageable. The maximum number of outcome attributes should therefore be limited to 10-12 if possible. For unit testing, the choice of outcome attributes may be slightly different as the very nature of unit testing means that intermediate attributes are monitored, rather than the overall end result.
There are two ways to add outcomes to your test script:
From within the outcome set editor
From within the test case editor
Attributes from any entity can be added as outcomes.
Add outcomes in the outcome set editor
The outcome set editor can be accessed by clicking on the Outcomes tab in the test script file.
To add an outcome attribute in the outcome set editor:
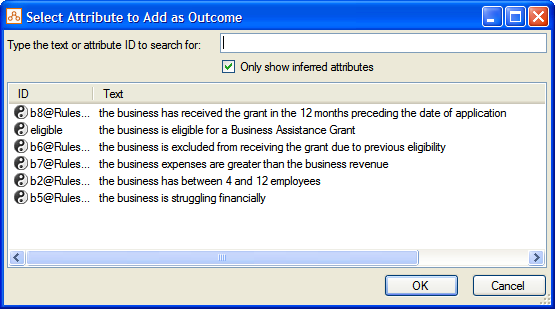
Right-click anywhere in the outcome set editor and select Add New Outcome.... The Select Attribute to Add as Outcome dialog will be displayed.
(By default, only inferred attributes will be shown. If you want to see all attributes, uncheck the Only show inferred attributes check box.)
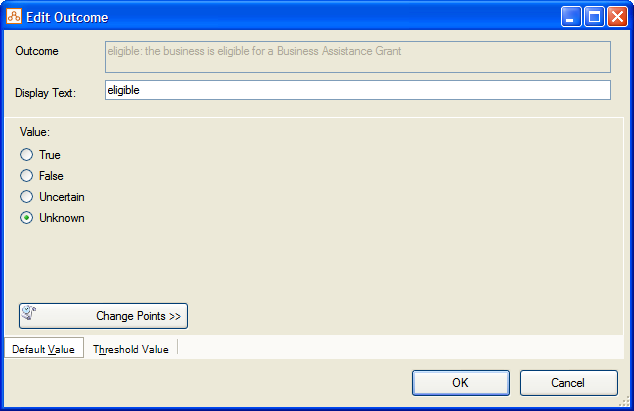
Select the attribute you want to add as an outcome, then click OK. The Edit Outcome dialog is displayed.
Change the Display Text for the attribute if you want to. This is the name that will appear in the attribute list in the outcome set editor, and in the regression tester report.
Change the Value from unknown if appropriate. This is the value that the attribute instance will be set to when the attribute is first created. By default this value is set to "unknown". You can also specify change points for the attribute.
Enter a Threshold Value if required (see below).
Click OK. The new outcome attribute will now appear in the list of attributes in the outcome set editor.
TIP: Outcomes can be reordered in the outcome set editor by right-clicking and selecting Move Up or Move Down.
Add outcomes in the test case editor
To add an attribute as an outcome from the test case editor:
Right-click on any inferred attribute in the right hand pane of the Data view. Select Add as outcome.... The Edit Outcome dialog will be displayed.
Follow steps 3 to 5 above.
Outcome attributes are shown underlined in the Inferred Attributes list in the test case editor.
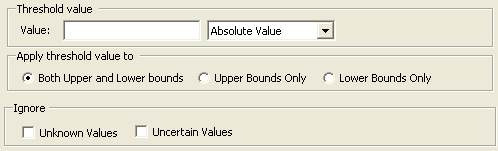
Specify threshold values
Threshold values tell the regression tester that a given test case should pass if an actual value falls within a specified range. To specify a threshold for an attribute, select the Threshold Value tab in the Edit Outcome dialog.
The following table explains how to set a threshold:
Setting
Applies to
Description
Value
Date, currency or number attributes
A date threshold is defined as a number of days, months or years.
A number threshold can be either an absolute value or a percentage.
Number and currency thresholds can either be integer or decimal values.
Apply threshold value to
Date, currency or number attributes
Specifies whether the threshold applies above and/or below the expected outcome, as follows:
Both upper and lower bounds – the threshold will be applied as Y – T ≤ X ≤ Y + T (default)
Upper bounds only – the threshold will be applied as Y – T ≤ X < Y
Lower bounds only – the threshold will be applied as Y ≤ X ≤ Y + T
where X = Actual Result, Y = Expected Result and T= threshold value.
Ignore
Specifies whether unknown and or/uncertain values should be ignored, as follows:
Unknown values – this means that a test will pass if Expected Value = Actual Value (to within whatever threshold is specified) OR Actual Value = unknown.
Uncertain values – this means that a test will pass if Expected Value = Actual Value (to within whatever threshold is specified) OR Actual Value = uncertain.
Ignore results
You can flag an outcome so that any actual value for the outcome will be ignored when the test case is run. This will result in the expected outcome always passing. To do this, select the outcome attribute in the test case editor, right-click and select Ignore Result.
Delete invalid outcomes
To bulk delete attributes that are no longer used in your rulebase, right-click anywhere in the outcome set editor and select Delete Invalid Outcomes...
NOTE: If an entity no longer exists in the rulebase then all attributes belonging to that entity will be flagged as invalid.
Modify a test script
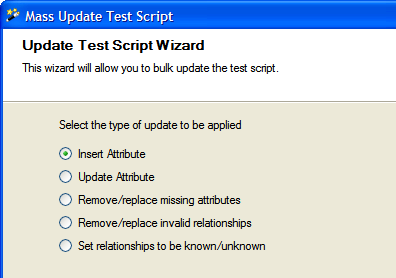
Test cases often need to be reviewed or modified to allow for changes in the rulebase. Changes can be made to individual test cases in the test case editor, or across multiple test scripts and test cases with the Update Test Script Wizard.
To make changes across multiple test scripts and test cases:
In Oracle Policy Modeling, right-click on a test script, or on a folder that contains test scripts, and select Update Test Script Wizard. The Mass Update Test Script dialog is shown.
Select from one of the following four options which are explained further below:
Insert Attribute
Update Attribute
Remove/replace missing attributes
Remove/replace invalid relationships
Set relationships to be known/unknown
Insert attribute
This option allows you to insert a value for an attribute which hasn't yet been added to your test cases. This is usually where a new attribute has been added to the rulebase since the last time the test cases were updated.
To insert an attribute:
Select the Insert Attribute option on the first screen of the wizard and click Next.
Select the test cases to which the attribute should be added. Use the browse button to select the attribute to be added, and enter the value which you wish to insert for the attribute, if any. Click Next.
Review your changes on the Summary of Changes screen. Click Back to amend your changes if necessary, then click Next to apply the changes.
After the wizard has applied the changes, select the Yes option to make another change, otherwise select the No option and click Finish.
Update attribute
This option allows you to update the value for an attribute which already exists in your test cases.
To update the value for attribute:
Select the Update Attribute option on the first screen of the wizard and click Next.
Select the test cases to which the attribute should be added. Use the browse button to select the attribute to be added, and enter the new value which you wish to set for the attribute. Click Next.
Review your changes on the Summary of Changes screen. Click Back to amend your changes if necessary, then click Next to apply the changes.
After the wizard has applied the changes, select the Yes option to make another change, otherwise select the No option and click Finish.
Remove/replace missing attributes
This option allows you to remove an attribute which still exists in your test cases, but has been removed from the rulebase. Alternatively, you can specify an attribute value which should replace it.
To remove or replace missing attributes:
Select the Remove/replace missing attributes option on the first screen of the wizard and click Next.
The wizard will detect whether any attributes exist in your test cases which are no longer present in the rulebase. Select the attribute you wish to change from the Attributes With Errors list. Leave the Remove Only checkbox selected if you just want to remove the attribute value from your test cases, or uncheck it and use the browse button to select an attribute to replace it with, and enter the value for the new attribute.
Review your changes on the Summary of Changes screen. Click Back to amend your changes if necessary, then click Next to apply the changes.
After the wizard has applied the changes, select the Yes option to make another change, otherwise select the No option and click Finish.
Remove/replace invalid relationships
This option allows you to remove or replace any relationships in your test cases which no longer exist in the rulebase.
To remove or replace invalid relationships:
Select the Remove/replace invalid relationships option on the first screen of the wizard and click Next.
The wizard will detect whether any relationships exist in your test cases which are no longer present in the rulebase. For each Invalid relationship it detects, you can either remove it from the test case by selecting the Delete checkbox, or you can select a Valid relationship from the drop down list to replace it with. Once you have done this for each invalid relationship, then click Next.
Review your changes on the Summary of Changes screen. Click Back to amend your changes if necessary, then click Next to apply the changes.
After the wizard has applied the changes, select the Yes option to make another change, otherwise select the No option and click Finish.
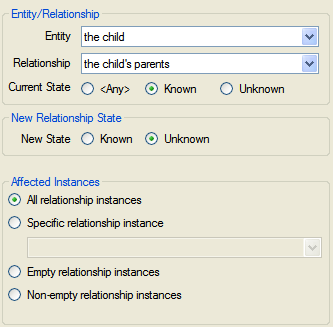
Set relationships to be known/unknown
This option allows you to set relationships to known or unknown.
To set the new state of a relationship:
Select the Set relationships to be known/unknown option on the first screen of the wizard and click Next.
In the left hand pane, select the test cases that the change is to apply to (or tick the Check all items checkbox of you want all test cases to be affected by the update).
In the right hand pane, select the Entity, Relationship and Current State. Then select the New Relationship State and the Affected Instances.
Click Next.
Review your changes on the Summary of Changes screen. Click Back to amend your changes if necessary, then click Next to apply the changes.
After the wizard has applied the changes, select the Yes option to make another change, otherwise select the No option and click Finish.
Validate a test script
You have the option to validate a test script when it is opened and show a warning message if:
A test case has no defined outcomes - this will show a warning for each test case that contains no outcomes. A test case with no outcomes is usually caused when the existing outcomes in a test case are removed from the test script. Consider either adding the relevant outcomes to the test script or moving the test case to a test script with the relevant outcomes defined.
A test case has no expected value for an outcome – this will show a warning if an outcome defined in the test script does not have an expected value defined in a test case. This warning is useful when a new outcome has been added to the test script to identify which test cases have not been updated. If you wish to define a lot of outcomes in your test script which are mutually exclusive then it may be convenient to turn off this warning.
To change or view these settings, go to File | Project Properties | Regression Tester Properties | General.
View the details of a test script
The Test Specification report allows you to view the details of all of your test cases at once. To view the Test Specification report for one or more test scripts:
In the Project Explorer, right-click on your test script or folder containing test scripts, and select View Test Script Specification.
In the View Test Script Specification dialog, select the test scripts that you want included in the report. If you want the selected test scripts included in the same report, select the Combine all test scripts into one report option.
Click View. The Test Specification/s will be displayed in the right hand pane. You can save a copy of the Test Specification by clicking the Save button.
Remove a test script
To remove a test script from a project:
In the Project Explorer in Oracle Policy Modeling, right-click the test script file that you want to remove and select Remove from Project.
NOTE: The file remains in your file system but has been removed from your Oracle Policy Modeling project. To permanently delete a file from both your file system and from your project, right-click it in Oracle Policy Modeling and select Delete.
Change the platform that the regression tester runs on
To change the runtime platform for the regression tester:
In Oracle Policy Modeling, go to File | Project Properties | Common Properties | Platform.
Select a different option from the Target Platform drop down list. (The options are .NET and Java, with .NET being the default platform.)
Click OK.
Note that this setting also determines which platform the test script coverage analyzer and the what-if analyzer run on.