ノート:
- このチュートリアルでは、Oracle Cloudへのアクセス権が必要です。無料アカウントにサインアップするには、Oracle Cloud Infrastructure Free Tierの開始を参照してください。
- Oracle Cloud Infrastructureの資格証明、テナンシおよびコンパートメントの値の例を使用します。演習を完了したら、これらの値をクラウド環境に固有の値に置き換えてください。
OCI GoldenGateを使用したオンプレミスMySQL DatabaseのOracle HeatWave MySQL管理対象インスタンスへの移行
イントロダクション
Oracle Cloud Infrastructure GoldenGate(OCI GoldenGate)はフルマネージド・サービスで、データ・エンジニアが1つ以上のデータ管理システムからOCIデータベースにデータをリアルタイムで大規模に移動するのに役立ちます。コンピュート環境の割当てや管理を行わずに、データ・レプリケーション・タスクを1つのインタフェースで設計、実行、調整およびモニターします。OCI GoldenGateでは、MySQLおよびOracle HeatWave MySQLデータベース・サービスなど、複数のソースおよびターゲットがサポートされています。
このチュートリアルでは、OCI GoldenGateを使用して、オンプレミスのMySQLデータベースをOracle HeatWave MySQL管理対象インスタンスに移行する方法について説明します。
目的
- OCI GoldenGateを使用して、OCI上のOracle HeatWave MySQL管理対象インスタンスにオンプレミスMySQLデータベースを移行します。
前提条件
-
ソースのMySQLデータベースはオンプレミスで、ターゲットのOracle Heatwave MySQL管理対象インスタンスとOCI Bastionホストが配置されています。
-
これは単方向レプリケーションであるため、ターゲットはソースより高いバージョンにすることができます。双方向レプリケーションの場合は、ソースとターゲットが同じバージョンであることが推奨されます。
-
log_bin(binlog)をソースで有効にする必要があります。 -
ソース・インスタンスおよびターゲット・インスタンスの
binlog_expire_logs_secondインスタンス・パラメータは、少なくとも72時間に設定する必要があります。 -
データ定義言語(DDL)レプリケーションを許可するには、ソース・インスタンスおよびターゲット・インスタンスの
binlog_row_metadataインスタンス・パラメータをフルに設定する必要があります。ノート:このチュートリアルでは、
binlog_row_metadataパラメータがサポートされていないMySQLバージョン5.7.44がソースで実行されています。したがって、DDLレプリケーションはサポートされていません。 -
ターゲットOracle Heatwave MySQLインスタンスに高可用性(HA)がある場合、グローバル・トランザクション識別子(GTID)モードはソース上にある必要があります。それ以外の場合はオプションです。
-
サポートされているデータ型をレビューします。詳細は、MySQL: サポートされているデータ型、オブジェクトおよび操作を参照してください。
-
DDLレプリケーションの制限を確認します。詳細は、DDLレプリケーションの使用を参照してください。
-
次のいずれかの方法を使用して、ターゲット・インスタンスをソースから事前に作成する必要があります。
- 方法1:
util.dumpInstanceやutil.loadDumpなどのMySQLシェル・ユーティリティを使用します。 - 方法2:
util.copyInstanceなどのMySQLシェル・ユーティリティを使用します。 - 方法3:初期ExtractおよびReplicatにOCI GoldenGateを使用して初期データ・ロードを実行します。
ノート:このチュートリアルでは、初期ロードに
util.copyInstanceを使用します。 - 方法1:
-
OCIにMySQLクライアントおよびMySQLシェル・ユーティリティがインストールされているOCI要塞ホスト。
-
FastConnect/IPSec/VPN、イングレス・ルールおよび更新されたセキュリティ・リストにより、オンプレミス・ソース、ターゲットOracle Heatwave MySQL、要塞およびOCI GoldenGate間の通信が可能になります。
制限事項
-
列の問題を自動増分します。
-
表に1つの列があり、主キーまたは一意キーでない場合、その表のすべての列の組合せがソースとターゲットで同じであるため、マッピングは失敗します。
-
データ型、DDLおよびその他の機能制限。
-
アクティブ/アクティブ型のレプリケーションを使用する場合は、タイムゾーンを両方のシステムで同じにする必要があるため、そのタイムスタンプベースの競合解決および検出を動作できます。
タスク1: ソースおよびターゲットのMySQLインスタンスの作成
-
ソース:
-On-premise Hostname: MySQLCI57 OEL 7.9 MySQL version 5.7.44 Intel Hardware Standard.Flex3 with 4 CPUs and 32GB Dedicated VM -
ターゲット:
-OCI Oracle Heatwave MySQL Managed Instance Hostname: MySQLGG1 with HA and no heatwave (4CPU and 32GB) OEL 8 with latest build MySQL version: 8.4.4 Private subnet -
OCI要塞ホスト:
-OCI
Hostname: Bastion
OEL 8 with Intel hardware Standard.Flex3 with 4CPUs and 32GB
タスク2: 要塞、オンプレミスおよびOracle Heatwave MySQLインスタンス間の接続のテスト
-
MySQLクライアントおよびMySQLシェル・ユーティリティをOCI要塞ホストにインストールします。
-
OCI Bastionからソース・オンプレミスMySQLインスタンスへの接続をテストします。
[root@bastion ~]# mysql --host <sourceIP> -uadmin -p mysql: [Warning] Using a password on the command line interface can be insecure. Welcome to the MySQL monitor. Commands end with ; or \g. Your MySQL connection id is 15 Server version: 5.7.44 MySQL Community Server (GPL) Copyright (c) 2000, 2025, Oracle and/or its affiliates. Oracle is a registered trademark of Oracle Corporation and/or its affiliates. Other names may be trademarks of their respective owners. Type 'help;' or '\h' for help. Type '\c' to clear the current input statement. mysql> show databases; +--------------------+ | Database | +--------------------+ | information_schema | | mysql | | performance_schema | | sys | +--------------------+ 4 rows in set (0.00 sec) mysql> select @@version; +-----------+ | @@version | +-----------+ | 5.7.44 | +-----------+ 1 row in set (0.00 sec) -
ソースのオンプレミスMySQLからOracle Heatwave MySQL管理対象インスタンスへの接続をテストします。
[root@mysqlci57 ~]# mysql --host <targetIP> -u admin -p
mysql: [Warning] Using a password on the command line interface can be insecure.
Welcome to the MySQL monitor.  Commands end with ; or \g.
Your MySQL connection id is 108
Server version: 8.4.4-u5-cloud MySQL Enterprise - Cloud

Copyright (c) 2000, 2023, Oracle and/or its affiliates.

Oracle is a registered trademark of Oracle Corporation and/or its
affiliates. Other names may be trademarks of their respective
owners.

Type 'help;' or '\h' for help. Type '\c' to clear the current input statement.

mysql> select @@version;
+----------------+
| @@version      |
+----------------+
| 8.4.4-u5-cloud |
+----------------+
1 row in set (0.01 sec)
タスク3: OCI GoldenGateのユーザーの作成
-
ソース:
create user 'ggsuser_S'@'%' identified by "<password>"; grant all privileges on airportdb.* to 'ggsuser_S'@'%' with grant option; Grant select, process, replication slave, reload, replication client on *.* to 'ggsuser_S'@'%'; -
ターゲット:
create user 'ggsuser_T'@'%' identified by "<password>";
grant all privileges on airportdb.* to 'ggsuser_T'@'%' with grant option;
Grant select,  process, replication slave, replication client on *.* to 'ggsuser_T'@'%';

Create database ggadmin;  -- you create this db on target side to store the checkpoint table.
grant all privileges on ggadmin.* to 'ggsuser_T'@'%' with grant option;
タスク4: OCI GoldenGateのソース・データベースでの必須パラメータの設定
ターゲットがスタンドアロン(HAではない)の場合、ソースでGTIDをオンにする必要はありません。ただし、ターゲットがHAの場合は、ソースでGTIDを有効にすることを強くお薦めします。binlogモードをオンにする必要があります。
-
/etc/my.cnfファイルを編集して、次の行を追加します。server-id=1 log-bin=/var/log/mysql/mysql-bin.log max_binlog_size=100M binlog_format=ROW expire_logs_days=10 -- binlog_row_metadata=FULL <-- this is not supported in Version 5.7.44. So DDL replication will not be possible if source is on v5.7.44. gtid_mode=ON enforce_gtid_consistency=ON -
MySQLサーバーを再起動します。
Systemctl stop mysqld Systemctl start mysqld Systemctl status mysqld完全なリストまたはパラメータについては、トランザクション・ログの設定および要件を確認してください。詳細は、オプションB: OCI Computeでの独自の要塞の使用を参照してください。
-
次のコマンドを実行して、バイナリ・ログが現在有効になっていることを確認します。
mysql> show binary logs; +------------------+-----------+ | Log_name | File_size | +------------------+-----------+ | mysql-bin.000001 | 154 | +------------------+-----------+ 1 row in set (0.00 sec) mysql> show variables like 'bin%'; +--------------------------------------------+--------------+ | Variable_name | Value | +--------------------------------------------+--------------+ | bind_address | * | | binlog_cache_size | 32768 | | binlog_checksum | CRC32 | | binlog_direct_non_transactional_updates | OFF | | binlog_error_action | ABORT_SERVER | | binlog_format | ROW | | binlog_group_commit_sync_delay | 0 | | binlog_group_commit_sync_no_delay_count | 0 | | binlog_gtid_simple_recovery | ON | | binlog_max_flush_queue_time | 0 | | binlog_order_commits | ON | | binlog_row_image | FULL | | binlog_rows_query_log_events | OFF | | binlog_stmt_cache_size | 32768 | | binlog_transaction_dependency_history_size | 25000 | | binlog_transaction_dependency_tracking | COMMIT_ORDER | +--------------------------------------------+--------------+ 16 rows in set (0.01 sec) -
次のコマンドを実行して、GTIDモード(
gtid_mode)がオンであることを確認します。mysql> show variables like 'gtid%'; +----------------------------------+-----------+ | Variable_name | Value | +----------------------------------+-----------+ | gtid_executed_compression_period | 1000 | | gtid_mode | ON | <--- it is now showing ON | gtid_next | AUTOMATIC | | gtid_owned | | | gtid_purged | | +----------------------------------+-----------+ 5 rows in set (0.00 sec) mysql> select @@gtid_executed, @@gtid_purged\G *************************** 1. row *************************** @@gtid_executed: @@gtid_purged: 1 row in set, 1 warning (0.00 sec) mysql> select * from mysql.gtid_executed; Empty set (0.00 sec) <--- this is empty because we just turned it ON. As transactions occur this will get populated
ノート:最初の問合せでは、GTIDにNULL値を表示することが一般的です。これは、MySQL
versions 5.7では、GTID値がmysql.gtid_executed表にのみ格納されるためです。
タスク5: ターゲット・データベースでのairportdbスキーマ(メタデータのみ)の作成
-
ソース・データベースからスキーマ・メタデータを抽出します。
[root@bastion airport-db]# mysqldump --host <SourceIP> -u admin -p --no-data --routines --events airportdb > airportdb.sql mysqldump: [Warning] Using a password on the command line interface can be insecure. -- Warning: column statistics not supported by the server. -
ターゲット・データベースにスキーマ・メタデータをインポートします。
[root@bastion opc]#  mysql --host <TargetIP> -u admin -p
mysql: [Warning] Using a password on the command line interface can be insecure.
Welcome to the MySQL monitor.  Commands end with ; or \g.
Your MySQL connection id is 581
Server version: 8.4.4-u5-cloud MySQL Enterprise - Cloud

Copyright (c) 2000, 2025, Oracle and/or its affiliates.

Oracle is a registered trademark of Oracle Corporation and/or its
affiliates. Other names may be trademarks of their respective
owners.

Type 'help;' or '\h' for help. Type '\c' to clear the current input statement.

mysql> create database airportdb;
Query OK, 1 row affected (0.01 sec)

mysql> use airportdb;
Database changed
mysql> source airportdb.sql
タスク6: OCI GoldenGateデプロイメントの設定および接続の追加
いくつかのブログ、OCI GoldenGateデプロイメントの設定方法に関するチュートリアルがあります。ここでは、いくつかのステップを示します。
-
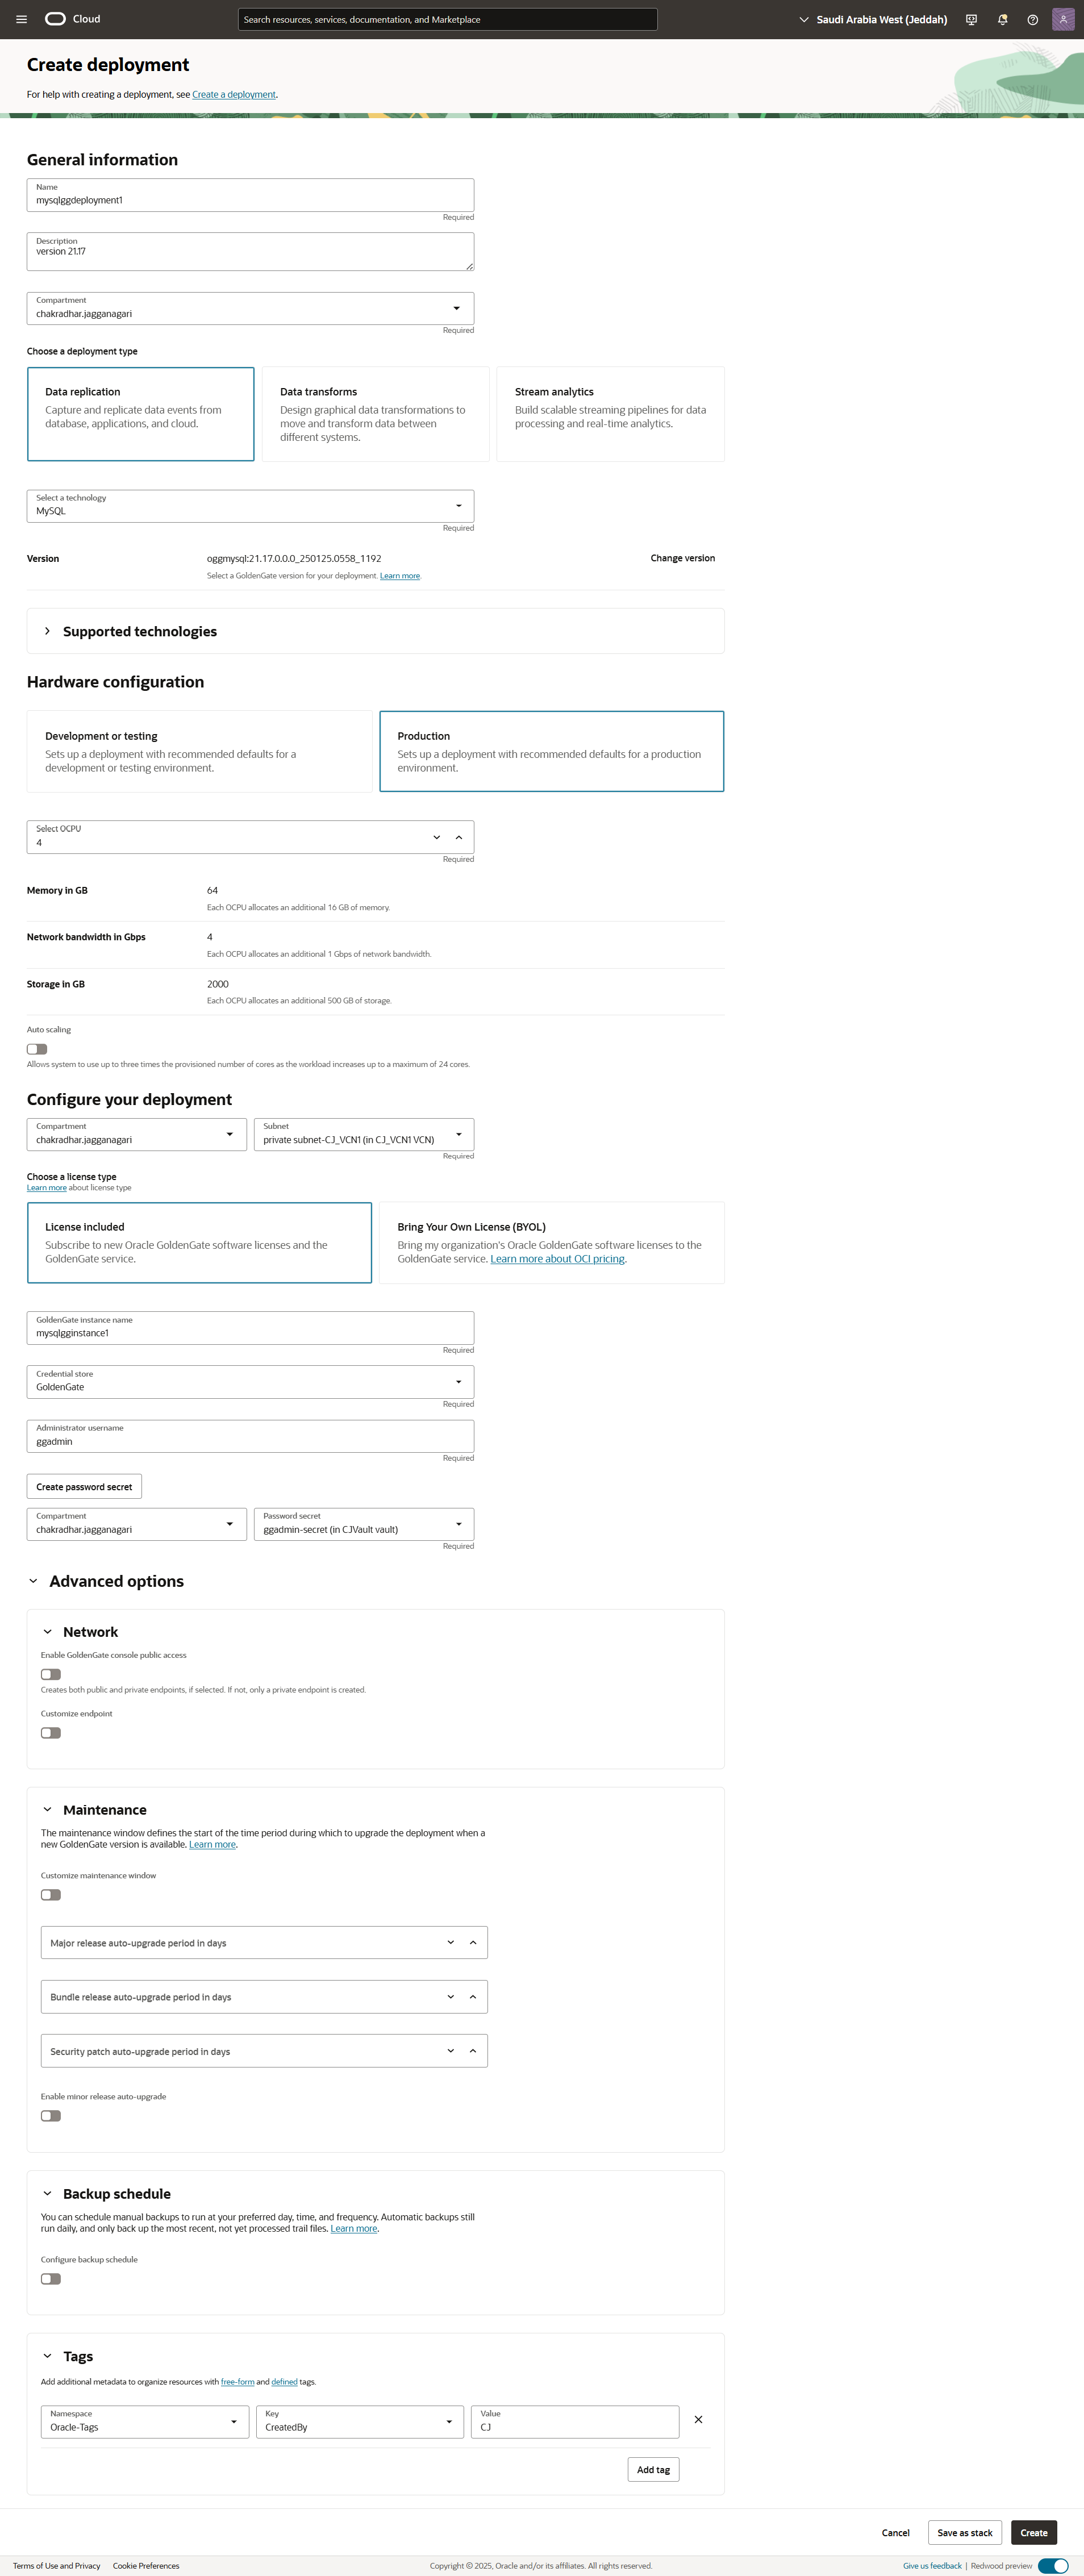
OCIコンソールにログインし、GoldenGateデプロイメントを選択します。
-
「デプロイメントの作成」をクリックし、次の図に示すように、必要な情報を入力します。
-
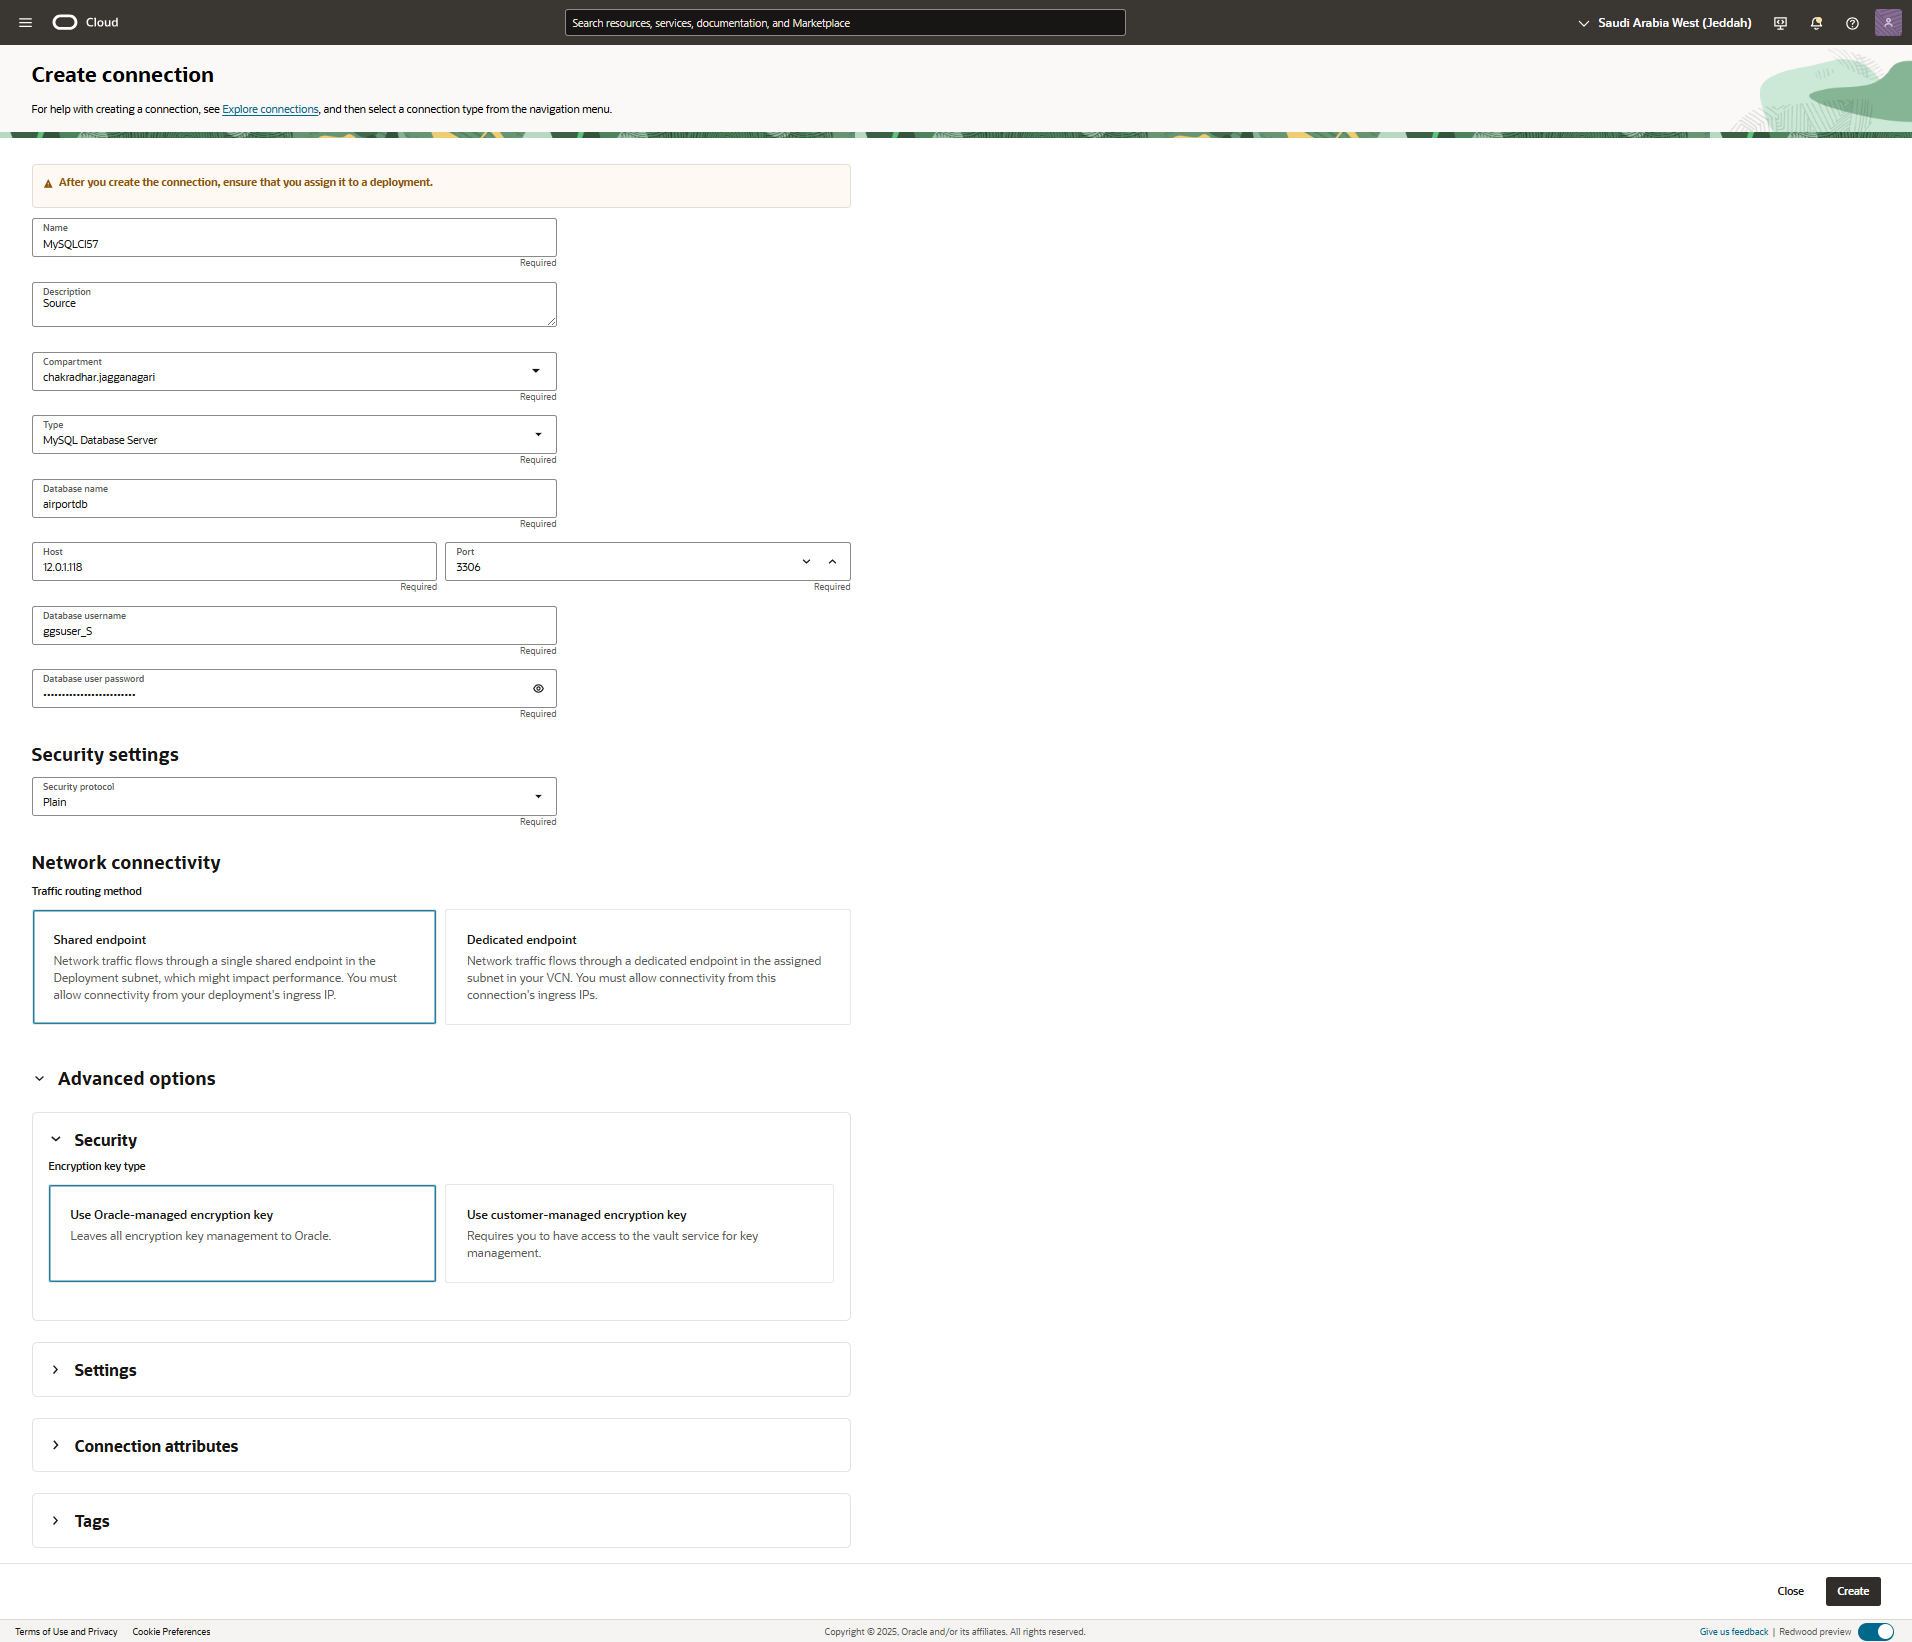
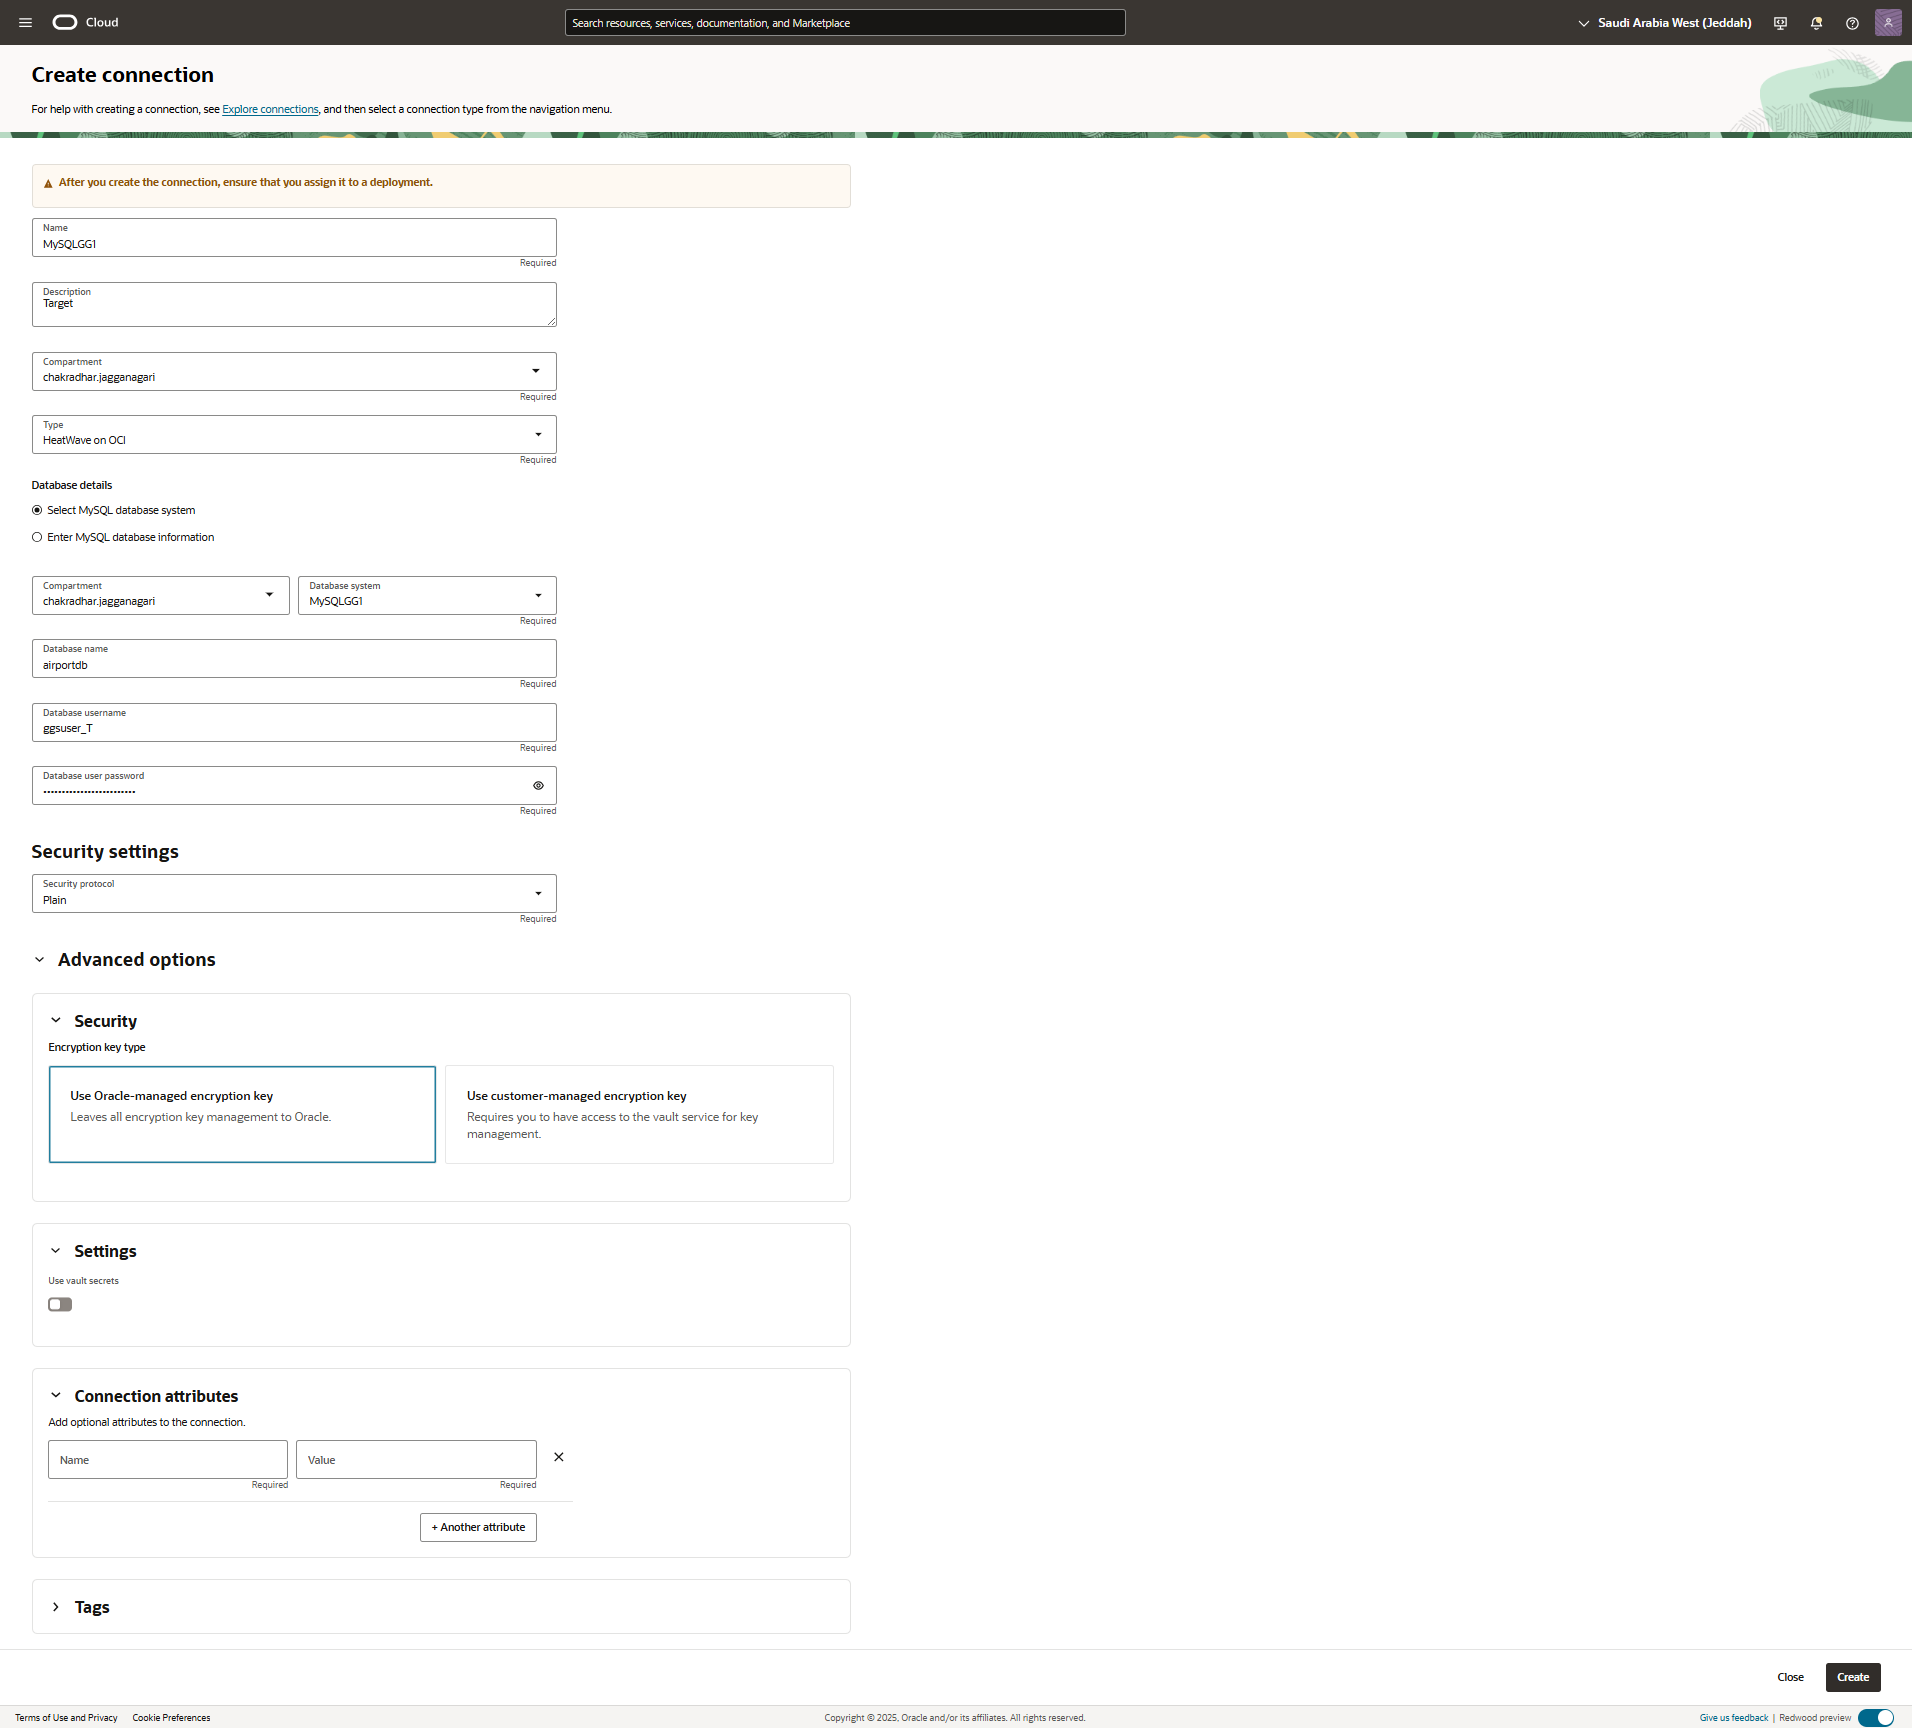
「デプロイメントの作成」ページで、ソースおよびターゲットの接続の詳細を追加します。

-
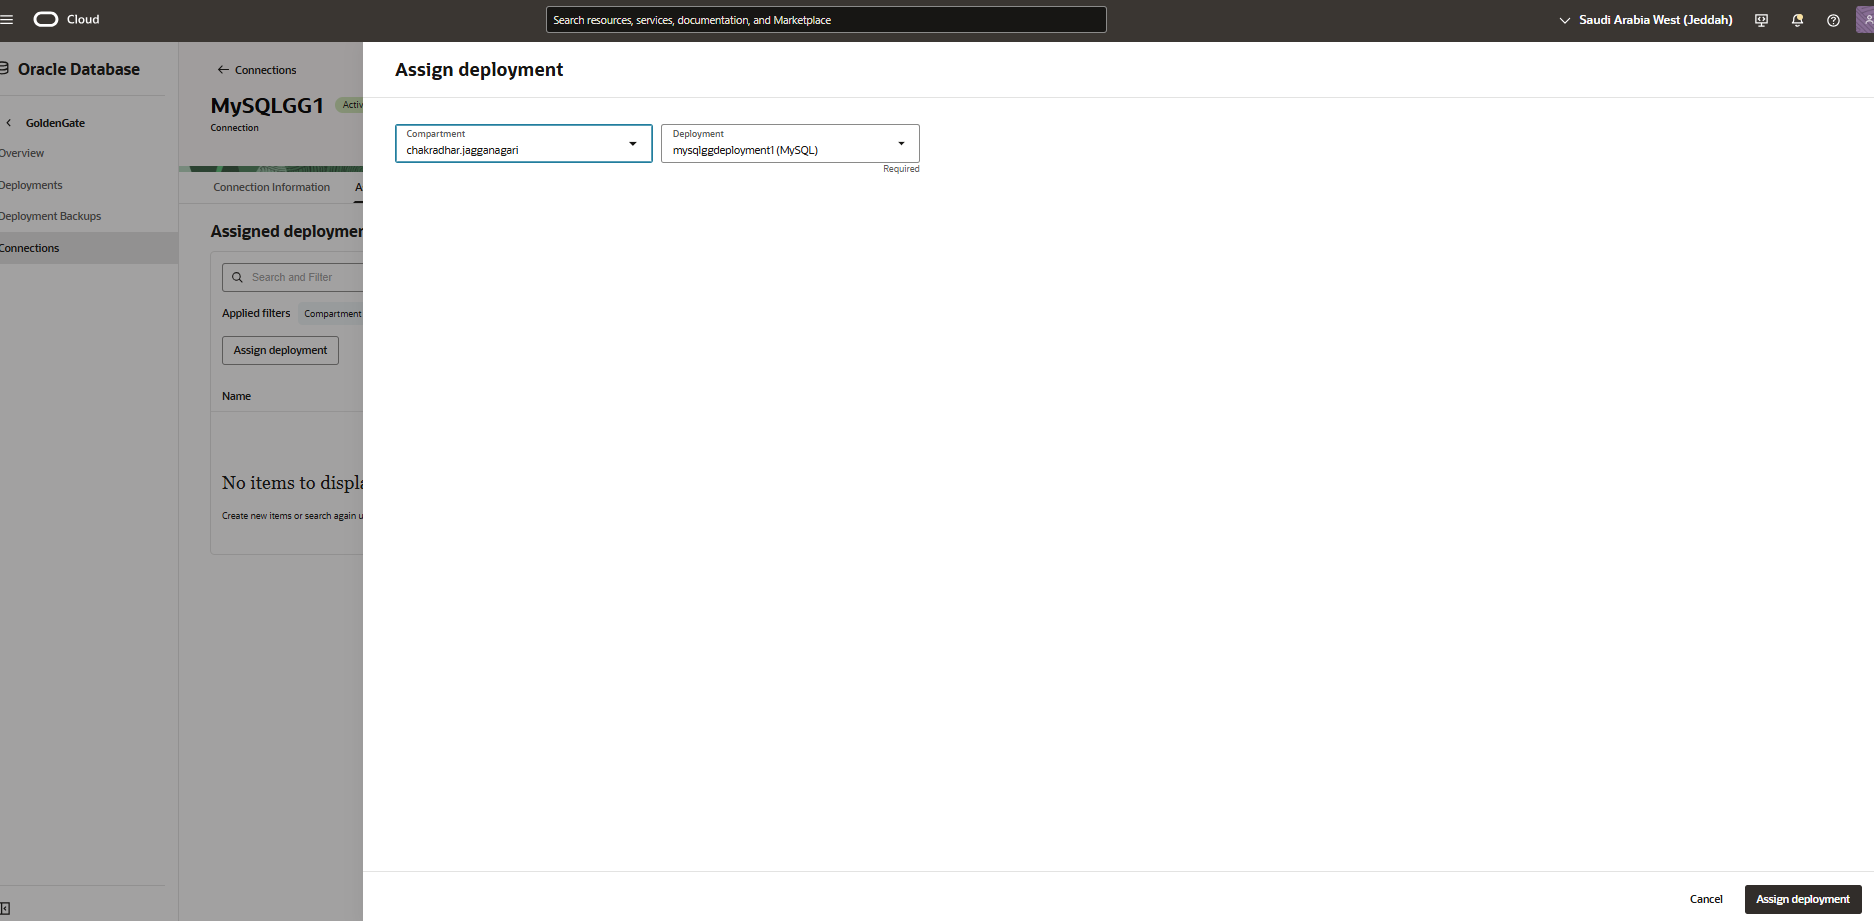
OCI GoldenGateデプロイメントに接続を割り当てます。接続名をクリックし、「デプロイメントの割当て」をクリックします。


-
OCI Bastionサービスを使用して、ポート
443へのポート転送を設定し、OCI GoldenGateコンソールにログインします。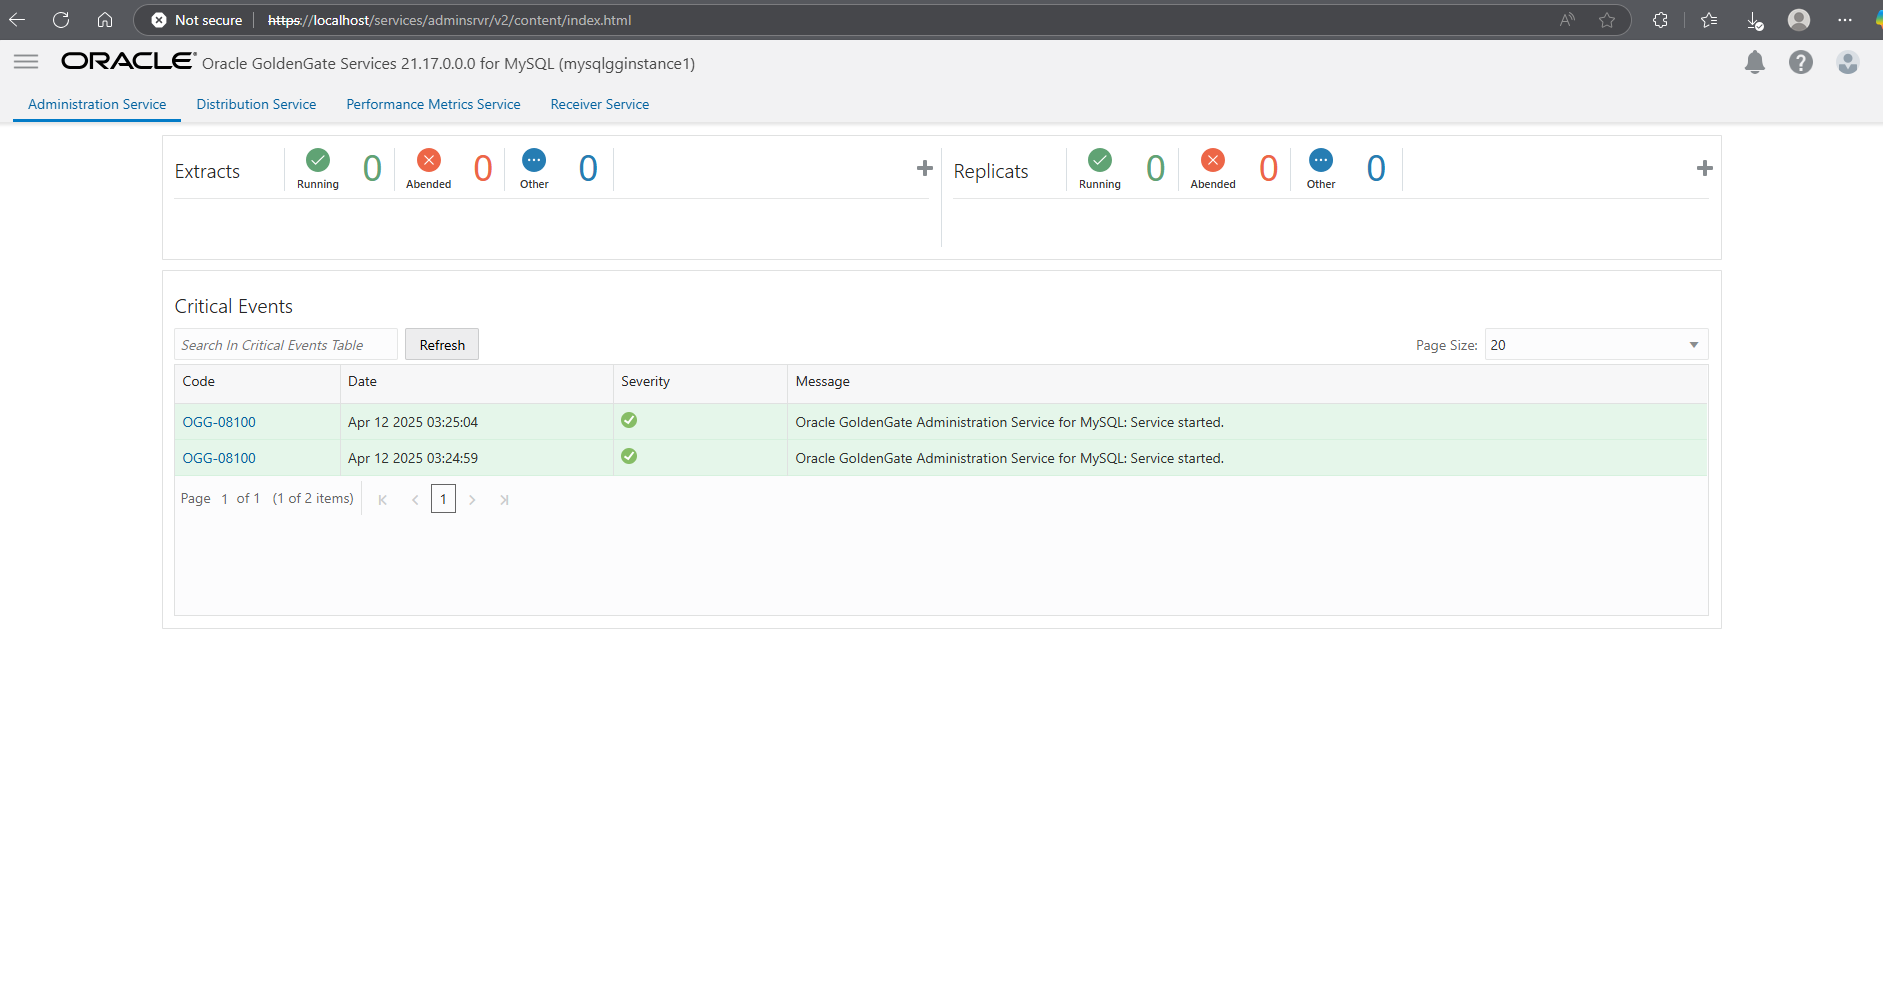
-
OCI GoldenGateコンソールからデータベース接続を検証します。
-
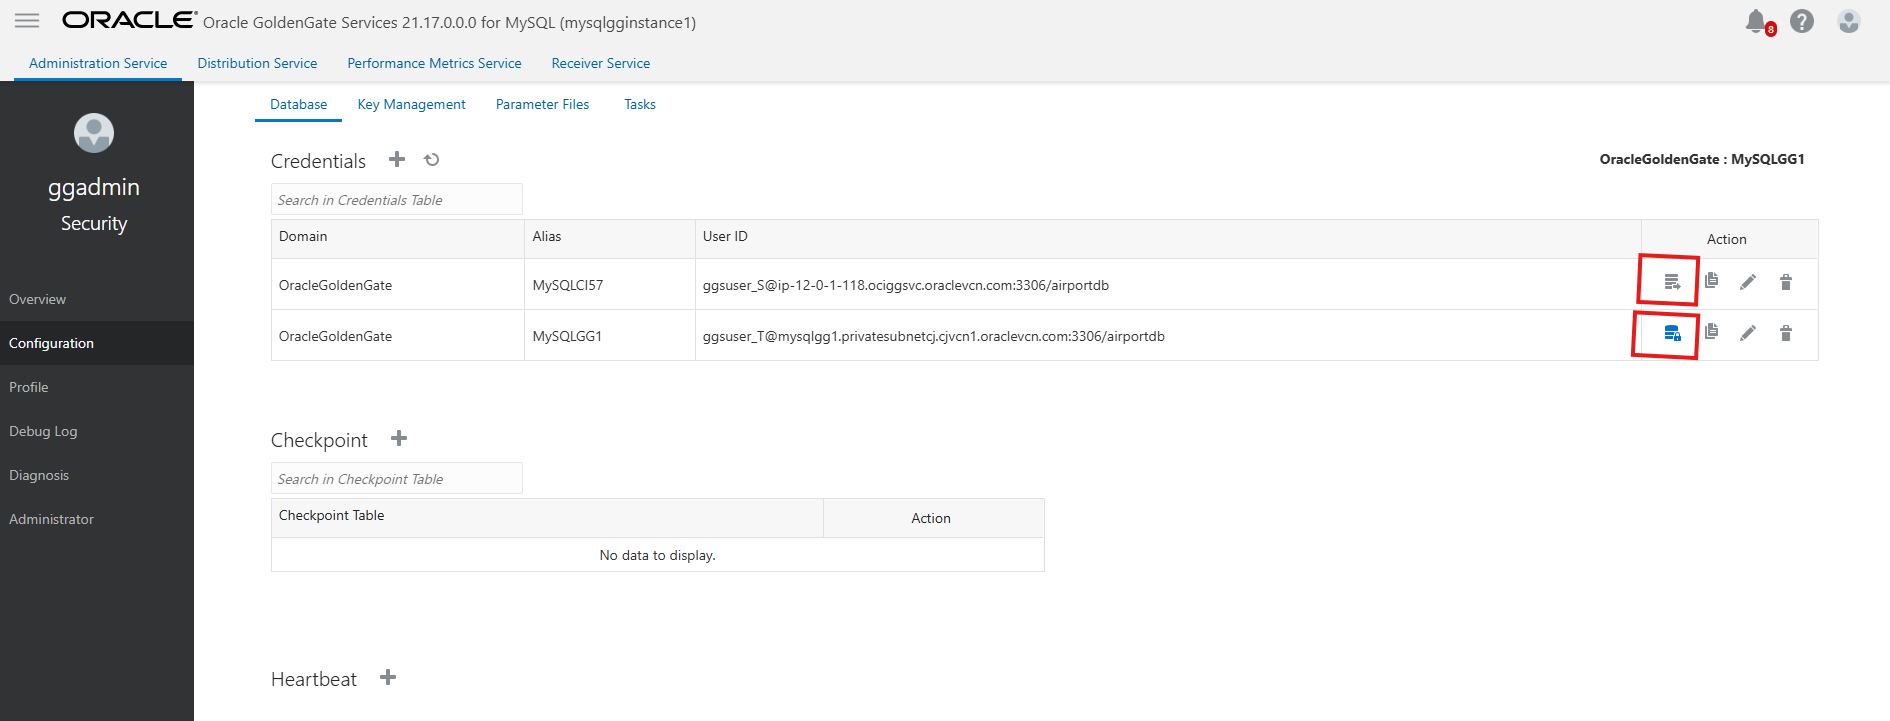
「ハンバーガー」メニューをクリックすると、タスク6.4でデプロイメントに追加された2つの接続が表示されます。
-
「接続」をクリックして接続を検証します。接続に成功すると、「チェックポイント+」をクリックしてチェックポイント表を作成するオプションが表示されます。
DNSがIPアドレスに自動的に追加されるため、OCIのOCI GoldenGateデプロイメントを使用して接続を追加することを強くお薦めします。これらのDNSがない場合、テスト接続は失敗します。
-
タスク7: ExtractおよびReplicatプロセスの作成
-
Extractプロセスを作成する前に、特にターゲットがHAの場合、ソース・データベースで
gtid_modeがONであることを確認してください。Extractを追加するには2つの方法があります。
-
方法1:初期ロード(インスタンスのコピーまたはダンプ)の完了後にExtractを追加し、正確なインスタンス化方法を使用できます。詳細は、MySQLシェル・ユーティリティおよびOracle GoldenGateを使用したMySQLからMySQLへの正確なインスタンス化を参照してください。
Extractを追加して開始し、次の図に示すように、特定のGTIDまたはbinlogからデータ・キャプチャを実行します。Oracleでは、この方法を使用することをお薦めします。
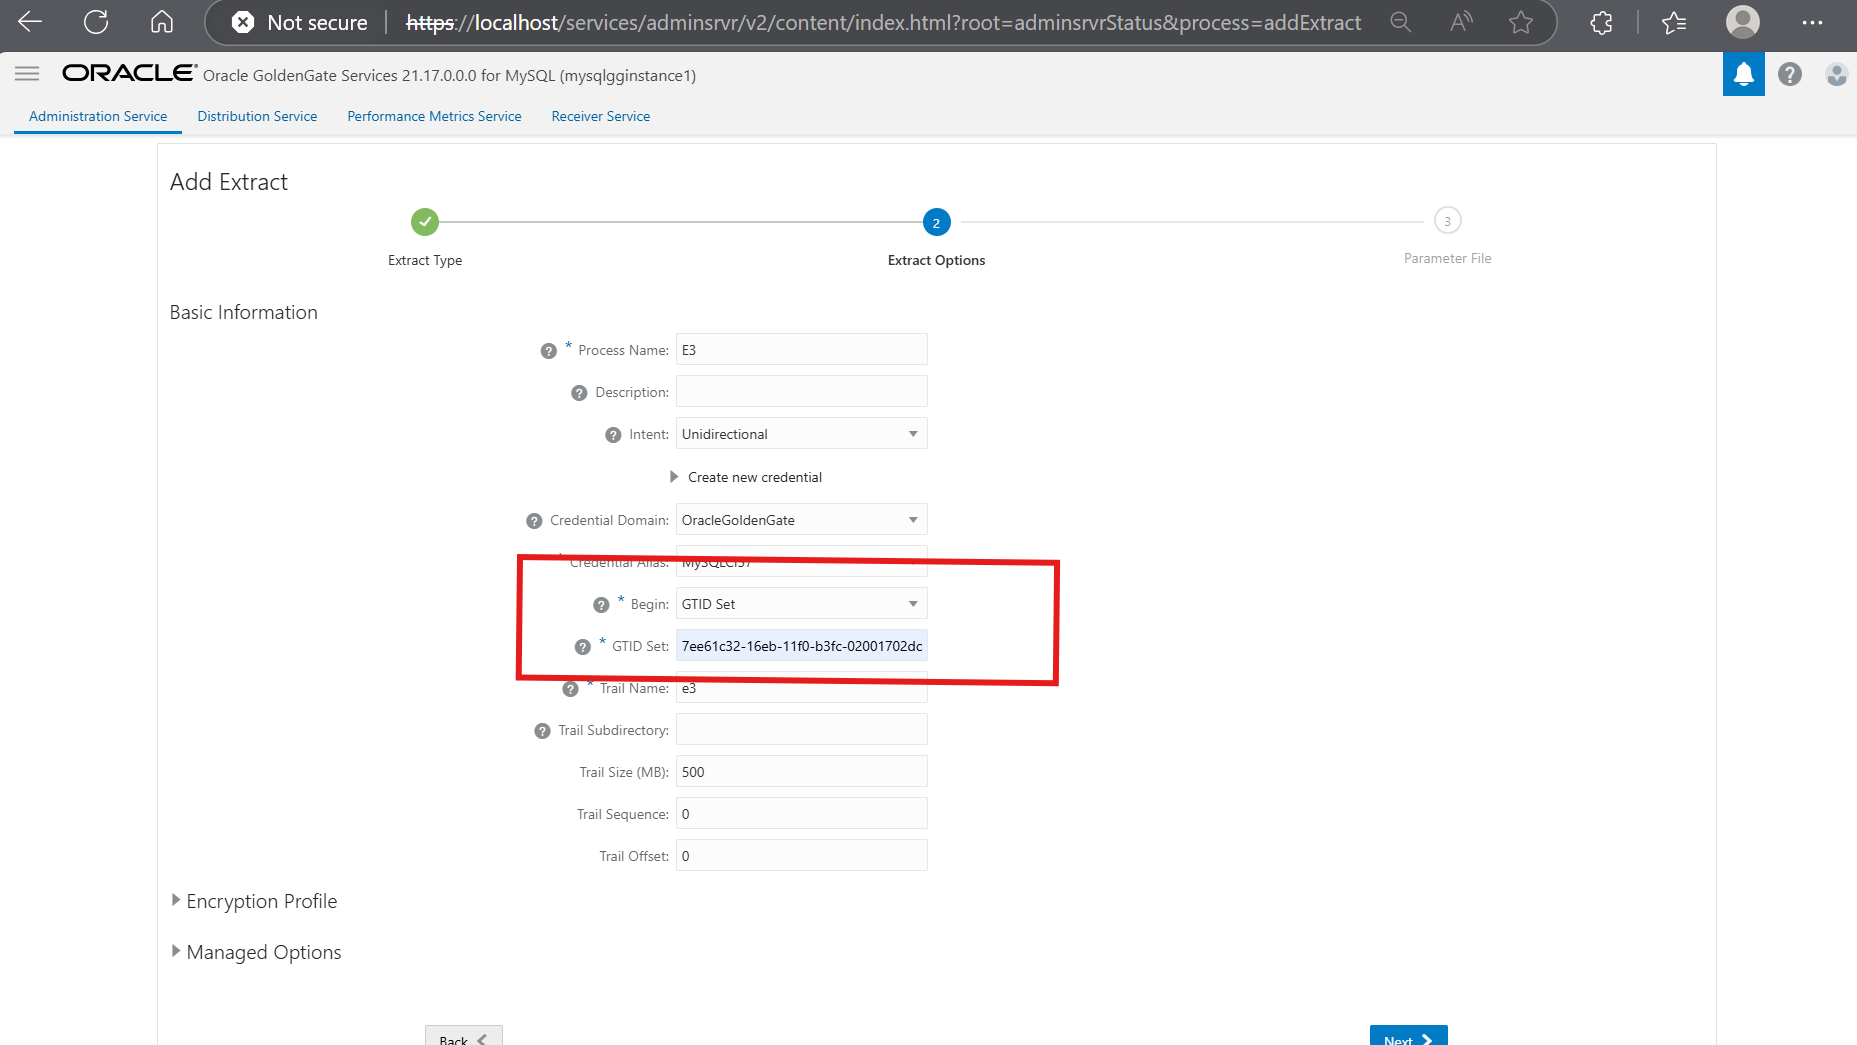
ノート:ここでは、GTIDセットは、
dumpInstanceのJSONファイルまたはcopyInstanceコマンドの出力から取得されます。 -
方法2:初期データ・ロードを開始する前にExtractを最初に追加し、後でReplicatを変更して、
dumpInstance()のJSONファイルまたはcopyInstance()の出力に表示される特定のgtidexecuted/binlog#およびbinlog位置から開始できます。重複データの問題を回避するには、このメソッドで
HANDLECOLLISIONパラメータを使用します。ノート:このPOCでは、方法2が使用されました。
Extractパラメータ・ファイルを編集します:
EXTRACT ext1
USERIDALIAS  MySQLCI57, DOMAIN OracleGoldenGate
EXTTRAIL e1
--DDL INCLUDE MAPPED  (needed for DDL replication, also need to set  binlog_row_metadata to FULL in mysql config file on source db). But not supported for MySQL V5.7
TRANLOGOPTIONS FETCHPARTIALJSON       (for JSON replication, also need to set binlog_row_value_options to empty string in the mysql config)
TABLE airportdb.*;
ノート:
DDL INCLUDE MAPPEDをExtractパラメータ・ファイルに追加すると、DDLレプリケーションがMySQLversion 5.7.4でサポートされていないというエラーが表示されます。
-
-
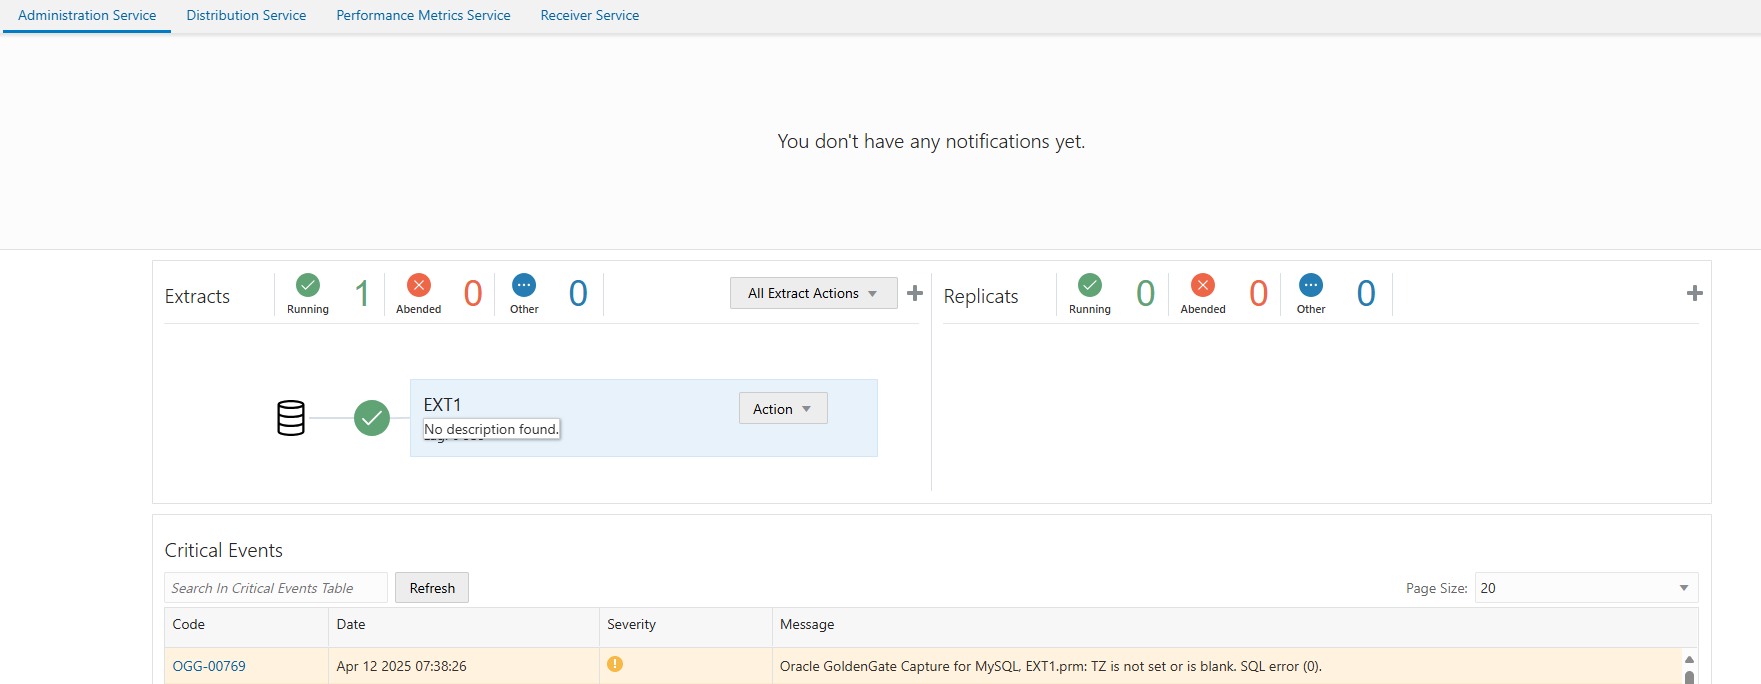
Extractプロセスを開始します。
-
Extractが実行され、証跡ファイルが生成され、Replicatが作成されるようになりました。
-
最初にチェックポイント表を作成します。「構成」セクションに移動し、ターゲット・データベースを選択し、「チェックポイント+」をクリックしてチェックポイント表を作成します。
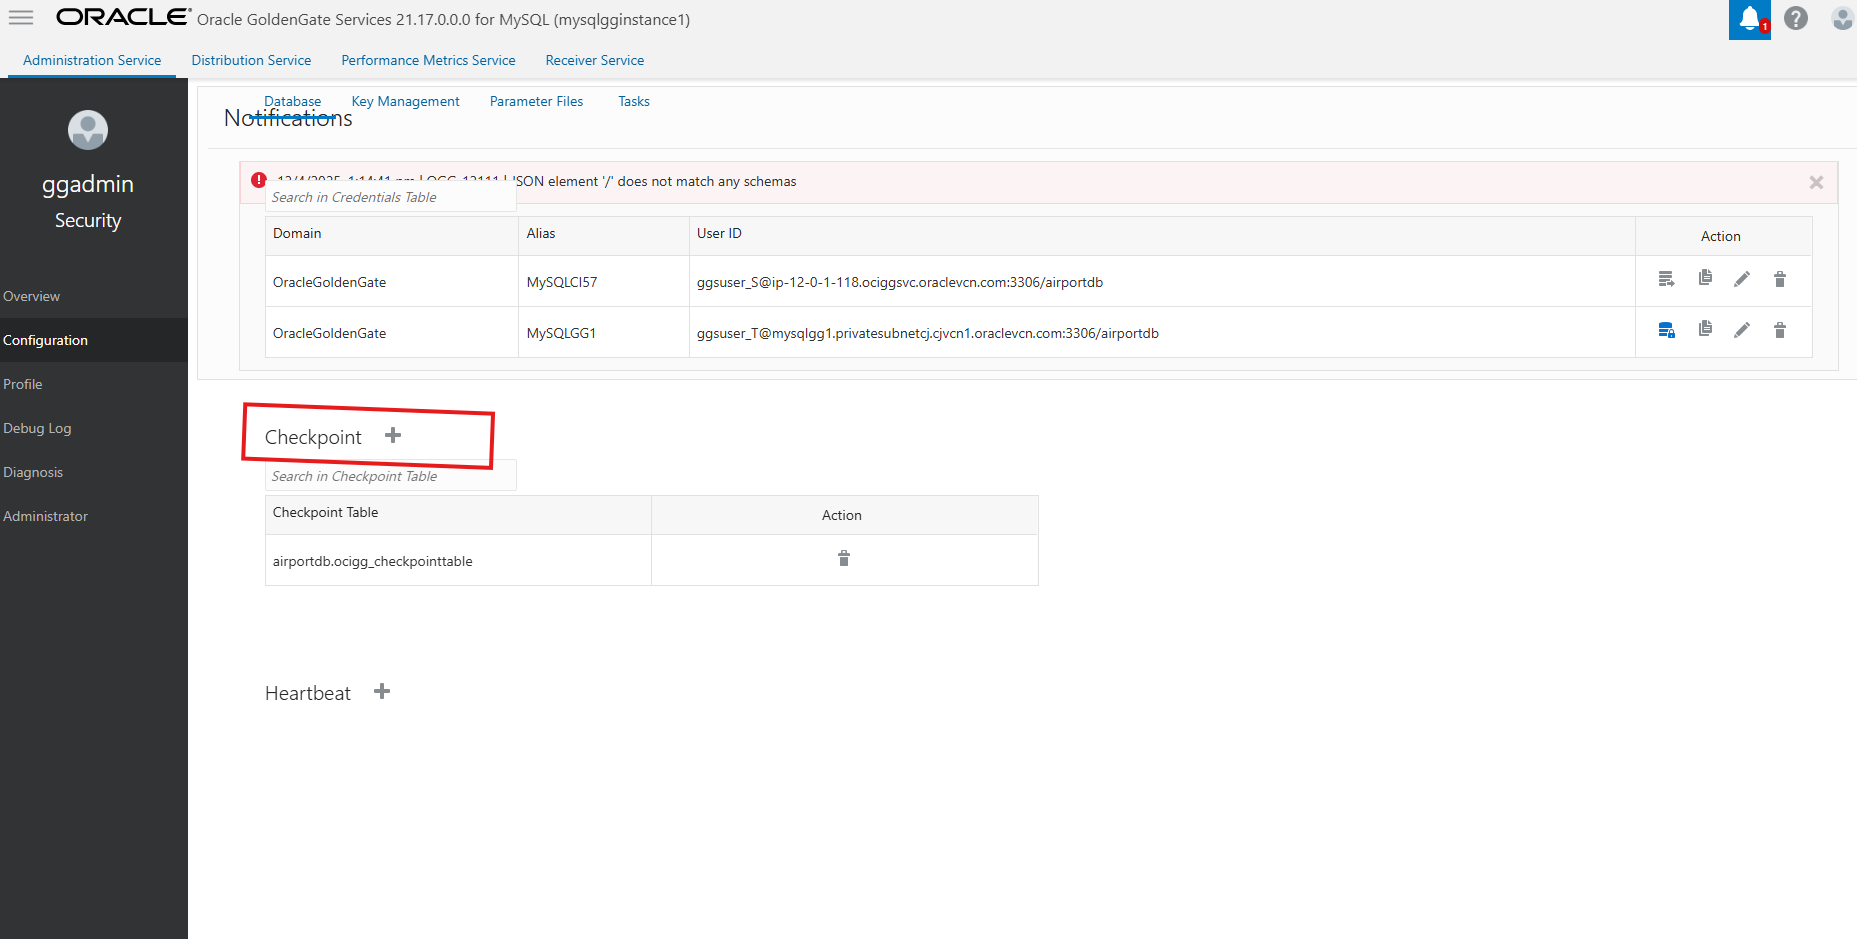
-
Replicatのプロセスを作成します。これは単方向レプリケーションであるため、パフォーマンスを向上させるためにパラレルReplicatを使用できます。双方向レプリケーションの場合、クラシックReplicatのみサポートされます。
Replicatプロセスを起動しないでください。作成してください。データのインポート後に開始します。
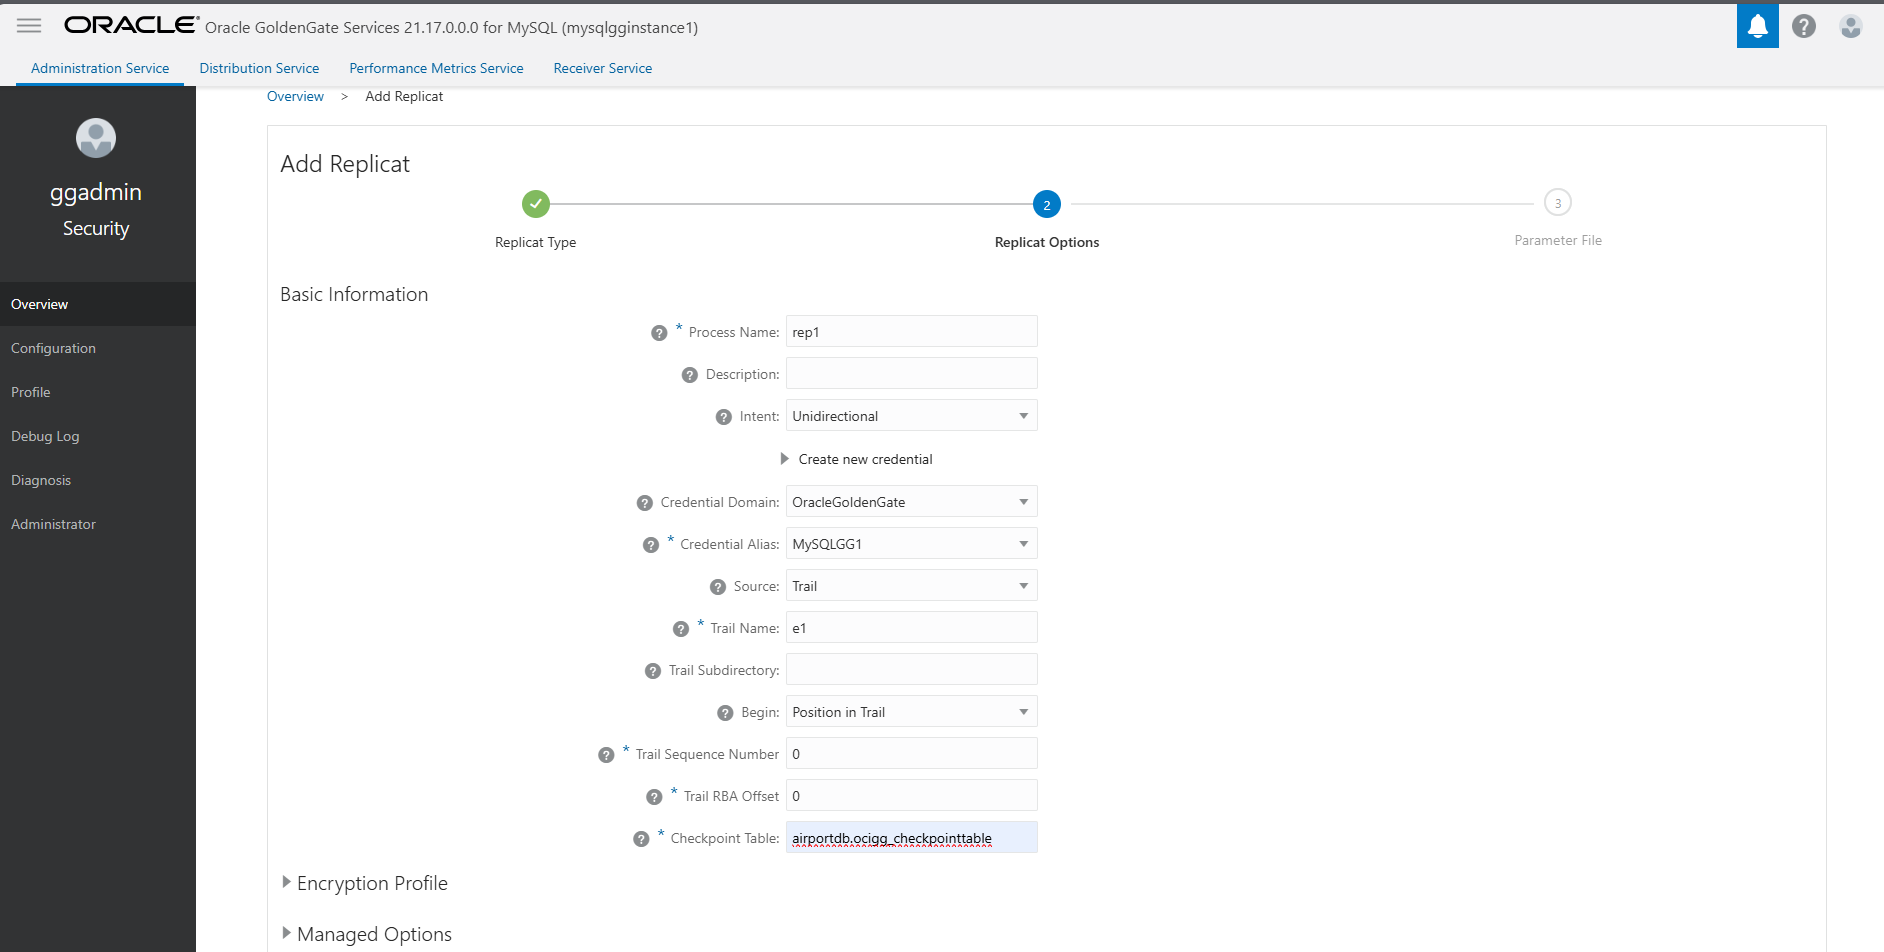
-
パラメータ・ファイルを編集してください。
PARALLELパラメータを追加することも、デフォルトの並列度を使用することもできます。REPLICAT rep1 USERIDALIAS MySQLGG1, DOMAIN OracleGoldenGate MAP airportdb.*, TARGET airportdb.*;
-
タスク8: copyInstance()を使用したソースからターゲットへのデータのコピー
-
copyInstance()のdryRun:"true"オプションを使用してドライ・ランを実行します。Type '\help' or '\?' for help; '\quit' to exit. MySQL SQL > \connect admin@<Source IP> Creating a session to 'admin@<Source IP>' Fetching global names for auto-completion... Press ^C to stop. Your MySQL connection id is 37 Server version: 5.7.44-log MySQL Community Server (GPL) No default schema selected; type \use <schema> to set one. MySQL <Source IP>:3306 ssl SQL > \js Switching to JavaScript mode... MySQL <Source IP>:3306 ssl JS > util.copyInstance('mysql://admin@<Target IP>', {"compatibility":["skip_invalid_accounts","strip_definers","strip_restricted_grants","strip_tablespaces","ignore_wildcard_grants","strip_invalid_grants","create_invisible_pks"], users:"true", threads:2, dryRun:"true"}); Please provide the password for 'admin@<target IP': ******************* Save password for 'admin@<target IP>'? [Y]es/[N]o/Ne[v]er (default No): -
エラーがない場合は、
dryRunオプションを削除して再実行し、データ・ロードを実行します。最終的な出力は次のようになります: エラーが報告されていません。SRC: Starting data dump 100% (59.50M rows / ~59.36M rows), 142.25K rows/s, 9.68 MB/s SRC: Dump duration: 00:07:50s SRC: Total duration: 00:07:50s SRC: Schemas dumped: 2 SRC: Tables dumped: 15 SRC: Data size: 2.03 GB SRC: Rows written: 59502422 SRC: Bytes written: 2.03 GB SRC: Average throughput: 4.33 MB/s 1 thds indexing \ 100% (2.03 GB / 2.03 GB), 7.47 MB/s (161.06K rows/s), 15 / 15 tables done Building indexes - done Executing common postamble SQL - done TGT: 53 chunks (59.50M rows, 2.03 GB) for 15 tables in 2 schemas were loaded in 7 min 51 sec (avg throughput 4.32 MB/s, 126.29K rows/s) TGT: 17 DDL files were executed in 0 sec. TGT: 0 accounts were loaded, 3 accounts failed to load due to unsupported authentication plugin errors TGT: Data load duration: 7 min 51 sec TGT: 1 indexes were built in 0 sec. TGT: Total duration: 7 min 51 sec TGT: 0 warnings were reported during the load. .. .. Dump_metadata: Binlog_file: mysql-bin.000006 Binlog_position: 626 Executed_GTID_set: 7ee61c32-16eb-11f0-b3fc-02001702dcb5:1-3
ノート:
copyInstance()の出力に示されているGTIDをノートにとり、これを使用してReplicatを変更します。
タスク9: Replicatの変更および起動
タスク8のcopyInstance()の出力に示すように、ログ・ファイル番号(000006)およびログ位置番号(626)を使用します。このログ・ファイルおよびログ位置は、CSN 000006:000000000000626を生成する形式で使用する必要があります。
Replicatを変更し、「起動」をクリックして起動します。 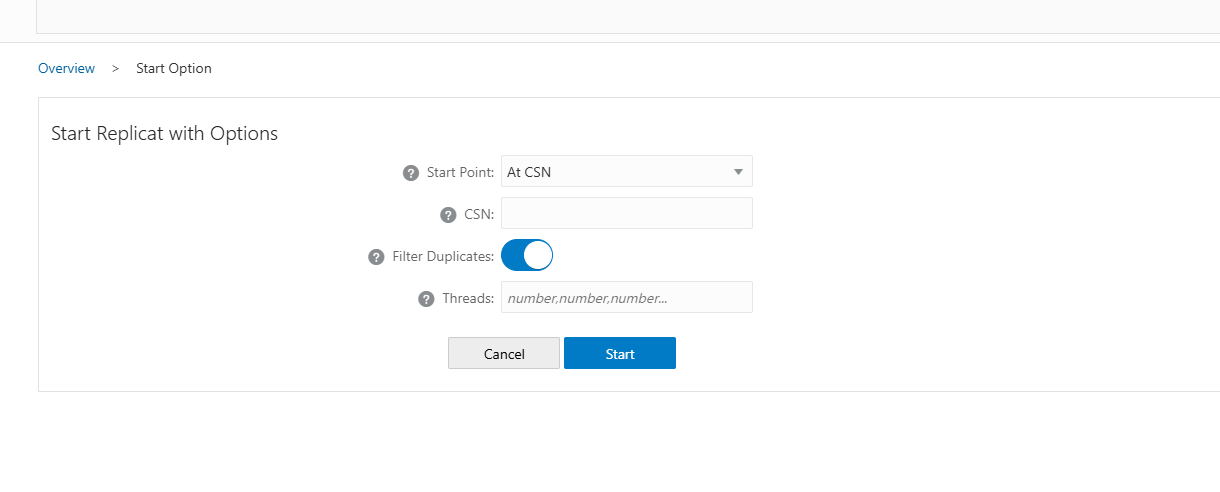
「実行中」と表示されるReplicatステータス。
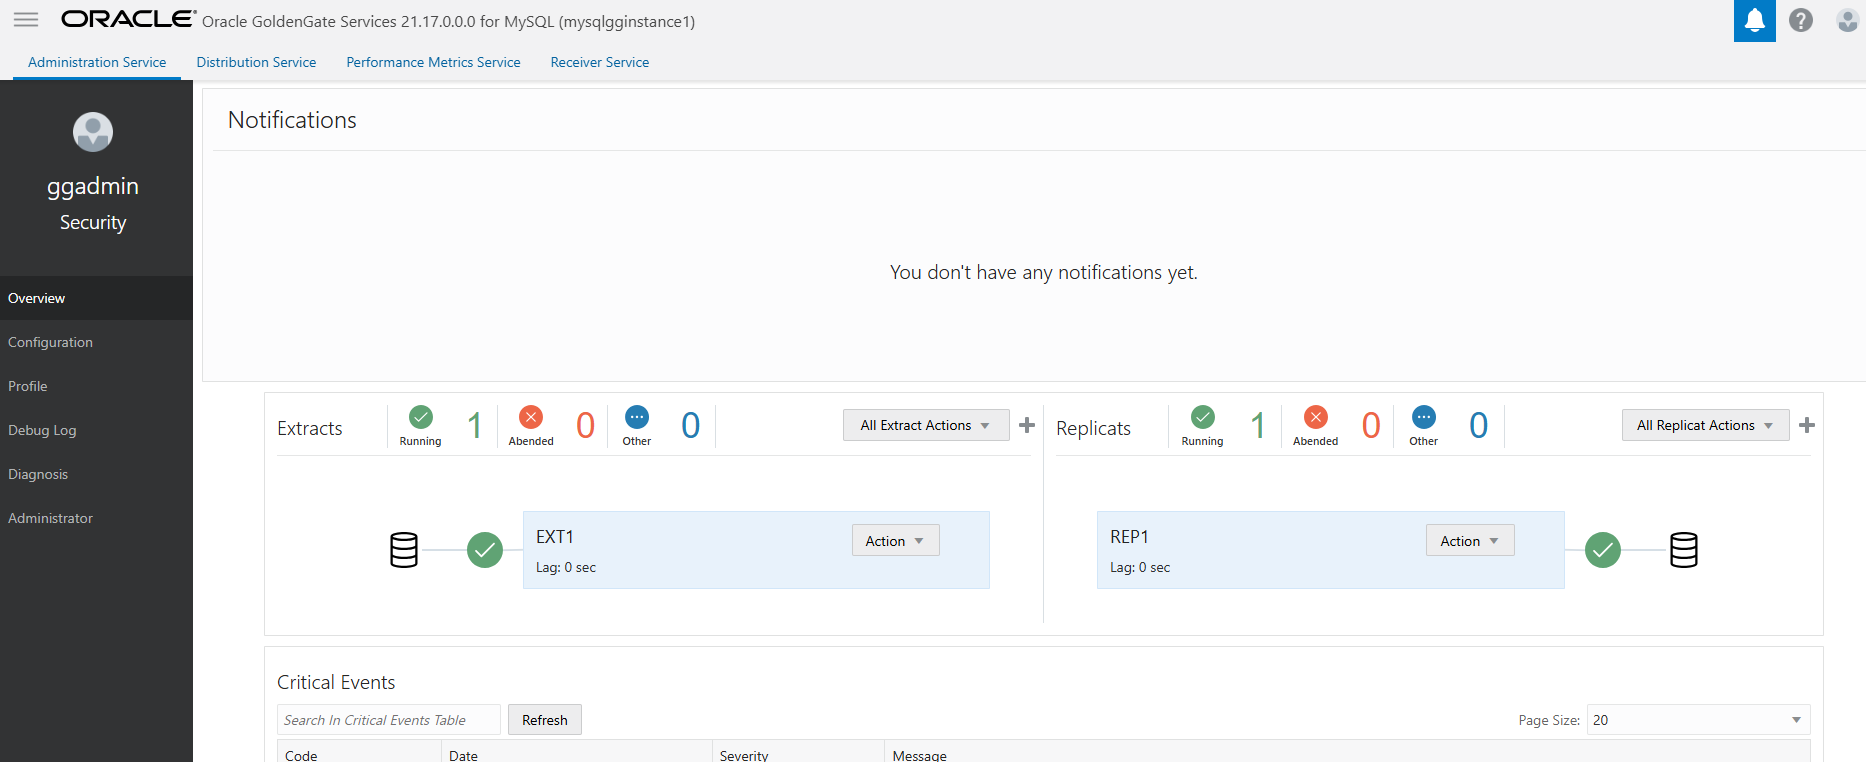
ノート:タスク7に示すように、Extractの追加に方法1を使用した場合、Replicatの変更は必要ありません。このPOCでは、方法2を使用してExtractを追加しました。どちらの方法でも問題ありません。
タスク10: DMLテストの実行
ソースでDMLアクティビティを実行して、レプリケーションをテストします。
-
ソース:
mysql> select count(*) from passenger; +----------+ | count(*) | +----------+ | 36095 | +----------+ 1 row in set (0.01 sec) mysql> insert into passenger (passportno,firstname,lastname) values ('Pd89UKL','Timothy','London'); Query OK, 1 row affected (0.00 sec) mysql> commit -> ; Query OK, 0 rows affected (0.00 sec) mysql> select count(*) from passenger; +----------+ | count(*) | +----------+ | 36096 | +----------+ 1 row in set (0.00 sec) mysql> select @@version; +------------+ | @@version | +------------+ | 5.7.44-log | +------------+ 1 row in set (0.00 sec) -
ターゲット:
[root@bastion opc]# mysql --host <target IP> -u admin -p
mysql: [Warning] Using a password on the command line interface can be insecure.
Welcome to the MySQL monitor.  Commands end with ; or \g.
Your MySQL connection id is 1249
Server version: 8.4.4-u5-cloud MySQL Enterprise - Cloud

Copyright (c) 2000, 2025, Oracle and/or its affiliates.

Oracle is a registered trademark of Oracle Corporation and/or its
affiliates. Other names may be trademarks of their respective
owners.

Type 'help;' or '\h' for help. Type '\c' to clear the current input statement.

mysql> use airportdb;
Reading table information for completion of table and column names
You can turn off this feature to get a quicker startup with -A

Database changed
mysql> select count(*) from passenger;
+----------+
| count(*) |
+----------+
|    36096 |
+----------+
1 row in set (0.00 sec)

mysql> select @@version
    -> ;
+----------------+
| @@version      |
+----------------+
| 8.4.4-u5-cloud |
+----------------+
1 row in set (0.00 sec)
関連リンク
確認
- 著者 - Chakradhar Jagganagari (リフト実装エキスパート- データベース)
その他の学習リソース
docs.oracle.com/learnで他のラボを確認するか、Oracle Learning YouTubeチャネルで無料のラーニング・コンテンツにアクセスしてください。また、education.oracle.com/learning-explorerにアクセスして、Oracle Learning Explorerになります。
製品ドキュメントについては、Oracle Help Centerを参照してください。
Migrate On-Premises MySQL Database to Oracle HeatWave MySQL Managed Instance using OCI GoldenGate
G34893-01
Copyright ©2025, Oracle and/or its affiliates.