Getting Started with JavaFX
6 Deploying Your First JavaFX Application
This topic shows how to deploy the samples from any of the Getting Started with JavaFX tutorials.
If you develop your JavaFX application in NetBeans IDE, it is packaged automatically and is easy to deploy.
This page contains the following sections.
Deployment Modes
JavaFX applications can be run in several ways:
-
Launch as a desktop application from a JAR file or self-contained application launcher
-
Launch from the command line using the Java launcher
-
Launch by clicking a link in the browser to download an application
-
View in a web page when opened
Packaging the Application in NetBeans IDE
When you run your application in NetBeans IDE or use the Clean and Build command, your application is packaged for all modes of JavaFX deployment, using options that are set as project properties. By default, applications are packaged into the following files as shown in Figure 6-1:
-
A JAR file, which contains the compiled class files and images.
-
A JNLP file, which contains a deployment descriptor for the two web modes (Web Start and embedded in browser).
-
An HTML file, which contains basic code for running both the Web Start application and the embedded application using the Deployment Toolkit.
-
A web-files folder, which contains an offline set of files from the Java Deployment Toolkit to assist with starting up your application. For more information about using the Java Deployment Toolkit in JavaFX applications, see "Deployment in the Browser" at
http://docs.oracle.com/javafx/2/deployment/deployment_toolkit.htm
Figure 6-1 Example of Default Application Packaging

Description of "Figure 6-1 Example of Default Application Packaging"
Optionally, you can package your application as a self-contained application in NetBeans IDE by adding the task shown in Example 6-1 to the build.xml file.
Example 6-1 Changes to the build.xml File for Packaging Self-Contained Applications
<project name="ColorfulCircles" default="default" basedir="."
        xmlns:fx="javafx:com.sun.javafx.tools.ant">
    target name="-post-jfx-deploy">
        <fx:deploy width="${javafx.run.width}" height="${javafx.run.height}"
                   nativeBundles="all"
                   outdir="${basedir}/${dist.dir}" outfile="${application.title}">
            <fx:application name="${application.title}"
                            mainClass="${javafx.main.class}"/>
            <fx:resources>
                <fx:fileset dir="${basedir}/${dist.dir}" includes="*.jar"/>
            </fx:resources>
            <fx:info title="${application.title}" vendor="${application.vendor}"/>
        </fx:deploy>
    </target>
</project>
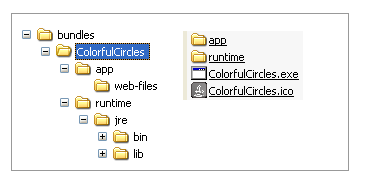
A self-contained application runs similar to the way in which a native application runs. The self-contained application package contains your application, the JRE, the JavaFX runtime, and a platform-specific application launcher. An example of a package is shown in Figure 6-2. For additional information, see Self-Contained Application Packaging.
Figure 6-2 Example of a Self-Contained Application Package

Description of "Figure 6-2 Example of a Self-Contained Application Package"
Sizing the Application Window
With standalone and Web Start mode, the window is sized around the width and height values you specify for the scene in the code. If you do not specify a width and height in the code, the window automatically sizes itself to fit the application.
Applications that are embedded in a web page require that you set width and height values in the NetBeans project's properties, even if you specify width and height values in the code. You can even specify different width and height values in the project properties from what is specified in the code, so you can experiment to see what looks best in the browser.
To specify application width and height in NetBeans project properties:
-
In the Projects pane, right-click your NetBeans project and choose Properties.
-
Select the Run category.
-
In the section entitled Web Start and Browser Application Properties, specify width and height values.
-
If you want to test the application in a browser when you run it inside NetBeans IDE, choose in Browser in the Run field.
-
Click OK to close the Properties dialog box.
-
Right-click the project and choose Clean and Build.
-
If you chose to run the application in the browser in the project properties, you can right-click the project and choose Run. Otherwise, test the HTML file outside the browser by following the instructions in Running the Application Outside NetBeans IDE.
Running the Application Outside NetBeans IDE
To run the packaged application outside NetBeans IDE, go to the dist subdirectory of your application project directory and do the following:
-
To run the application in standalone mode, double-click the JAR file.
-
To run as a Web Start application, either click the link in the HTML page in your browser or double-click the JNLP file. The advantage of using the link in the browser is that the web page contains logic that uses the Deployment Toolkit, which checks to ensure that the minimum required version of both the Java and JavaFX Runtimes are installed on the user's system.
-
To run the application in a web page, open the HTML file in a browser.
Note:
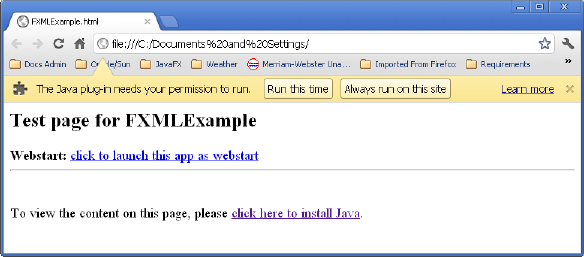
If you open the HTML file in Google Chrome, you might have to click either Run this time or Always run on this site to enable the Java plug-in, as shown in Figure 6-3. Then reload the page to run the application.
Note:
For applications that include FXML markup, NetBeans IDE adds a digital signature to the JAR file by default to ensure that it will run on the web. For more information about packaging FXML applications and FXML deployment, see
http://docs.oracle.com/javafx/2/fxml_get_started/fxml_deployment.htm -
To run a self-contained application package, go to the folder that contains the application. If you are running on a Windows or Linux platform, click the launcher file for the application. If you are running on a Mac platform, double click the application folder.
Deploying the Packaged Files
With the Java 7 Runtime and later, you can move the deployment files to other locations without changing any configuration properties in the deployment descriptor (which means the contents of the JNLP file). The files required for each deployment mode are shown in Table 6-1.
Other Ways to Package JavaFX Applications
Instead of using NetBeans IDE to package your deployment files, you can also use the JavaFX Packager tool or a custom Ant task. All of these tools generate a default HTML file with application launch descriptors that you manually copy into your web page, but you can optionally generate the application launch descriptors directly into your own HTML pages using an input template. You can also customize many other aspects of application startup and execution. For more information, see Deploying JavaFX Applications at
http://docs.oracle.com/javafx/2/deployment/jfxpub-deployment.htm
 Gail is part of the JavaFX documentation team and enjoys working on cutting-edge, innovative documentation.
 Nancy is a technical writer
in the JavaFX group. She has a background in content management systems, enterprise server-client software, and XML.
She lives on 480 acres in the middle of nowhere with horses, a donkey, dogs, cats, and chickens, and stays
connected by satellite.
