Using JavaFX Scene Builder with Java IDEs
2 Using Scene Builder with Eclipse IDE
This chapter describes how to download and install the e(fx)clipse tool, which enables you to create a new JavaFX FXML project using Eclipse IDE, start Scene Builder from within the IDE, and run Scene Builder sample applications.
The JavaFX integration with the Eclipse IDE is provided with the e(fx)clipse tool. It is assumed that you have already installed Scene Builder before continuing with the rest of this section. Go to the JavaFX Scene Builder Installation Guide for installation information.
Downloading and Installing e(fx)clipse
Go to http://www.eclipse.org/efxclipse/install.html for information about the available options to download and install the e(fx)clipse tool to use with your JavaFX Scene Builder installation.
|
Note: The information in this chapter is based on the pre-configured distribution of Eclipse 4.2.2. SDK with e(fx)clipse 0.8.1 |
Creating a New JavaFX FXML Project
To create a new JavaFX FXML project using Eclipse, you must first create a new JavaFX project and then add a new FXML document to that JavaFX project.
-
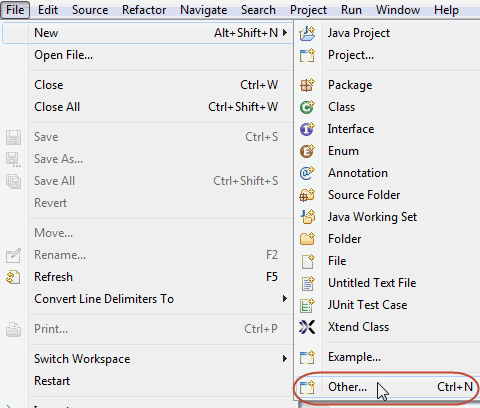
From the Eclipse IDE Main menu, select File, choose New, and then Other, as shown in Figure 2-1.
-
From the New dialog box, expand the JavaFX folder, and select the JavaFX Project wizard, as shown in Figure 2-2.
Figure 2-2 Choose the JavaFX Project Wizard
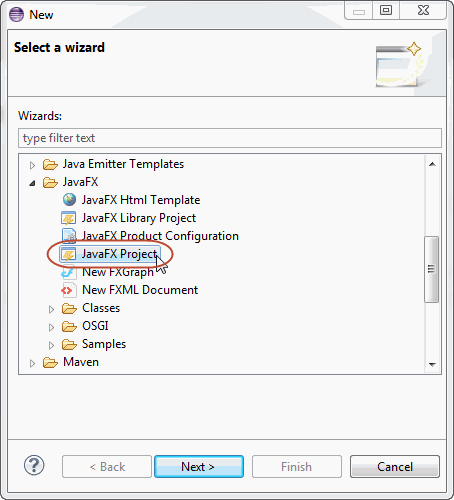
Description of "Figure 2-2 Choose the JavaFX Project Wizard"
-
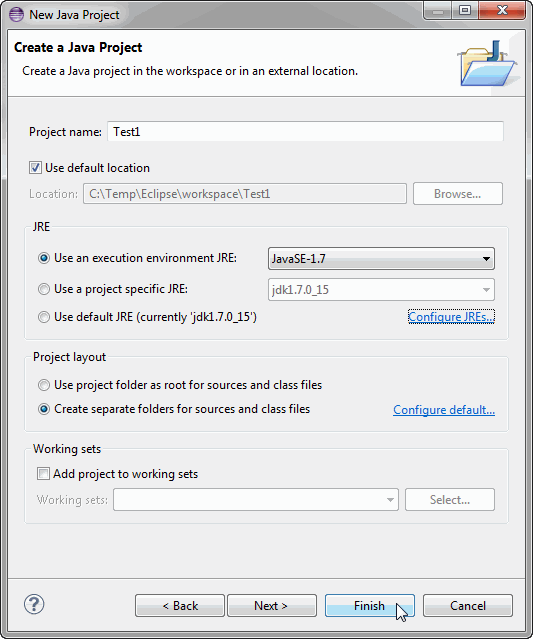
Enter the project name, specify the JRE to use, and select the Project layout option. Click Finish to complete the project creation, as shown in Figure 2-3.
-
Now create a new FXML document
-
Right-click the Test folder in the Package Explorer.
-
Select New and then Other.
-
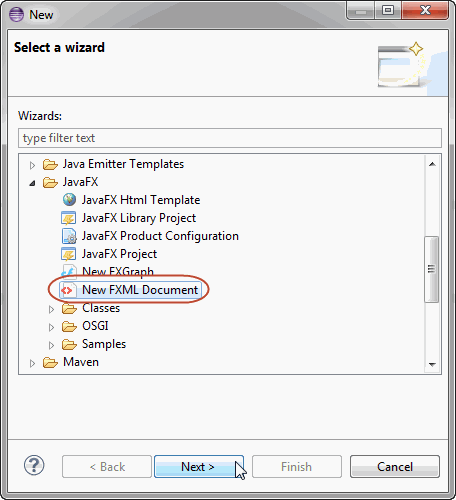
Expand the JavaFX folder in the New dialog box and then choose New FXML Document, as shown in Figure 2-4. Click Next
-
-
In the FXML File dialog box, complete the creation of the new FXML document using the following steps:
-
If not automatically set to test/src, specify the Source folder value by clicking Browse. Navigate to the src folder of the JavaFX project that you just created in the previous steps. Leave the Package field as is.
-
In the Name field, enter Sample for the FXML file name, as shown in Figure 2-5.
-
If not already set, specify the FXML document's root element by clicking Browse and selecting an item from the Find Preloader dialog box. The default value shown is AnchorPane.
-
Leave Dynamic Root unselected. It is for advanced users who want to manage custom types.
-
Click Finish to close the dialog box.
You can now complete the creation of your JavaFX FXML layout
Figure 2-5 Finish Creating a New FXML File
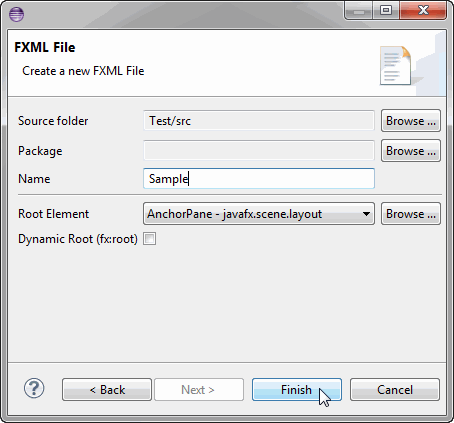
Description of "Figure 2-5 Finish Creating a New FXML File"
-
Editing an FXML File Using Scene Builder
You can edit an FXML file using the Eclipse FXML editor or by opening the file using the JavaFX Scene Builder tool:
-
In the IDE's Package Explorer tab, expand the Test and src folders.
-
Right-click the
Sample.fxmlfile and select Open with Scene Builder, as shown in Figure 2-6.
A separate window for Scene Builder is opened and displays theSample.fxmllayout in the Content panel area. You may have to increase the size of the default AchorPane that appears in the Content panel. You may start to add controls.Figure 2-6 Open Sample.fxml File in Scene Builder
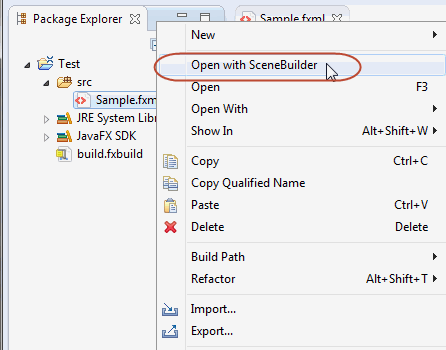
Description of "Figure 2-6 Open Sample.fxml File in Scene Builder"
-
Use
JavaFX Scene Builder User Guideto learn more about the available Scene Builder features andGetting Started with JavaFX Scene Builderto create a simple issue tracking application.
Where to Go From Here
Now that you are familiar with the integration between the Scene Builder tool and Eclipse IDE, look at JavaFX Scene Builder User Guide to learn more about the available Scene Builder features. Follow the steps described in Getting Started with JavaFX Scene Builder to create a simple issue tracking application.
You can also try the sample applications provided with the Scene Builder release. The samples are Netbeans projects, so use the following information to learn how to use a sample using Eclipse IDE.
Using Scene Builder Samples From Eclipse IDE
Use the following information to use the Scene Builder samples. The HelloWorld application is used for illustratative purpose.
-
Ensure that you have downloaded JavaFX Scene Builder Samples bundle from
http://www.oracle.com/technetwork/java/javafx/downloads/index.htmland extracted its contents. -
Create a new JavaFX Project by selecting File, and then choosing New and then Other.
-
In the New wizard, expand the JavaFX folder and choose JavaFX Project. Click Next.
-
In the New Java Project dialog box, enter HelloWorld for the Project Name, as shown in Figure 2-7, and click Next.
Figure 2-7 Create a JavaFX Project for the HelloWorld Sample
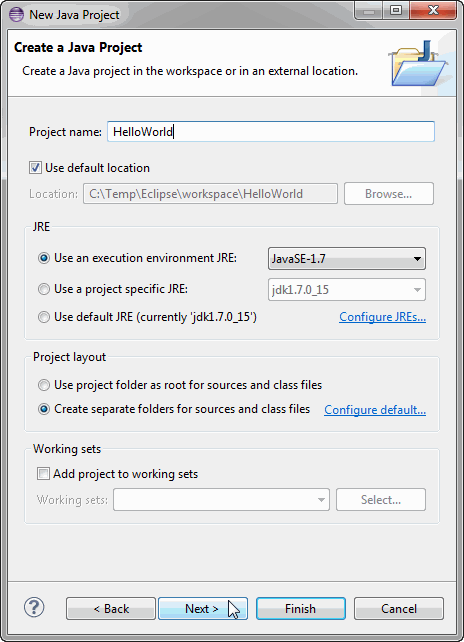
Description of "Figure 2-7 Create a JavaFX Project for the HelloWorld Sample"
-
In the Details section of the Java Settings dialog box, click Link additional source option. The Link Source dialog box is displayed.
-
Click Browse and navigate to the location of the src folder for the Scene Builder HelloWorld sample application and click OK, as shown in Figure 2-8.
Note:
Ignore the error “The folder is already a source folder.” because the Folder name field is automatically filled in
Figure 2-8 Open the HelloWorld Sample's src Folder
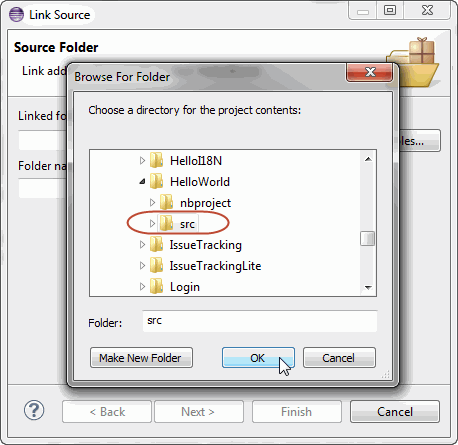
Description of "Figure 2-8 Open the HelloWorld Sample's src Folder"
-
Change the default value in the Folder name text field to src_samples, or any folder name of your choice, and click Finish.
-
Back in the New Java Project wizard, click Finish.
-
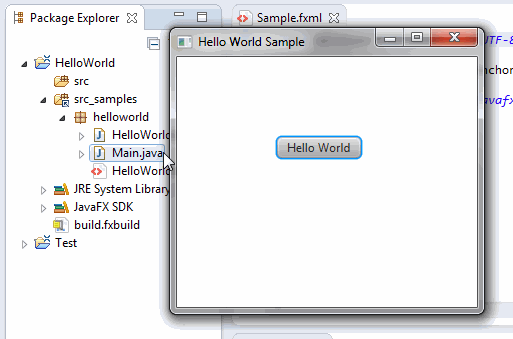
Run the HelloWorld sample, as shown in Figure 2-9:
-
In the Project Explorer window, expand the src_samples and helloworld folders for the HelloWorld project.
-
Right-click the node for the Main.java source file.
-
Choose Run As and then Java Application.
Figure 2-9 Run Scene Builder HelloWorld Sample
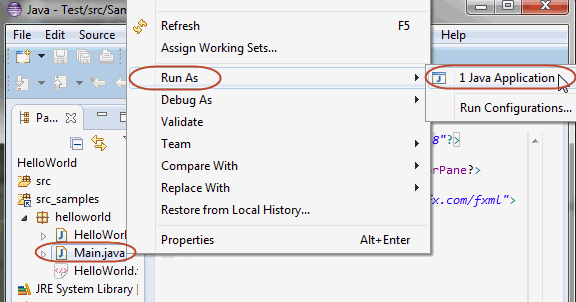
Description of "Figure 2-9 Run Scene Builder HelloWorld Sample"
The HelloWorld application is displayed, as shown in Figure 2-10.
-
 Jerome is a member of the JavaFX Scene Builder development team.
 Cindy is a technical writer in the JavaFX group.
She has written tutorials, online help, and technical articles for Java and JavaFX technologies.

