Beta Draft: 2016-07-11

1 Installing the Java ME Embedded Software on the Intel Galileo Gen2 Board

Learn how to install the Java ME Embedded software 8.3 onto an Intel Galileo Gen2 board, configure the Java ME Embedded system, connect to the command-line and logging interfaces, and perform basic configuration tasks.

Required Hardware and Software Items

This section describes the hardware and software items that are required for developing on the Intel Galileo Gen2 board.

  • Intel Galileo Gen2 board

  • Yocto Linux v.2.1 Operating System image

  • Oracle Java ME Embedded 8.3 distribution

  • Oracle Java ME SDK 8.3 (optionally)

    Note:

    You have two options to work with the Intel Galileo Gen2 board: with or without using the Java ME SDK.

  • A 7-15-V DC power supply.

  • A micro SD card of 2GB or greater up to 32 GB

  • Ethernet cable with an RJ-45 connector, as well as a connection to a network with a DHCP server.

  • A terminal emulator program, such as PuTTY, if you wish to connect to the board using the Application Management System (AMS) interface

Optionally, you can use a 6-pin Serial to Type A USB cable (FTDI cable # TTL-232R-3V3 is recommended) to connect to the board.

Installing Yocto Linux Operating System

You must prepare a bootable SD card for your Intel Galileo Gen2 board by downloading and installing the Yocto Linux v2.1 operating system. After that you need to install Oracle Java ME Embedded software.

  1. Download the Yocto Linux v2.1 operating system image to your desktop from the following location.
  2. Use 7–Zip to unzip the distribution file, which creates a single disk image file.
    On Windows, use 7–Zip utility.
    On Linux, use bunzip2 or tar -xf <file> to unzip the archive.
    You now have a file called iotdk-galileo-image.
  3. Mount the SD card to the desktop, and use a utility to create a bootable SD card by writing the disk image file to the SD card.
    Note that this is not the same as copying the file to the base-level directory on the SD card. Instead, it is similar to burning a disk image onto a CD-ROM or DVD-ROM. There are a number of utilities that perform this action.
  4. Eject the SD card from your host computer.

Connecting to the Galileo Gen2 Board

To connect to the Intel Galileo Gen2 board, follow these steps:

  1. Insert a bootable SD card into your Intel Galileo Gen2 board.
  2. Connect the RJ-45 network cable to the board.
  3. Connect power to the board.
    The green light ON on the board should glow, then the USB light should also glow and in a few seconds, the green light SD should start blinking. The blinking green light indicates that the board is booting Linux.
  4. If the Linux installation was successful, the Intel Galileo Gen2 board obtains an IP address.
  5. Scan the network to find out the Intel Galileo Gen2 IP address.
    For example, run the nmap command.
    nmap -sn <IP Address>/<Subnet Mask | grep Intel -B2
    You need to know the IP Address of your board to access and control the board remotely. Remember this IP address for further use.
  6. Start an LXTerminal program and login to the board.
    Linux users can use the ssh command to login to the board. Note that there is no sudo command in Intel Galileo Gen2 board.
    The user name is root, a password is empty, i.e no password is required.

Structure of the Oracle Java ME Embedded Software

The Oracle Java ME Embedded software for the Intel Galileo Gen2 board is distributed as a ZIP archive.

The user has an option to run a Developer Agent program on the desktop under Windows or Linux. Commands that are sent to the board from the host desktop are no longer sent directly across the network. Instead, they are sent to the Developer Agent program, which transmits all communication to and from the Oracle Java ME Embedded executable file on the Intel Galileo Gen2 board.

The Oracle Java ME Embedded ZIP archive consists of the following directories:

  • /appdb: This directory is used on the Intel Galileo Gen2 and contains internal Java libraries.

  • /bin: This directory is used on the Intel Galileo Gen2 and contains executables and the jwc_properties.ini file.

  • /legal: This directory contains important legal documentation.

  • /lib: This directory contains the files needed to compile IMlets on the Intel Galileo Gen2 board.

  • /toolkit-lib: This directory contains Java heap dumps and Java Heap Analyzer Tool (HAT).

  • /util: This directory contains the Developer Agent program.

Installing the Java ME Embedded Software on the Intel Galileo Gen2 Board

This section describes how to install the Oracle Java ME Embedded Software manually. Download the Oracle Java ME Embedded ZIP archive file and follow these steps:

  1. Use an sftp client or scp command to transfer a copy of the Oracle Java ME Embedded archive to the Intel Galileo Gen2 board.

    For example, on a UNIX or Mac system, you can transfer the ZIP file using a command similar to the following:

    $sftp pi@[IP address of board]
    

    Windows users can download the psftp.exe to obtain a free SFTP client which is available from the same address as the PuTTY executable:

    http://www.putty.org/

  2. After the ZIP archive is transferred, either go directly to the keyboard and the mouse connected to the Intel Galileo Gen2 board, or start a secure shell script on your desktop to connect to the board using the following command:
    $ssh -l pi [IP address of board]
    
  3. Unzip the archive on the Intel Galileo Gen2 board.
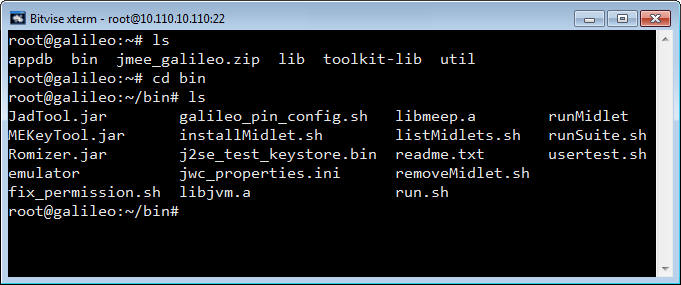
  4. Change to the bin directory.
    The contents of the bin directory are shown in Figure 1-1.

    Figure 1-1 Intel Galileo Gen2 Board bin Directory

    Description of Figure 1-1 follows
    Description of "Figure 1-1 Intel Galileo Gen2 Board bin Directory"
  5. Run the fix_permission.sh script to enable a privilege escalation mechanism.
    root@galileo:~/bin# fix_permission.sh
    

Running Java ME on the Galileo Board

Ensure that you installed the bootable SD card in your Intel Galileo Gen2 board, connect the board to the power source and to Ethernet.
  1. Run an SSH shell and login to the board using its IP Address.
    Note that the default user name is root without a password.
  2. CD to the bin directory.
  3. Run the galileo_pin_config.sh script.
    root@galileo:~/bin# ./galileo_pin_config.sh
    You need to run the galileo_pin_config.sh script once after a reboot. For more information, see Functionality of the galileo_pin_config Script.
  4. Run the fix_permission.sh script to enable a privilege escalation mechanism.
    root@galileo:~/bin# ./fix_permission.sh
    The fix_permission.sh provides the following functionality:
    • Sets an executable mode for all .sh files

    • Sets an executable mode for the runMidlet

    • Sets the network capabilities for the runMidlet by granting superuser privileges to perform various network-related operations

    • Enables the runMidlet to access the files required for the Device I/O functionality

  5. Run Java ME on the Intel Galileo Gen2 board.
    root@galileo:~/bin# ./usertest.sh
You will see the following output.

Java is starting. Press Ctrl-C to exit

Editing the grub.conf File

The grub.conf file modification is required for connecting SPI devices to the Intel Galileo Gen2 board. You must add a special kernel parameter to enable the Linux SPI driver to control the Chip Select (CS) pin for SPI input/output.

To edit the grub.conf file, perform the following steps.
  1. Login to the Intel Galileo Gen2 board.
  2. Run the cat command to check the current setting.
    root@galileo:~# cat /sys/module/intel_qrk_plat_galileo_gen2/parameters/gpio_cs
    The respond is 0.
  3. CD to the root directory on the SD card.
    root@galileo:~# cd ./
  4. Open the /media/mmcblk0p1/boot/grub/grub.conf file for editing.
  5. Append the kernel parameter intel_qrk_plat_galileo_gen2.gpio_cs=1 to the end of the line beginning with kernel
    kernel /bzImage root=/dev/mmcblk0p2 rootwait console=ttyS1,115200n8 ... intel_qrk_plat_galileo_gen2.gpio_cs=1
  6. Reboot the board.
  7. Run the cat command to check the setting again.
    root@galileo:~# cat /sys/module/intel_qrk_plat_galileo_gen2/parameters/gpio_cs
    The respond is 1 which means that you set the parameter correctly.

Downloading and Installing the PuTTY Terminal Emulator Program

The PuTTY terminal emulator is used to connect to the AMS command-line interface (CLI) that sends commands to the board.

Download the PuTTY terminal emulator program (putty.exe) from the following site:

http://www.putty.org/

Note:

Using the PuTTY terminal emulator program is highly recommended. You can use any terminal program to connect to the CLI, however, Oracle cannot guarantee that other terminal programs work with the CLI in the same manner as PuTTY.