5 Applying Effects
This tutorial describes how to use visual effects to enhance the look of your JavaFX application.
All effects are located in the javafx.scene.effect package and are subclasses of the Effect class. For more information about particular classes, methods, or additional features, see the API documentation.
Blend Effect
Blend is an effect that combines two inputs together using one of the predefined blending modes.
In the case of a node blending (node.setBlendMode()), the two inputs are:
-
The node being rendered (a top input)
-
Everything underneath the node (a bottom input)
The determination of the bottom input is based on the following rules:
-
All lower Z-order siblings in the same group are included.
-
If the group has a defined blend mode, then the process stops, and the bottom input is defined.
-
If the group has the default blend mode, then everything underneath the group is included, recursively using this same rule.
-
If the process recursively gets back to the root node, then the background paint of the scene is included.
Note:
If the background paint of the scene, which is usually an opaque color, is included in the bottom input, then the SRC_ATOP mode renders on a completely opaque bottom source and has no effect. In this case, the SRC_ATOP mode is equivalent to SRC_OVER.
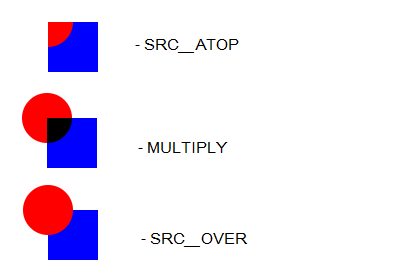
A blending mode defines the manner in which the objects are mixed together. For example, in Figure 5-1, you can see examples of some blending modes applied to a circle that is grouped with a square.
Example 5-1 shows a code snippet for the blend effect in the sample application.
Example 5-1 Blend Effect
static Node blendMode() {
        Rectangle r = new Rectangle();
        r.setX(590);
        r.setY(50);
        r.setWidth(50);
        r.setHeight(50);
        r.setFill(Color.BLUE);

        Circle c = new Circle();
        c.setFill(Color.RED);
        c.setCenterX(590);
        c.setCenterY(50);
        c.setRadius(25);
        c.setBlendMode(BlendMode.SRC_ATOP);

        Group g = new Group();
        g.setBlendMode(BlendMode.SRC_OVER);
        g.getChildren().add(r);
        g.getChildren().add(c);
        return g;
    }
Bloom Effect
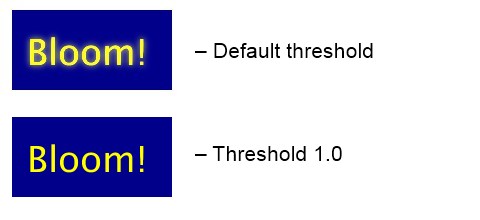
The bloom effect makes brighter portions an image appear to glow, based on a configurable threshold. The threshold varies from 0.0 to 1.0. By default, the threshold is set to 0.3.
Figure 5-2 shows the bloom effect at the default threshold and at a threshold of 1.0.
Example 5-2 shows a code snippet from the sample application that is using the bloom effect.
Example 5-2 Bloom Example
static Node bloom() {
        Group g = new Group();

        Rectangle r = new Rectangle();
        r.setX(10);
        r.setY(10);
        r.setWidth(160);
        r.setHeight(80);
        r.setFill(Color.DARKBLUE);

        Text t = new Text();
        t.setText("Bloom!");
        t.setFill(Color.YELLOW);
        t.setFont(Font.font("null", FontWeight.BOLD, 36));
        t.setX(25);
        t.setY(65);

        g.setCache(true);
        //g.setEffect(new Bloom());
        Bloom bloom = new Bloom();
        bloom.setThreshold(1.0);
        g.setEffect(bloom);
        g.getChildren().add(r);
        g.getChildren().add(t);
        g.setTranslateX(350);
        return g;
    }
Blur Effects
Blurring are common effects that can be used to provide more focus to selected objects. With JavaFX you can apply a boxblur, a motion blur, or a gaussian blur.
BoxBlur
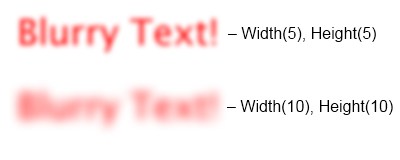
The BoxBlur is a blur effect that uses a simple box filter kernel, with separately configurable sizes in both dimensions that control the amount of blur applied to an object, and an Iterations parameter that controls the quality of the resulting blur.
Figure 5-3 shows two samples of blurred text.
Example 5-3 is a code snippet that uses the BoxBlur effect.
Example 5-3 BoxBlur Example
static Node boxBlur() {
        Text t = new Text();
        t.setText("Blurry Text!");
        t.setFill(Color.RED);
        t.setFont(Font.font("null", FontWeight.BOLD, 36));
        t.setX(10);
        t.setY(40);

        BoxBlur bb = new BoxBlur();
        bb.setWidth(5);
        bb.setHeight(5);
        bb.setIterations(3);

        t.setEffect(bb);
        t.setTranslateX(300);
        t.setTranslateY(100);

        return t;
    }
Motion Blur
A motion blur effect uses a Gaussian blur, with a configurable radius and angle to create the effect of a moving object.
Figure 5-4 shows the effect of the motion blur on a text.
Example 5-4 shows a code snippet that creates a motion blur effect with radius set to 15 and angle set to 45 in the sample application.
Example 5-4 Motion Blur Example
static Node motionBlur() {
        Text t = new Text();
        t.setX(20.0f);
        t.setY(80.0f);
        t.setText("Motion Blur");
        t.setFill(Color.RED);
        t.setFont(Font.font("null", FontWeight.BOLD, 60));

        MotionBlur mb = new MotionBlur();
        mb.setRadius(15.0f);
        mb.setAngle(45.0f);

        t.setEffect(mb);

        t.setTranslateX(300);
        t.setTranslateY(150);

        return t;
    }
Gaussian Blur
The Gaussian blur is an effect that uses a Gaussian algorithm with a configurable radius to blur objects.
Figure 5-5 shows the effect of the Gaussian blur on a text.
Example 5-5 shows a code snippet that blurs the text using Gaussian blur effect.
Drop Shadow Effect
A drop shadow is an effect that renders a shadow of the content to which it is applied. You can specify the color, the radius, the offset, and some other parameters of the shadow.
Figure 5-6 shows the shadow effect on different objects.
Example 5-6 shows how to create a drop shadow on text and a circle.
Example 5-6 Text and Circle With Shadows
import javafx.collections.ObservableList;
import javafx.application.Application;
import javafx.scene.*;
import javafx.stage.*;
import javafx.scene.shape.*;
import javafx.scene.effect.*;
import javafx.scene.paint.*;
import javafx.scene.text.*;

public class HelloEffects extends Application {

    Stage stage;
    Scene scene;

    @Override
    public void start(Stage stage) {
        stage.show();

        scene = new Scene(new Group(), 840, 680);
        ObservableList<Node> content = ((Group)scene.getRoot()).getChildren();

        content.add(dropShadow());
        stage.setScene(scene);
    }

    static Node dropShadow() {
        Group g = new Group();

        DropShadow ds = new DropShadow();
        ds.setOffsetY(3.0);
        ds.setOffsetX(3.0);
        ds.setColor(Color.GRAY);

        Text t = new Text();
        t.setEffect(ds);
        t.setCache(true);
        t.setX(20.0f);
        t.setY(70.0f);
        t.setFill(Color.RED);
        t.setText("JavaFX drop shadow effect");
        t.setFont(Font.font("null", FontWeight.BOLD, 32));

        DropShadow ds1 = new DropShadow();
        ds1.setOffsetY(4.0f);
        ds1.setOffsetX(4.0f);
        ds1.setColor(Color.CORAL);

        Circle c = new Circle();
        c.setEffect(ds1);
        c.setCenterX(50.0f);
        c.setCenterY(325.0f);
        c.setRadius(30.0f);
        c.setFill(Color.RED);
        c.setCache(true);

        g.getChildren().add(t);
        g.getChildren().add(c);
        return g;
    }
    public static void main(String[] args) {
        Application.launch(args);
    }
}
Tip:
-
Making the drop shadow too wide gives the element the look of heaviness. The color of the shadow should be realistic, usually a few shades lighter than the background color.
-
If you have multiple objects with drop shadows, orient the drop shadow the same for all of the objects. A drop shadow gives the appearance of a light coming from one direction and casting a shadow on objects.
Inner Shadow Effect
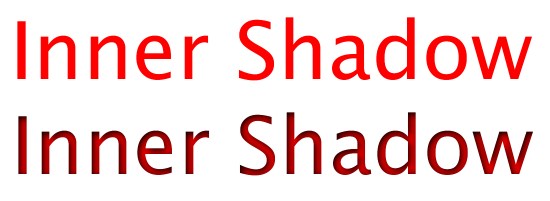
An inner shadow is an effect that renders a shadow inside the edges of the given content with the specified color, radius, and offset.
Figure 5-7 shows plain text and the same text with the inner shadow effect applied.
Example 5-7 shows how to create an inner shadow on text.
Example 5-7 Inner Shadow
static Node innerShadow() {
        InnerShadow is = new InnerShadow();
        is.setOffsetX(2.0f);
        is.setOffsetY(2.0f);

        Text t = new Text();
        t.setEffect(is);
        t.setX(20);
        t.setY(100);
        t.setText("Inner Shadow");
        t.setFill(Color.RED);
        t.setFont(Font.font("null", FontWeight.BOLD, 80));

        t.setTranslateX(300);
        t.setTranslateY(300);

        return t;
    }
Reflection
Reflection is an effect that renders a reflected version of the object below the actual object.
Note:
The reflection of a node with a reflection effect will not respond to mouse events or the containment methods on the node.
Figure 5-8 shows a reflection applied to text. Use the setFraction method to specify the amount of visible reflection.
Example 5-8 shows how to create the reflection effect on text.
Example 5-8 Text With Reflection
import javafx.scene.text.*;
import javafx.scene.paint.*;
import javafx.scene.effect.*;
public class HelloEffects extends Application {

    Stage stage;
    Scene scene;

    @Override public void start(Stage stage) {
        stage.show();

        scene = new Scene(new Group(), 840, 680);
        ObservableList<Node> content = ((Group)scene.getRoot()).getChildren();
        content.add(reflection());
        stage.setScene(scene);
    }
    static Node reflection() {
        Text t = new Text();
        t.setX(10.0f);
        t.setY(50.0f);
        t.setCache(true);
        t.setText("Reflection in JavaFX...");
        t.setFill(Color.RED);
        t.setFont(Font.font("null", FontWeight.BOLD, 30));

        Reflection r = new Reflection();
        r.setFraction(0.9);

        t.setEffect(r);

        t.setTranslateY(400);
        return t;
    }
    public static void main(String[] args) {
        Application.launch(args);
    }
}
Lighting Effect
The lighting effect simulates a light source shining on the given content, which can be used to give flat objects a more realistic three-dimensional appearance.
Figure 5-9 shows the lighting effect on text.
Example 5-9 shows how to create a lighting effect on text.
Example 5-9 Text with Applied Lighting Effect
import javafx.application.Application;
import javafx.collections.ObservableList;
import javafx.geometry.VPos;
import javafx.scene.effect.Light.Distant;
import javafx.scene.*;
import javafx.stage.*;
import javafx.scene.shape.*;
import javafx.scene.effect.*;
import javafx.scene.paint.*;
import javafx.scene.text.*;

public class HelloEffects extends Application {
    Stage stage;
    Scene scene;

    @Override public void start(Stage stage) {
        stage.show();

        scene = new Scene(new Group());
        ObservableList<Node> content = ((Group)scene.getRoot()).getChildren();

        content.add(lighting());
        stage.setScene(scene);    }
    static Node lighting() {
        Distant light = new Distant();
        light.setAzimuth(-135.0f);

        Lighting l = new Lighting();
        l.setLight(light);
        l.setSurfaceScale(5.0f);

        Text t = new Text();
        t.setText("JavaFX"+"\n"+"Lighting!");
        t.setFill(Color.RED);
        t.setFont(Font.font("null", FontWeight.BOLD, 70));
        t.setX(10.0f);
        t.setY(10.0f);
        t.setTextOrigin(VPos.TOP);

        t.setEffect(l);

        t.setTranslateX(0);
        t.setTranslateY(320);

        return t;
    }
    public static void main(String[] args) {
        Application.launch(args);
    }
}
Perspective Effect
The perspective effect creates a three-dimensional effect of otherwise two-dimensional object.
Figure 5-10 shows the perspective effect.
A perspective transformation can map any square to another square, while preserving the straightness of the lines. Unlike affine transformations, the parallelism of lines in the source is not necessarily preserved in the output.
Note:
This effect does not adjust the coordinates of input events or any methods that measure containment on a node. Mouse clicking and the containment methods are undefined if a perspective effect is applied to a node.
Example 5-10 is a code snippet from the sample application that shows how to create a perspective effect.
Example 5-10 Perspective Effect
static Node perspective() {
        Group g = new Group();
        PerspectiveTransform pt = new PerspectiveTransform();
        pt.setUlx(10.0f);
        pt.setUly(10.0f);
        pt.setUrx(210.0f);
        pt.setUry(40.0f);
        pt.setLrx(210.0f);
        pt.setLry(60.0f);
        pt.setLlx(10.0f);
        pt.setLly(90.0f);

        g.setEffect(pt);
        g.setCache(true);

        Rectangle r = new Rectangle();
        r.setX(10.0f);
        r.setY(10.0f);
        r.setWidth(280.0f);
        r.setHeight(80.0f);
        r.setFill(Color.DARKBLUE);

        Text t = new Text();
        t.setX(20.0f);
        t.setY(65.0f);
        t.setText("Perspective");
        t.setFill(Color.RED);
        t.setFont(Font.font("null", FontWeight.BOLD, 36));

        g.getChildren().add(r);
        g.getChildren().add(t);
        return g;
    }
Figure 5-11 shows which coordinates affect the resulting image.
Figure 5-11 Coordinates for Perspective Effect
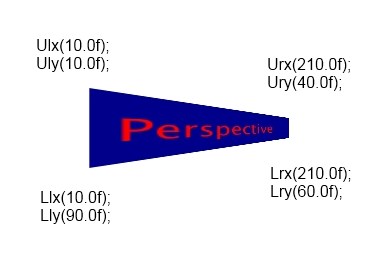
Description of "Figure 5-11 Coordinates for Perspective Effect"
Creating a Chain of Effects
Some of the effects have an input property that you can use to create a chain of effects. The chain of effects can be a tree-like structure, because some effects have two inputs and some do not have any.
In Figure 5-12 the reflection effect is used as an input for the drop shadow effect, which means that first the rectangle is reflected by the reflection effect and then the drop shadow effect is applied to the result.
Example 5-11 Rectangle with a Shadow and Reflection Sequentially Applied
import javafx.application.Application;
import javafx.collections.ObservableList;
import javafx.scene.*;
import javafx.stage.*;
import javafx.scene.shape.*;
import javafx.scene.effect.*;
import javafx.scene.paint.*;
import javafx.scene.text.*;

public class HelloEffects extends Application {

    Stage stage;
    Scene scene;

    @Override public void start(Stage stage) {
        stage.show();

        scene = new Scene(new Group());
        ObservableList<Node> content = ((Group)scene.getRoot()).getChildren();

        content.add(chainEffects());
        stage.setScene(scene);
    }
    static Node chainEffects() {

        Rectangle rect = new Rectangle();
        rect.setFill(Color.RED);
        rect.setWidth(200);
        rect.setHeight(100);
        rect.setX(20.0f);
        rect.setY(20.0f);

        DropShadow ds = new DropShadow();
        ds.setOffsetY(5.0);
        ds.setOffsetX(5.0);
        ds.setColor(Color.GRAY);


        Reflection reflection = new Reflection();

        ds.setInput(reflection);
        rect.setEffect(ds);

        return rect;
    }
    public static void main(String[] args) {
        Application.launch(args);
    }
}
Note:
If you change the last two lines in the chainEffects()method to reflection.setInput(ds); and rect.setEffect(reflection);, first the drop shadow will be applied to the rectangle, and then the result will be reflected by the reflection effect.
For more information about particular classes, methods, or additional features, see the API documentation.
