4 Create the FXML File and the Base Panes
In this chapter, you create a new FXML layout file using either the NetBeans IDE New command or the JavaFX Scene Builder New command. You then assign the cascading style sheet (CSS) to use for the FXML layout and create the base panes to start the application's GUI design.
The FXML layout that you are about to build for the IssueTrackingLite application is an interface that enables you to query existing project issues, modify them, or add new issues. Build your own IssueTrackingLite user interface by doing the following:
-
Create the new FXML file by following the steps in either Use NetBeans IDE New Wizard or Use JavaFX Scene Builder New Command.
-
Set the Root Container, CSS, and Style Class to use for the entire layout.
-
Create the Base Panes for the layout.
Use NetBeans IDE New Wizard
Create a new empty FXML file using the NetBeans IDE New wizard.
-
From the Projects window of the IDE, right-click the issuetrackinglite folder node under Source Packages, select New, and then Other.
-
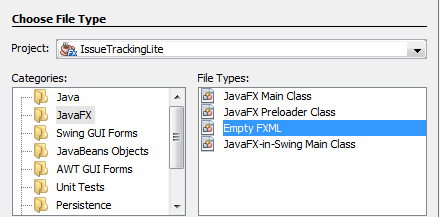
In the New File dialog box, select the JavaFX category and select the Empty FXML file type, as shown in Figure 4-1. Click Next.
-
In the New Empty FXML dialog box, enter
IssueTrackingLitein the FXML Name text field. Ensure that the Package text field has the valueissuetrackinglite. Click FinishThe
IssueTrackingLite.fxmlfile is opened in the IDE source editor. This new FXML file is in the same folder as the provided controller source code,IssueTrackingLiteController.java, that will connect with the user interface that you build with this tutorial. -
In the Projects window, double-click the IssueTrackingLite.fxml node to open the file in the JavaFX Scene Builder tool.
The main window for the JavaFX Scene Builder tool appears with an FXML file opened in the Content panel, as shown in Figure 4-2.
Figure 4-2 JavaFX Scene Builder Main Window at Startup from NetBeans IDE
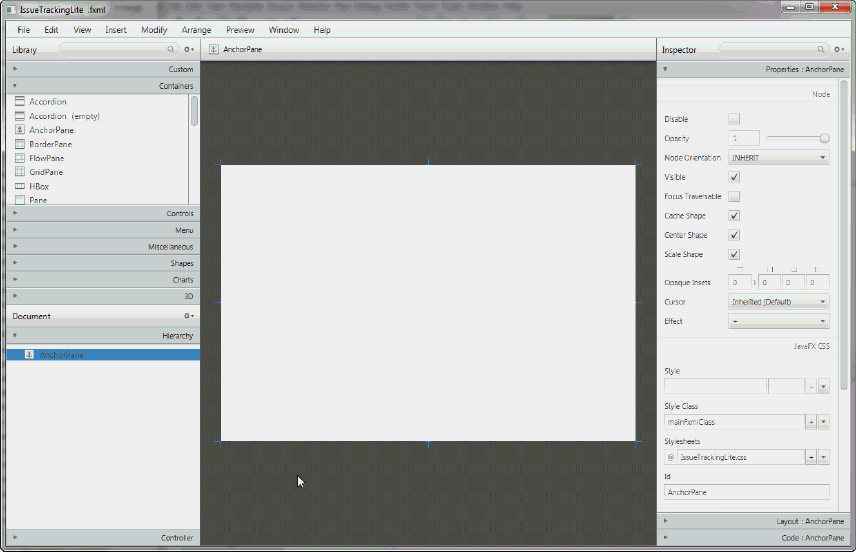
Description of "Figure 4-2 JavaFX Scene Builder Main Window at Startup from NetBeans IDE"
-
In the Scene Builder Hierarchy panel, right-click the AnchorPane node and select Delete.
The IssueTrackingLite layout you build in this tutorial uses a different top container which you will add in Set the Root Container, CSS, and Style Class. -
Select File and then Save from the JavaFX Scene Builder Menu bar.
Use JavaFX Scene Builder New Command
If you chose not to use NetBeans IDE to complete this tutorial, use the following steps to create a new empty FXML file using the Scene Builder New command.
From the Scene Builder Menu bar, select File and then New.
A new JavaFX Scene Builder window appears with an empty FXML file opened in the Content panel, as shown in Figure 4-2. The Content panel is initially empty.
Figure 4-3 JavaFX Scene Builder Main Window After New File Creation
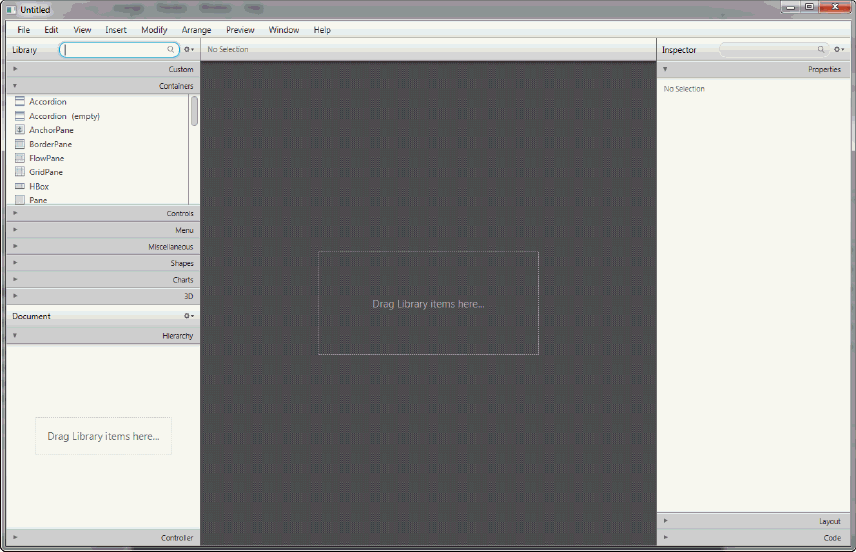
Description of "Figure 4-3 JavaFX Scene Builder Main Window After New File Creation"
Set the Root Container, CSS, and Style Class
Set the root container, stylesheet, and style class to use for the entire layout.
Tip:
From the Menu bar, select File and then Save command often. Also, from the Menu bar, select Edit and then Undo to undo actions when necessary while you build the IssueTrackingLite application.
-
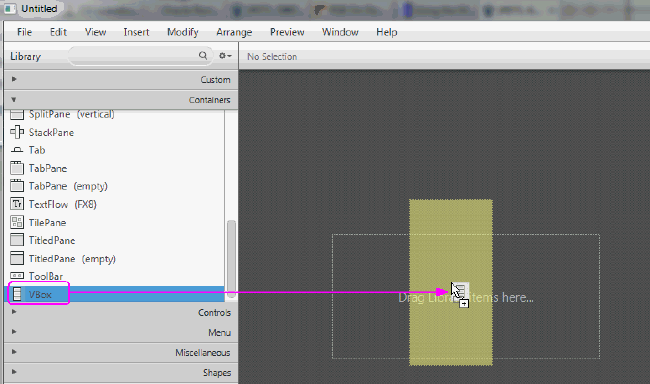
Drag a VBox container from the Library panel to the Content panel, as shown in Figure 4-4.
Figure 4-4 Add the Initial VBox Container
Description of "Figure 4-4 Add the Initial VBox Container"
-
Set the CSS file to use for your new FXML layout.
-
In the Hierarchy section of the Document panel, ensure that the root VBox container element is selected.
-
In the Properties section of the Inspector panel, go to the JavaFX CSS section and locate the Stylesheets text field. Click the button with the plus sign (+) symbol.
-
In the Add Style Sheet dialog box, navigate to where you extracted the
IssueTrackingLitesample file. Open theissuetrackinglitefolder and select the IssueTrackingLite.css file. Click Open.
-
-
Set the Style Class.
-
Ensure that the root VBox container is still selected in the Hierarchy panel.
-
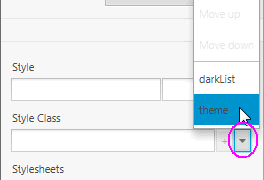
In the Properties section of the Inspector panel, locate the Style Class text field and click the drop-down arrow. The list of style classes is retrieved from the
IssueTrackingLite.cssfile. Select theme, as shown in Figure 4-5Figure 4-5 Set the Style Class for the Layout
Description of "Figure 4-5 Set the Style Class for the Layout"
-
-
Save the new FXML file before you continue with the rest of the tutorial.
-
From the main menu bar, select File and then Save, if you created the file via the NetBeans IDE, or Save As, if you created the file via Scene Builder File > New command.
-
In the Save As dialog window, navigate to where you extracted the
IssueTrackingLitesample file. Expand theIssueTrackingLite,src, and thenissuetrackinglitefolders. -
Enter
IssueTrackingLite.fxmlin the File name text field and click Save. -
Select Yes when asked if you want to replace the existing
IssueTrackingLite.fxmlfile.
-
Resize the Scene and the Scene Builder Window
Resize the scene and the Scene Builder window so that you have a bigger working area.
-
Resize the scene's width and height in the Content panel to get a larger working area.
-
In the Inspector panel, select the Layout section.
-
In the Size section, change the
Pref Widthproperty value to 800 and thePref Heightproperty value to 600. -
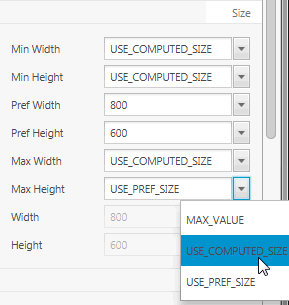
Change the Min Width, Min Height, Max Width, and Max Height property values to USE_COMPUTED_SIZE, as shown in Figure 4-6.
-
-
Resize the Scene Builder window so you are able to view the entire VBox container.
Create the Base Panes
Create the base layout panes to define the different sections of your GUI layout.
-
Open the Hierarchy section of the Document panel, if not already opened.
-
Add a SplitPane object.
-
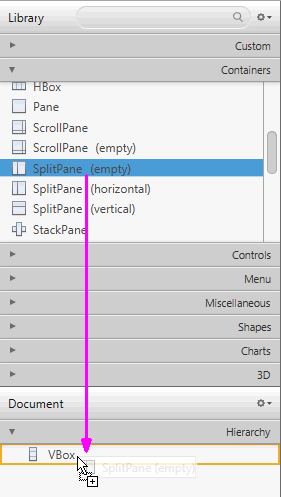
From the Library panel, drag a SplitPane (empty) container to the Document panel's Hierarchy section and drop it inside the VBox element, as shown in Figure 4-7.
Figure 4-7 Add Empty SplitPane to the VBox Container
Description of "Figure 4-7 Add Empty SplitPane to the VBox Container"
-
Select the Split Pane in the Hierarchy panel and from the menu bar select Modify and then Use Computed Sizes.
-
In the Inspector panel, select the Layout section. Set the Vgrow property value to ALWAYS.
-
-
Add another
SplitPaneelement and modify its contents.-
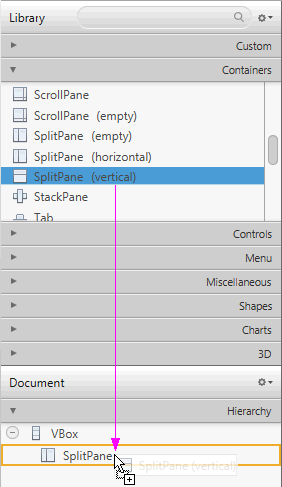
From the Library panel's Containers section, drag a SplitPane (vertical) element and drop it into the previously added SplitPane in the Hierarchy panel, as shown in Figure 4-8.
Figure 4-8 Add Split Pane (Vertical) Element
Description of "Figure 4-8 Add Split Pane (Vertical) Element"
Notice that after the SplitPane (Vertical) element is dropped, it is added to the Document panel with its AnchorPane children.
-
From the menu bar, select Modify and then Use Computed Size. Alternatively, you can press Ctrl+Shift+K.
-
In the Hierarchy panel, expand the second SplitPane container element you just added to display its contents. Right-click the first AnchorPane node and select Delete from the contextual menu.
-
Select the node for the remaining AnchorPane and from the main menu bar, select Modify and then Use Computed Sizes.
Notice that in the Layout section of the Inspector panel, the Sizes properties for the AnchorPane is updated to the value ofUSE_COMPUTED_SIZE.
-
-
From the Menu bar, select File and then Save. Alternatively, you can press Ctrl-S (for Windows or Linux platforms) or Cmd-S (for Mac OS platform).
Perform the Save action frequently to preserve your work.
