2 Using Scene Builder with NetBeans IDE
This chapter describes how to download and install NetBeans IDE, use it to create a new JavaFX FXML project, start Scene Builder from within the IDE, and run Scene Builder sample applications.
The integration of JavaFX Scene Builder with NetBeans IDE provides optimal development workflow. It is assumed that you have already installed Scene Builder before continuing with the rest of this chapter. Go to the JavaFX Scene Builder Installation Guide for installation information.
Downloading and Installing NetBeans IDE
Go to http://netbeans.org/downloads for the latest NetBeans IDE 8 download and installation information.
Creating a New JavaFX FXML Project
In NetBeans IDE, you use the New wizard to create a new JavaFX FXML Application, which is a JavaFX project that is based on an FXML layout. After the project is created, you can edit the FXML file using Scene Builder.
-
From the NetBeans IDE Main menu, select File, and then choose New Project.
-
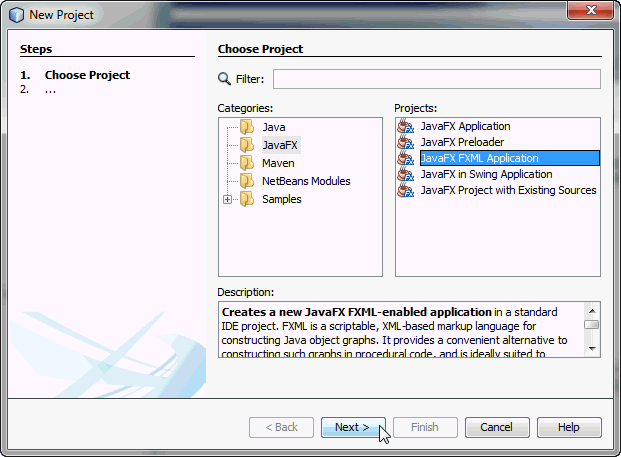
In the New Project dialog box, choose the JavaFX category and JavaFX FXML Application project, as shown in Figure 2-1. Click Next.
Figure 2-1 Create New JavaFX FXML Application Project
Description of "Figure 2-1 Create New JavaFX FXML Application Project"
-
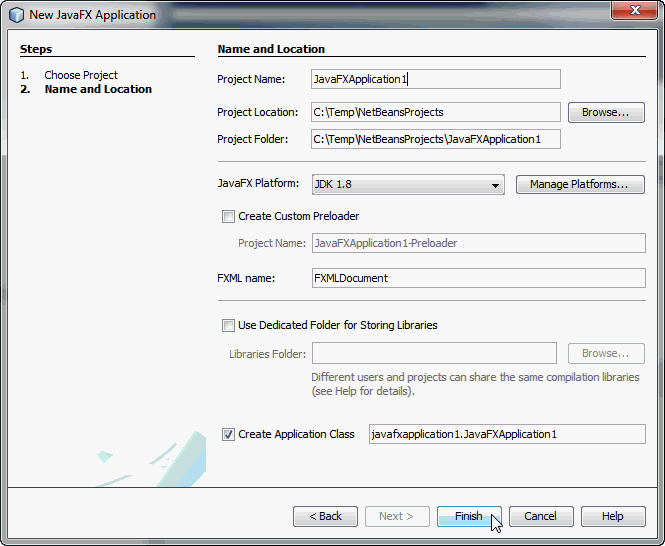
In the New JavaFX Application dialog box, enter the values you would like to use for the project name, project location, and FXML file name. Click Finish to complete the project creation. Figure 2-2 gives an example with sample values.
Figure 2-2 Set the Name and Location of the New JavaFX Application
Description of "Figure 2-2 Set the Name and Location of the New JavaFX Application"
The IDE's Projects window is updated with the new JavaFX application you just created.
Editing an FXML File Using Scene Builder
You can modify your FXML file using the NetBeans IDE editor or by opening it using Scene Builder. If you installed Scene Builder in a location other than the default, you need to first ensure that NetBeans IDE is configured with that Scene Builder installation by following Configuring the Scene Builder Installation Location.
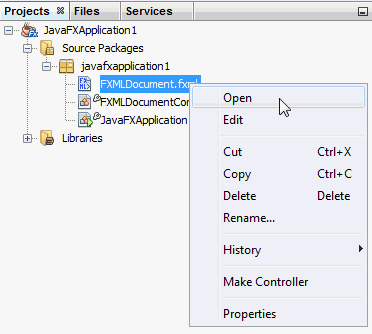
As shown in Figure 2-3, you can either choose Open to edit the FXML file with the Scene Builder tool or choose Edit to edit the FXML file with the Netbeans FXML editor.
Figure 2-3 Open FXML File from NetBeans IDE
Description of "Figure 2-3 Open FXML File from NetBeans IDE"
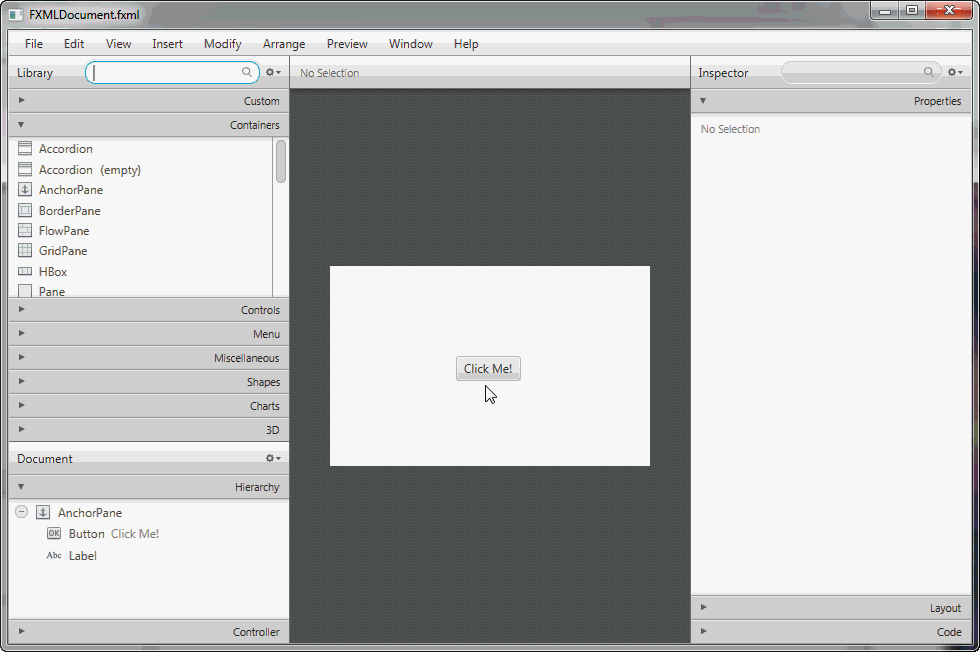
When you right-click the node for the FXML file and choose Open, NetBeans IDE invokes the latest installed Scene Builder on your system, and the Scene Builder window appears, as shown in Figure 2-4. Changes you make to your FXML file using Scene Builder are reflected in the file.
Figure 2-4 Open FXML File in Scene Builder
Description of "Figure 2-4 Open FXML File in Scene Builder"
Configuring the Scene Builder Installation Location
If you did not install Scene Builder in the default installation location, use the following steps to let NetBeans IDE be aware of its location:
-
From the IDE's Main menu, select Tools and choose Options.
On the Mac OS platform, select NetBeans and choose Preferences from the Main menu. -
In the Options window, click Java and then the JavaFX tab.
-
Specify the location of the Scene Builder installation folder and then click OK.
Figure 2-5 shows the JavaFX tab with the path to the Scene Builder installation.Figure 2-5 Set the Scene Builder Home in NetBeans IDE
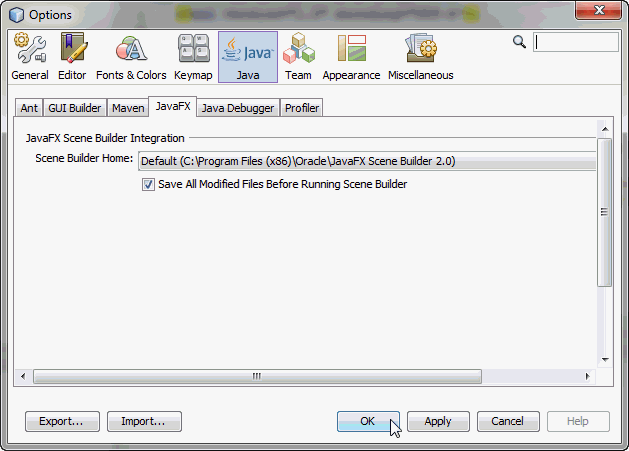
Description of "Figure 2-5 Set the Scene Builder Home in NetBeans IDE"
Synchronizing With the Controller Source Code
The NetBeans IDE's Make Controller feature allows you to synchronize the modifications you make in the FXML file that is currently opened in Scene Builder and the controller source code opened in NetBeans IDE. To illustrate this feature, do the following:
-
In the Scene Builder window, drag another Button control from the Library panel to the Content panel.
-
In the Code panel on the right side of the window, type
button2for the new button'sfx:idfield and a new method name,handleButtonAction2, for theonActionmethod. -
Select File in the main menu and then Save.
-
In NetBeans IDE, right click the node for the
FXMLDocument.fxmlfile that you just edited, if it is not already opened, and select Edit from the contextual menu.
Notice there is an error badge to indicate that the handleButtonAction2 is undefined. -
From the IDE's main menu, select Source and then Make Controller.
The@FXML private Button button2declaration and the declaration for the new method,handleActionButton2, are created in the controller source file,FXMLDocumentController.java. Use the Make Controller command if you delete an element from the Scene Builder's Content panel, or update anfx:idvalue or a method name in Scene Builder.
Where to Go From Here
Now that you are familiar with the integration between the Scene Builder tool and NetBeans IDE, look at JavaFX Scene Builder User Guide to learn more about the available Scene Builder features. Use the steps described in Getting Started with JavaFX Scene Builder to create a simple issue tracking application.
You can also try the sample applications provided with the Scene Builder release. These samples are Netbeans projects, which means they can be compiled and ran directly after being opened in the NetBeans IDE.
-
Download the Scene Builder samples bundle from the Additional Resources section of the Java SE Downloads page at
https://www.oracle.com/technetwork/java/javase/downloads/index.html. -
Extract the
javafx_scenebuilder_samples-2_0.zipfile. -
From the NetBeans IDE, open on of the sample NetBeans projects you just extracted.
-
Right-click the project's node in the IDE's Project window and choose Run, as shown in Figure 2-6.
Figure 2-6 Run Scene Builder Sample Application
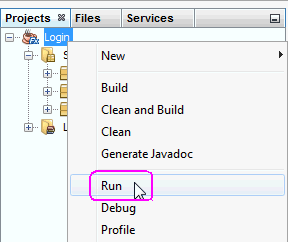
Description of "Figure 2-6 Run Scene Builder Sample Application "

