Lesson: Laying Out Components Within a Container
Section: How to Use GroupLayout
The Java Tutorials have been written for JDK 8. Examples and practices described in this page don't take advantage of improvements introduced in later releases and might use technology no longer available.
See Dev.java for updated tutorials taking advantage of the latest releases.
See Java Language Changes for a summary of updated language features in Java SE 9 and subsequent releases.
See JDK Release Notes for information about new features, enhancements, and removed or deprecated options for all JDK releases.
A GroupLayout Example
Note: This lesson covers writing layout code by hand, which can be challenging. If you are not interested in learning all the details of layout management, you might prefer to use the
GroupLayout layout manager combined with a builder tool to lay out your GUI. One such builder tool is the
NetBeans IDE. Otherwise, if you want to code by hand and do not want to use GroupLayout, then GridBagLayout is recommended as the next most flexible and powerful layout manager.
If you are interested in using JavaFX to create your GUI, see Working With Layouts in JavaFX.
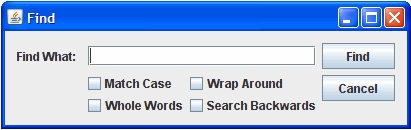
As an example of GUI creation with GroupLayout, let us create a layout for this "Find" dialog box:
Horizontal layout
Examining the horizontal dimension from left to right, we can see there are 3 groups in a sequence. The first one is actually not a group, just a component -- the label. The second one is a group containing the text field and the check boxes (we will decompose it later). And the third is a group of the two buttons. As illustrated here:
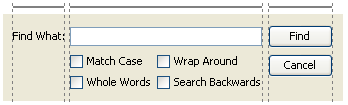
Let us sketch out the sequential group in code. Note that GroupLayout.Alignment.LEADING corresponds to left alignment in the horizontal dimension. Also note we do not specify gaps, assuming the gap auto-insertion feature is turned on.
layout.setHorizontalGroup(layout.createSequentialGroup()
    .addComponent(label)
    .addGroup(layout.createParallelGroup(GroupLayout.Alignment.LEADING))
    .addGroup(layout.createParallelGroup(GroupLayout.Alignment.LEADING))
);
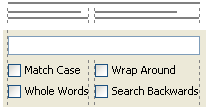
Now let us decompose the group in the middle. This is the hardest one. There is a text field in parallel with a sequence of two parallel groups each containing two check boxes. See the following illustration:
Let us add the corresponding code:
layout.setHorizontalGroup(layout.createSequentialGroup()
    .addComponent(label)
    .addGroup(layout.createParallelGroup(GroupLayout.Alignment.LEADING)
         .addComponent(textField)
         .addGroup(layout.createSequentialGroup()
              .addGroup(layout.createParallelGroup(GroupLayout.Alignment.LEADING)
                  .addComponent(caseCheckBox)
                  .addComponent(wholeCheckBox))
              .addGroup(layout.createParallelGroup(GroupLayout.Alignment.LEADING)
                  .addComponent(wrapCheckBox)
                  .addComponent(backCheckBox))))
     .addGroup(layout.createParallelGroup(GroupLayout.Alignment.LEADING))
);
We want the text field to be resizable, but that happens automatically since JTextField returns the right maximum size by default.
The remaining group on the right is trivial: it contains just two buttons. Here is the code:
layout.setHorizontalGroup(layout.createSequentialGroup()
    .addComponent(label)
    .addGroup(layout.createParallelGroup(GroupLayout.Alignment.LEADING)
        .addComponent(textField)
        .addGroup(layout.createSequentialGroup()
            .addGroup(layout.createParallelGroup(GroupLayout.Alignment.LEADING)
                .addComponent(caseCheckBox)
                .addComponent(wholeCheckBox))
            .addGroup(layout.createParallelGroup(GroupLayout.Alignment.LEADING)
                .addComponent(wrapCheckBox)
                .addComponent(backCheckBox))))
    .addGroup(layout.createParallelGroup(GroupLayout.Alignment.LEADING)
        .addComponent(findButton)
        .addComponent(cancelButton))
);
And finally, we would like the buttons to be always the same size, so let us link them:
layout.linkSize(SwingConstants.HORIZONTAL, findButton, cancelButton);
Now we are done with the horizontal dimension. Let us switch to the vertical dimension. From now, we will only need to think about the y axis.
Vertical layout
In the vertical dimension, we examine the layout from top to bottom. We definitely want all the components on the first line aligned on the baseline. So along the vertical axis there is a sequence of the baseline group, followed by a group of the remaining components. See the following picture.
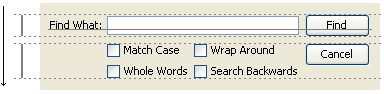
Let us sketch out the code. First, we need to define two parallel groups. Note that GroupLayout.Alignment.LEADING corresponds to the top alignment in the vertical dimension.
layout.setVerticalGroup(layout.createSequentialGroup()
    .addGroup(layout.createParallelGroup(GroupLayout.Alignment.BASELINE))
    .addGroup(layout.createParallelGroup(GroupLayout.Alignment.LEADING))
);
We can fill the baseline group right away:
layout.setVerticalGroup(layout.createSequentialGroup()
    .addGroup(layout.createParallelGroup(GroupLayout.Alignment.BASELINE)
        .addComponent(label)
        .addComponent(textField)
        .addComponent(findButton))
    .addGroup(layout.createParallelGroup(GroupLayout.Alignment.LEADING))
);
Now let us look at the bottom group. Note the Cancel button is not on a shared baseline with the check boxes; it is aligned at the top. So the second parallel group comprises the button and a sequential group of two baseline groups with check boxes:

The corresponding code looks as follows:
layout.setVerticalGroup(layout.createSequentialGroup()
    .addGroup(layout.createParallelGroup(GroupLayout.Alignment.BASELINE)
        .addComponent(label)
        .addComponent(textField)
        .addComponent(findButton))
    .addGroup(layout.createParallelGroup(GroupLayout.Alignment.LEADING)
        .addGroup(layout.createSequentialGroup()
            .addGroup(layout.createParallelGroup(GroupLayout.Alignment.BASELINE)
                .addComponent(caseCheckBox)
                .addComponent(wrapCheckBox))
            .addGroup(layout.createParallelGroup(GroupLayout.Alignment.BASELINE)
                .addComponent(wholeCheckBox)
                .addComponent(backCheckBox)))
        .addComponent(cancelButton))
);
So, we have created a complete layout, including resize behavior, without specifying a single number in pixels—a true cross platform layout. Note that we do not need to specify gaps between components, we get correct spacing automatically and according to the look and feel guidelines. Here is the complete code for the Find dialog's layout:
GroupLayout layout = new GroupLayout(getContentPane());
getContentPane().setLayout(layout);
layout.setAutoCreateGaps(true);
layout.setAutoCreateContainerGaps(true);

layout.setHorizontalGroup(layout.createSequentialGroup()
    .addComponent(label)
    .addGroup(layout.createParallelGroup(GroupLayout.Alignment.LEADING)
        .addComponent(textField)
        .addGroup(layout.createSequentialGroup()
            .addGroup(layout.createParallelGroup(GroupLayout.Alignment.LEADING)
                .addComponent(caseCheckBox)
                .addComponent(wholeCheckBox))
            .addGroup(layout.createParallelGroup(GroupLayout.Alignment.LEADING)
                .addComponent(wrapCheckBox)
                .addComponent(backCheckBox))))
    .addGroup(layout.createParallelGroup(GroupLayout.Alignment.LEADING)
        .addComponent(findButton)
        .addComponent(cancelButton))
);
layout.linkSize(SwingConstants.HORIZONTAL, findButton, cancelButton);

layout.setVerticalGroup(layout.createSequentialGroup()
    .addGroup(layout.createParallelGroup(GroupLayout.Alignment.BASELINE)
        .addComponent(label)
        .addComponent(textField)
        .addComponent(findButton))
    .addGroup(layout.createParallelGroup(GroupLayout.Alignment.LEADING)
        .addGroup(layout.createSequentialGroup()
            .addGroup(layout.createParallelGroup(GroupLayout.Alignment.BASELINE)
                .addComponent(caseCheckBox)
                .addComponent(wrapCheckBox))
            .addGroup(layout.createParallelGroup(GroupLayout.Alignment.BASELINE)
                .addComponent(wholeCheckBox)
                .addComponent(backCheckBox)))
        .addComponent(cancelButton))
);
Here is the complete
Find.java file. You can compile and run it. Try resizing the dialog horizontally to see how the layout automatically adjusts to the new size.