The Java Tutorials have been written for JDK 8. Examples and practices described in this page don't take advantage of improvements introduced in later releases and might use technology no longer available.
See Dev.java for updated tutorials taking advantage of the latest releases.
See Java Language Changes for a summary of updated language features in Java SE 9 and subsequent releases.
See JDK Release Notes for information about new features, enhancements, and removed or deprecated options for all JDK releases.
Lesson: Learning Swing with the NetBeans IDE
This lesson provides an introduction to Graphical User Interface (GUI) programming with Swing and the NetBeans IDE. As you learned in the "Hello World!" lesson, the NetBeans IDE is a free, open-source, cross-platform integrated development environment with built-in support for the Java programming language. It offers many advantages over coding with a text editor; we recommend its use whenever possible. If you have not yet read the above lesson, please take a moment to do so now. It provides valuable information about downloading and installing the JDK and NetBeans IDE.
The goal of this lesson is to introduce the Swing API by designing a simple application that converts temperature from Celsius to Fahrenheit. Its GUI will be basic, focusing on only a subset of the available Swing components. We will use the NetBeans IDE GUI builder, which makes user interface creation a simple matter of drag and drop. Its automatic code generation feature simplifies the GUI development process, letting you focus on the application logic instead of the underlying infrastructure.
Because this lesson is a step-by-step checklist of specific actions to take, we recommend that you run the NetBeans IDE and perform each step as you read along. This will be the quickest and easiest way to begin programming with Swing. If you are unable to do so, simply reading along should still be useful, since each step is illustrated with screenshots.
If you prefer the traditional approach of programming each component manually (without the assistance of an IDE), think of this lesson as an entry point into the lower-level discussions already provided elsewhere in the tutorial. Hyperlinks in each discussion will take you to related lessons, should you wish to learn such lower-level details.
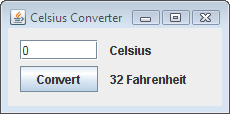
The finished GUI for this application will look as follows:

The CelsiusConverter Application.
Click the Launch button to run CelsiusConverter using Java™ Web Start (download JDK 7 or later). Alternatively, to compile and run the example yourself, consult the example index.
From an end-user's perspective, usage is simple: enter a temperature (in Celsius) into the text box, click the "Convert" button, and watch the converted temperature (in Fahrenheit) appear on screen. The minimize, maximize, and close buttons will behave as expected, and the application will also have a title that appears along the top of the window.
From a programmer's perspective, we will write the application in two main stages. First, we will populate the GUI with the various Swing components and arrange them as shown above. Then, we will add the application logic, so that the program actually performs a conversion when the user presses the "Convert" button.
If you are interested in using JavaFX to create your GUI, see the JavaFX Documentation and JavaFX - NetBeans Wiki .