주:
- 이 사용지침서에서는 Oracle Cloud에 액세스해야 합니다. 무료 계정에 등록하려면 Oracle Cloud Infrastructure Free Tier 시작하기를 참조하십시오.
- Oracle Cloud Infrastructure 인증서, 테넌시 및 구획에 대한 예제 값을 사용합니다. 실습을 마칠 때는 이러한 값을 클라우드 환경과 관련된 값으로 대체하십시오.
Cilium을 사용하여 Oracle Cloud Infrastructure Container Engine for Kubernetes에서 네트워킹 서비스 제공
소개
OKE(Oracle Cloud Infrastructure Container Engine for Kubernetes)를 사용하여 새 Kubernetes 클러스터를 배포할 때 설치된 기본 CNI(컨테이너 네트워크 인터페이스) 플러그인은 OCI VCN-Native CNI 플러그인입니다. 클라우드 네이티브 컴퓨팅을 사용하면 다른 CNI 플러그인을 선택하여 컨테이너 플랫폼에 네트워크(보안) 서비스를 제공하는 방법을 유연하게 선택할 수 있습니다. 이 자습서에서는 Flannel CNI 플러그인과 함께 OKE를 사용하여 새 Kubernetes 클러스터를 배치하고 이를 Cilium CNI 플러그인으로 변경합니다. Cilium은 OCI VCN-Native CNI 플러그인 및 Flannel과 비교하여 다른 네트워크(보안) 기능을 제공합니다.

목표
- 사용자정의 생성 방법을 사용하여 Oracle Cloud Infrastructure Container Engine for Kubernetes 플랫폼에 새 Kubernetes 클러스터를 배치합니다. 이 배포 중에 Flannel CNI 플러그인을 선택한 다음 Cilium CNI 플러그인을 배포하고 Flannel CNI 플러그인을 제거하여 Cilium이 클라우드 네이티브 애플리케이션을 위한 네트워크(보안) 서비스용 주 CNI 플러그인이고 Cilium CNI 플러그인을 사용하여 NetworkPolicy 및 LoadBalancer 서비스를 배포하고 테스트합니다.
작업 1: OKE를 사용하여 Kubernetes 클러스터 배치
여러 OKE 배치 모델에 대한 자세한 내용은 Example Network Resource Configurations을 참조하십시오.
OKE 배치 모델의 예는 다음과 같습니다.
-
예 1: Flannel CNI 플러그인, 공용 Kubernetes API 끝점, 전용 작업자 노드 및 공용 로드 밸런서가 있는 클러스터입니다.
-
예제 2: Flannel CNI 플러그인, 전용 Kubernetes API 끝점, 전용 작업자 노드 및 공용 로드 밸런서가 있는 클러스터입니다.
-
예제 3: OCI CNI 플러그인, 공용 Kubernetes API 끝점, 전용 작업자 노드 및 공용 로드 밸런서를 사용한 클러스터입니다.
-
예제 4: OCI CNI 플러그인, 전용 Kubernetes API 끝점, 전용 작업자 노드 및 공용 로드 밸런서를 사용한 클러스터입니다.
이 자습서에서는 예 1 배포 모델을 선택합니다. 예제 3을 배포하는 방법은 이미 설명했습니다. 예: Create a New Kubernetes Cluster and Verify the Components
-
햄버거 메뉴를 누릅니다.
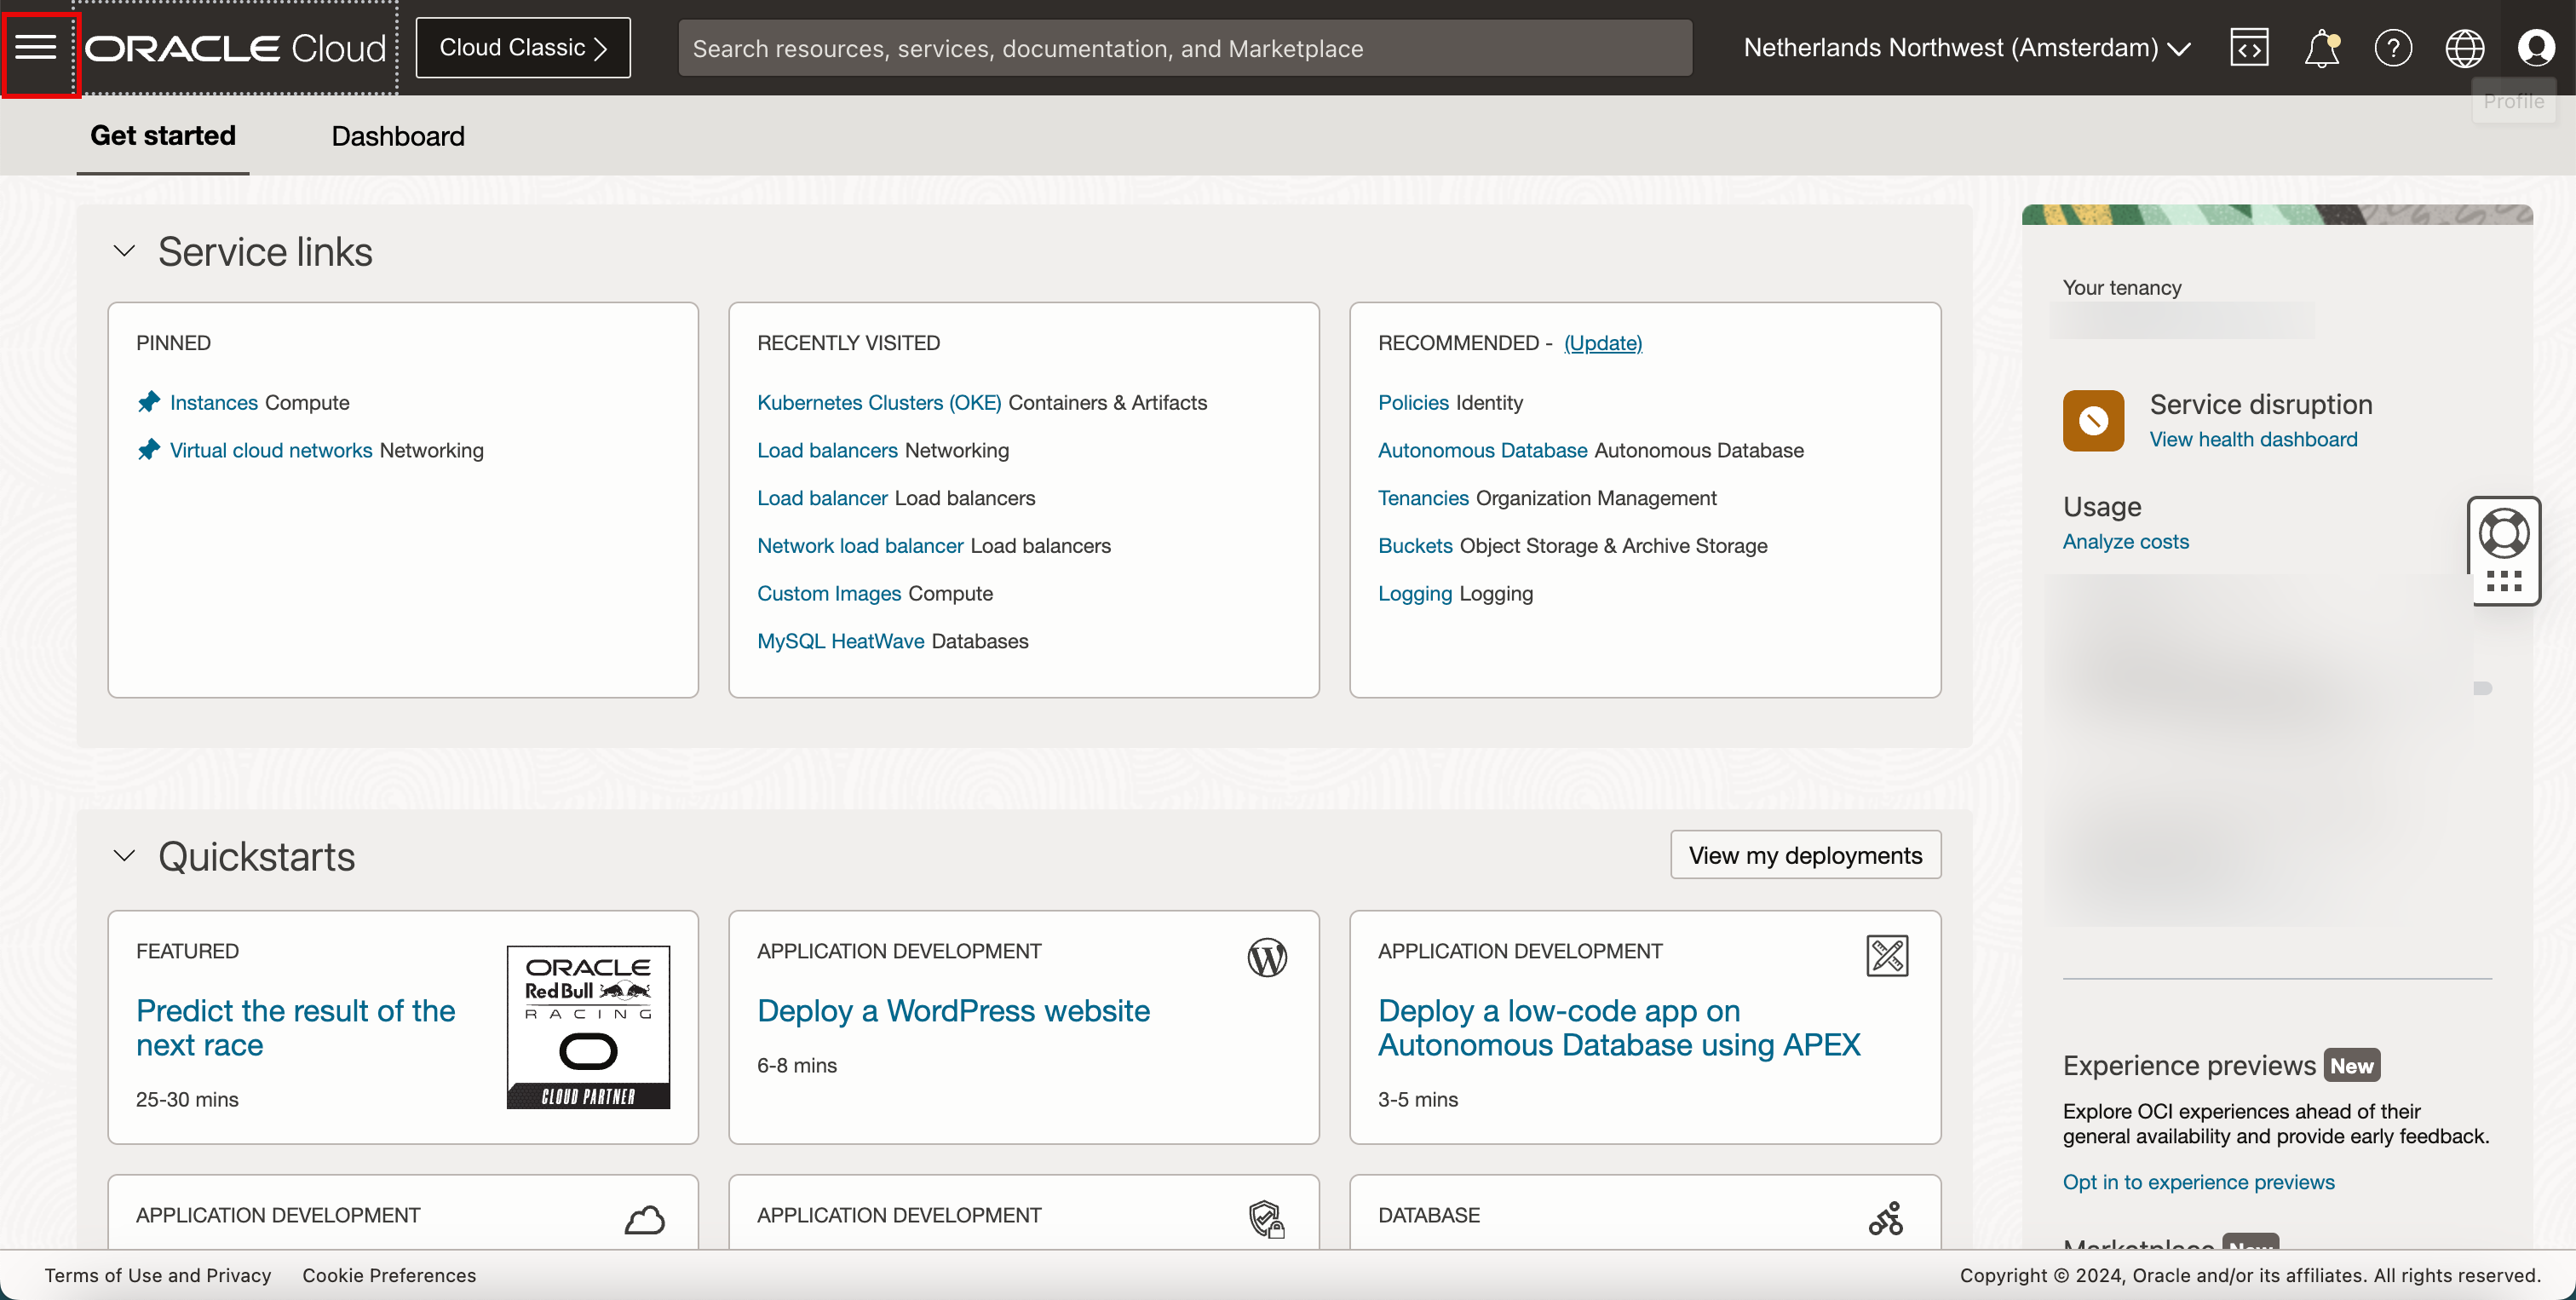
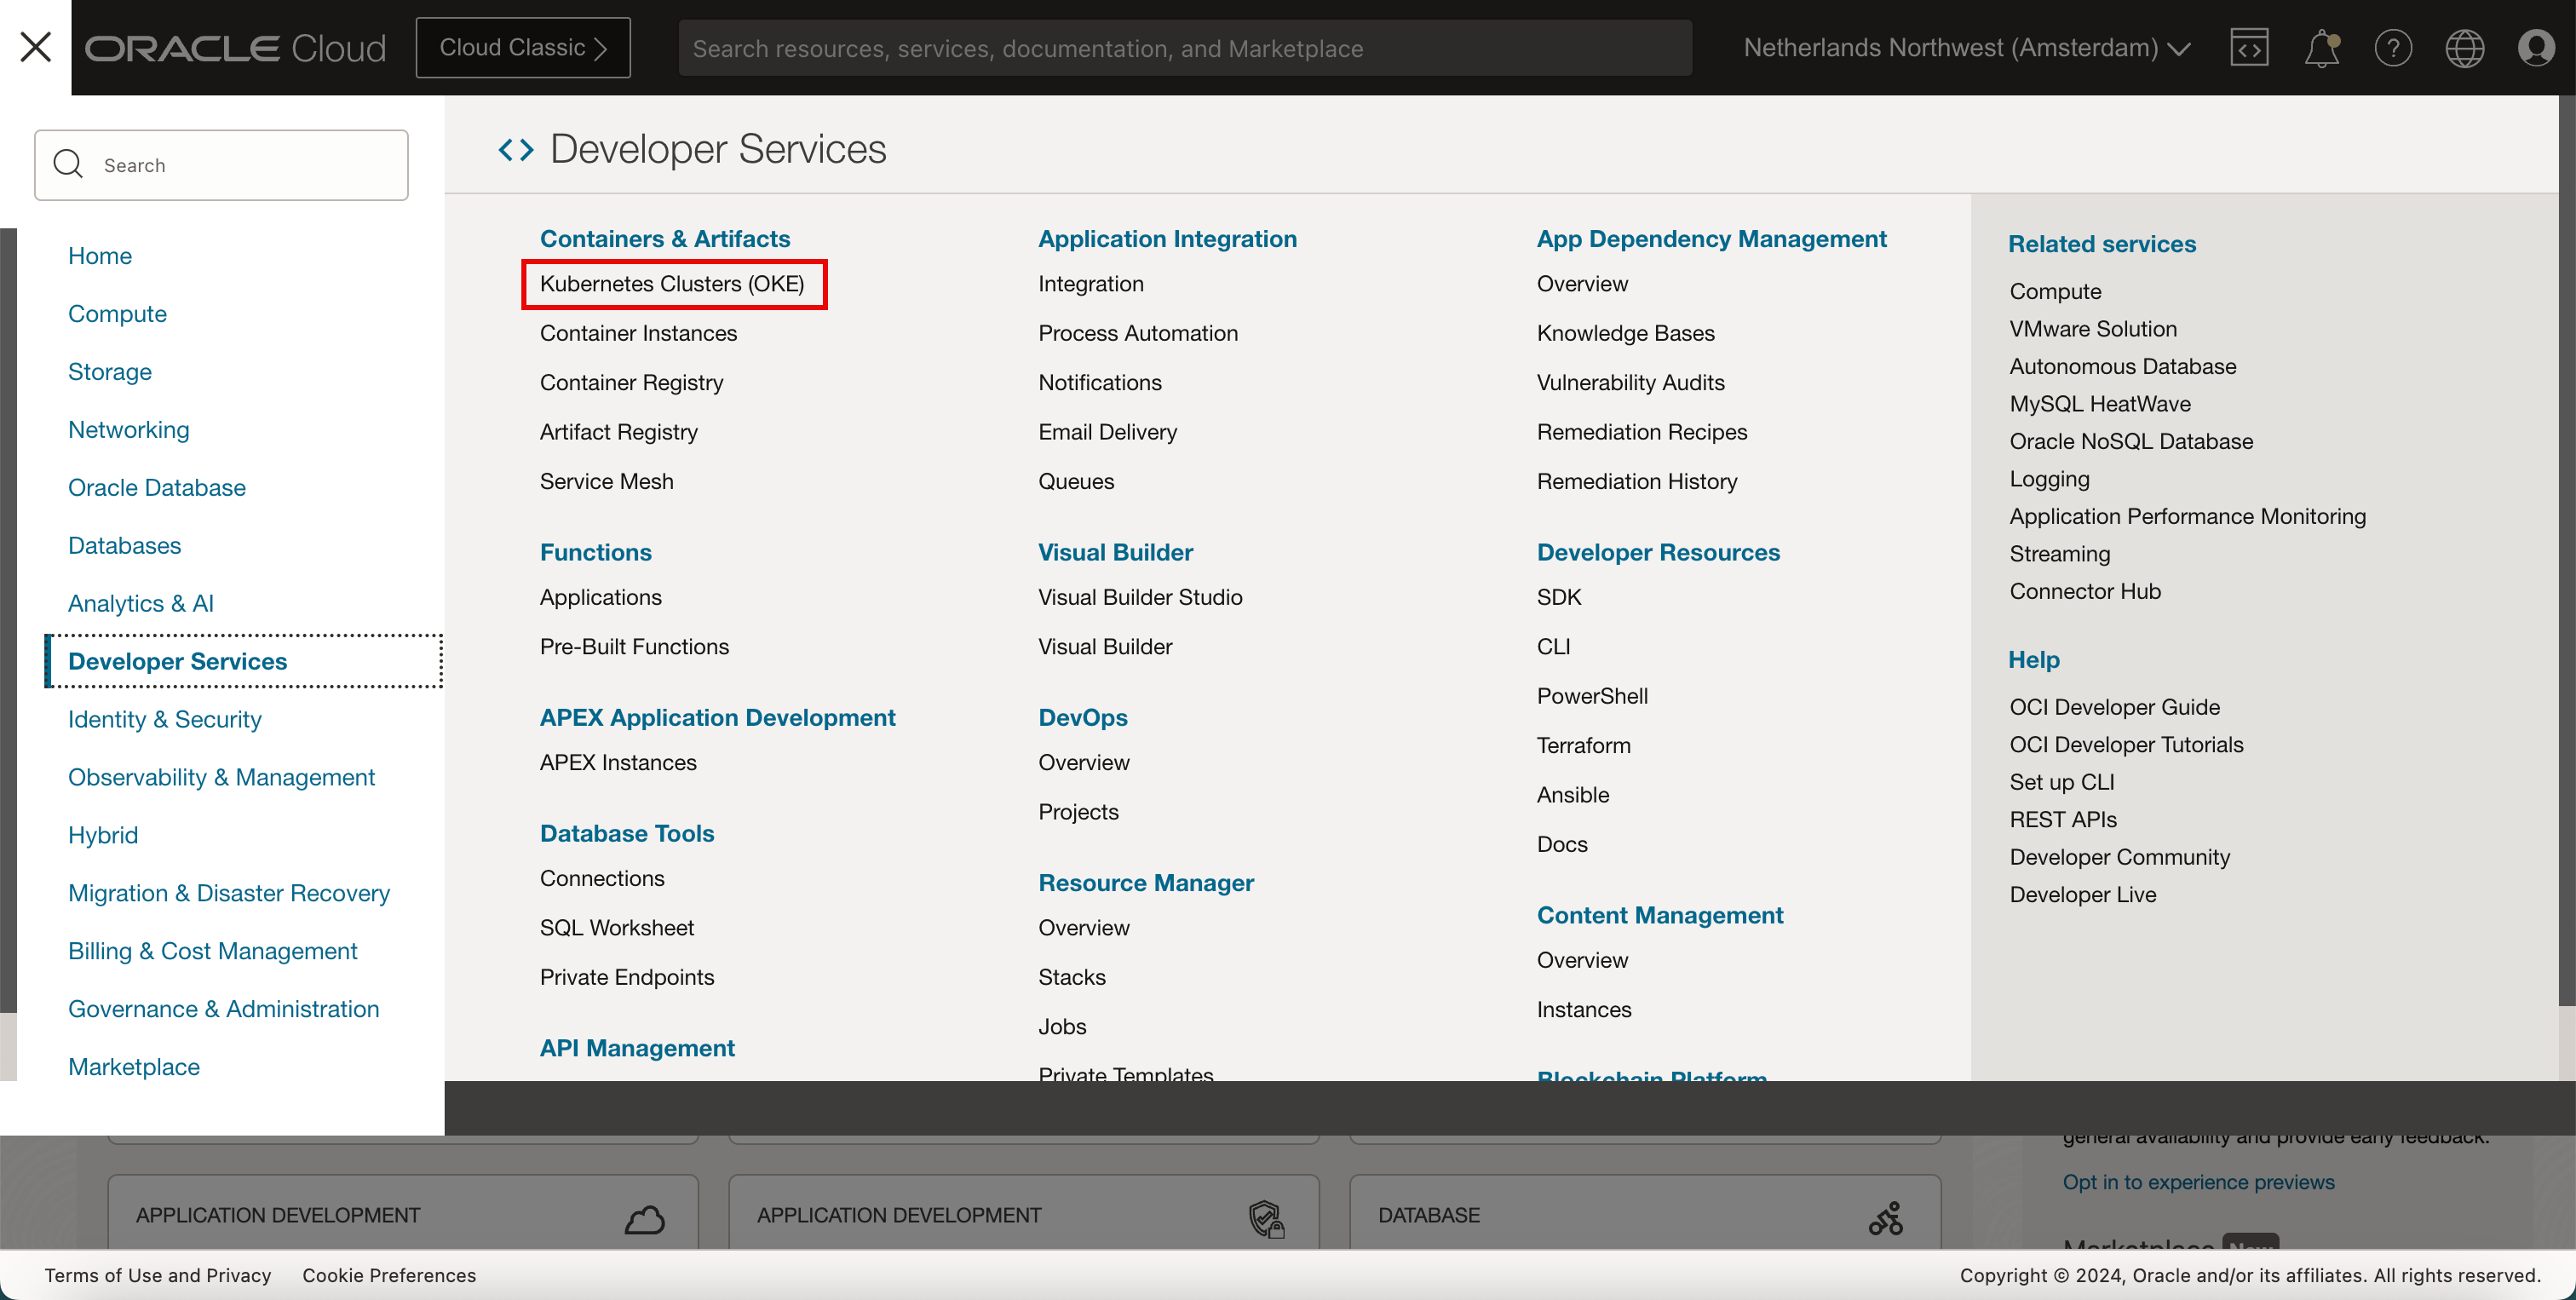
- 개발자 서비스를 누릅니다.
- Kubernetes 클러스터(OKE)를 누릅니다.
-
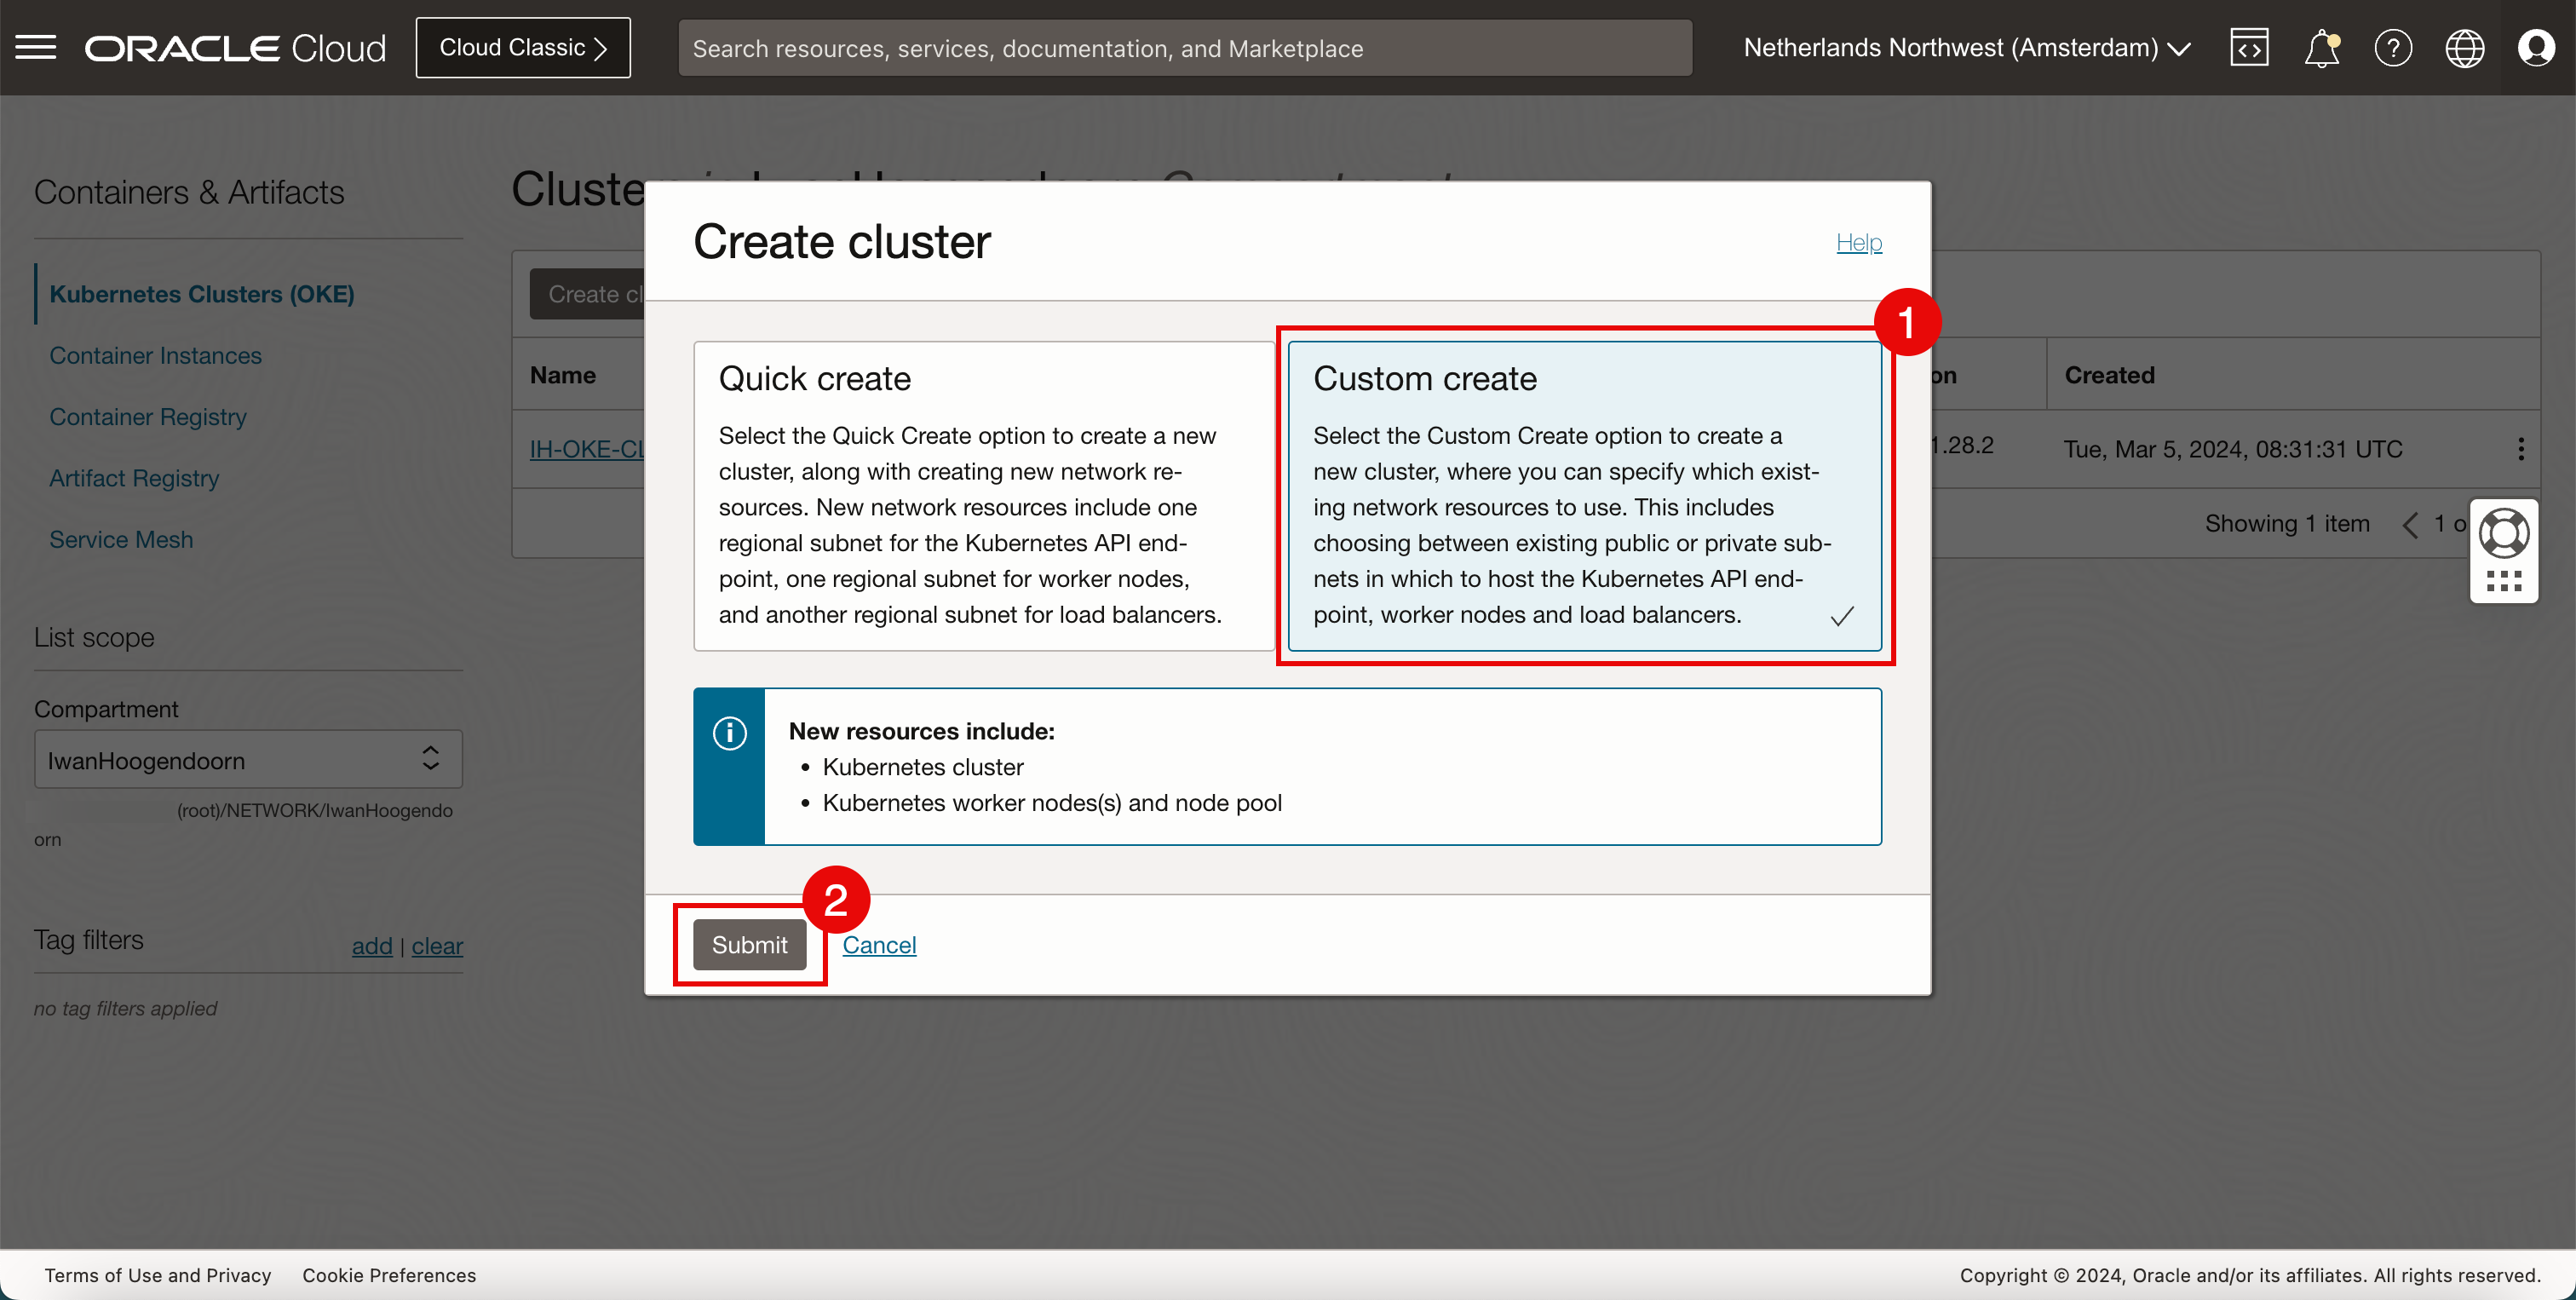
클러스터 생성을 누릅니다.
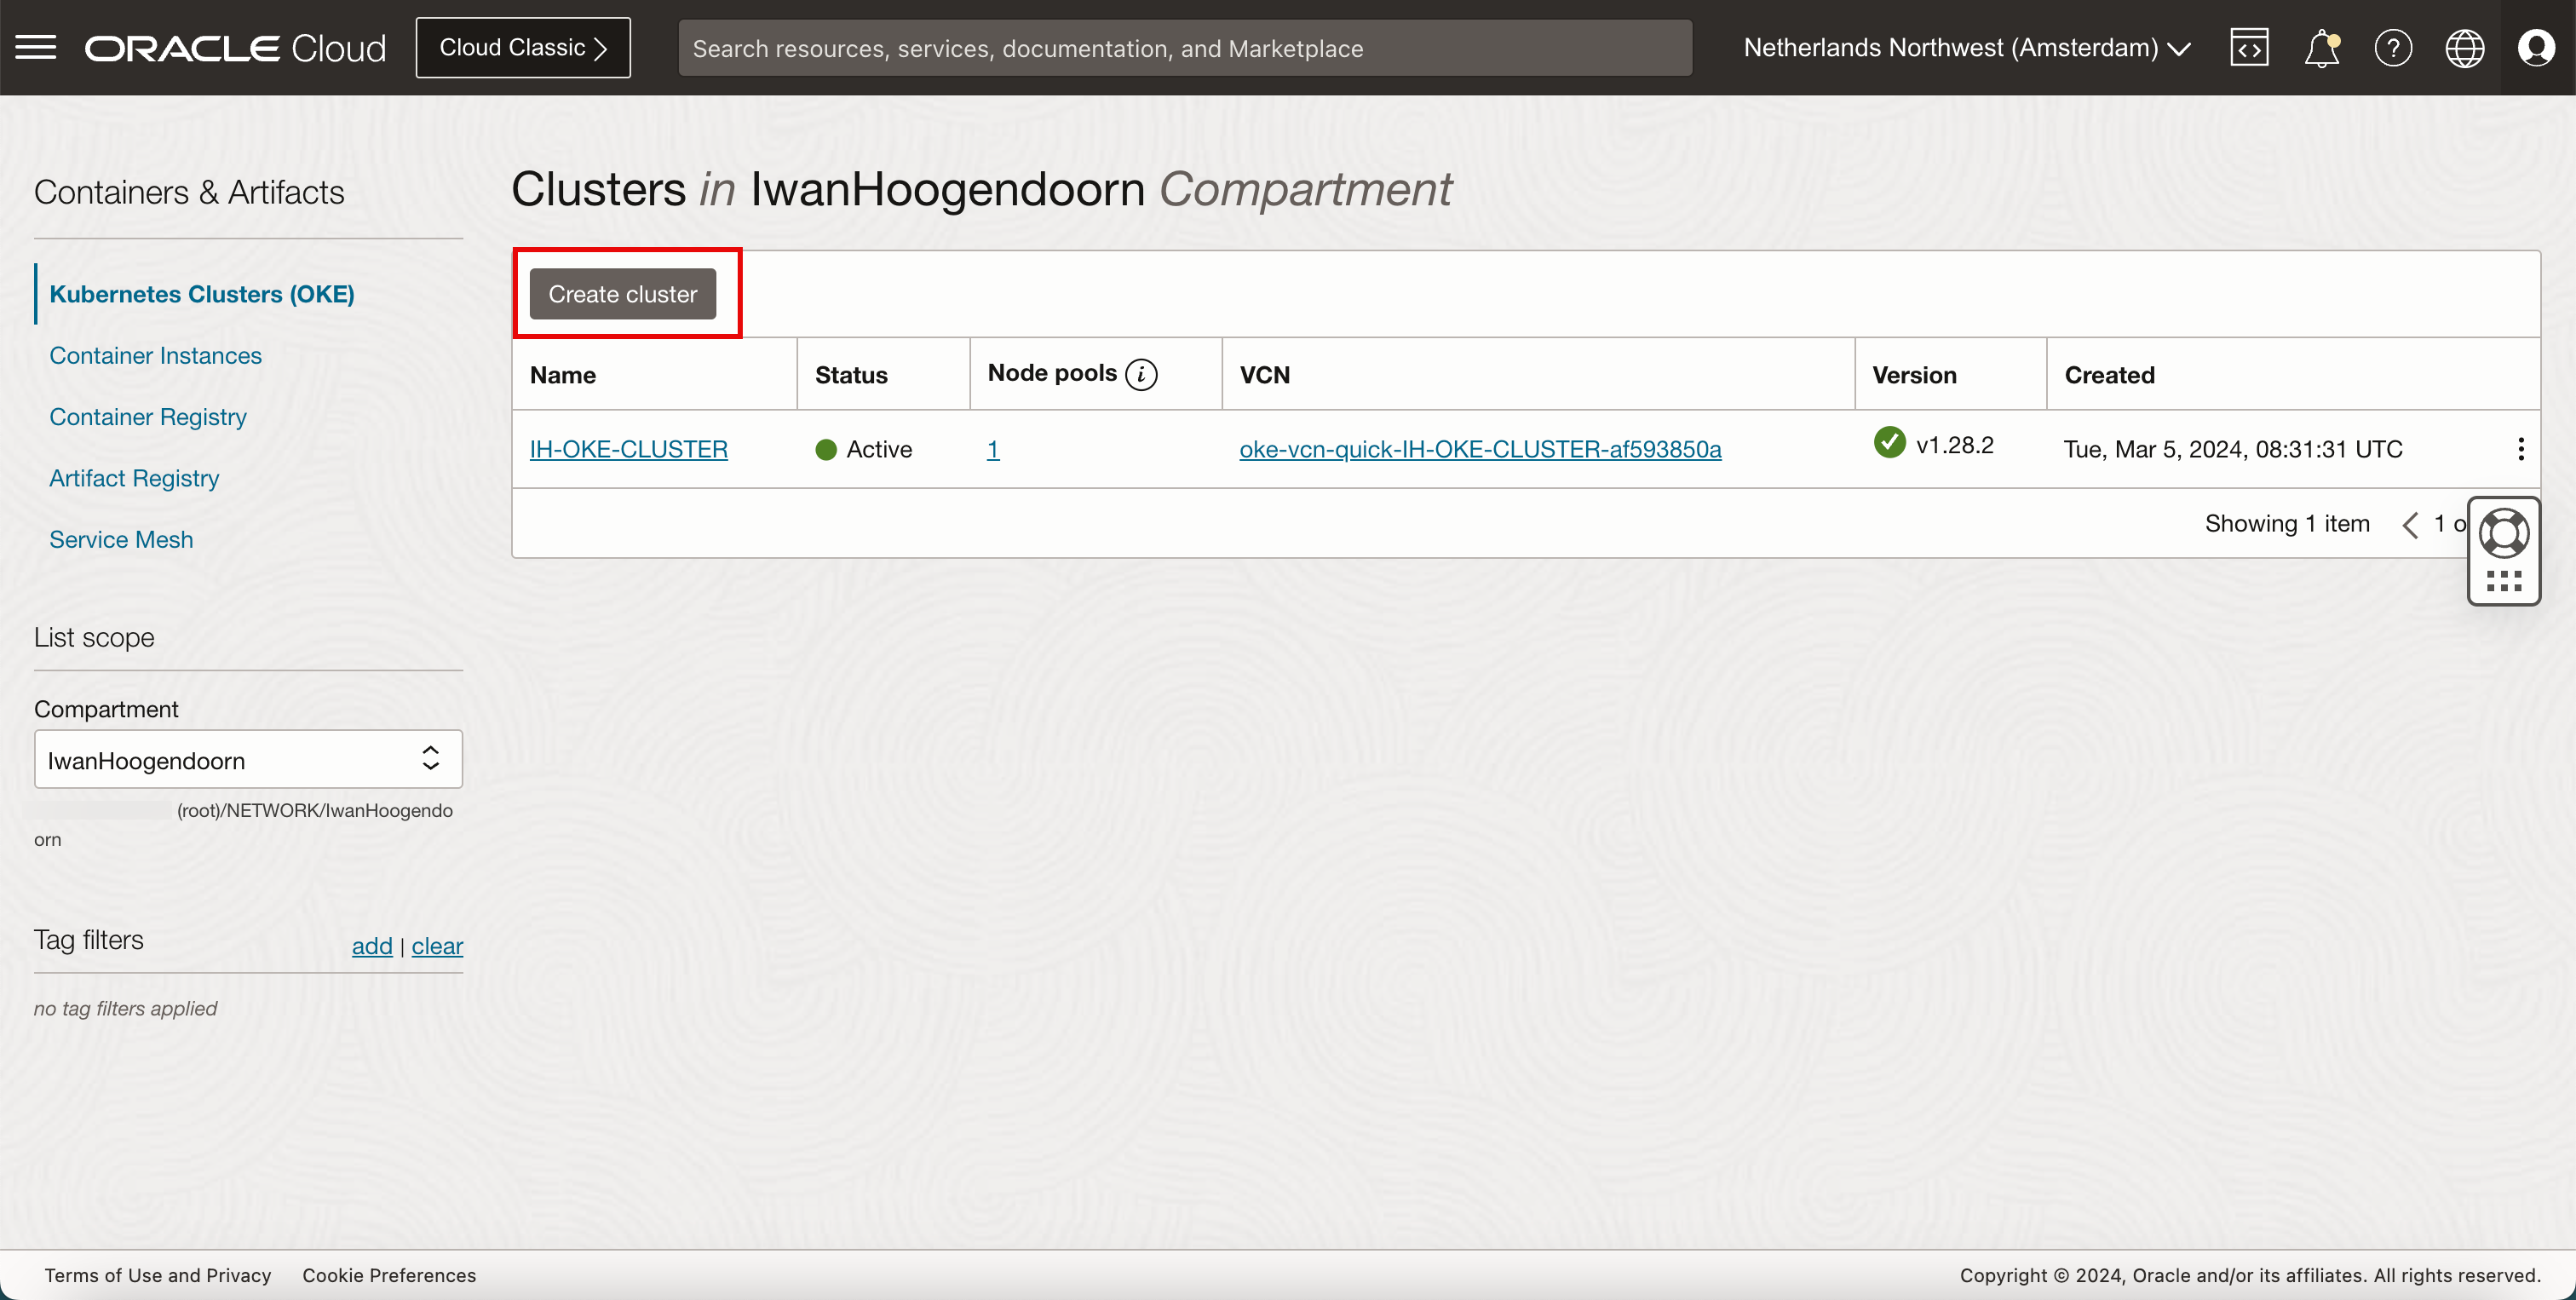
- 사용자정의 생성을 선택합니다.
- 제출을 누릅니다.
-
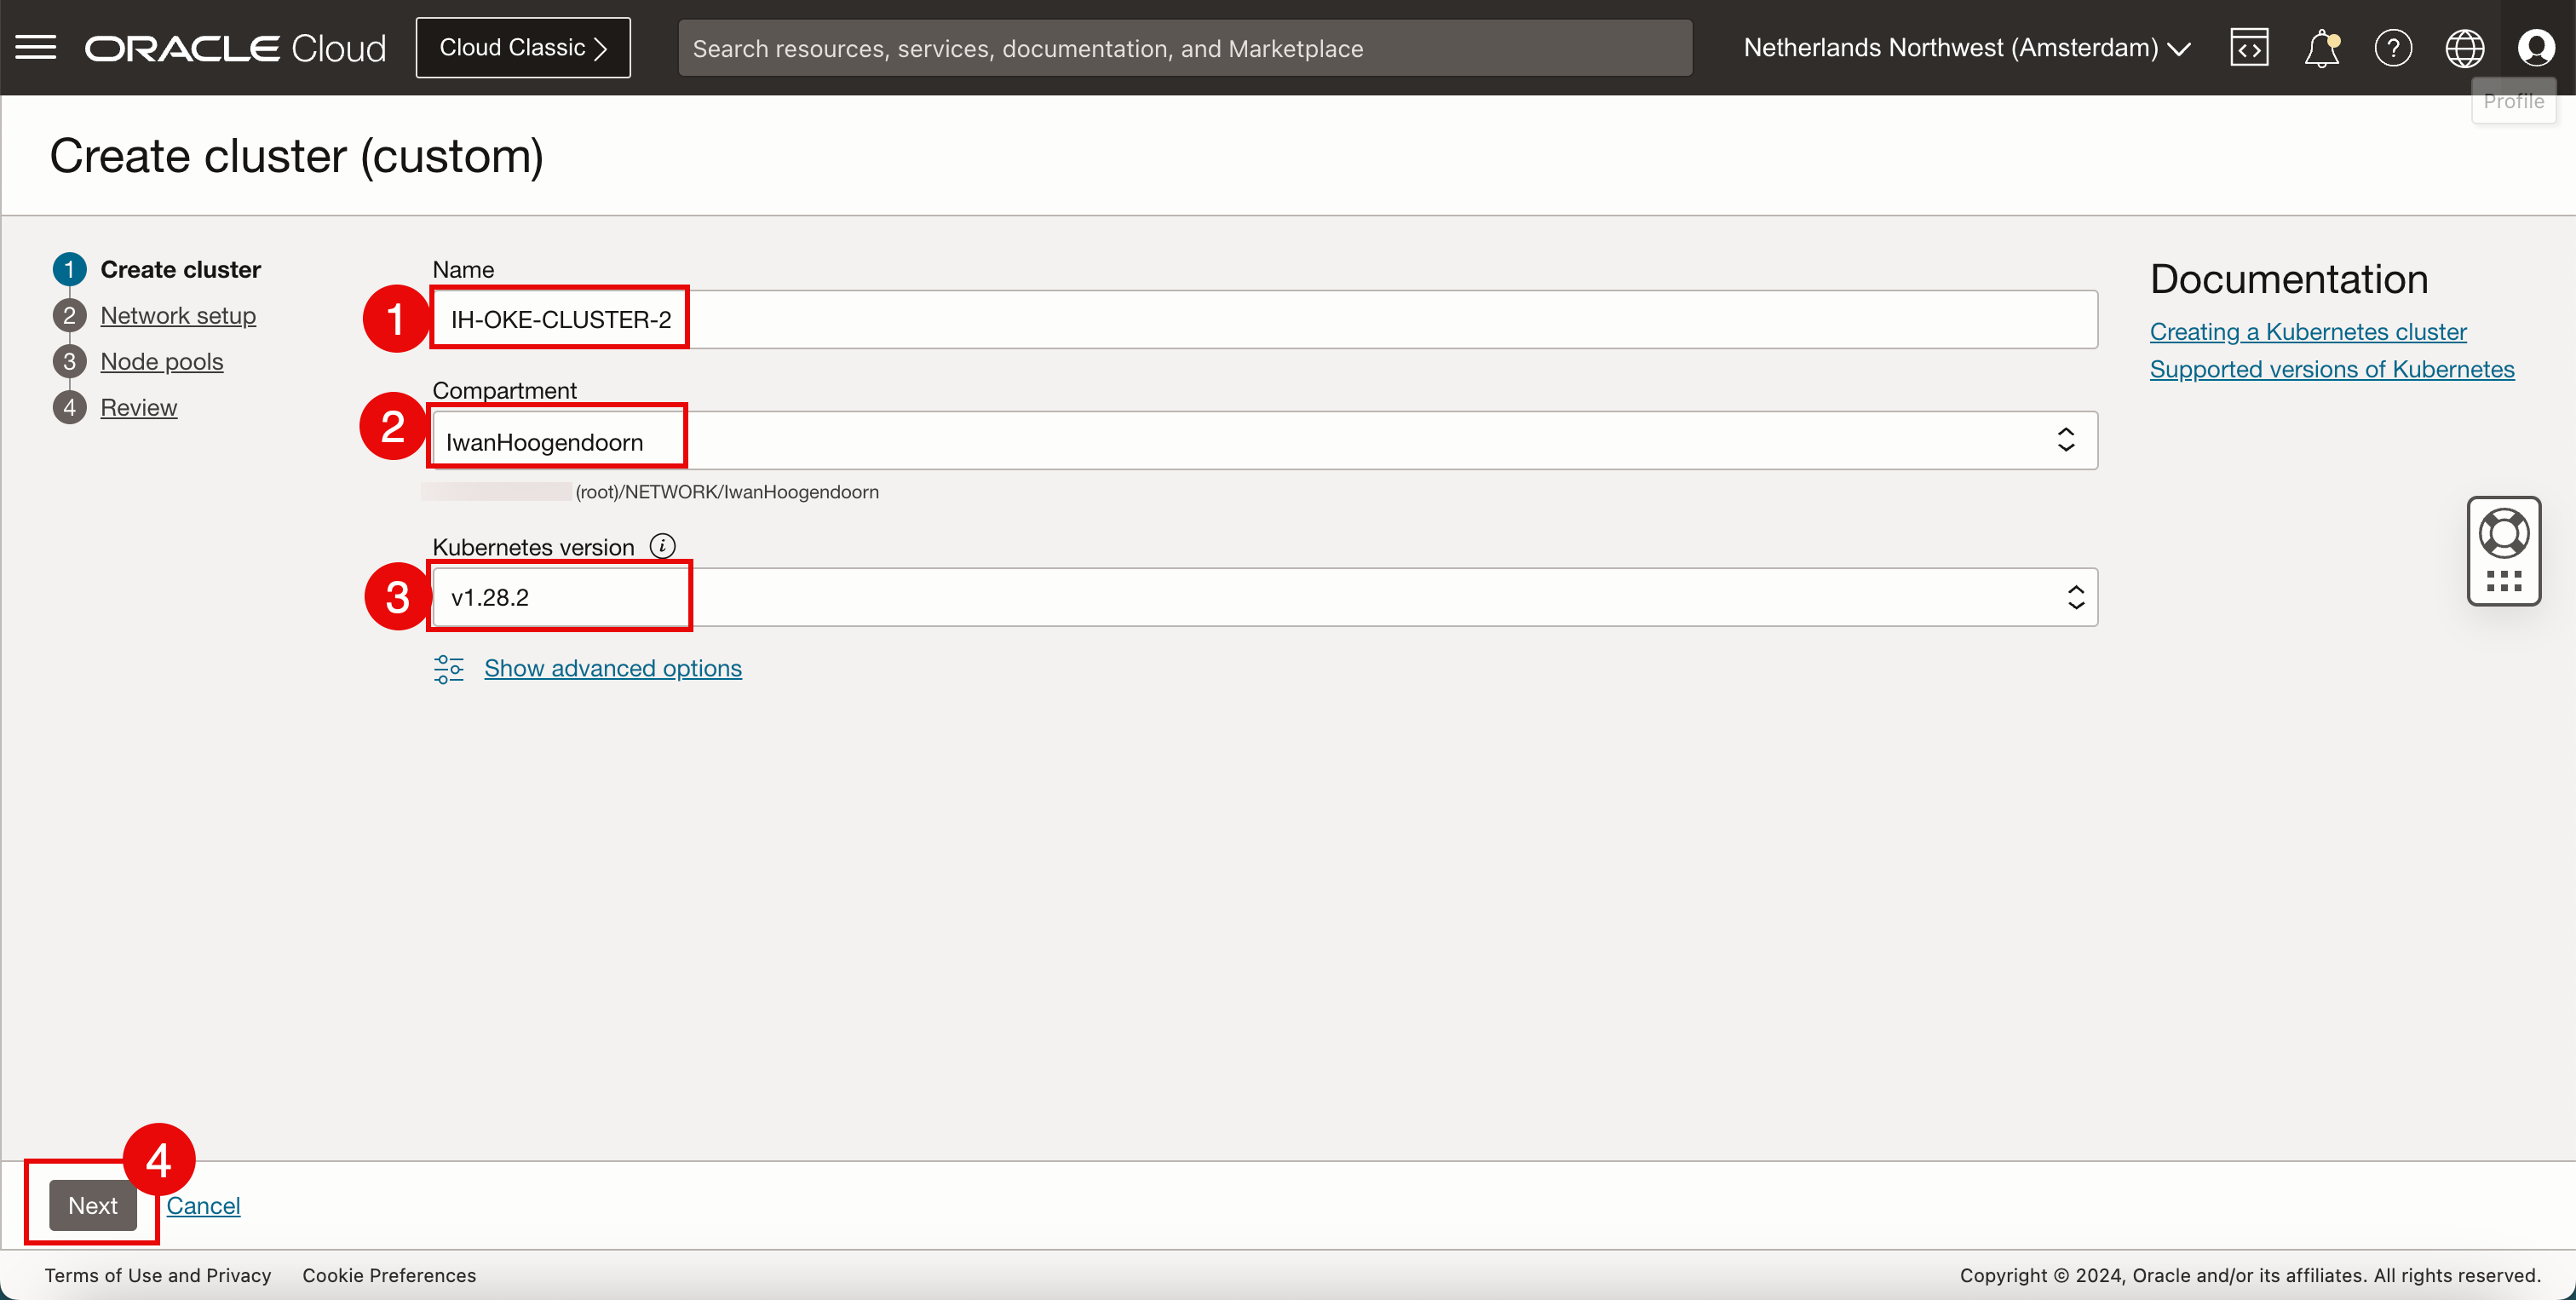
다음 정보를 입력합니다.
- 클러스터 이름을 입력합니다.
- 구획을 선택합니다.
- Kubernetes 버전을 선택합니다.
- 다음을 누릅니다.
-
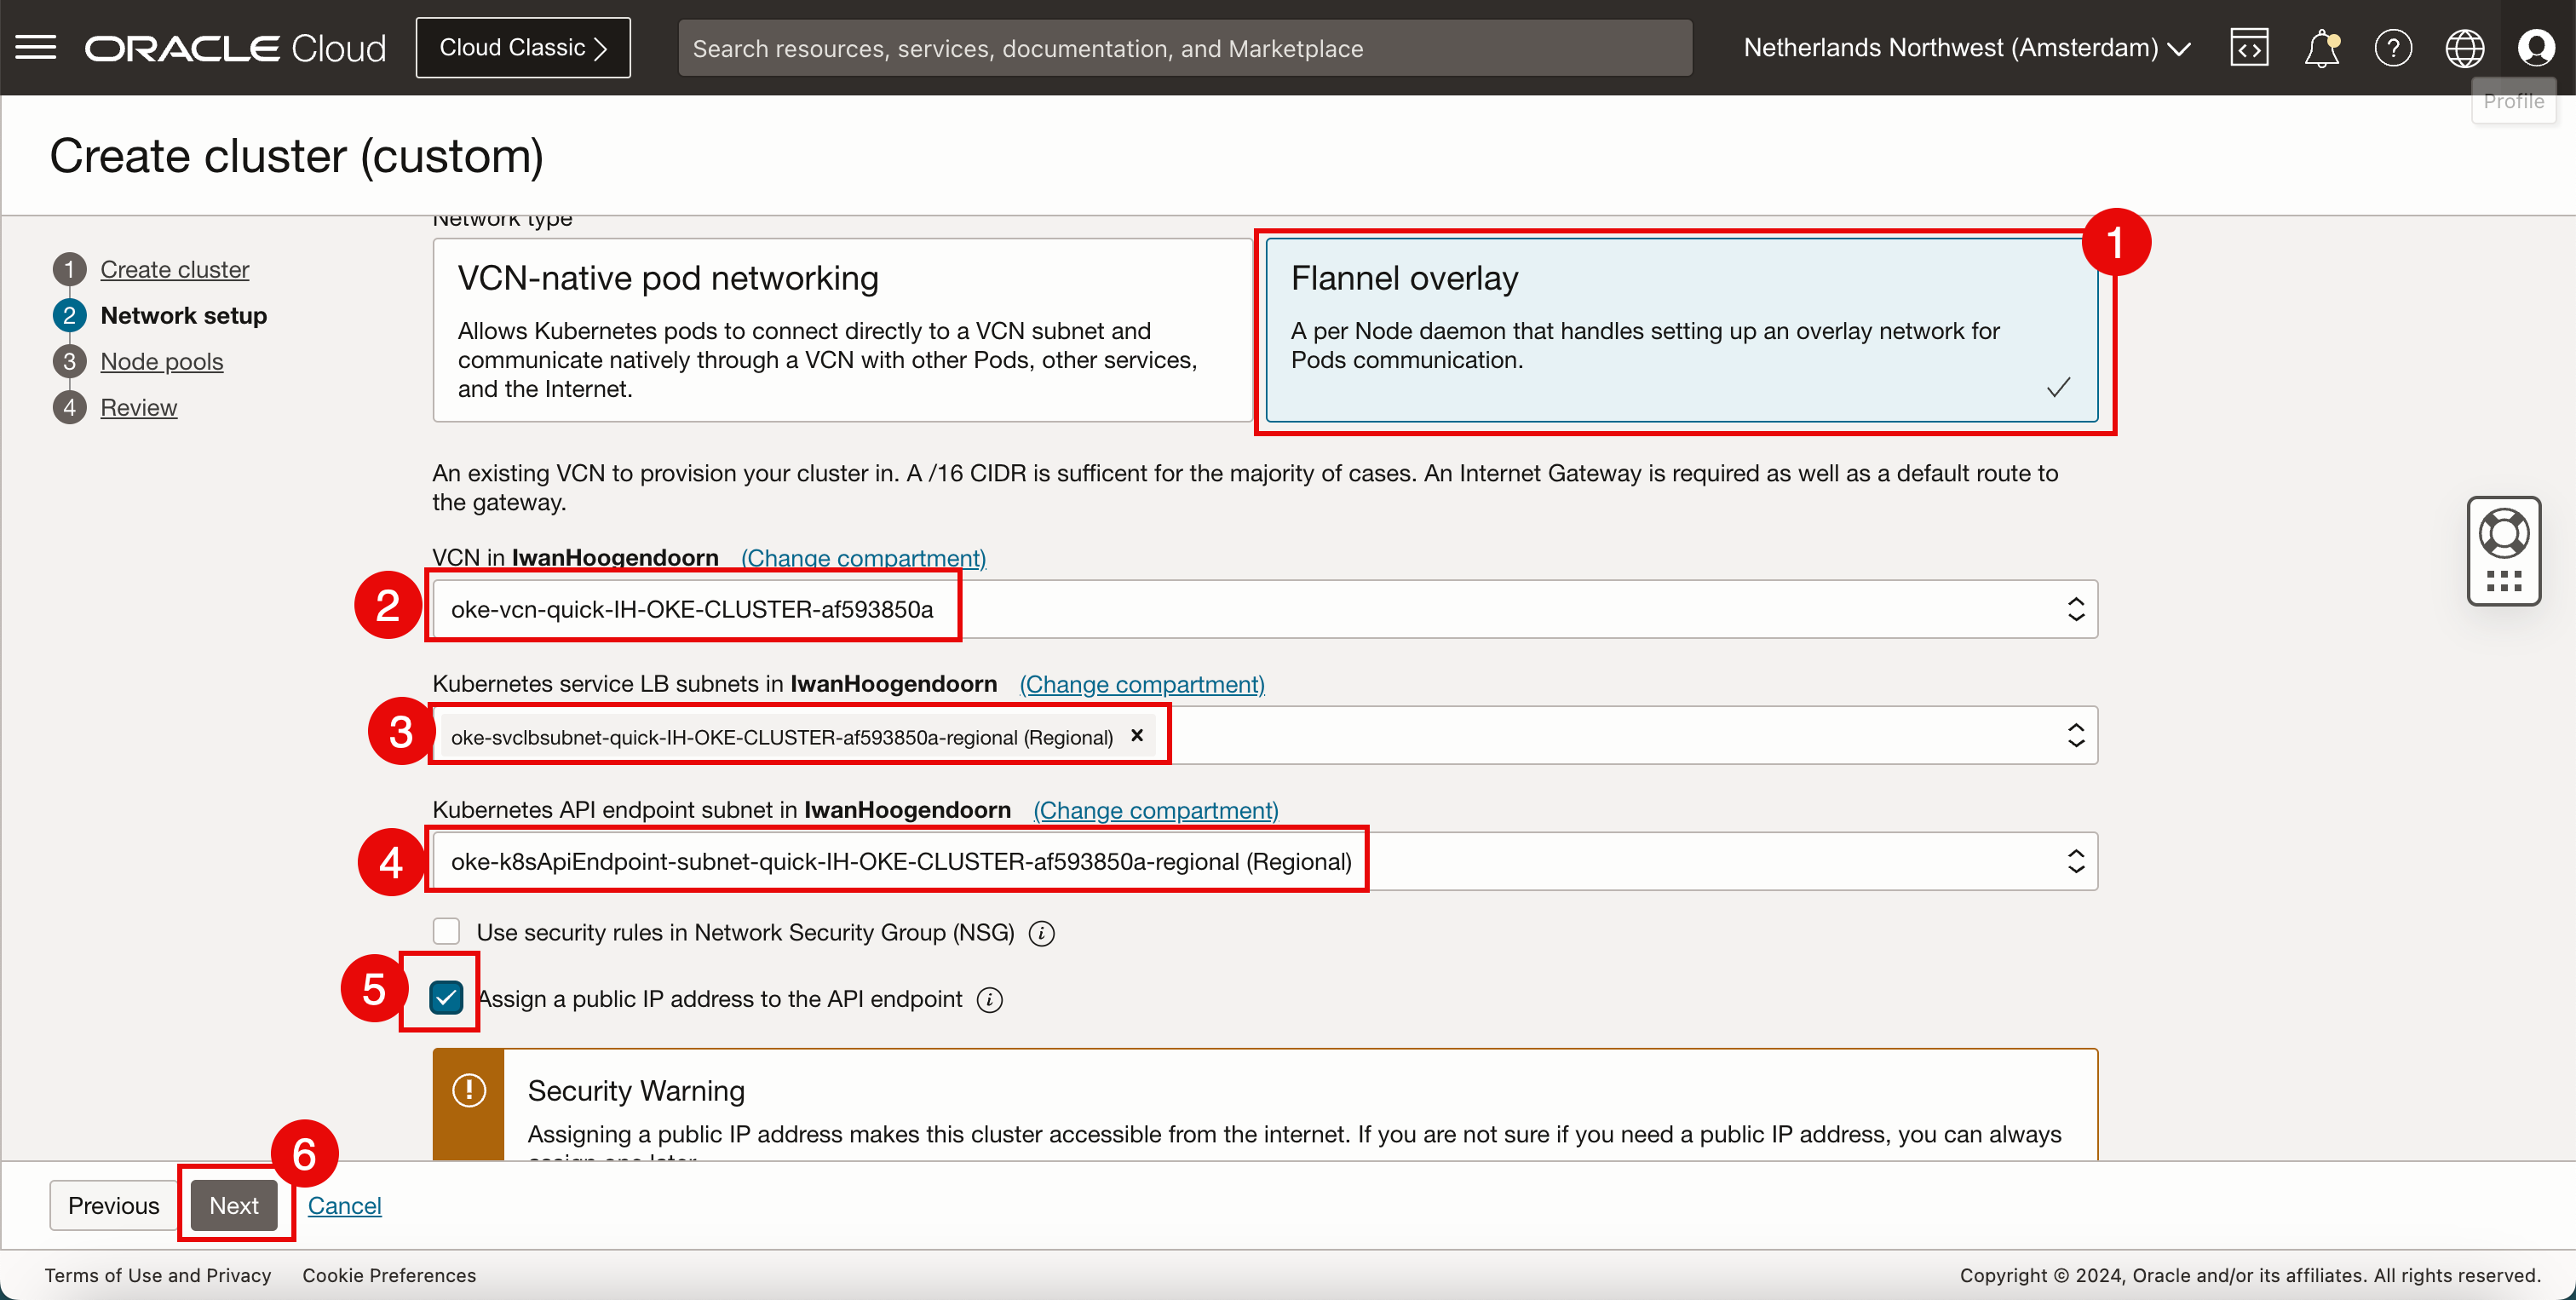
네트워크 설정에서 다음 정보를 입력합니다.
- 플래널 오버레이를 네트워크 유형으로 선택합니다.
- 새 Kubernetes 클러스터 배치에 사용할 VCN을 선택합니다. VCN을 생성하려면 새 VCN 생성을 참조하십시오.
- Kubernetes 서비스에 IP 주소를 제공하도록 선택한 VCN 내의 서브넷을 선택합니다. 서브넷을 생성하려면 VCN 내에 전용 서브넷 생성을 참조하십시오.
- Kubernetes API 끝점에 IP 주소를 제공하도록 선택한 VCN 내의 서브넷을 선택합니다.
- API 끝점에 공용 IP 주소 지정을 선택합니다.
- 다음을 누릅니다.
-
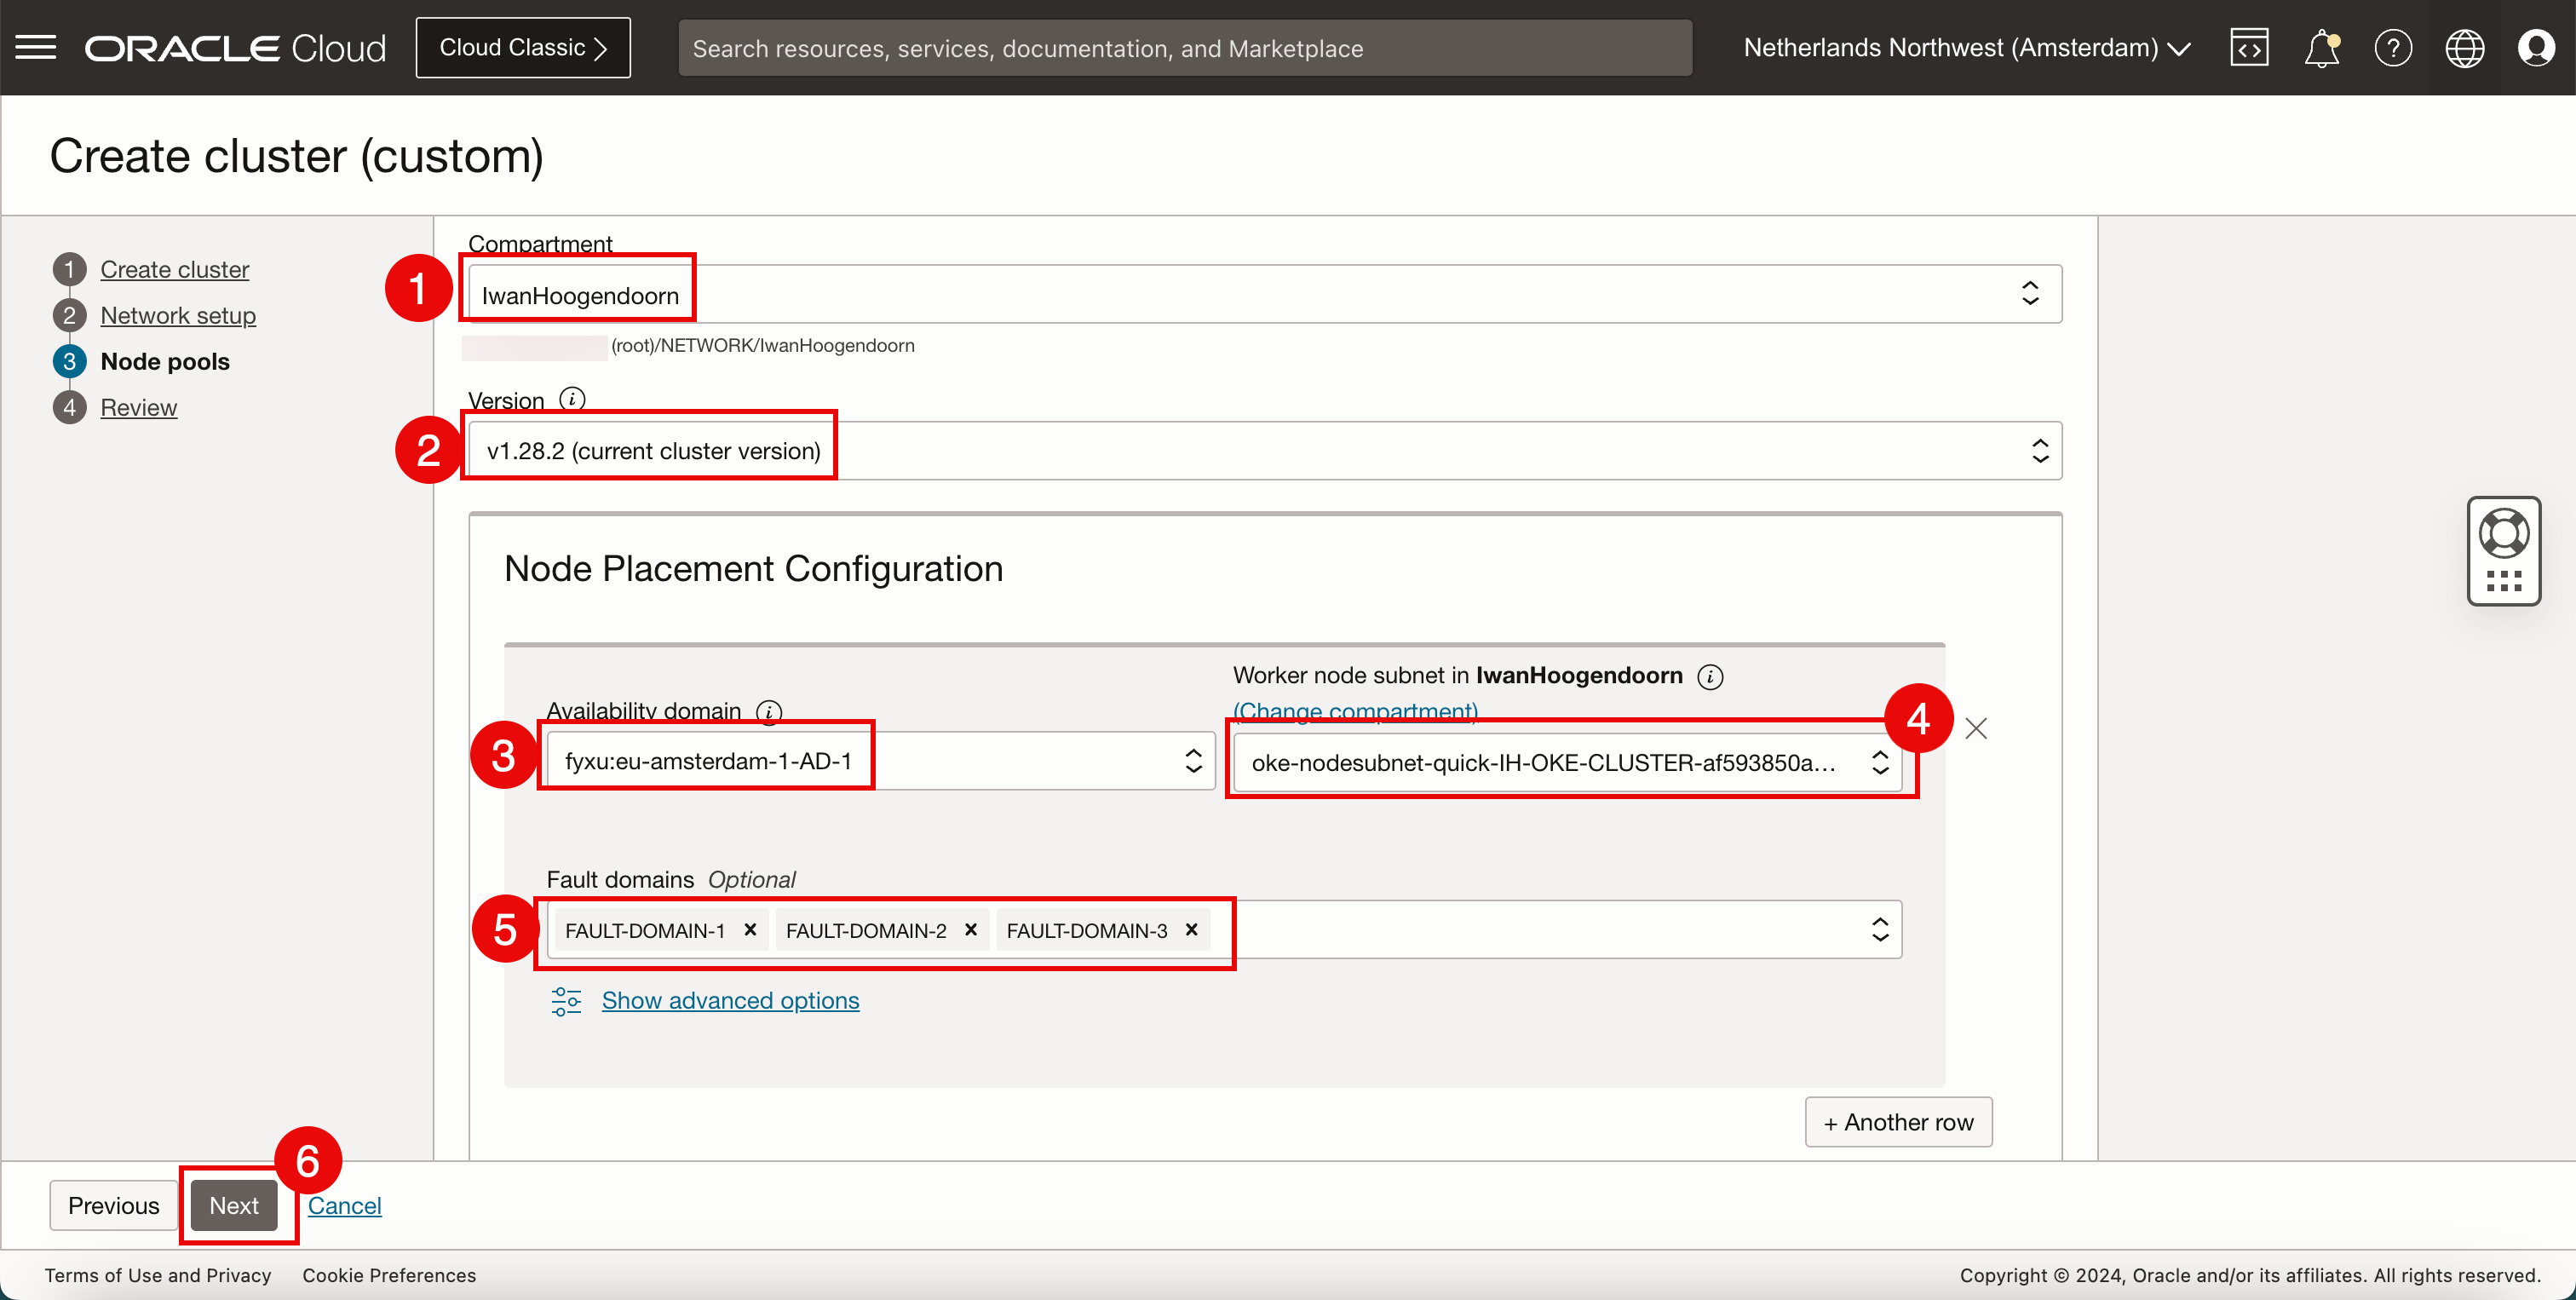
노드 풀(작업자 노드)에 다음 정보를 입력합니다. 다른 설정을 선택할 수 있지만 동일한 설정을 유지하려고 합니다.
- 구획을 선택합니다.
- Kubernetes 버전을 선택합니다.
- 가용성 도메인을 선택합니다.
- Kubernetes 워커 노드에 IP 주소를 제공하도록 선택한 VCN 내의 서브넷을 선택합니다.
- 작업자 노드를 배치할 때 사용할 결함 도메인을 선택합니다.
- 다음을 누릅니다.
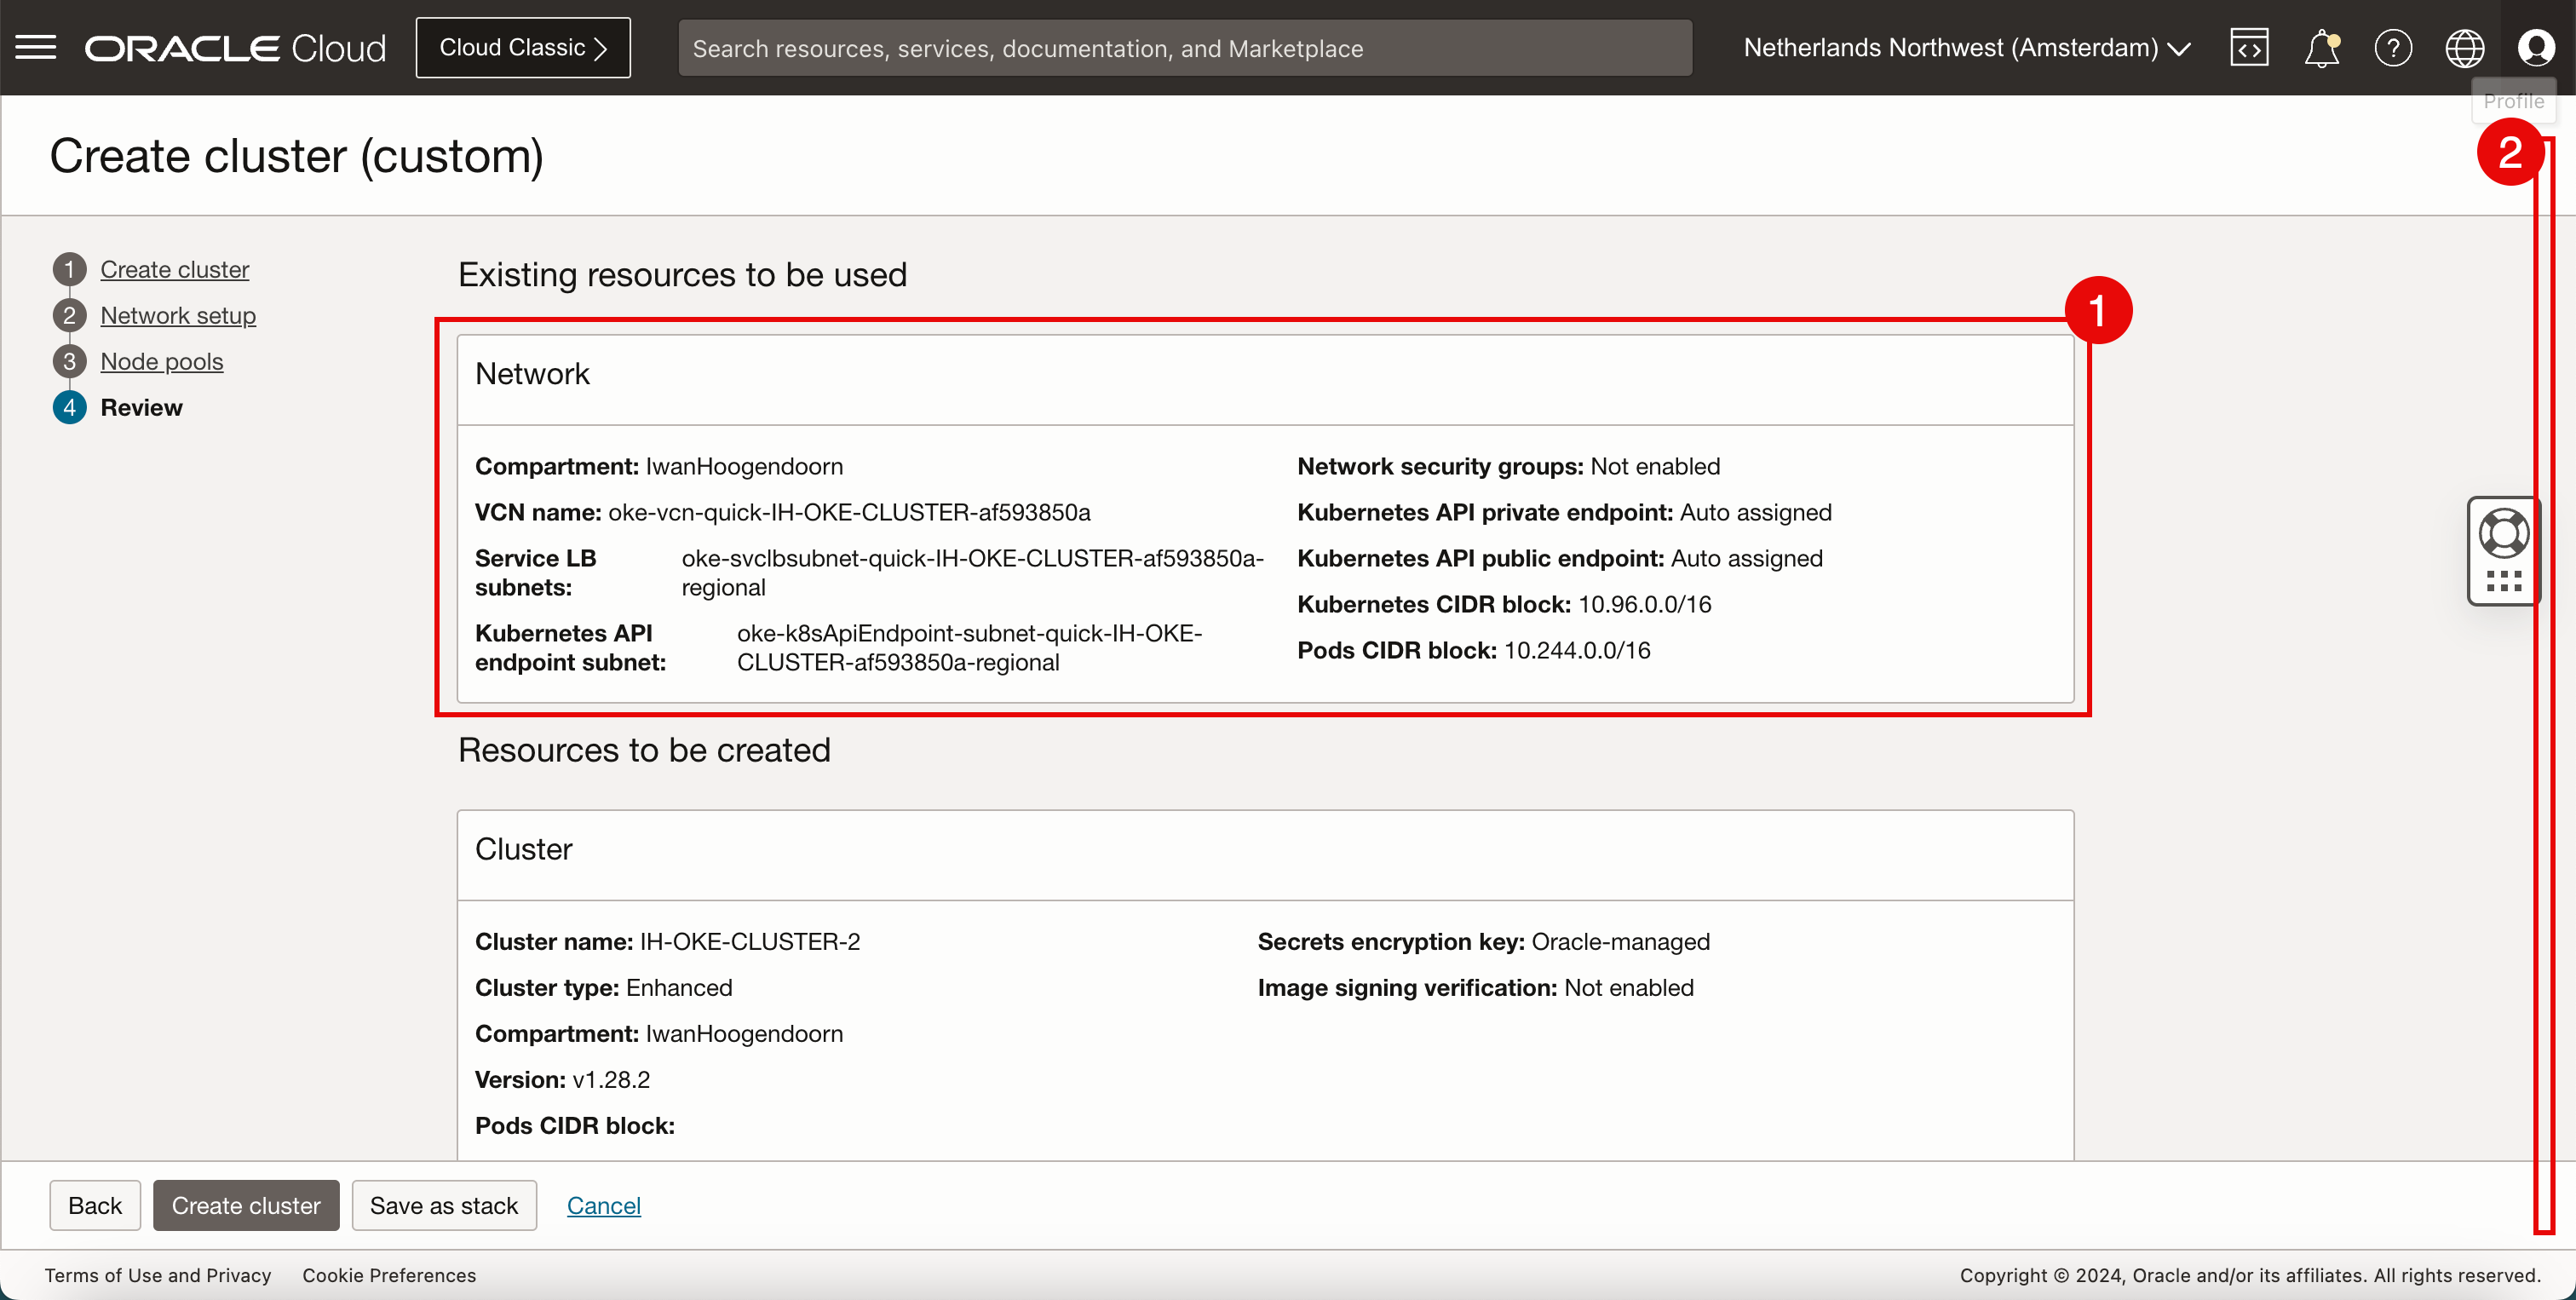
- 네트워크 정보를 검토합니다.
- 아래로.
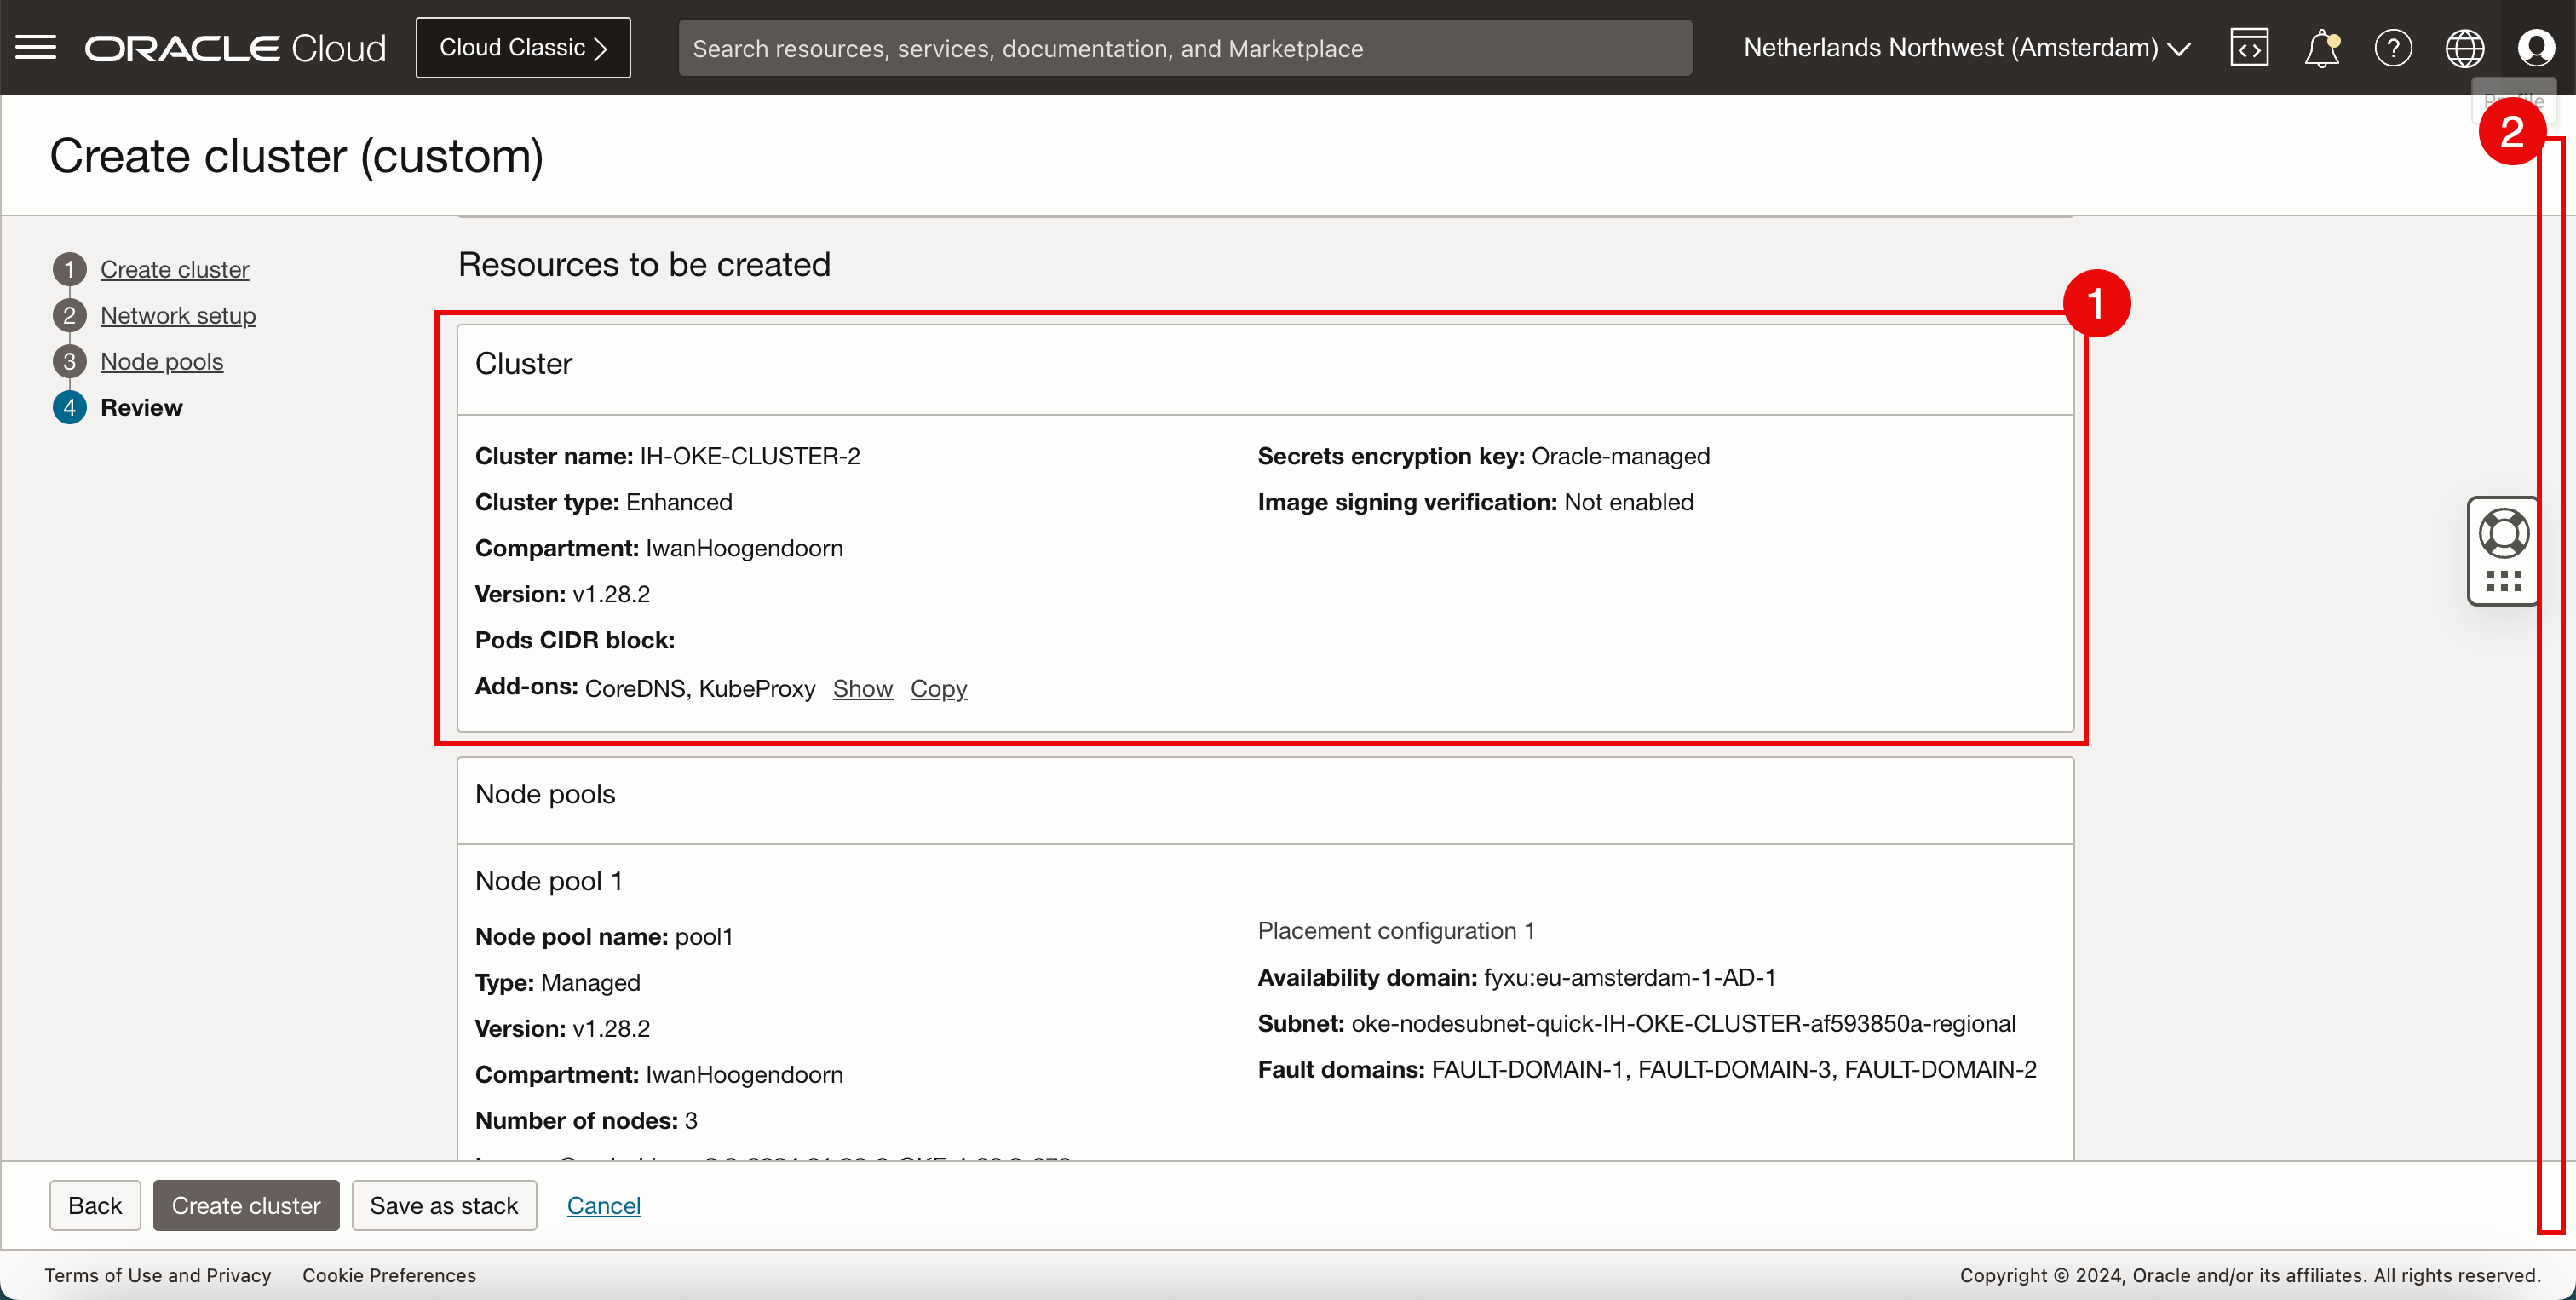
- 클러스터 정보를 검토합니다.
- 아래로.
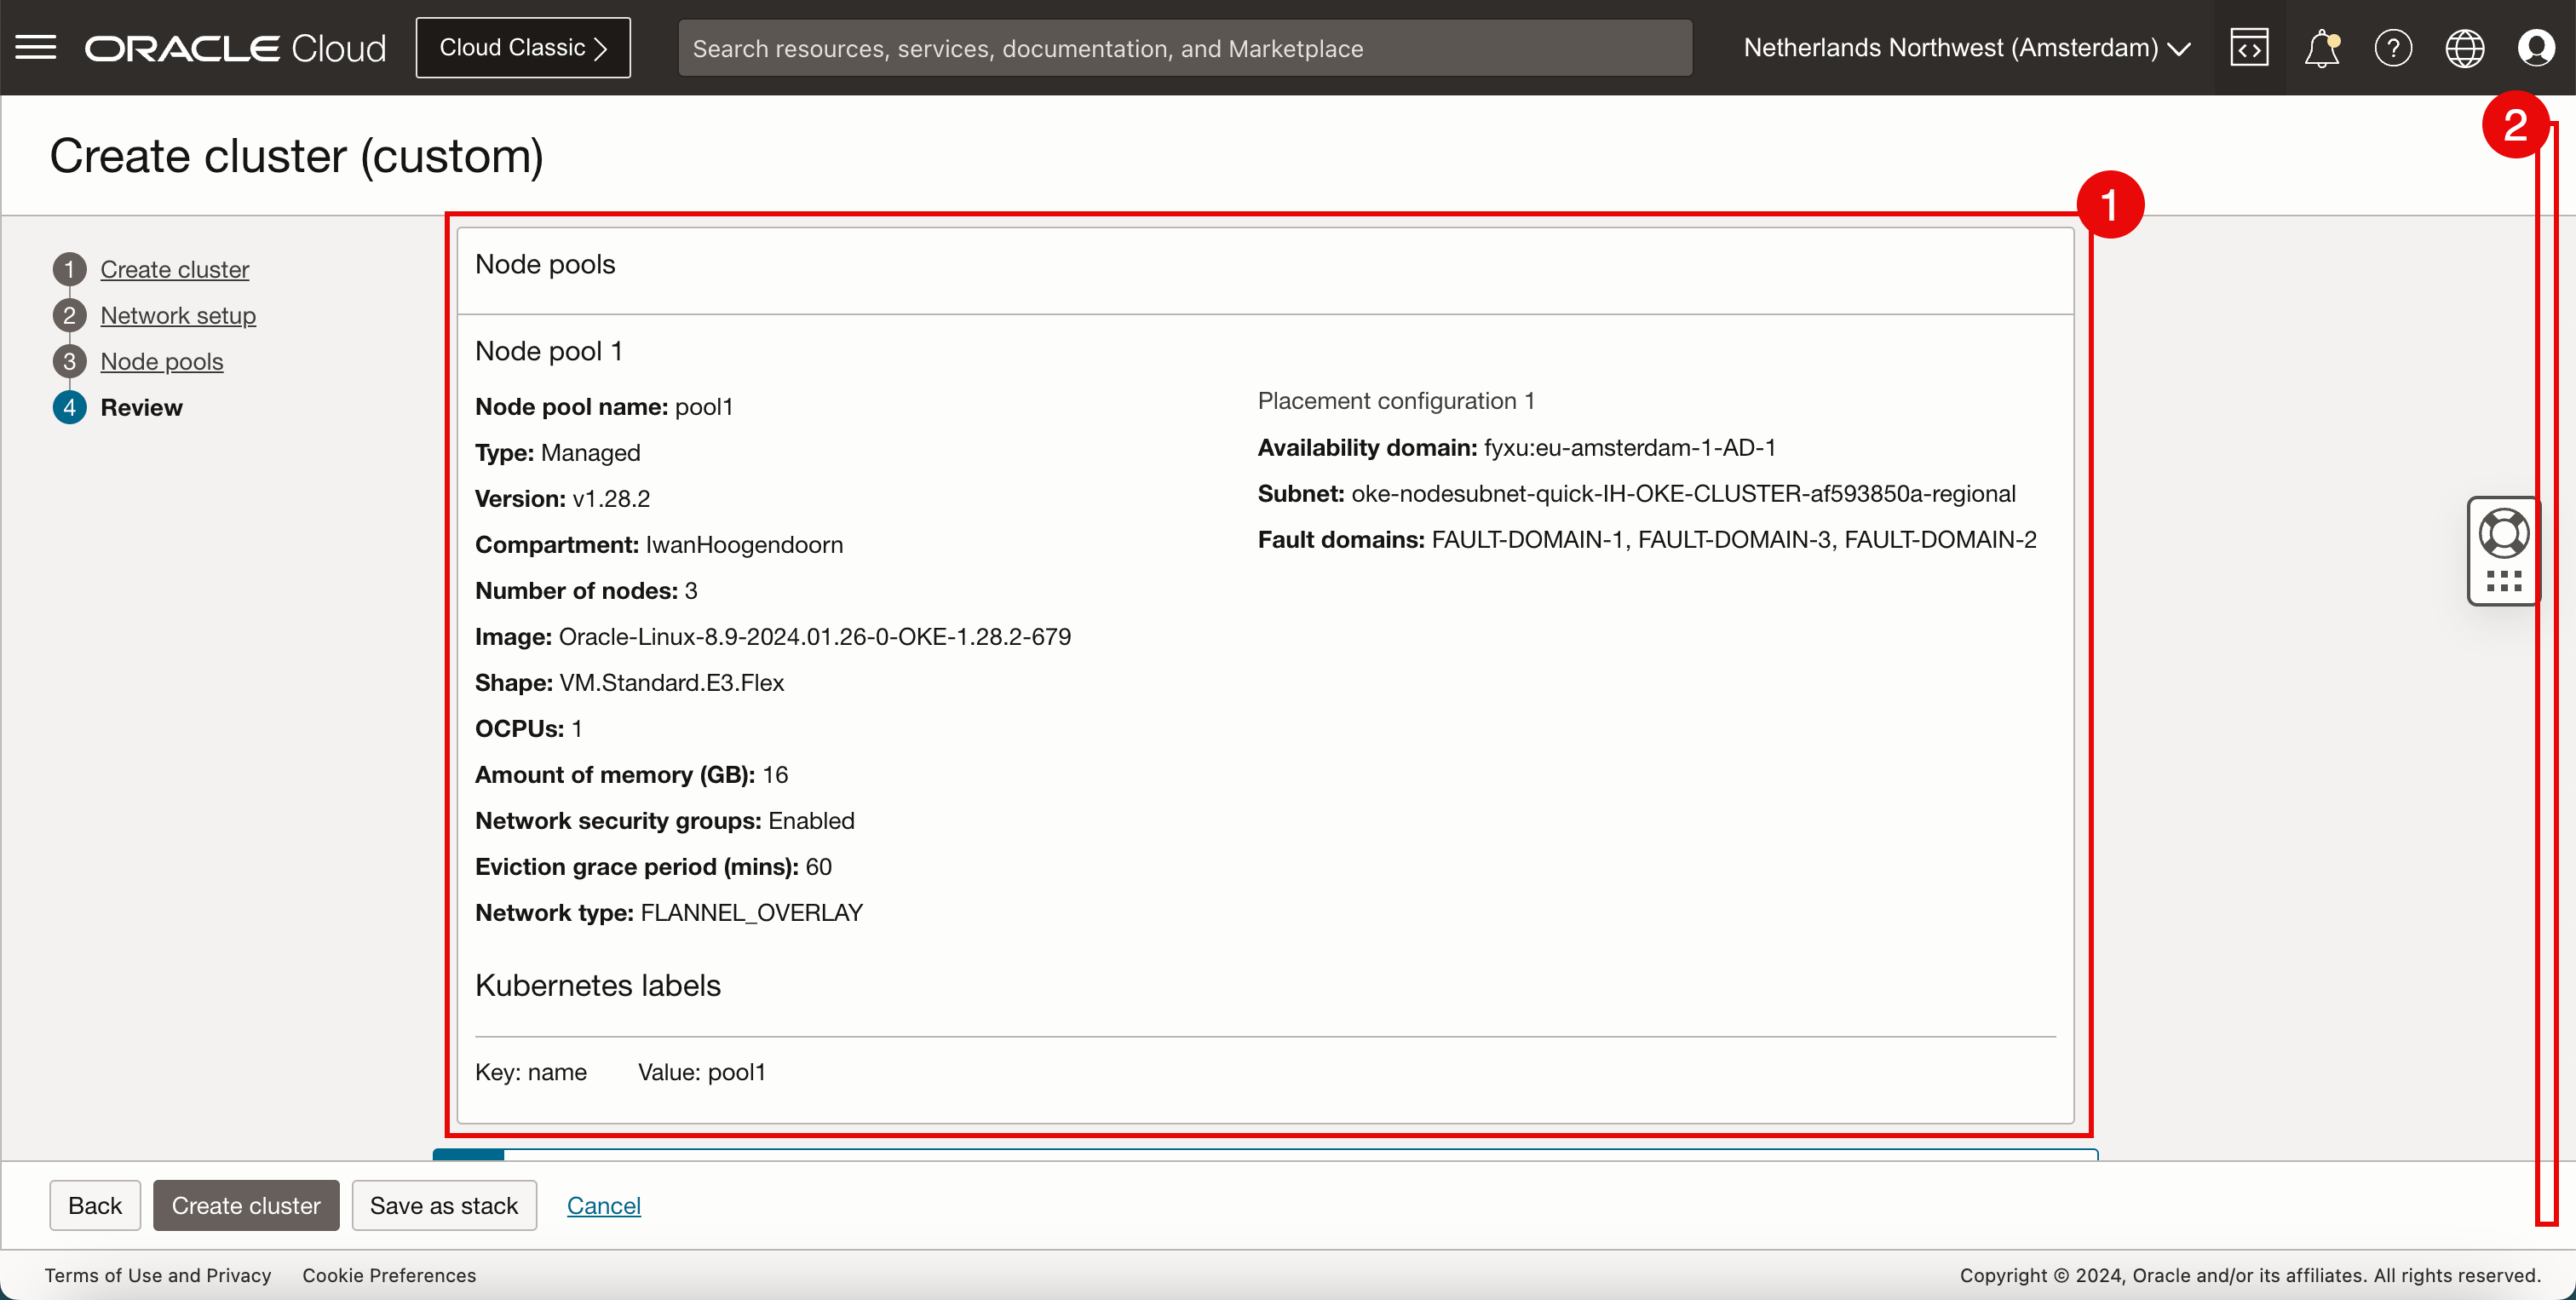
- 노드 풀 정보를 검토합니다.
- 아래로.
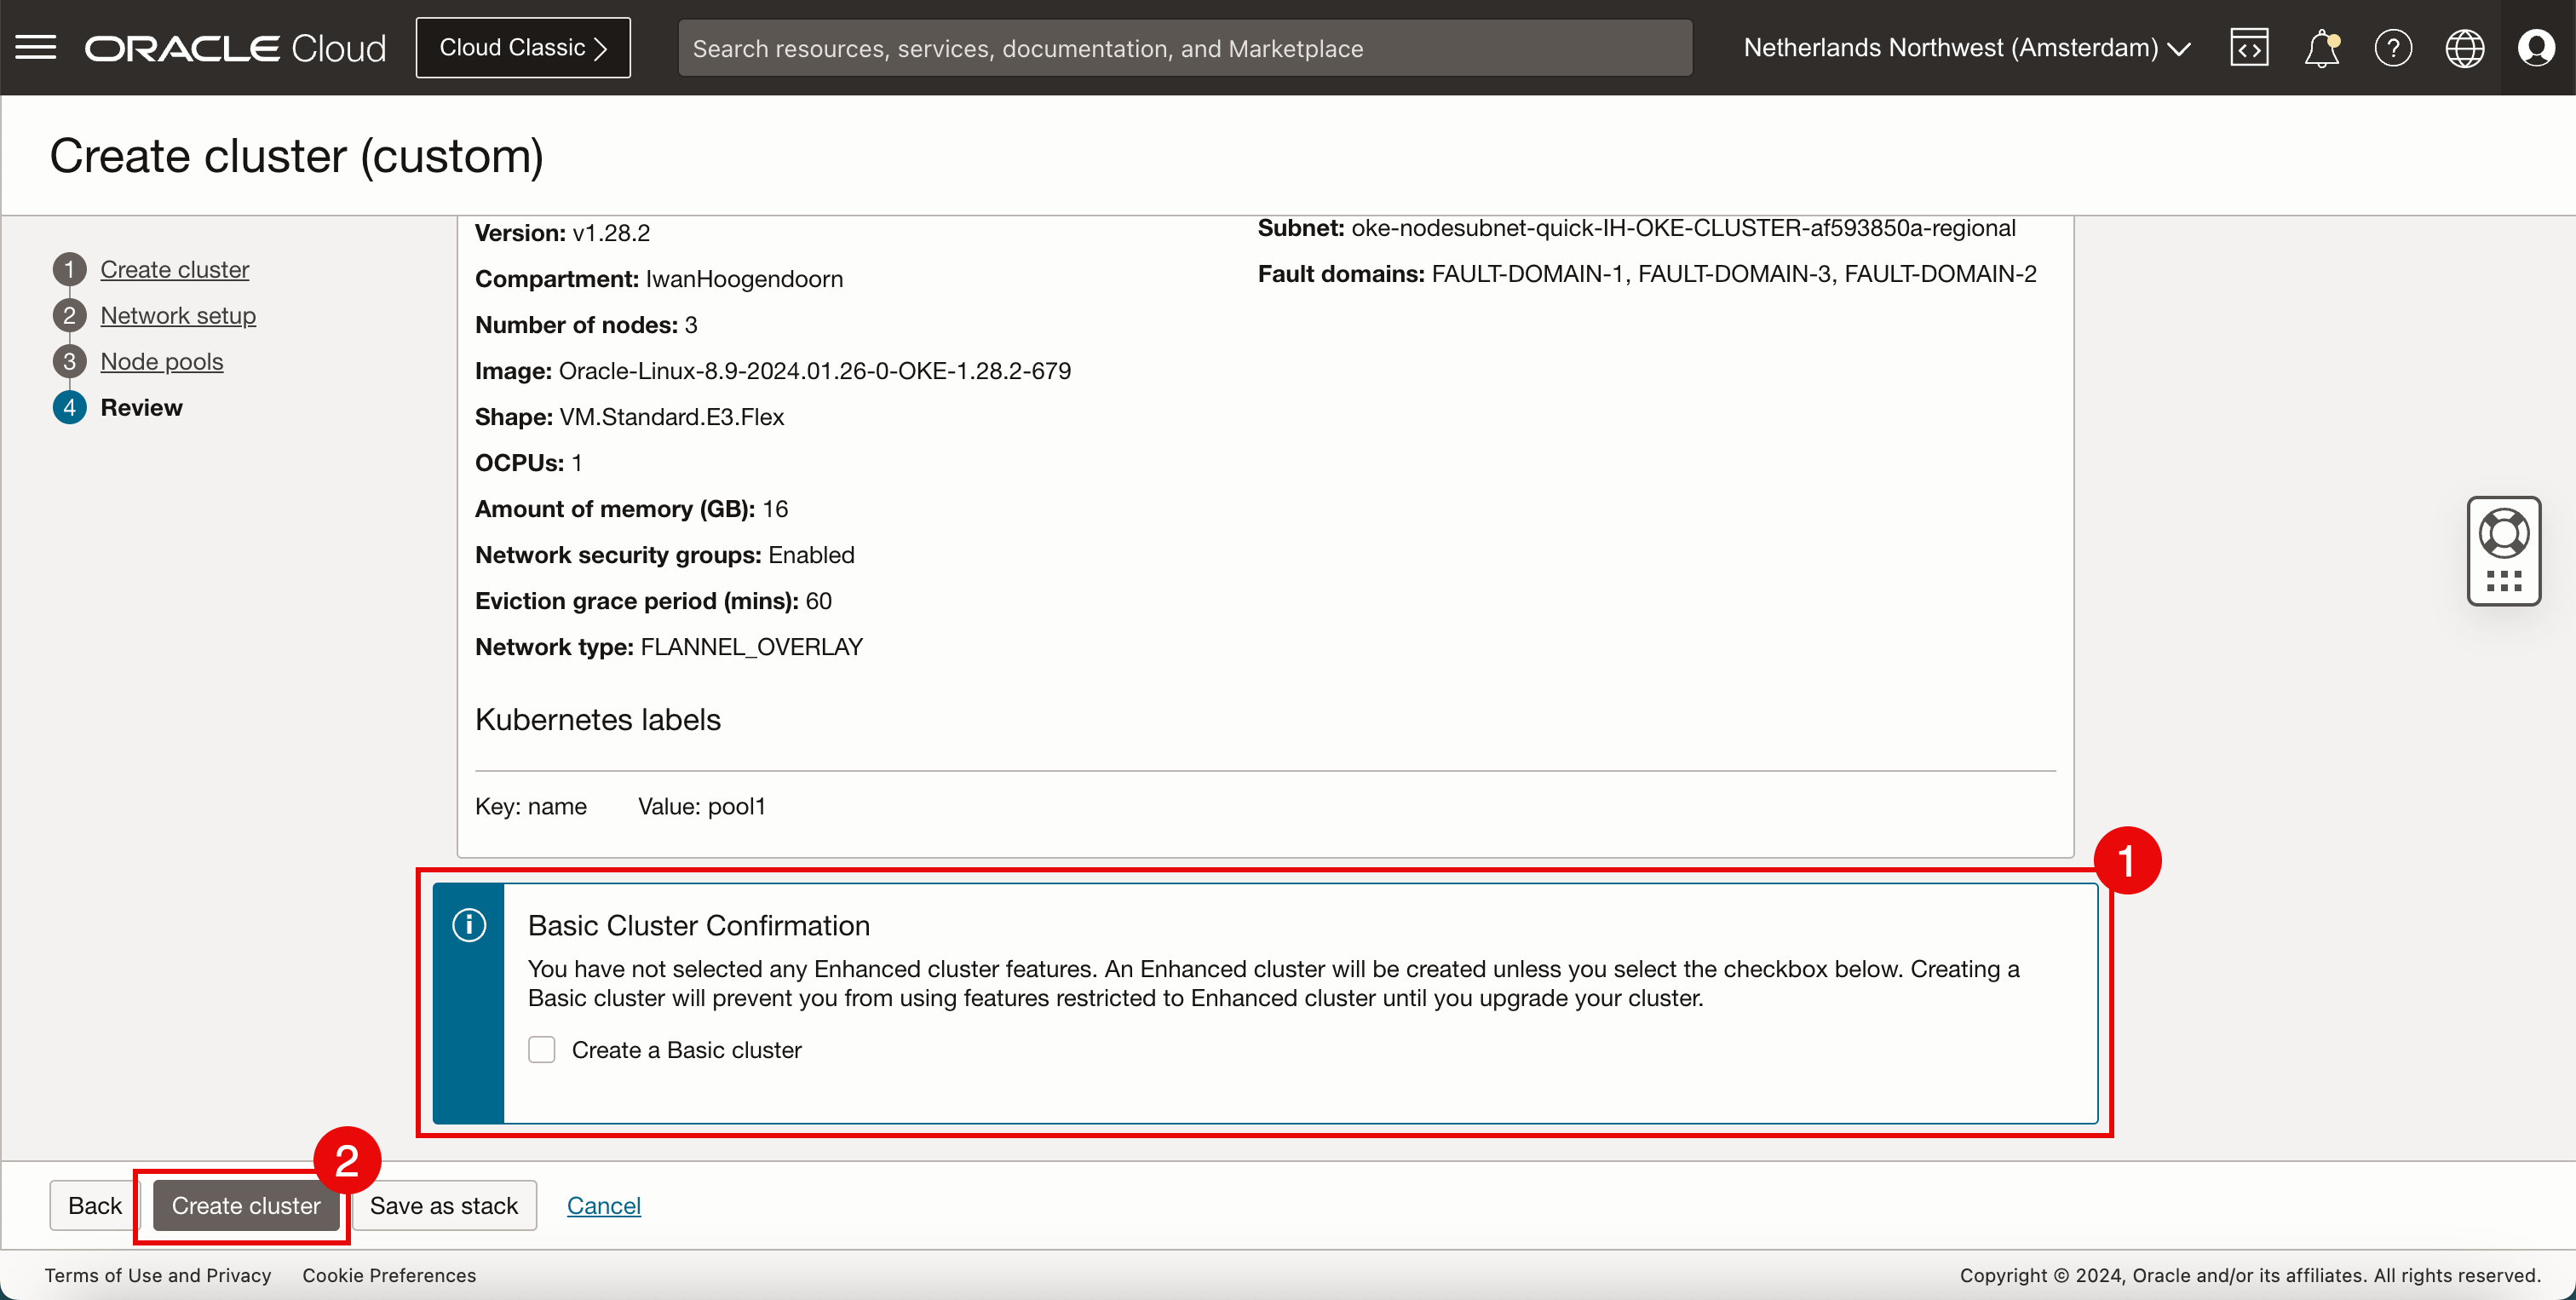
- Create a Basic Cluster를 선택하지 마십시오.
- 클러스터 생성을 누릅니다.
- 여러 구성 요소의 상태를 검토합니다.
- 닫기를 누르면
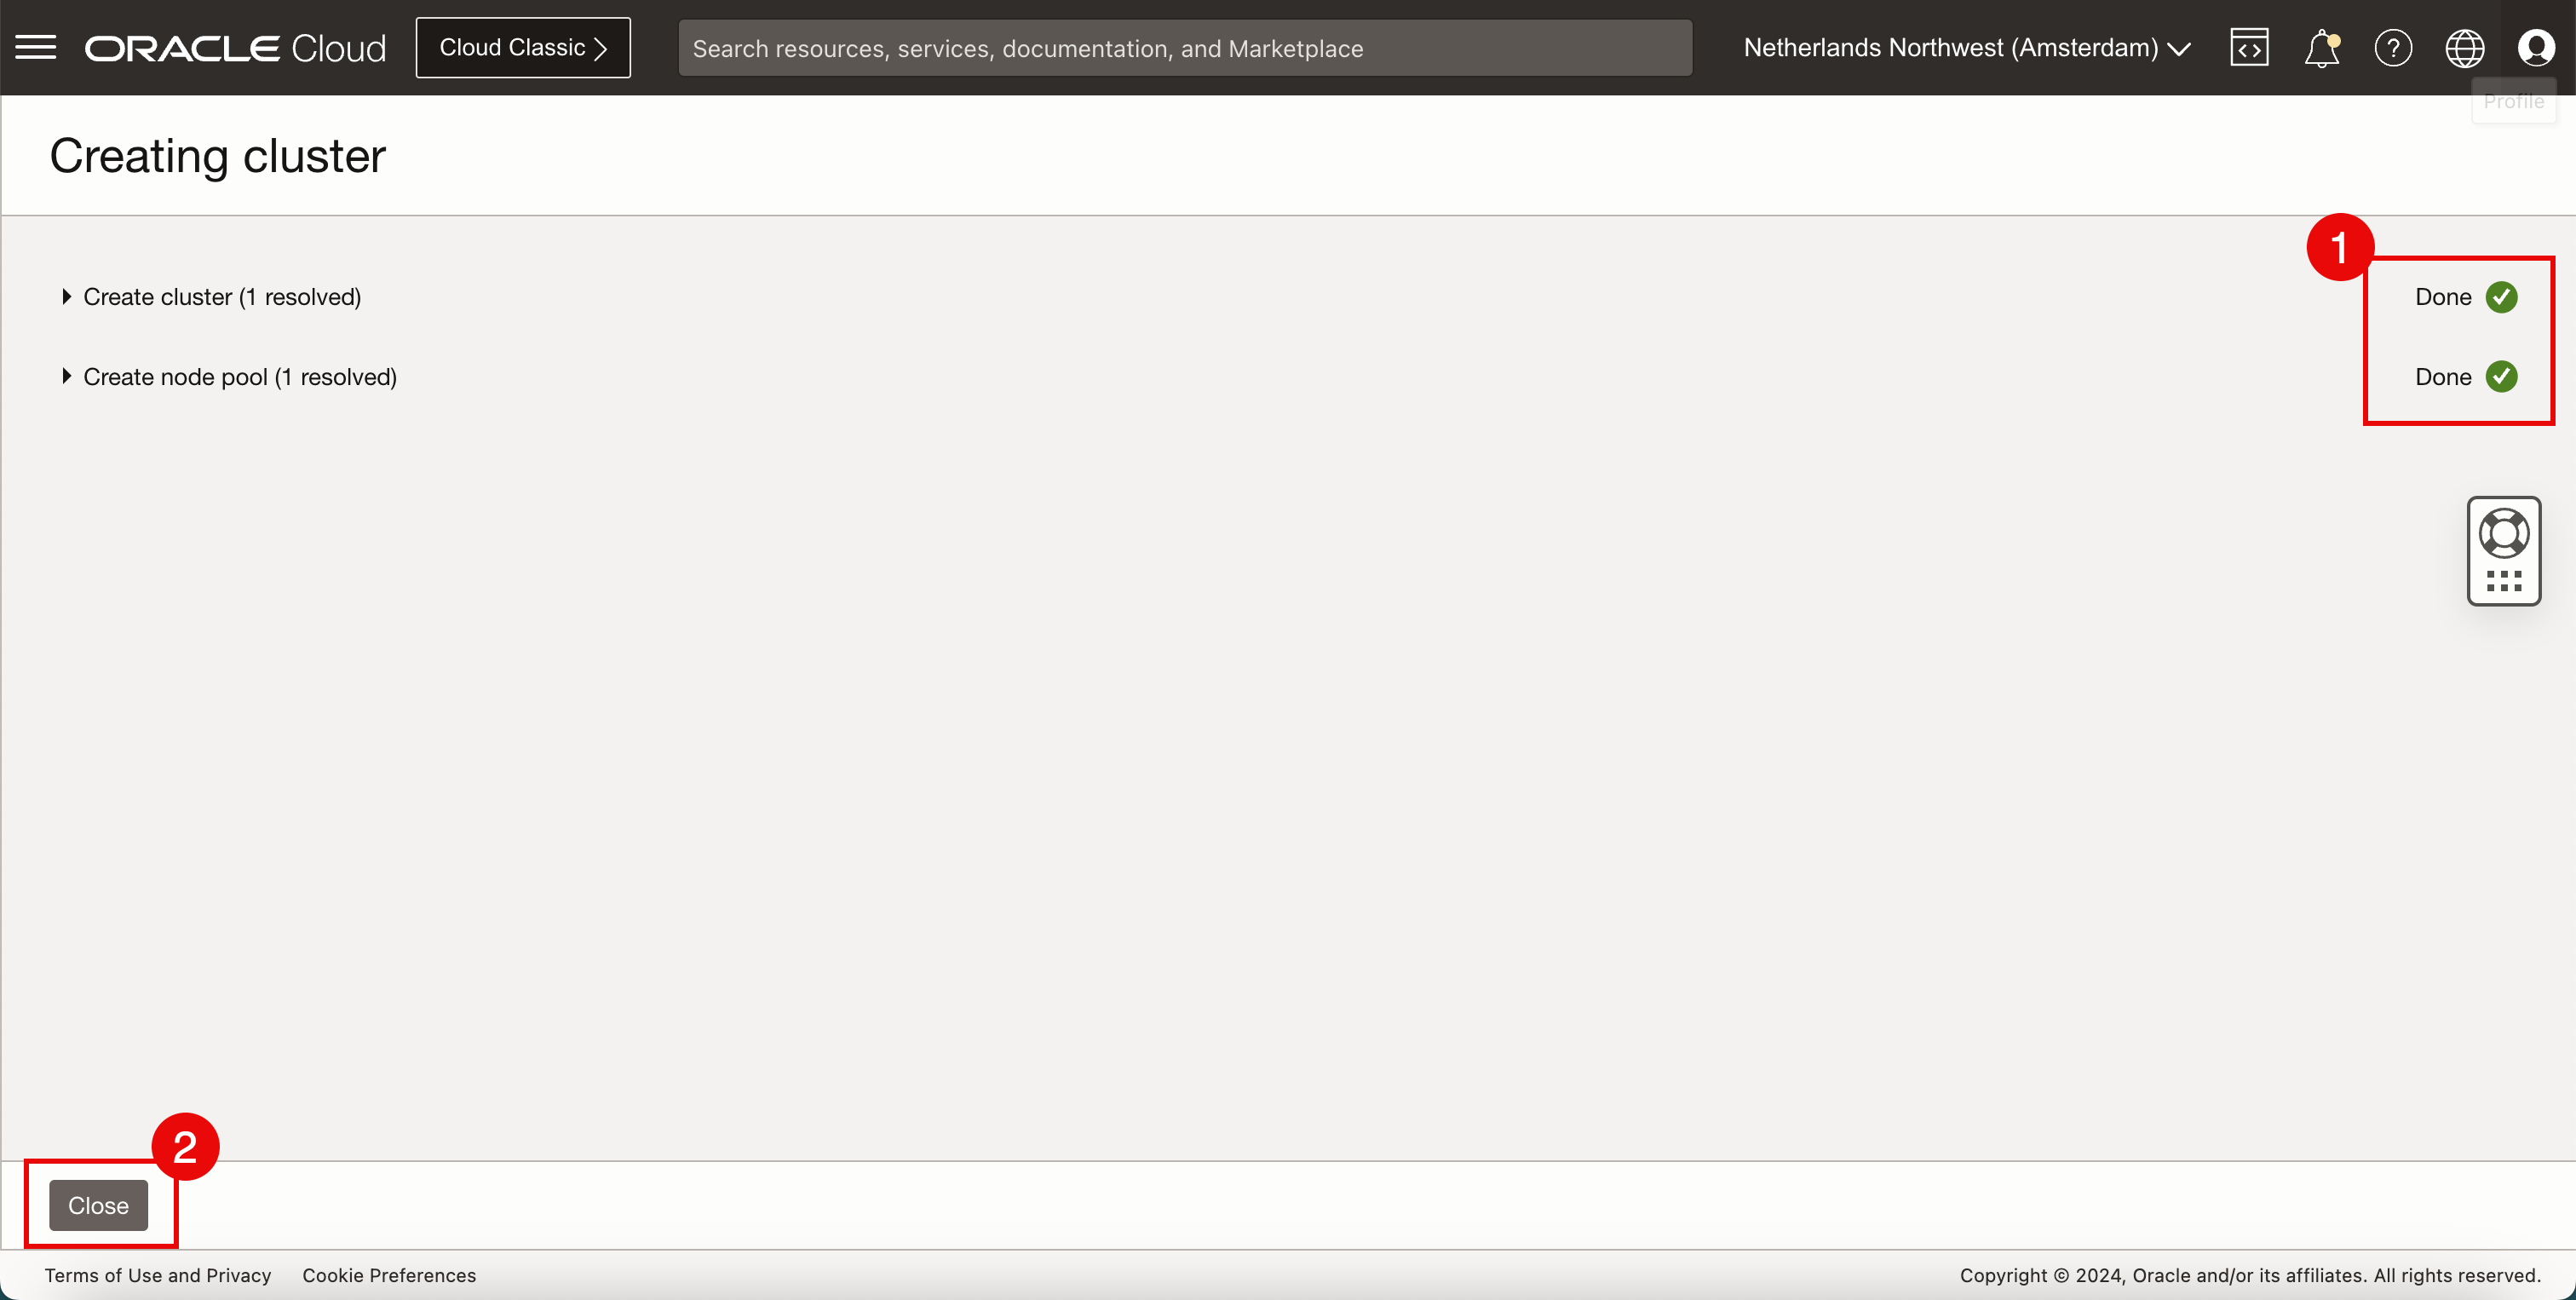
-
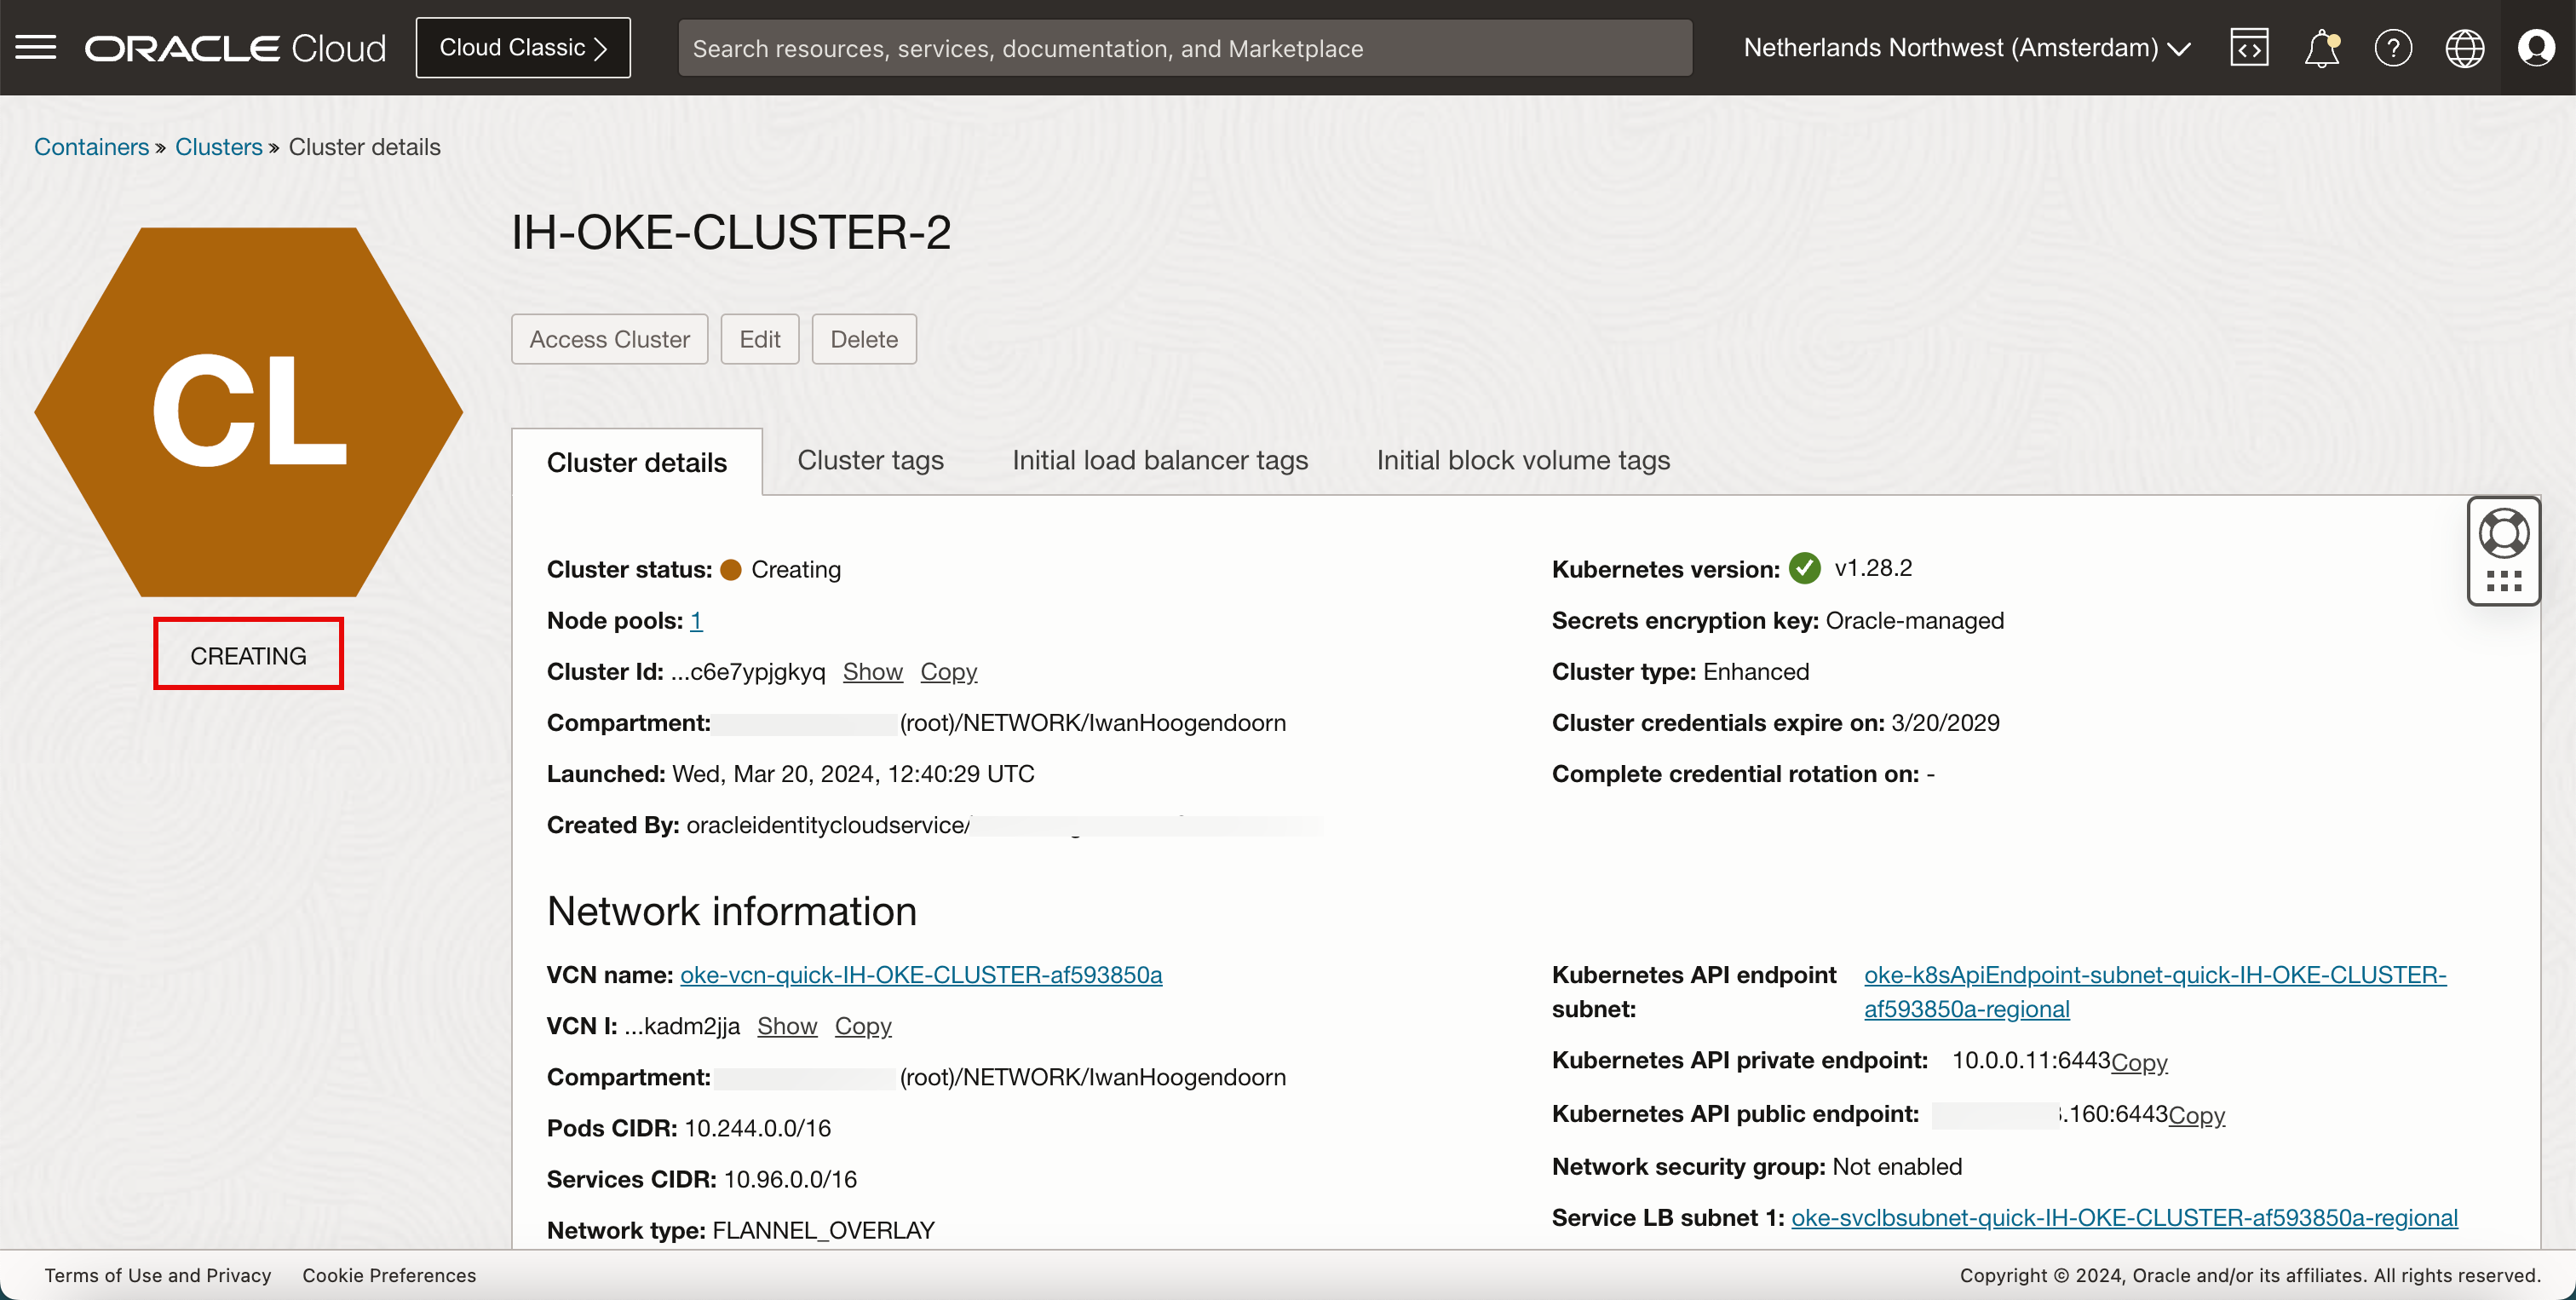
상태가 CREATING인지 검토합니다.
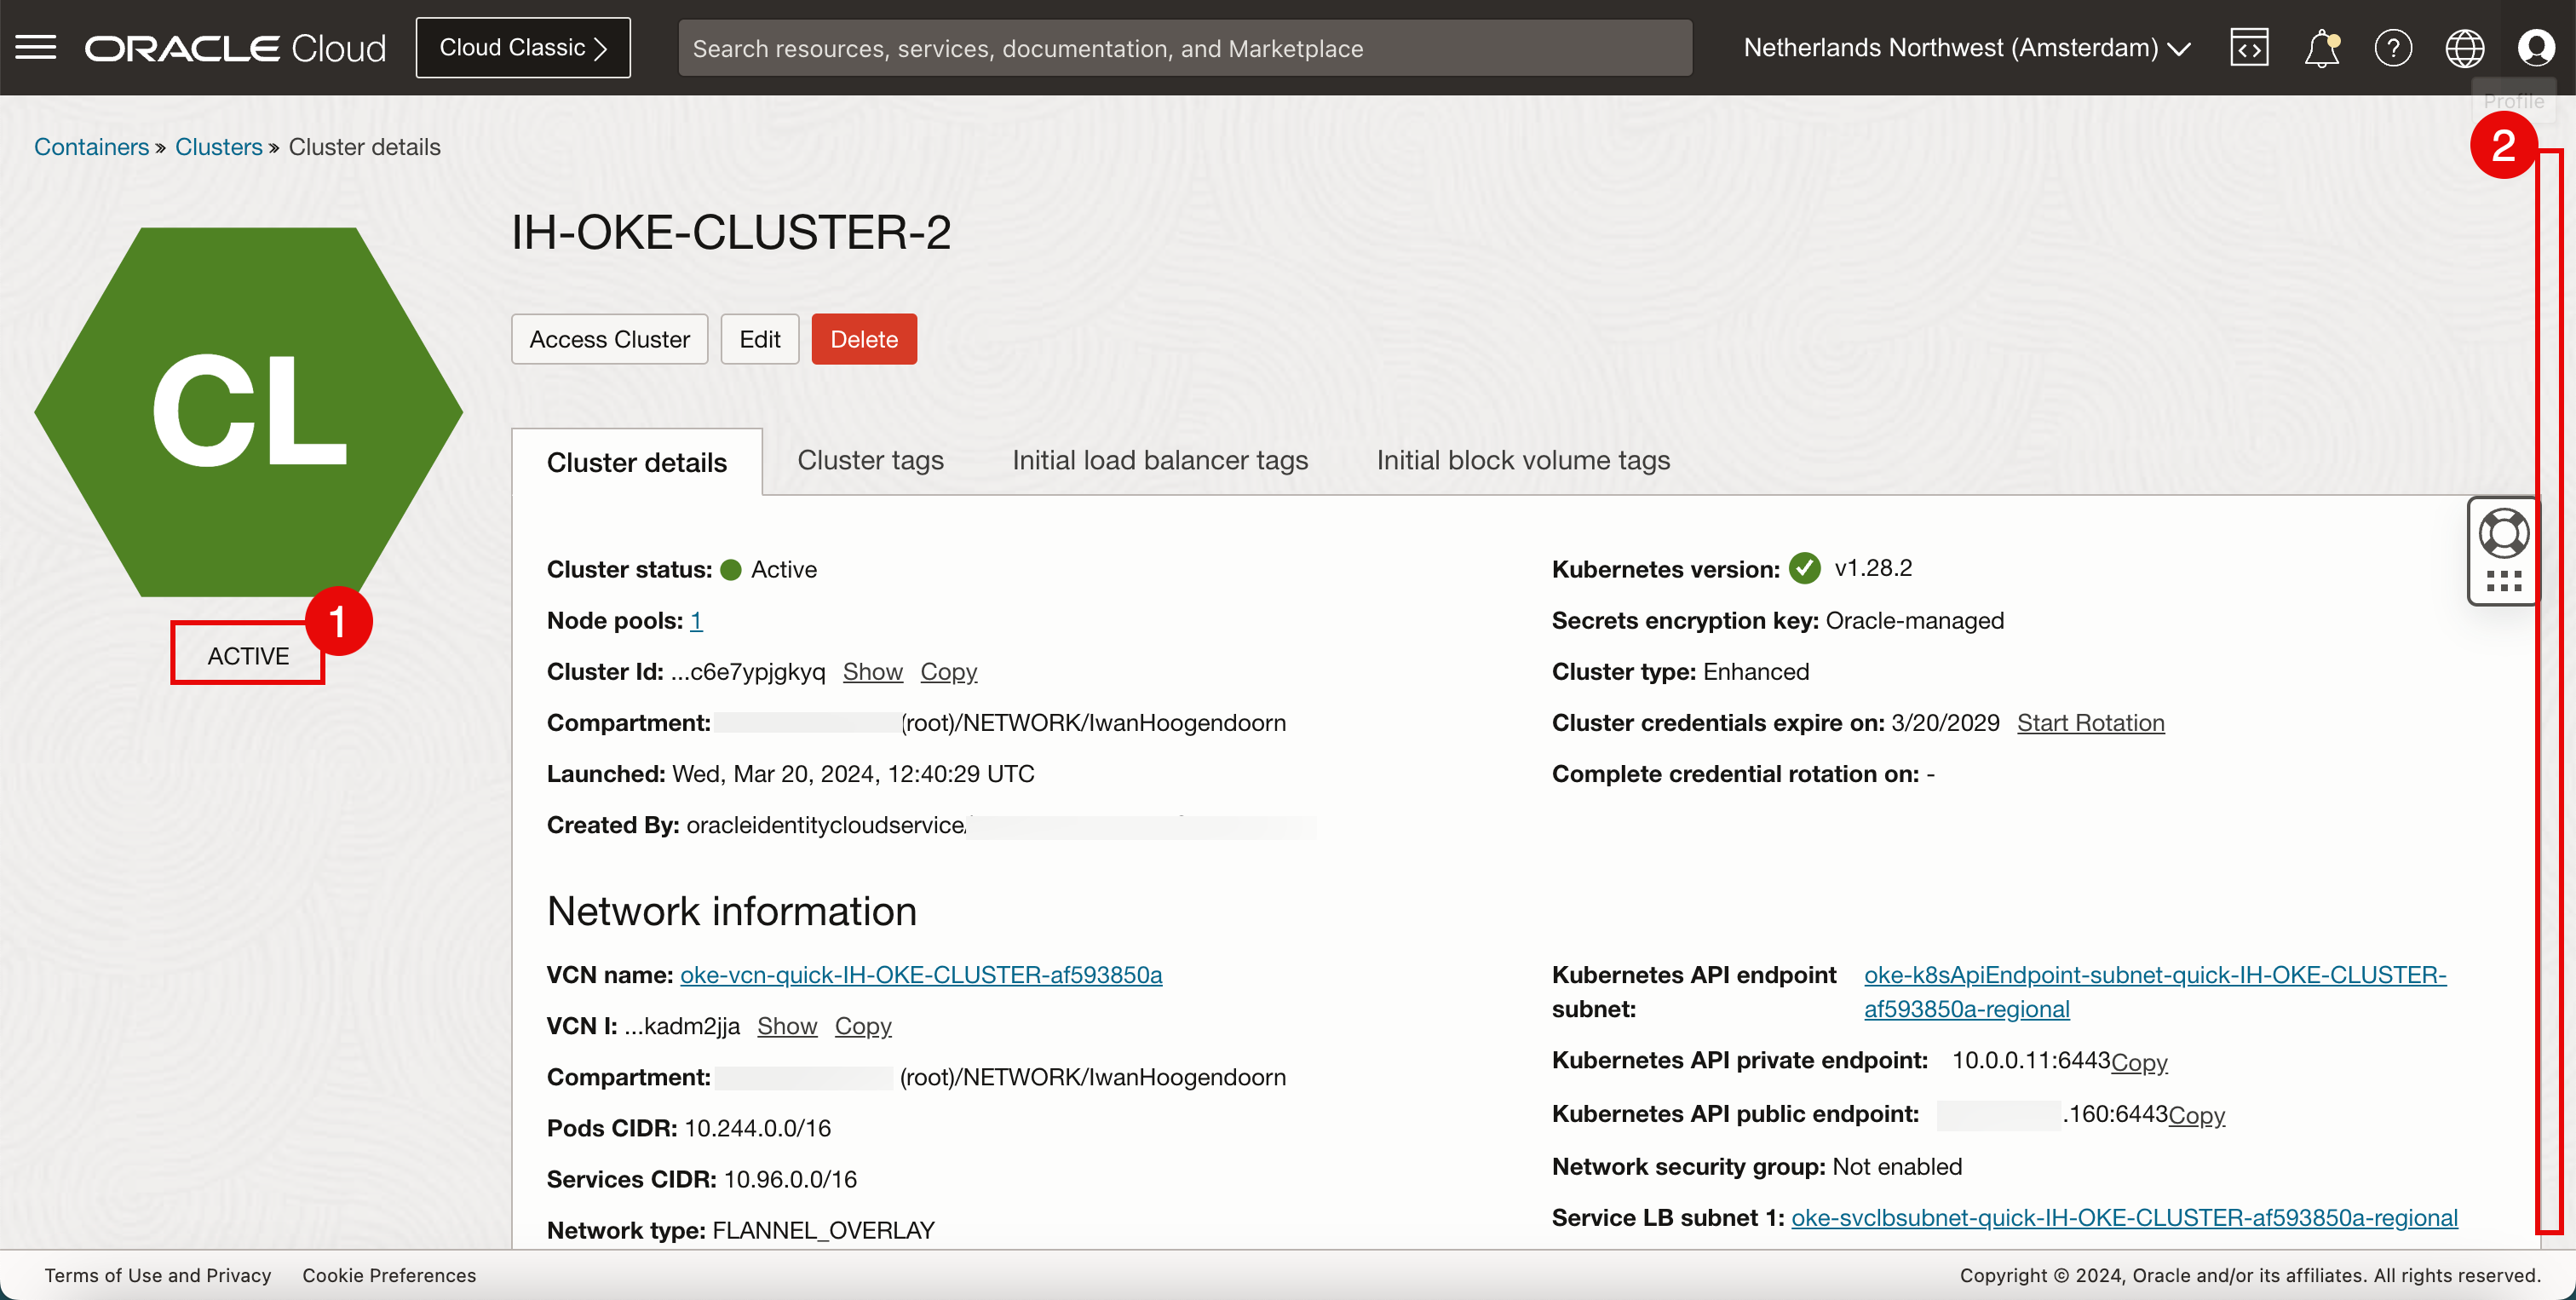
- 상태가 ACTIVE인지 확인합니다.
- 아래로.
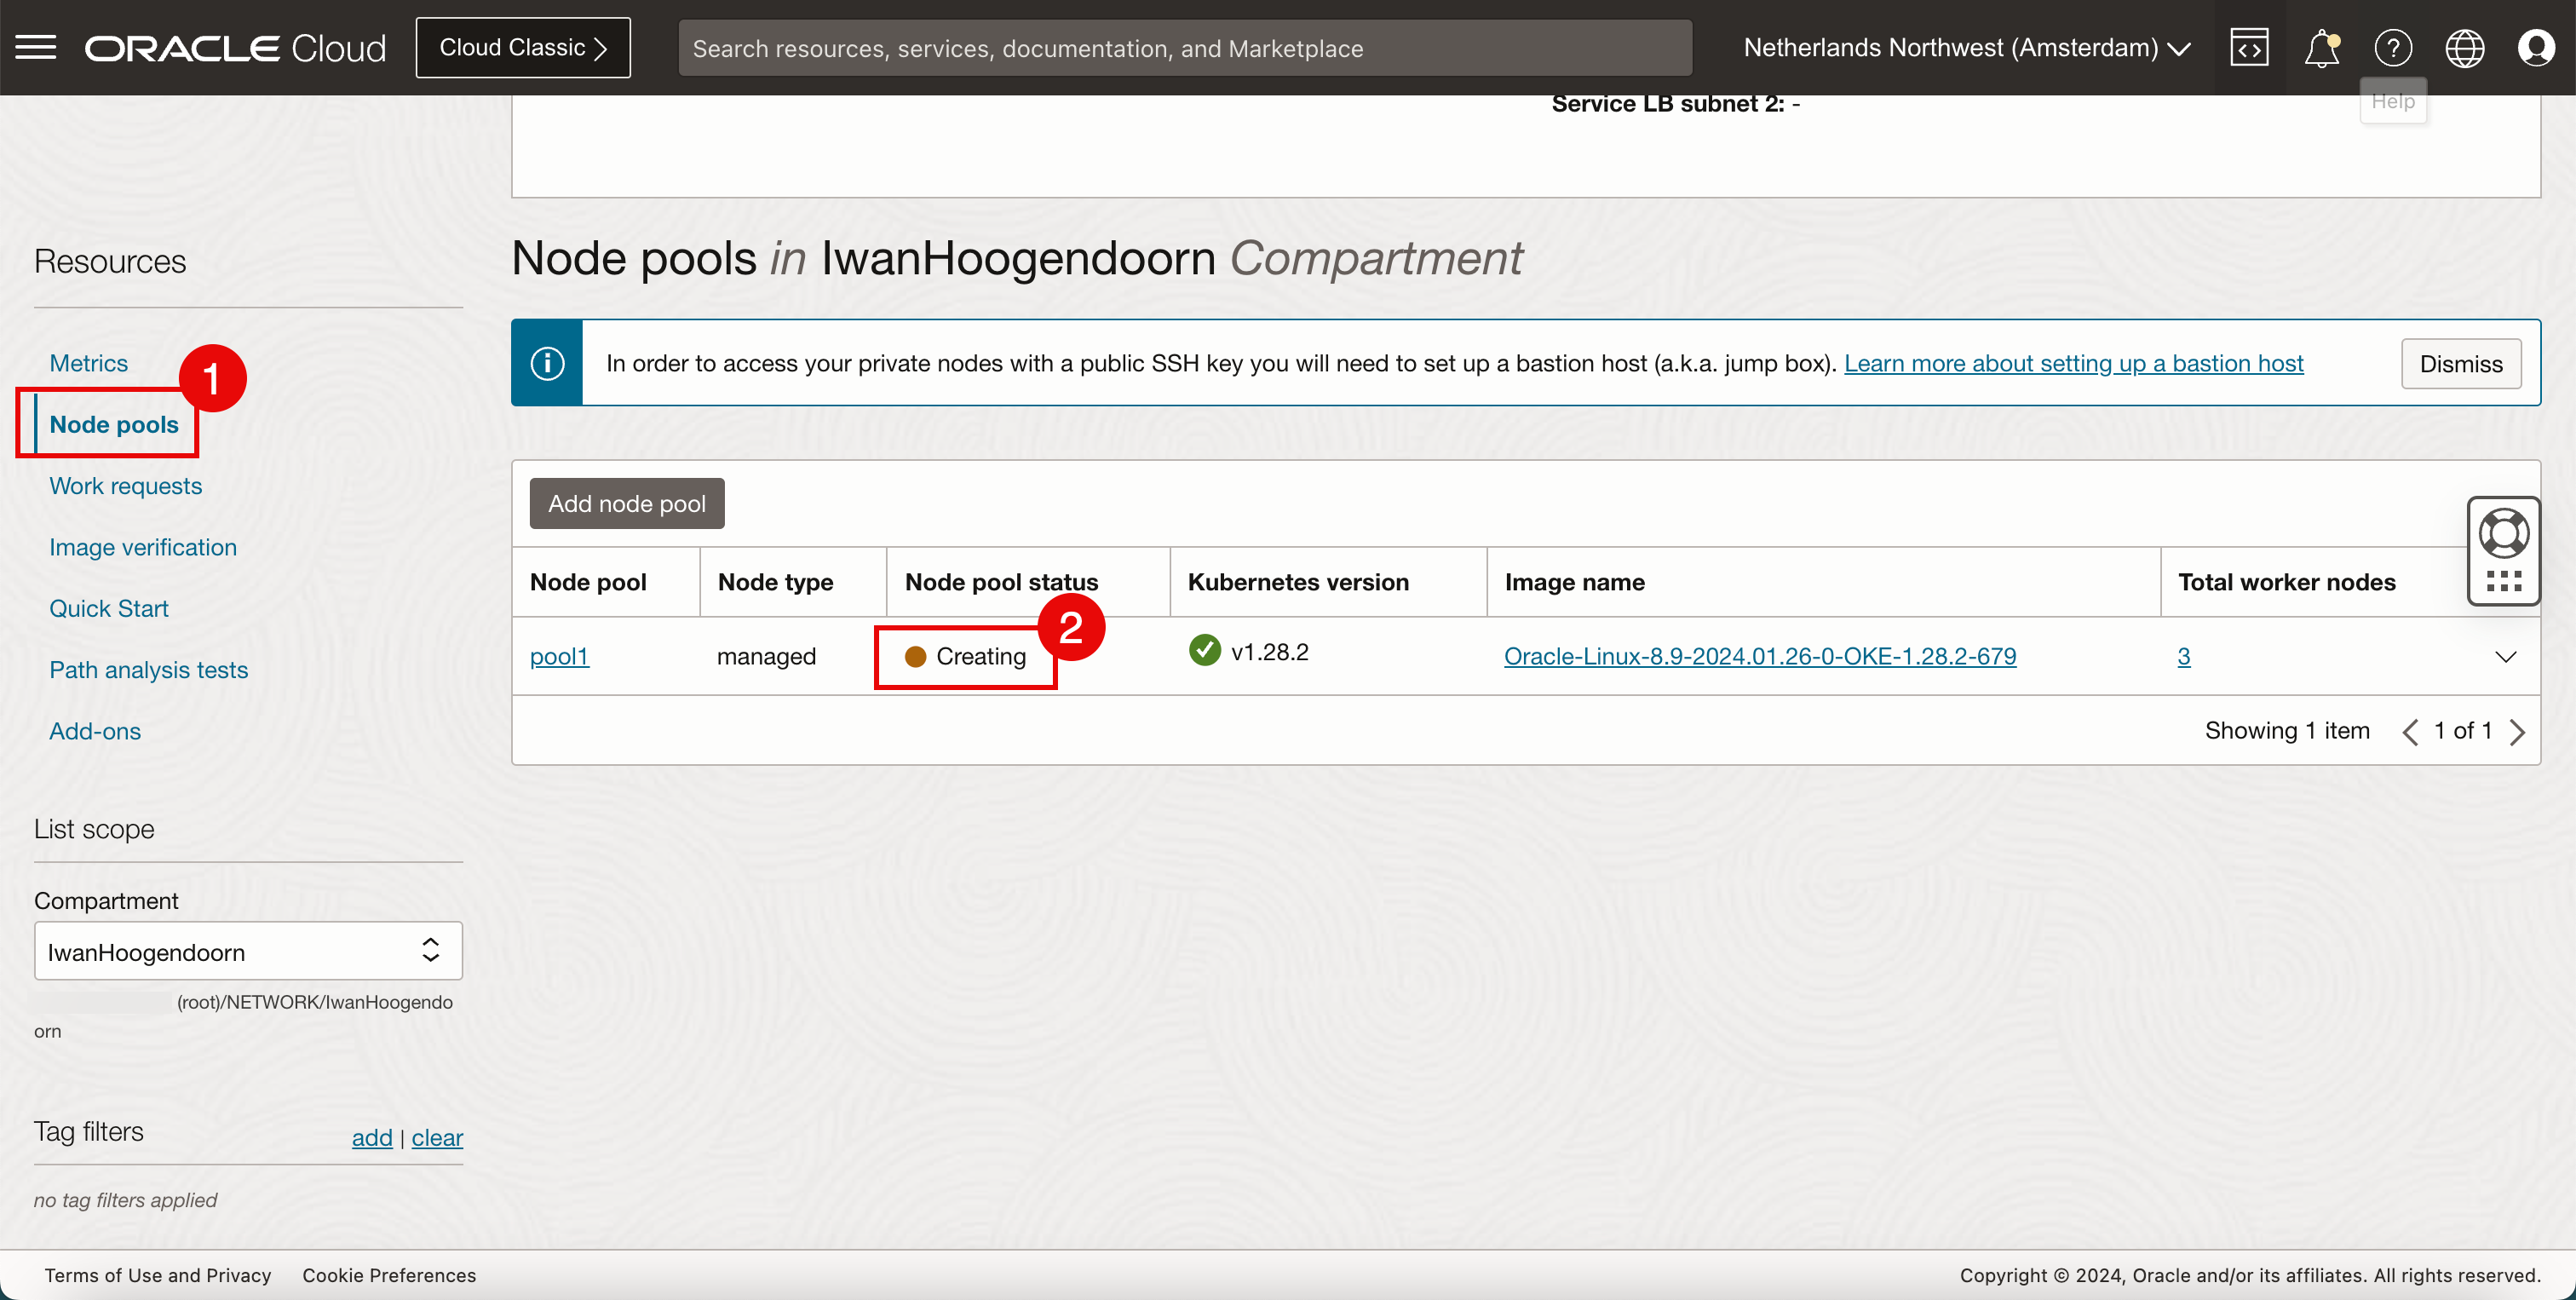
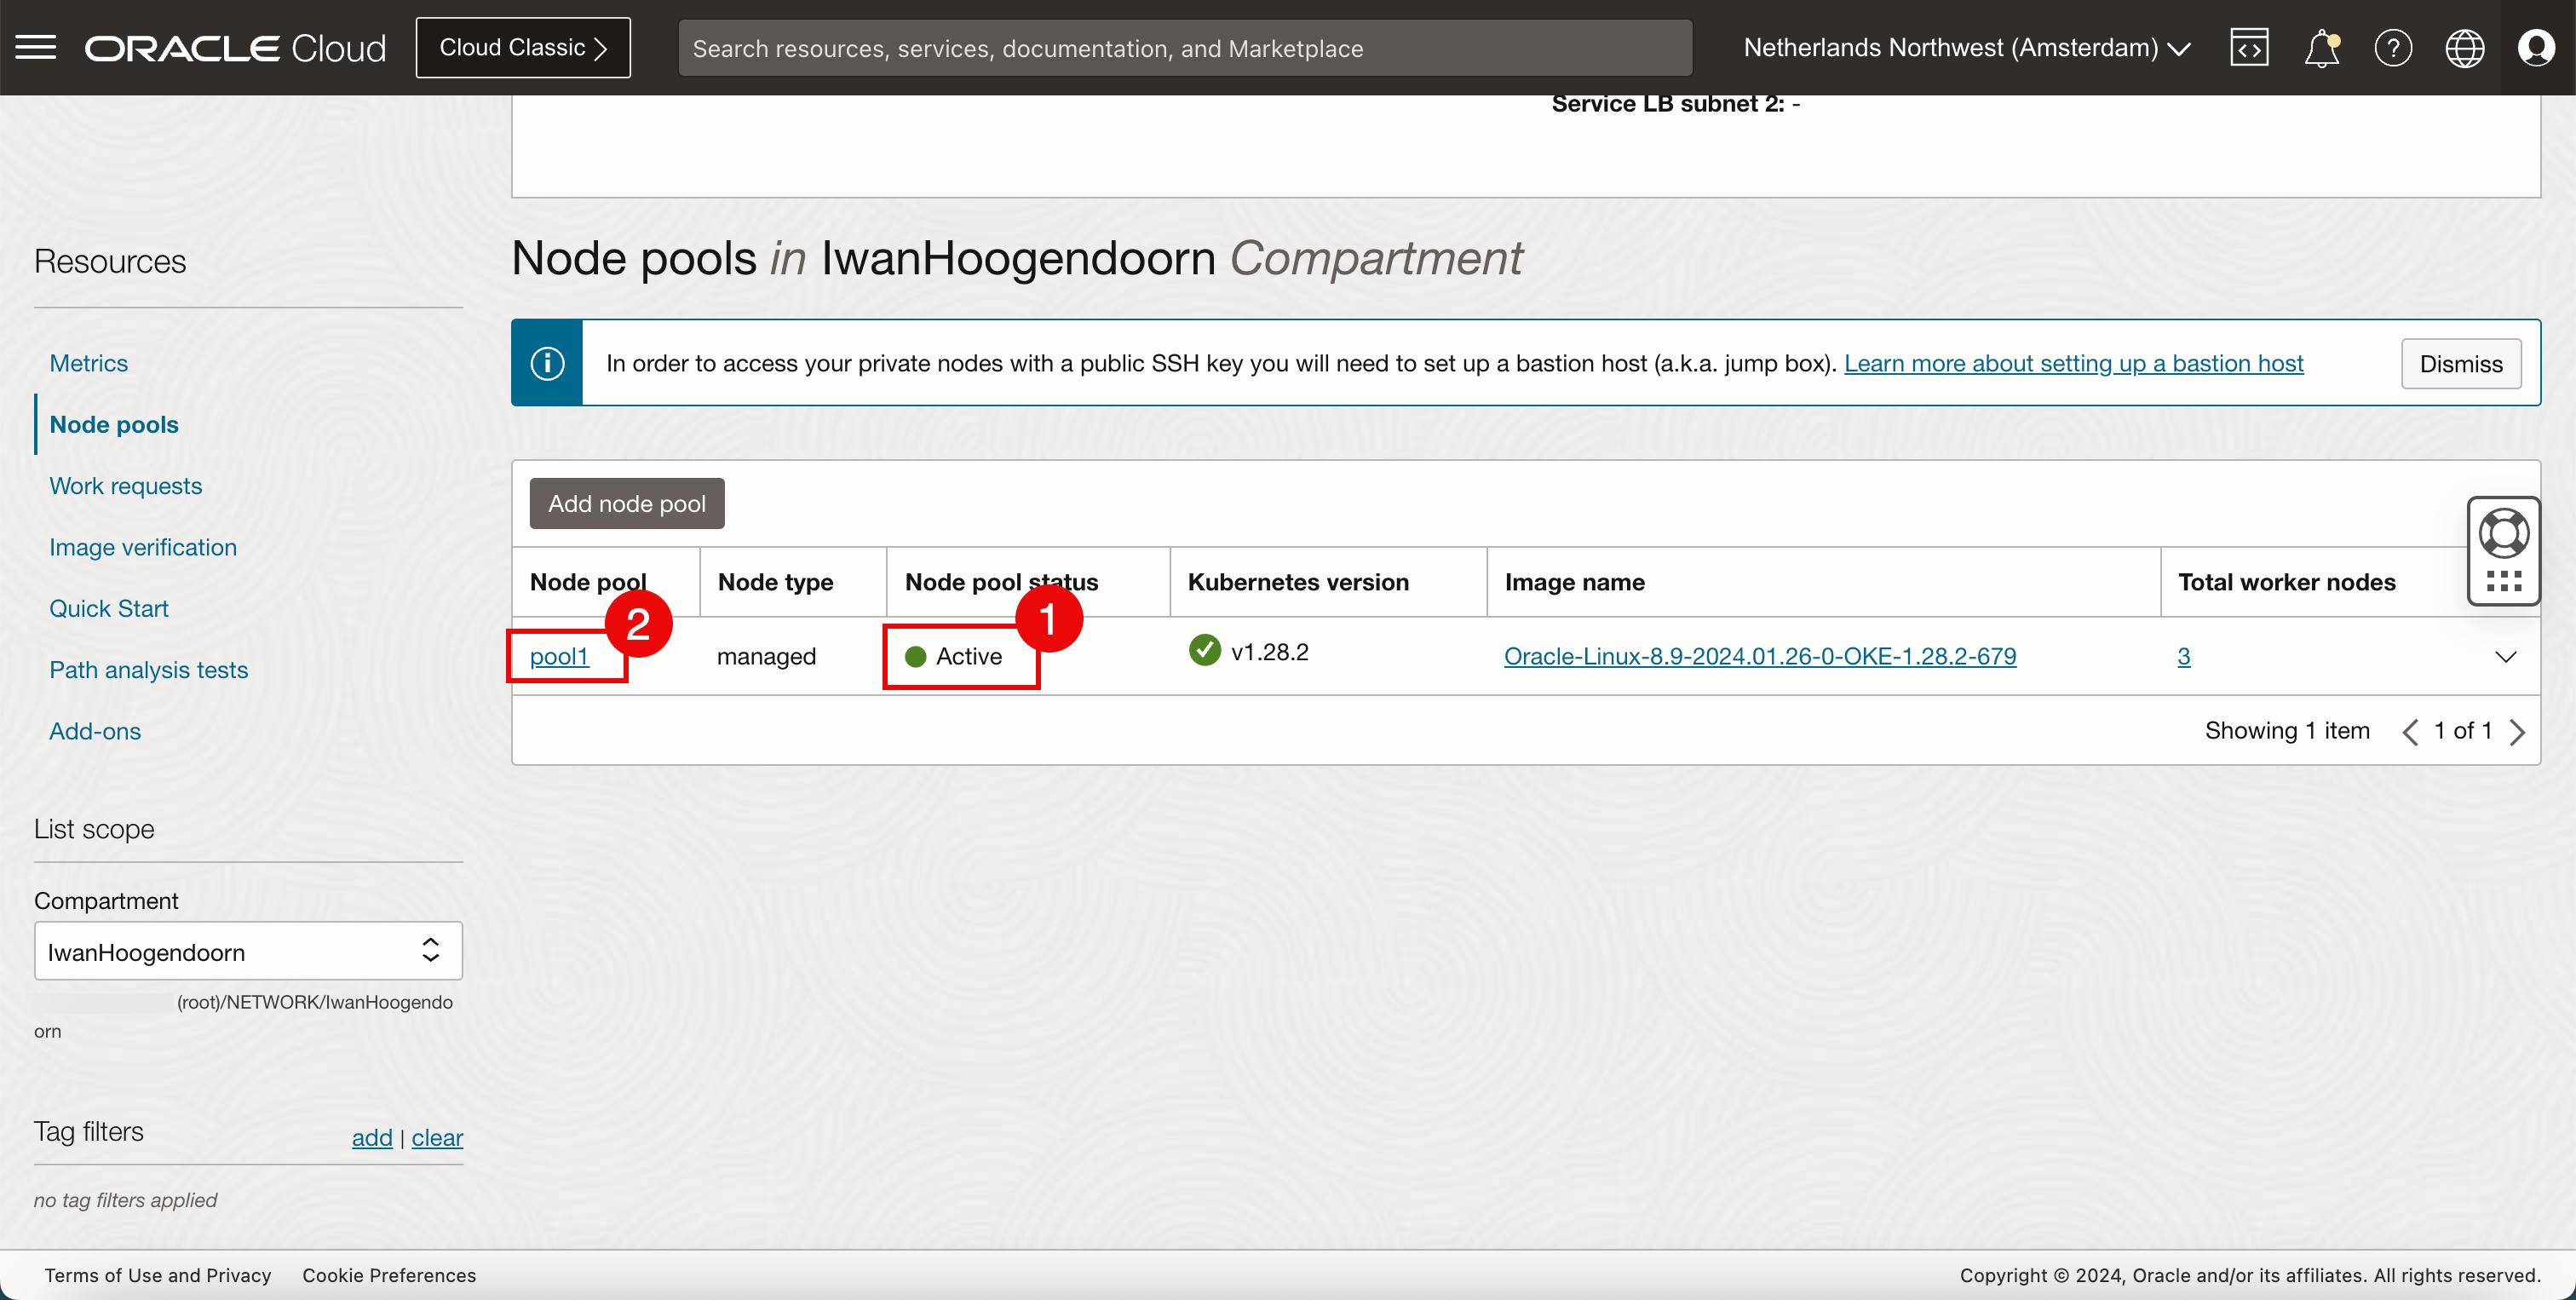
- 노드 풀을 누릅니다.
- 풀의 워커 노드가 여전히 Creating입니다.
- 풀의 워커 노드가 Active 상태입니다.
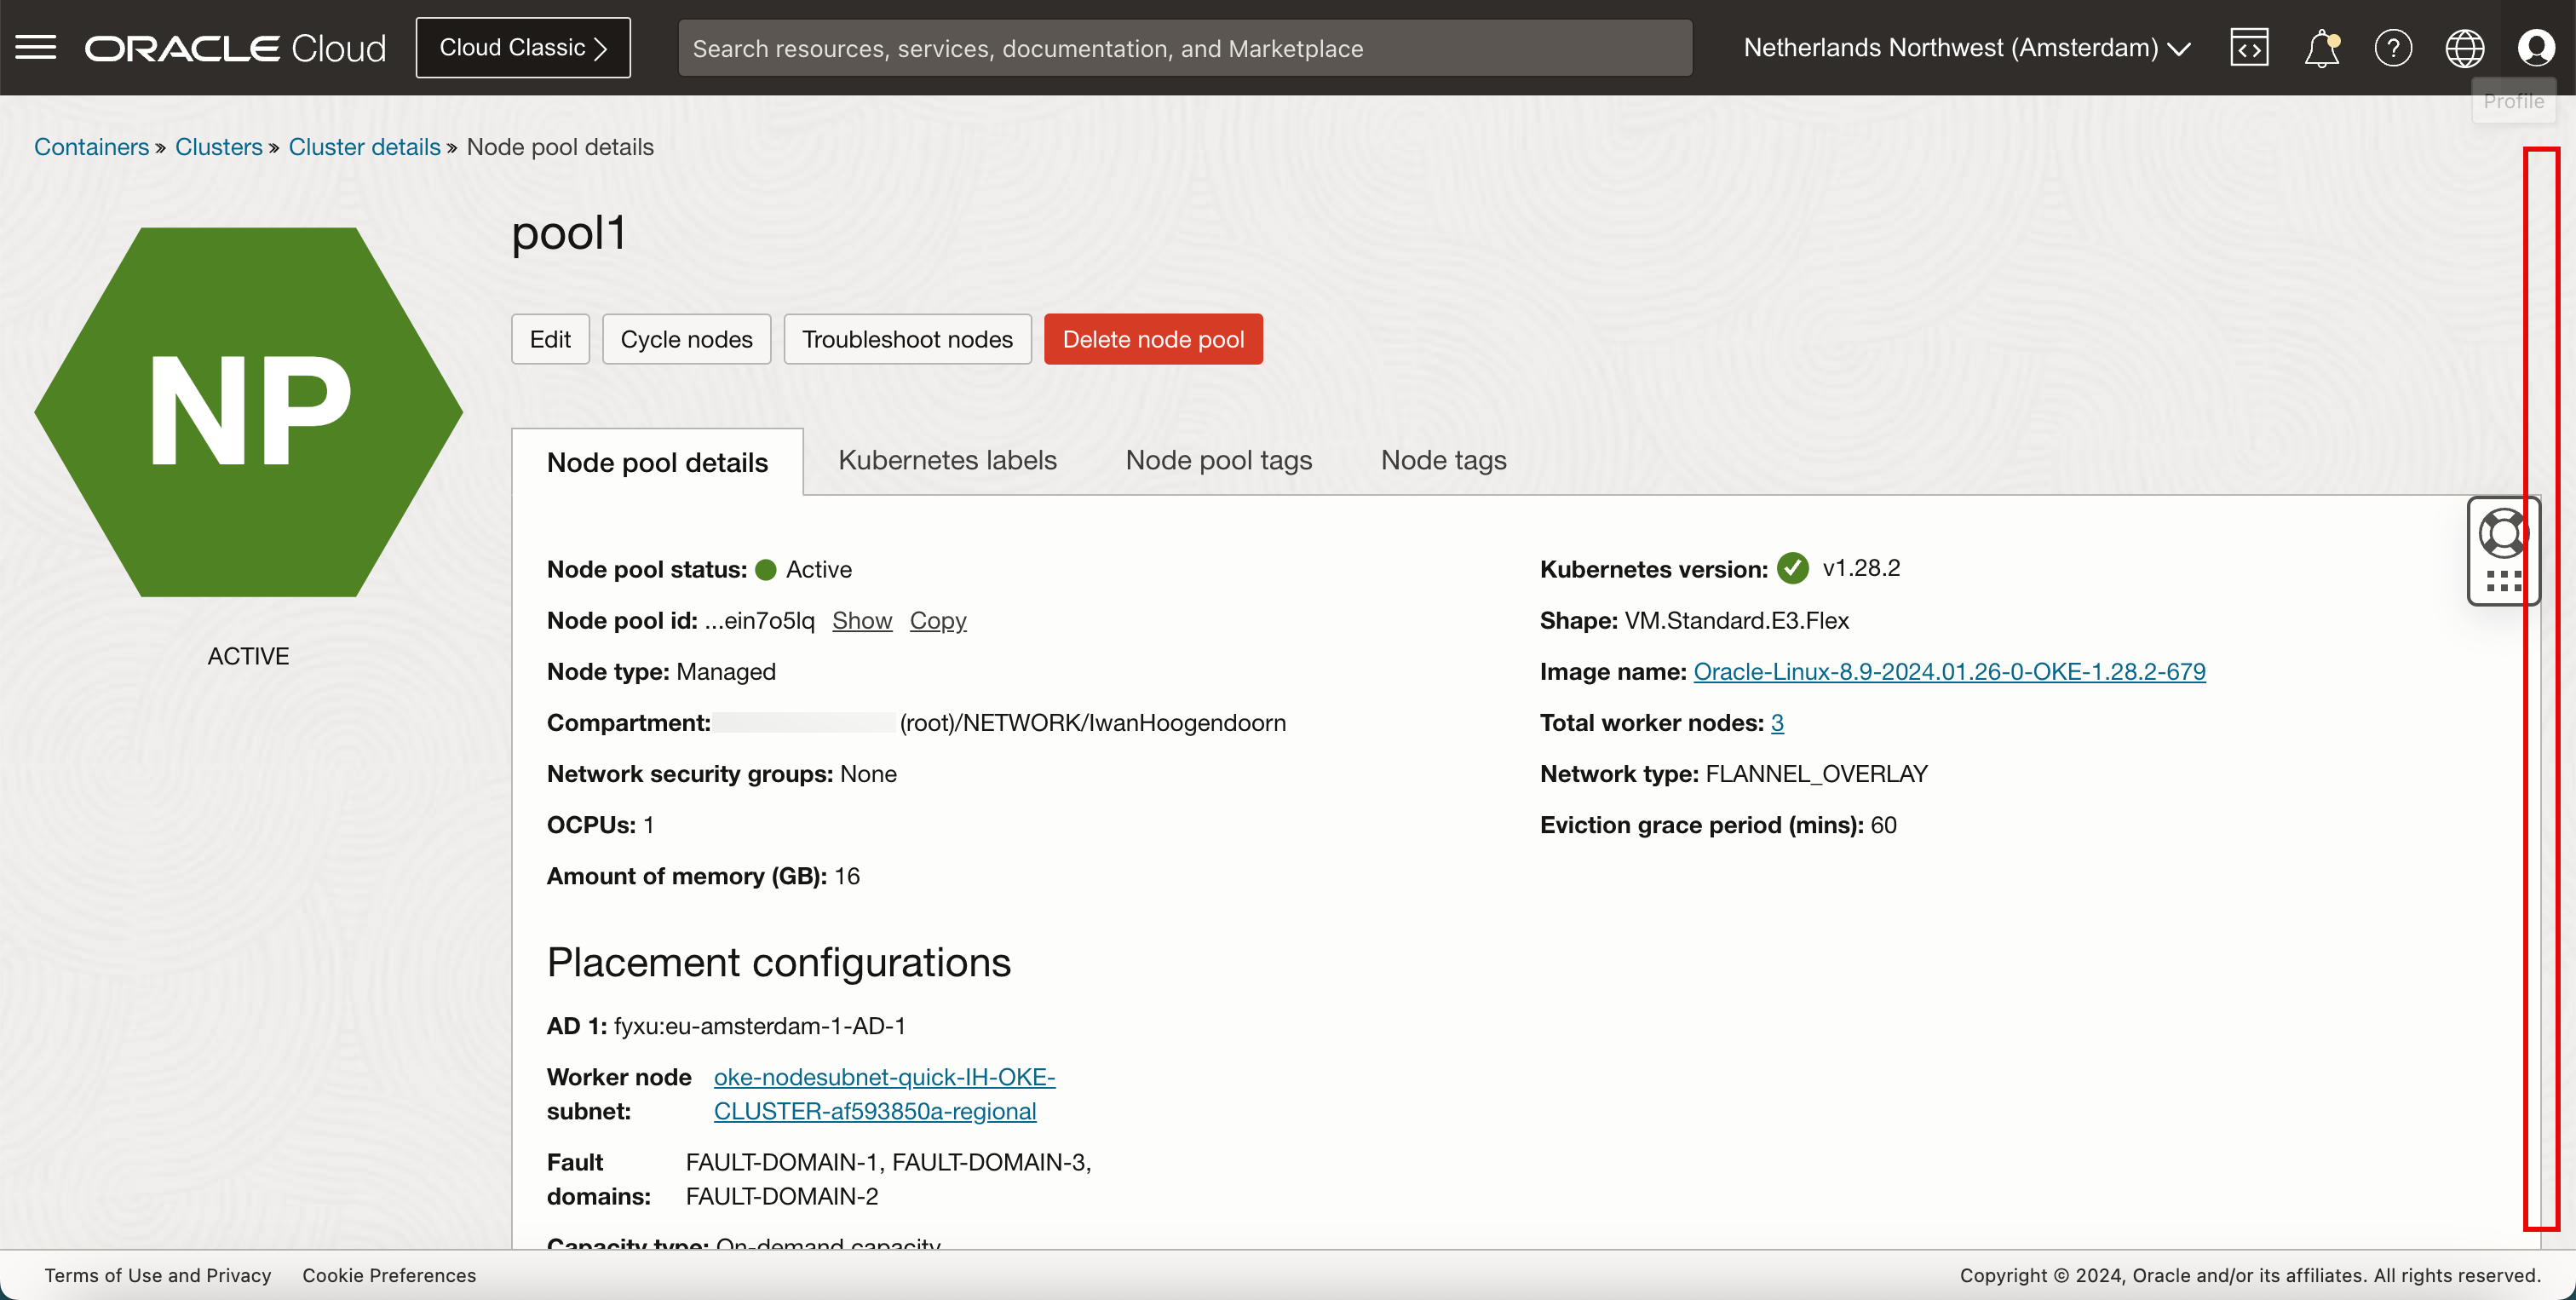
- 노드 풀 이름을 누릅니다.
-
아래로.
-
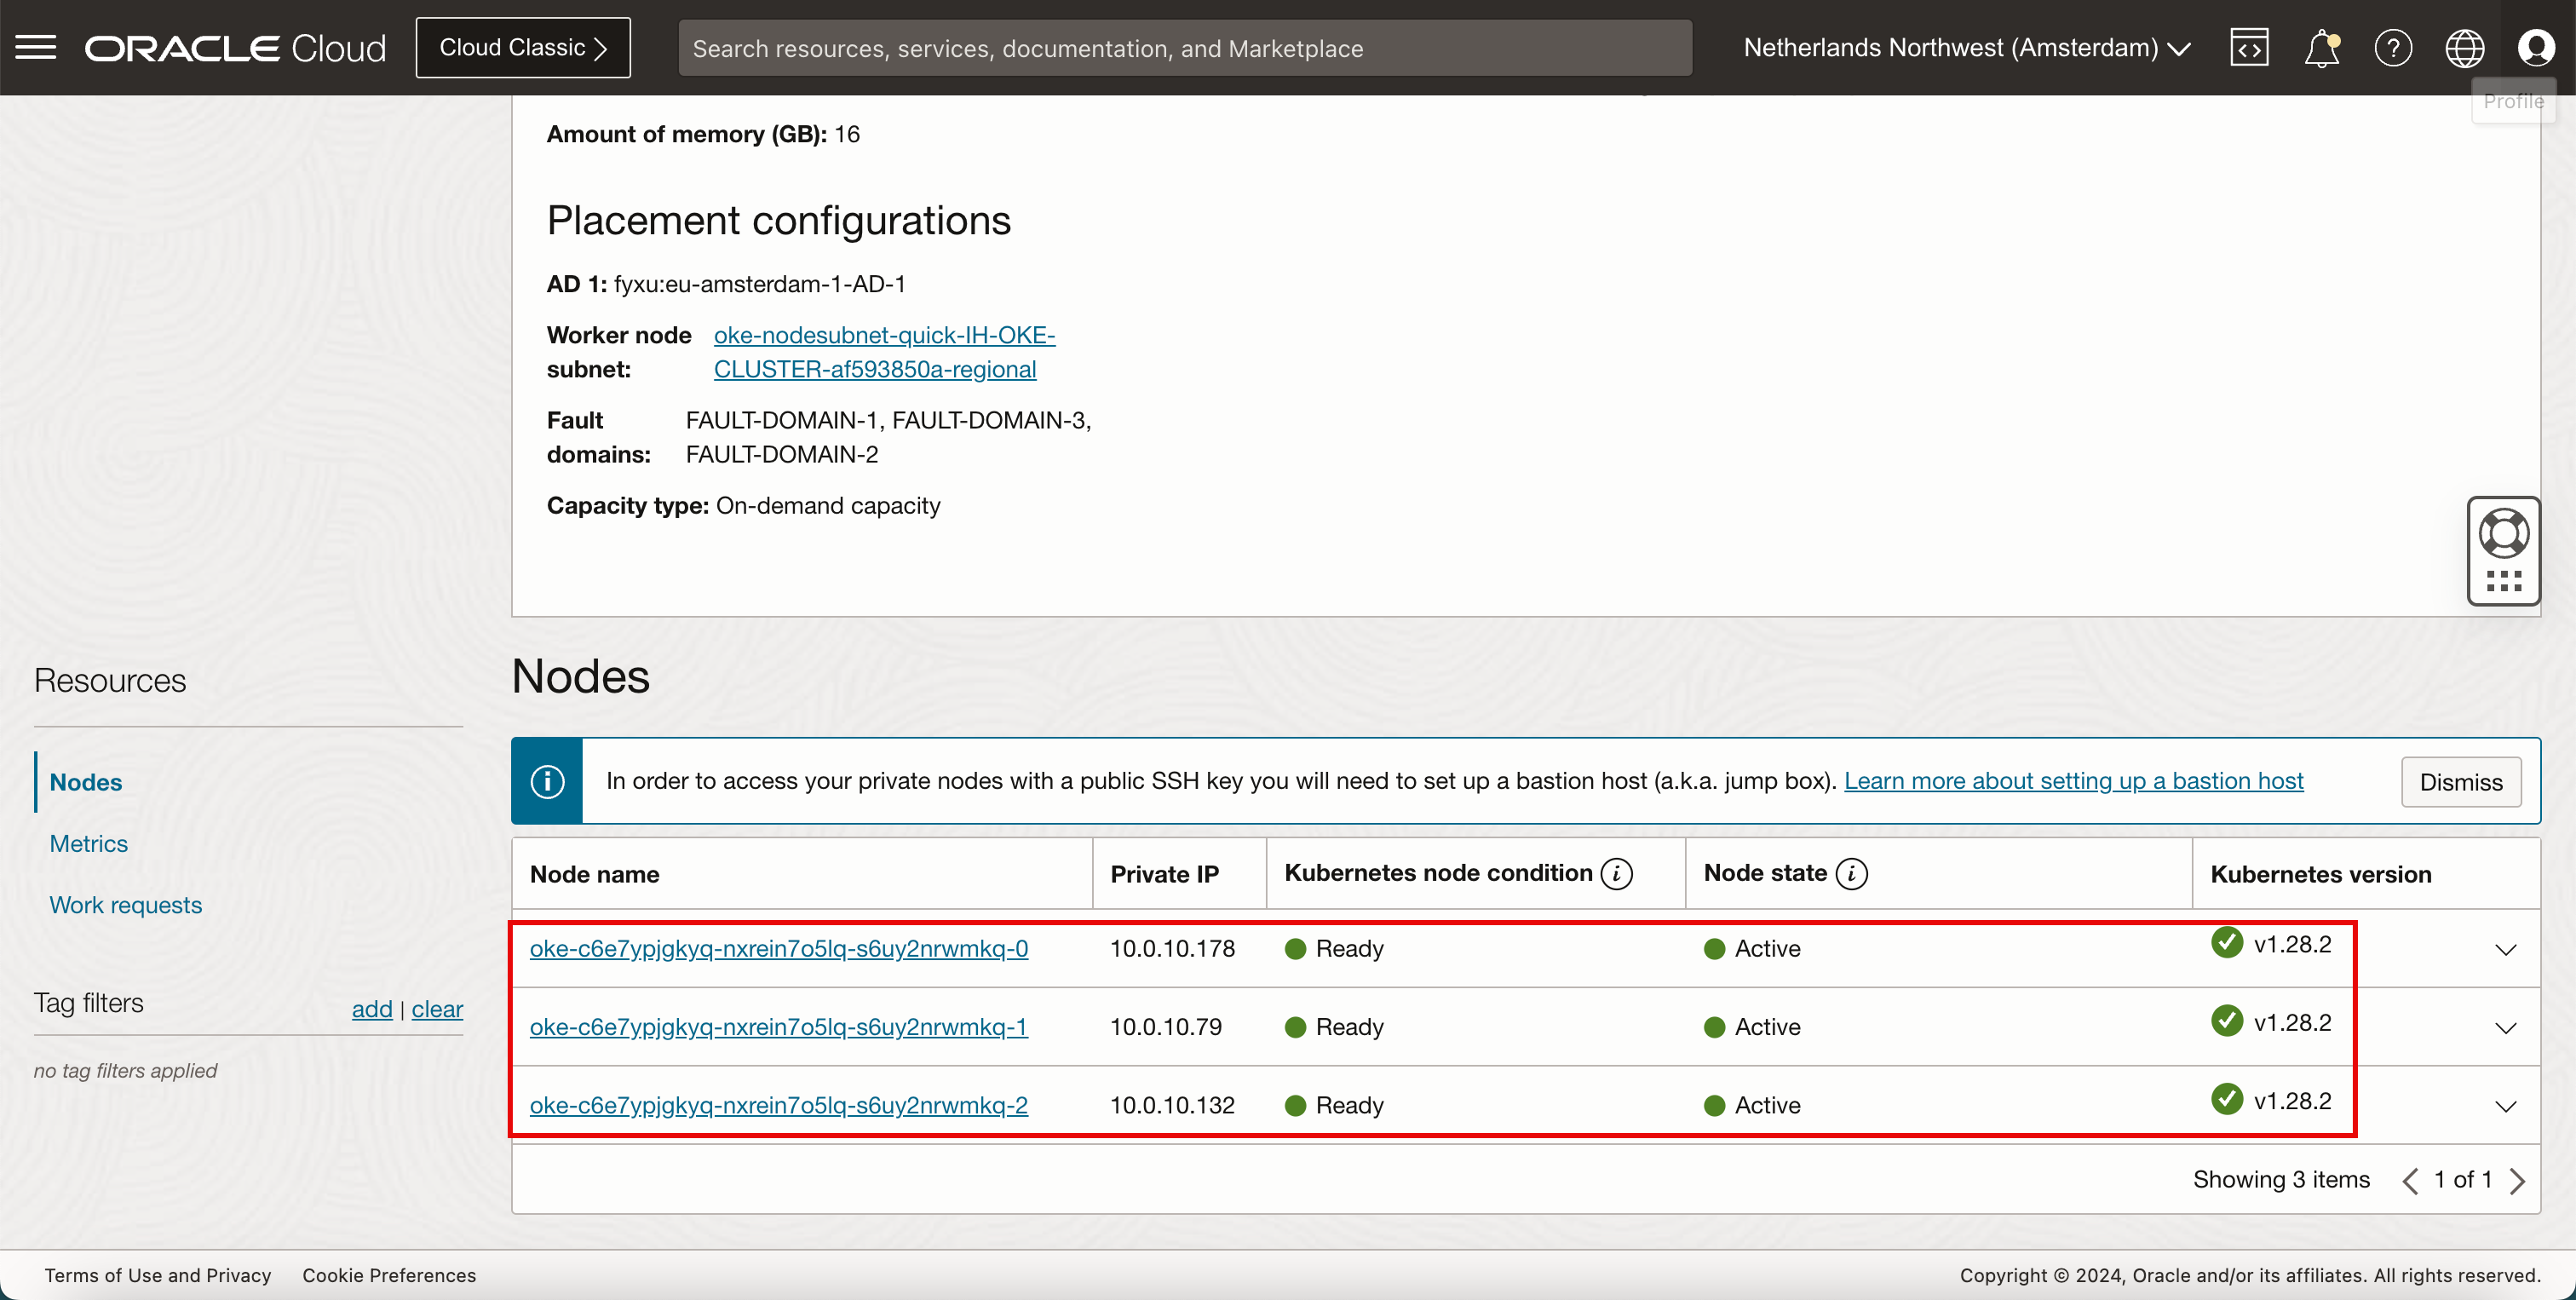
모든 노드가 Ready 및 Active임을 알 수 있습니다.
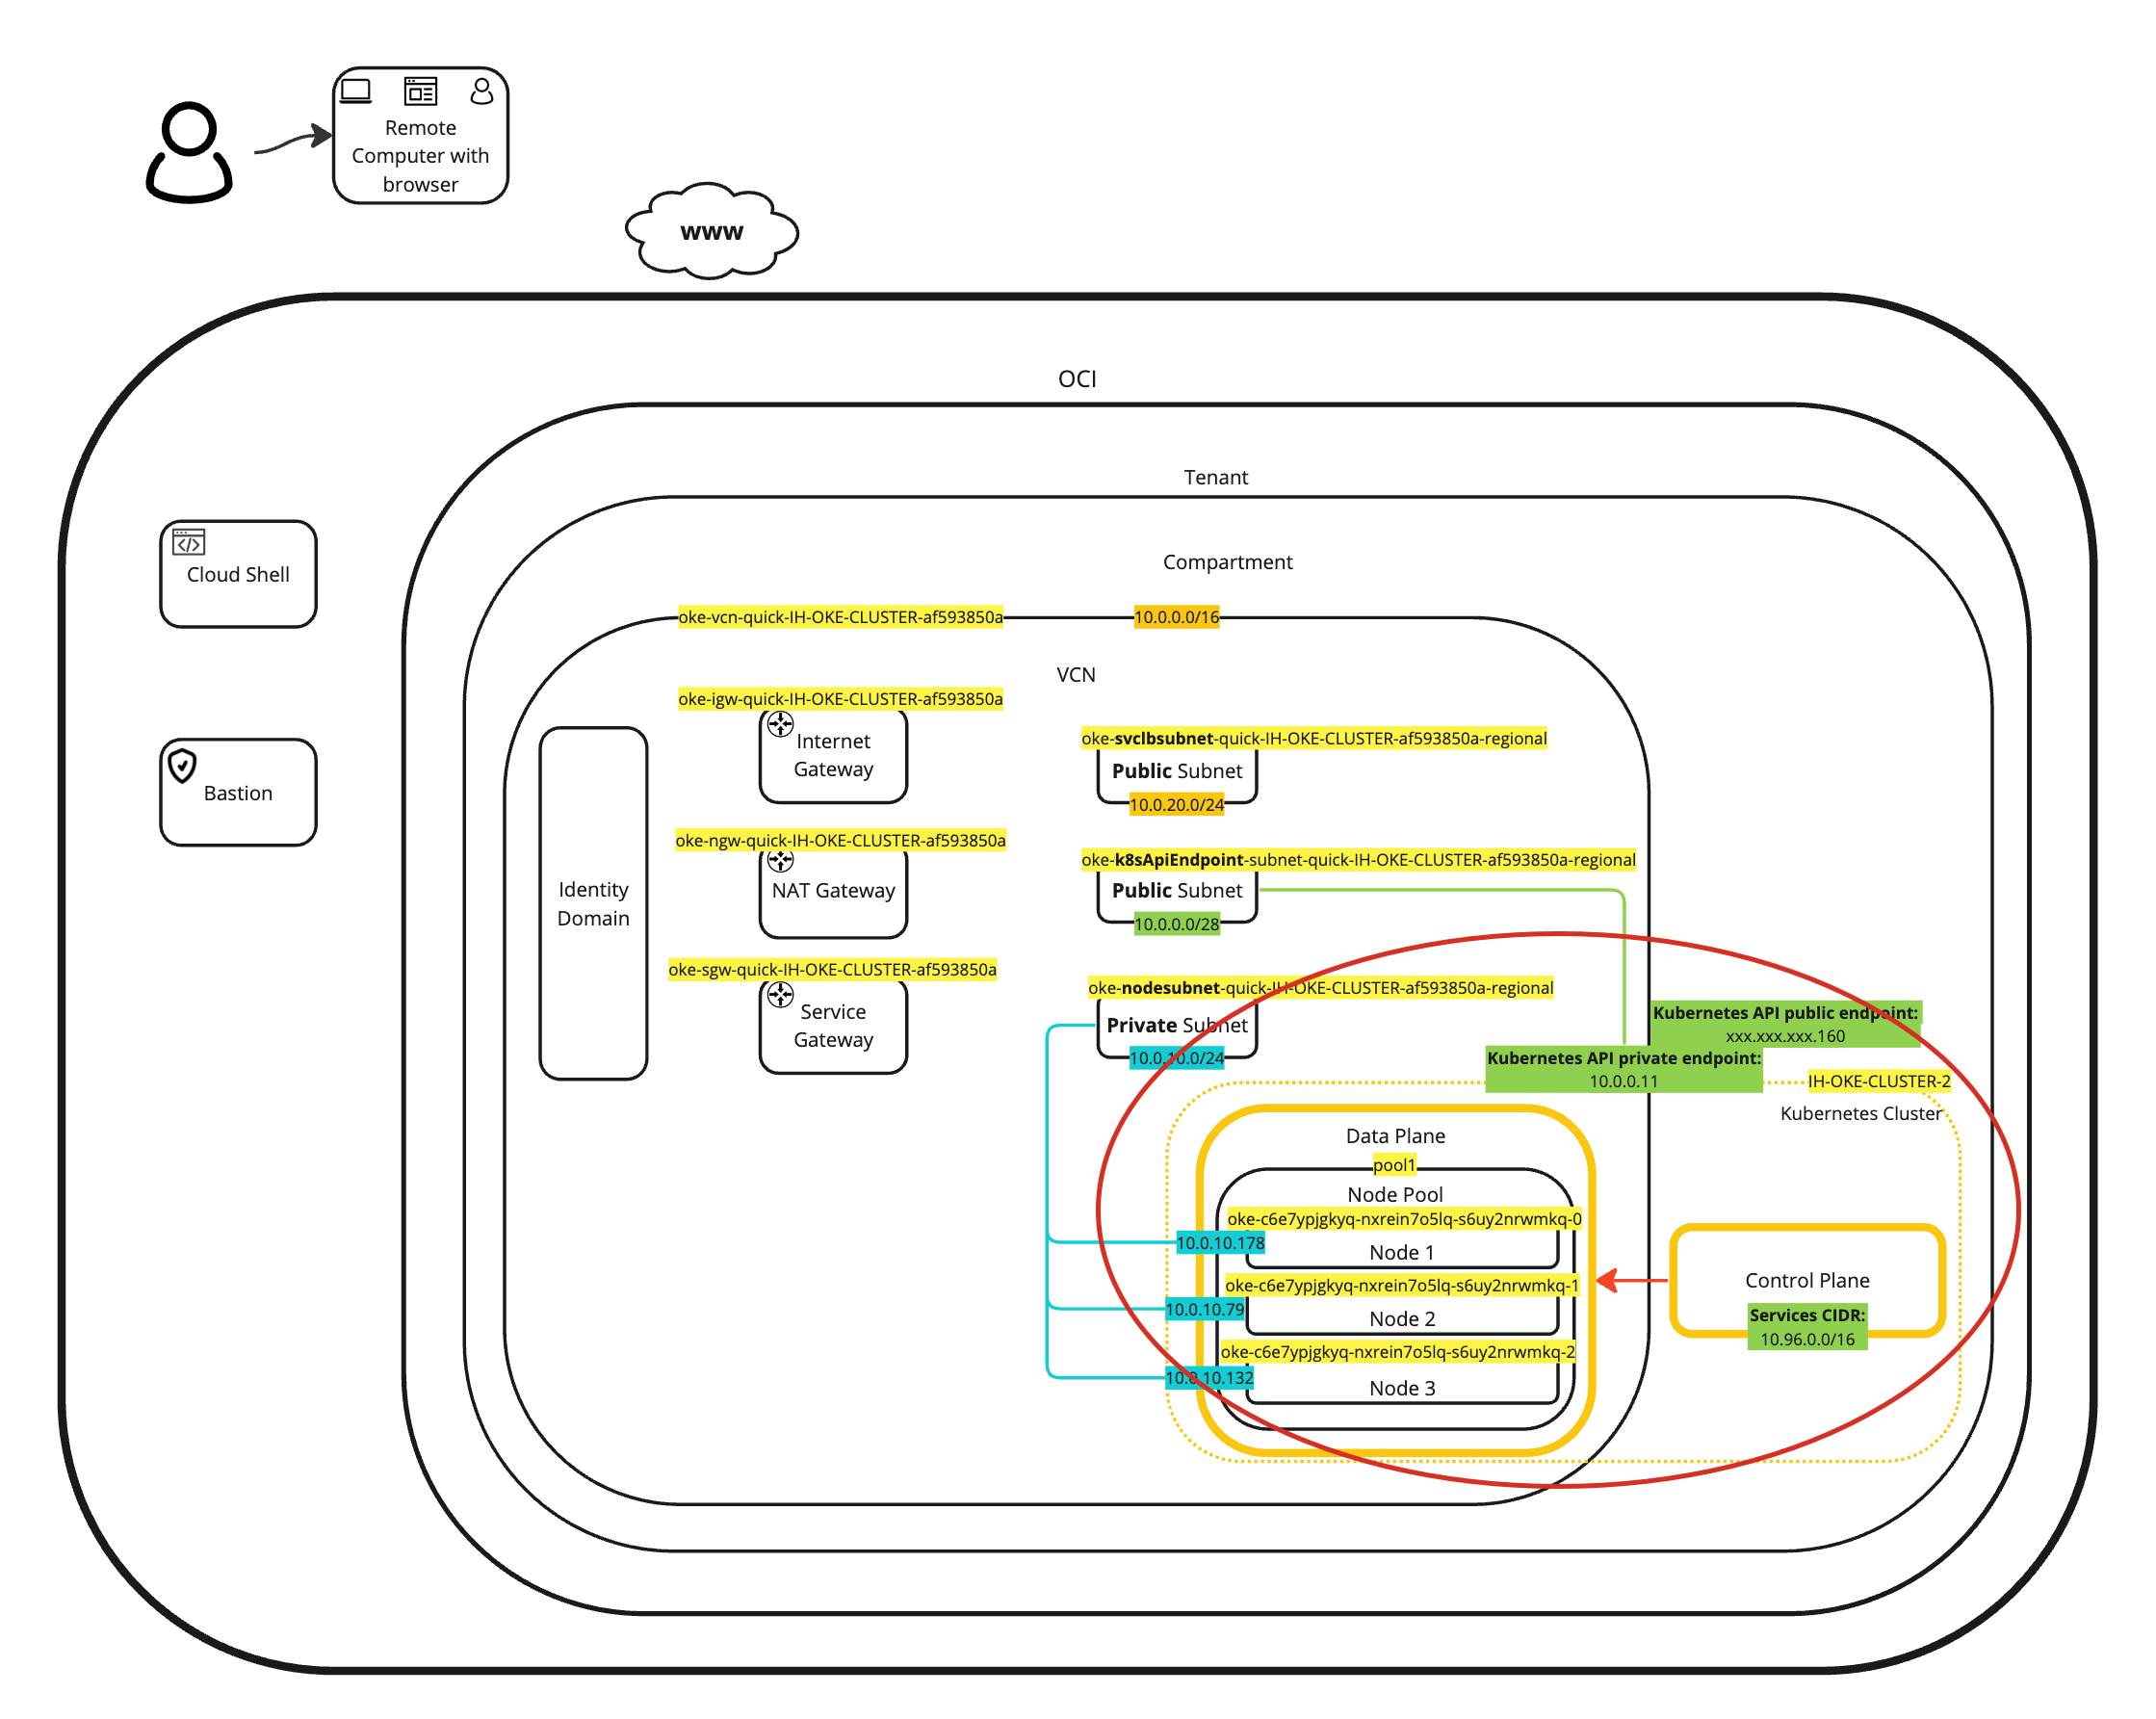
이 배치의 시각적 표현은 다음 다이어그램에서 확인할 수 있습니다.
-
개발자 서비스 및 OKE(Kubernetes 클러스터)로 이동합니다. 새로 배치된 Kubernetes 클러스터를 누릅니다.
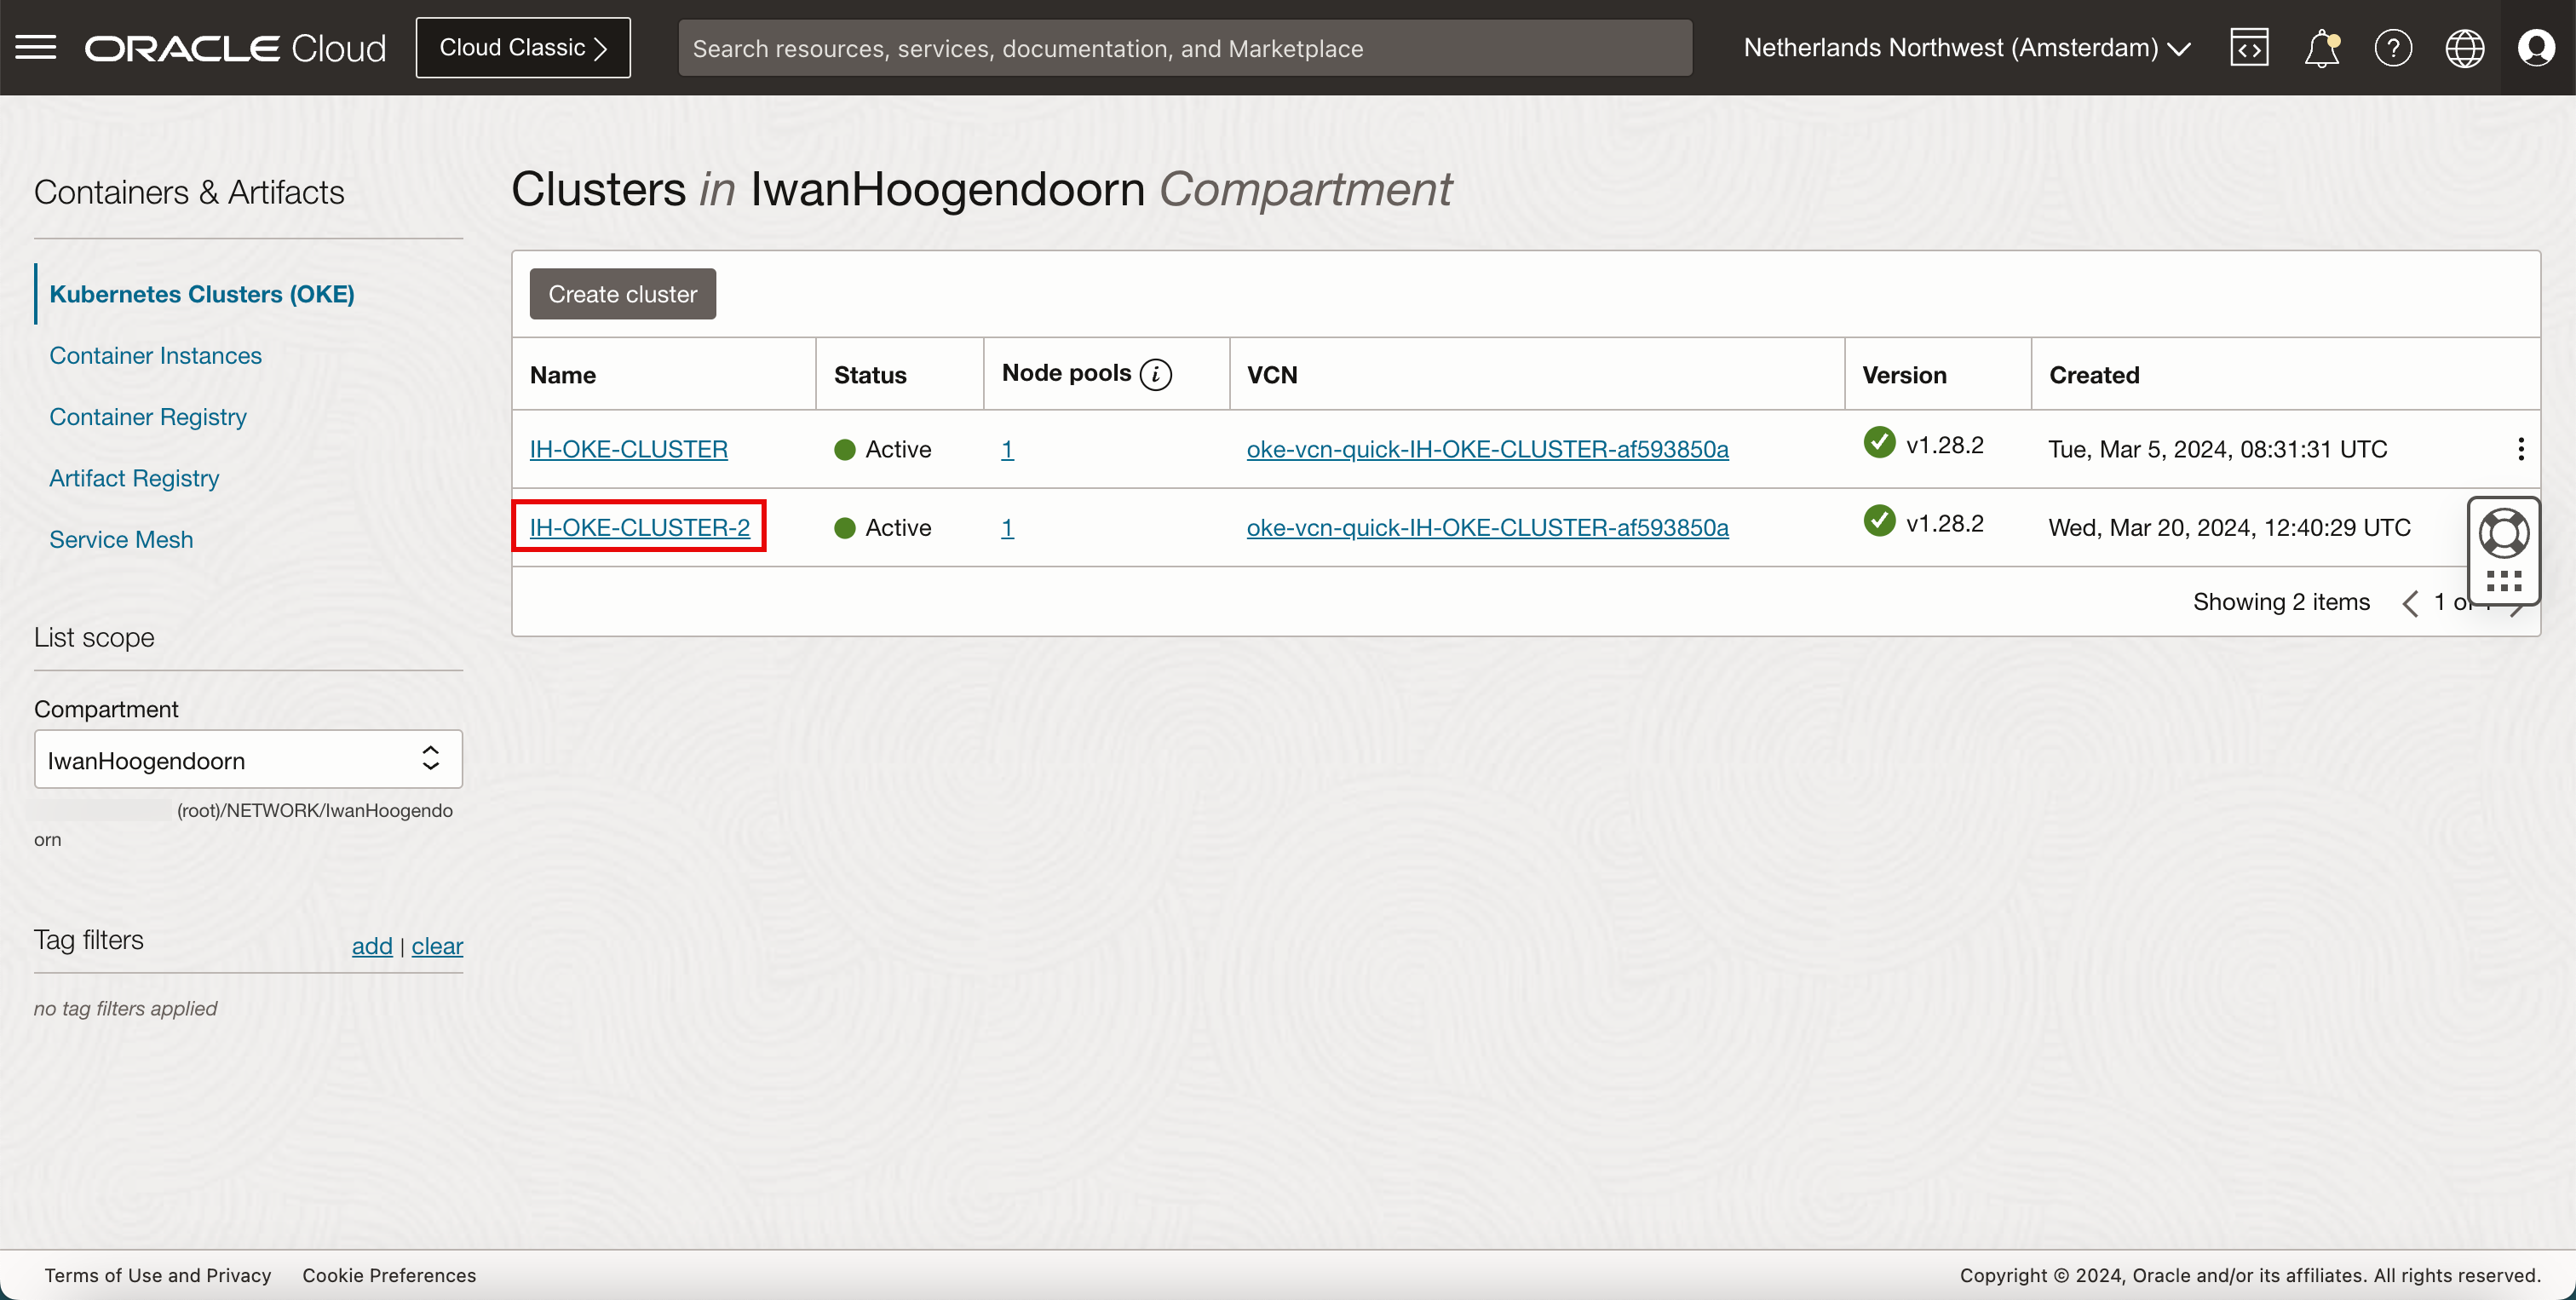
-
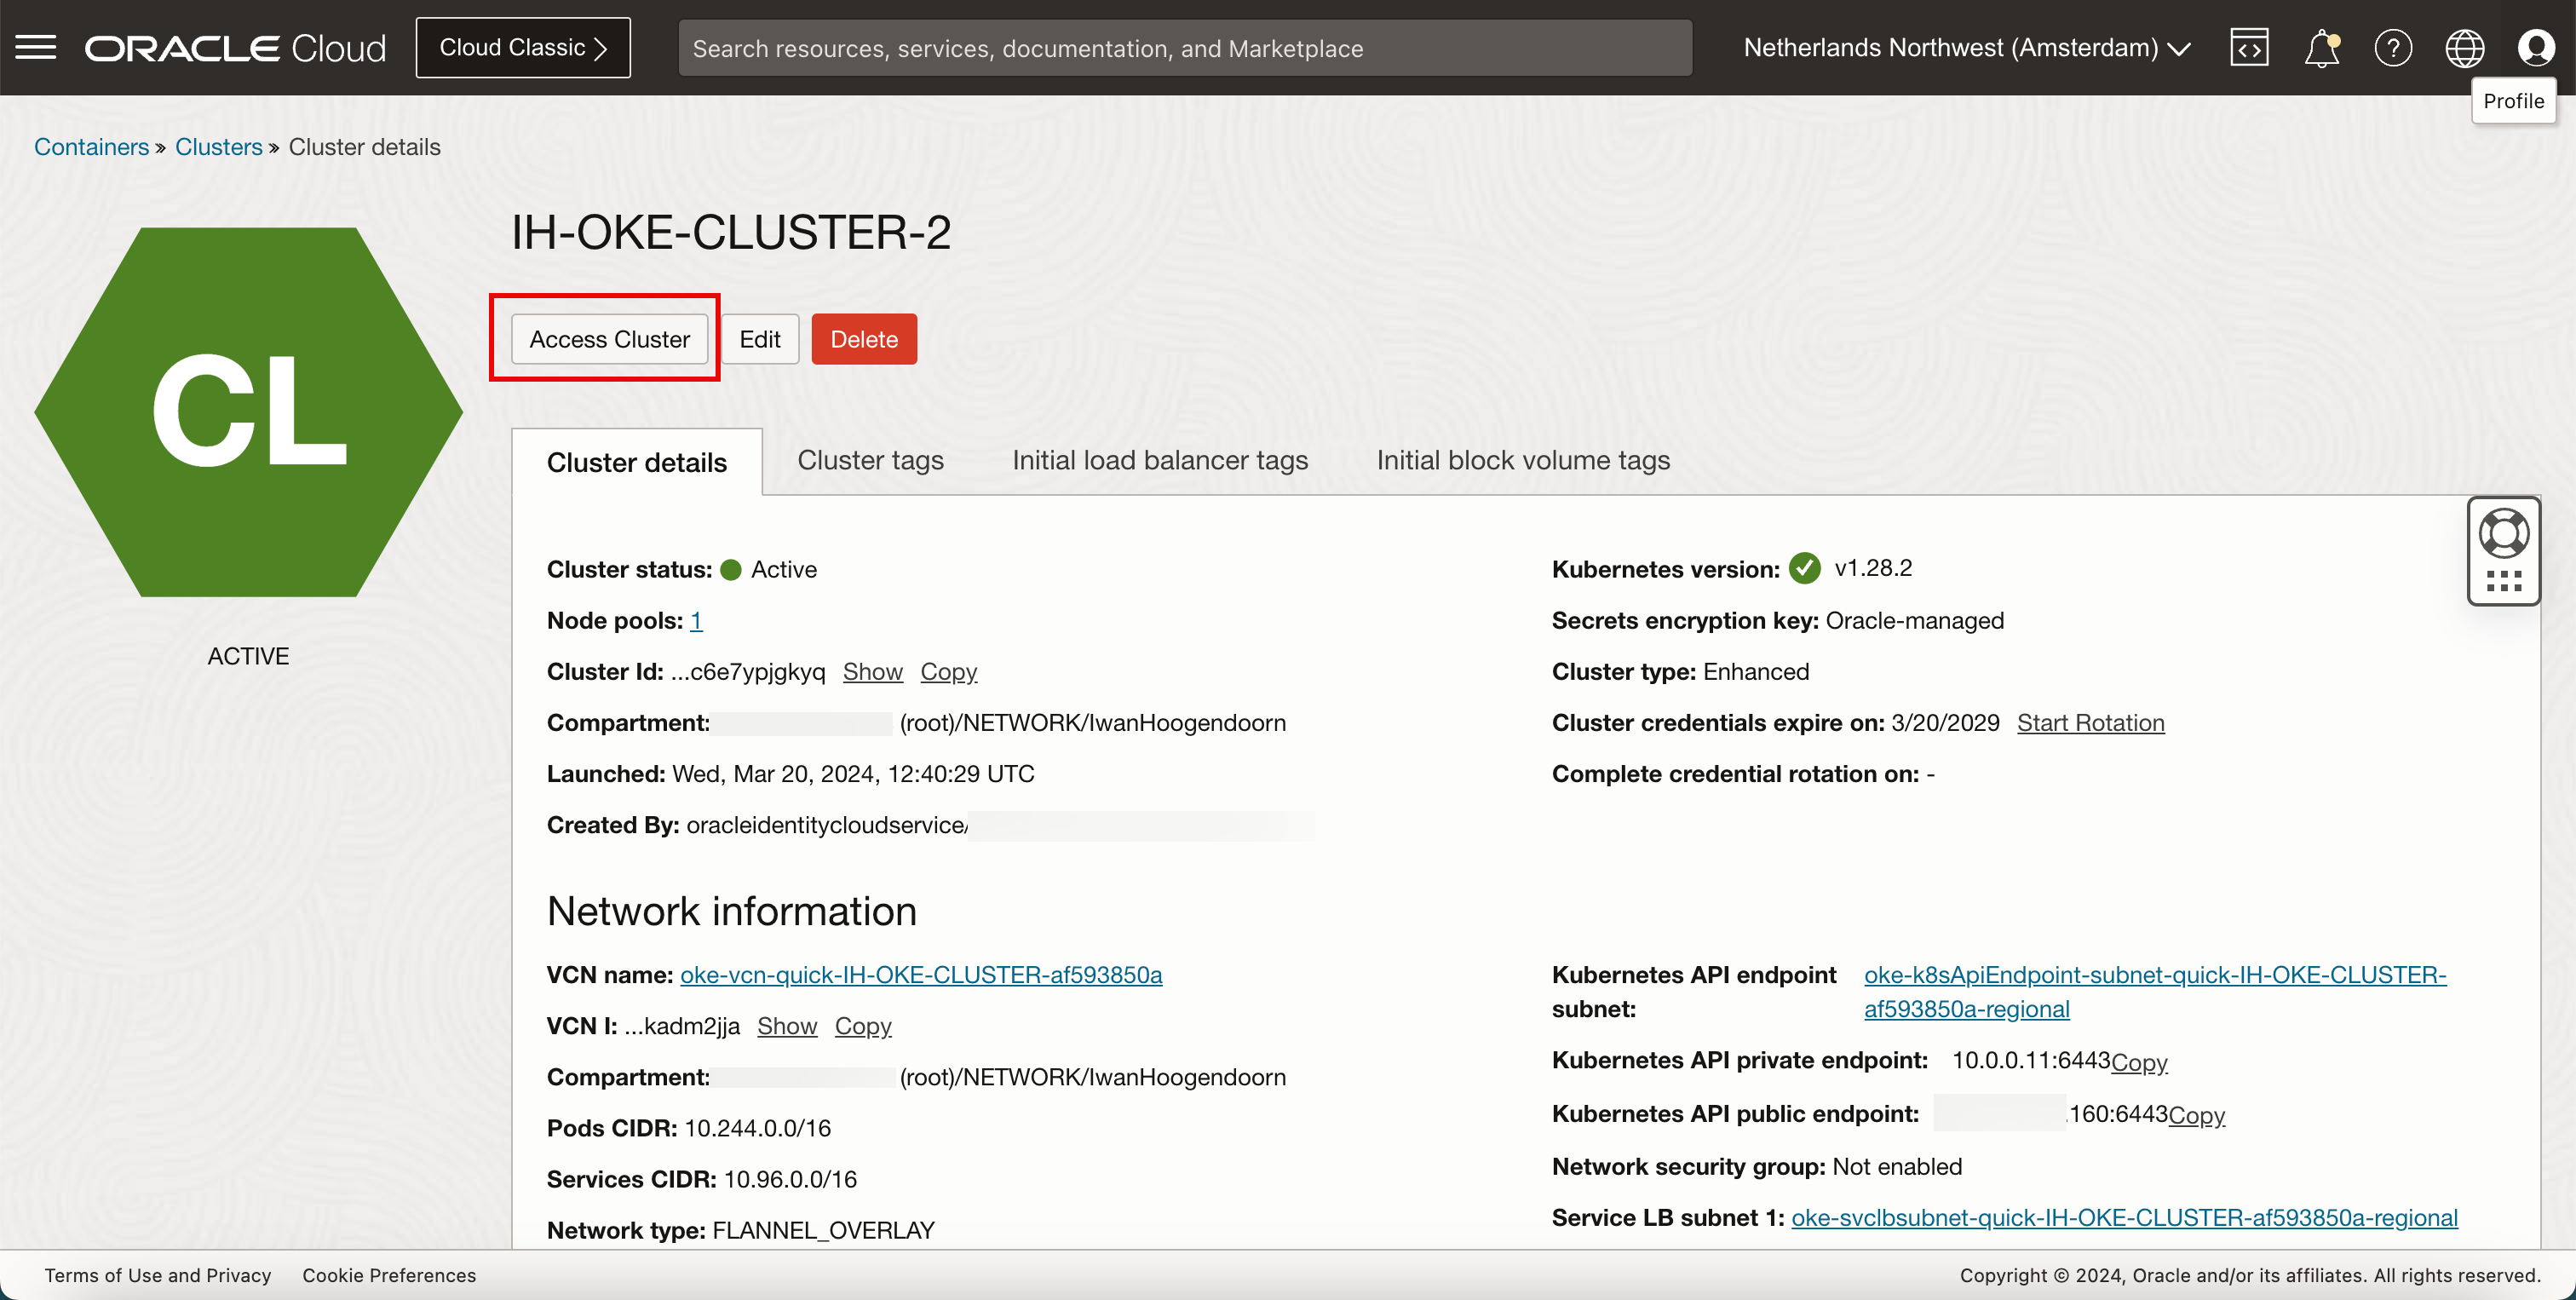
Access Cluster(클러스터에 액세스)를 누릅니다.
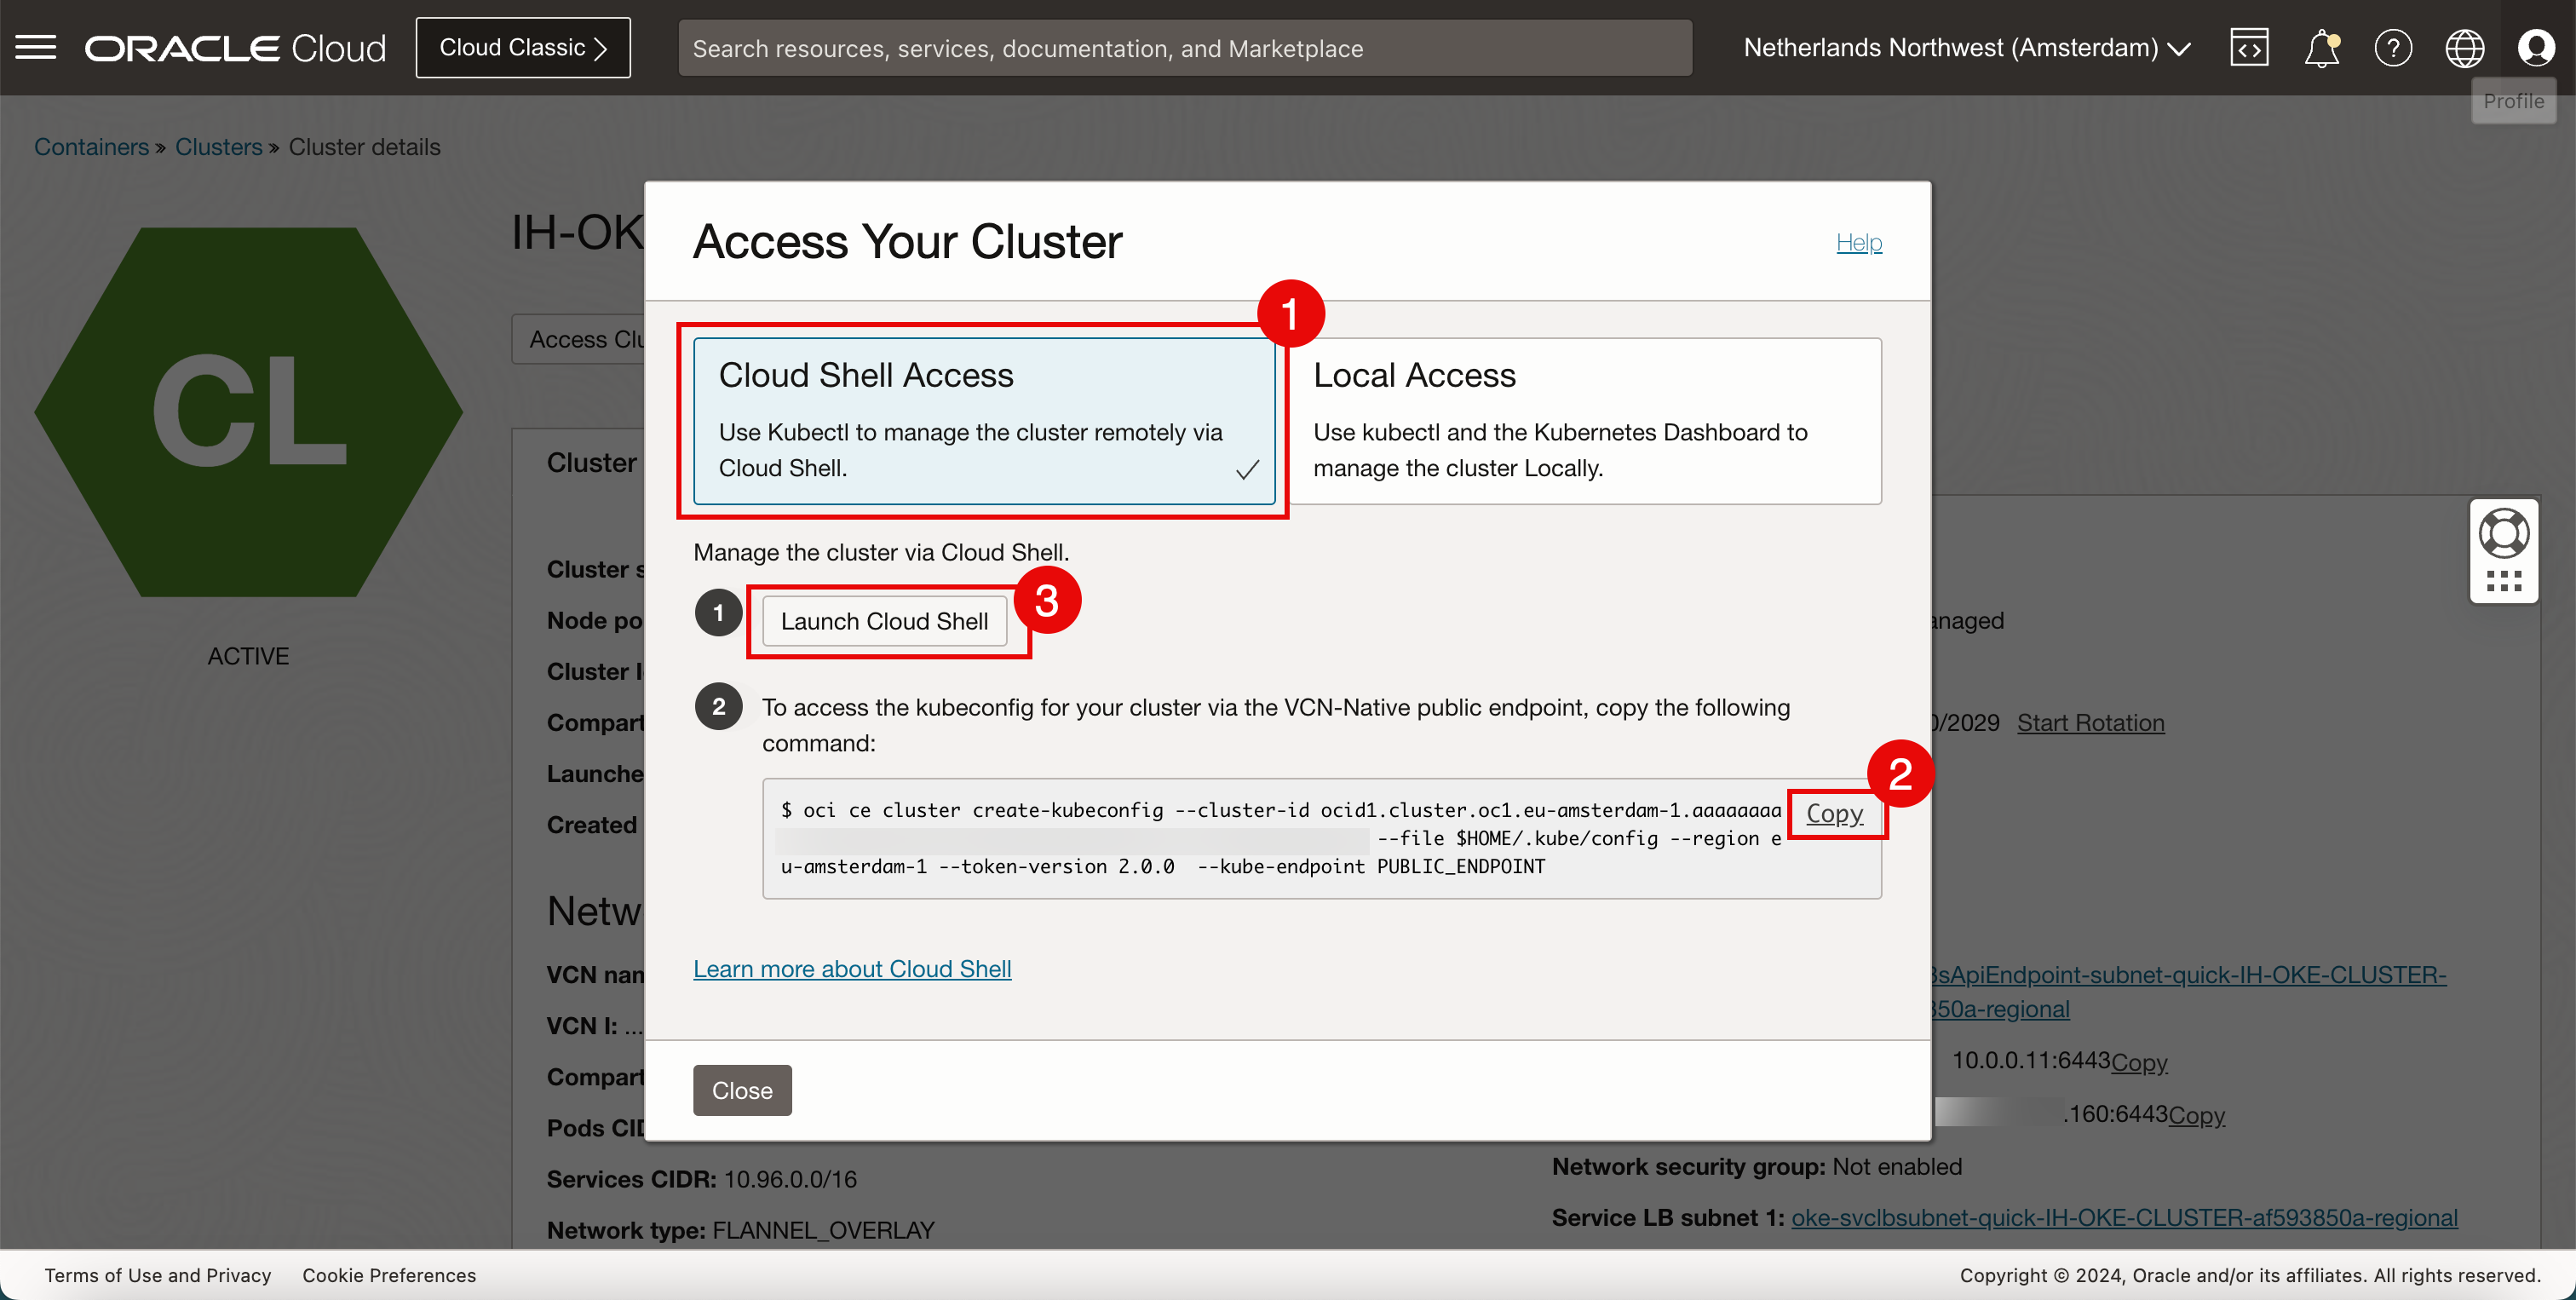
- Cloud Shell Access를 선택합니다.
- 복사를 눌러 Kubernetes 클러스터에 대한 액세스를 허용하도록 명령을 복사합니다.
- Cloud Shell 실행을 누릅니다.
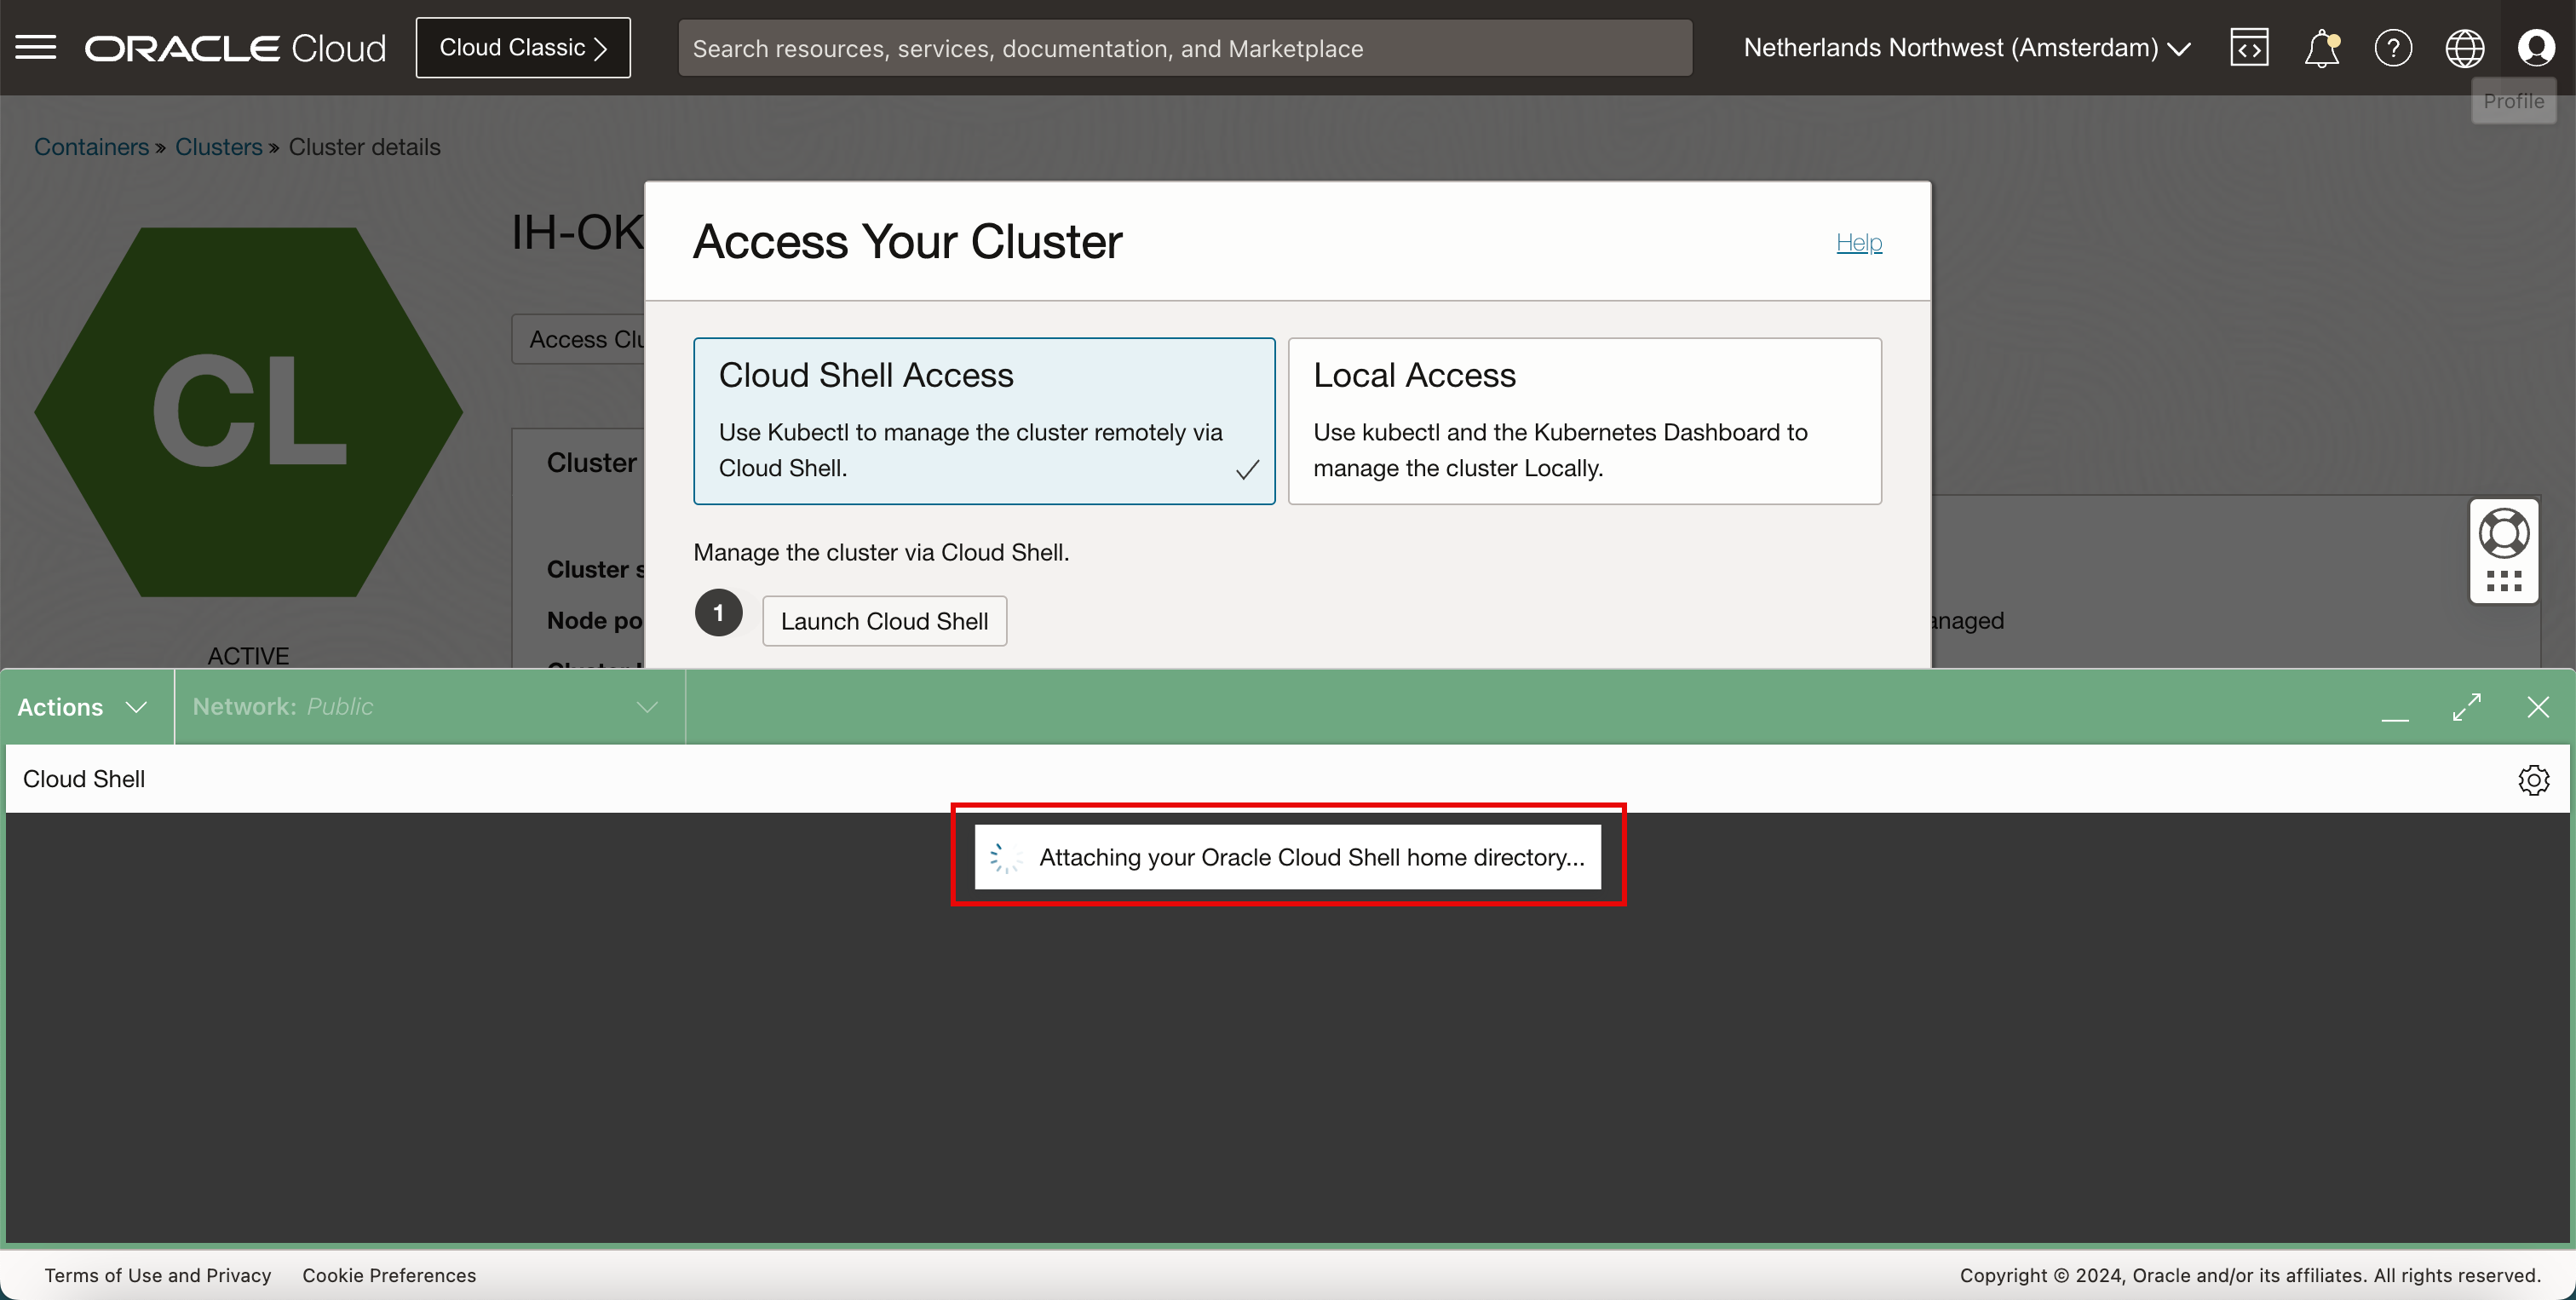
-
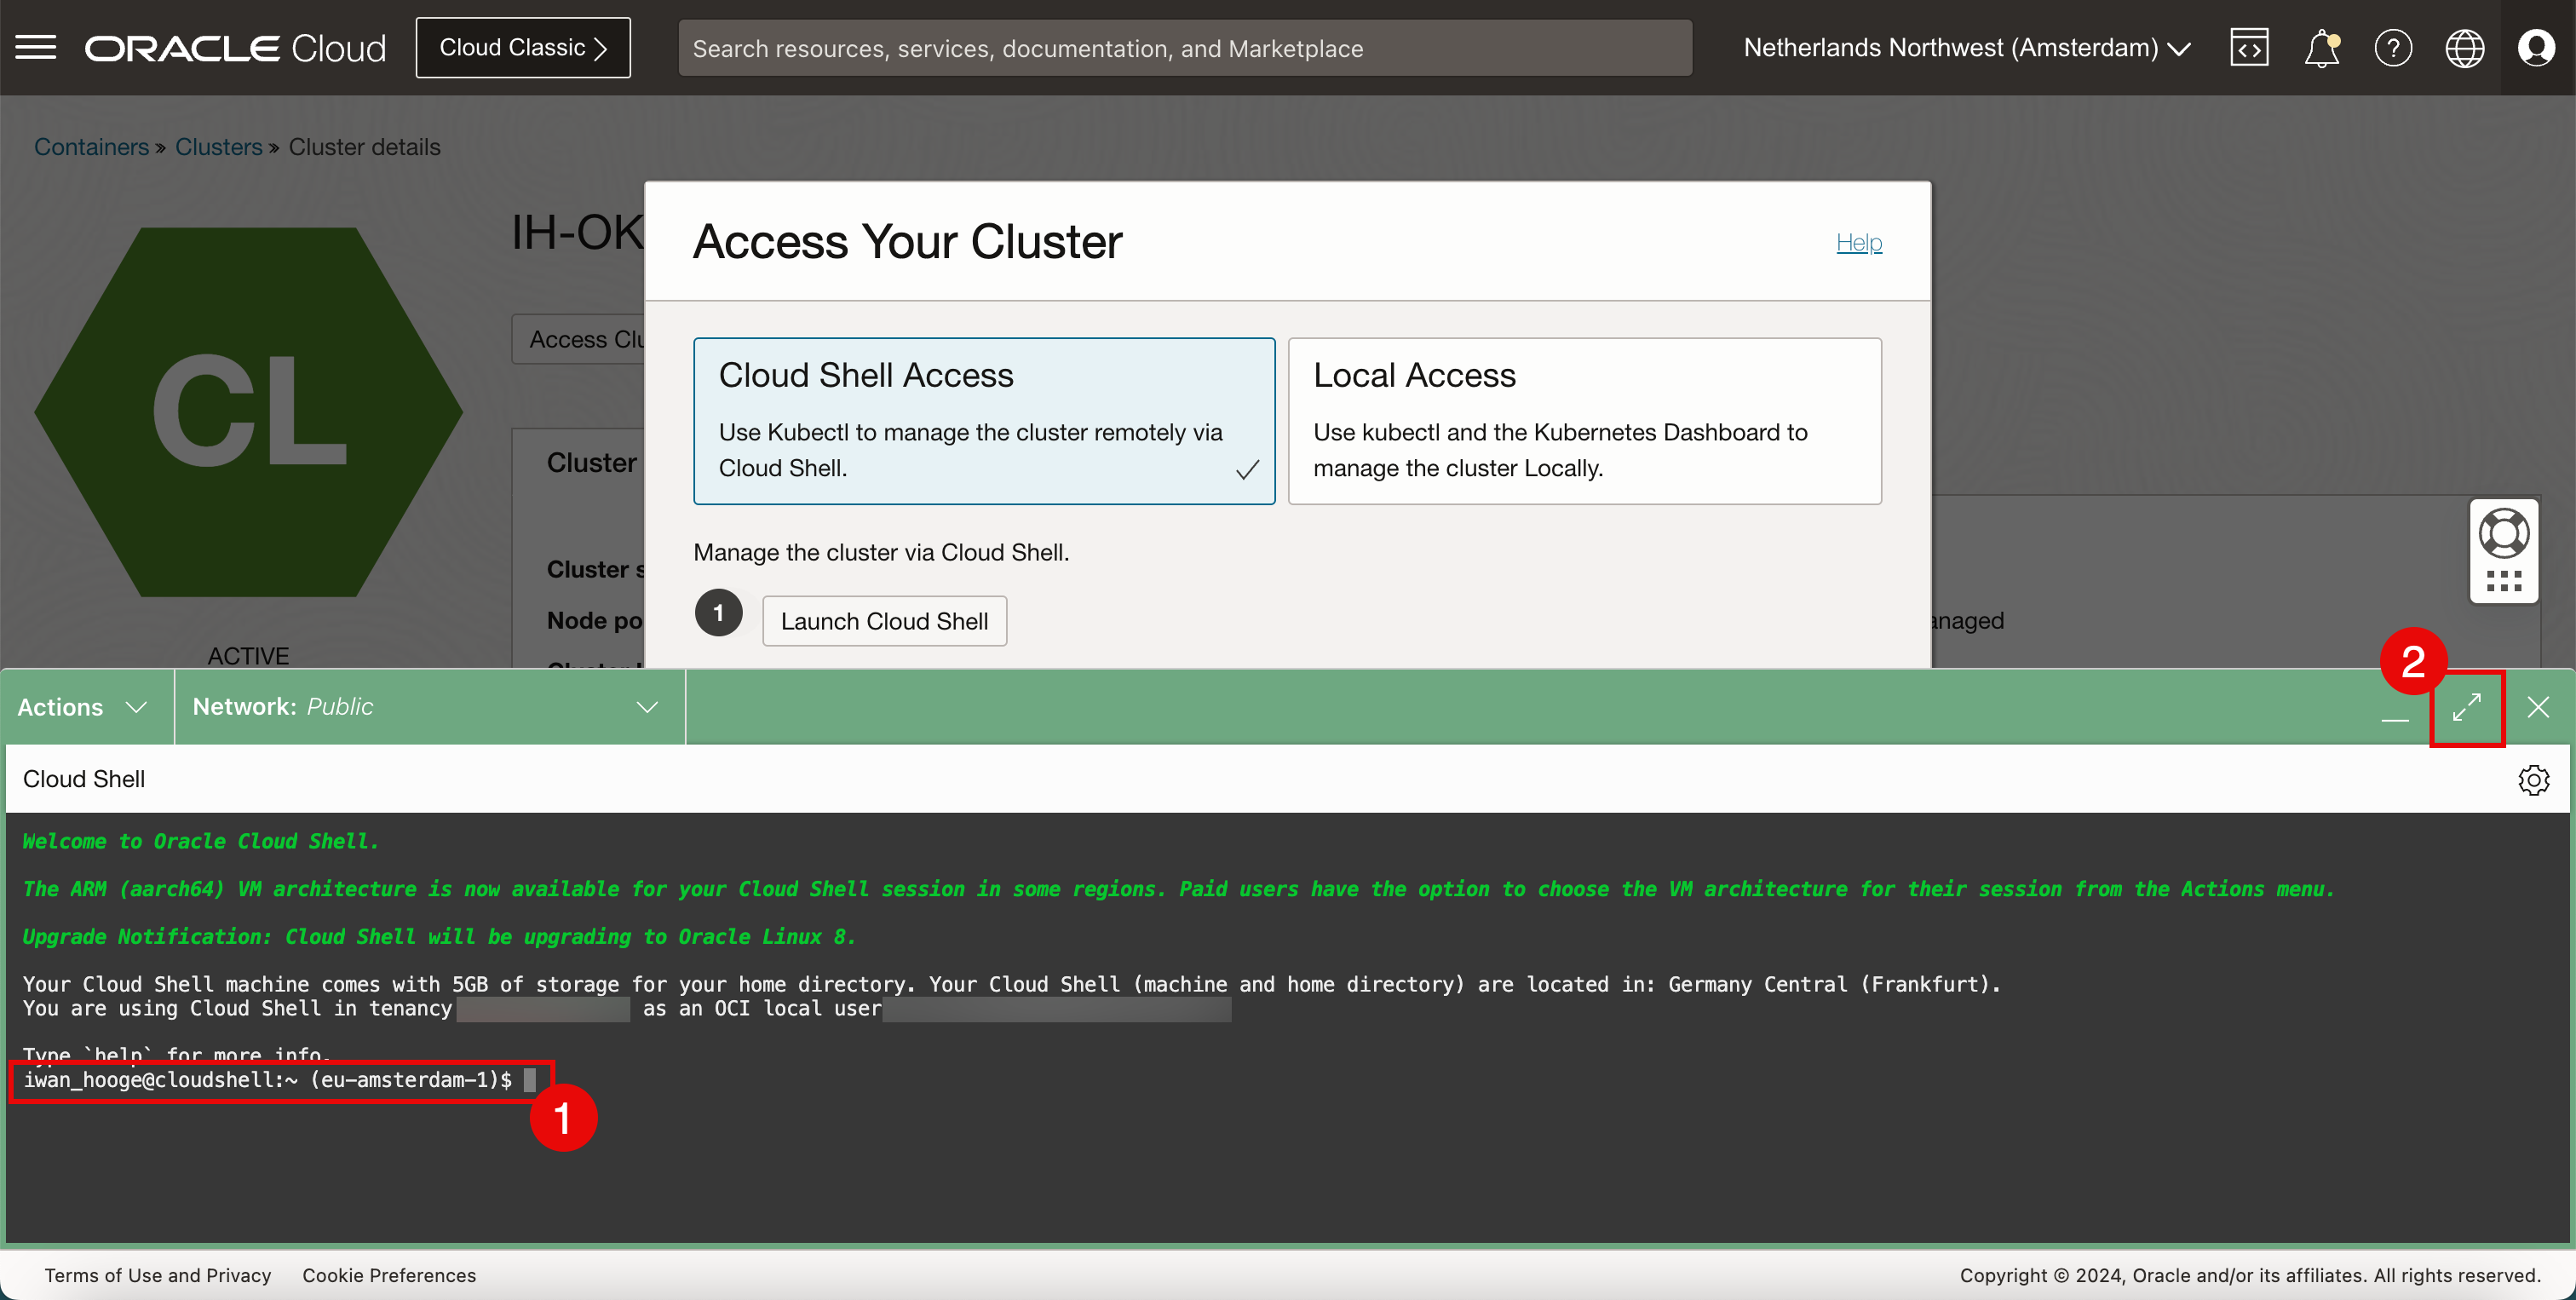
이제 Cloud Shell이 시작됩니다. 일부 정보는 백그라운드로 표시됩니다.
- Cloud Shell 액세스 권한이 있습니다.
- 최대화 아이콘을 눌러 Cloud Shell 창을 확장합니다.
-
복사된 명령을 붙여넣습니다.
iwan_hooge@cloudshell:~ (eu-amsterdam-1)$ oci ce cluster create-kubeconfig --cluster-id ocid1.cluster.oc1.eu-amsterdam-1.aaaaaaaaXXX --file $HOME/.kube/config --region eu-amsterdam-1 --token-version 2.0.0  --kube-endpoint PUBLIC_ENDPOINT
Existing Kubeconfig file found at /home/iwan_hooge/.kube/config and new config merged into it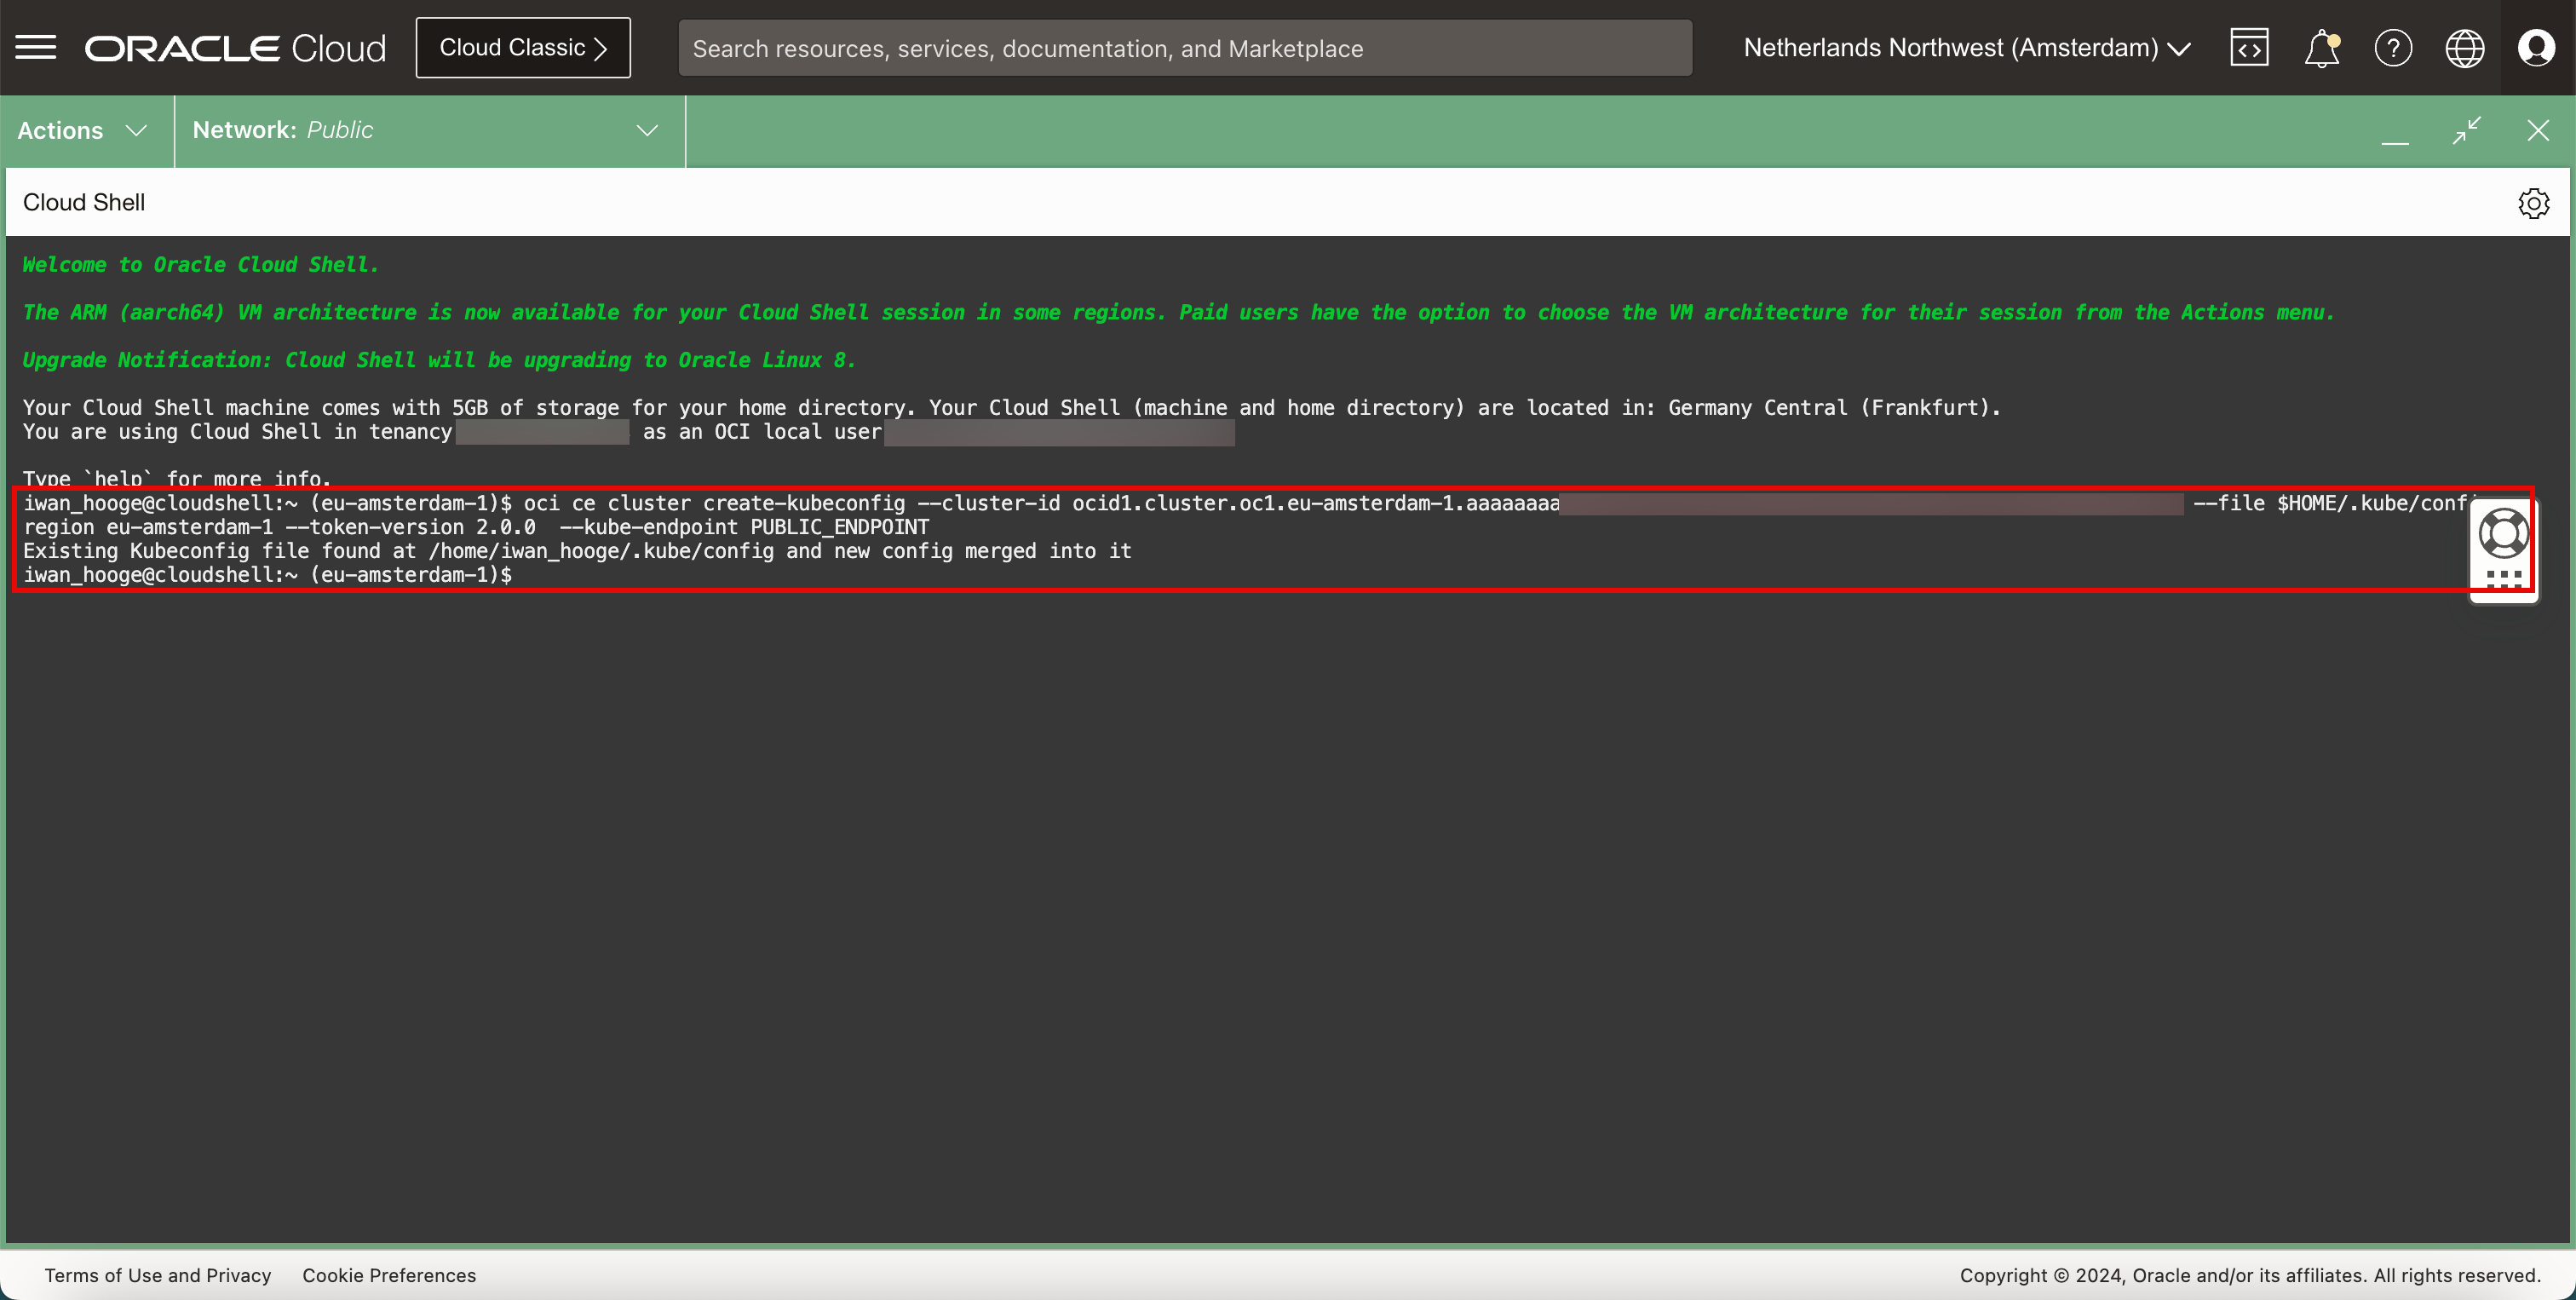
-
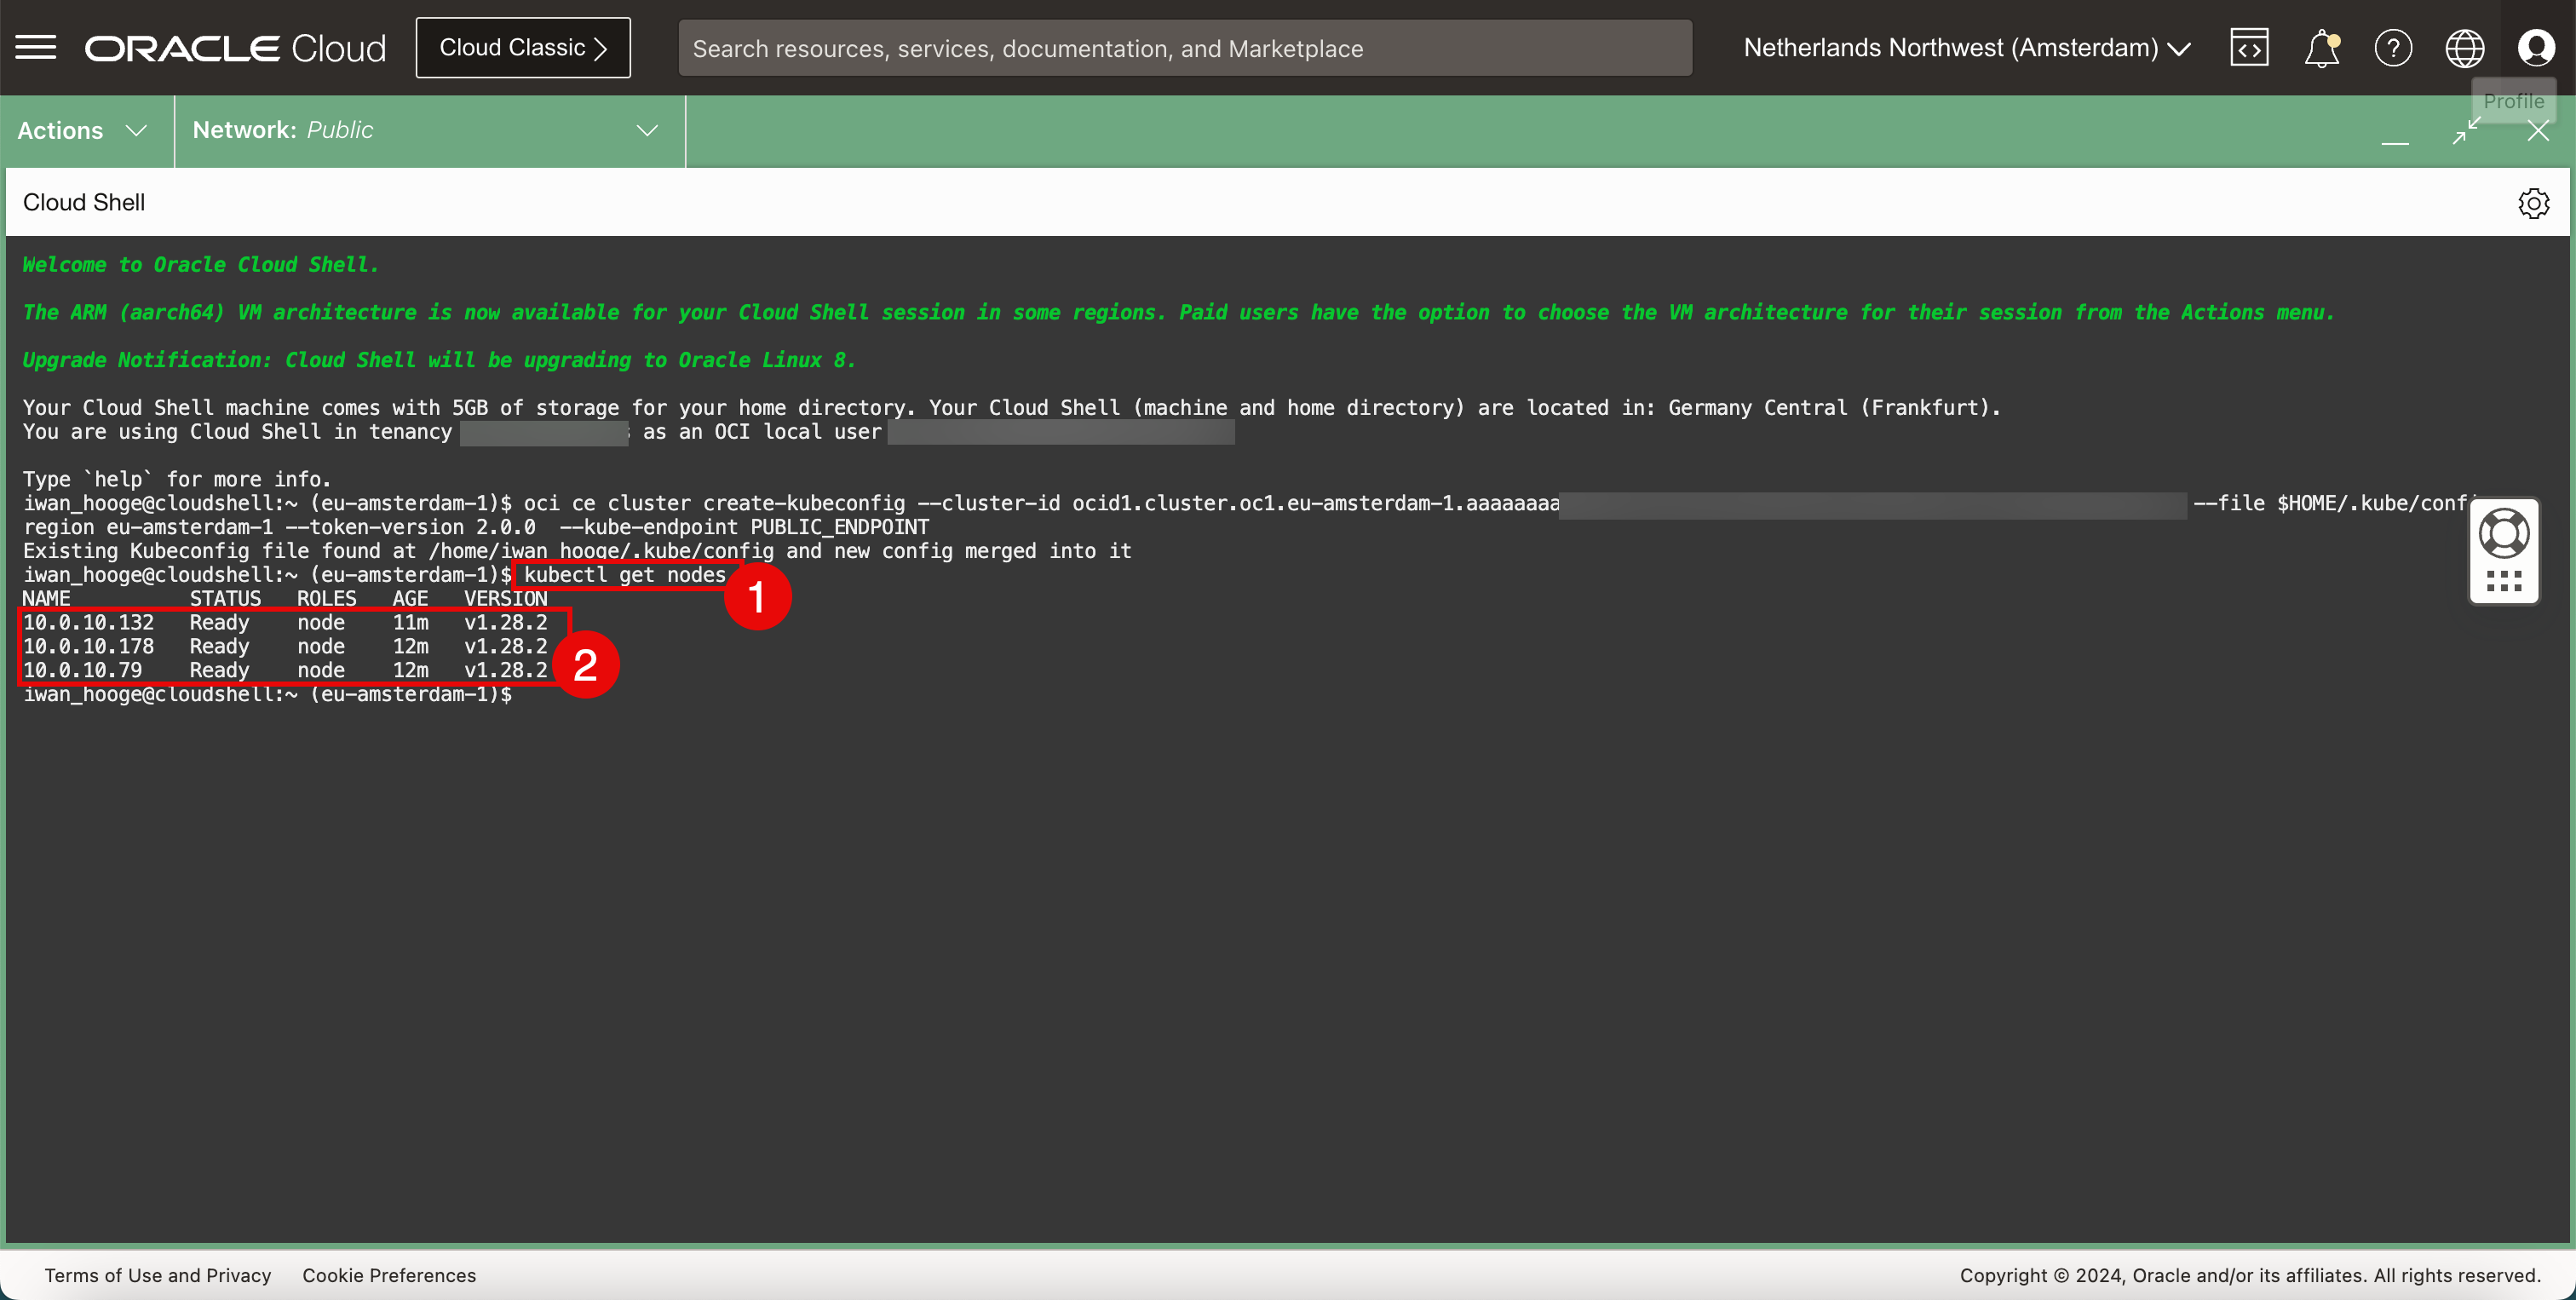
다음 명령을 실행하여 작업자 노드에 대한 정보를 가져옵니다.
iwan_hooge@cloudshell:~ (eu-amsterdam-1)$ kubectl get nodes NAME STATUS ROLES AGE VERSION 10.0.10.132 Ready node 11m v1.28.2 10.0.10.178 Ready node 12m v1.28.2 10.0.10.79 Ready node 12m v1.28.2 -
배치된 워커 노드를 검토합니다.
-
작업 2: 배치된 OKE Kubernetes 클러스터에 CNI 플러그인으로 Cilium 설치
-
현재 배치된 CNI 플러그인(플래널)을 확인합니다.
-
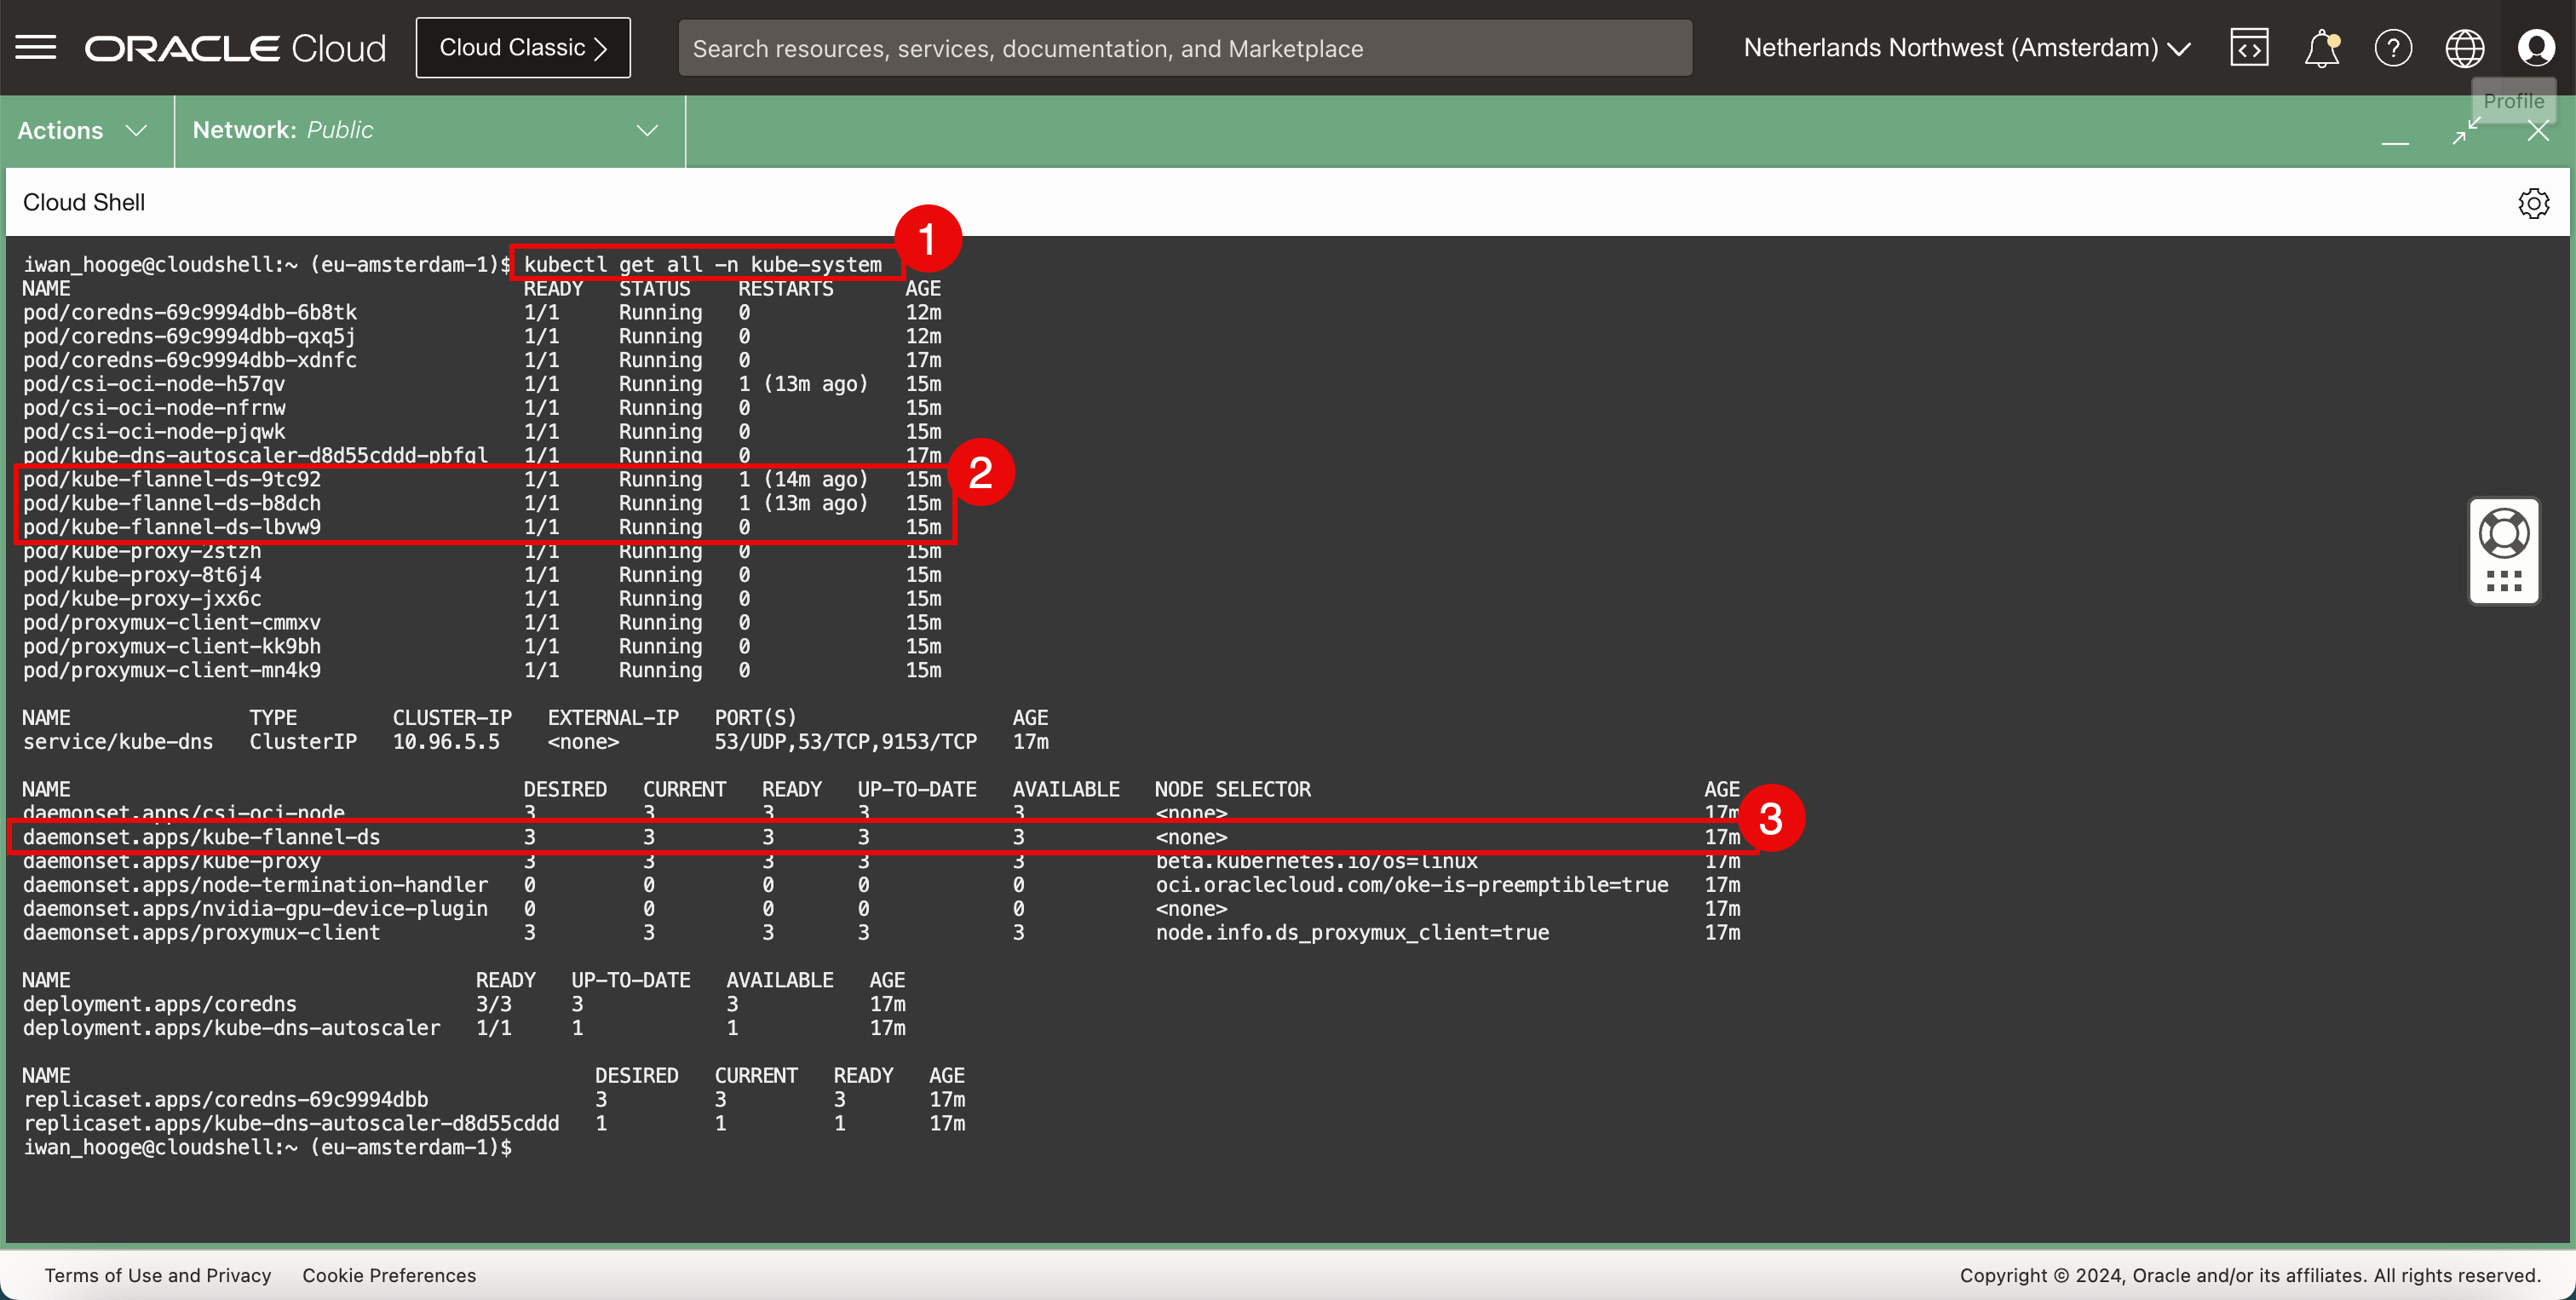
다음 명령을 실행합니다.
iwan_hooge@cloudshell:~ (eu-amsterdam-1)$ kubectl get all -n kube-system NAME READY STATUS RESTARTS AGE pod/coredns-69c9994dbb-6b8tk 1/1 Running 0 12m pod/coredns-69c9994dbb-qxq5j 1/1 Running 0 12m pod/coredns-69c9994dbb-xdnfc 1/1 Running 0 16m pod/csi-oci-node-h57qv 1/1 Running 1 (12m ago) 14m pod/csi-oci-node-nfrnw 1/1 Running 0 14m pod/csi-oci-node-pjqwk 1/1 Running 0 15m pod/kube-dns-autoscaler-d8d55cddd-pbfql 1/1 Running 0 16m pod/kube-flannel-ds-9tc92 1/1 Running 1 (13m ago) 14m pod/kube-flannel-ds-b8dch 1/1 Running 1 (12m ago) 14m pod/kube-flannel-ds-lbvw9 1/1 Running 0 15m pod/kube-proxy-2stzh 1/1 Running 0 15m pod/kube-proxy-8t6j4 1/1 Running 0 14m pod/kube-proxy-jxx6c 1/1 Running 0 14m pod/proxymux-client-cmmxv 1/1 Running 0 15m pod/proxymux-client-kk9bh 1/1 Running 0 14m pod/proxymux-client-mn4k9 1/1 Running 0 14m NAME TYPE CLUSTER-IP EXTERNAL-IP PORT(S) AGE service/kube-dns ClusterIP 10.96.5.5 <none> 53/UDP,53/TCP,9153/TCP 16m NAME DESIRED CURRENT READY UP-TO-DATE AVAILABLE NODE SELECTOR AGE daemonset.apps/csi-oci-node 3 3 3 3 3 <none> 16m daemonset.apps/kube-flannel-ds 3 3 3 3 3 <none> 16m daemonset.apps/kube-proxy 3 3 3 3 3 beta.kubernetes.io/os=linux 16m daemonset.apps/node-termination-handler 0 0 0 0 0 oci.oraclecloud.com/oke-is-preemptible=true 16m daemonset.apps/nvidia-gpu-device-plugin 0 0 0 0 0 <none> 16m daemonset.apps/proxymux-client 3 3 3 3 3 node.info.ds_proxymux_client=true 16m NAME READY UP-TO-DATE AVAILABLE AGE deployment.apps/coredns 3/3 3 3 16m deployment.apps/kube-dns-autoscaler 1/1 1 1 16m NAME DESIRED CURRENT READY AGE replicaset.apps/coredns-69c9994dbb 3 3 3 16m replicaset.apps/kube-dns-autoscaler-d8d55cddd 1 1 1 16m iwan_hooge@cloudshell:~ (eu-amsterdam-1)$ -
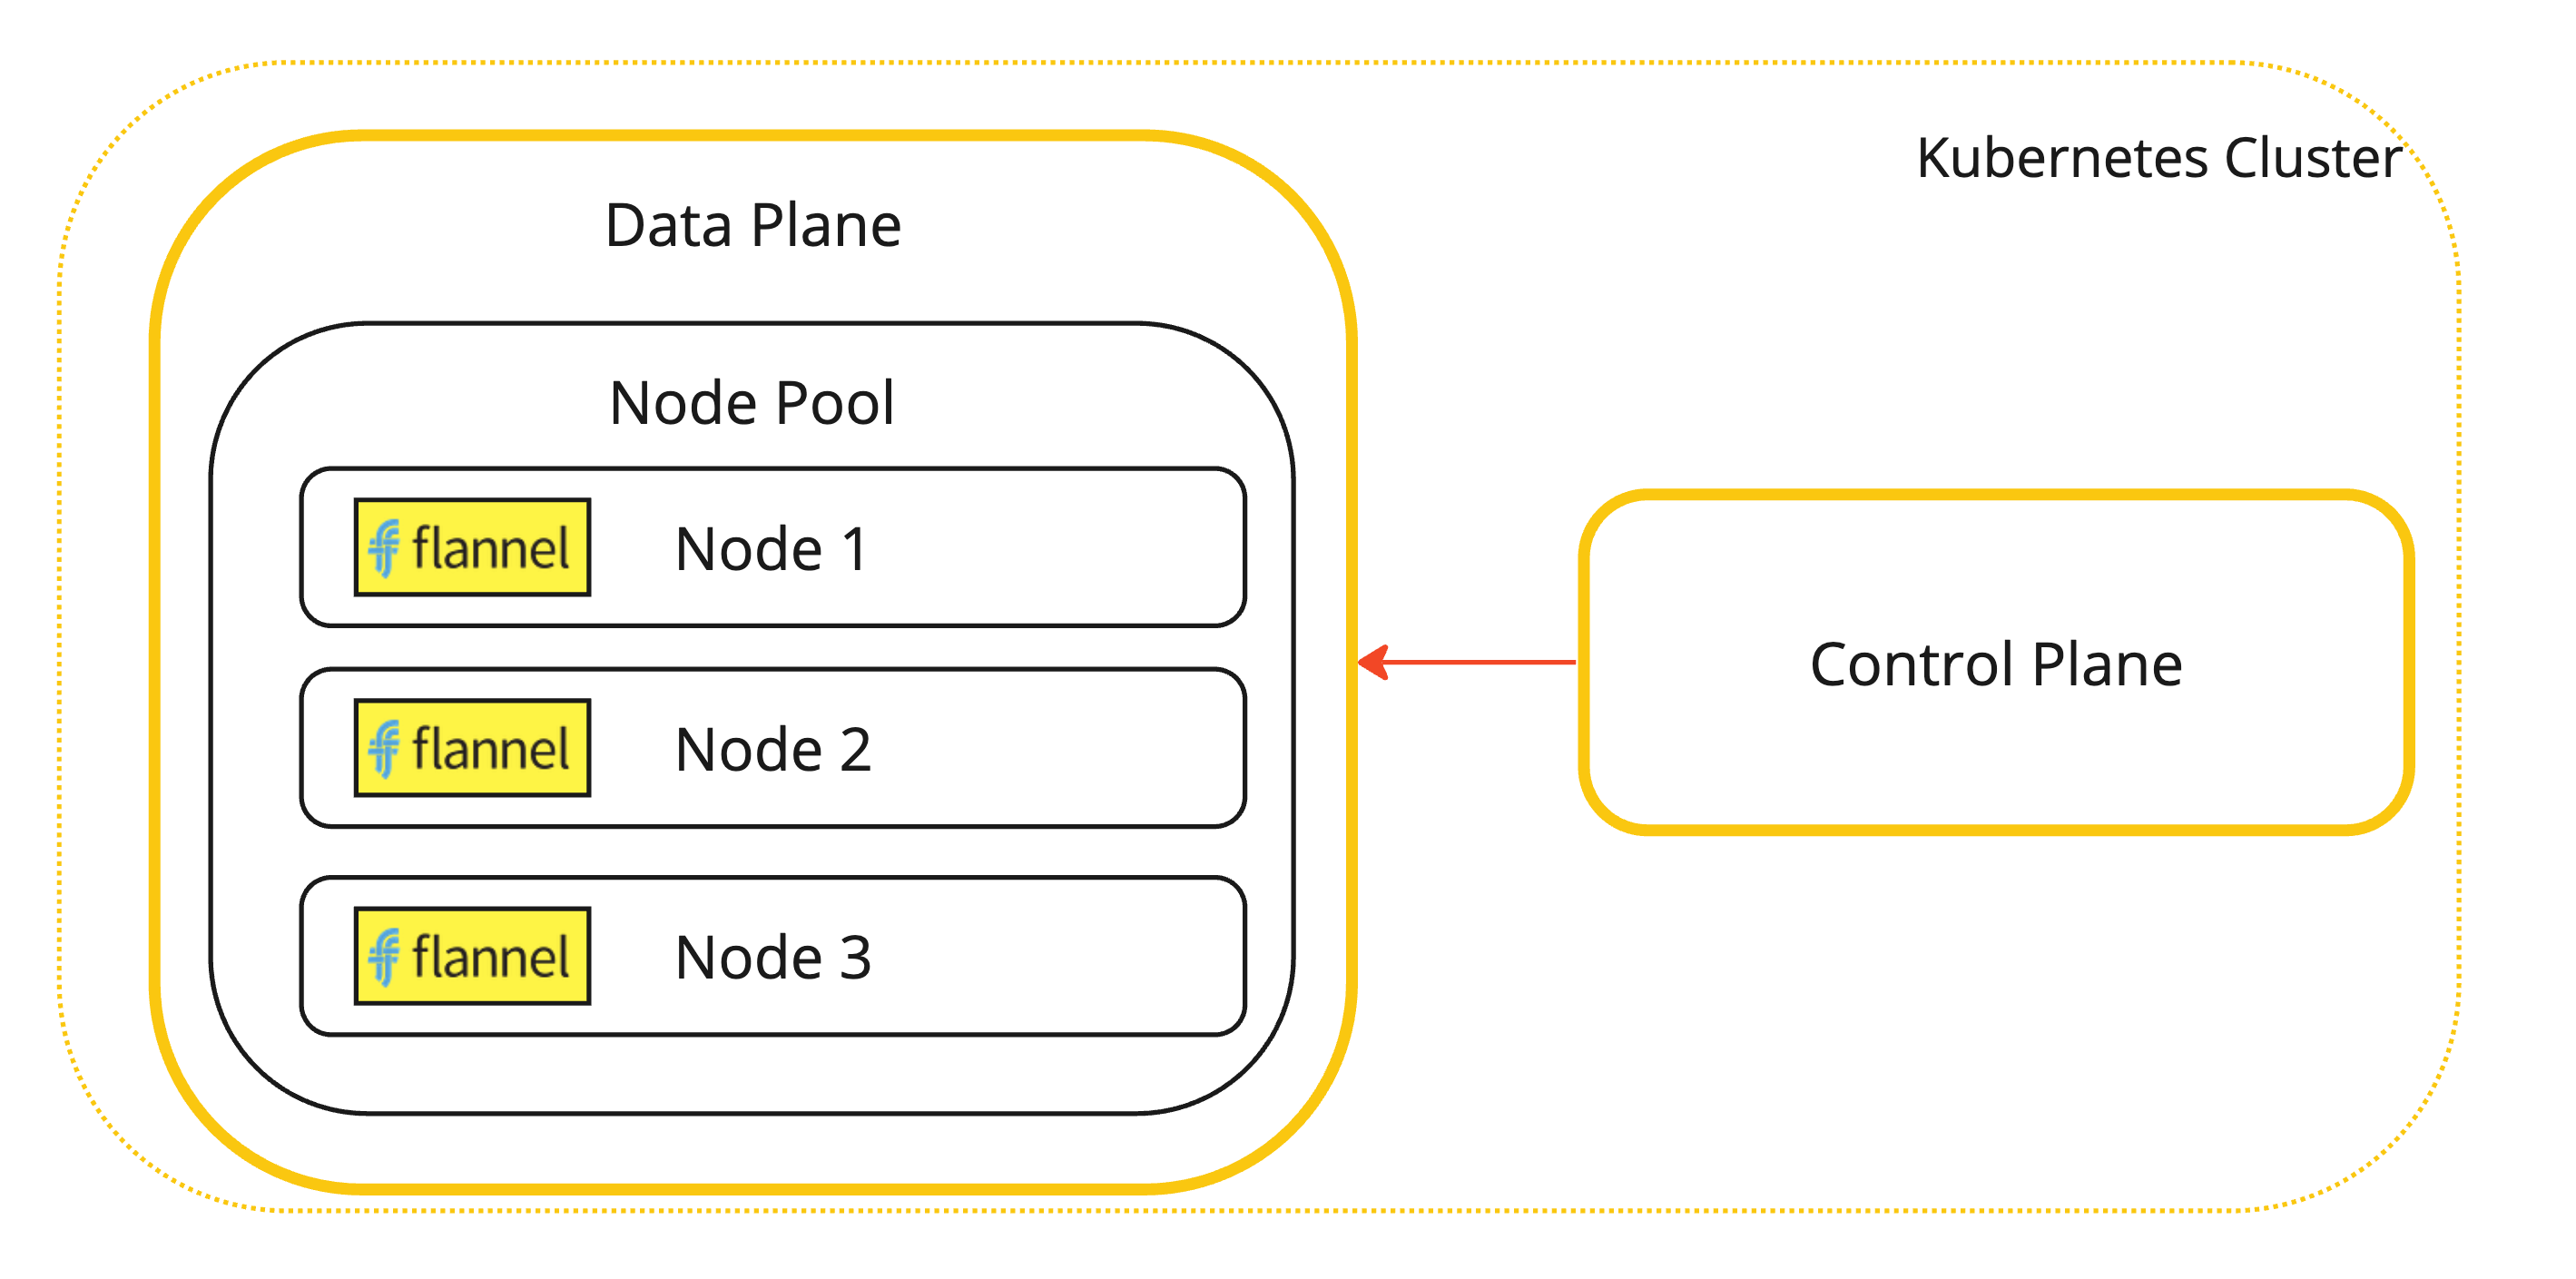
Flannel CNI 플러그인은 pod로 배포됩니다.
-
Flannel CNI 플러그인은 서비스로 배포됩니다.
Flannel CNI 플러그인이 설치된 Kubernetes 워커 노드의 시각적 표현입니다.
-
-
Cilium 저장소를 추가합니다.
-
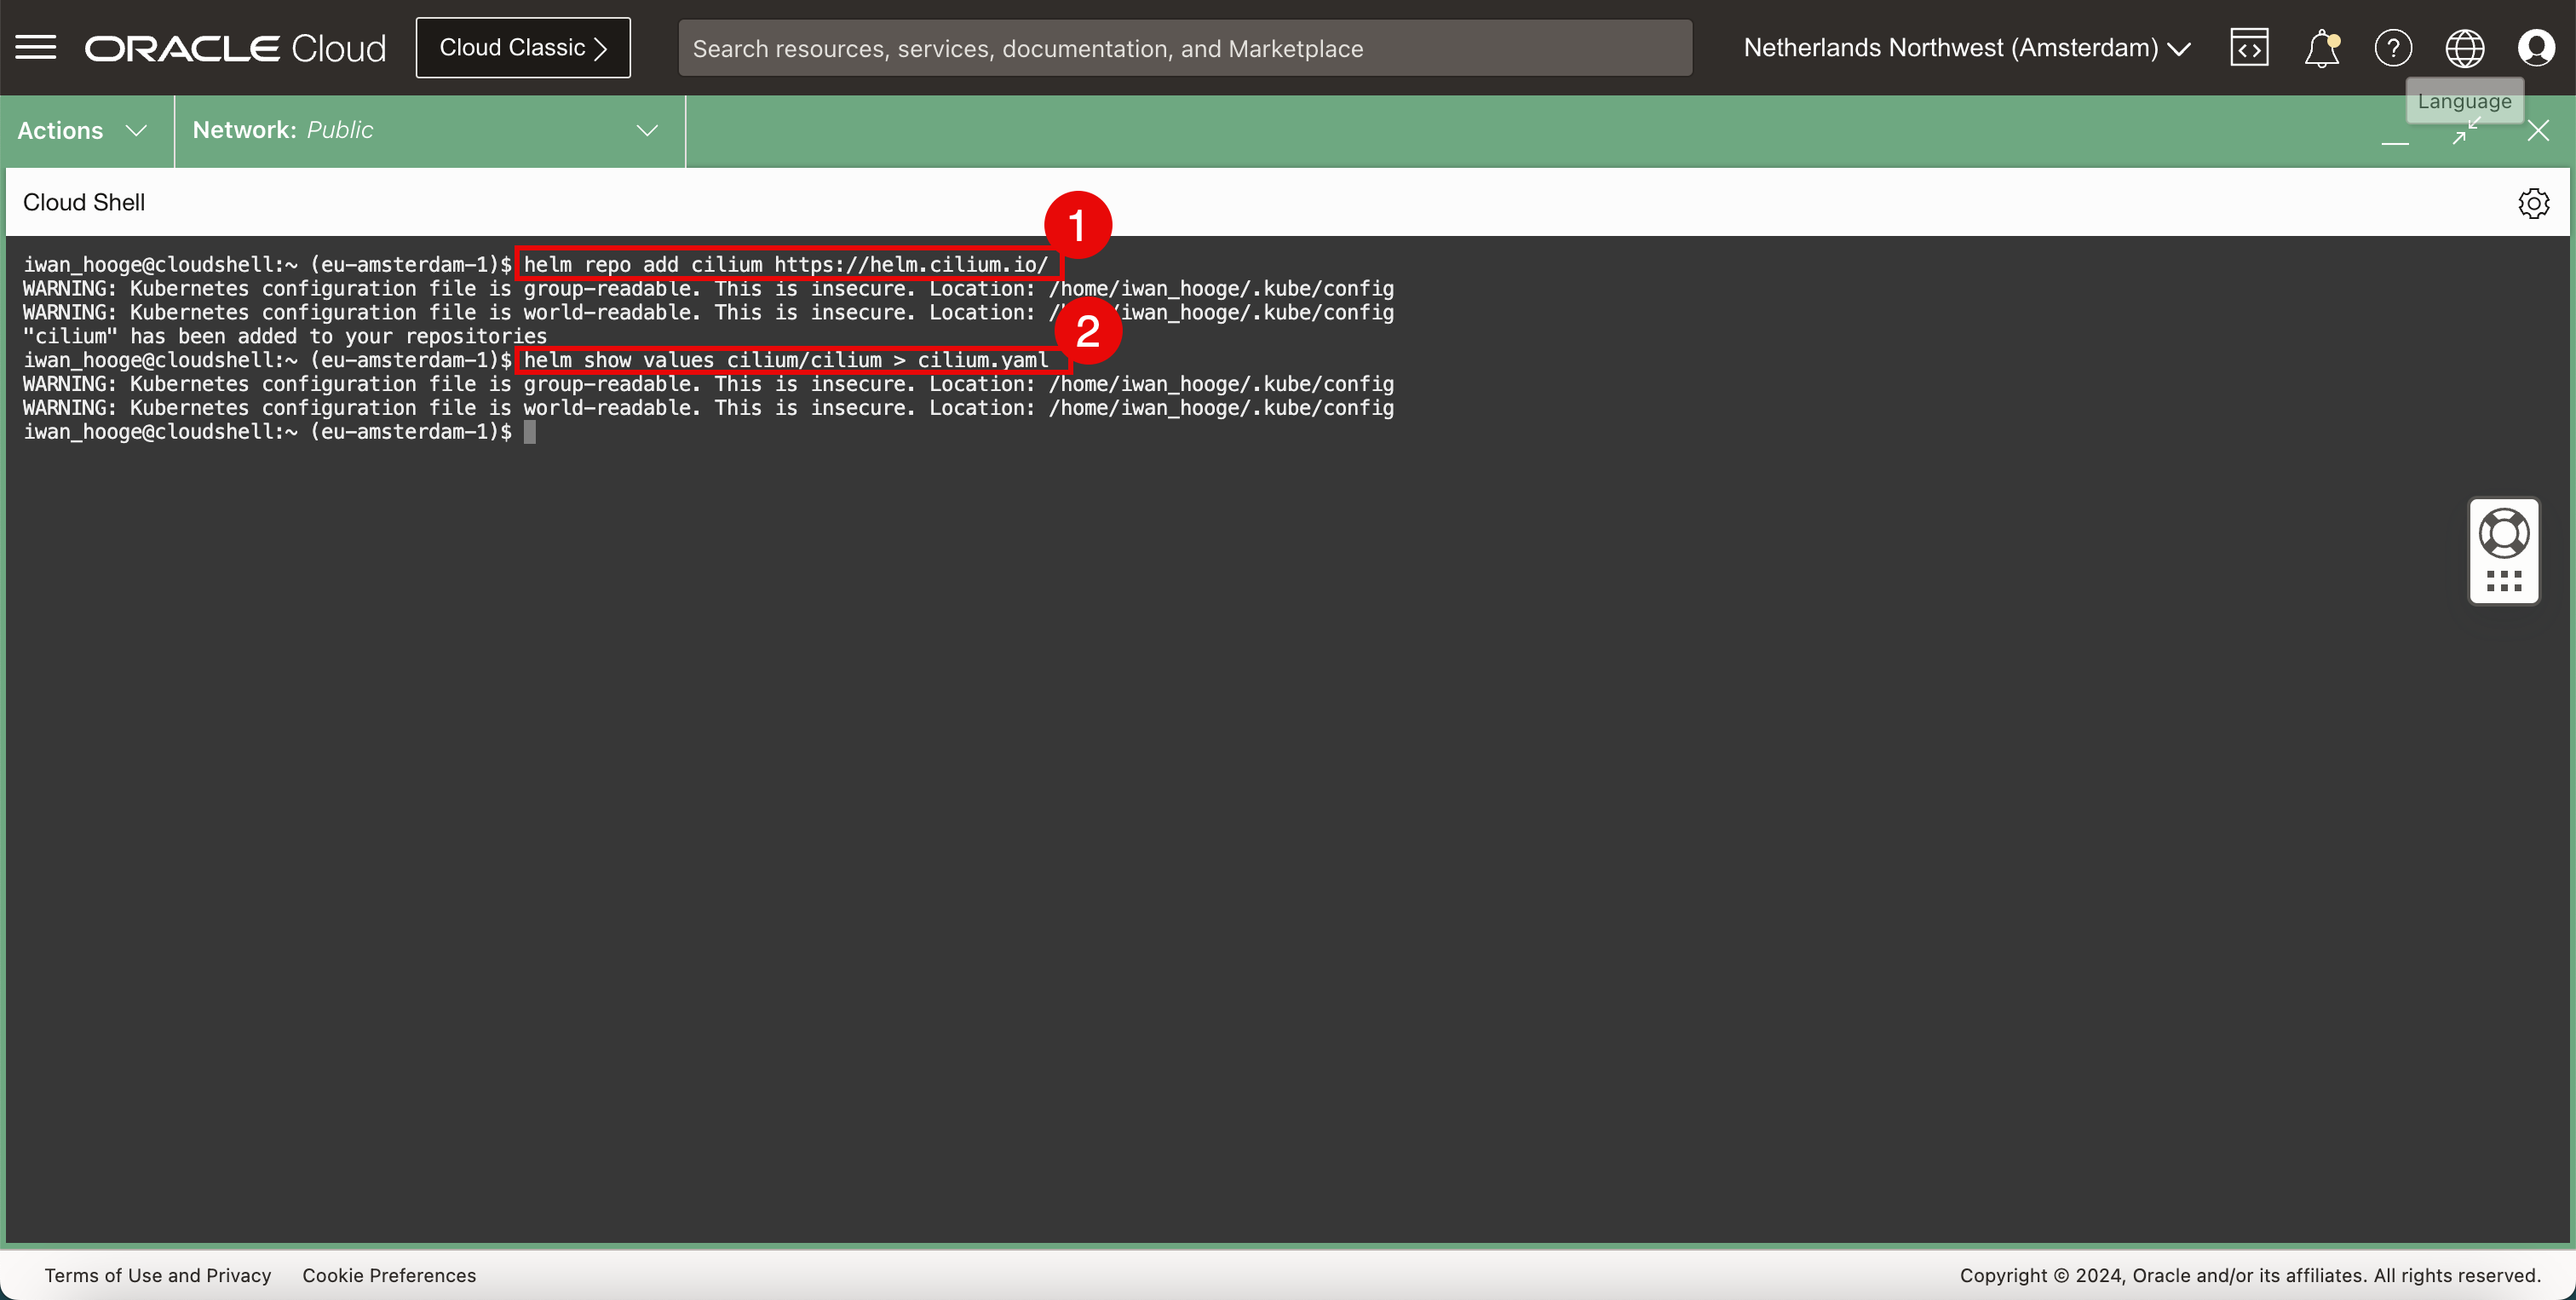
다음 명령을 실행하여 Cilium 저장소를 추가합니다.
iwan_hooge@cloudshell:~ (eu-amsterdam-1)$ helm repo add cilium https://helm.cilium.io/ WARNING: Kubernetes configuration file is group-readable. This is insecure. Location: /home/iwan_hooge/.kube/config WARNING: Kubernetes configuration file is world-readable. This is insecure. Location: /home/iwan_hooge/.kube/config "cilium" has been added to your repositories -
다음 명령을 실행하여 cilium deployment
YAML파일을 생성합니다.iwan_hooge@cloudshell:~ (eu-amsterdam-1)$ helm show values cilium/cilium > cilium.yaml WARNING: Kubernetes configuration file is group-readable. This is insecure. Location: /home/iwan_hooge/.kube/config WARNING: Kubernetes configuration file is world-readable. This is insecure. Location: /home/iwan_hooge/.kube/config iwan_hooge@cloudshell:~ (eu-amsterdam-1)$
-
-
다음 명령을 사용하여 Cilium
YAML파일이 있는지 확인합니다.-
다음 명령을 실행합니다.
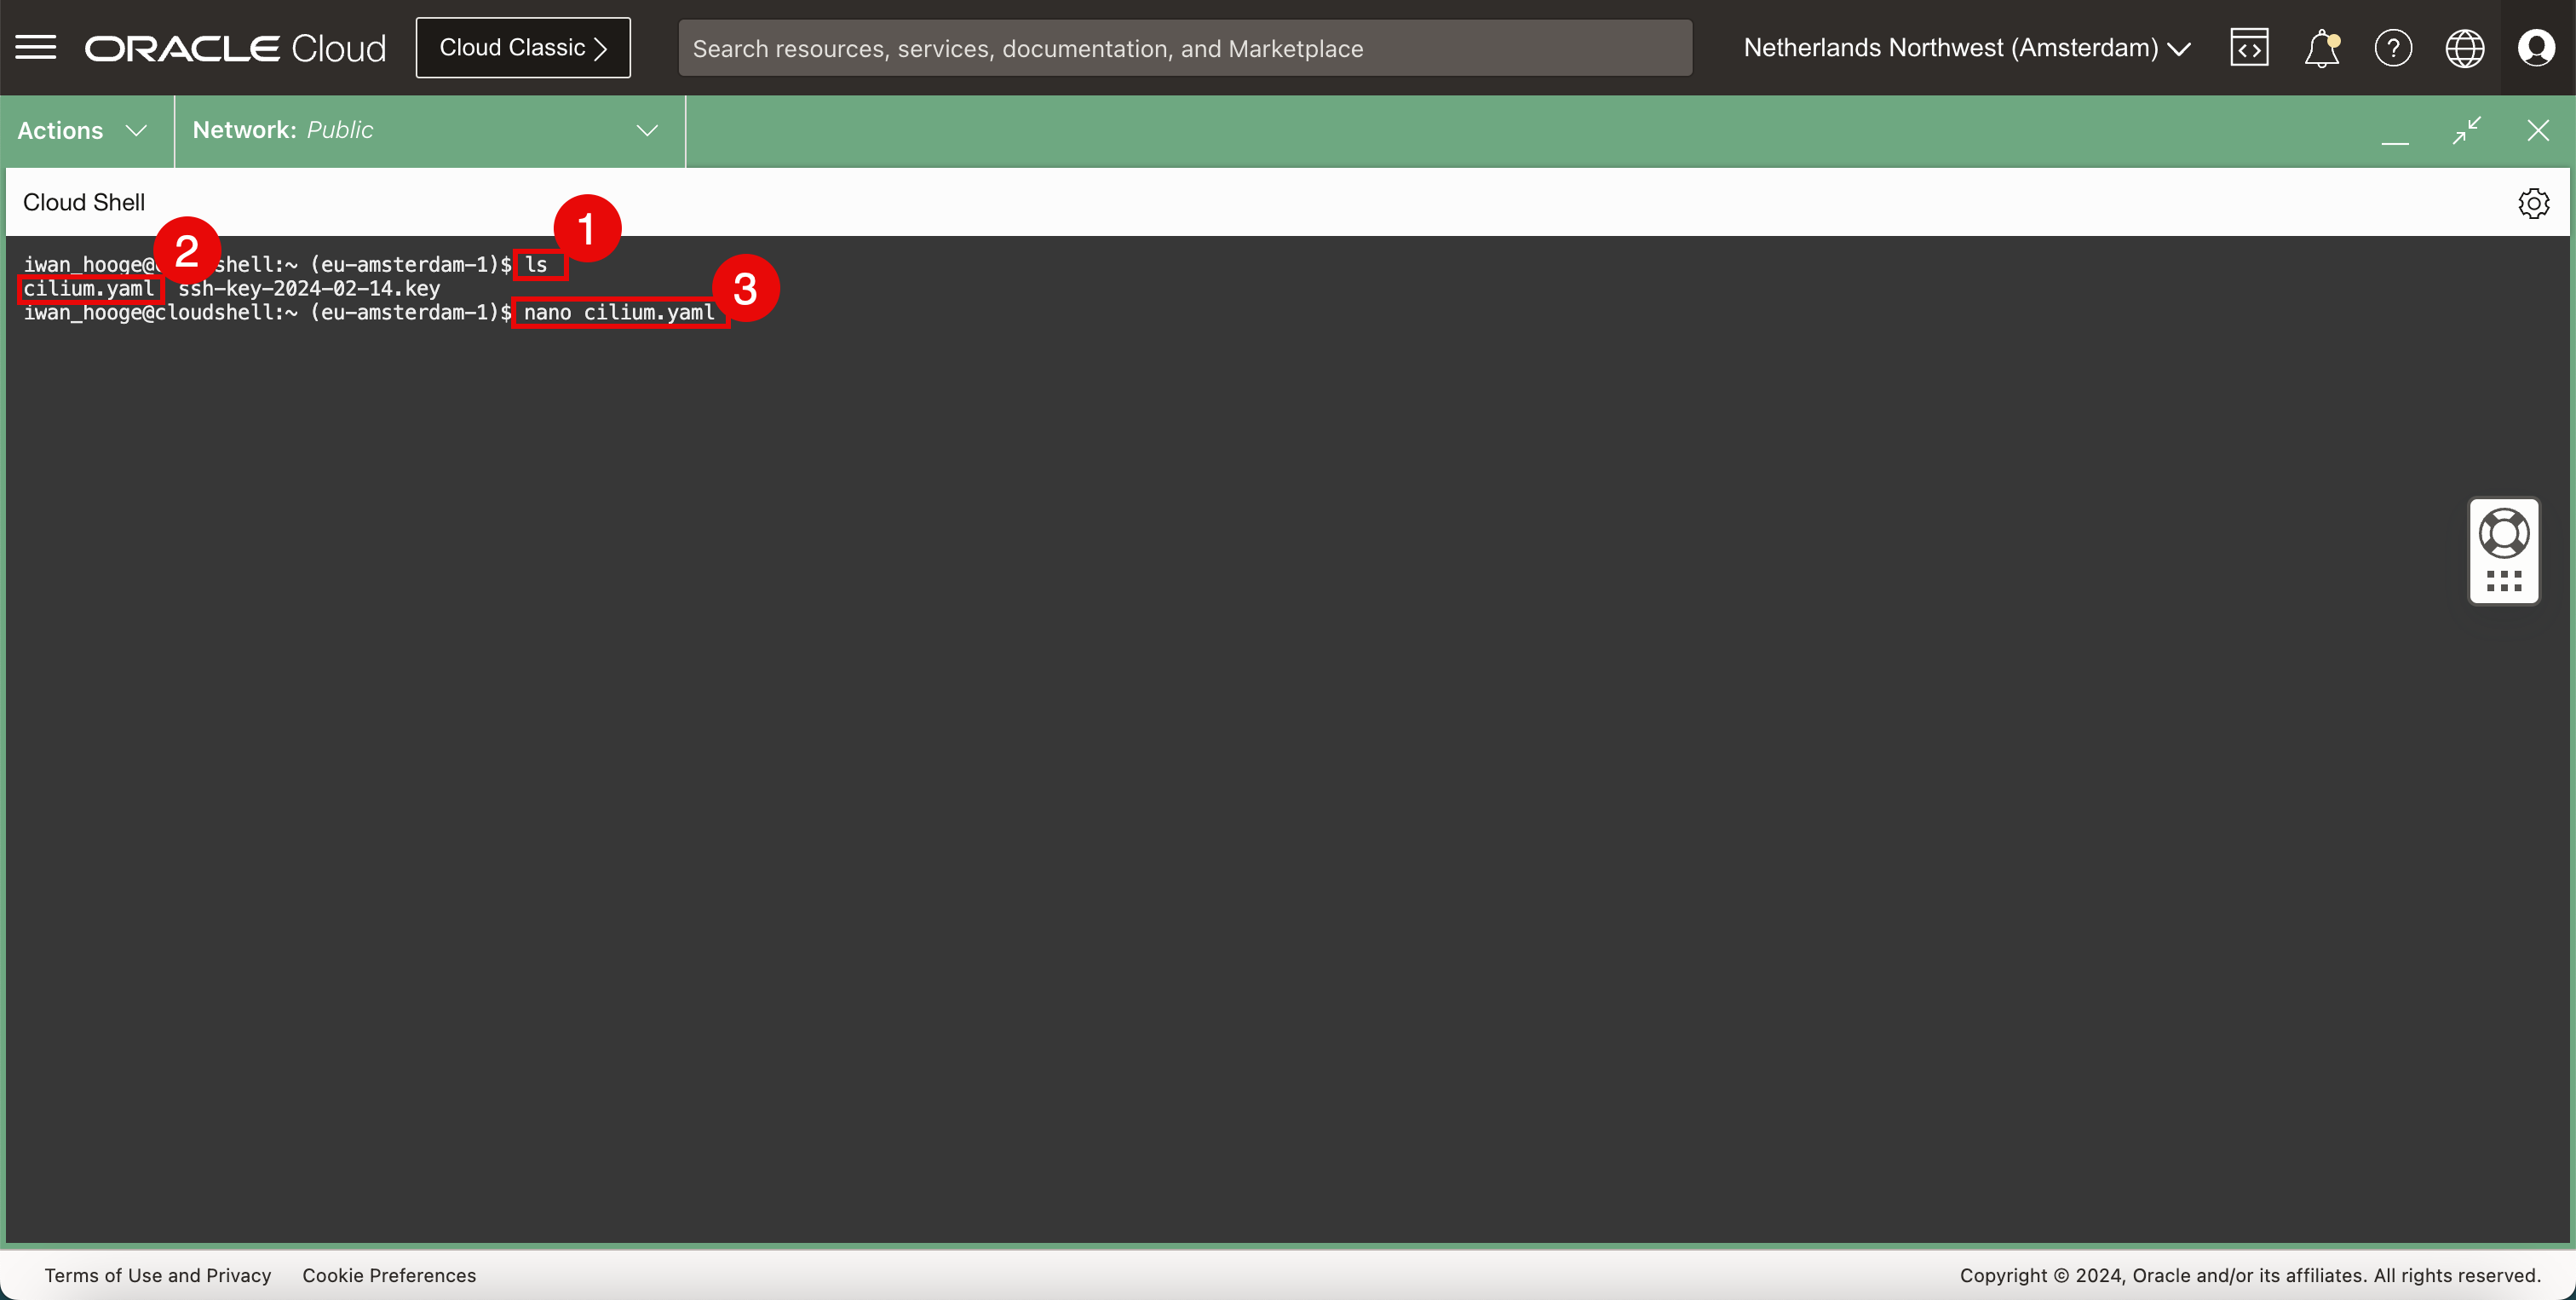
iwan_hooge@cloudshell:~ (eu-amsterdam-1)$ ls cilium.yaml ssh-key-2024-02-14.key -
YAML파일이 있는지 확인합니다. -
다음 명령을 실행하여 nano 편집기로
YAML파일을 편집합니다.iwan_hooge@cloudshell:~ (eu-amsterdam-1)$ nano cilium.yaml
-
-
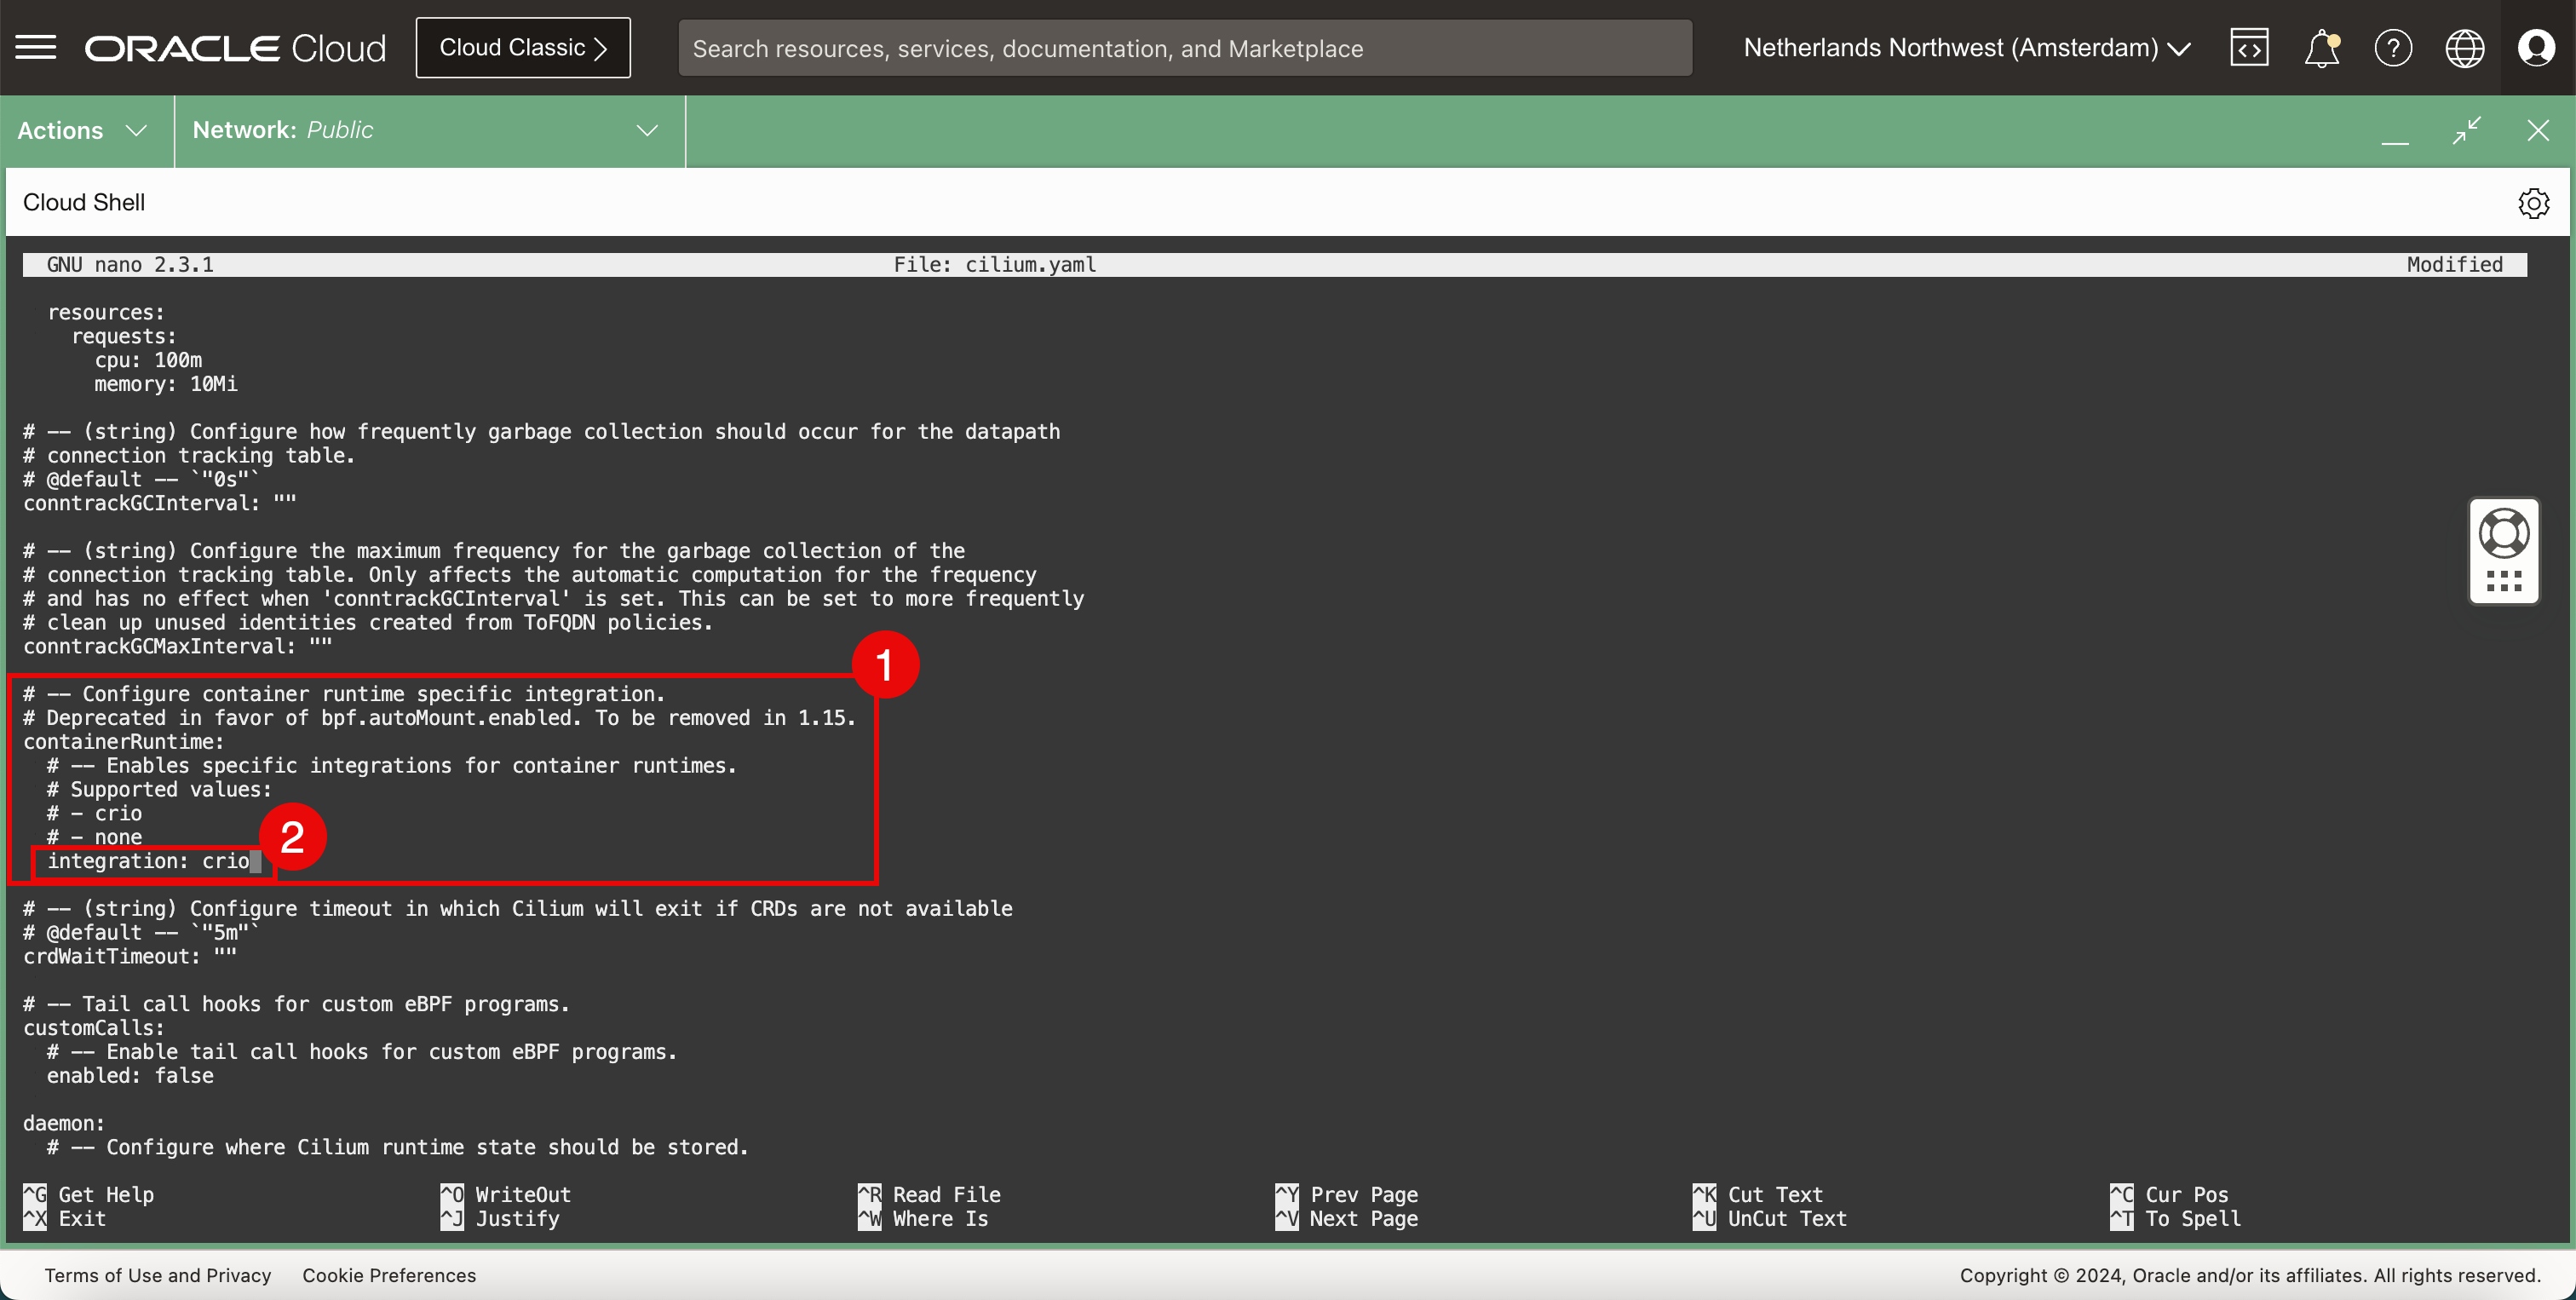
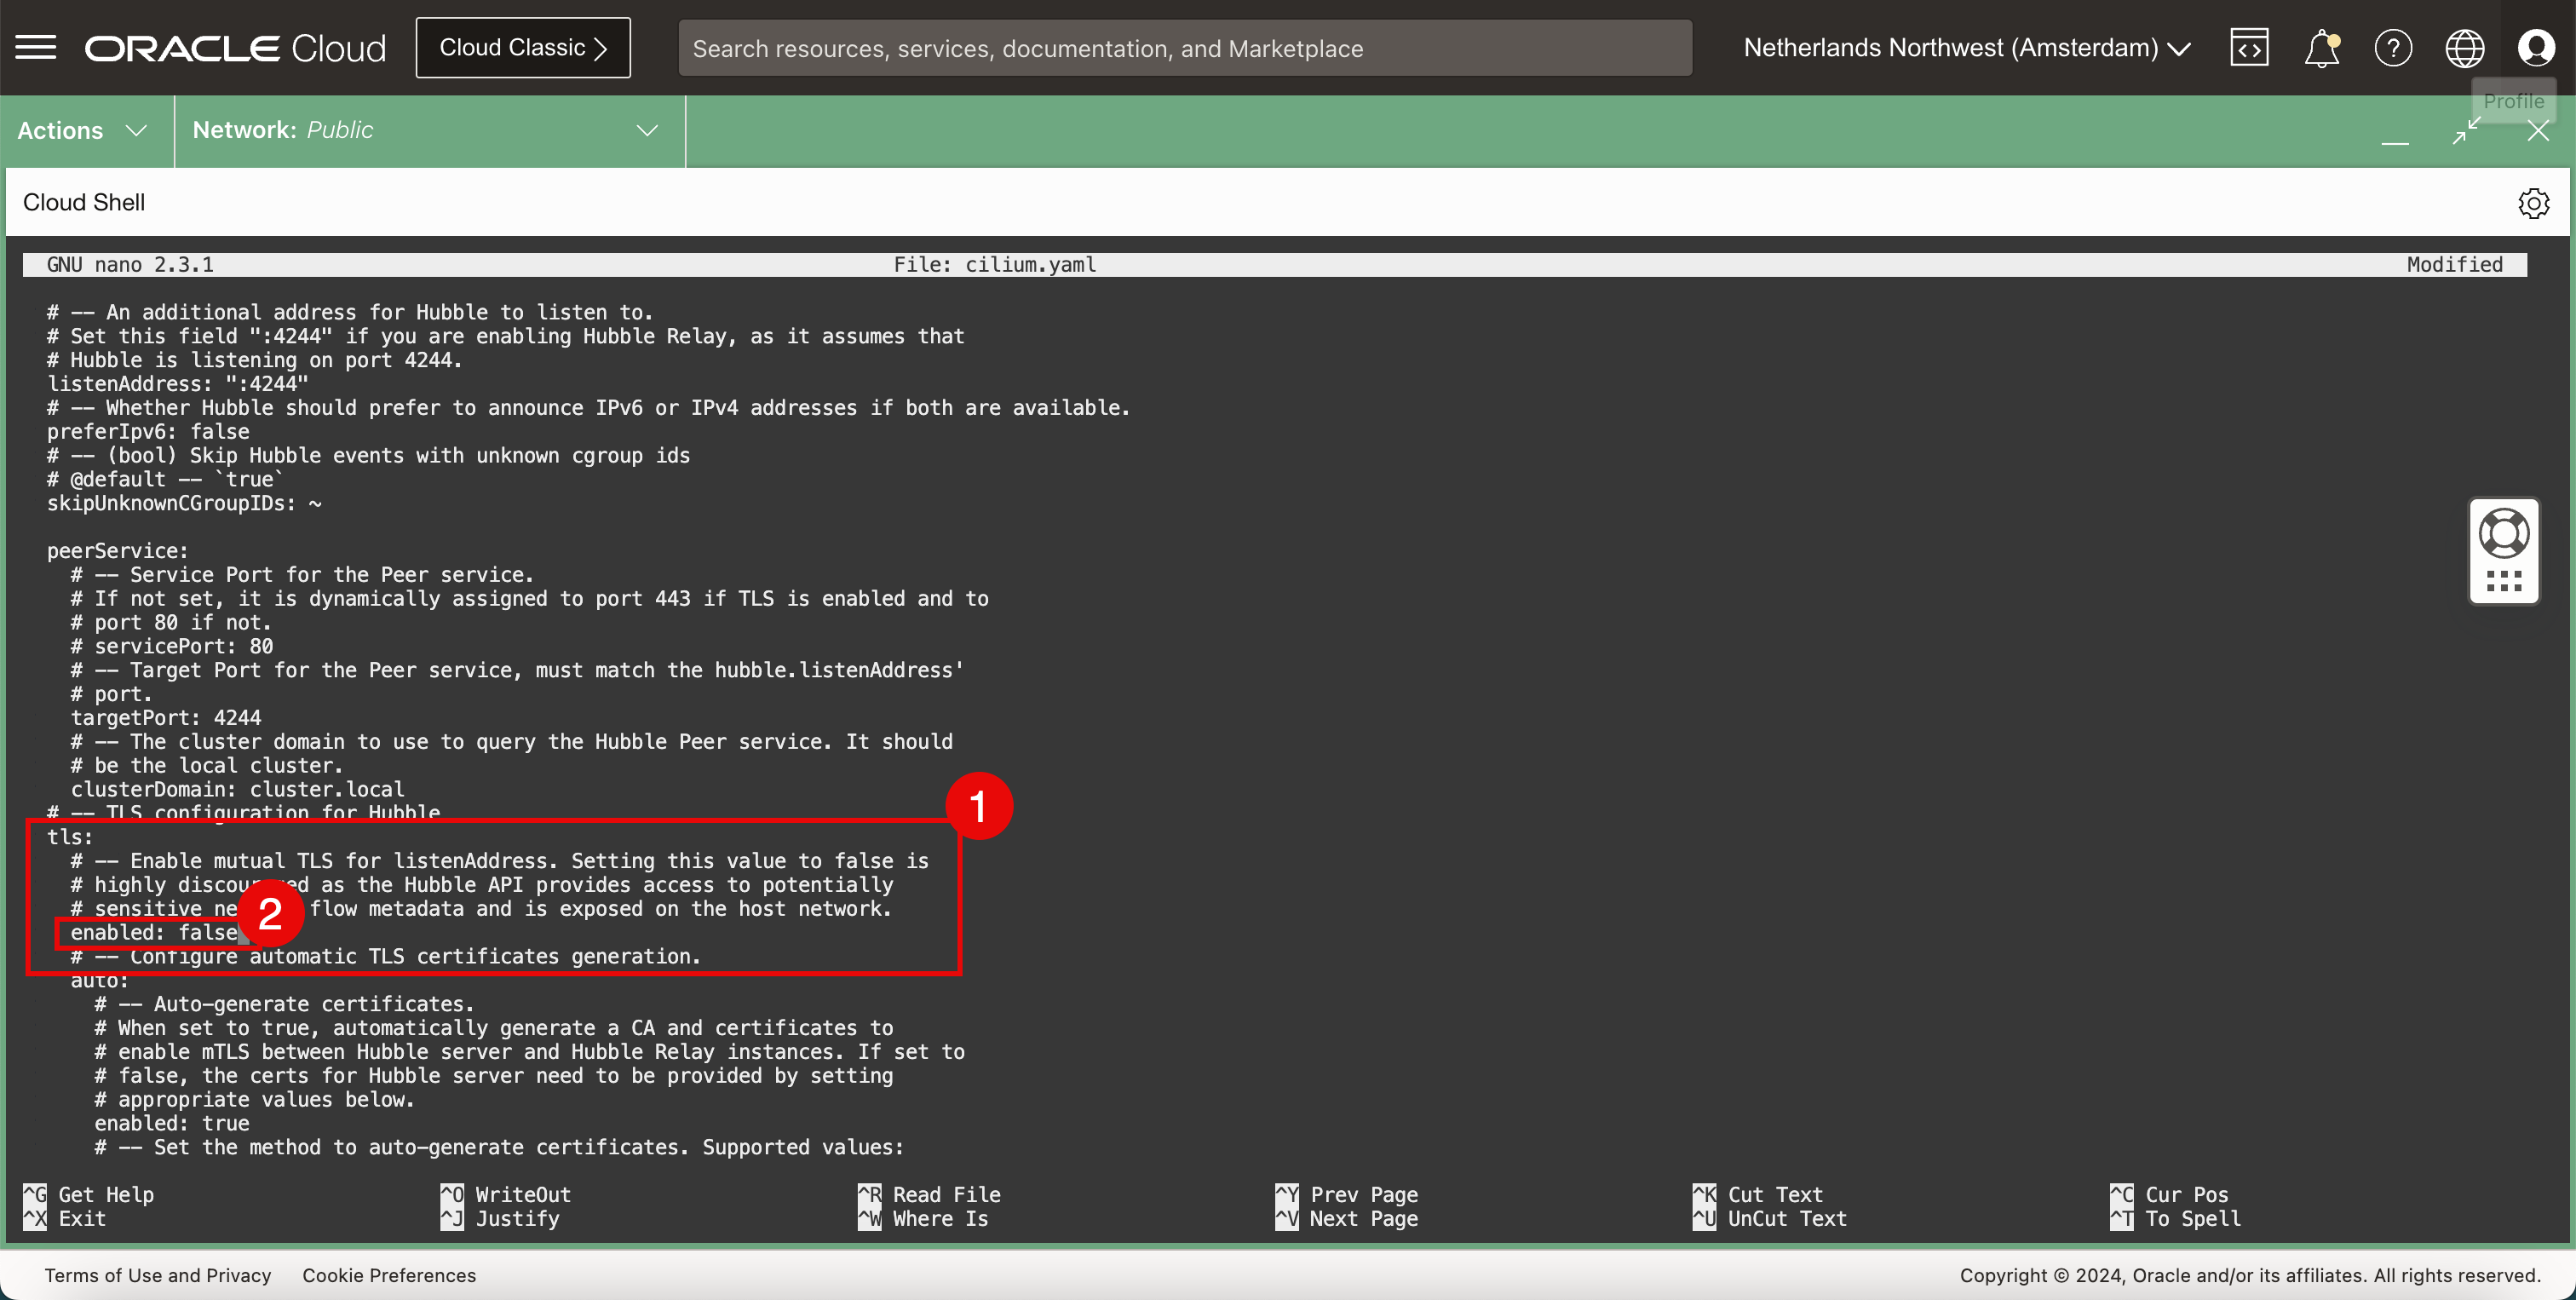
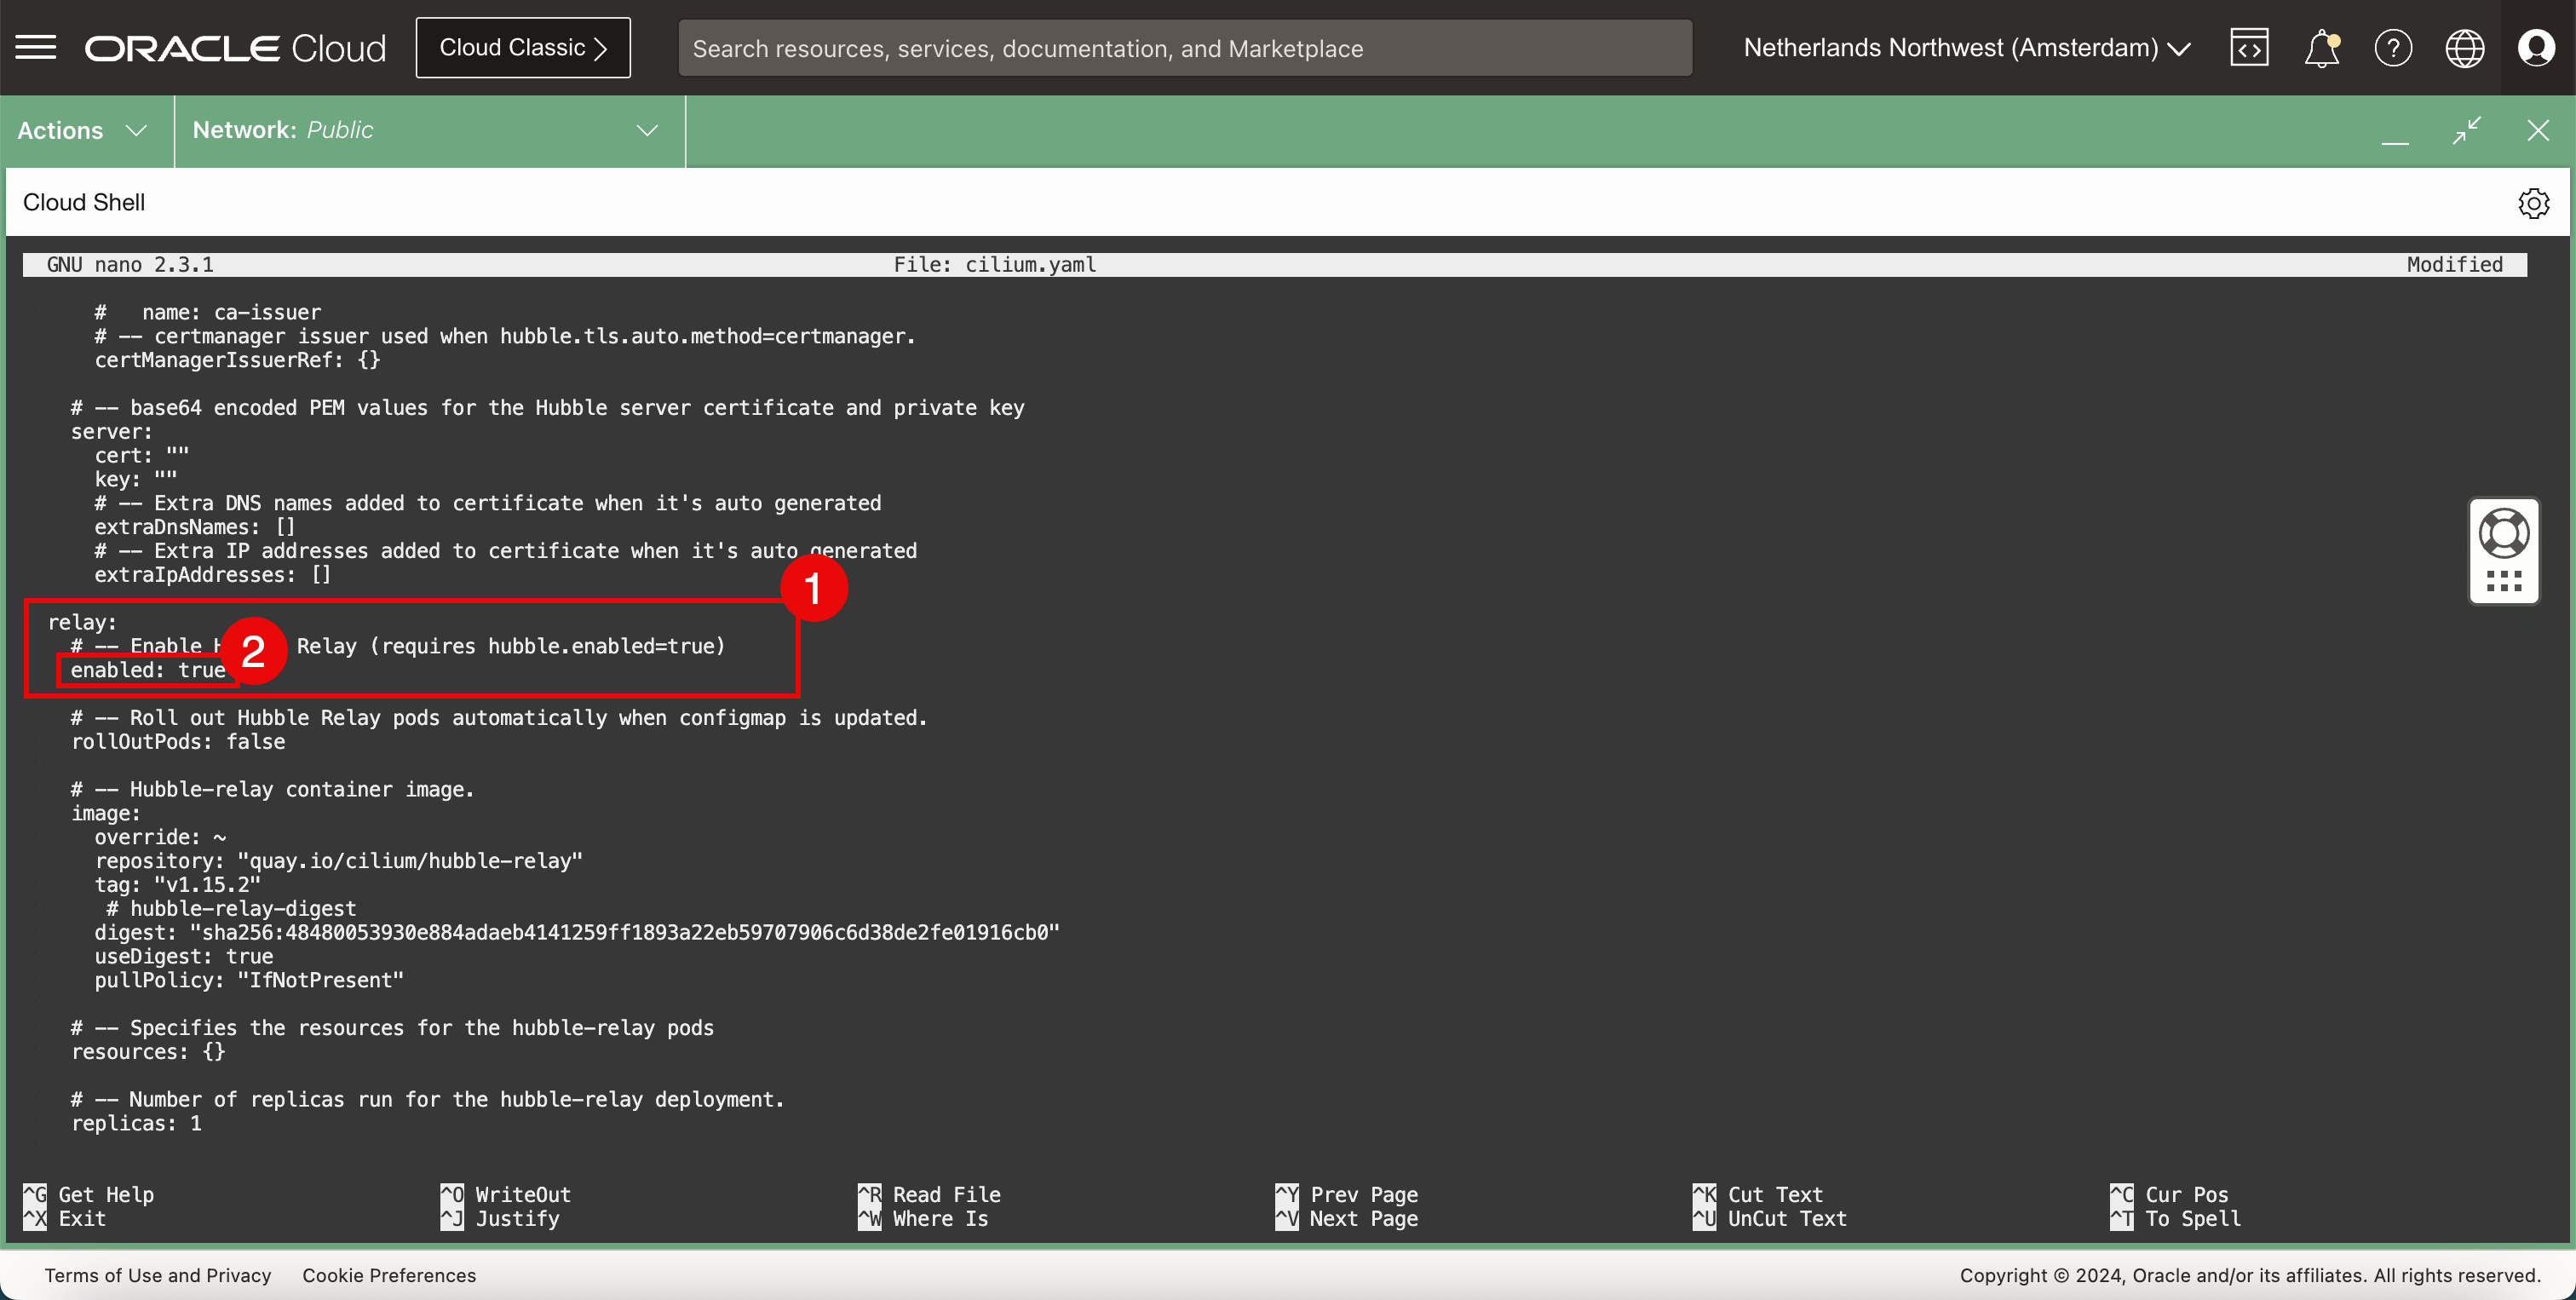
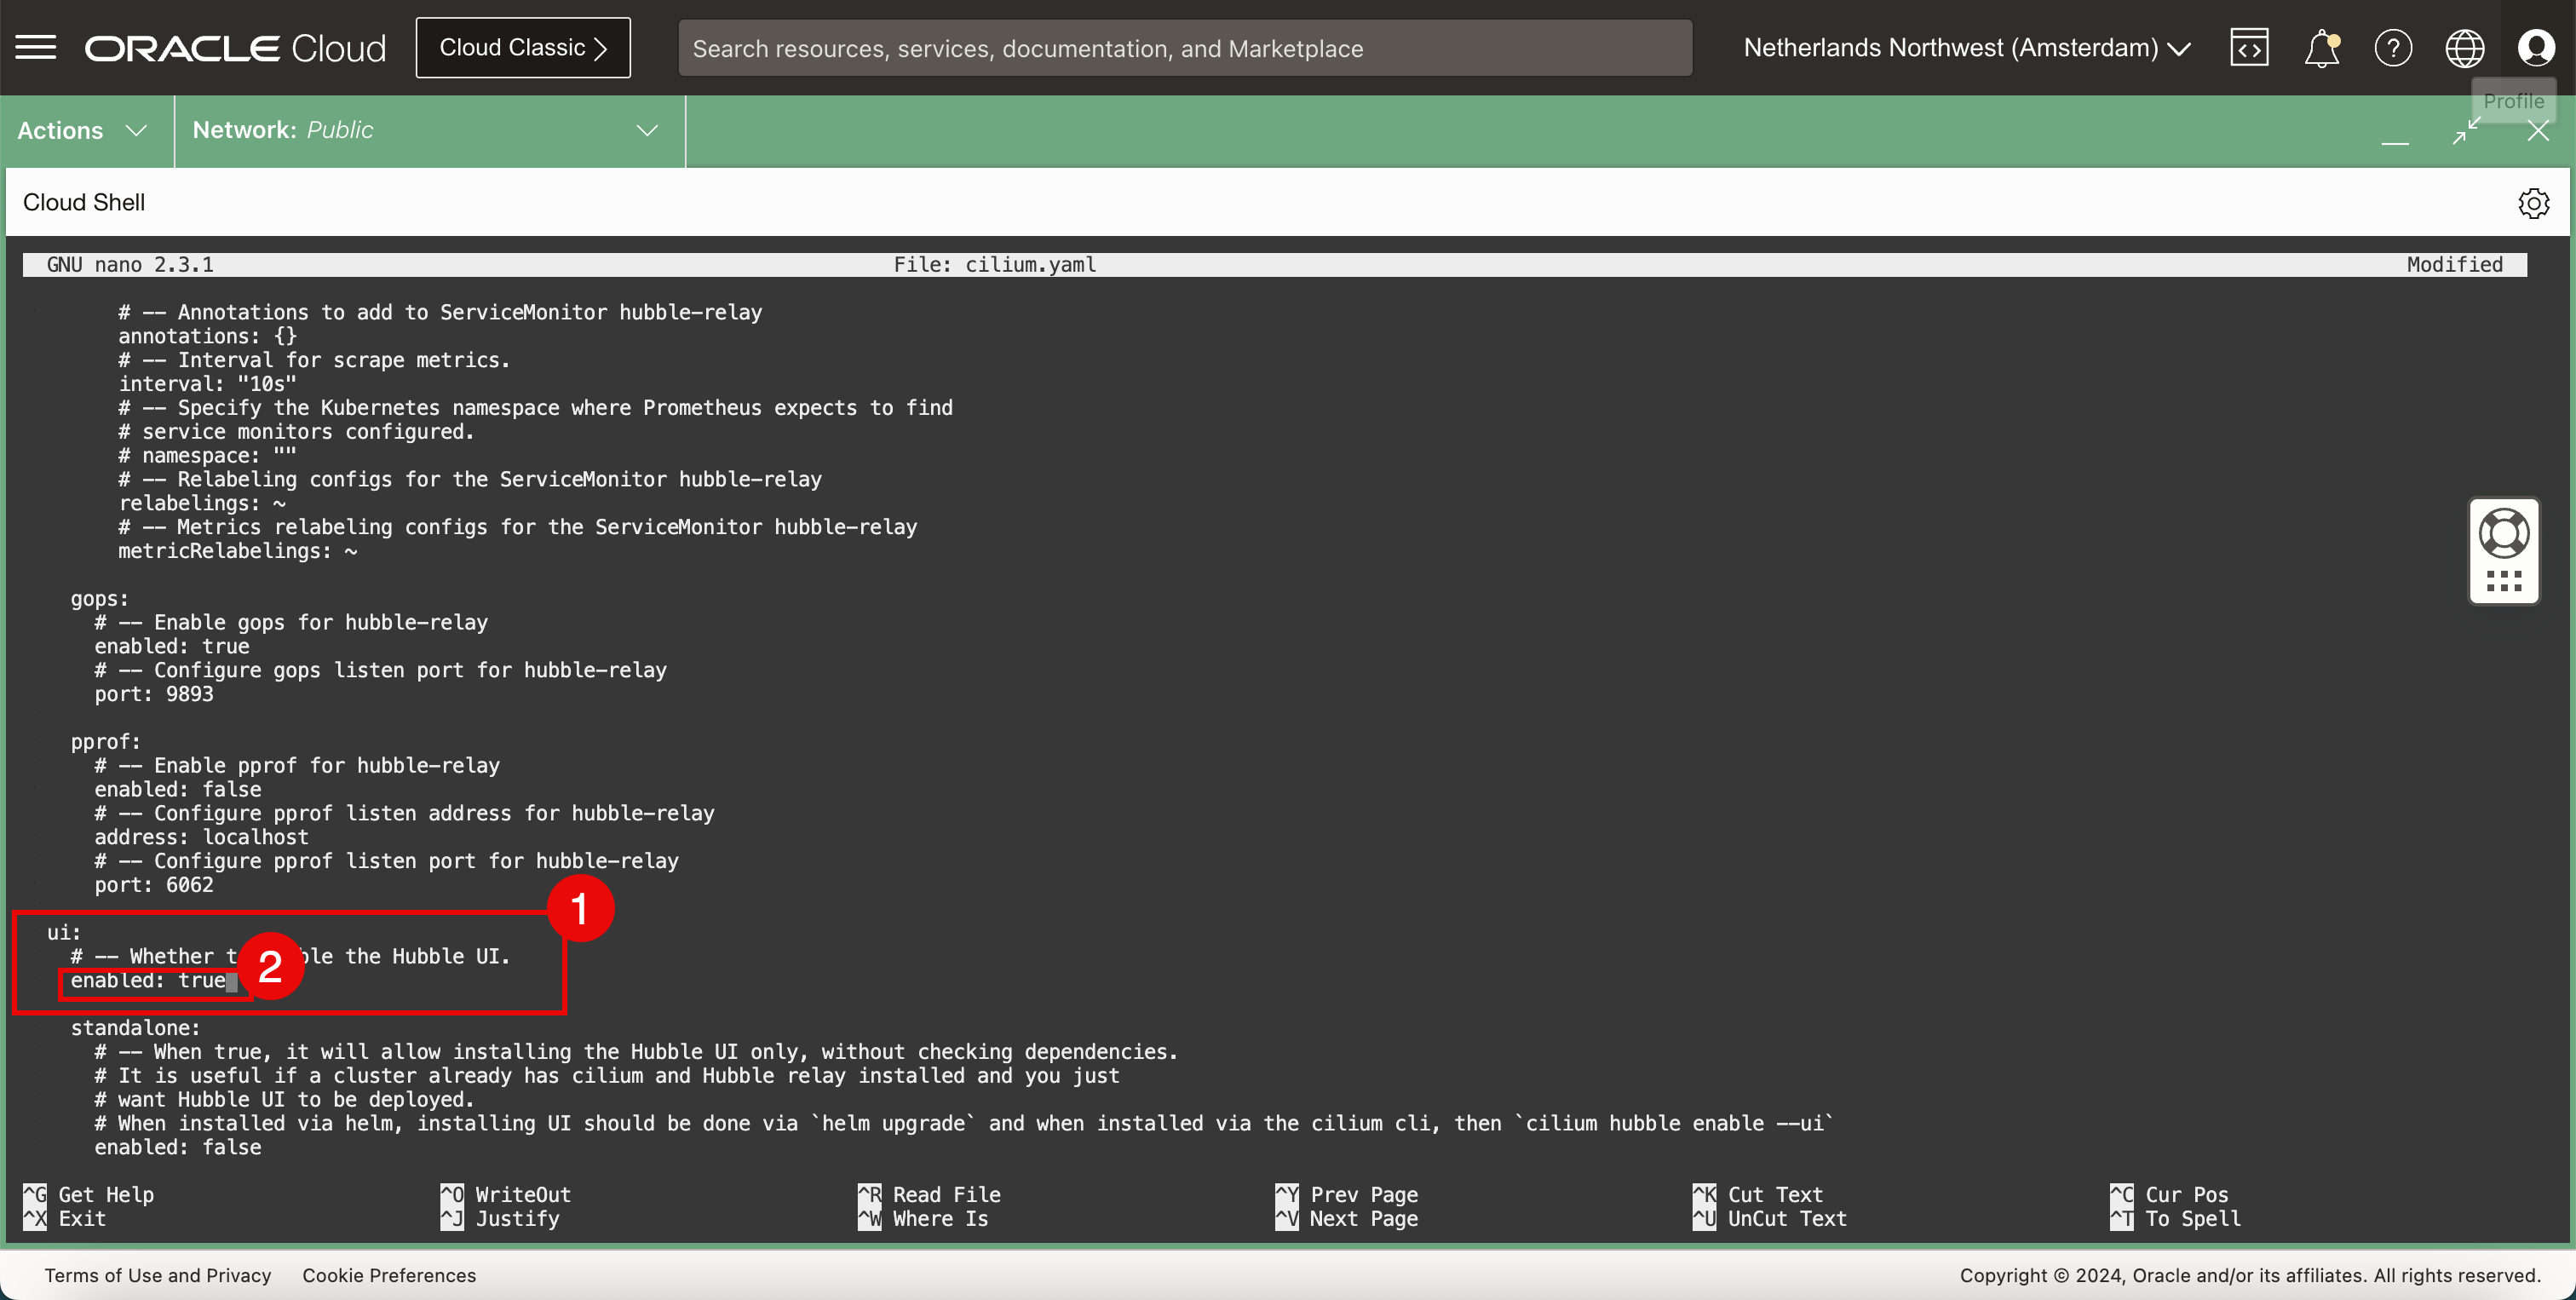
YAML파일은 많은 설정이 있는 큰 파일이며, 파일을 스크롤하여 다음 설정을 찾아 업데이트합니다.containerRuntime: integration: crio hubble: tls: enabled: false hubble: relay: enabled: true hubble: ui: enabled: true ipam: mode: "kubernetes" clustermesh: useAPIServer: true -
CTRL + W바로가기를 사용하여 키워드, 설정 또는 섹션을 찾습니다.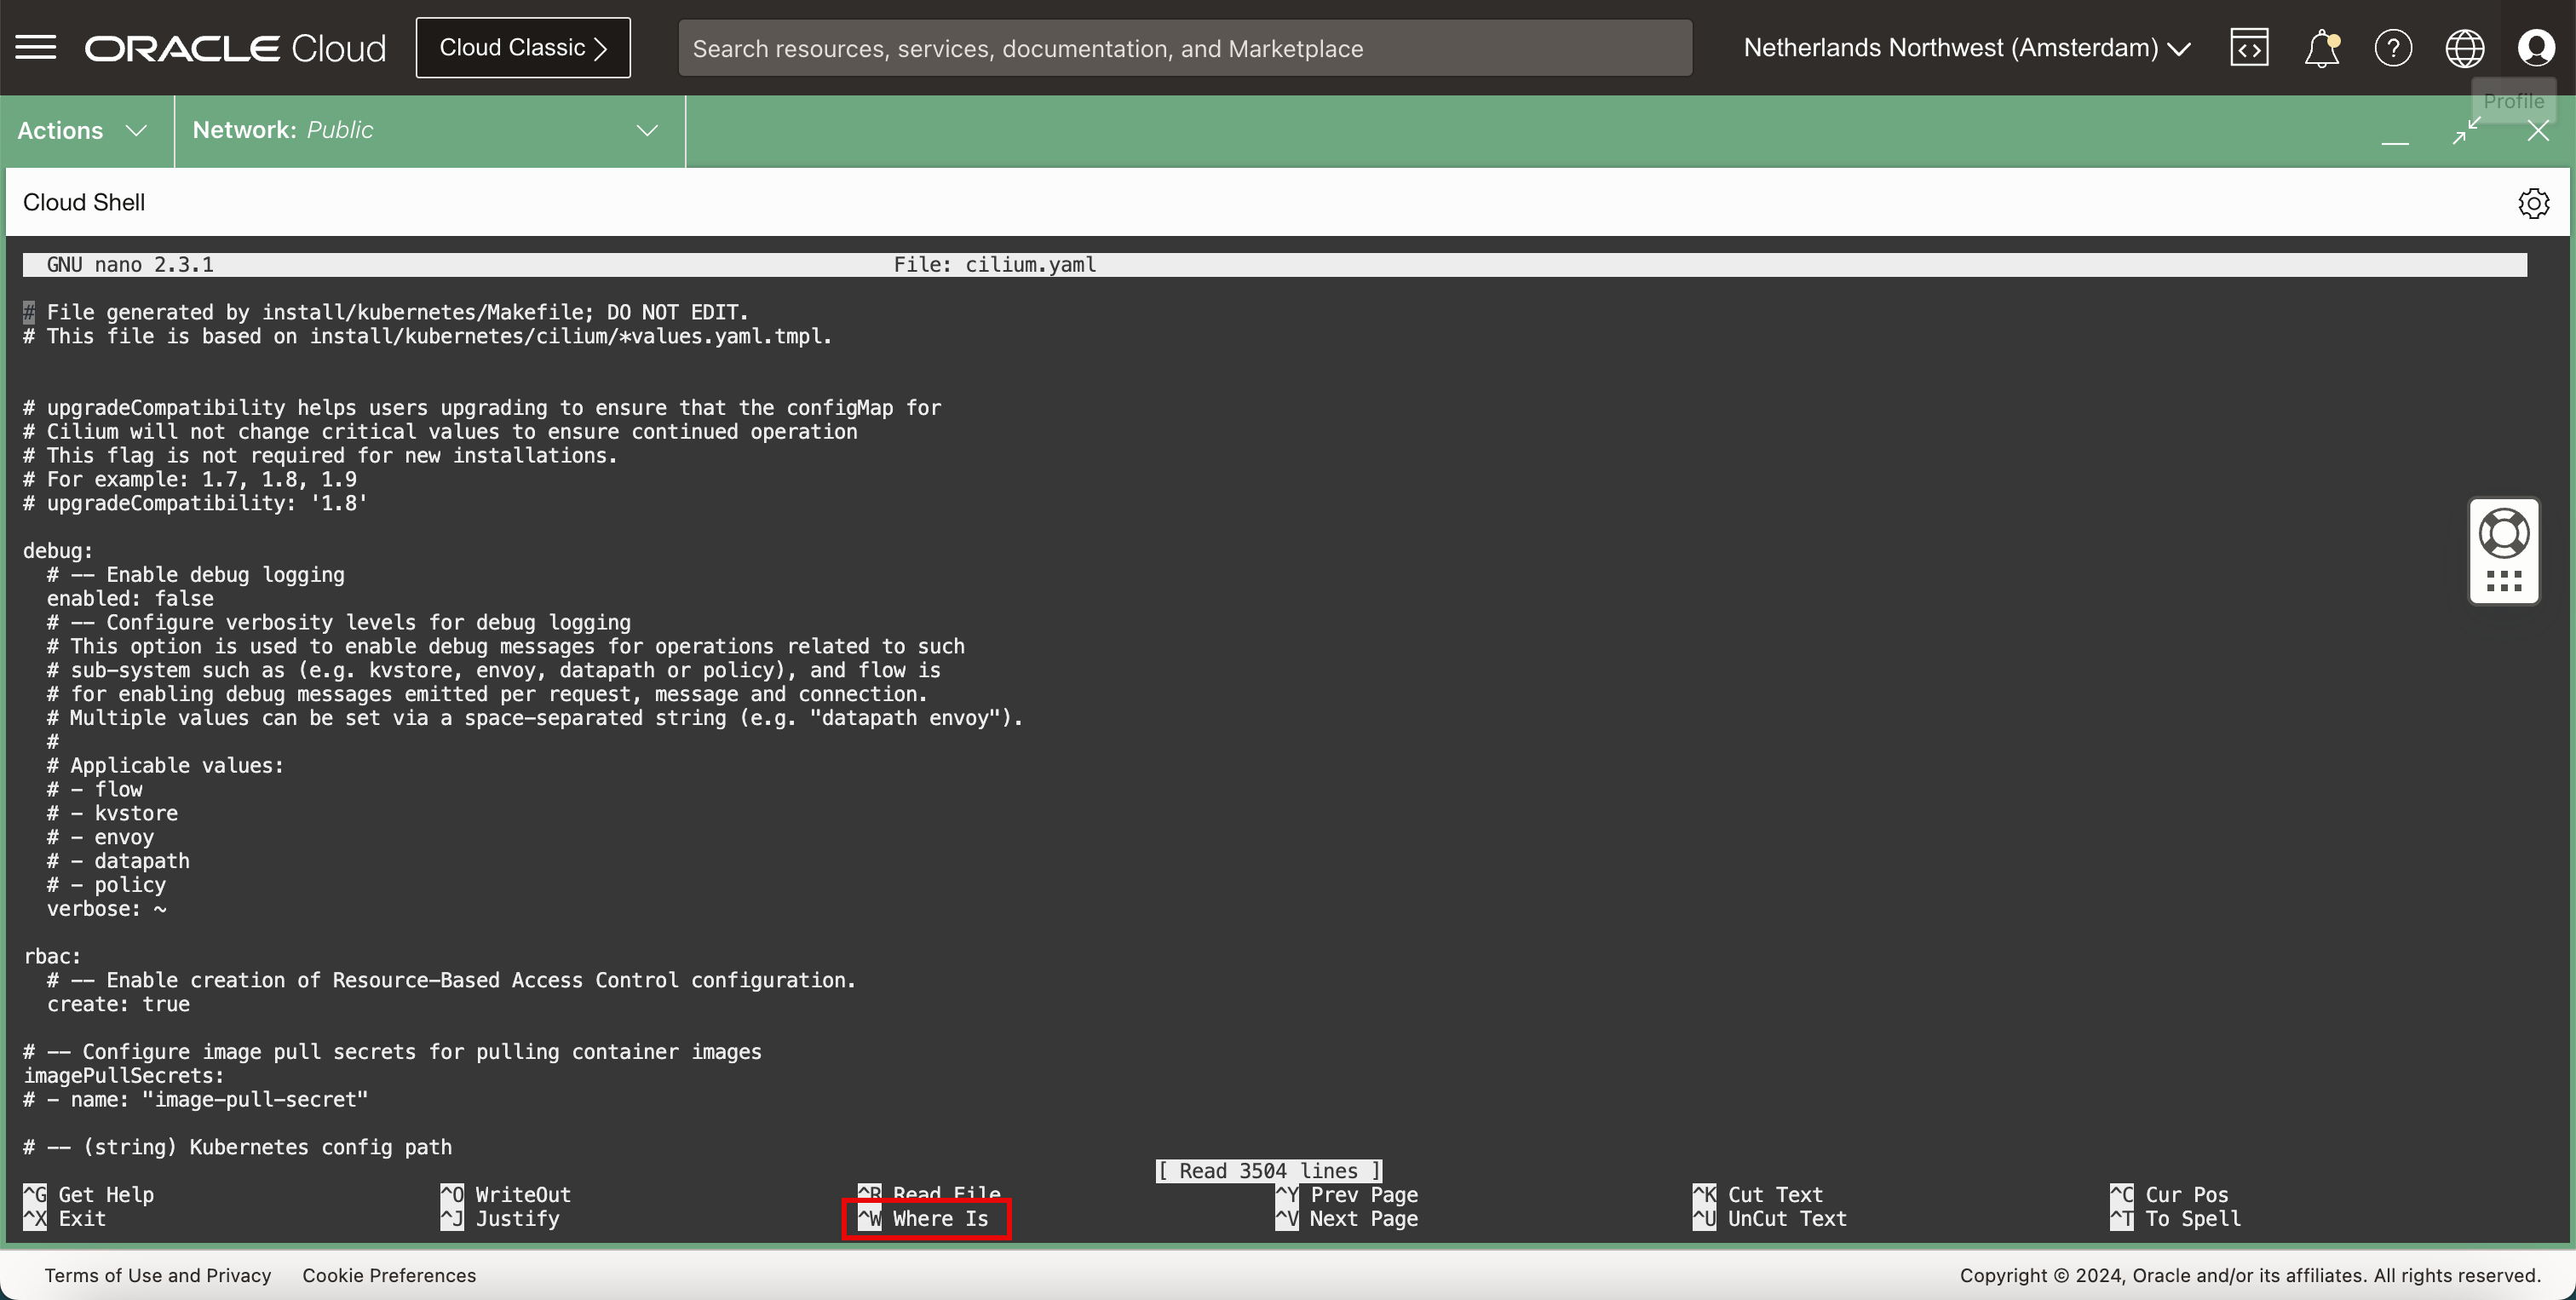
- 컨테이너 런타임 섹션을 찾습니다.
- integration 유형을 변경합니다.
- 허블에 대한 TLS 구성 섹션에서 다음을 수행합니다.
- TLS를 사용 안함으로 설정합니다.
- relay 섹션
- 릴레이를 사용으로 설정합니다.
- *ui 섹션에서
- UI를 사용으로 설정합니다.
- ipam 섹션에서
- 모드를 kubernetes로 설정합니다.
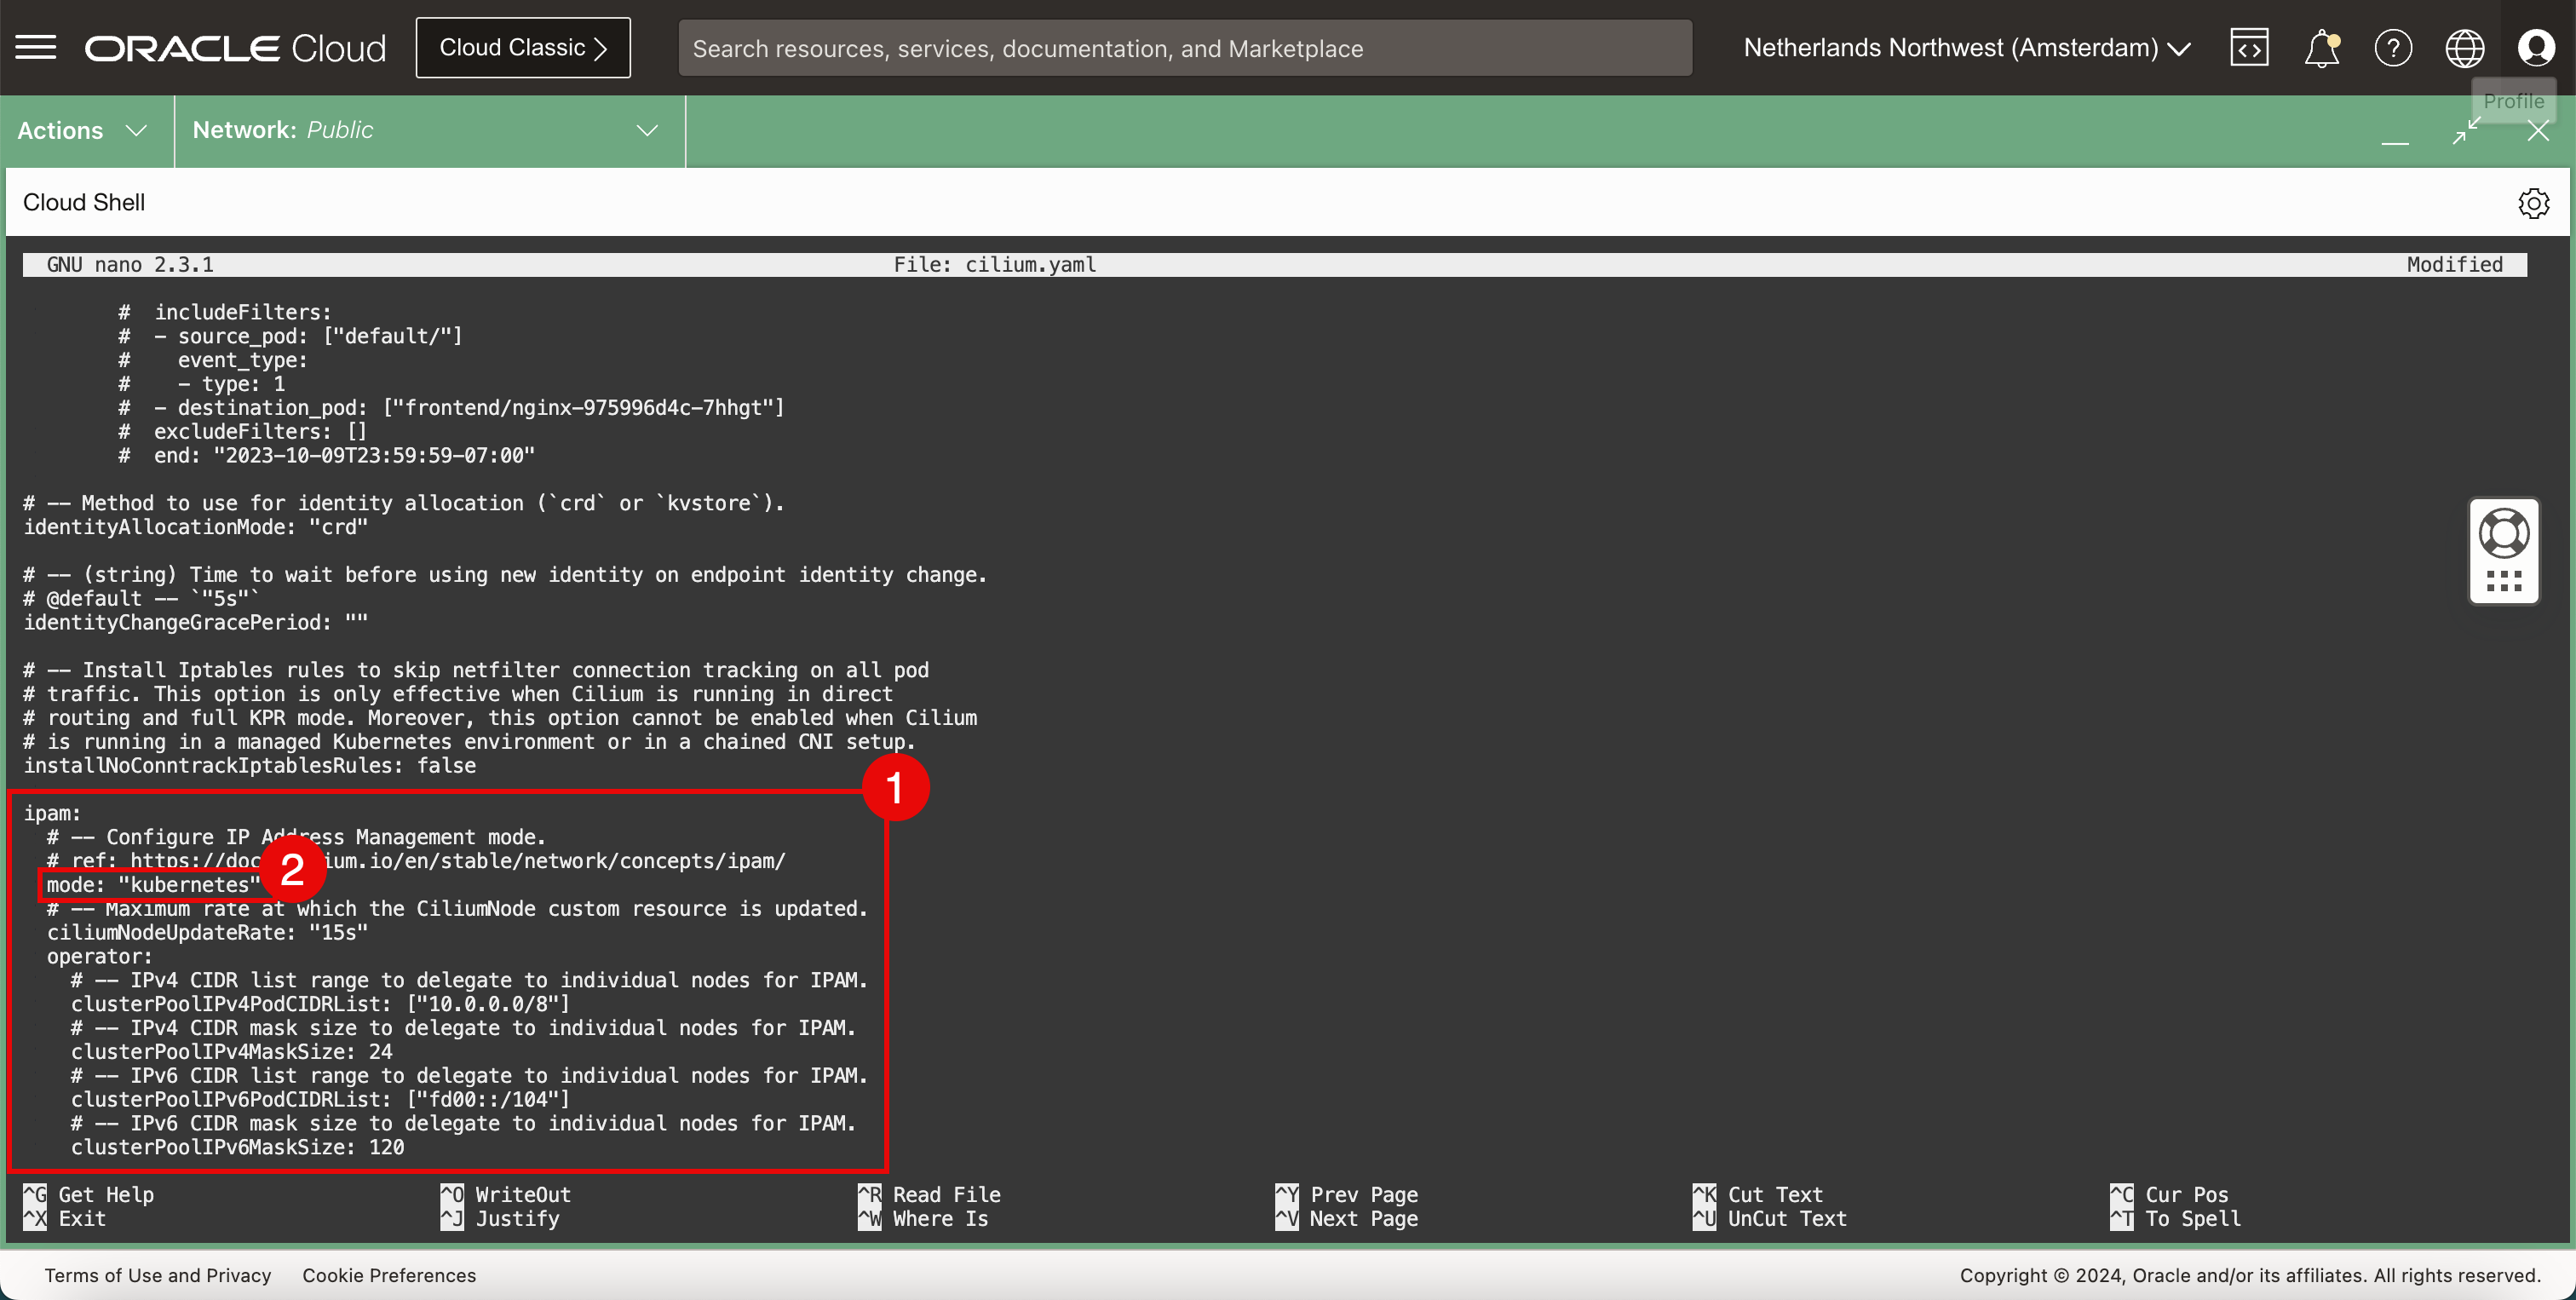
- clustermesh 섹션에서
- useAPIServer를
true로 설정합니다. CTRL + X바로가기를 사용하여 나노 편집기를 종료합니다.
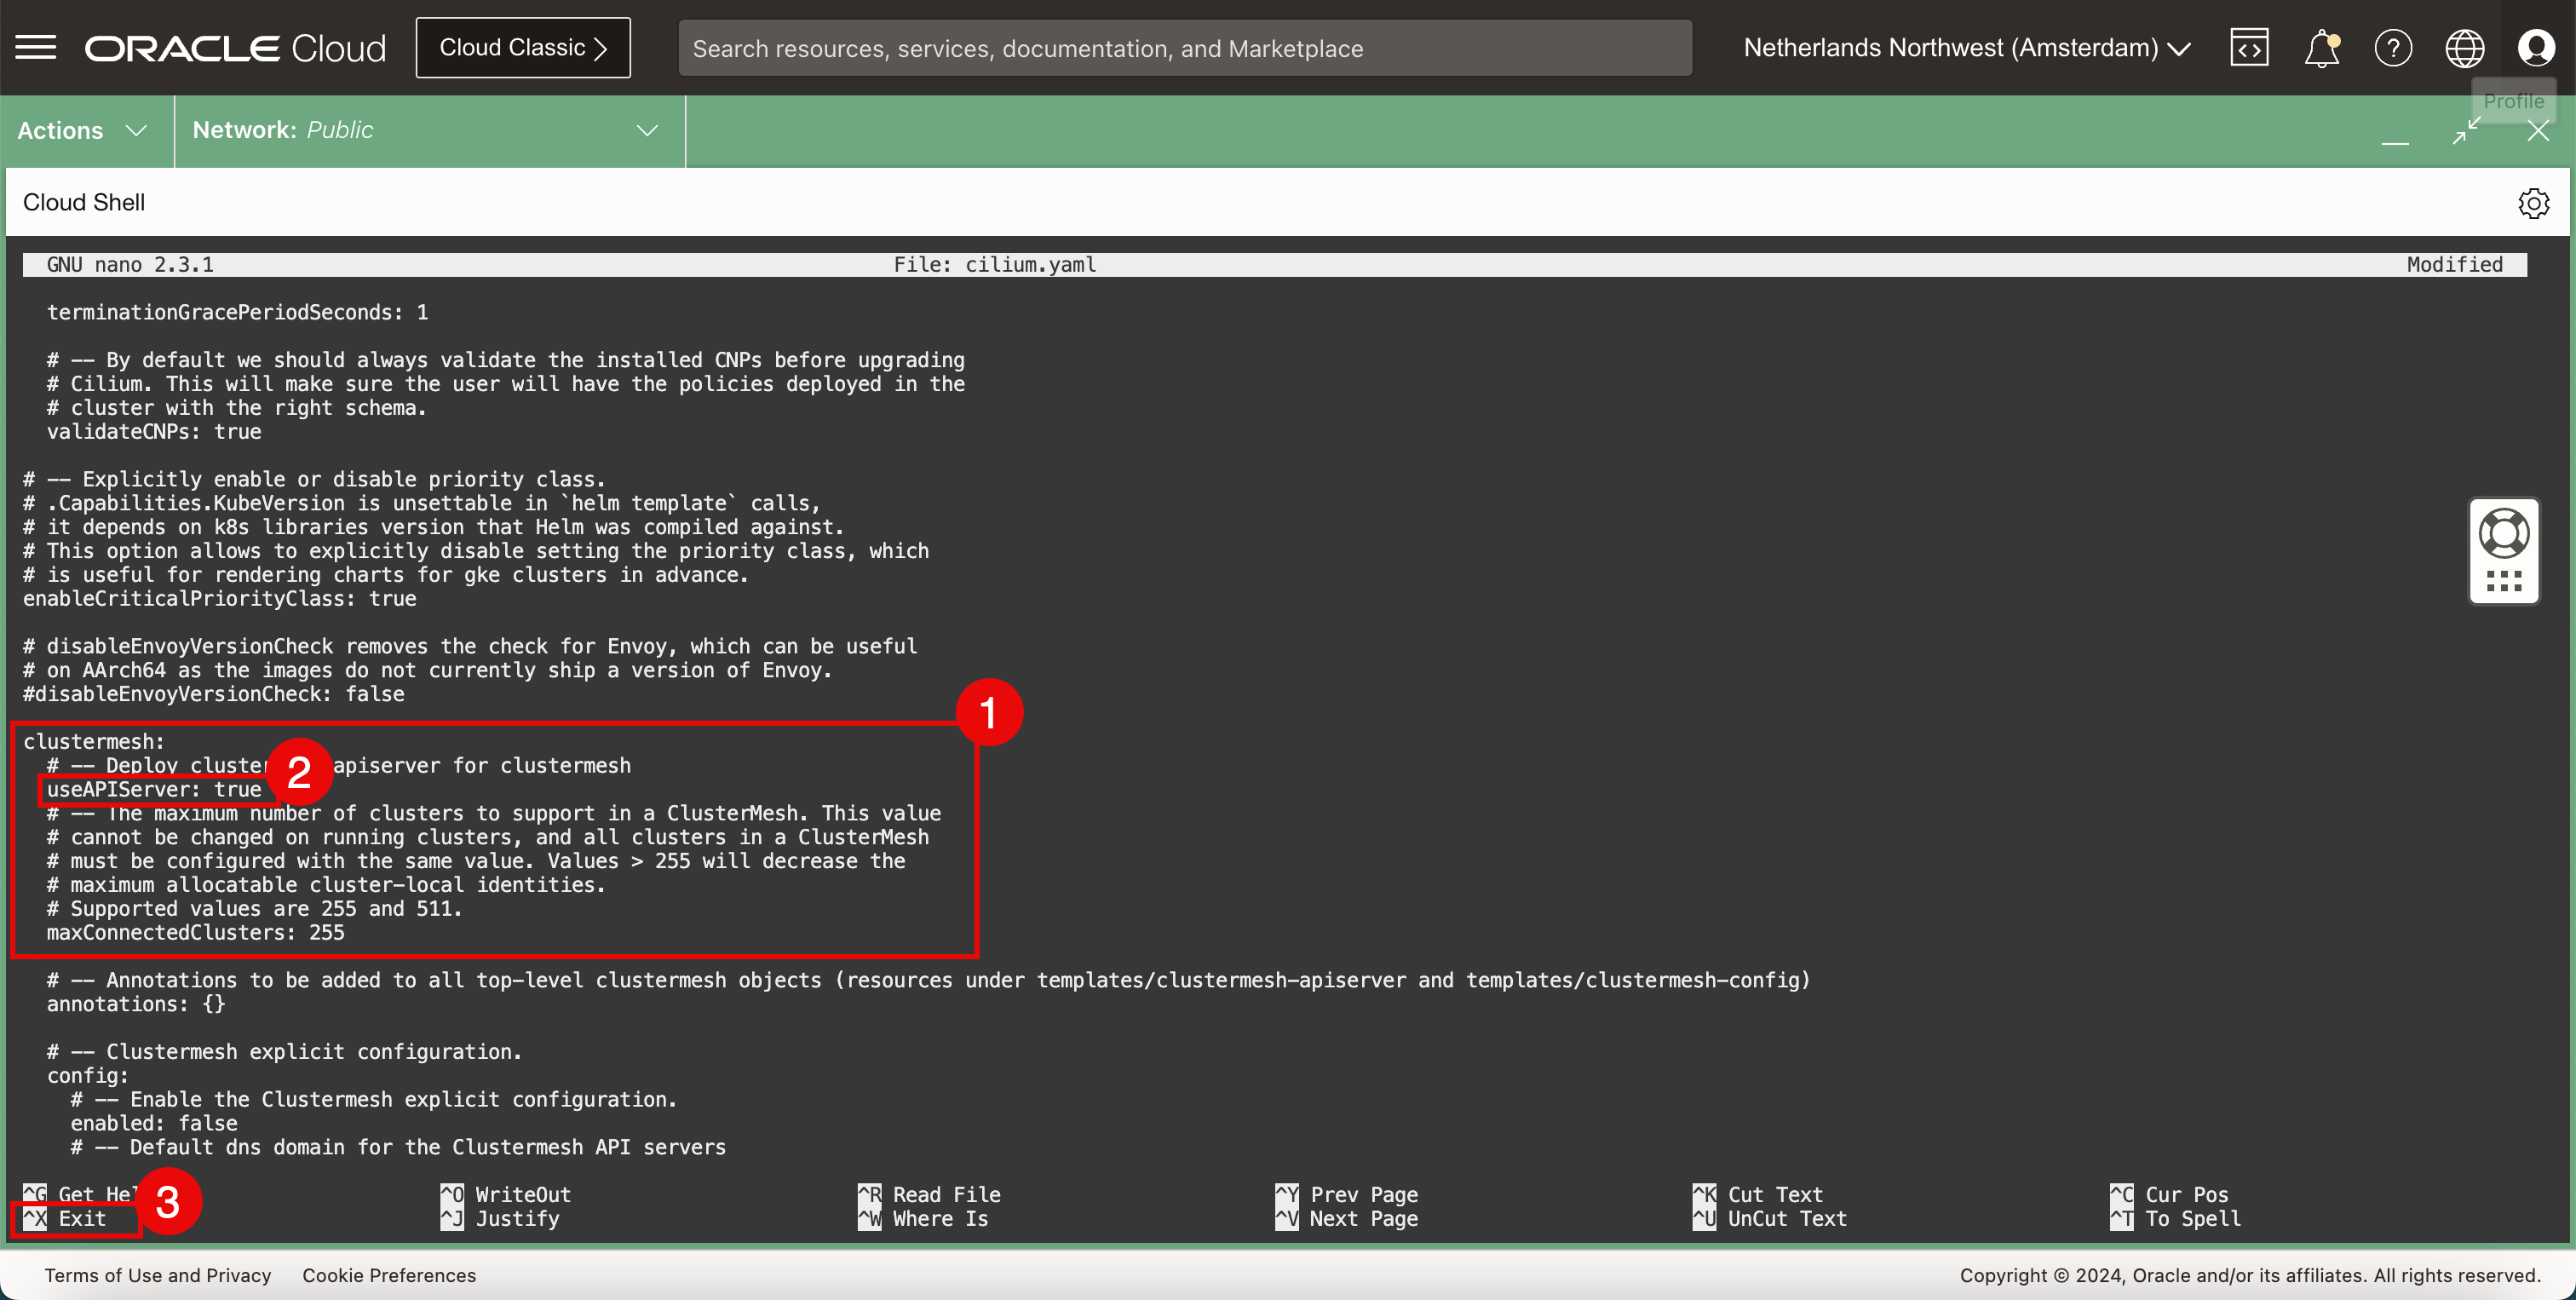
-
Y(yes)를 입력하여YAML파일을 저장합니다.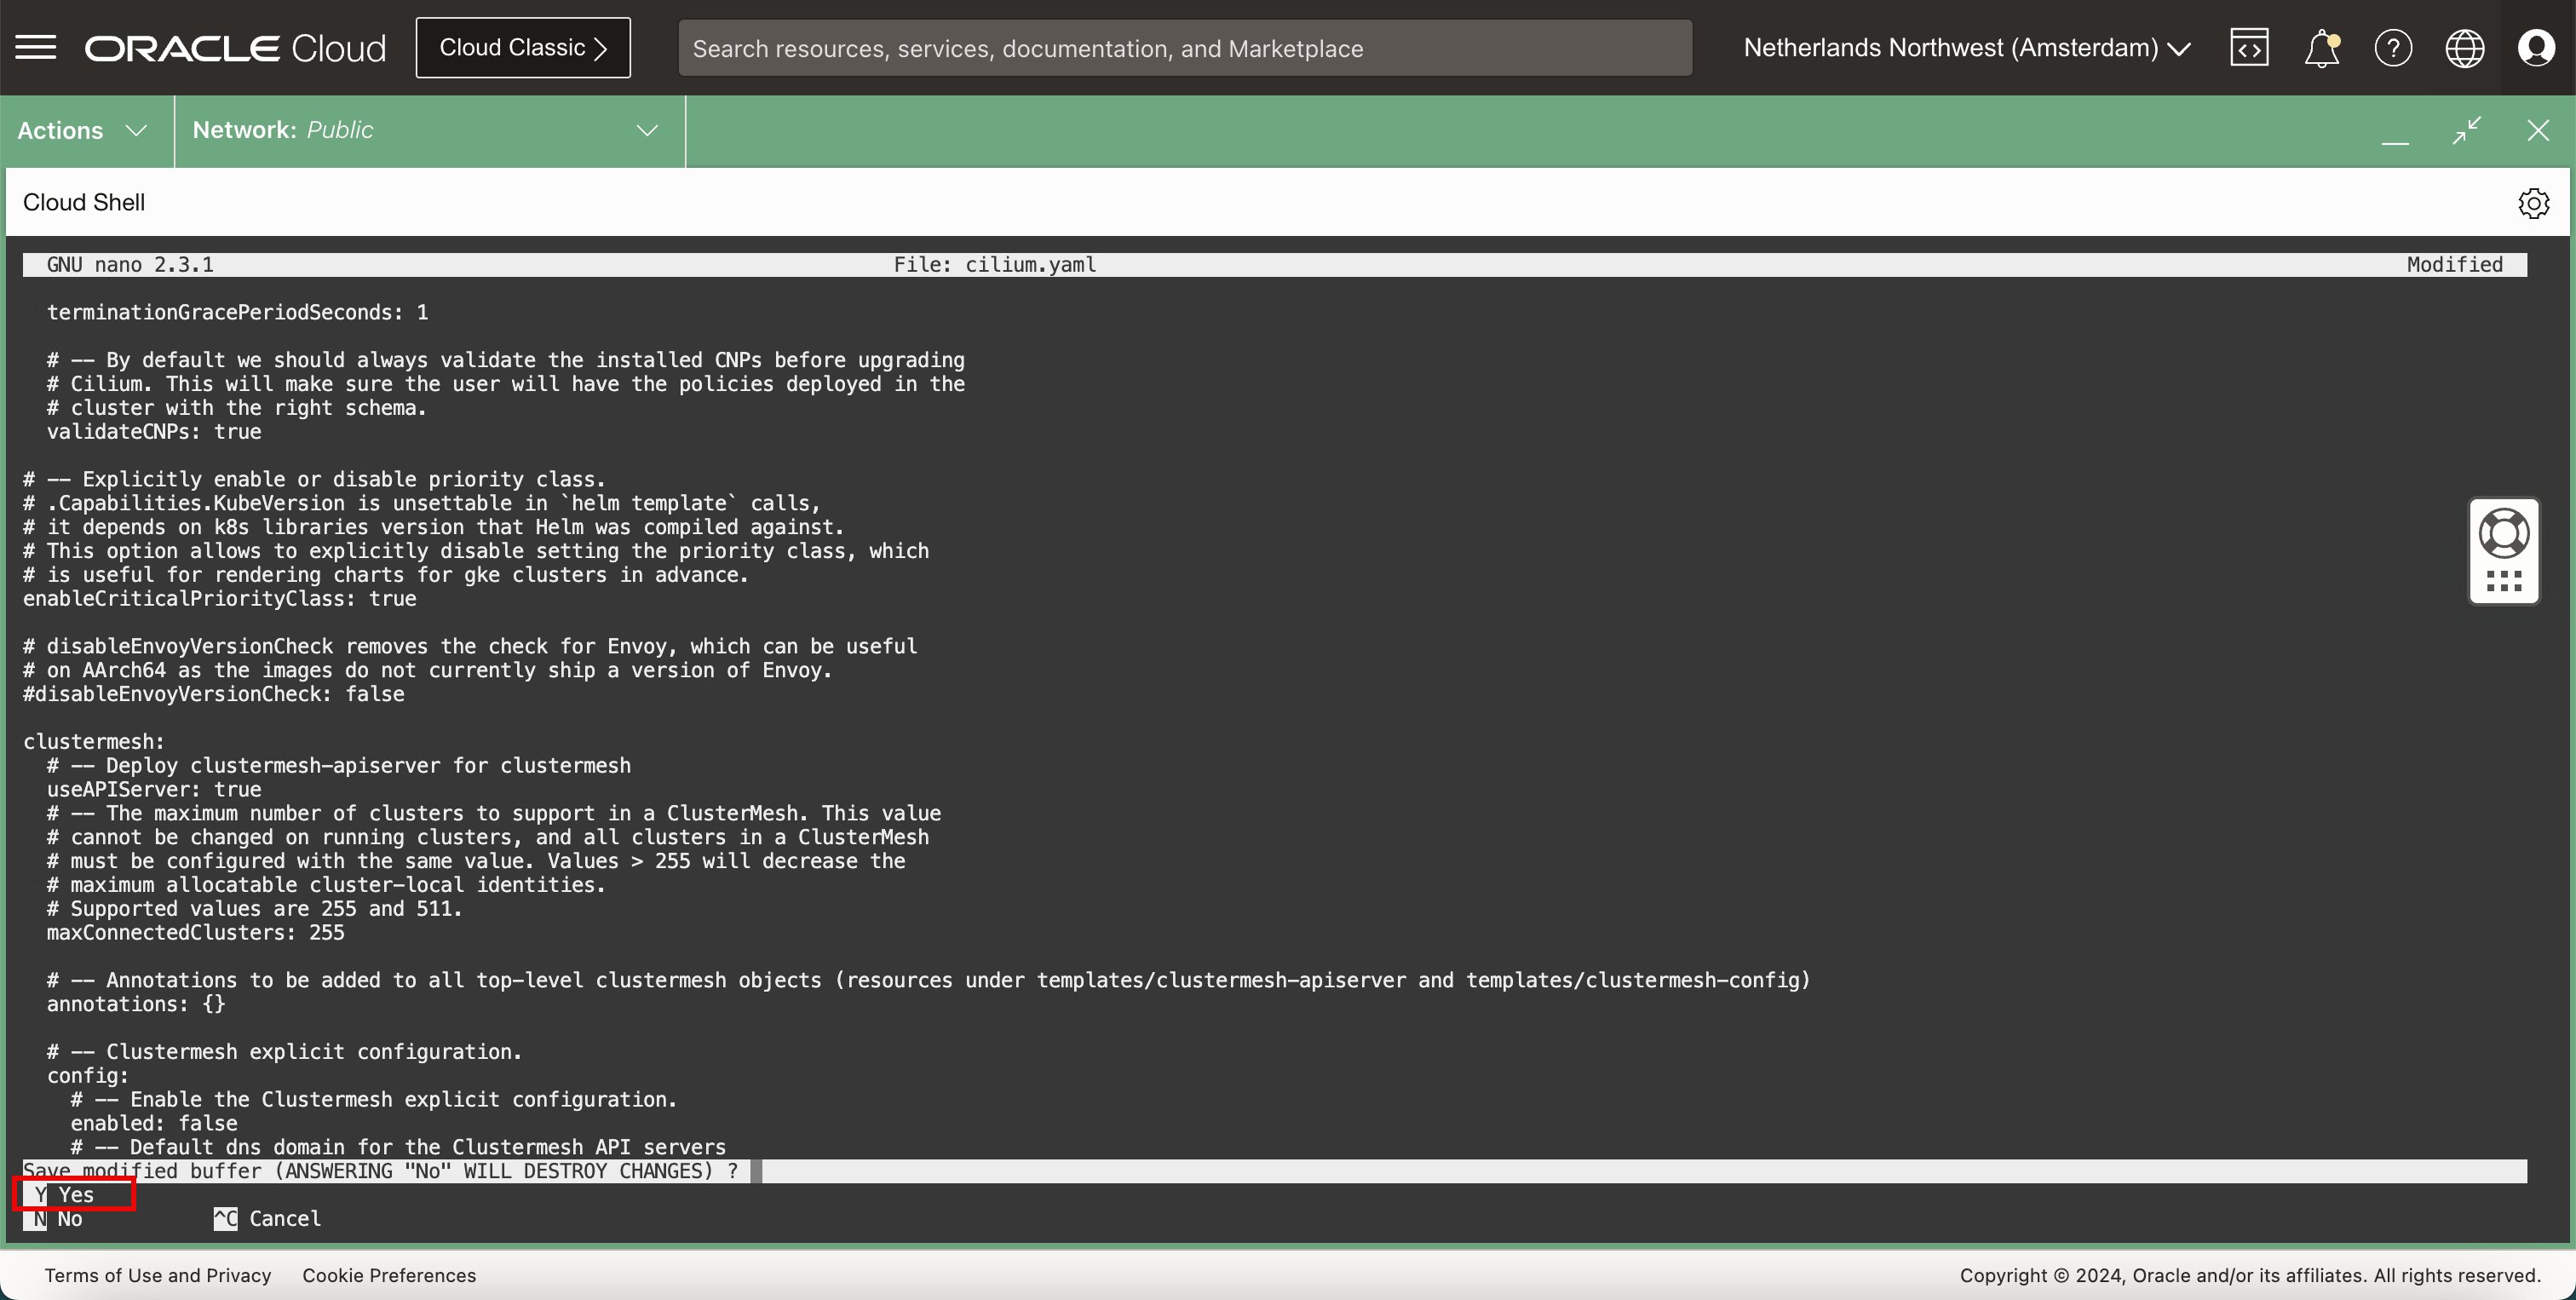
-
YAML파일 이름을 기본값으로 유지합니다.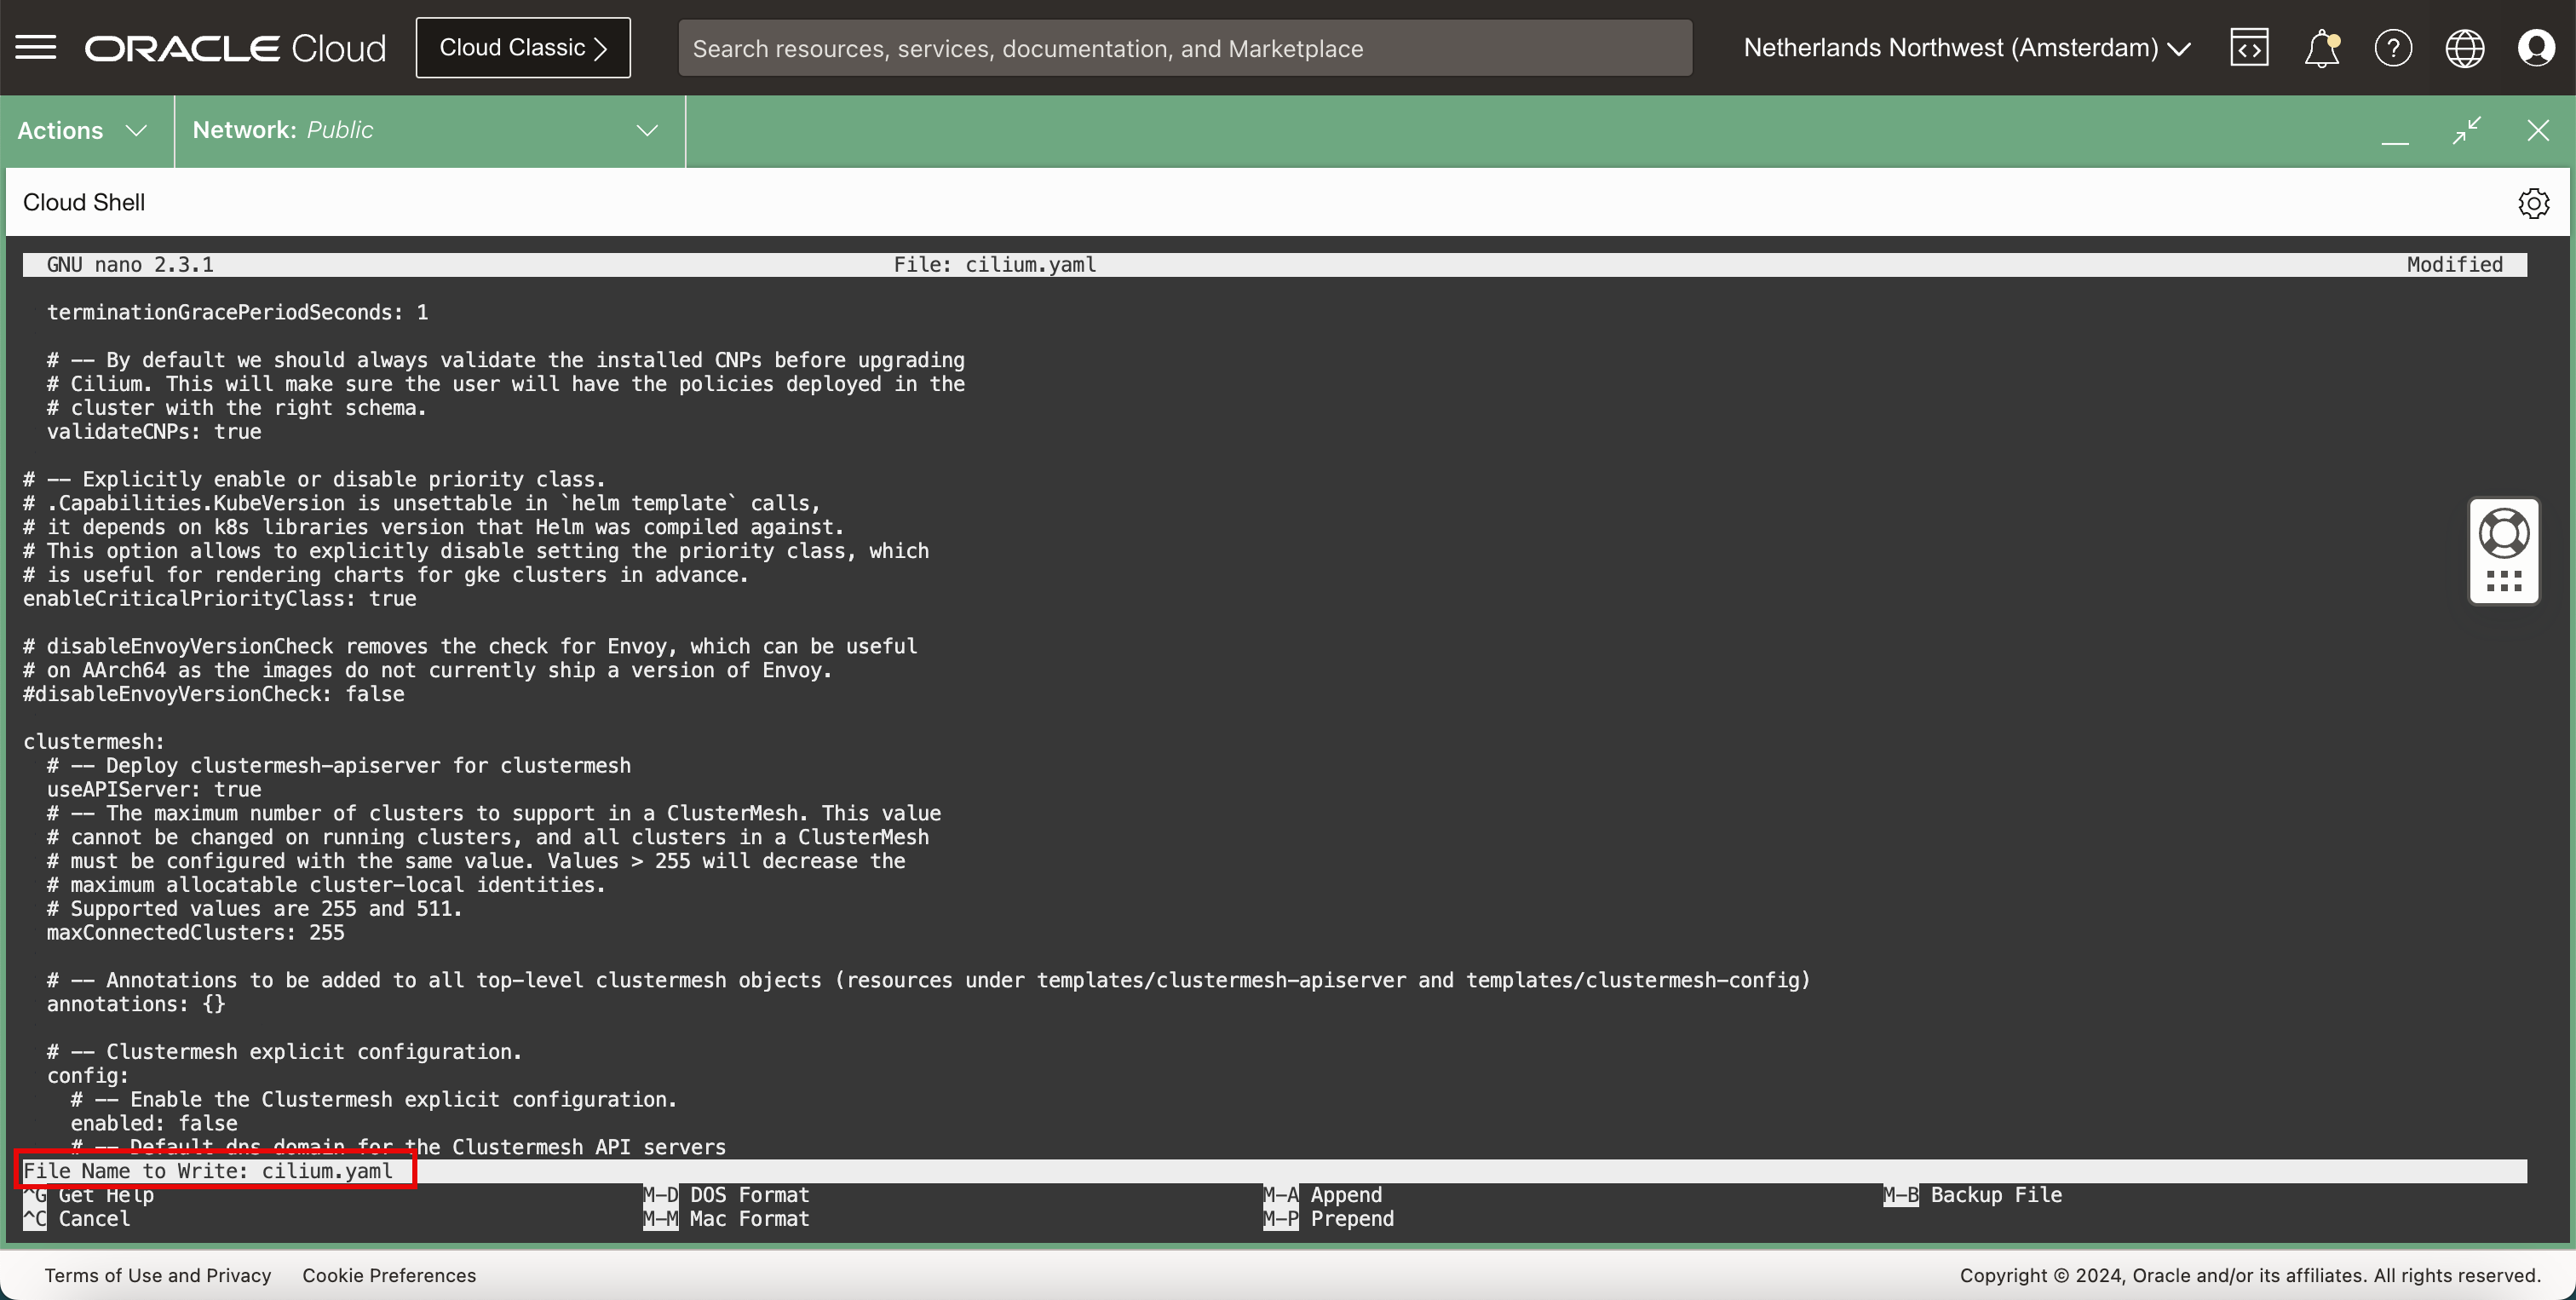
-
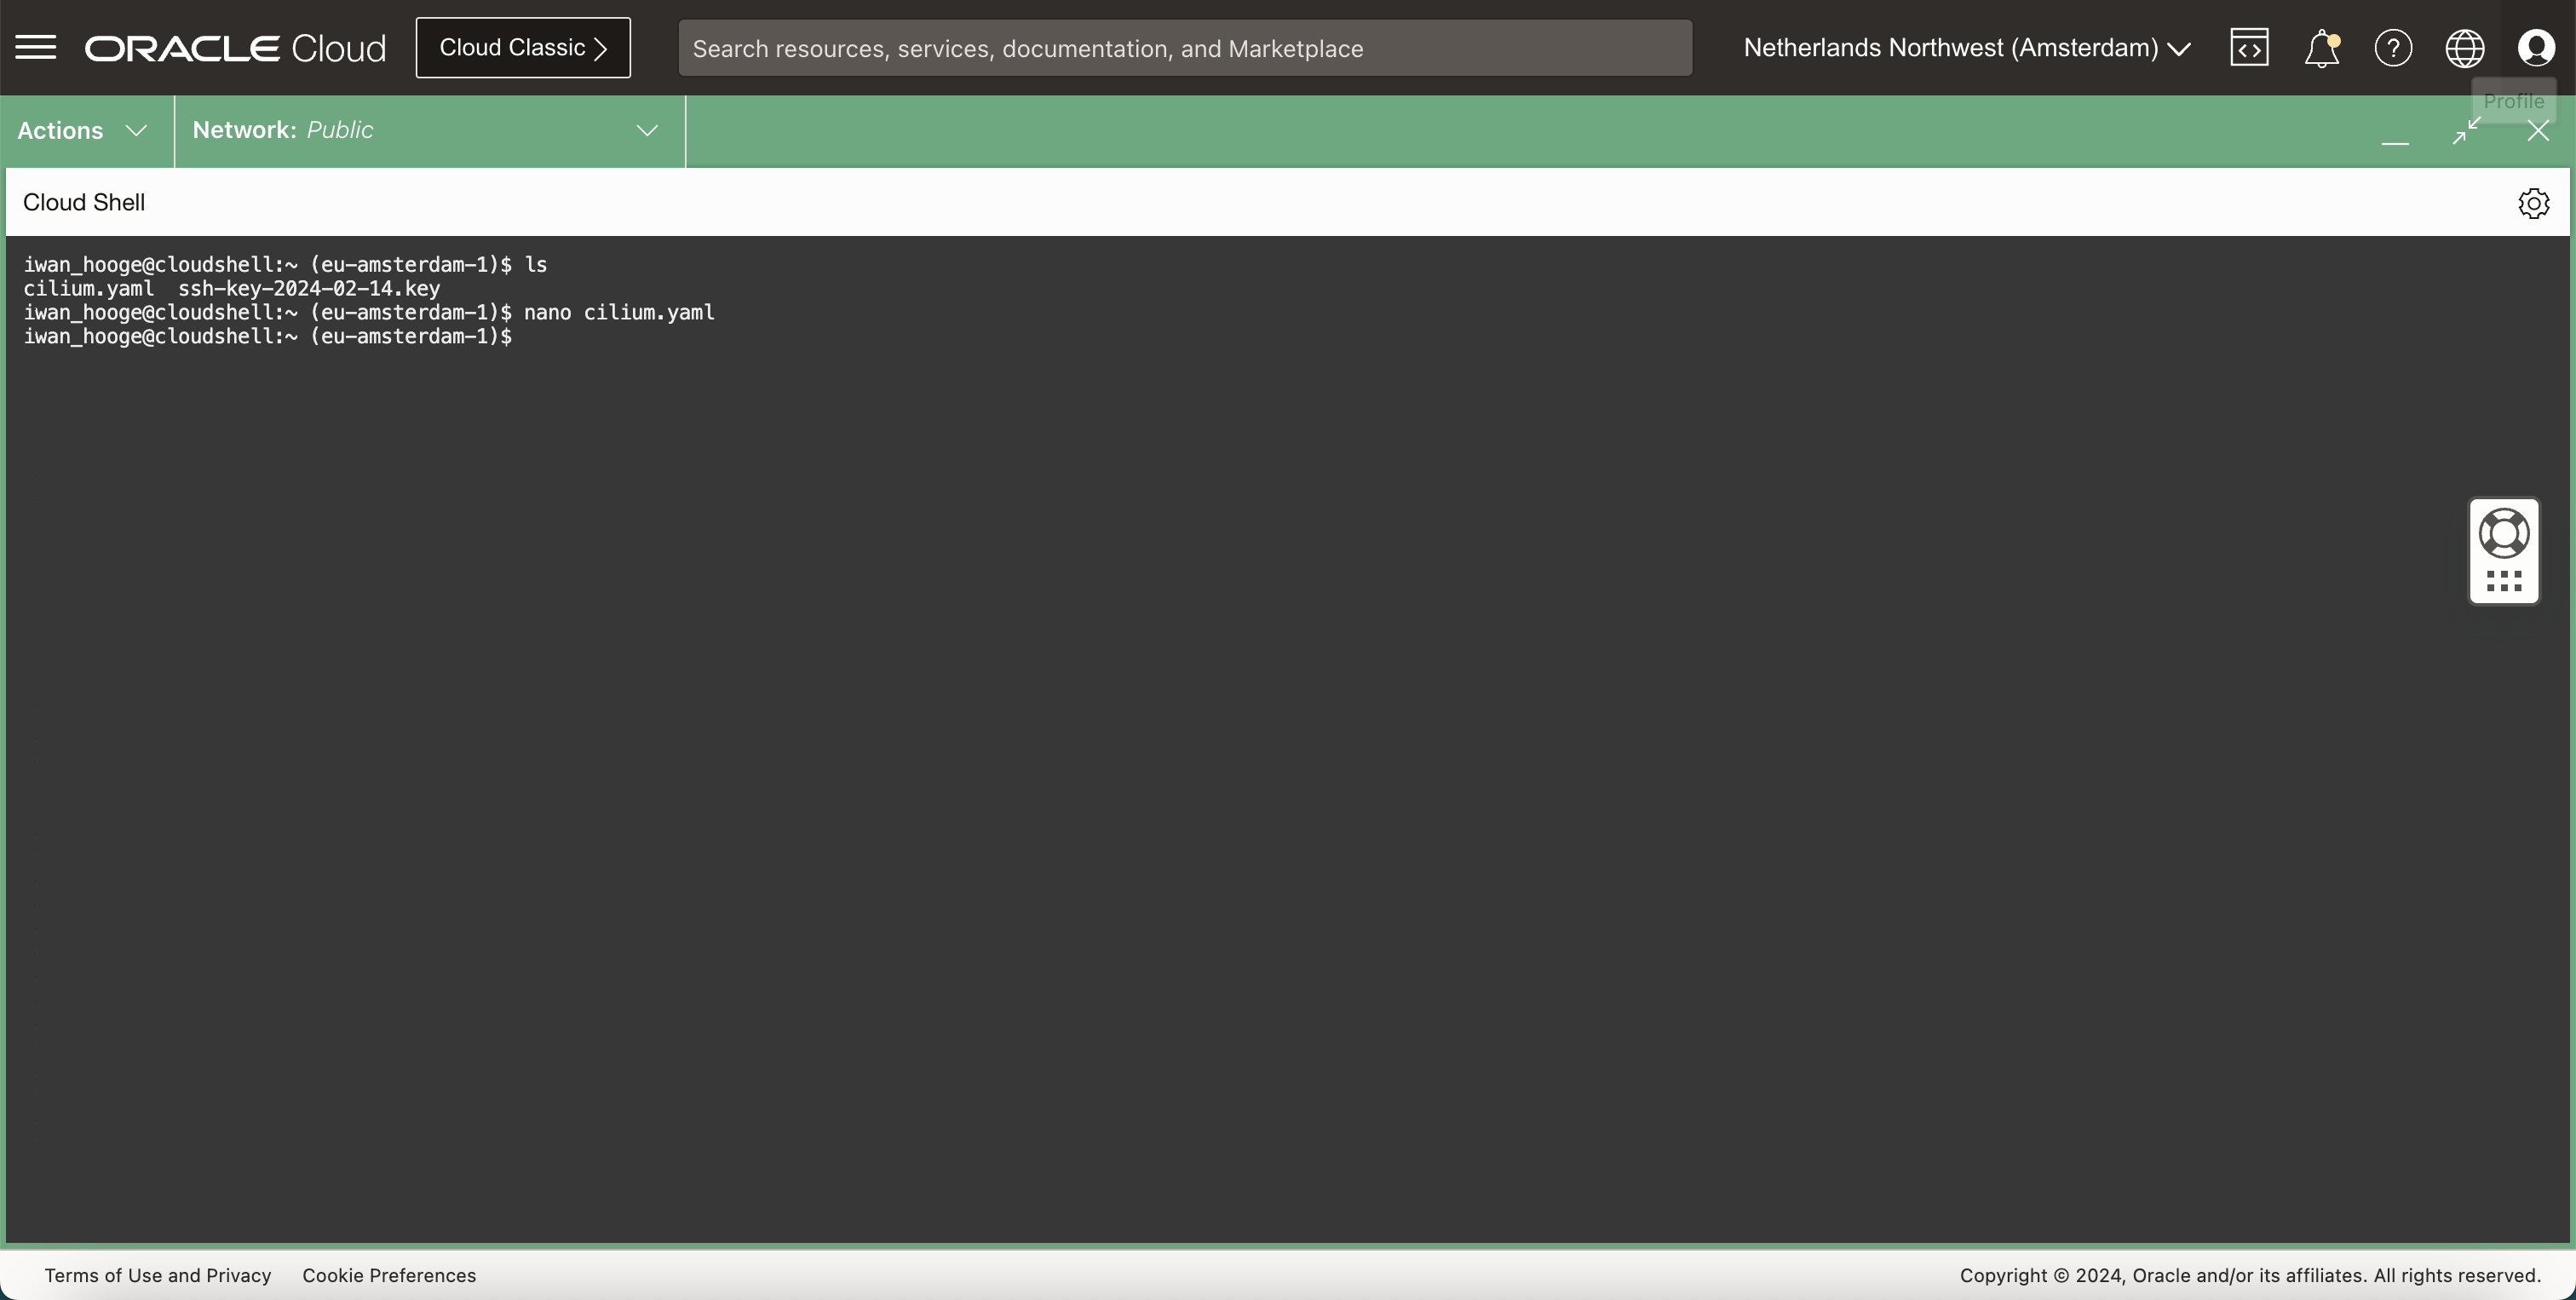
파일이 저장되면 터미널로 돌아갑니다.
-
Cilium을 설치합니다.
-
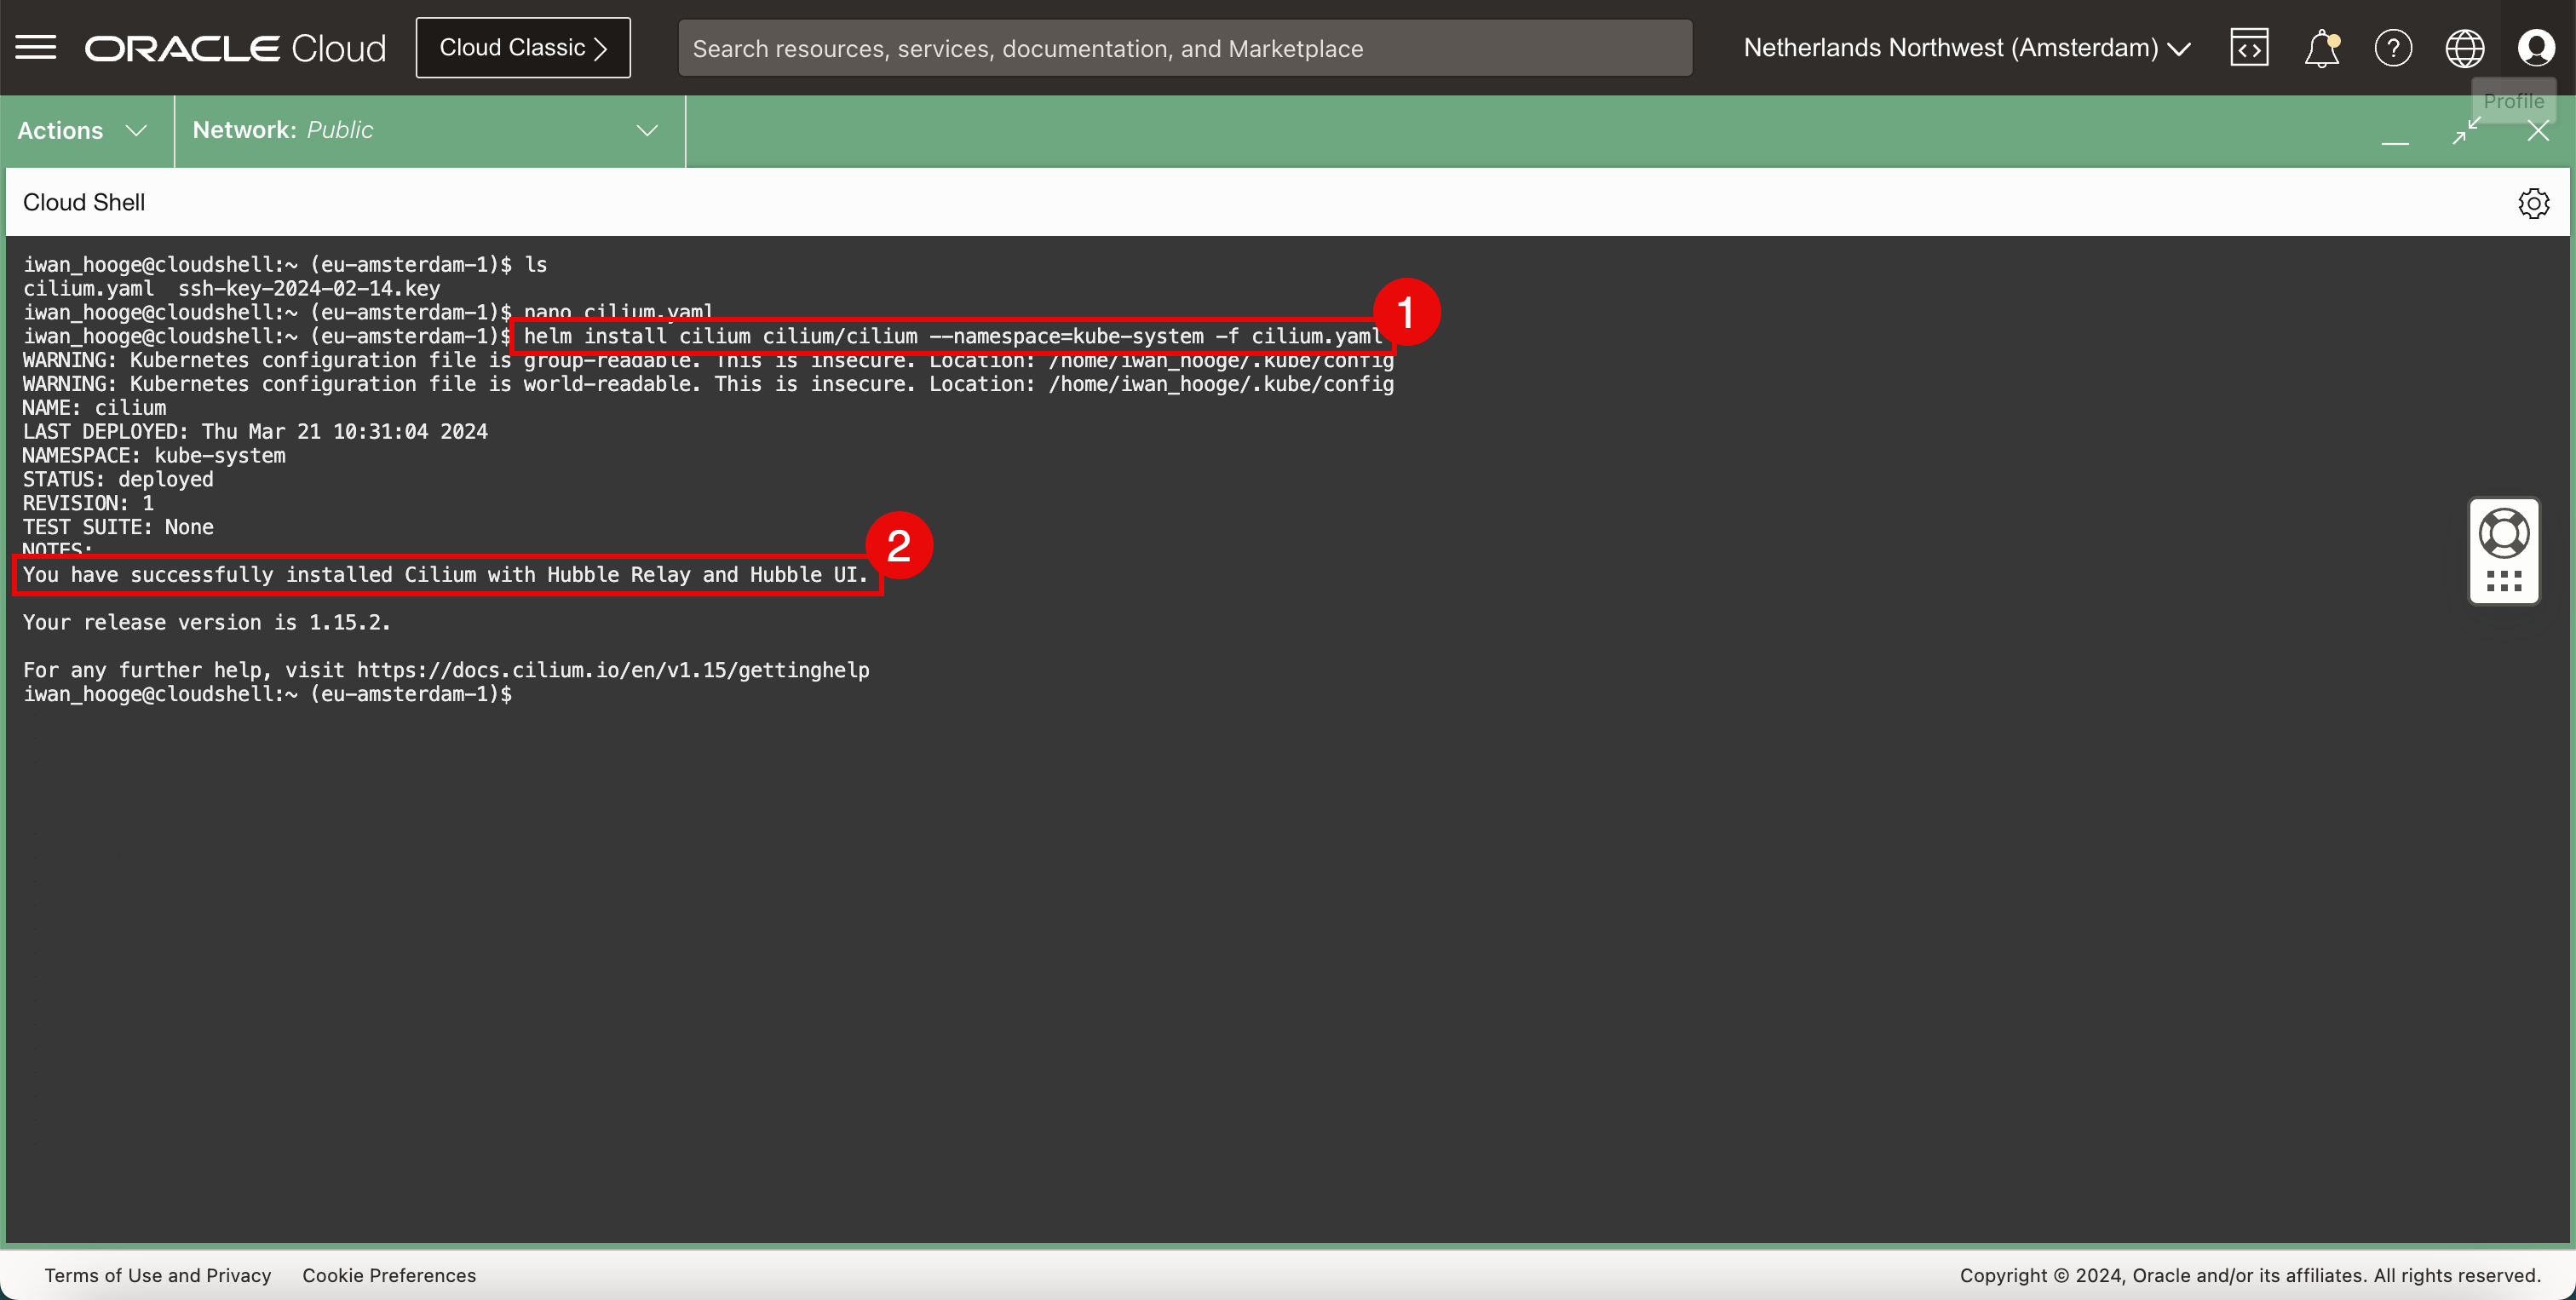
다음 명령을 실행하여 Cilium을 설치합니다.
iwan_hooge@cloudshell:~ (eu-amsterdam-1)$ helm install cilium cilium/cilium --namespace=kube-system -f cilium.yaml WARNING: Kubernetes configuration file is group-readable. This is insecure. Location: /home/iwan_hooge/.kube/config WARNING: Kubernetes configuration file is world-readable. This is insecure. Location: /home/iwan_hooge/.kube/config NAME: cilium LAST DEPLOYED: Thu Mar 21 10:31:04 2024 NAMESPACE: kube-system STATUS: deployed REVISION: 1 TEST SUITE: None NOTES: You have successfully installed Cilium with Hubble Relay and Hubble UI. Your release version is 1.15.2. For any further help, visit https://docs.cilium.io/en/v1.15/gettinghelp iwan_hooge@cloudshell:~ (eu-amsterdam-1)$ -
Cilium이 성공적으로 설치되었다는 메시지를 확인합니다.
-
-
Cilium 명령을 실행하려면 다음 명령을 사용하여 Cilium CLI(명령줄 인터페이스)를 다운로드합니다.
iwan_hooge@cloudshell:~ (eu-amsterdam-1)$ CILIUM_CLI_VERSION=$(curl -s https://raw.githubusercontent.com/cilium/cilium-cli/master/stable.txt)

iwan_hooge@cloudshell:~ (eu-amsterdam-1)$ CLI_ARCH=amd64

iwan_hooge@cloudshell:~ (eu-amsterdam-1)$ if [ "$(uname -m)" = "aarch64" ]; then CLI_ARCH=arm64; fi

iwan_hooge@cloudshell:~ (eu-amsterdam-1)$ curl -L --fail --remote-name-all https://github.com/cilium/cilium-cli/releases/download/${CILIUM_CLI_VERSION}/cilium-linux-${CLI_ARCH}.tar.gz{,.sha256sum}
% Total    % Received % Xferd  Average Speed   Time    Time     Time  Current
                                Dload  Upload   Total   Spent    Left  Speed
0     0    0     0    0     0      0      0 --:--:-- --:--:-- --:--:--     0
100 37.5M  100 37.5M    0     0  28.7M      0  0:00:01  0:00:01 --:--:-- 53.3M
% Total    % Received % Xferd  Average Speed   Time    Time     Time  Current
                                Dload  Upload   Total   Spent    Left  Speed
0     0    0     0    0     0      0      0 --:--:-- --:--:-- --:--:--     0
100    92  100    92    0     0    128      0 --:--:-- --:--:-- --:--:--     0
iwan_hooge@cloudshell:~ (eu-amsterdam-1)$ sha256sum --check cilium-linux-${CLI_ARCH}.tar.gz.sha256sum
cilium-linux-arm64.tar.gz: OK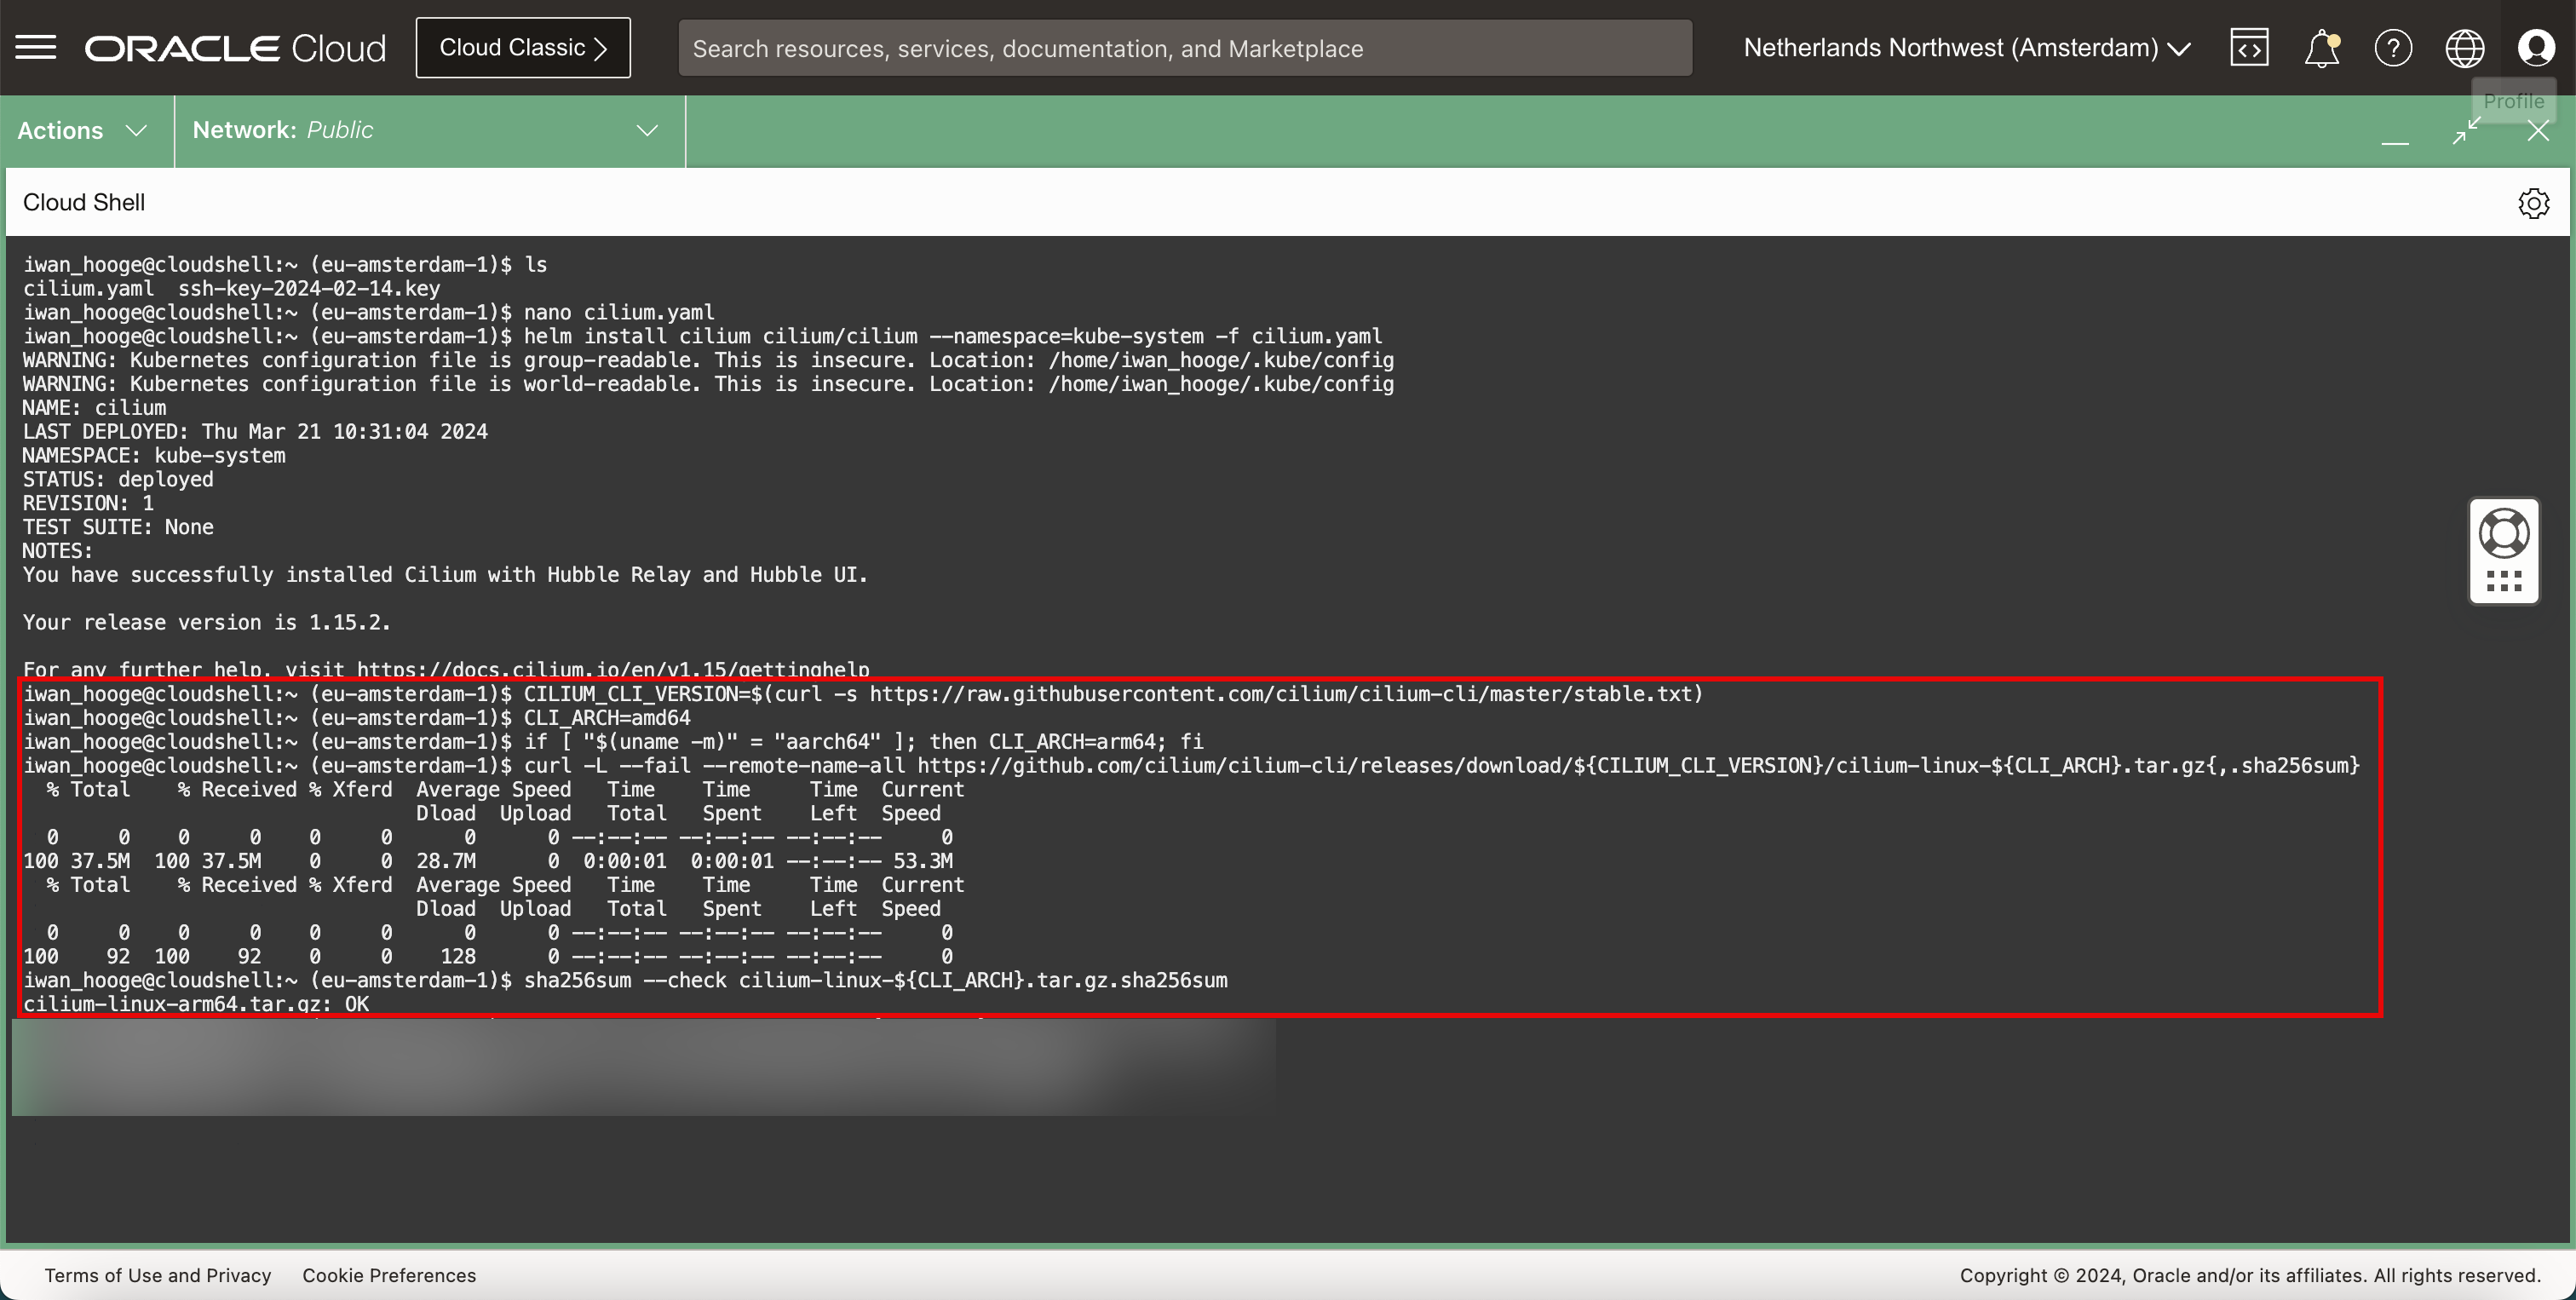
-
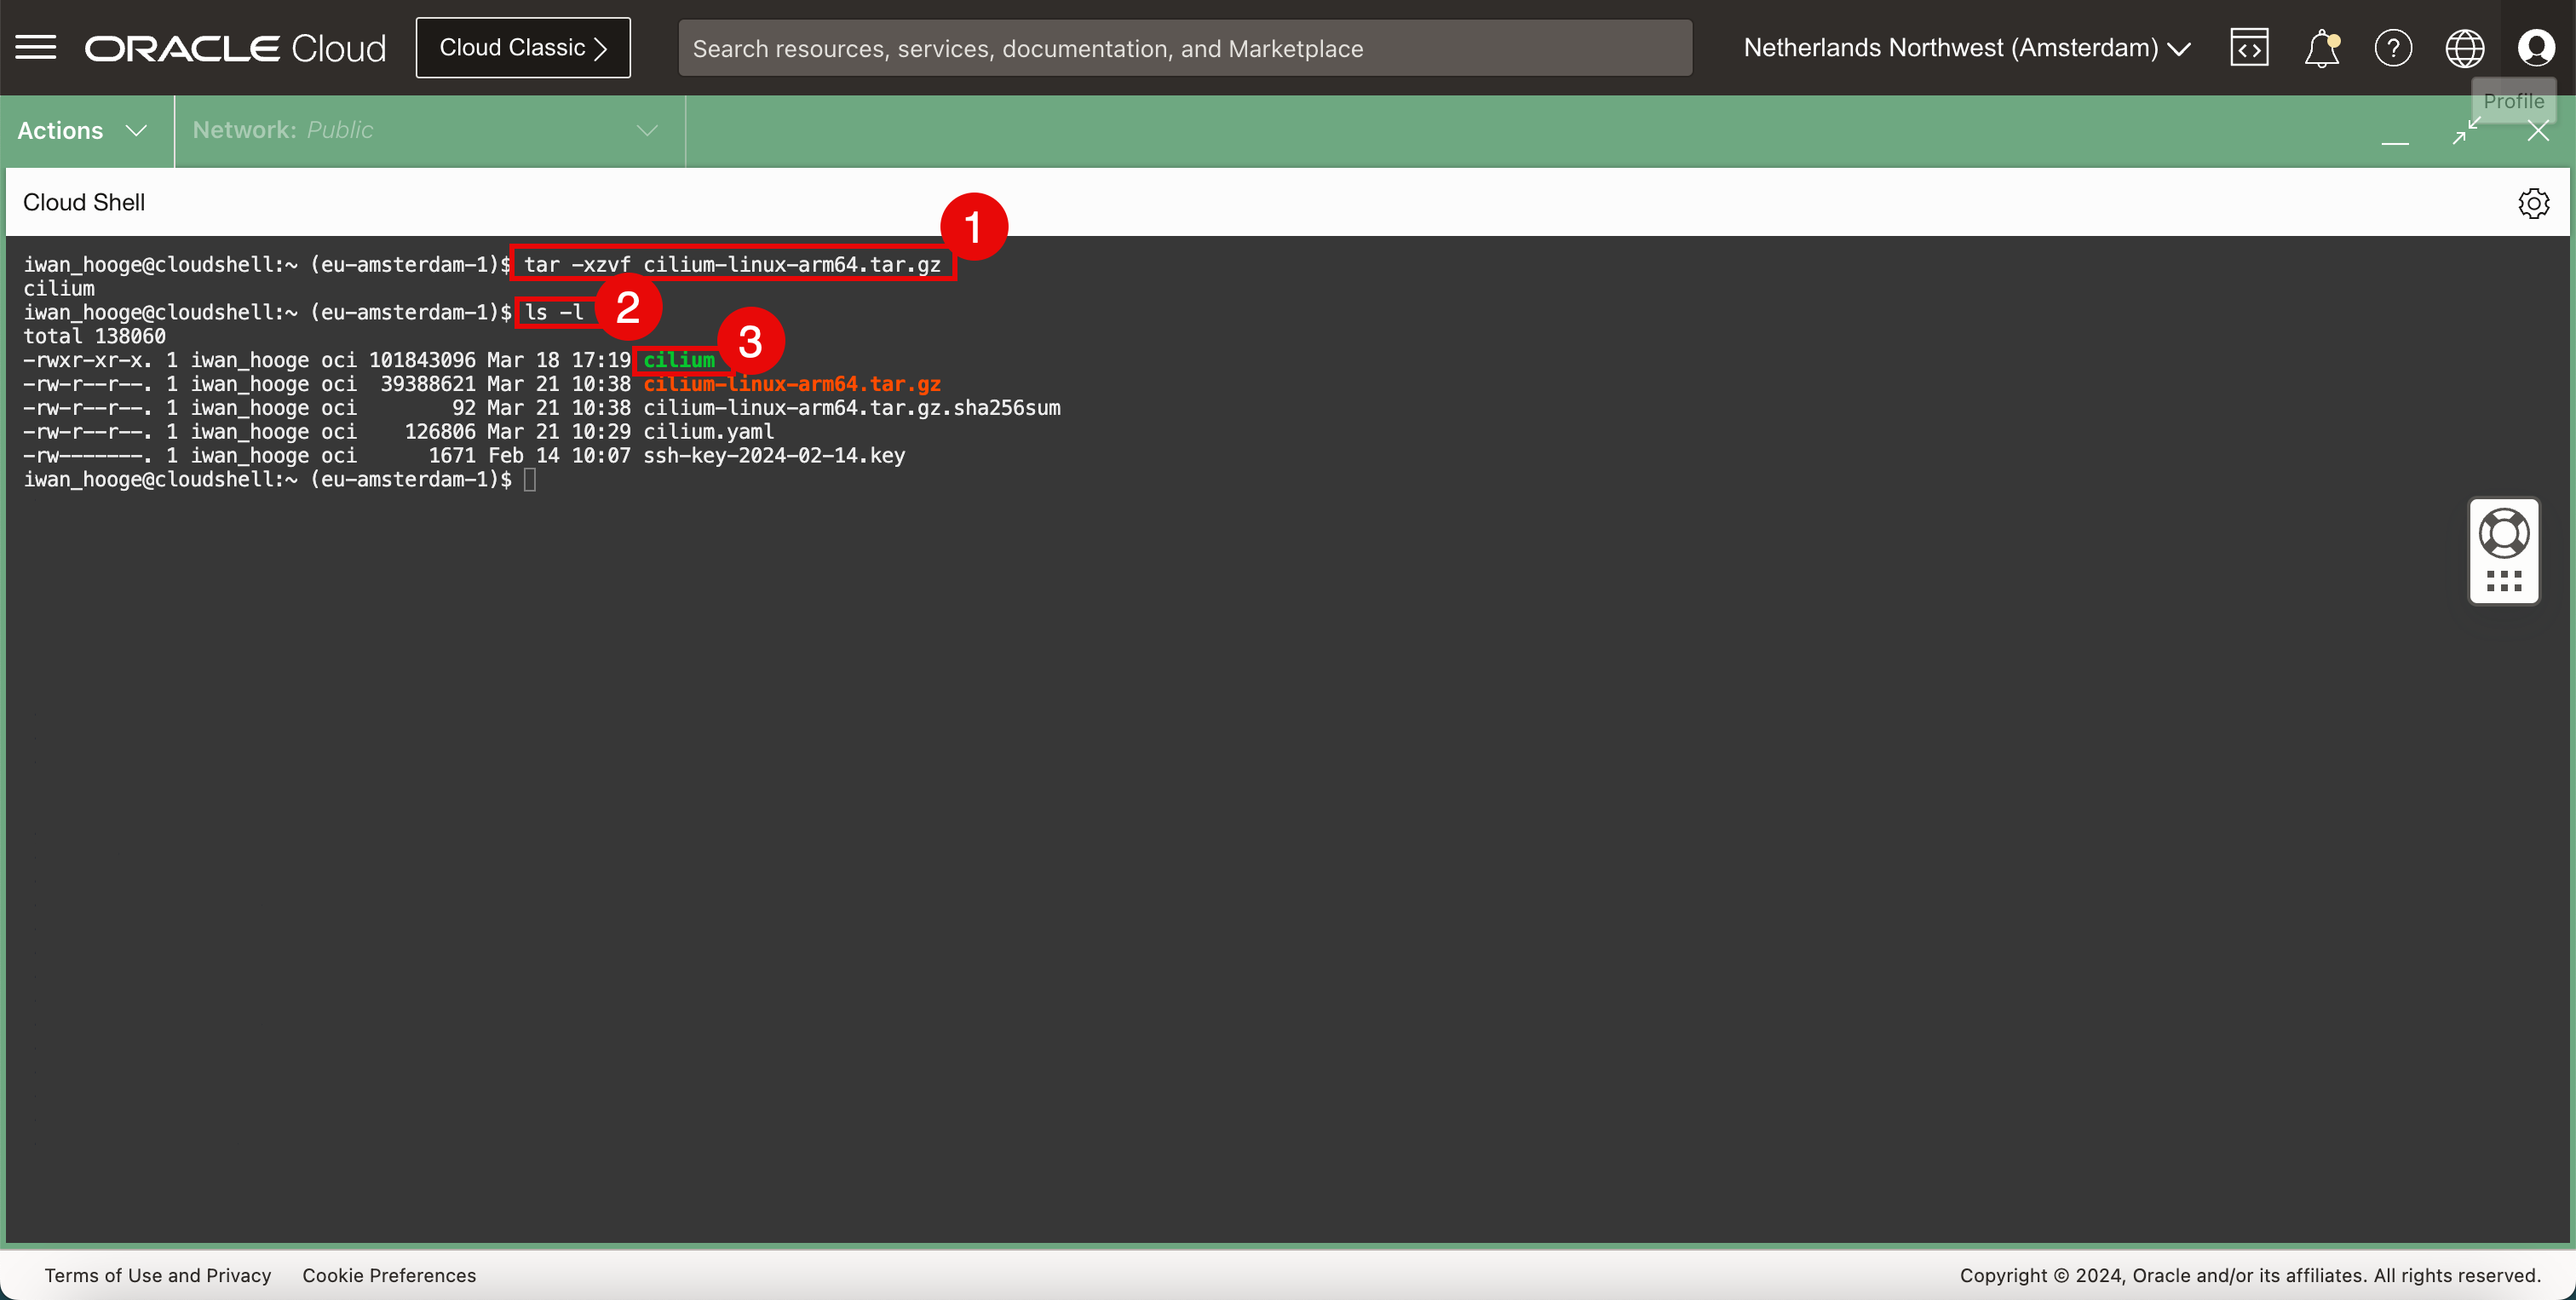
다음 명령을 실행하여 Cilium CLI 응용 프로그램의 압축을 풉니다.
iwan_hooge@cloudshell:~ (eu-amsterdam-1)$ sudo tar xzvf cilium-linux-${CLI_ARCH}.tar.gz -
Cilium CLI 파일이 있는지 확인하려면 다음 명령을 실행합니다.
iwan_hooge@cloudshell:~ (eu-amsterdam-1)$ ls -l total 138060 -rw-r--r--. 1 iwan_hooge oci 101843096 Mar 18 17:19 cilium -rw-r--r--. 1 iwan_hooge oci 39388621 Mar 21 10:38 cilium-linux-arm64.tar.gz -rw-r--r--. 1 iwan_hooge oci 92 Mar 21 10:38 cilium-linux-arm64.tar.gz.sha256sum -rw-r--r--. 1 iwan_hooge oci 126806 Mar 21 10:29 cilium.yaml -rw-------. 1 iwan_hooge oci 1671 Feb 14 10:07 ssh-key-2024-02-14.key iwan_hooge@cloudshell:~ (eu-amsterdam-1)$ -
성공적으로 압축한 후 리스트에
cillium라는 파일이 있는지 확인합니다.
-
-
다음 명령을 실행하여 다운로드한 압축 파일을 제거합니다.
iwan_hooge@cloudshell:~ (eu-amsterdam-1)$ rm cilium-linux-${CLI_ARCH}.tar.gz{,.sha256sum} -
Cilium CLI를 사용합니다.
-
다음 명령을 실행하여 Cilium CLI 파일을 실행 가능한 상태로 만듭니다.
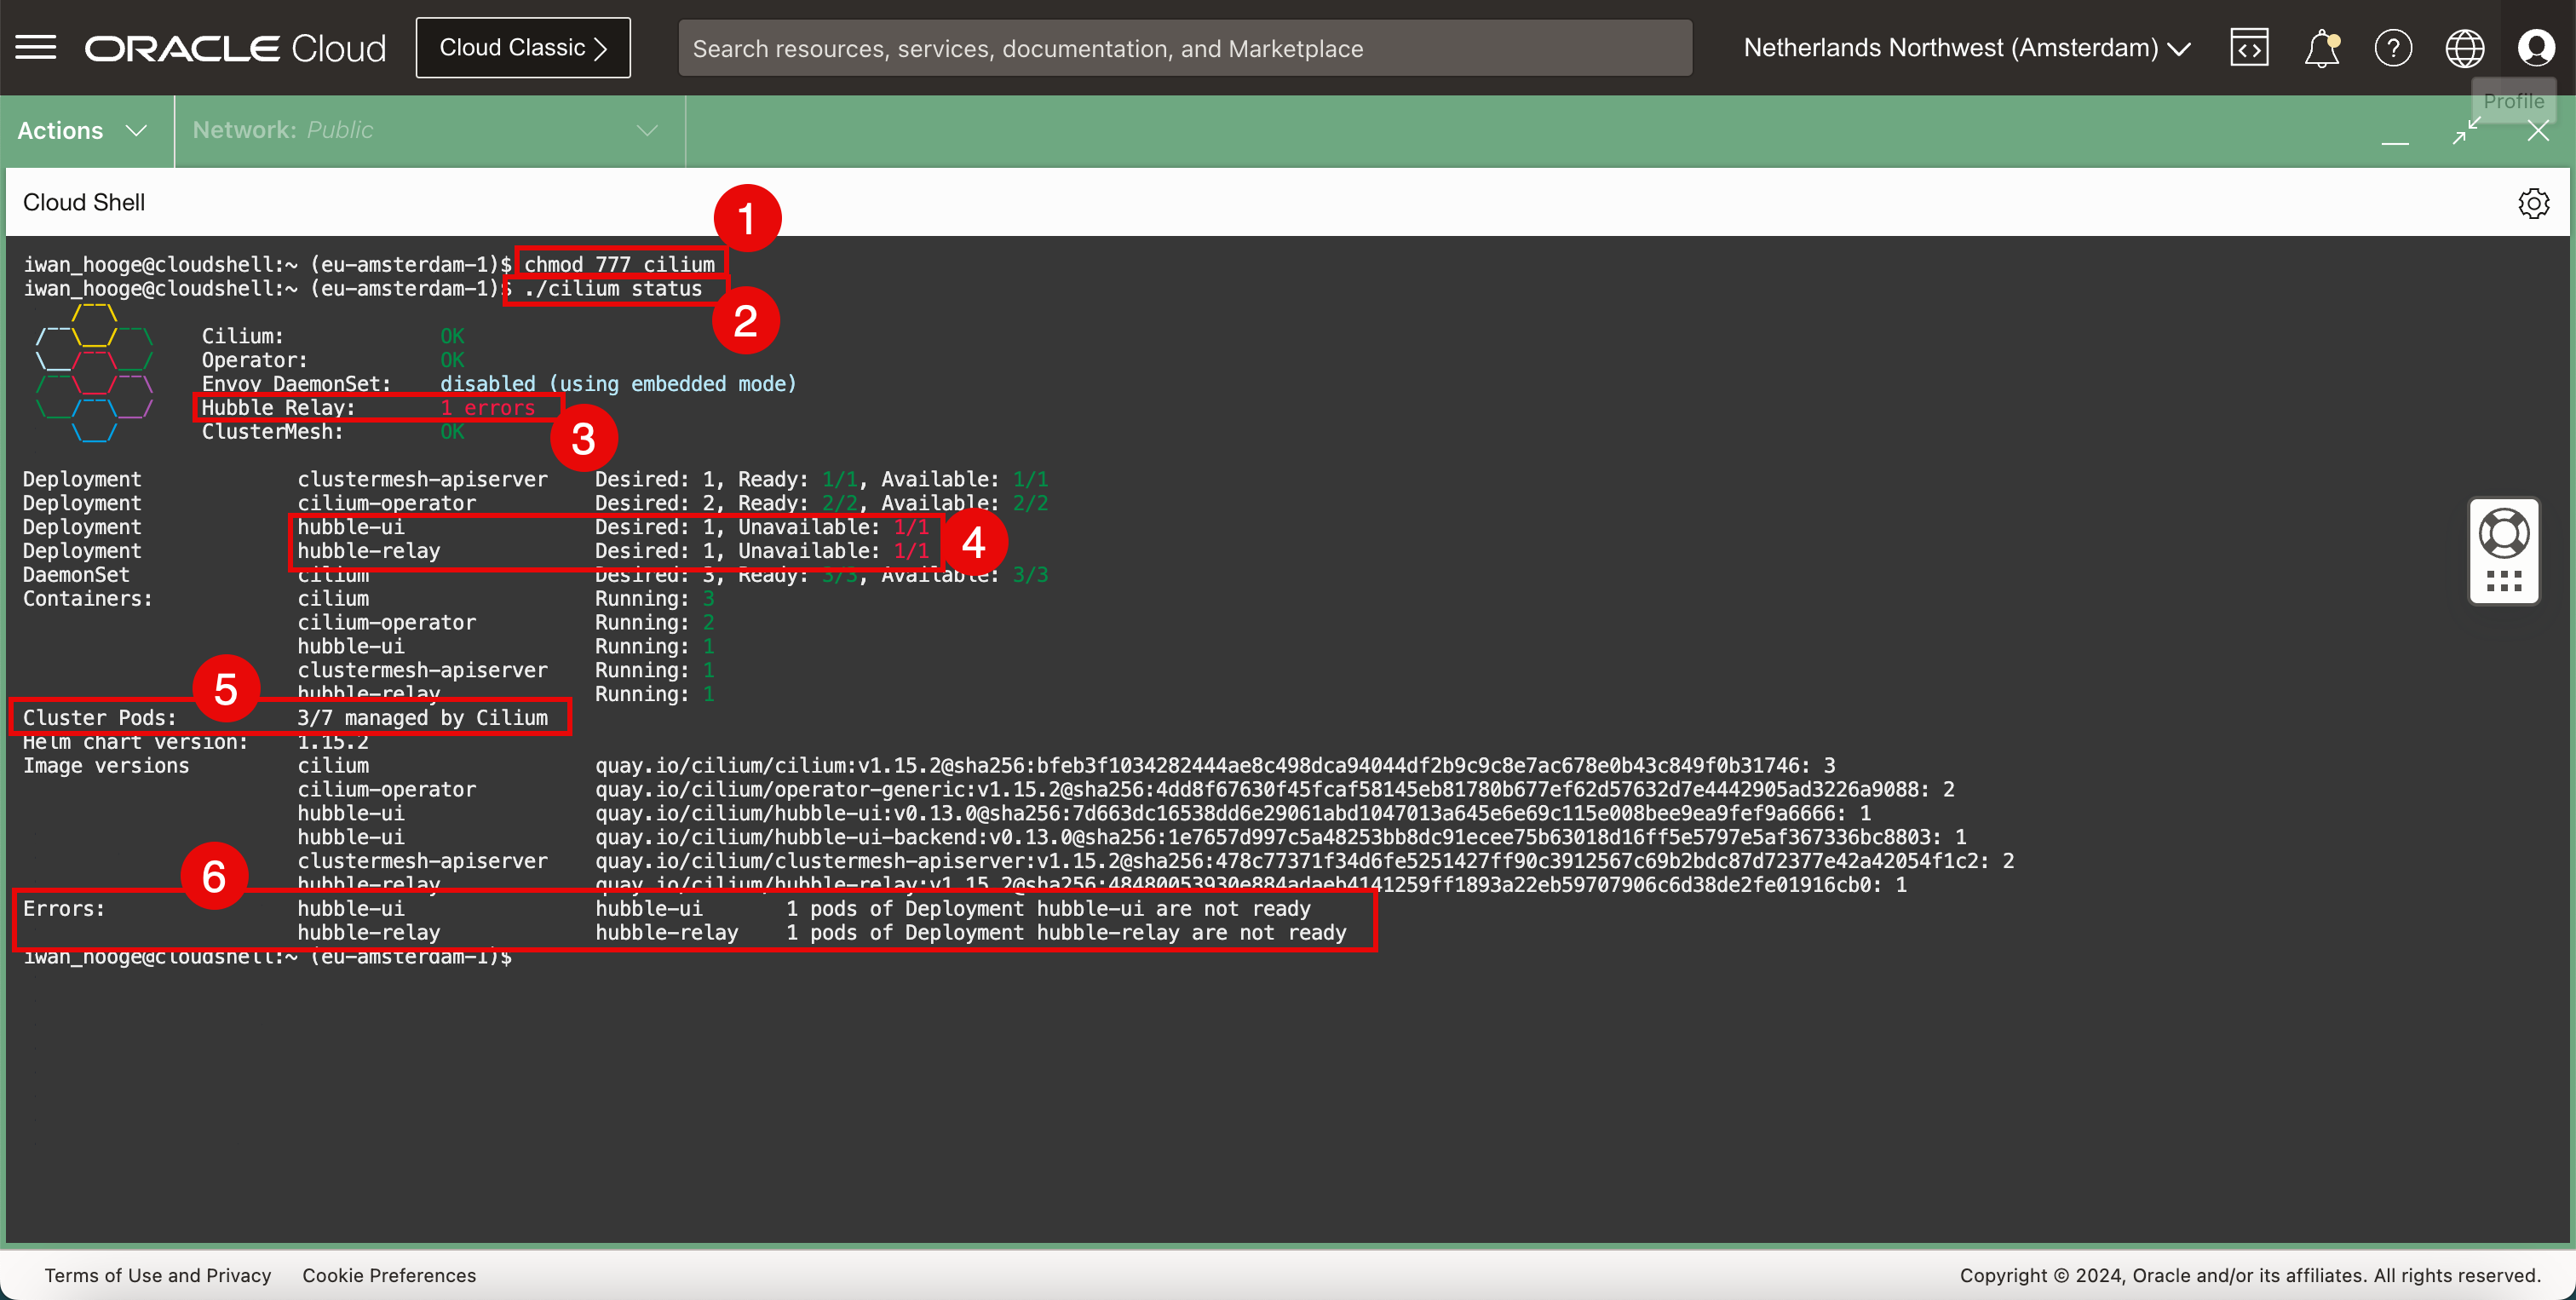
iwan_hooge@cloudshell:~ (eu-amsterdam-1)$ chmod 777 cilium -
다음 명령을 실행하여 Cilium으로 Kubernetes 클러스터의 상태를 확인합니다.
iwan_hooge@cloudshell:~ (eu-amsterdam-1)$ ./cilium status
    /¯¯\
/¯¯\__/¯¯\    Cilium:             OK
\__/¯¯\__/    Operator:           OK
/¯¯\__/¯¯\    Envoy DaemonSet:    disabled (using embedded mode)
\__/¯¯\__/    Hubble Relay:       1 errors
    \__/       ClusterMesh:        OK

Deployment             clustermesh-apiserver    Desired: 1, Ready: 1/1, Available: 1/1
Deployment             cilium-operator          Desired: 2, Ready: 2/2, Available: 2/2
Deployment             hubble-ui                Desired: 1, Unavailable: 1/1
Deployment             hubble-relay             Desired: 1, Unavailable: 1/1
DaemonSet              cilium                   Desired: 3, Ready: 3/3, Available: 3/3
Containers:            cilium                   Running: 3
                    cilium-operator          Running: 2
                    hubble-ui                Running: 1
                    clustermesh-apiserver    Running: 1
                    hubble-relay             Running: 1
Cluster Pods:          3/7 managed by Cilium
Helm chart version:    1.15.2
Image versions         cilium                   quay.io/cilium/cilium:v1.15.2@sha256:bfeb3f1034282444ae8c498dca94044df2b9c9c8e7ac678e0b43c849f0b31746: 3
                    cilium-operator          quay.io/cilium/operator-generic:v1.15.2@sha256:4dd8f67630f45fcaf58145eb81780b677ef62d57632d7e4442905ad3226a9088: 2
                    hubble-ui                quay.io/cilium/hubble-ui:v0.13.0@sha256:7d663dc16538dd6e29061abd1047013a645e6e69c115e008bee9ea9fef9a6666: 1
                    hubble-ui                quay.io/cilium/hubble-ui-backend:v0.13.0@sha256:1e7657d997c5a48253bb8dc91ecee75b63018d16ff5e5797e5af367336bc8803: 1
                    clustermesh-apiserver    quay.io/cilium/clustermesh-apiserver:v1.15.2@sha256:478c77371f34d6fe5251427ff90c3912567c69b2bdc87d72377e42a42054f1c2: 2
                    hubble-relay             quay.io/cilium/hubble-relay:v1.15.2@sha256:48480053930e884adaeb4141259ff1893a22eb59707906c6d38de2fe01916cb0: 1
Errors:                hubble-ui                hubble-ui       1 pods of Deployment hubble-ui are not ready
                    hubble-relay             hubble-relay    1 pods of Deployment hubble-relay are not ready
iwan_hooge@cloudshell:~ (eu-amsterdam-1)$
주: 일부 포드는 Cilium이 실행되기 전에 포드가 시작될 때 Cilium에서 아직 관리되지 않았기 때문에 오류가 발생합니다.
-
이 오류는 ClusterMesh와 관련이 있습니다.
-
이 오류는 허블 UI나 허블 릴레이와 관련이 있습니다.
-
일부 클러스터 포드는 Cilium에서 관리되지 않습니다. 3/7 파드는 Cilium에 의해 관리됩니다. 우리는 모두 Cilium에 의해 관리되어야합니다.
-
위의 오류와 관련된 몇 가지 추가 오류 메시지를 확인합니다.
-
-
현재 Cilium에서 관리하지 않는 포드를 확인하고 할당합니다. Cilium은 이를 식별하는 데 도움이 되는 스크립트를 제공합니다.
-
다음 명령을 실행하여 스크립트를 다운로드하십시오.
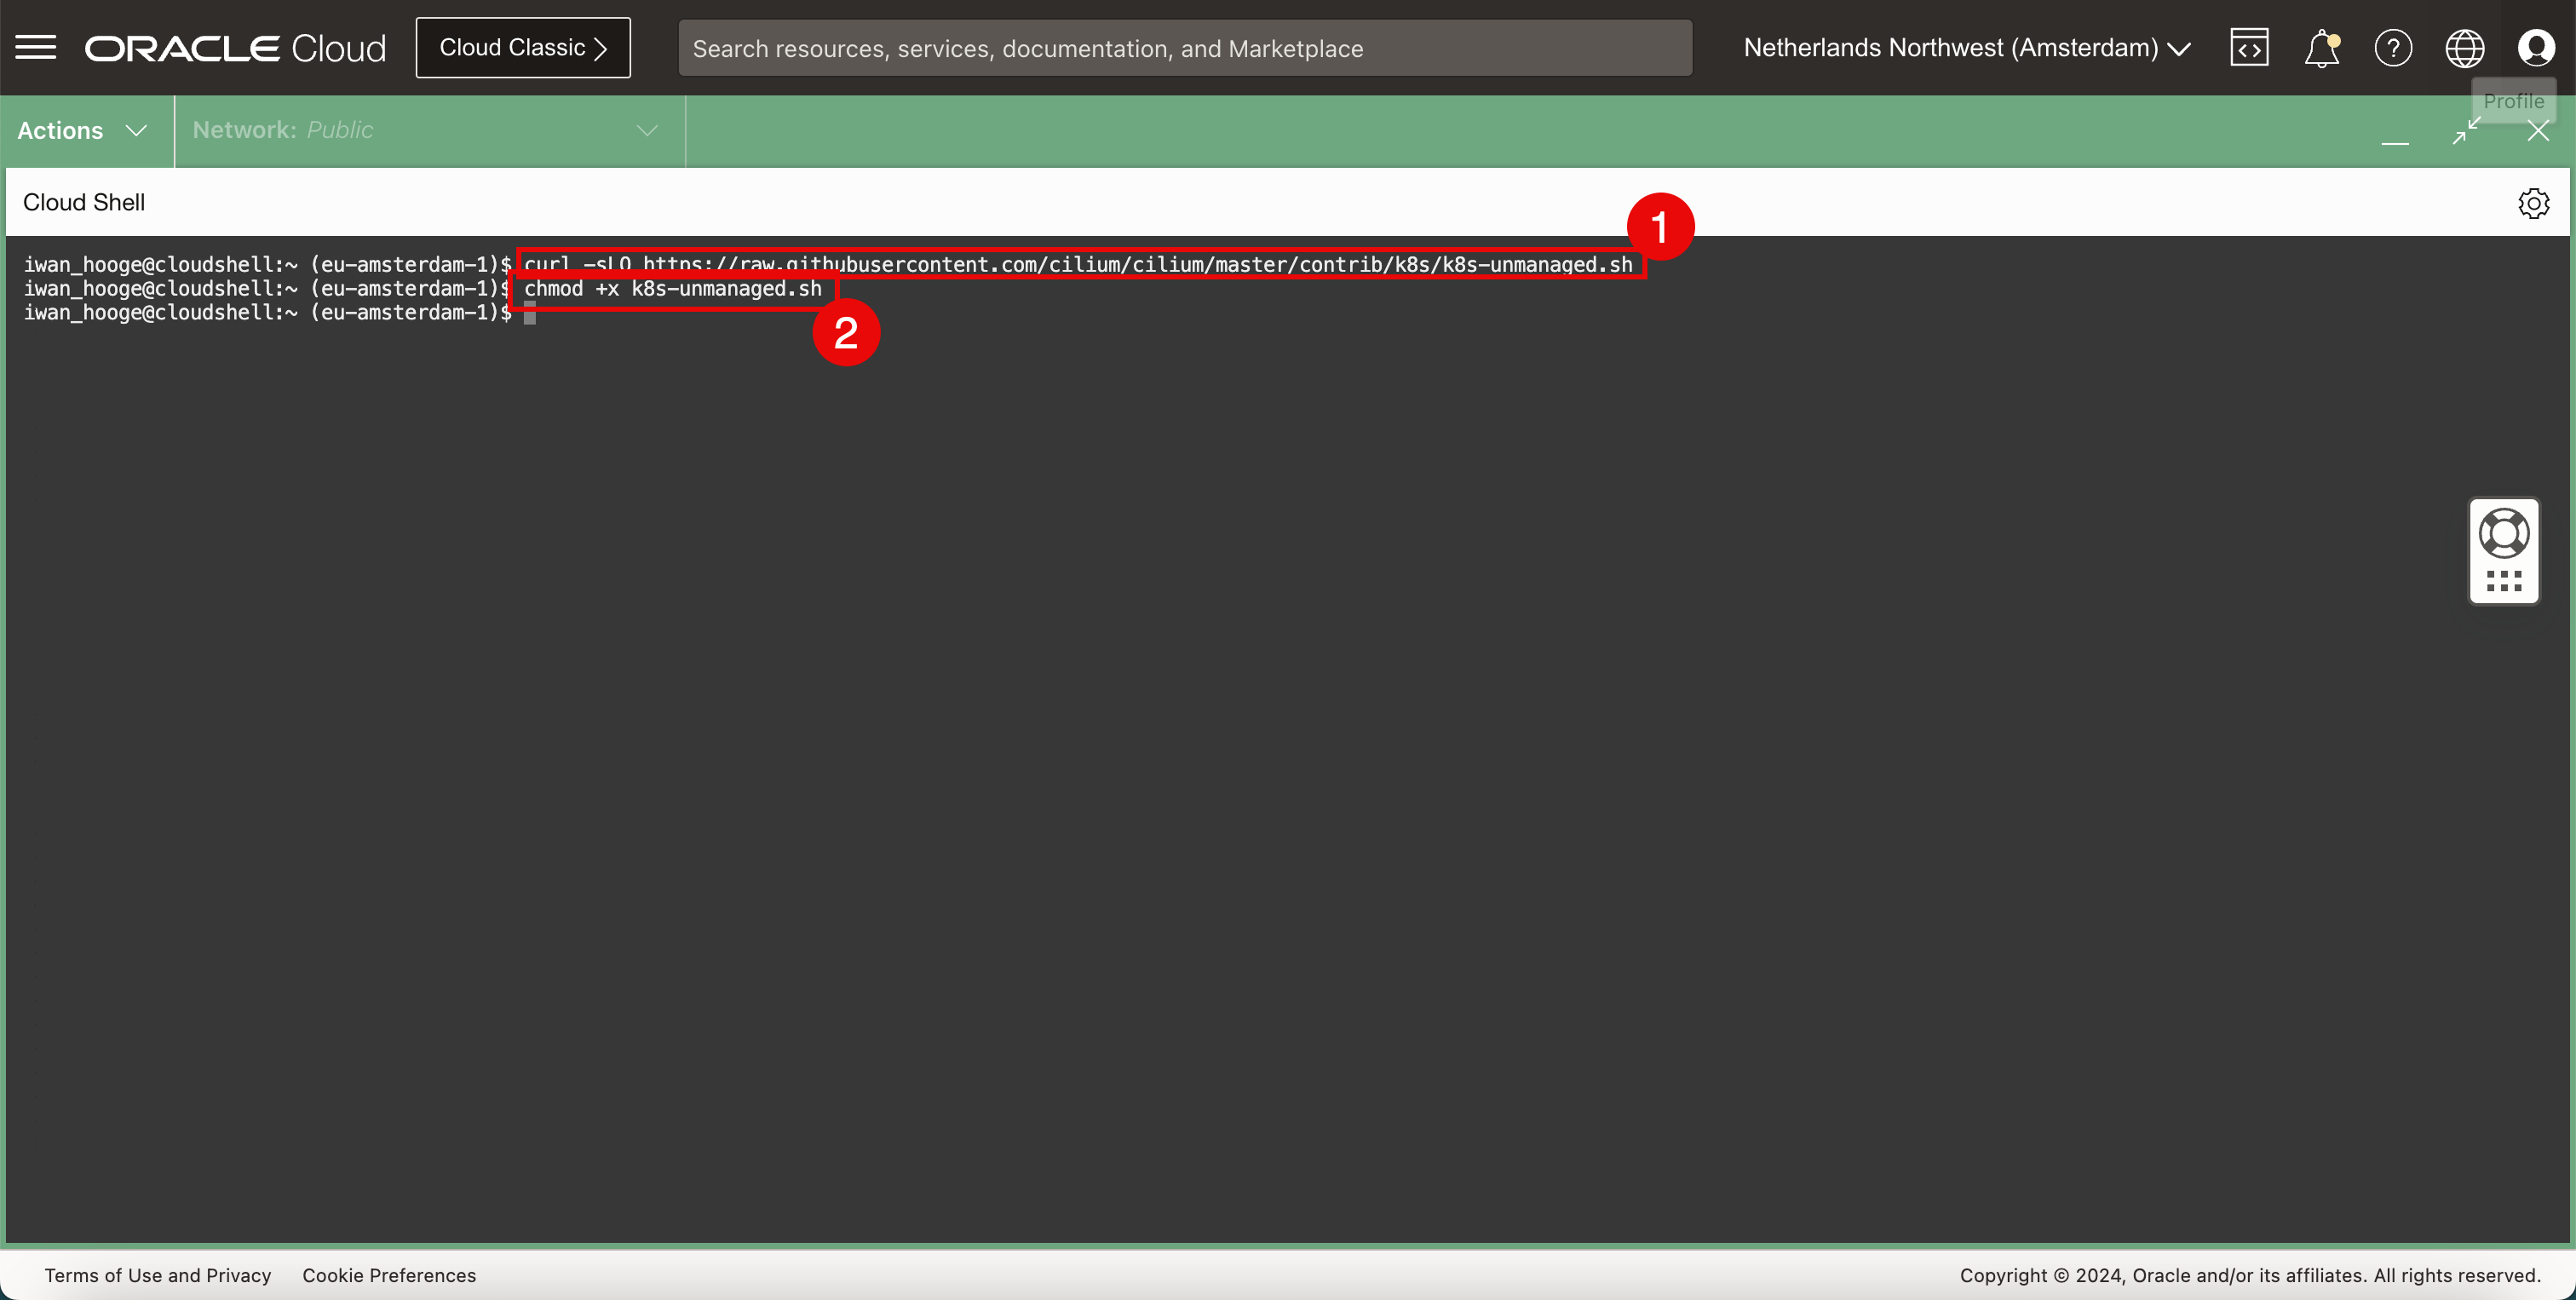
iwan_hooge@cloudshell:~ (eu-amsterdam-1)$ curl -sLO https://raw.githubusercontent.com/cilium/cilium/master/contrib/k8s/k8s-unmanaged.sh -
다음 명령을 실행하여 이 스크립트를 실행할 수 있도록 합니다.
iwan_hooge@cloudshell:~ (eu-amsterdam-1)$ chmod +x k8s-unmanaged.sh
-
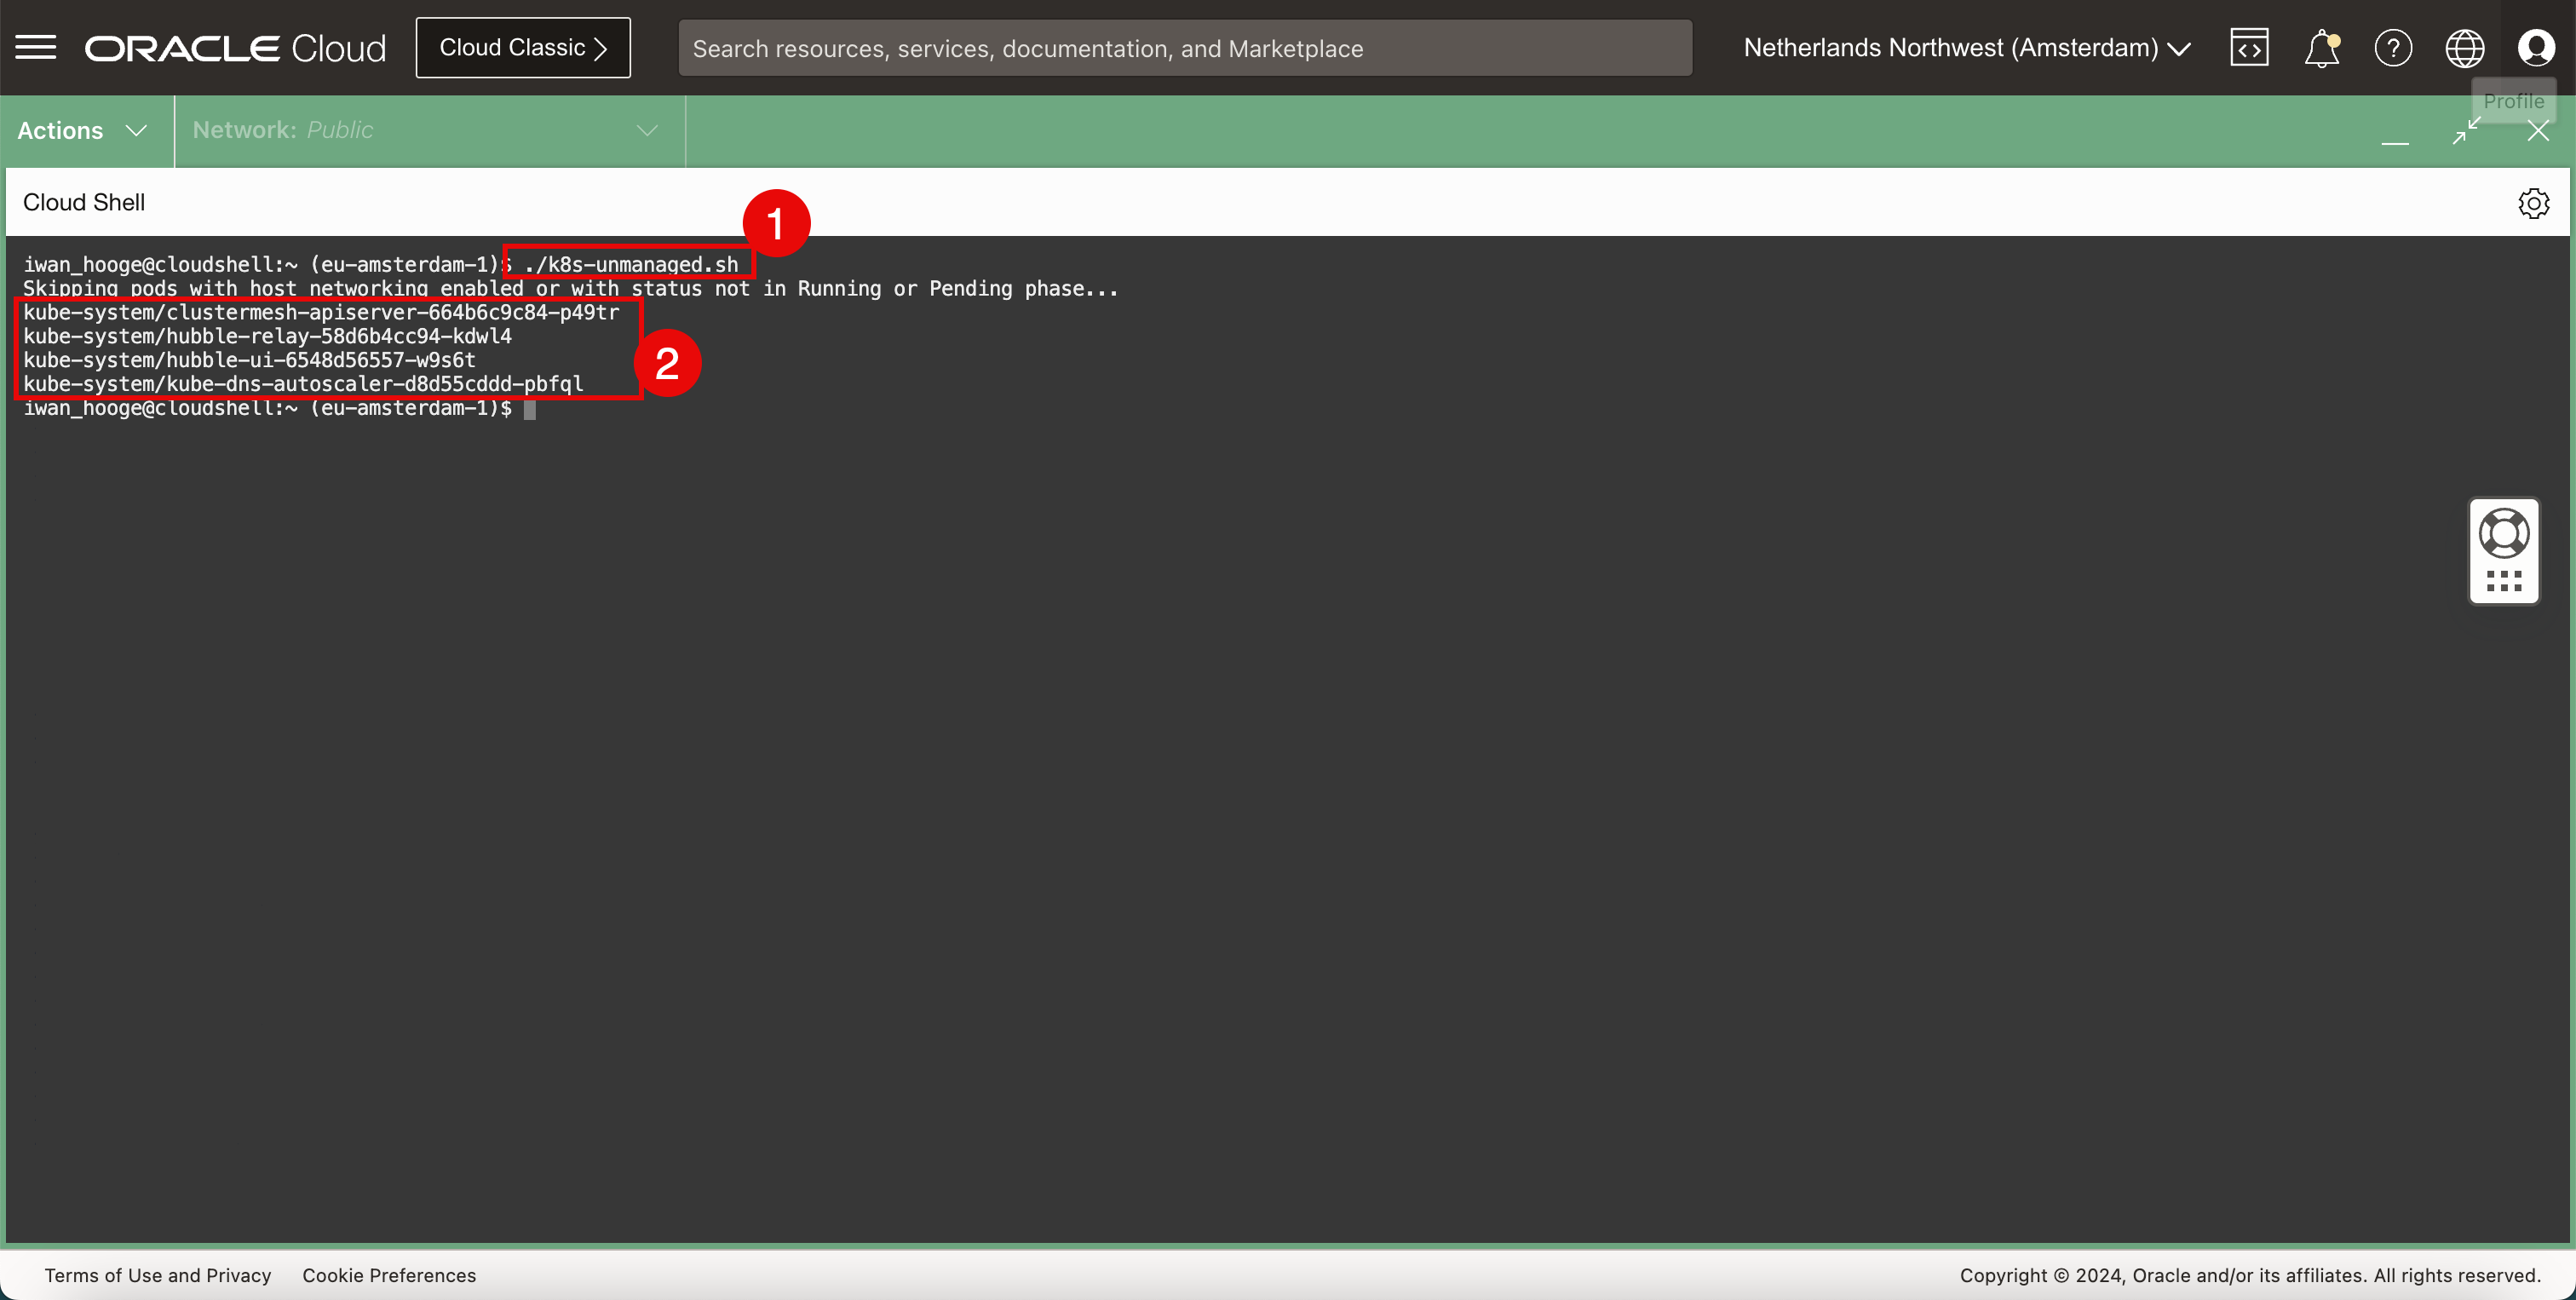
다음 명령을 실행하여 이 스크립트를 실행하고 추가 주의가 필요한 포드를 감지합니다.
iwan_hooge@cloudshell:~ (eu-amsterdam-1)$ ./k8s-unmanaged.sh Skipping pods with host networking enabled or with status not in Running or Pending phase... kube-system/clustermesh-apiserver-664b6c9c84-p49tr kube-system/hubble-relay-58d6b4cc94-kdwl4 kube-system/hubble-ui-6548d56557-w9s6t kube-system/kube-dns-autoscaler-d8d55cddd-pbfql iwan_hooge@cloudshell:~ (eu-amsterdam-1)$ -
주의가 필요한 포드를 확인합니다.
-
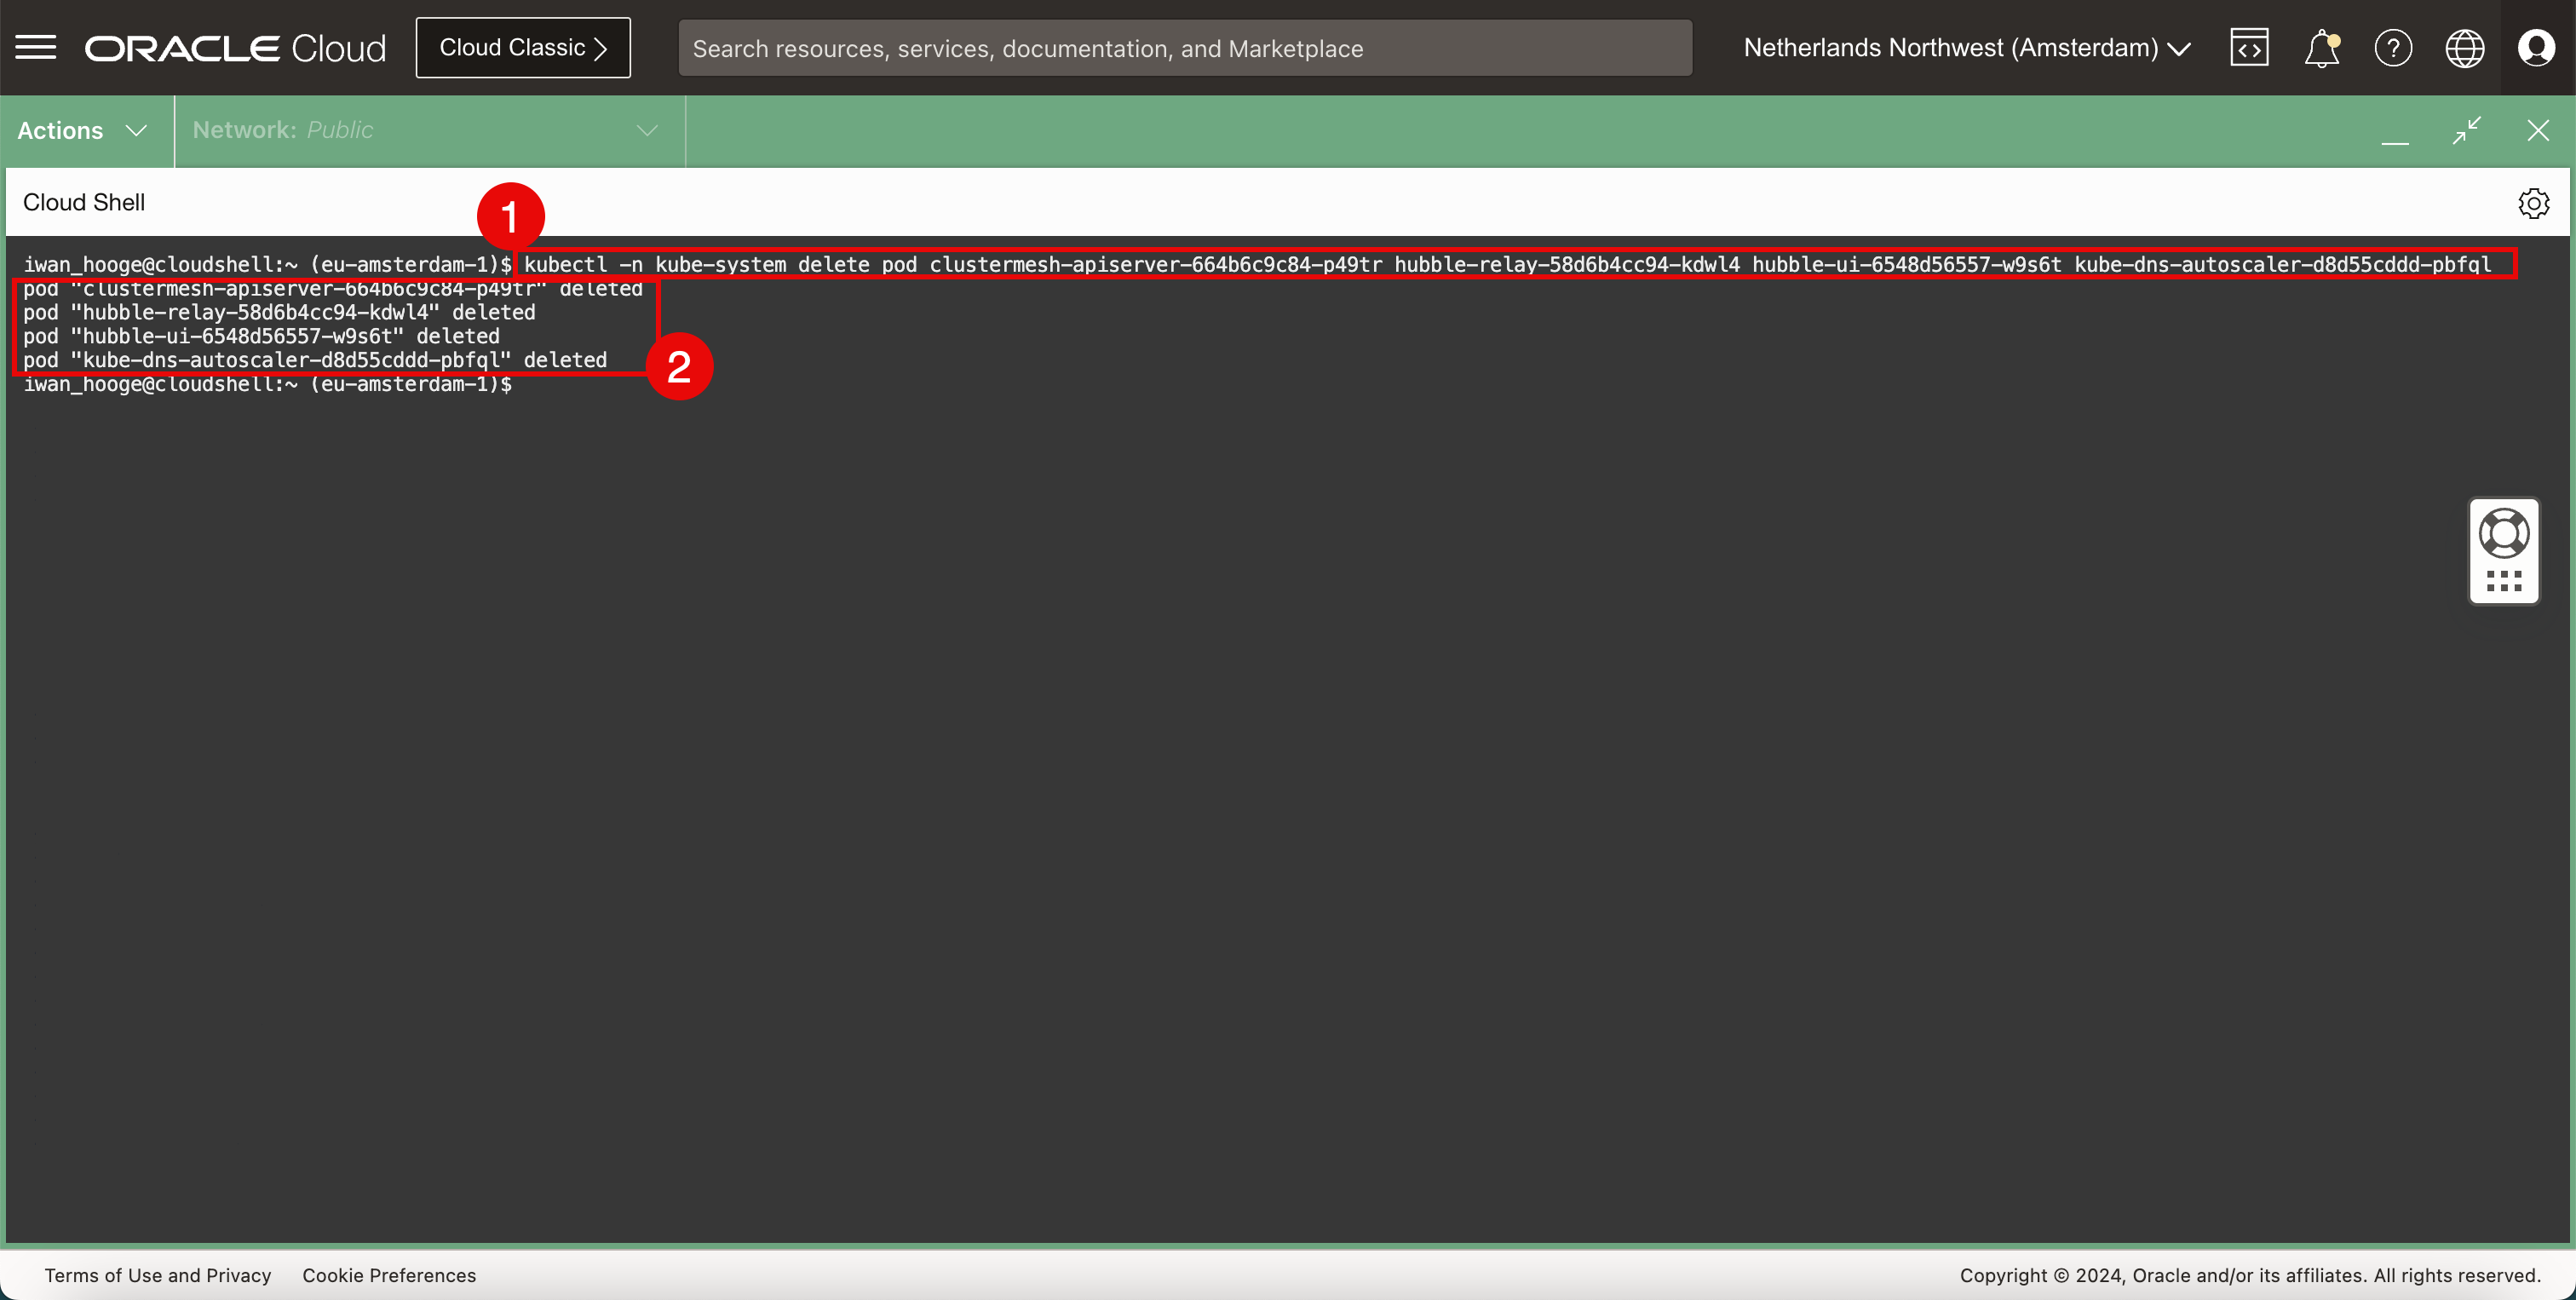
다음 명령을 실행하여 주의가 필요한 포드를 삭제합니다.
iwan_hooge@cloudshell:~ (eu-amsterdam-1)$ kubectl -n kube-system delete pod clustermesh-apiserver-664b6c9c84-p49tr hubble-relay-58d6b4cc94-kdwl4 hubble-ui-6548d56557-w9s6t kube-dns-autoscaler-d8d55cddd-pbfql pod "clustermesh-apiserver-664b6c9c84-p49tr" deleted pod "hubble-relay-58d6b4cc94-kdwl4" deleted pod "hubble-ui-6548d56557-w9s6t" deleted pod "kube-dns-autoscaler-d8d55cddd-pbfql" deleted iwan_hooge@cloudshell:~ (eu-amsterdam-1)$ -
삭제된 포드의 확인입니다.
-
-
다음 명령을 실행하여 이 스크립트를 실행하고 추가 주의가 필요한 포드를 다시 감지합니다.
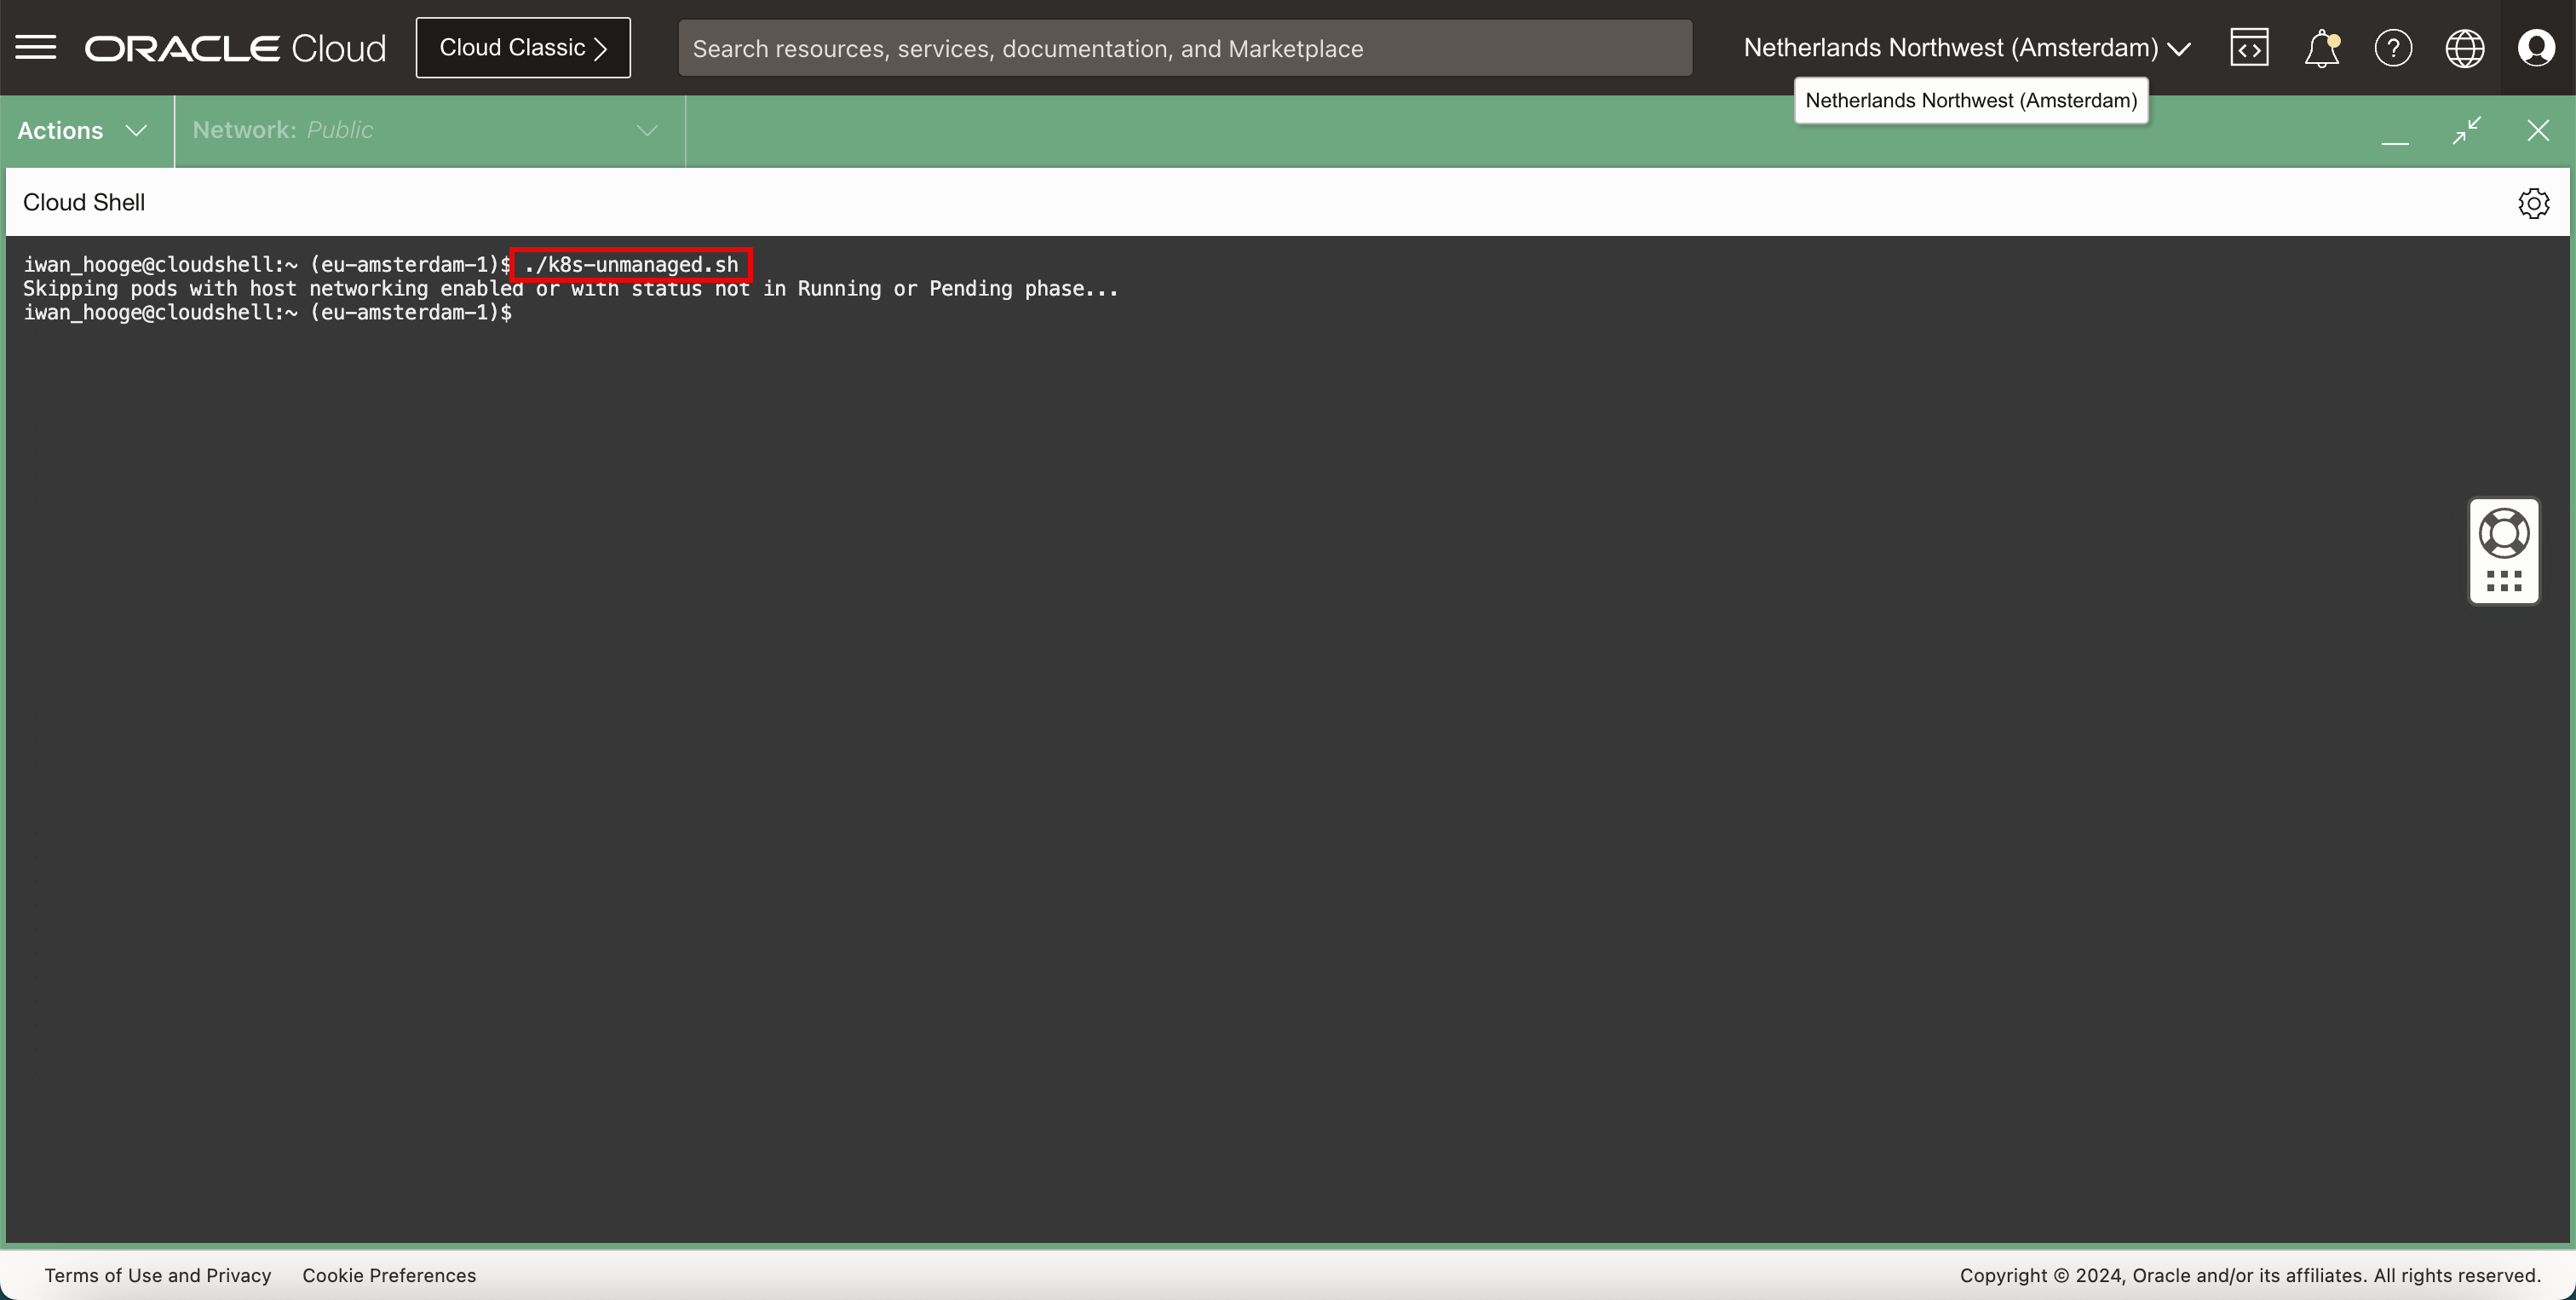
iwan_hooge@cloudshell:~ (eu-amsterdam-1)$ ./k8s-unmanaged.sh Skipping pods with host networking enabled or with status not in Running or Pending phase... iwan_hooge@cloudshell:~ (eu-amsterdam-1)$ -
더 이상 주의가 필요한 포드가 없습니다. 즉, 이제 Cilium 네트워킹이 사용으로 설정된 상태에서 포드가 재생성됩니다.
-
Cilium으로 Kubernetes 클러스터의 상태를 확인합니다.
-
다음 명령을 실행하여 Cilium으로 Kubernetes 클러스터의 상태를 확인합니다.
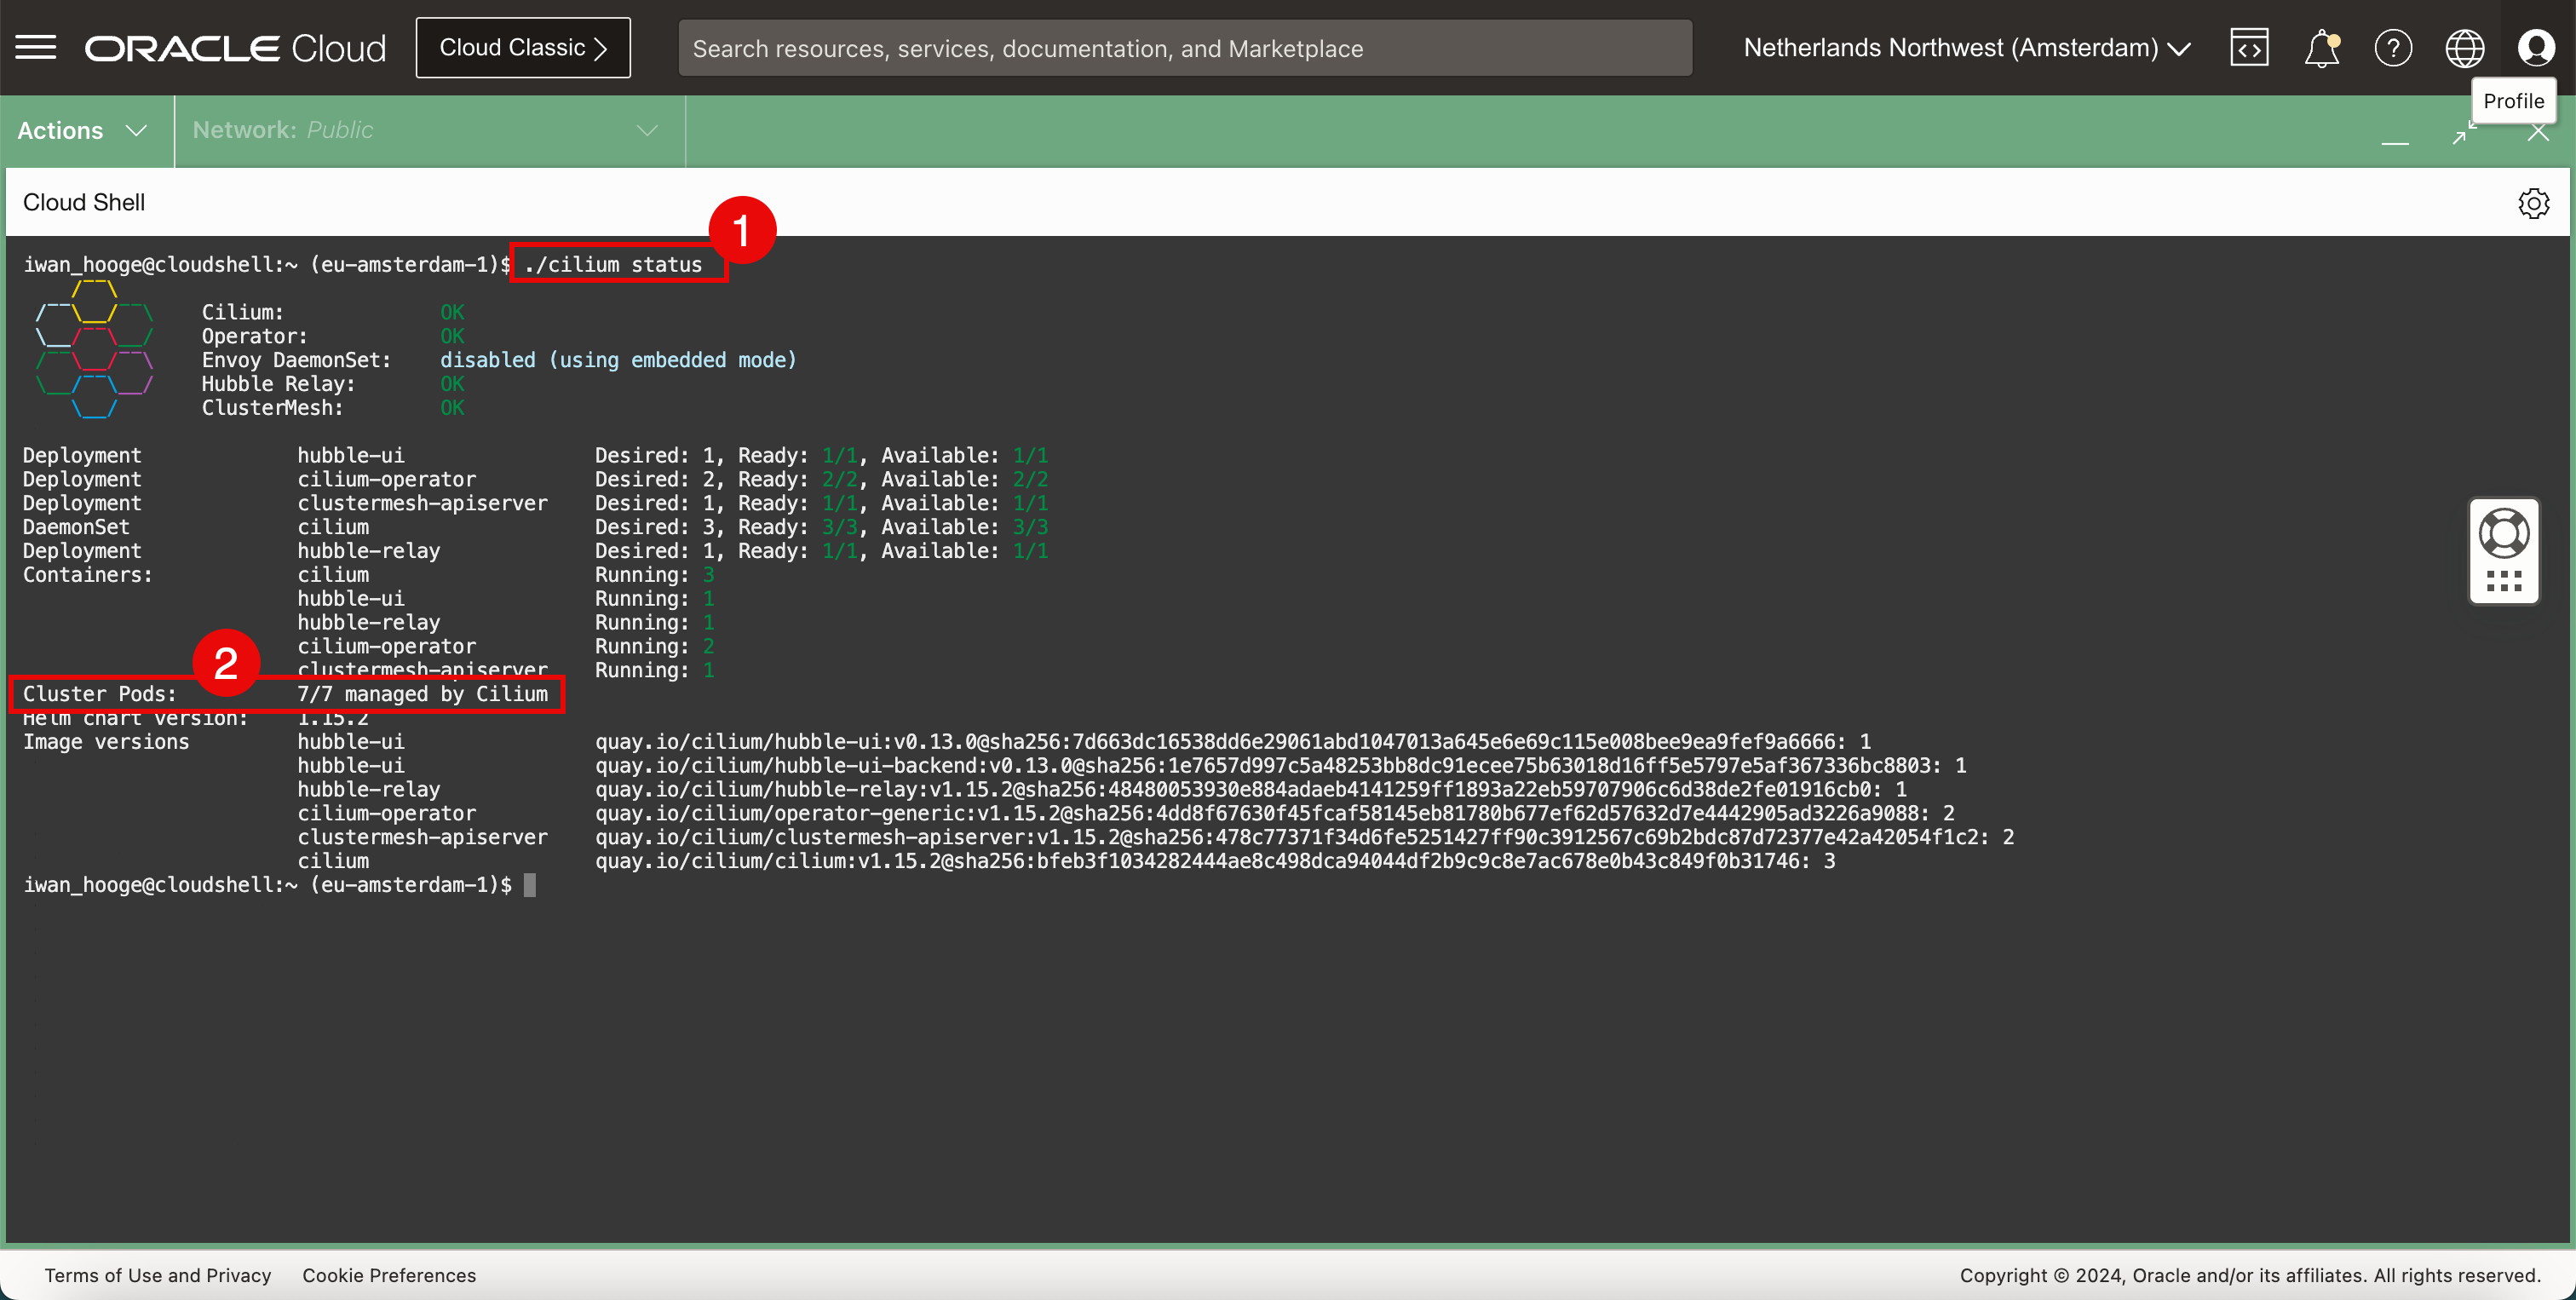
iwan_hooge@cloudshell:~ (eu-amsterdam-1)$ ./cilium status /¯¯\ /¯¯\__/¯¯\ Cilium: OK \__/¯¯\__/ Operator: OK /¯¯\__/¯¯\ Envoy DaemonSet: disabled (using embedded mode) \__/¯¯\__/ Hubble Relay: OK \__/ ClusterMesh: OK Deployment hubble-ui Desired: 1, Ready: 1/1, Available: 1/1 Deployment cilium-operator Desired: 2, Ready: 2/2, Available: 2/2 Deployment clustermesh-apiserver Desired: 1, Ready: 1/1, Available: 1/1 DaemonSet cilium Desired: 3, Ready: 3/3, Available: 3/3 Deployment hubble-relay Desired: 1, Ready: 1/1, Available: 1/1 Containers: cilium Running: 3 hubble-ui Running: 1 hubble-relay Running: 1 cilium-operator Running: 2 clustermesh-apiserver Running: 1 Cluster Pods: 7/7 managed by Cilium Helm chart version: 1.15.2 Image versions hubble-ui quay.io/cilium/hubble-ui:v0.13.0@sha256:7d663dc16538dd6e29061abd1047013a645e6e69c115e008bee9ea9fef9a6666: 1 hubble-ui quay.io/cilium/hubble-ui-backend:v0.13.0@sha256:1e7657d997c5a48253bb8dc91ecee75b63018d16ff5e5797e5af367336bc8803: 1 hubble-relay quay.io/cilium/hubble-relay:v1.15.2@sha256:48480053930e884adaeb4141259ff1893a22eb59707906c6d38de2fe01916cb0: 1 cilium-operator quay.io/cilium/operator-generic:v1.15.2@sha256:4dd8f67630f45fcaf58145eb81780b677ef62d57632d7e4442905ad3226a9088: 2 clustermesh-apiserver quay.io/cilium/clustermesh-apiserver:v1.15.2@sha256:478c77371f34d6fe5251427ff90c3912567c69b2bdc87d72377e42a42054f1c2: 2 cilium quay.io/cilium/cilium:v1.15.2@sha256:bfeb3f1034282444ae8c498dca94044df2b9c9c8e7ac678e0b43c849f0b31746: 3 iwan_hooge@cloudshell:~ (eu-amsterdam-1)$ -
모든 클러스터 포드는 Cilium에서 관리합니다.
-
-
현재 배치된 CNI 플러그인을 확인합니다.
-
다음 명령을 실행하여 현재 배치된 CNI 플러그인(Flannel 및 Cilium)을 확인합니다.
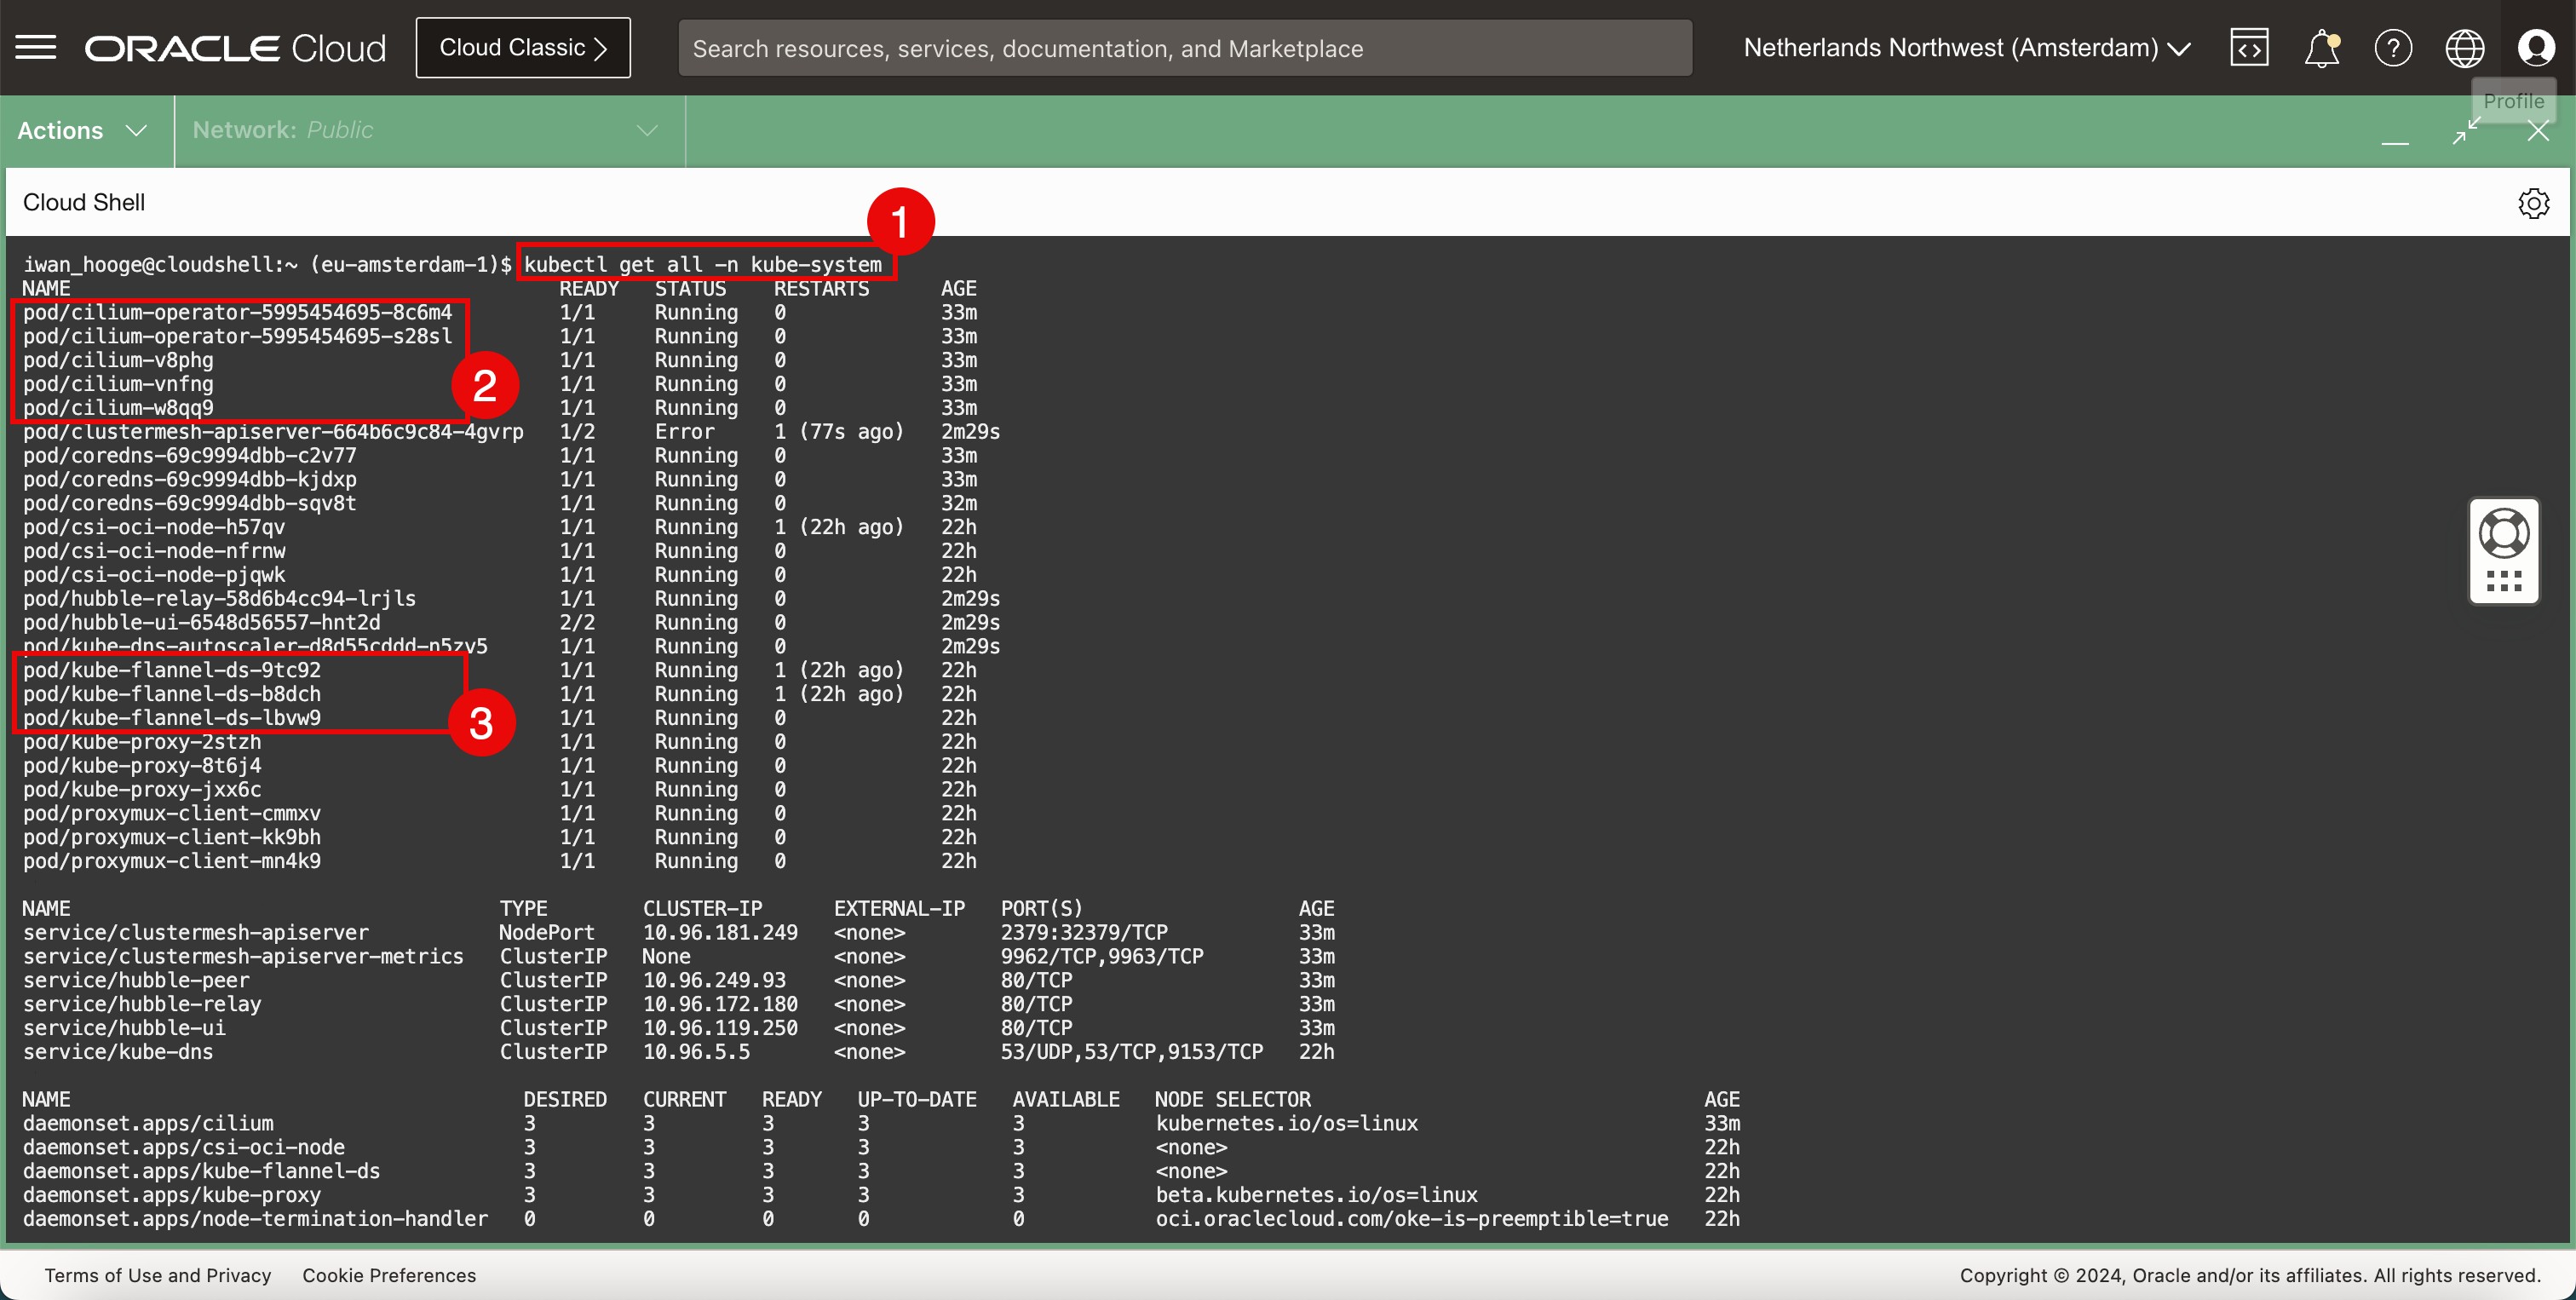
iwan_hooge@cloudshell:~ (eu-amsterdam-1)$ kubectl get all -n kube-system NAME READY STATUS RESTARTS AGE pod/cilium-operator-5995454695-8c6m4 1/1 Running 0 33m pod/cilium-operator-5995454695-s28sl 1/1 Running 0 33m pod/cilium-v8phg 1/1 Running 0 33m pod/cilium-vnfng 1/1 Running 0 33m pod/cilium-w8qq9 1/1 Running 0 33m pod/clustermesh-apiserver-664b6c9c84-4gvrp 1/2 Error 1 (77s ago) 2m29s pod/coredns-69c9994dbb-c2v77 1/1 Running 0 33m pod/coredns-69c9994dbb-kjdxp 1/1 Running 0 33m pod/coredns-69c9994dbb-sqv8t 1/1 Running 0 32m pod/csi-oci-node-h57qv 1/1 Running 1 (22h ago) 22h pod/csi-oci-node-nfrnw 1/1 Running 0 22h pod/csi-oci-node-pjqwk 1/1 Running 0 22h pod/hubble-relay-58d6b4cc94-lrjls 1/1 Running 0 2m29s pod/hubble-ui-6548d56557-hnt2d 2/2 Running 0 2m29s pod/kube-dns-autoscaler-d8d55cddd-n5zv5 1/1 Running 0 2m29s pod/kube-flannel-ds-9tc92 1/1 Running 1 (22h ago) 22h pod/kube-flannel-ds-b8dch 1/1 Running 1 (22h ago) 22h pod/kube-flannel-ds-lbvw9 1/1 Running 0 22h pod/kube-proxy-2stzh 1/1 Running 0 22h pod/kube-proxy-8t6j4 1/1 Running 0 22h pod/kube-proxy-jxx6c 1/1 Running 0 22h pod/proxymux-client-cmmxv 1/1 Running 0 22h pod/proxymux-client-kk9bh 1/1 Running 0 22h pod/proxymux-client-mn4k9 1/1 Running 0 22h NAME TYPE CLUSTER-IP EXTERNAL-IP PORT(S) AGE service/clustermesh-apiserver NodePort 10.96.181.249 <none> 2379:32379/TCP 33m service/clustermesh-apiserver-metrics ClusterIP None <none> 9962/TCP,9963/TCP 33m service/hubble-peer ClusterIP 10.96.249.93 <none> 80/TCP 33m service/hubble-relay ClusterIP 10.96.172.180 <none> 80/TCP 33m service/hubble-ui ClusterIP 10.96.119.250 <none> 80/TCP 33m service/kube-dns ClusterIP 10.96.5.5 <none> 53/UDP,53/TCP,9153/TCP 22h NAME DESIRED CURRENT READY UP-TO-DATE AVAILABLE NODE SELECTOR AGE daemonset.apps/cilium 3 3 3 3 3 kubernetes.io/os=linux 33m daemonset.apps/csi-oci-node 3 3 3 3 3 <none> 22h daemonset.apps/kube-flannel-ds 3 3 3 3 3 <none> 22h daemonset.apps/kube-proxy 3 3 3 3 3 beta.kubernetes.io/os=linux 22h daemonset.apps/node-termination-handler 0 0 0 0 0 oci.oraclecloud.com/oke-is-preemptible=true 22h daemonset.apps/nvidia-gpu-device-plugin 0 0 0 0 0 <none> 22h daemonset.apps/proxymux-client 3 3 3 3 3 node.info.ds_proxymux_client=true 22h NAME READY UP-TO-DATE AVAILABLE AGE deployment.apps/cilium-operator 2/2 2 2 33m deployment.apps/clustermesh-apiserver 0/1 1 0 33m deployment.apps/coredns 3/3 3 3 22h deployment.apps/hubble-relay 1/1 1 1 33m deployment.apps/hubble-ui 1/1 1 1 33m deployment.apps/kube-dns-autoscaler 1/1 1 1 22h NAME DESIRED CURRENT READY AGE replicaset.apps/cilium-operator-5995454695 2 2 2 33m replicaset.apps/clustermesh-apiserver-664b6c9c84 1 1 0 33m replicaset.apps/coredns-69c9994dbb 3 3 3 22h replicaset.apps/hubble-relay-58d6b4cc94 1 1 1 33m replicaset.apps/hubble-ui-6548d56557 1 1 1 33m replicaset.apps/kube-dns-autoscaler-d8d55cddd 1 1 1 22h iwan_hooge@cloudshell:~ (eu-amsterdam-1)$ -
Cilium CNI 플러그인이 있습니다.
-
Flannel CNI 플러그인도 있습니다.
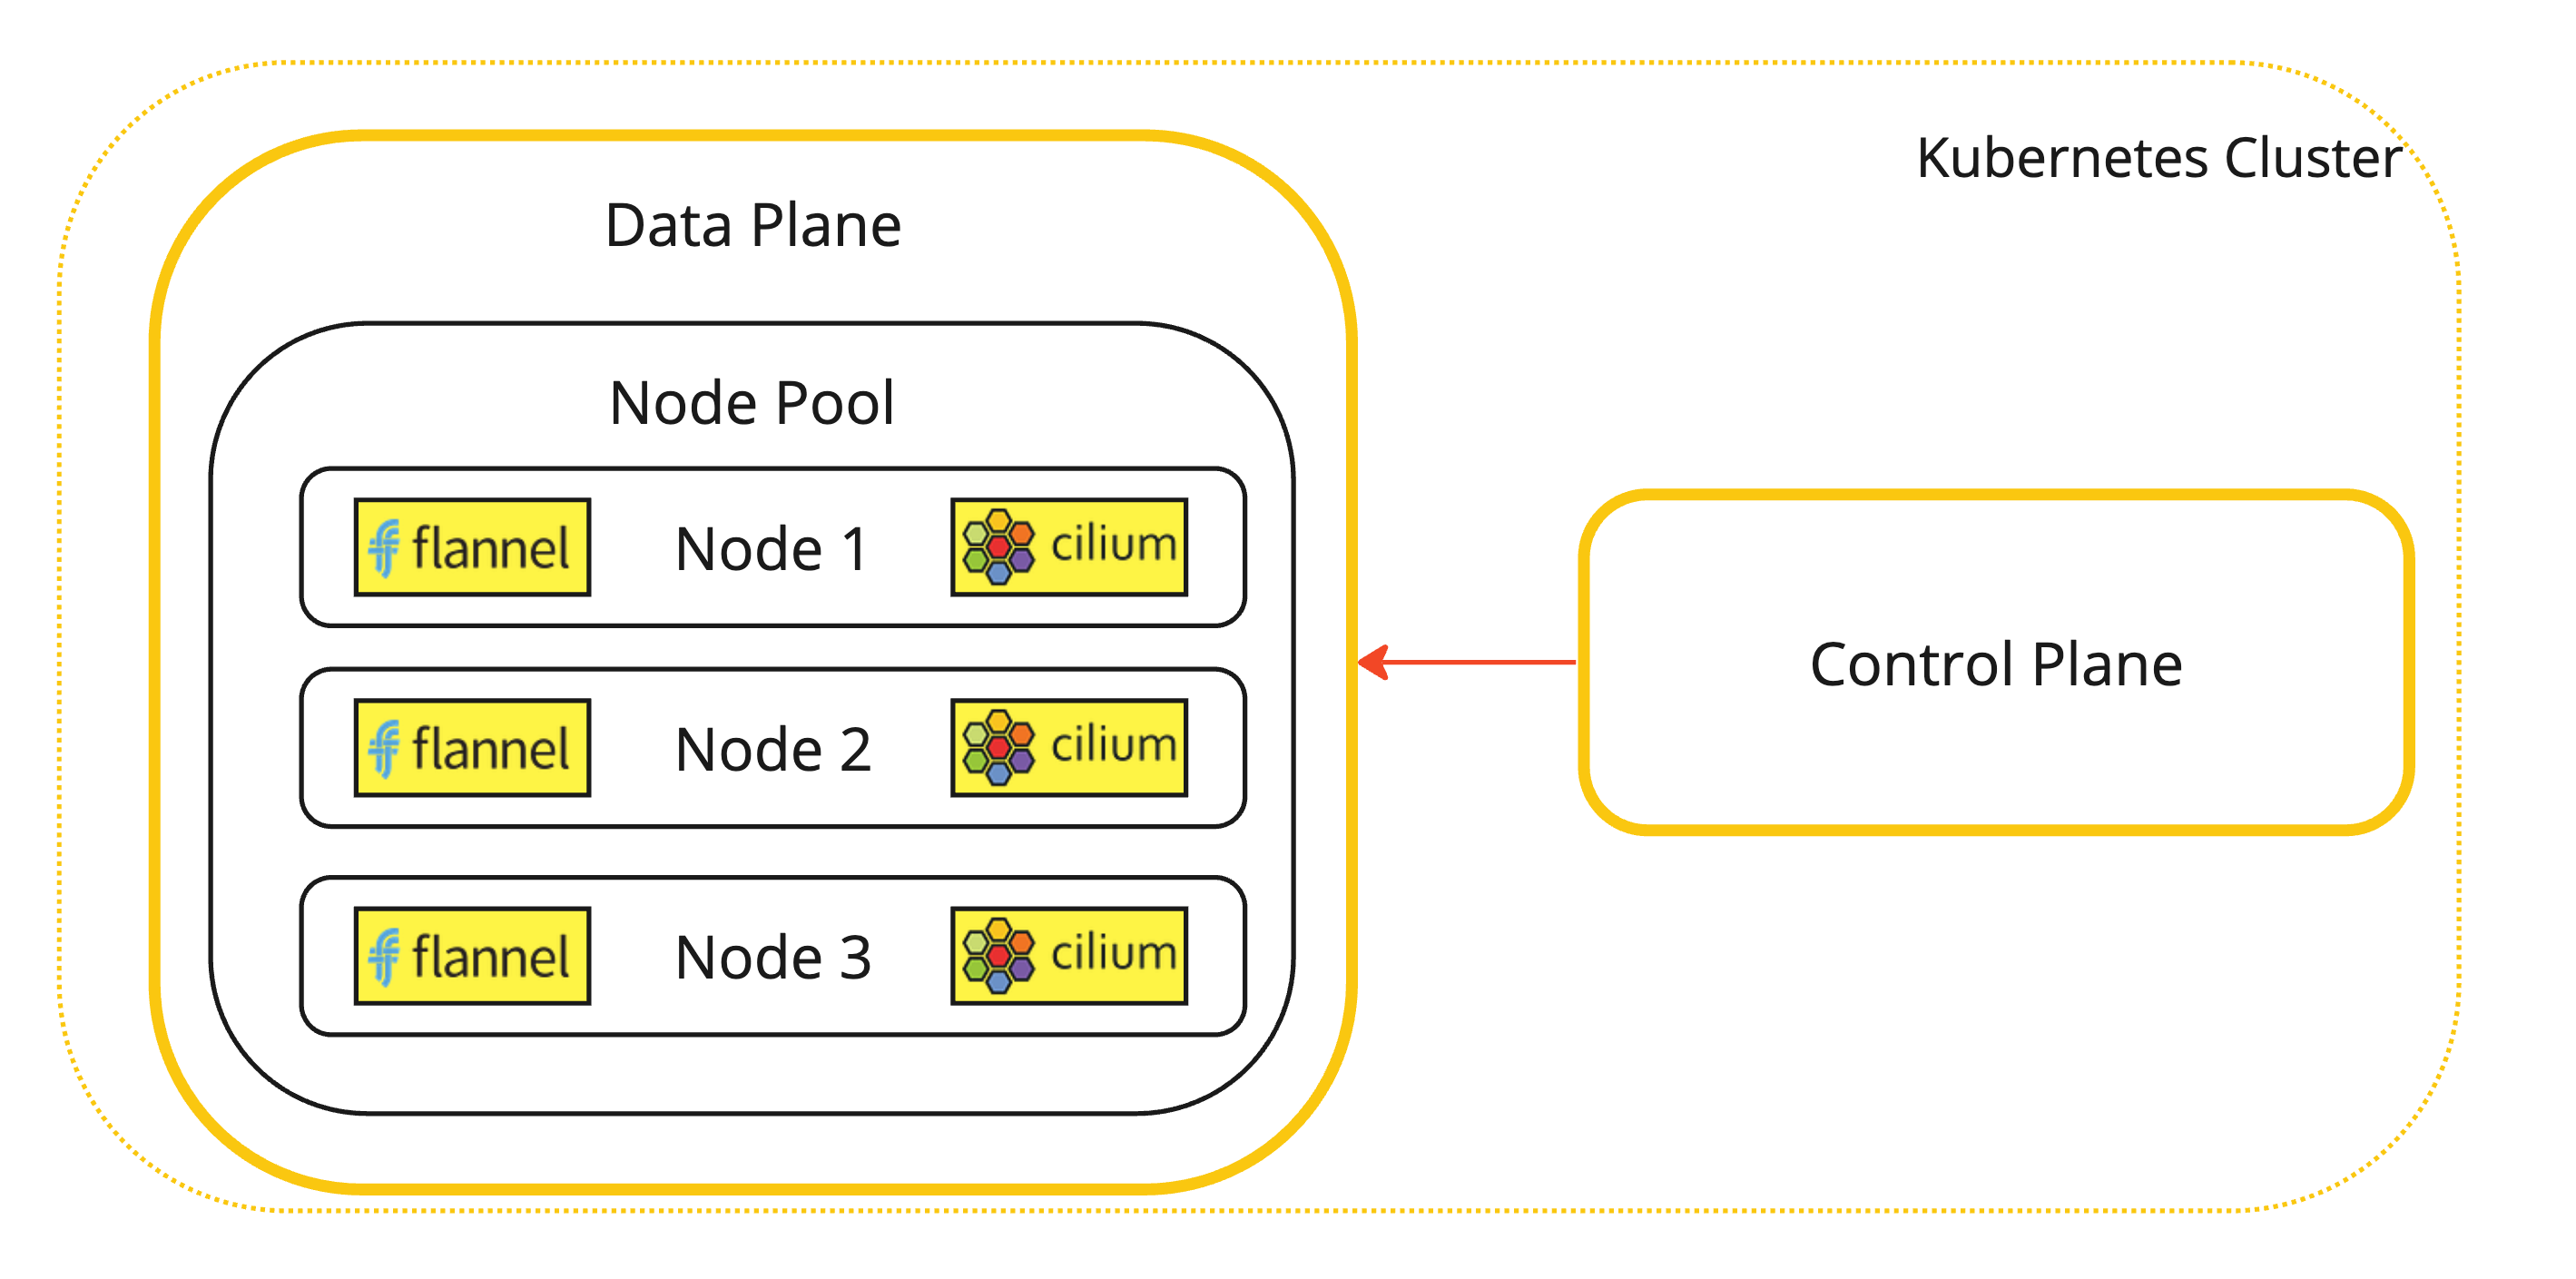
Flannel 및 Cilium CNI 플러그인이 설치된 Kubernetes 워커 노드의 시각적 표현입니다.
-
-
Flannel CNI 플러그인을 삭제합니다.
-
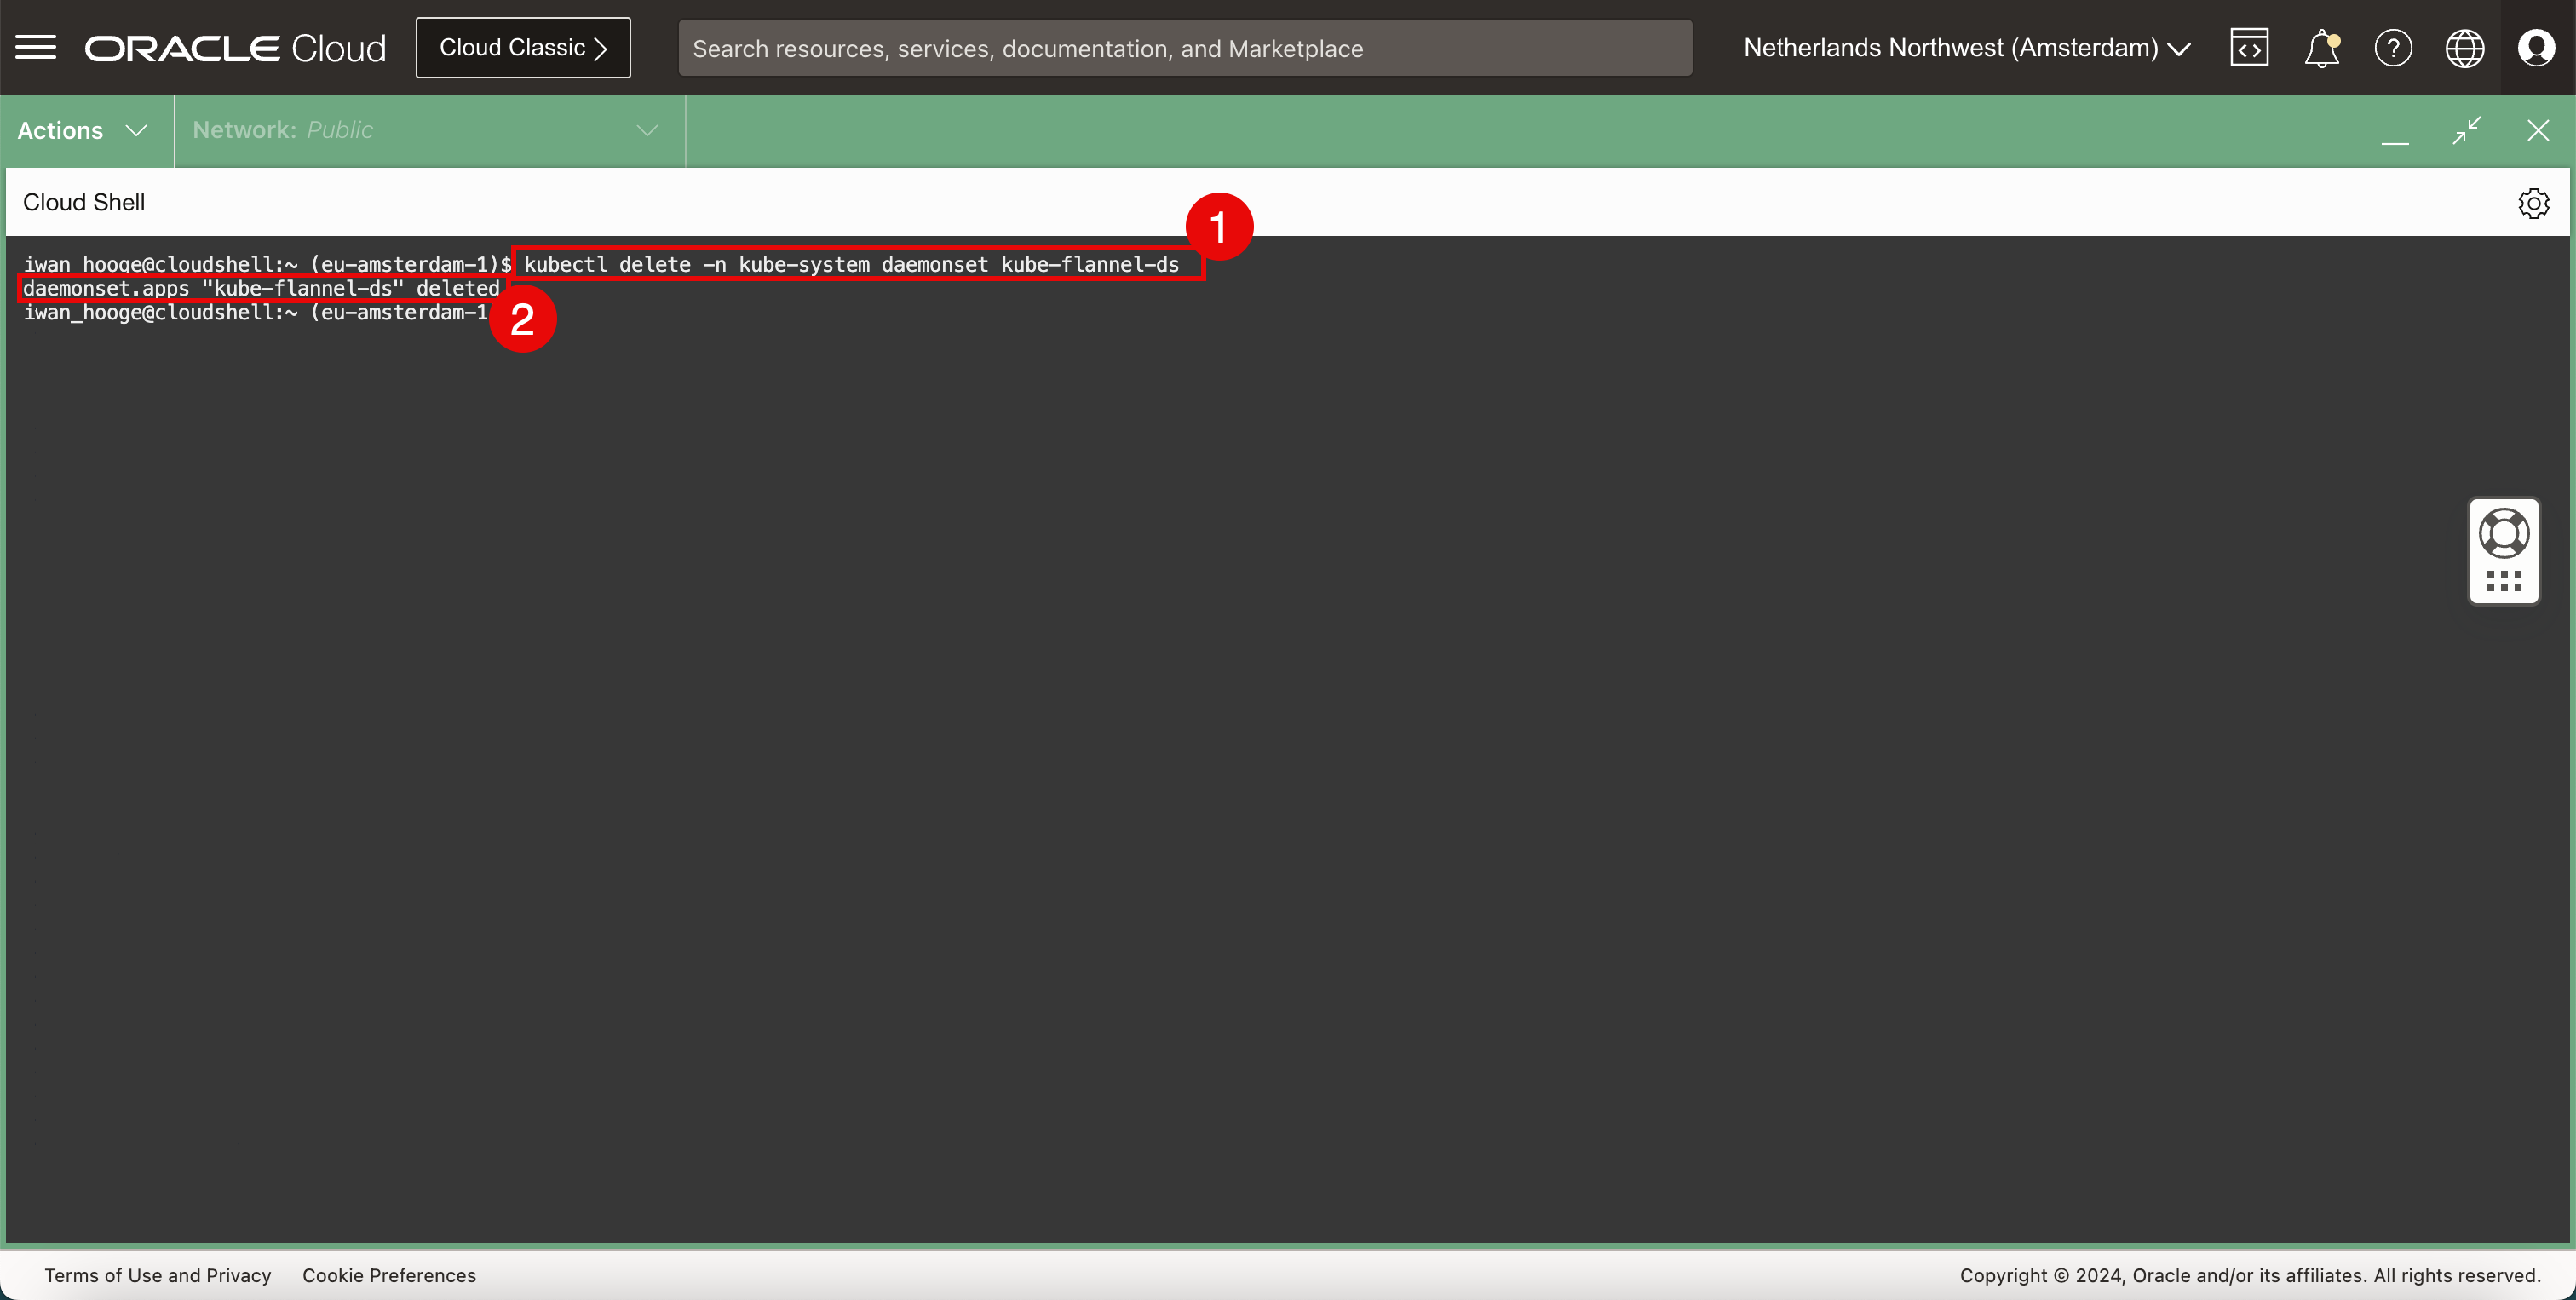
다음 명령을 실행하여 Flannel CNI 플러그인을 삭제합니다.
iwan_hooge@cloudshell:~ (eu-amsterdam-1)$ kubectl delete -n kube-system daemonset kube-flannel-ds daemonset.apps "kube-flannel-ds" deleted iwan_hooge@cloudshell:~ (eu-amsterdam-1)$ -
Flannel CNI 플러그인이 성공적으로 삭제되었다는 메시지를 확인합니다.
-
-
현재 배치된 CNI 플러그인을 확인합니다.
-
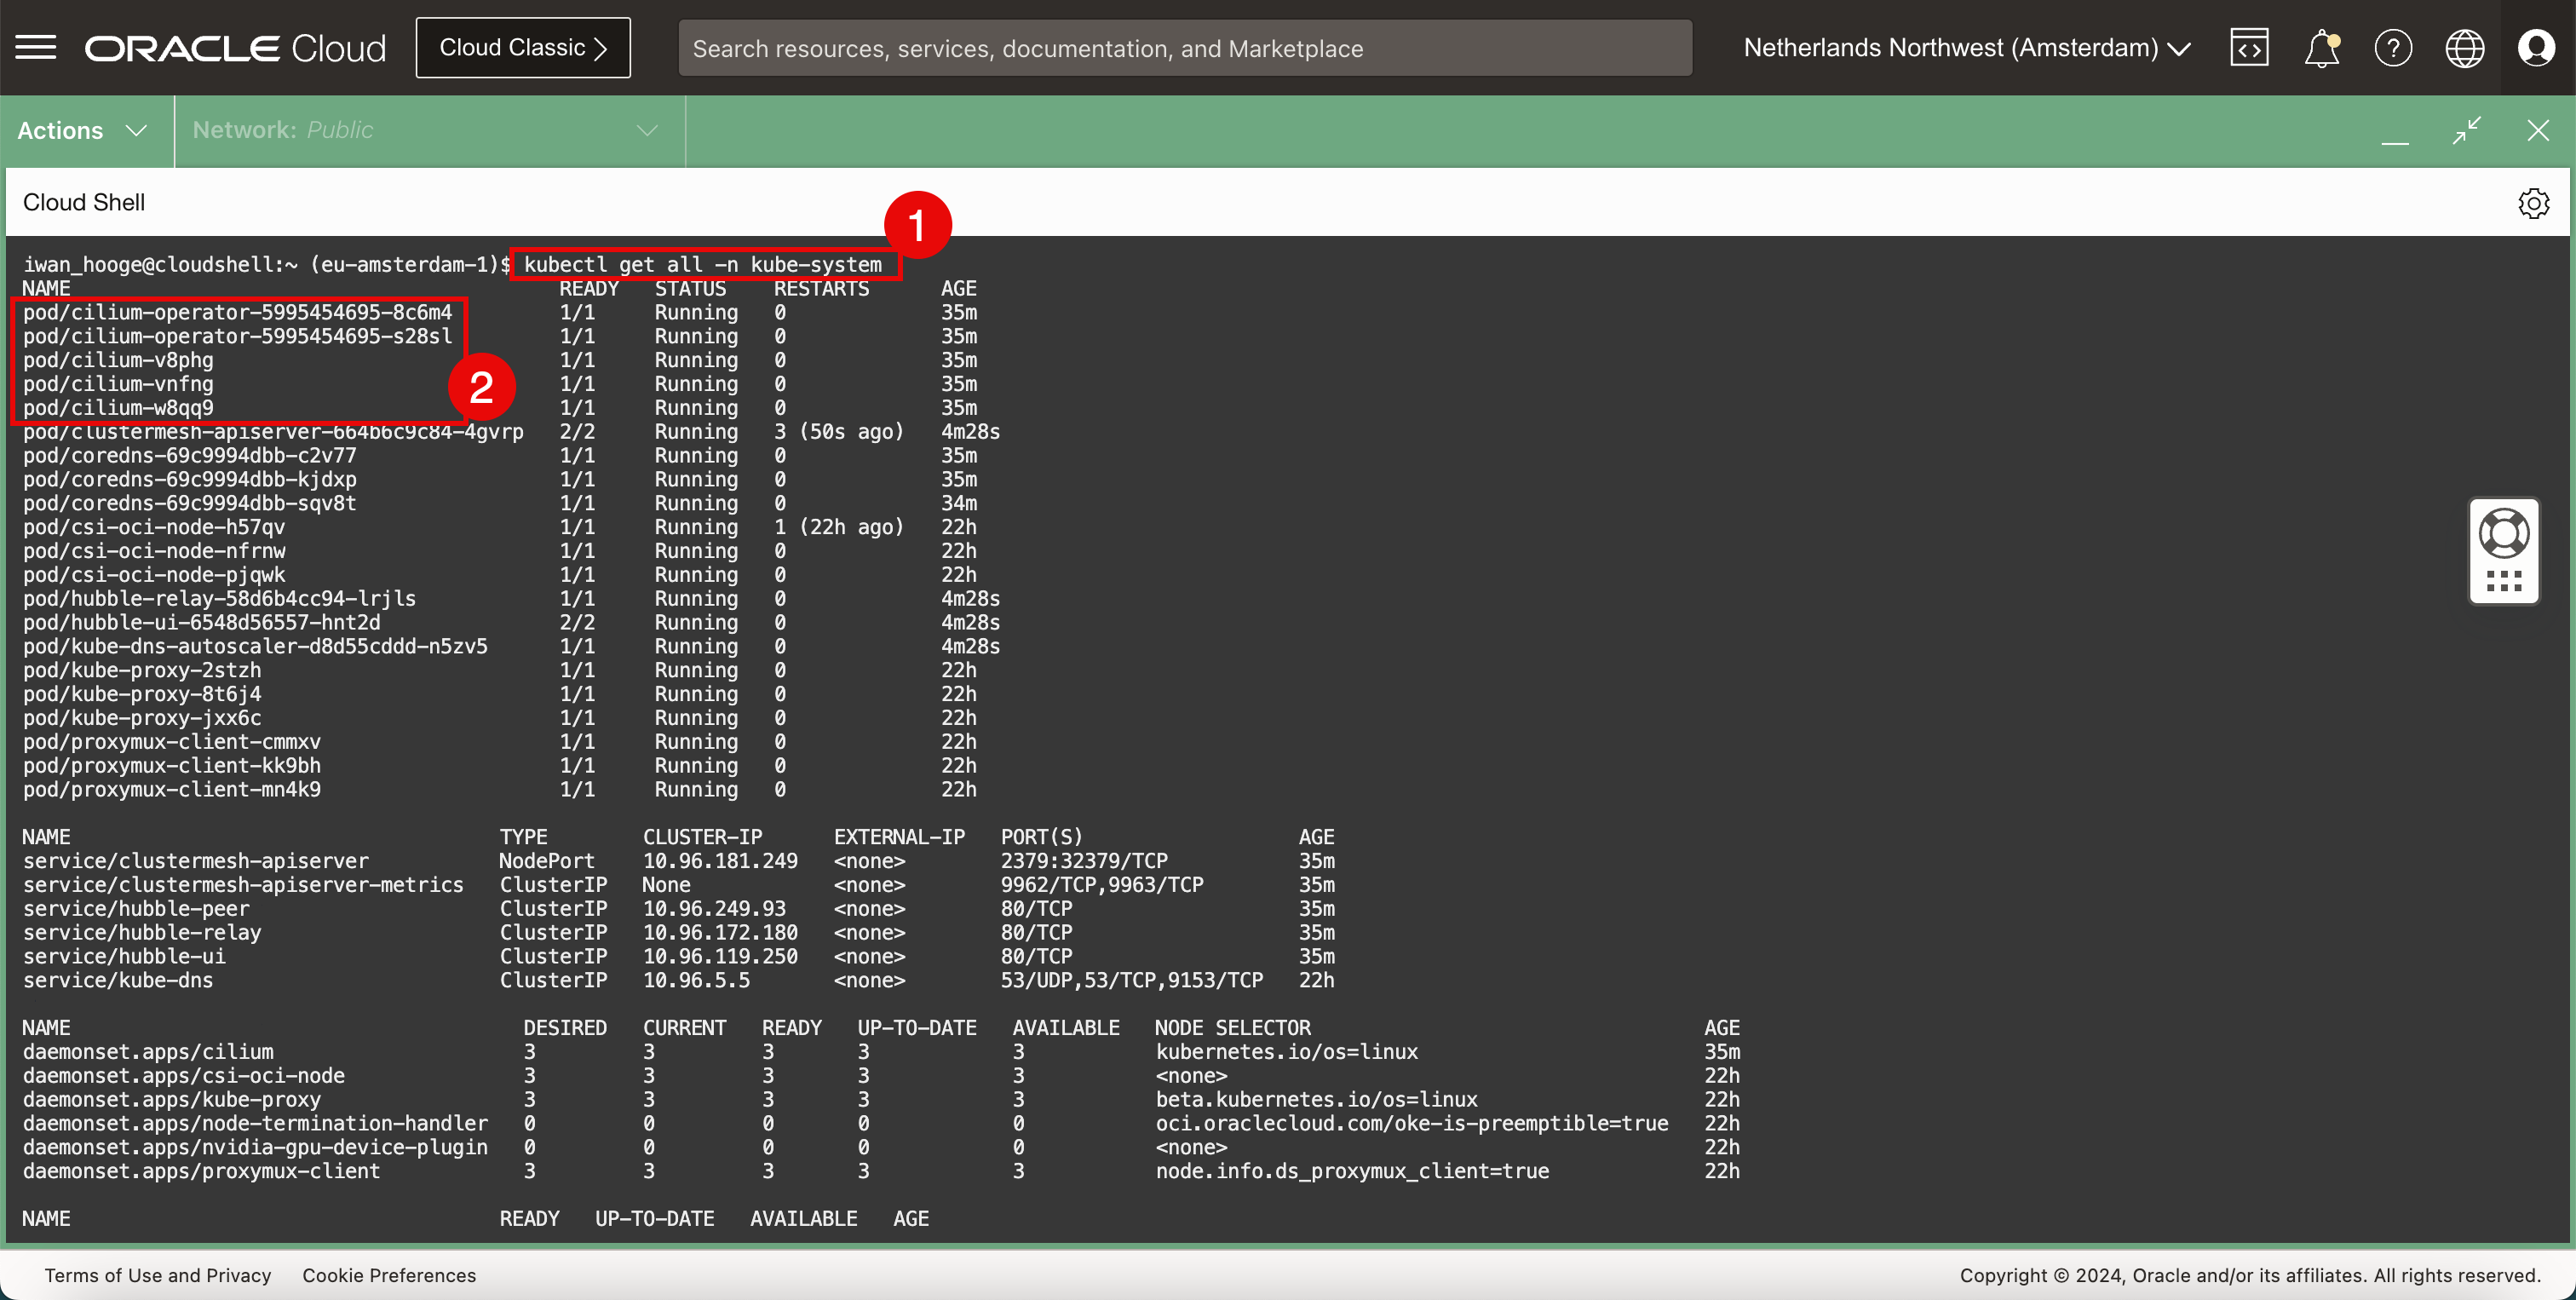
다음 명령을 실행하여 현재 배치된 CNI 플러그인(실륨)을 확인합니다.
iwan_hooge@cloudshell:~ (eu-amsterdam-1)$ kubectl get all -n kube-system NAME READY STATUS RESTARTS AGE pod/cilium-operator-5995454695-8c6m4 1/1 Running 0 35m pod/cilium-operator-5995454695-s28sl 1/1 Running 0 35m pod/cilium-v8phg 1/1 Running 0 35m pod/cilium-vnfng 1/1 Running 0 35m pod/cilium-w8qq9 1/1 Running 0 35m pod/clustermesh-apiserver-664b6c9c84-4gvrp 2/2 Running 3 (50s ago) 4m28s pod/coredns-69c9994dbb-c2v77 1/1 Running 0 35m pod/coredns-69c9994dbb-kjdxp 1/1 Running 0 35m pod/coredns-69c9994dbb-sqv8t 1/1 Running 0 34m pod/csi-oci-node-h57qv 1/1 Running 1 (22h ago) 22h pod/csi-oci-node-nfrnw 1/1 Running 0 22h pod/csi-oci-node-pjqwk 1/1 Running 0 22h pod/hubble-relay-58d6b4cc94-lrjls 1/1 Running 0 4m28s pod/hubble-ui-6548d56557-hnt2d 2/2 Running 0 4m28s pod/kube-dns-autoscaler-d8d55cddd-n5zv5 1/1 Running 0 4m28s pod/kube-proxy-2stzh 1/1 Running 0 22h pod/kube-proxy-8t6j4 1/1 Running 0 22h pod/kube-proxy-jxx6c 1/1 Running 0 22h pod/proxymux-client-cmmxv 1/1 Running 0 22h pod/proxymux-client-kk9bh 1/1 Running 0 22h pod/proxymux-client-mn4k9 1/1 Running 0 22h NAME TYPE CLUSTER-IP EXTERNAL-IP PORT(S) AGE service/clustermesh-apiserver NodePort 10.96.181.249 <none> 2379:32379/TCP 35m service/clustermesh-apiserver-metrics ClusterIP None <none> 9962/TCP,9963/TCP 35m service/hubble-peer ClusterIP 10.96.249.93 <none> 80/TCP 35m service/hubble-relay ClusterIP 10.96.172.180 <none> 80/TCP 35m service/hubble-ui ClusterIP 10.96.119.250 <none> 80/TCP 35m service/kube-dns ClusterIP 10.96.5.5 <none> 53/UDP,53/TCP,9153/TCP 22h NAME DESIRED CURRENT READY UP-TO-DATE AVAILABLE NODE SELECTOR AGE daemonset.apps/cilium 3 3 3 3 3 kubernetes.io/os=linux 35m daemonset.apps/csi-oci-node 3 3 3 3 3 <none> 22h daemonset.apps/kube-proxy 3 3 3 3 3 beta.kubernetes.io/os=linux 22h daemonset.apps/node-termination-handler 0 0 0 0 0 oci.oraclecloud.com/oke-is-preemptible=true 22h daemonset.apps/nvidia-gpu-device-plugin 0 0 0 0 0 <none> 22h daemonset.apps/proxymux-client 3 3 3 3 3 node.info.ds_proxymux_client=true 22h NAME READY UP-TO-DATE AVAILABLE AGE deployment.apps/cilium-operator 2/2 2 2 35m deployment.apps/clustermesh-apiserver 1/1 1 1 35m deployment.apps/coredns 3/3 3 3 22h deployment.apps/hubble-relay 1/1 1 1 35m deployment.apps/hubble-ui 1/1 1 1 35m deployment.apps/kube-dns-autoscaler 1/1 1 1 22h NAME DESIRED CURRENT READY AGE replicaset.apps/cilium-operator-5995454695 2 2 2 35m replicaset.apps/clustermesh-apiserver-664b6c9c84 1 1 1 35m replicaset.apps/coredns-69c9994dbb 3 3 3 22h replicaset.apps/hubble-relay-58d6b4cc94 1 1 1 35m replicaset.apps/hubble-ui-6548d56557 1 1 1 35m replicaset.apps/kube-dns-autoscaler-d8d55cddd 1 1 1 22h iwan_hooge@cloudshell:~ (eu-amsterdam-1)$ -
Cilium CNI 플러그인이 있고 Flannel CNI 플러그인이 제거되었습니다.
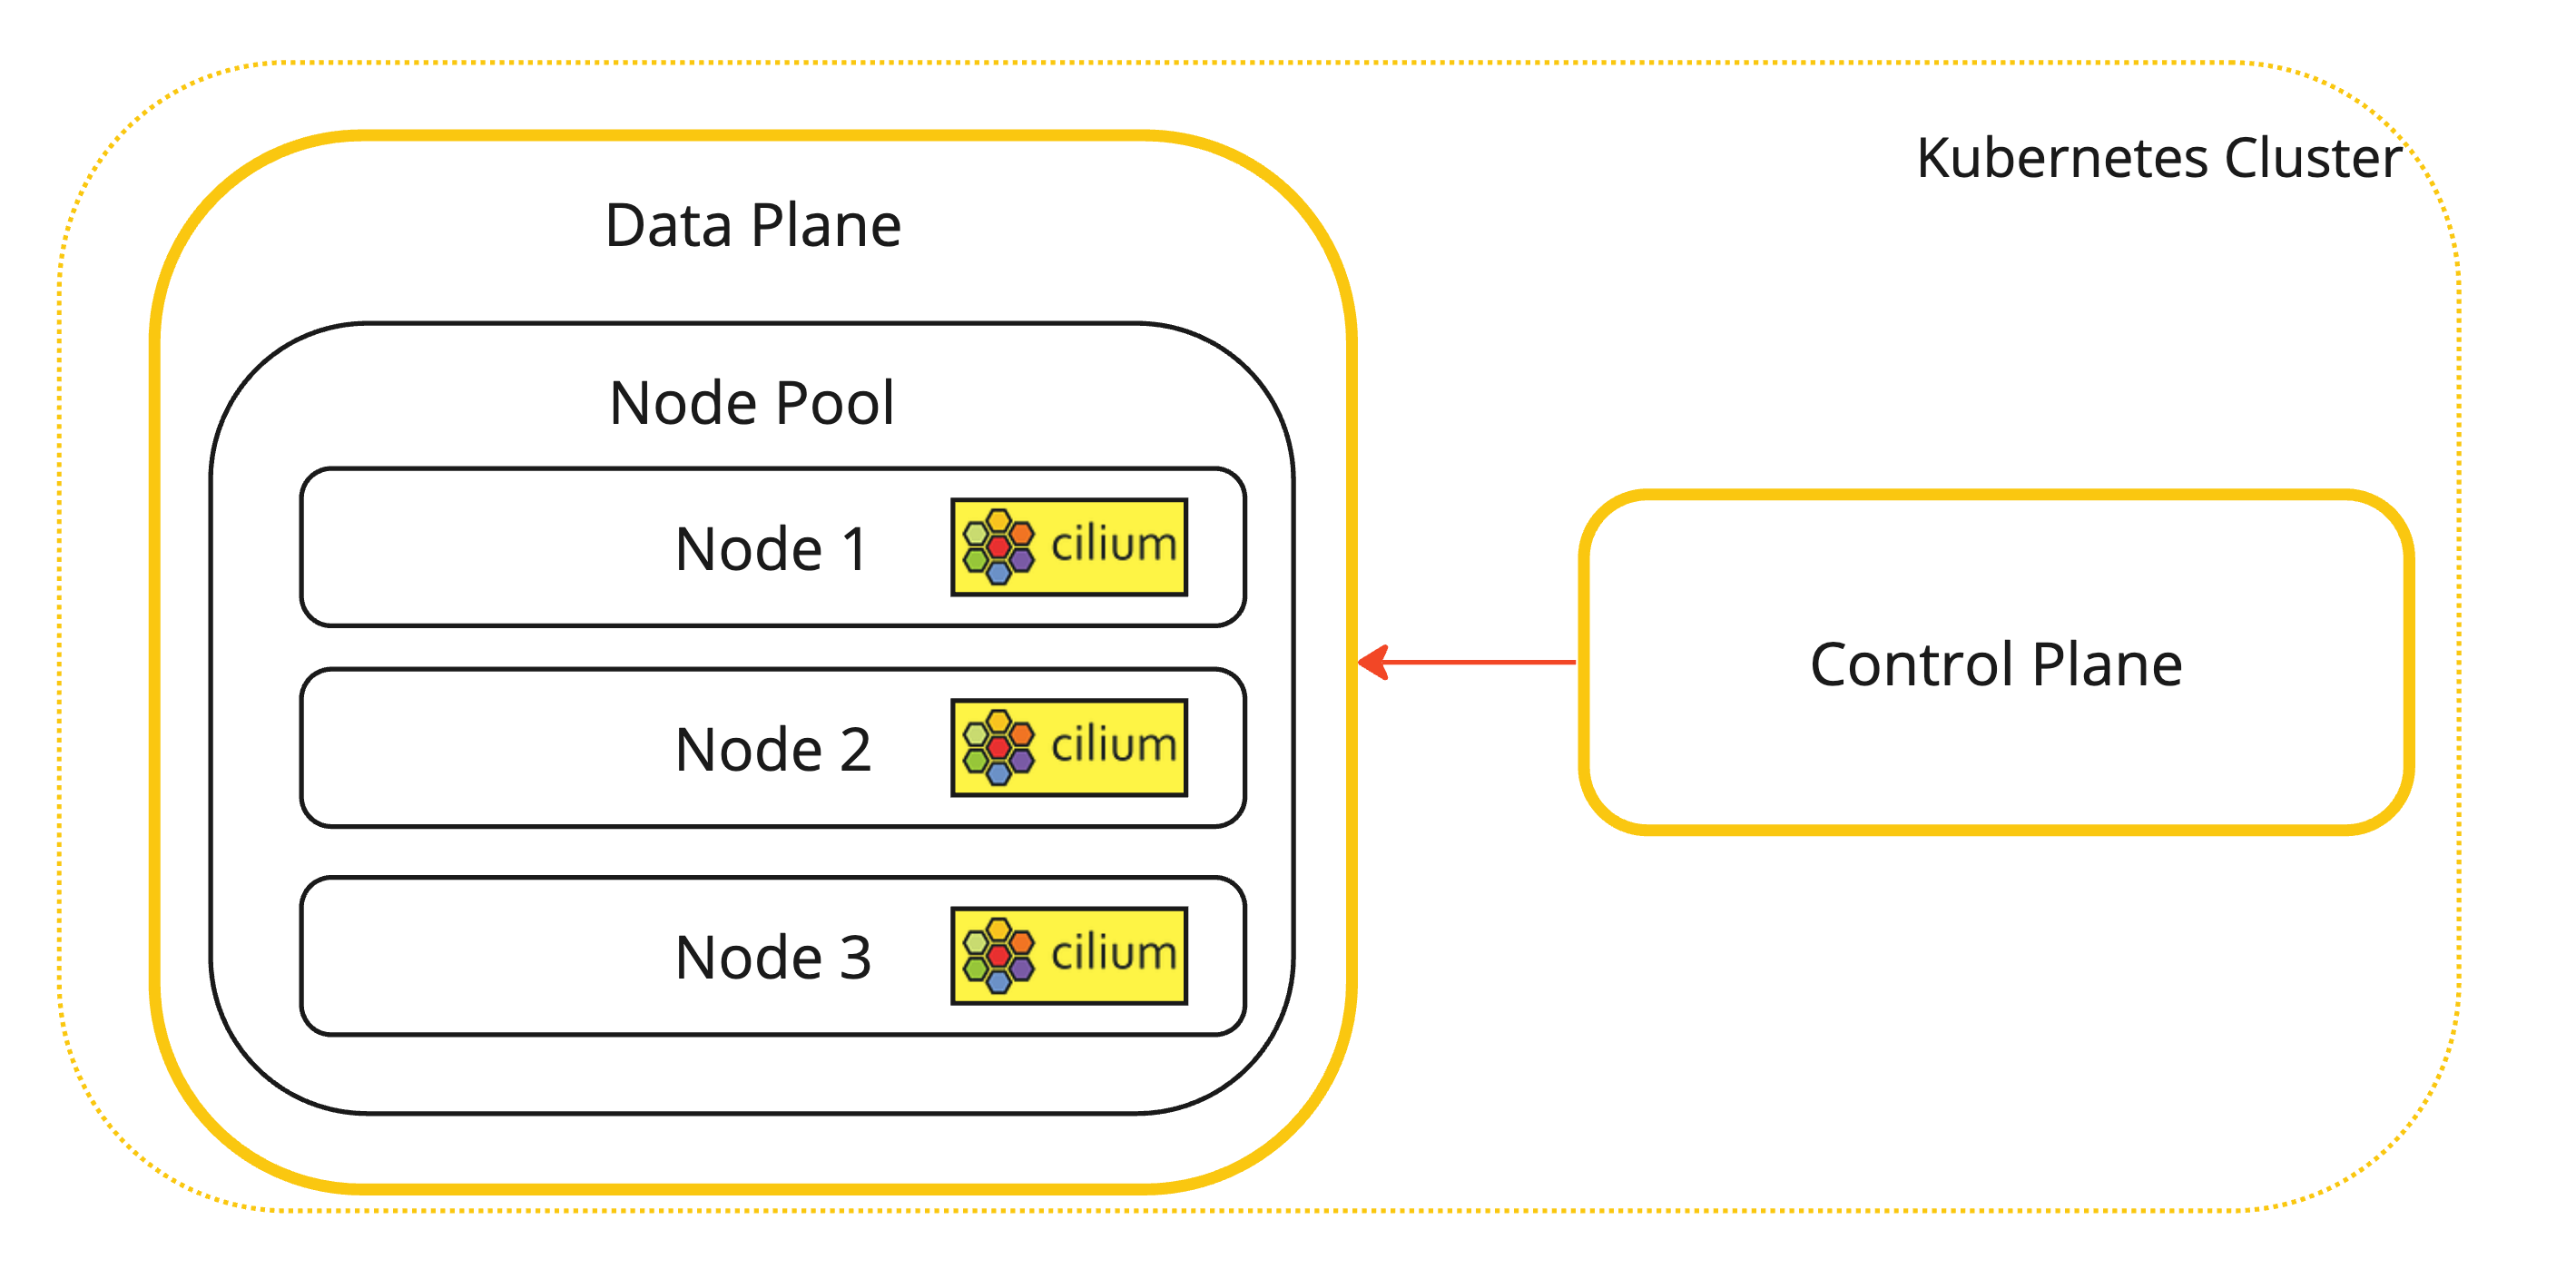
이는 Cilium CNI 플러그인이 설치된 Kubernetes 워커 노드의 시각적 표현입니다.
-
-
Cilium이 설치된 위치를 확인하는 데 사용할 수 있는 추가 명령입니다.
iwan_hooge@cloudshell:~ (eu-amsterdam-1)$ kubectl -n kube-system get pods -l k8s-app=cilium NAME READY STATUS RESTARTS AGE cilium-v8phg 1/1 Running 0 22h cilium-vnfng 1/1 Running 0 22h cilium-w8qq9 1/1 Running 0 22h iwan_hooge@cloudshell:~ (eu-amsterdam-1)$ -
Cilium으로 Kubernetes 클러스터의 상태를 확인합니다.
-
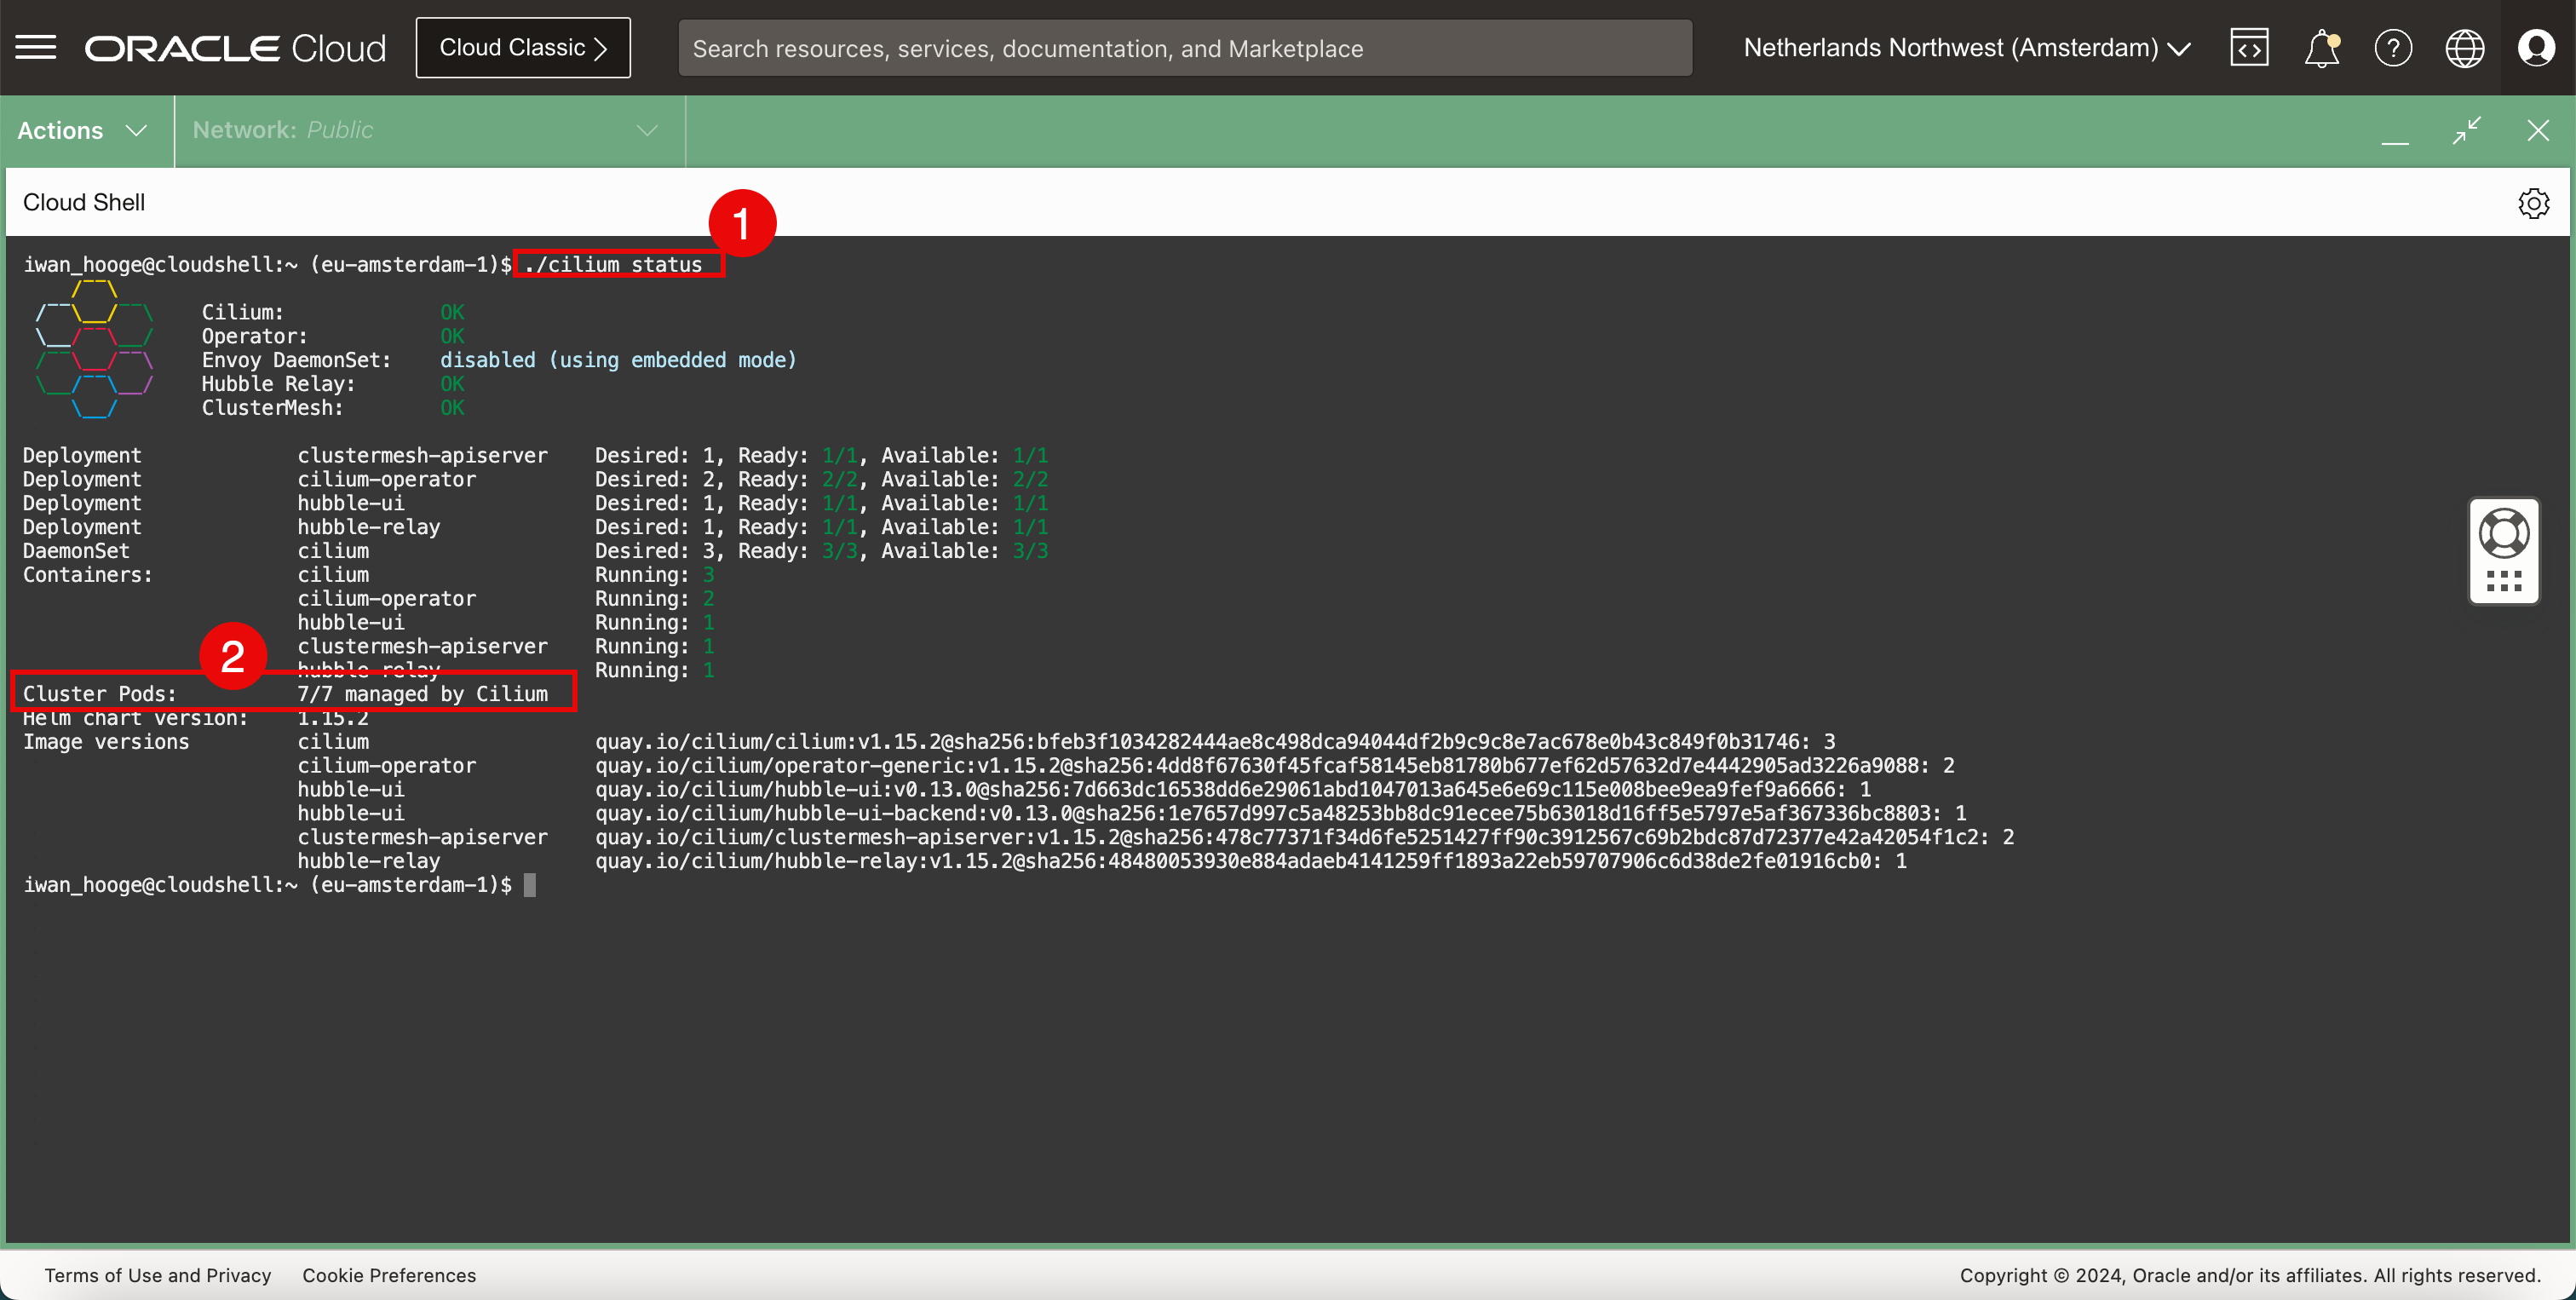
다음 명령을 실행하여 Cilium으로 Kubernetes 클러스터의 상태를 확인합니다.
iwan_hooge@cloudshell:~ (eu-amsterdam-1)$ ./cilium status /¯¯\ /¯¯\__/¯¯\ Cilium: OK \__/¯¯\__/ Operator: OK /¯¯\__/¯¯\ Envoy DaemonSet: disabled (using embedded mode) \__/¯¯\__/ Hubble Relay: OK \__/ ClusterMesh: OK Deployment clustermesh-apiserver Desired: 1, Ready: 1/1, Available: 1/1 Deployment cilium-operator Desired: 2, Ready: 2/2, Available: 2/2 Deployment hubble-ui Desired: 1, Ready: 1/1, Available: 1/1 Deployment hubble-relay Desired: 1, Ready: 1/1, Available: 1/1 DaemonSet cilium Desired: 3, Ready: 3/3, Available: 3/3 Containers: cilium Running: 3 cilium-operator Running: 2 hubble-ui Running: 1 clustermesh-apiserver Running: 1 hubble-relay Running: 1 Cluster Pods: 7/7 managed by Cilium Helm chart version: 1.15.2 Image versions cilium quay.io/cilium/cilium:v1.15.2@sha256:bfeb3f1034282444ae8c498dca94044df2b9c9c8e7ac678e0b43c849f0b31746: 3 cilium-operator quay.io/cilium/operator-generic:v1.15.2@sha256:4dd8f67630f45fcaf58145eb81780b677ef62d57632d7e4442905ad3226a9088: 2 hubble-ui quay.io/cilium/hubble-ui:v0.13.0@sha256:7d663dc16538dd6e29061abd1047013a645e6e69c115e008bee9ea9fef9a6666: 1 hubble-ui quay.io/cilium/hubble-ui-backend:v0.13.0@sha256:1e7657d997c5a48253bb8dc91ecee75b63018d16ff5e5797e5af367336bc8803: 1 clustermesh-apiserver quay.io/cilium/clustermesh-apiserver:v1.15.2@sha256:478c77371f34d6fe5251427ff90c3912567c69b2bdc87d72377e42a42054f1c2: 2 hubble-relay quay.io/cilium/hubble-relay:v1.15.2@sha256:48480053930e884adaeb4141259ff1893a22eb59707906c6d38de2fe01916cb0: 1 iwan_hooge@cloudshell:~ (eu-amsterdam-1)$ -
모든 클러스터 포드는 Cilium에서 관리합니다.
-
-
Cilium에는 Kubernetes 클러스터 내부의 네트워킹을 테스트할 수 있는 내장 연결 테스트가 있습니다. 다음 명령을 실행하여 Cilium 연결 테스트를 수행합니다.
iwan_hooge@cloudshell:~ (eu-amsterdam-1)$ ./cilium connectivity test
ℹ️  Monitor aggregation detected, will skip some flow validation steps
✨ [cluster-c6e7ypjgkyq] Creating namespace cilium-test for connectivity check...
✨ [cluster-c6e7ypjgkyq] Deploying echo-same-node service...
✨ [cluster-c6e7ypjgkyq] Deploying DNS test server configmap...
✨ [cluster-c6e7ypjgkyq] Deploying same-node deployment...
✨ [cluster-c6e7ypjgkyq] Deploying client deployment...
✨ [cluster-c6e7ypjgkyq] Deploying client2 deployment...
✨ [cluster-c6e7ypjgkyq] Deploying client3 deployment...
✨ [cluster-c6e7ypjgkyq] Deploying echo-other-node service...
✨ [cluster-c6e7ypjgkyq] Deploying other-node deployment...
✨ [host-netns] Deploying cluster-c6e7ypjgkyq daemonset...
✨ [host-netns-non-cilium] Deploying cluster-c6e7ypjgkyq daemonset...
ℹ️  Skipping tests that require a node Without Cilium
⌛ [cluster-c6e7ypjgkyq] Waiting for deployment cilium-test/client to become ready...
⌛ [cluster-c6e7ypjgkyq] Waiting for deployment cilium-test/client2 to become ready...
⌛ [cluster-c6e7ypjgkyq] Waiting for deployment cilium-test/echo-same-node to become ready...
⌛ [cluster-c6e7ypjgkyq] Waiting for deployment cilium-test/client3 to become ready...
⌛ [cluster-c6e7ypjgkyq] Waiting for deployment cilium-test/echo-other-node to become ready...
⌛ [cluster-c6e7ypjgkyq] Waiting for pod cilium-test/client-69748f45d8-pxzz5 to reach DNS server on cilium-test/echo-same-node-66b5db75b9-hxjws pod...
⌛ [cluster-c6e7ypjgkyq] Waiting for pod cilium-test/client2-56896f78f8-5tzsv to reach DNS server on cilium-test/echo-same-node-66b5db75b9-hxjws pod...
⌛ [cluster-c6e7ypjgkyq] Waiting for pod cilium-test/client3-5f56bc568c-xx8kd to reach DNS server on cilium-test/echo-same-node-66b5db75b9-hxjws pod...
⌛ [cluster-c6e7ypjgkyq] Waiting for pod cilium-test/client3-5f56bc568c-xx8kd to reach DNS server on cilium-test/echo-other-node-d8c5659dc-mhpkk pod...
⌛ [cluster-c6e7ypjgkyq] Waiting for pod cilium-test/client-69748f45d8-pxzz5 to reach DNS server on cilium-test/echo-other-node-d8c5659dc-mhpkk pod...
⌛ [cluster-c6e7ypjgkyq] Waiting for pod cilium-test/client2-56896f78f8-5tzsv to reach DNS server on cilium-test/echo-other-node-d8c5659dc-mhpkk pod...
⌛ [cluster-c6e7ypjgkyq] Waiting for pod cilium-test/client-69748f45d8-pxzz5 to reach default/kubernetes service...
⌛ [cluster-c6e7ypjgkyq] Waiting for pod cilium-test/client2-56896f78f8-5tzsv to reach default/kubernetes service...
⌛ [cluster-c6e7ypjgkyq] Waiting for pod cilium-test/client3-5f56bc568c-xx8kd to reach default/kubernetes service...
⌛ [cluster-c6e7ypjgkyq] Waiting for Service cilium-test/echo-other-node to become ready...
⌛ [cluster-c6e7ypjgkyq] Waiting for Service cilium-test/echo-other-node to be synchronized by Cilium pod kube-system/cilium-v8phg
⌛ [cluster-c6e7ypjgkyq] Waiting for Service cilium-test/echo-other-node to be synchronized by Cilium pod kube-system/cilium-vnfng
⌛ [cluster-c6e7ypjgkyq] Waiting for Service cilium-test/echo-same-node to become ready...
⌛ [cluster-c6e7ypjgkyq] Waiting for Service cilium-test/echo-same-node to be synchronized by Cilium pod kube-system/cilium-v8phg
⌛ [cluster-c6e7ypjgkyq] Waiting for Service cilium-test/echo-same-node to be synchronized by Cilium pod kube-system/cilium-vnfng
⌛ [cluster-c6e7ypjgkyq] Waiting for NodePort 10.0.10.132:31758 (cilium-test/echo-other-node) to become ready...
⌛ [cluster-c6e7ypjgkyq] Waiting for NodePort 10.0.10.132:31787 (cilium-test/echo-same-node) to become ready...
⌛ [cluster-c6e7ypjgkyq] Waiting for NodePort 10.0.10.178:31758 (cilium-test/echo-other-node) to become ready...
⌛ [cluster-c6e7ypjgkyq] Waiting for NodePort 10.0.10.178:31787 (cilium-test/echo-same-node) to become ready...
⌛ [cluster-c6e7ypjgkyq] Waiting for NodePort 10.0.10.79:31758 (cilium-test/echo-other-node) to become ready...
⌛ [cluster-c6e7ypjgkyq] Waiting for NodePort 10.0.10.79:31787 (cilium-test/echo-same-node) to become ready...
⌛ [cluster-c6e7ypjgkyq] Waiting for DaemonSet cilium-test/host-netns-non-cilium to become ready...
⌛ [cluster-c6e7ypjgkyq] Waiting for DaemonSet cilium-test/host-netns to become ready...
ℹ️  Skipping IPCache check
🔭 Enabling Hubble telescope...
⚠️  Unable to contact Hubble Relay, disabling Hubble telescope and flow validation: rpc error: code = Unavailable desc = connection error: desc = "transport: Error while dialing: dial tcp 127.0.0.1:4245: connect: connection refused"
ℹ️  Expose Relay locally with:
   cilium hubble enable
   cilium hubble port-forward&
ℹ️  Cilium version: 1.15.2
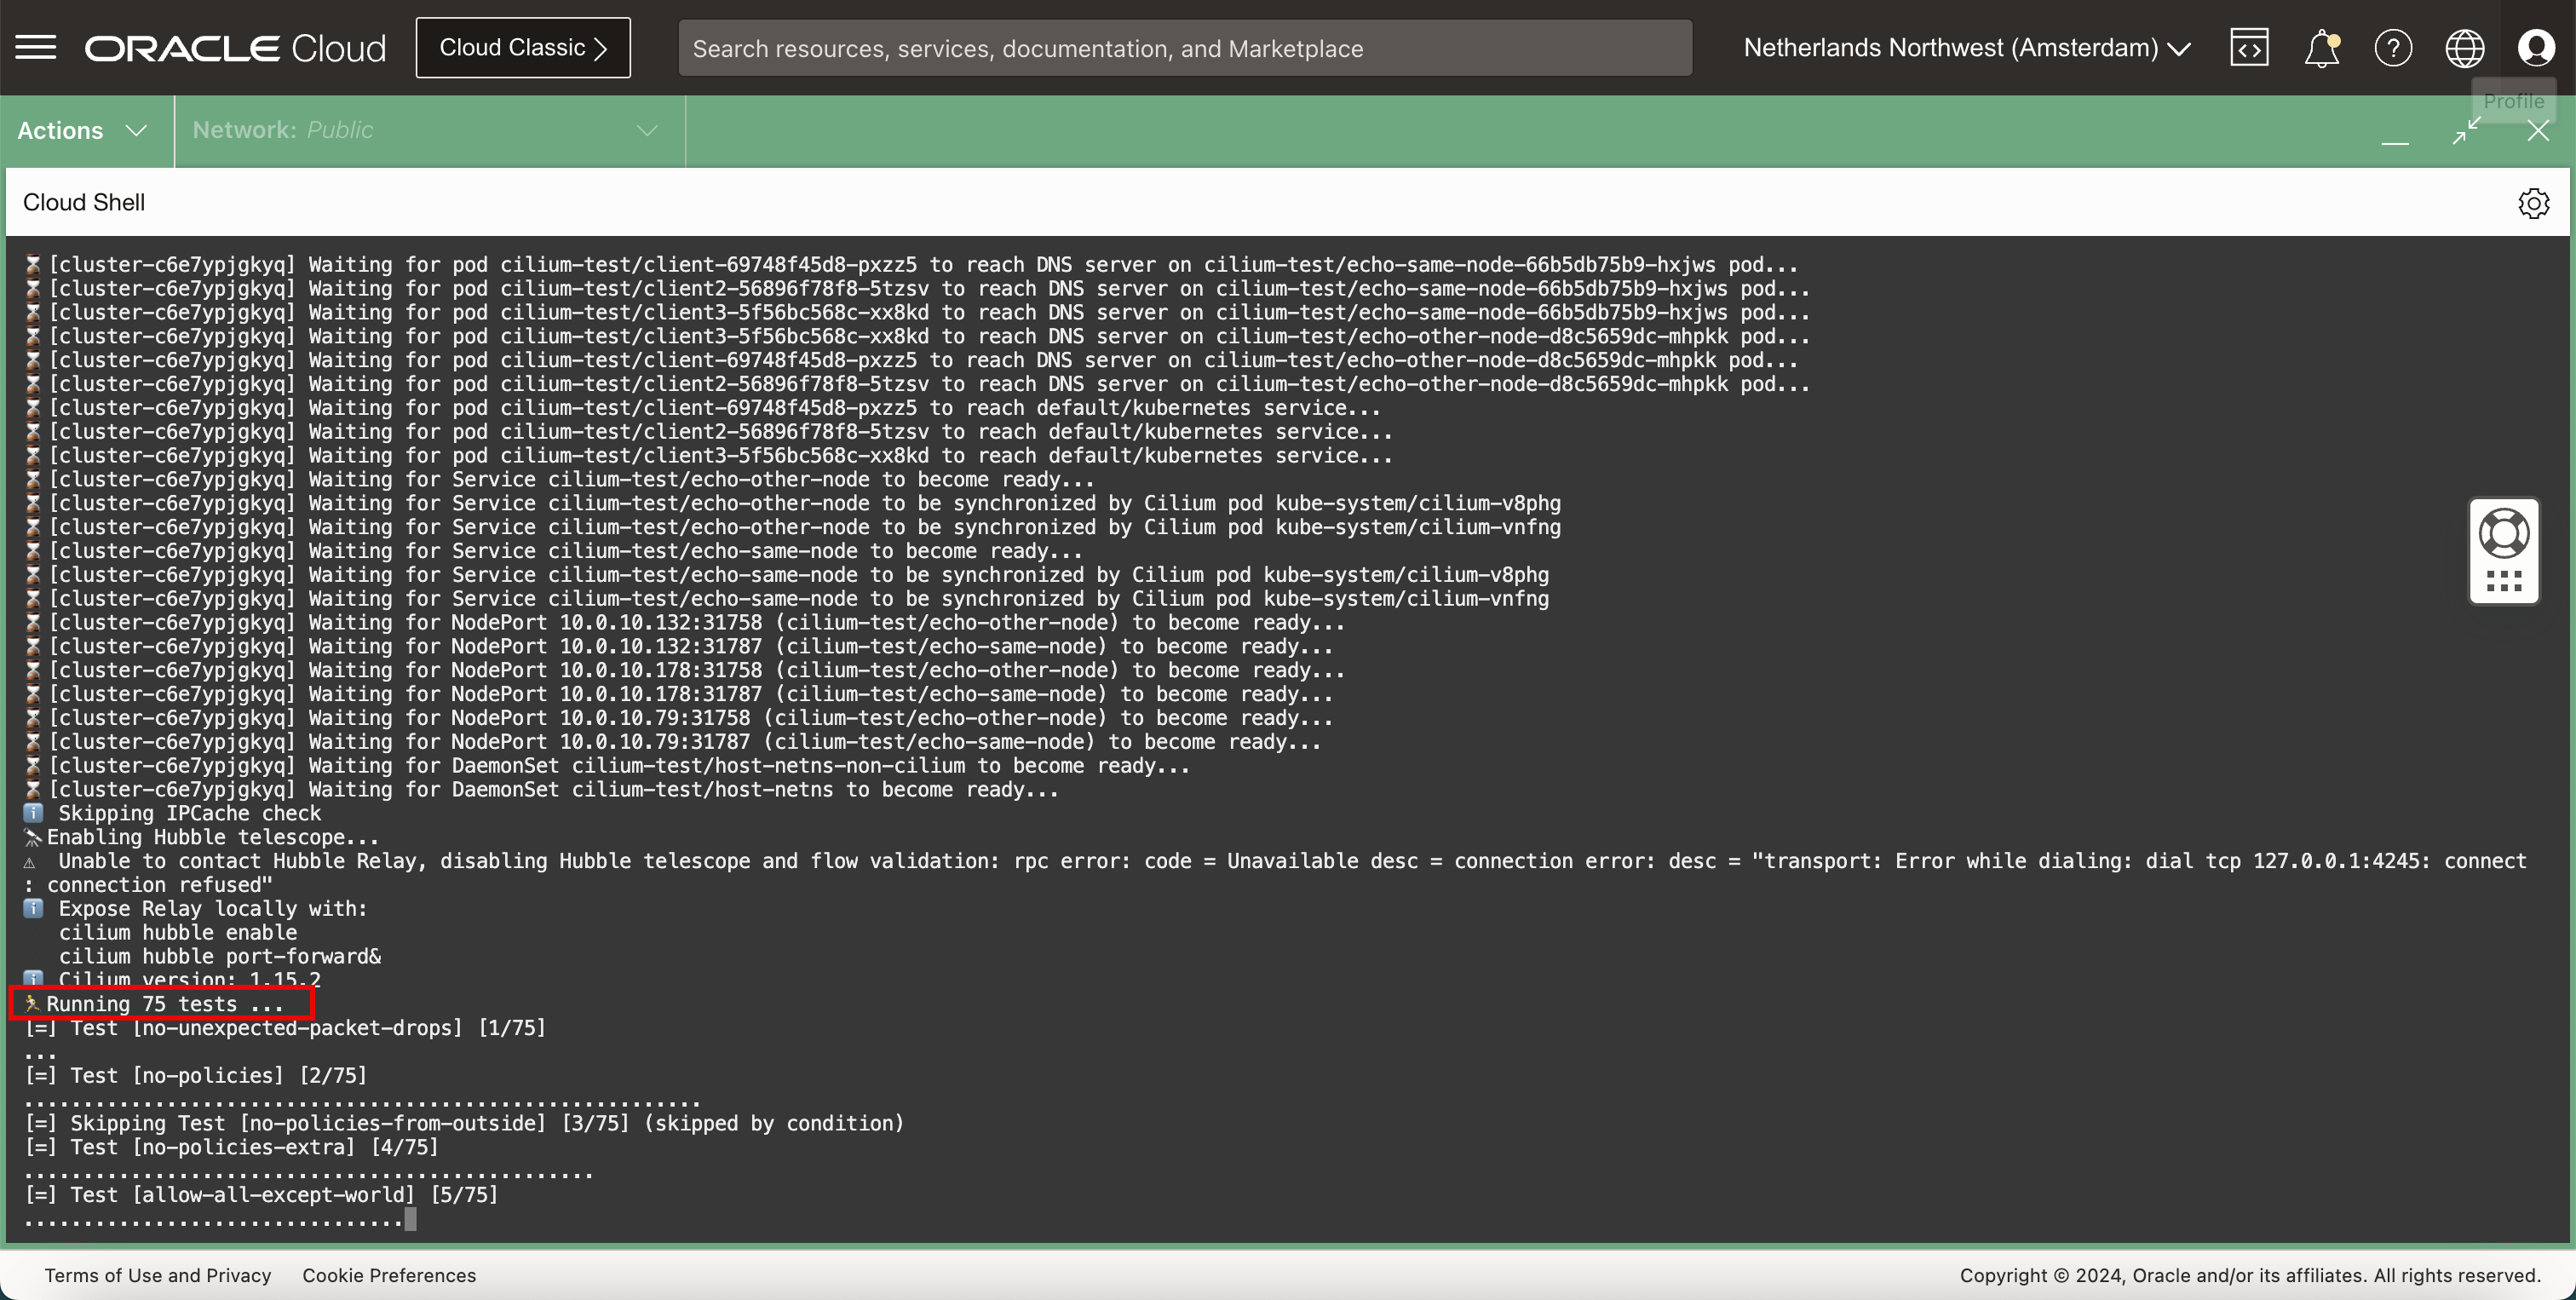
🏃 Running 75 tests ...
[=] Test [no-unexpected-packet-drops] [1/75]
...
[=] Test [no-policies] [2/75]
.........................................................
[=] Skipping Test [no-policies-from-outside] [3/75] (skipped by condition)
[=] Test [no-policies-extra] [4/75]
................................................
[=] Test [allow-all-except-world] [5/75]
....................................
[=] Test [client-ingress] [6/75]
......
[=] Test [client-ingress-knp] [7/75]
......
[=] Test [allow-all-with-metrics-check] [8/75]
......
[=] Test [all-ingress-deny] [9/75]
............
[=] Skipping Test [all-ingress-deny-from-outside] [10/75] (skipped by condition)
[=] Test [all-ingress-deny-knp] [11/75]
............
[=] Test [all-egress-deny] [12/75]
........................
[=] Test [all-egress-deny-knp] [13/75]
........................
[=] Test [all-entities-deny] [14/75]
............
[=] Test [cluster-entity] [15/75]
...
[=] Skipping Test [cluster-entity-multi-cluster] [16/75] (skipped by condition)
[=] Test [host-entity-egress] [17/75]
..................
[=] Test [host-entity-ingress] [18/75]
......
[=] Test [echo-ingress] [19/75]
......
[=] Skipping Test [echo-ingress-from-outside] [20/75] (skipped by condition)
[=] Test [echo-ingress-knp] [21/75]
......
[=] Test [client-ingress-icmp] [22/75]
......
[=] Test [client-egress] [23/75]
......
[=] Test [client-egress-knp] [24/75]
......
[=] Test [client-egress-expression] [25/75]
......
[=] Test [client-egress-expression-knp] [26/75]
......
[=] Test [client-with-service-account-egress-to-echo] [27/75]
......
[=] Test [client-egress-to-echo-service-account] [28/75]
......
[=] Test [to-entities-world] [29/75]
.........
[=] Test [to-cidr-external] [30/75]
......
[=] Test [to-cidr-external-knp] [31/75]
......
[=] Skipping Test [from-cidr-host-netns] [32/75] (skipped by condition)
[=] Test [echo-ingress-from-other-client-deny] [33/75]
..........
[=] Test [client-ingress-from-other-client-icmp-deny] [34/75]
............
[=] Test [client-egress-to-echo-deny] [35/75]
............
[=] Test [client-ingress-to-echo-named-port-deny] [36/75]
....
[=] Test [client-egress-to-echo-expression-deny] [37/75]
....
[=] Test [client-with-service-account-egress-to-echo-deny] [38/75]
....
[=] Test [client-egress-to-echo-service-account-deny] [39/75]
..
[=] Test [client-egress-to-cidr-deny] [40/75]
......
[=] Test [client-egress-to-cidr-deny-default] [41/75]
......
[=] Test [health] [42/75]
...
[=] Skipping Test [north-south-loadbalancing] [43/75] (Feature node-without-cilium is disabled)
[=] Test [pod-to-pod-encryption] [44/75]
.
[=] Test [node-to-node-encryption] [45/75]
...
[=] Skipping Test [egress-gateway] [46/75] (skipped by condition)
[=] Skipping Test [egress-gateway-excluded-cidrs] [47/75] (Feature enable-ipv4-egress-gateway is disabled)
[=] Skipping Test [pod-to-node-cidrpolicy] [48/75] (Feature cidr-match-nodes is disabled)
[=] Skipping Test [north-south-loadbalancing-with-l7-policy] [49/75] (Feature node-without-cilium is disabled)
[=] Test [echo-ingress-l7] [50/75]
..................
[=] Test [echo-ingress-l7-named-port] [51/75]
..................
[=] Test [client-egress-l7-method] [52/75]
..................
[=] Test [client-egress-l7] [53/75]
...............
[=] Test [client-egress-l7-named-port] [54/75]
...............
[=] Skipping Test [client-egress-l7-tls-deny-without-headers] [55/75] (Feature secret-backend-k8s is disabled)
[=] Skipping Test [client-egress-l7-tls-headers] [56/75] (Feature secret-backend-k8s is disabled)
[=] Skipping Test [client-egress-l7-set-header] [57/75] (Feature secret-backend-k8s is disabled)
[=] Skipping Test [echo-ingress-auth-always-fail] [58/75] (Feature mutual-auth-spiffe is disabled)
[=] Skipping Test [echo-ingress-mutual-auth-spiffe] [59/75] (Feature mutual-auth-spiffe is disabled)
[=] Skipping Test [pod-to-ingress-service] [60/75] (Feature ingress-controller is disabled)
[=] Skipping Test [pod-to-ingress-service-deny-all] [61/75] (Feature ingress-controller is disabled)
[=] Skipping Test [pod-to-ingress-service-deny-ingress-identity] [62/75] (Feature ingress-controller is disabled)
[=] Skipping Test [pod-to-ingress-service-deny-backend-service] [63/75] (Feature ingress-controller is disabled)
[=] Skipping Test [pod-to-ingress-service-allow-ingress-identity] [64/75] (Feature ingress-controller is disabled)
[=] Skipping Test [outside-to-ingress-service] [65/75] (Feature ingress-controller is disabled)
[=] Skipping Test [outside-to-ingress-service-deny-world-identity] [66/75] (Feature ingress-controller is disabled)
[=] Skipping Test [outside-to-ingress-service-deny-cidr] [67/75] (Feature ingress-controller is disabled)
[=] Skipping Test [outside-to-ingress-service-deny-all-ingress] [68/75] (Feature ingress-controller is disabled)
[=] Test [dns-only] [69/75]
...............
[=] Test [to-fqdns] [70/75]
............
[=] Skipping Test [pod-to-controlplane-host] [71/75] (skipped by condition)
[=] Skipping Test [pod-to-k8s-on-controlplane] [72/75] (skipped by condition)
[=] Skipping Test [pod-to-controlplane-host-cidr] [73/75] (skipped by condition)
[=] Skipping Test [pod-to-k8s-on-controlplane-cidr] [74/75] (skipped by condition)
[=] Test [check-log-errors] [75/75]
.............................

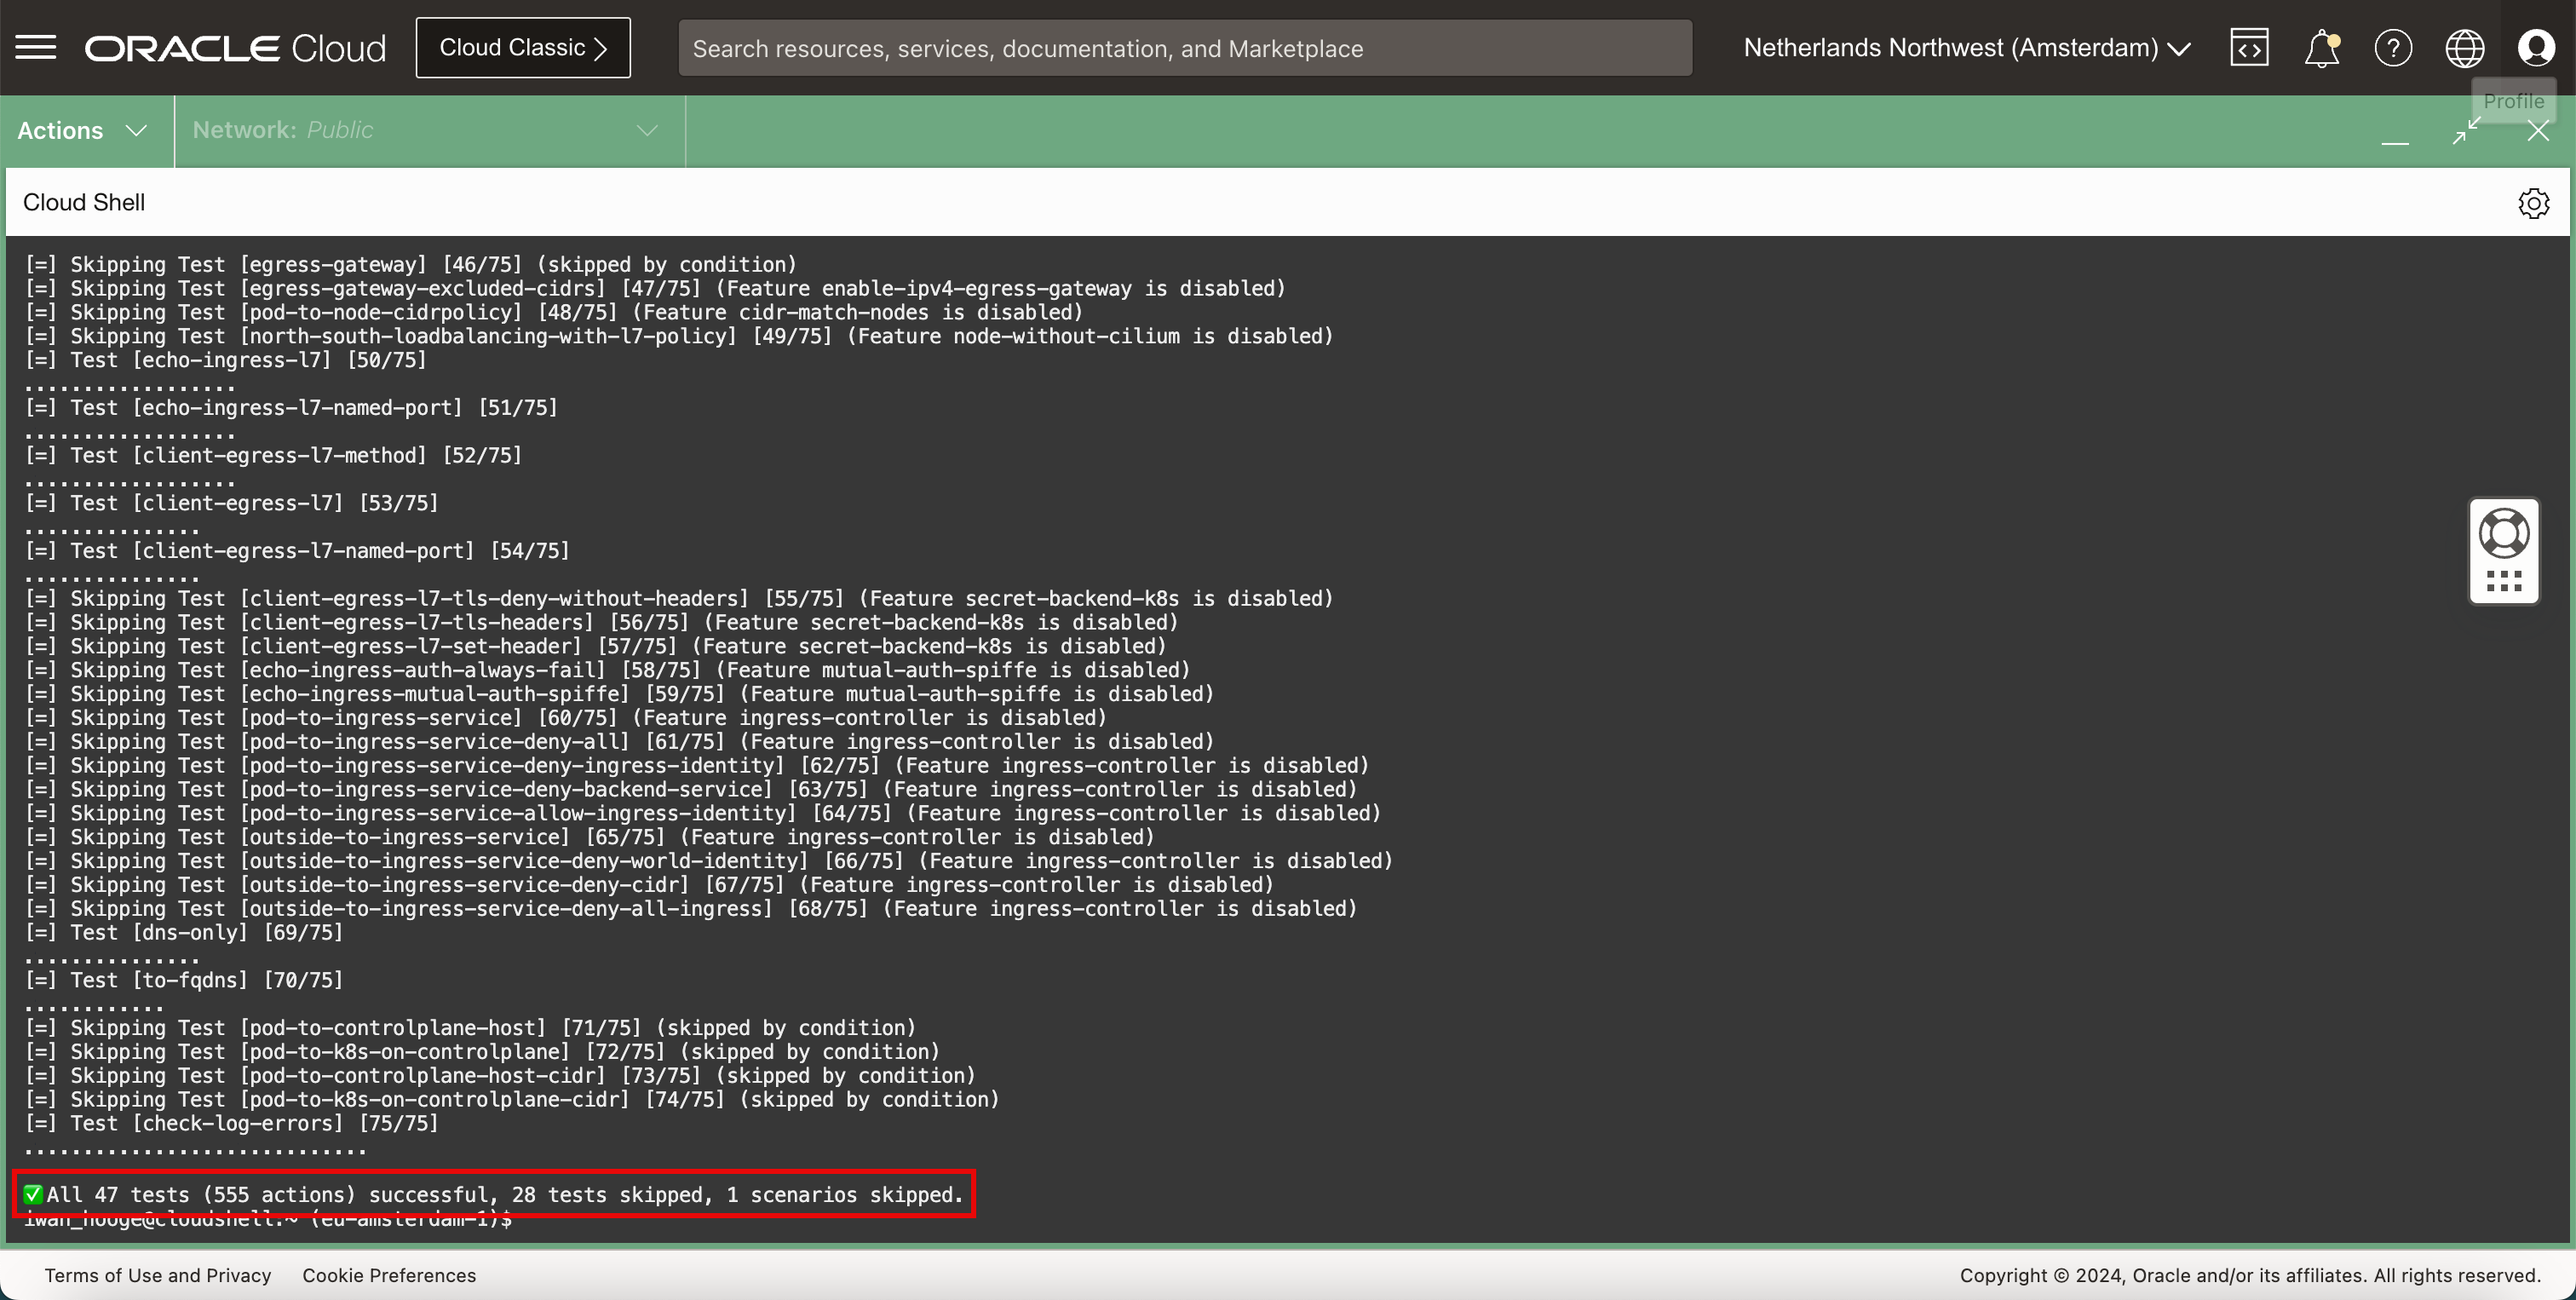
✅ All 47 tests (555 actions) successful, 28 tests skipped, 1 scenarios skipped.
iwan_hooge@cloudshell:~ (eu-amsterdam-1)$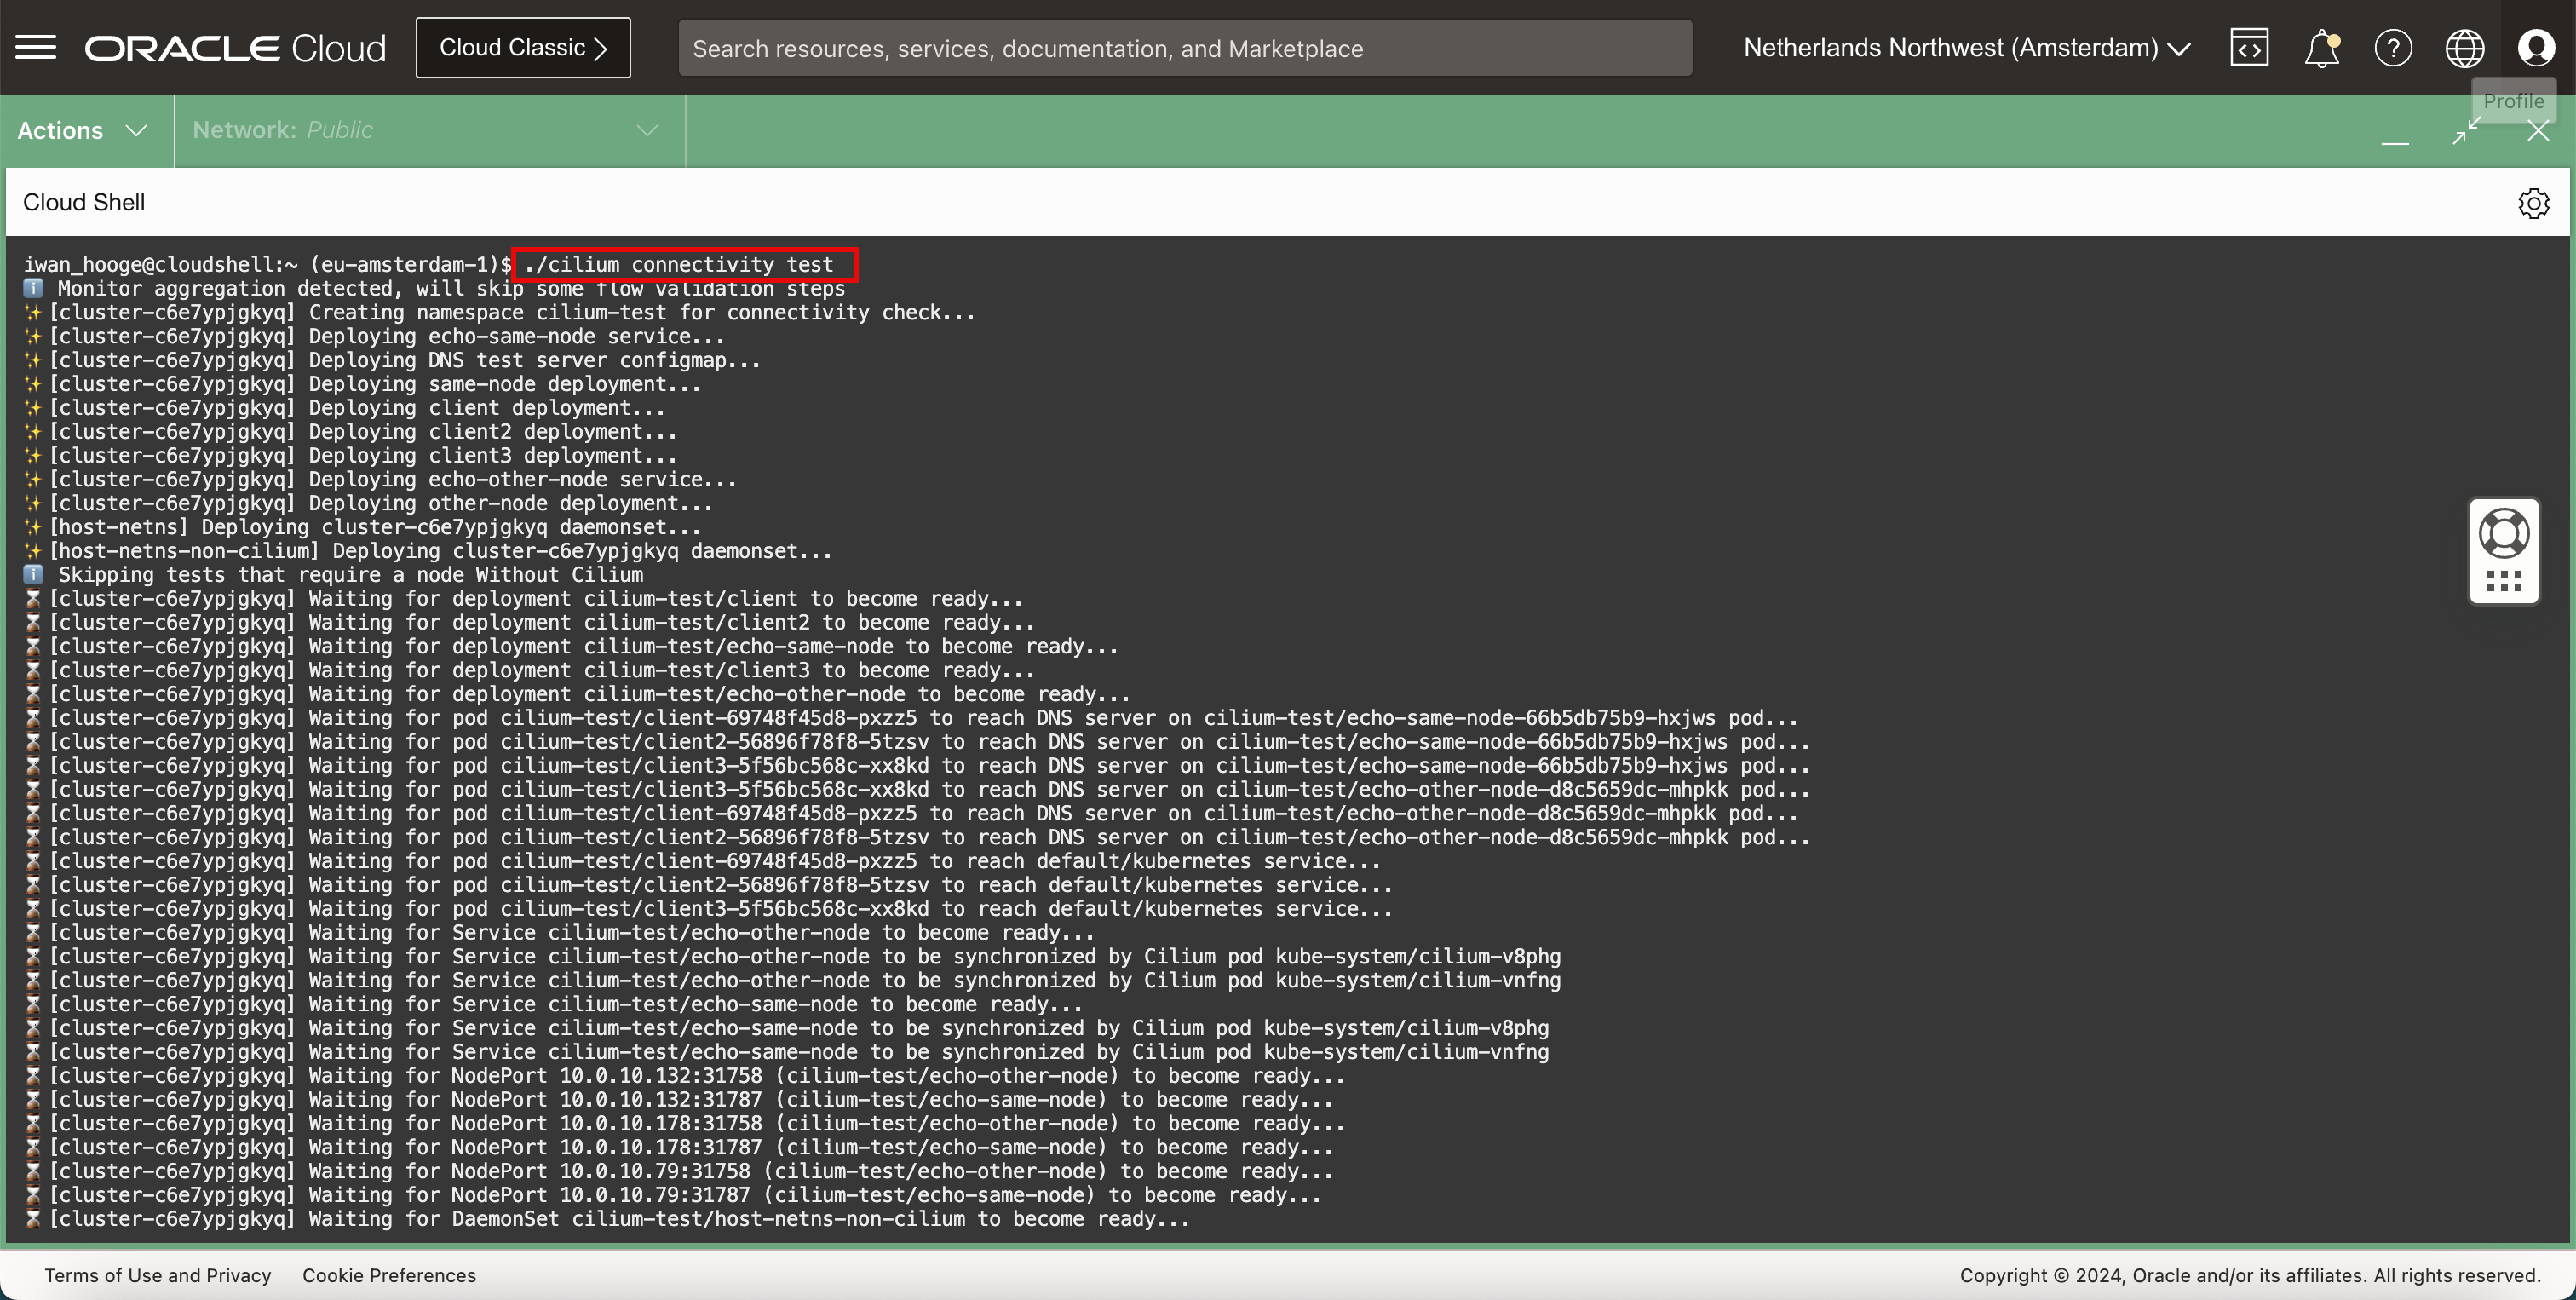
-
이 경우 테스트에서 75개의 테스트를 실행하기로 결정했습니다.
-
테스트가 완료되면 요약이 표시됩니다.
작업 3: 샘플 웹 응용 프로그램 및 서비스 배치
-
샘플 웹 응용 프로그램 및 서비스를 배치합니다.
-
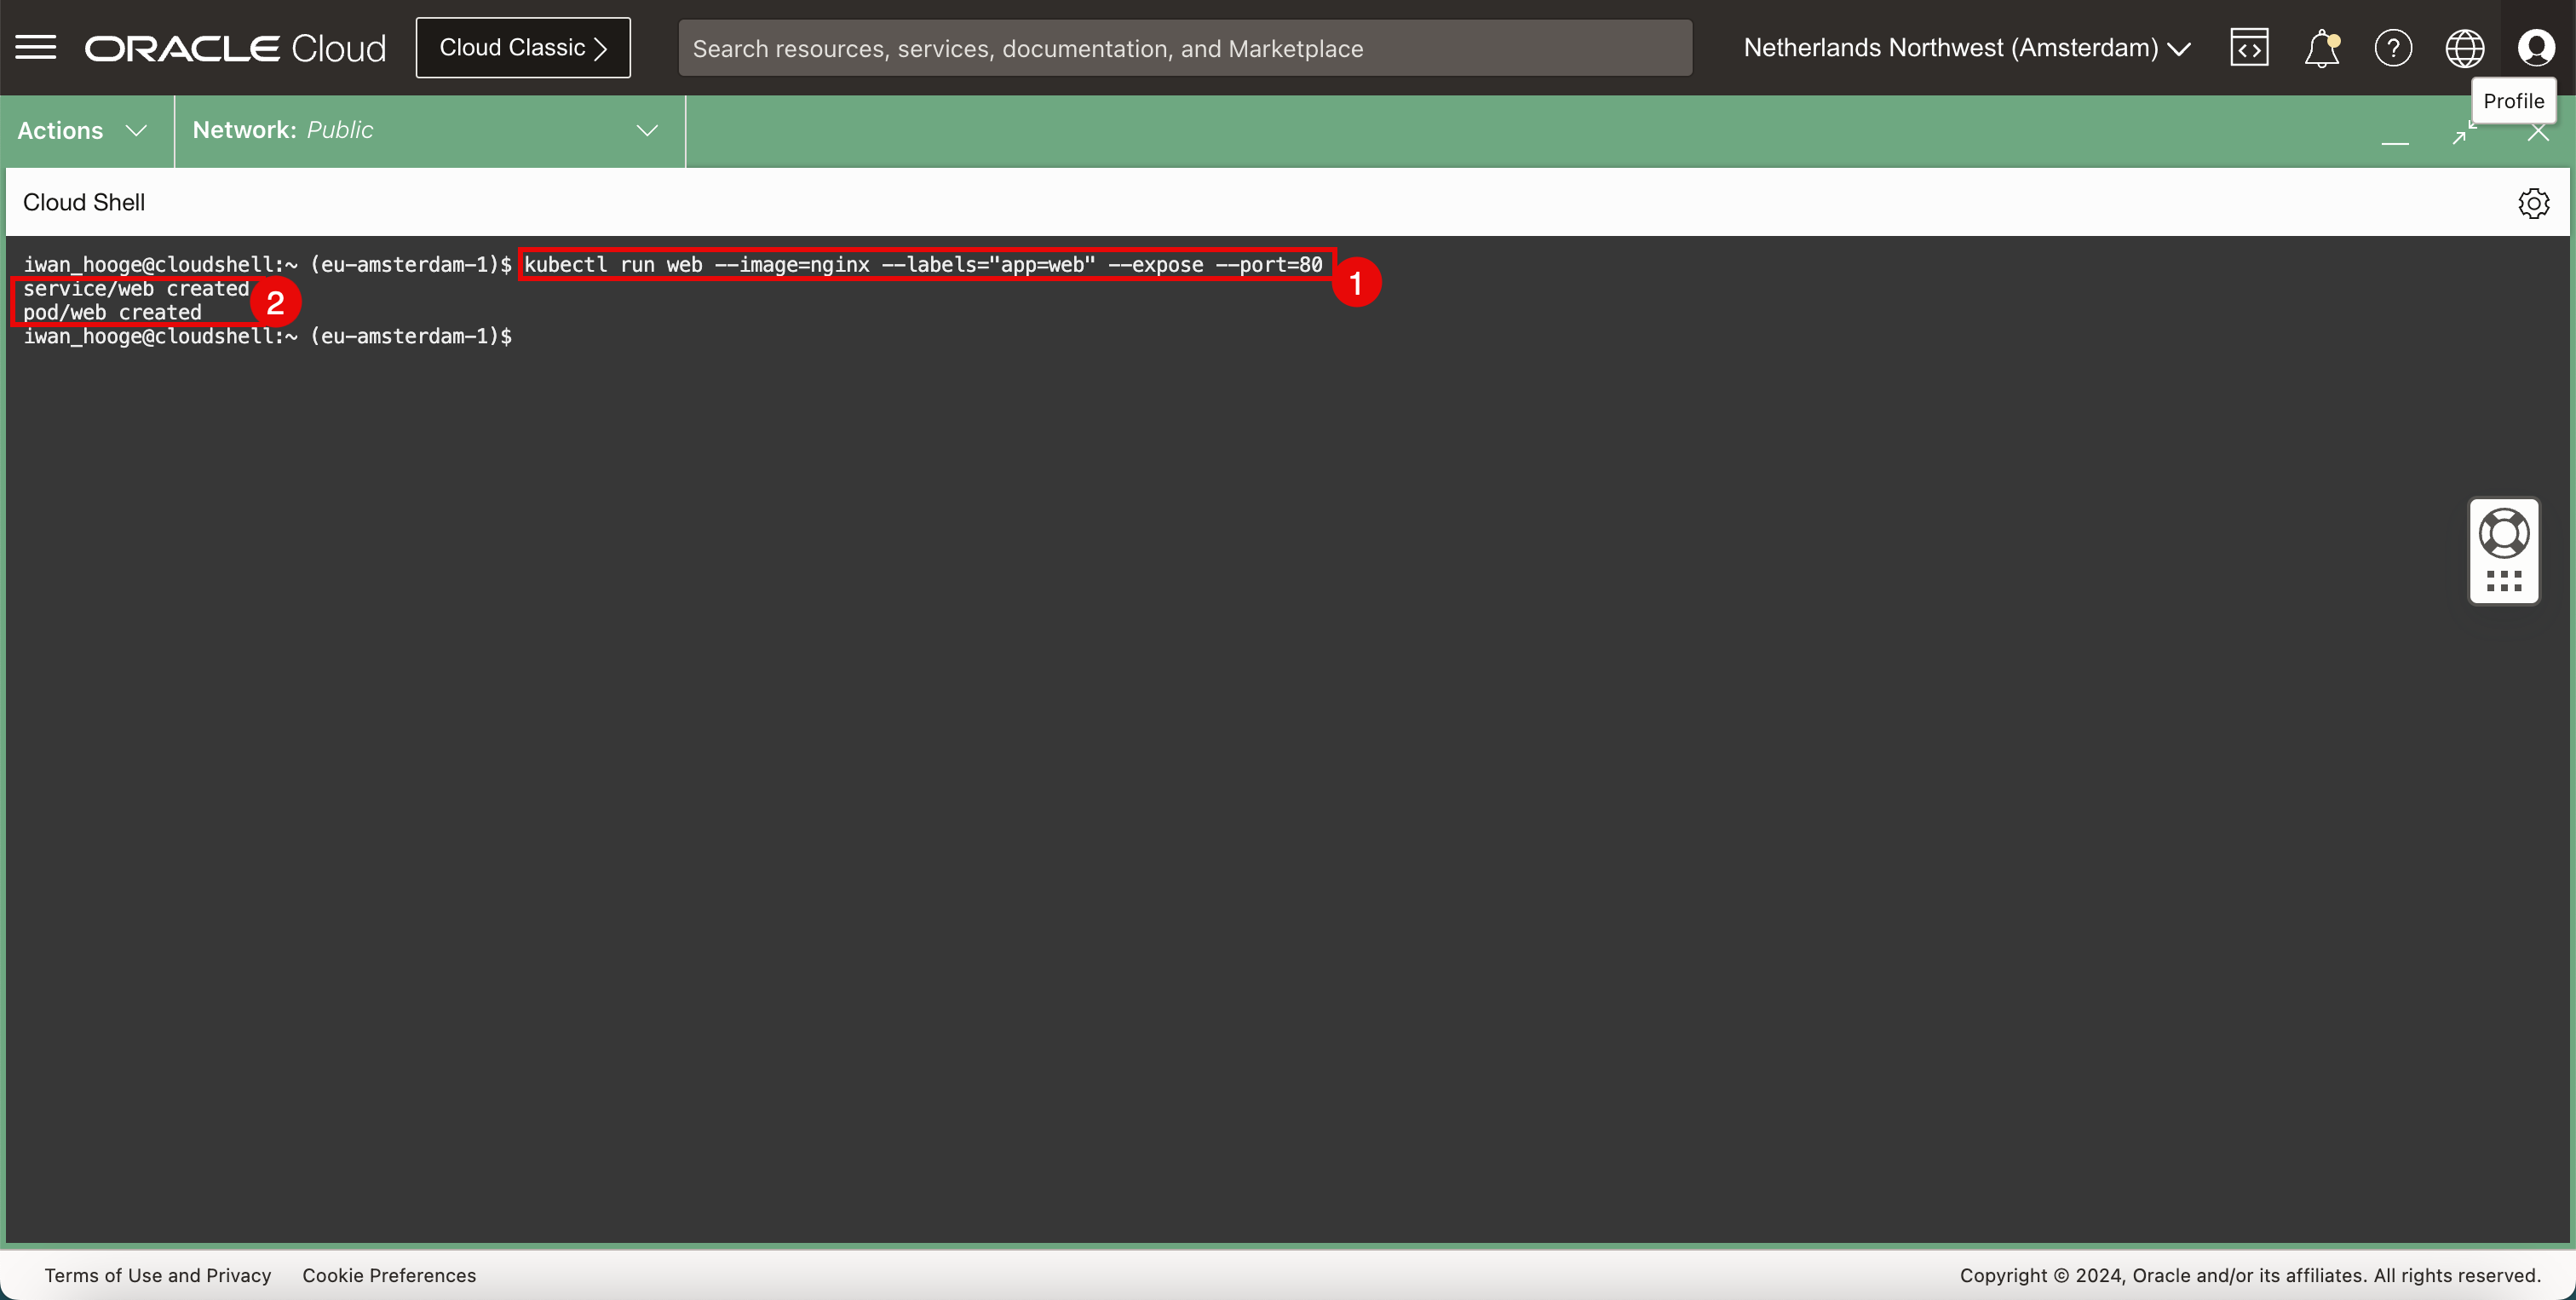
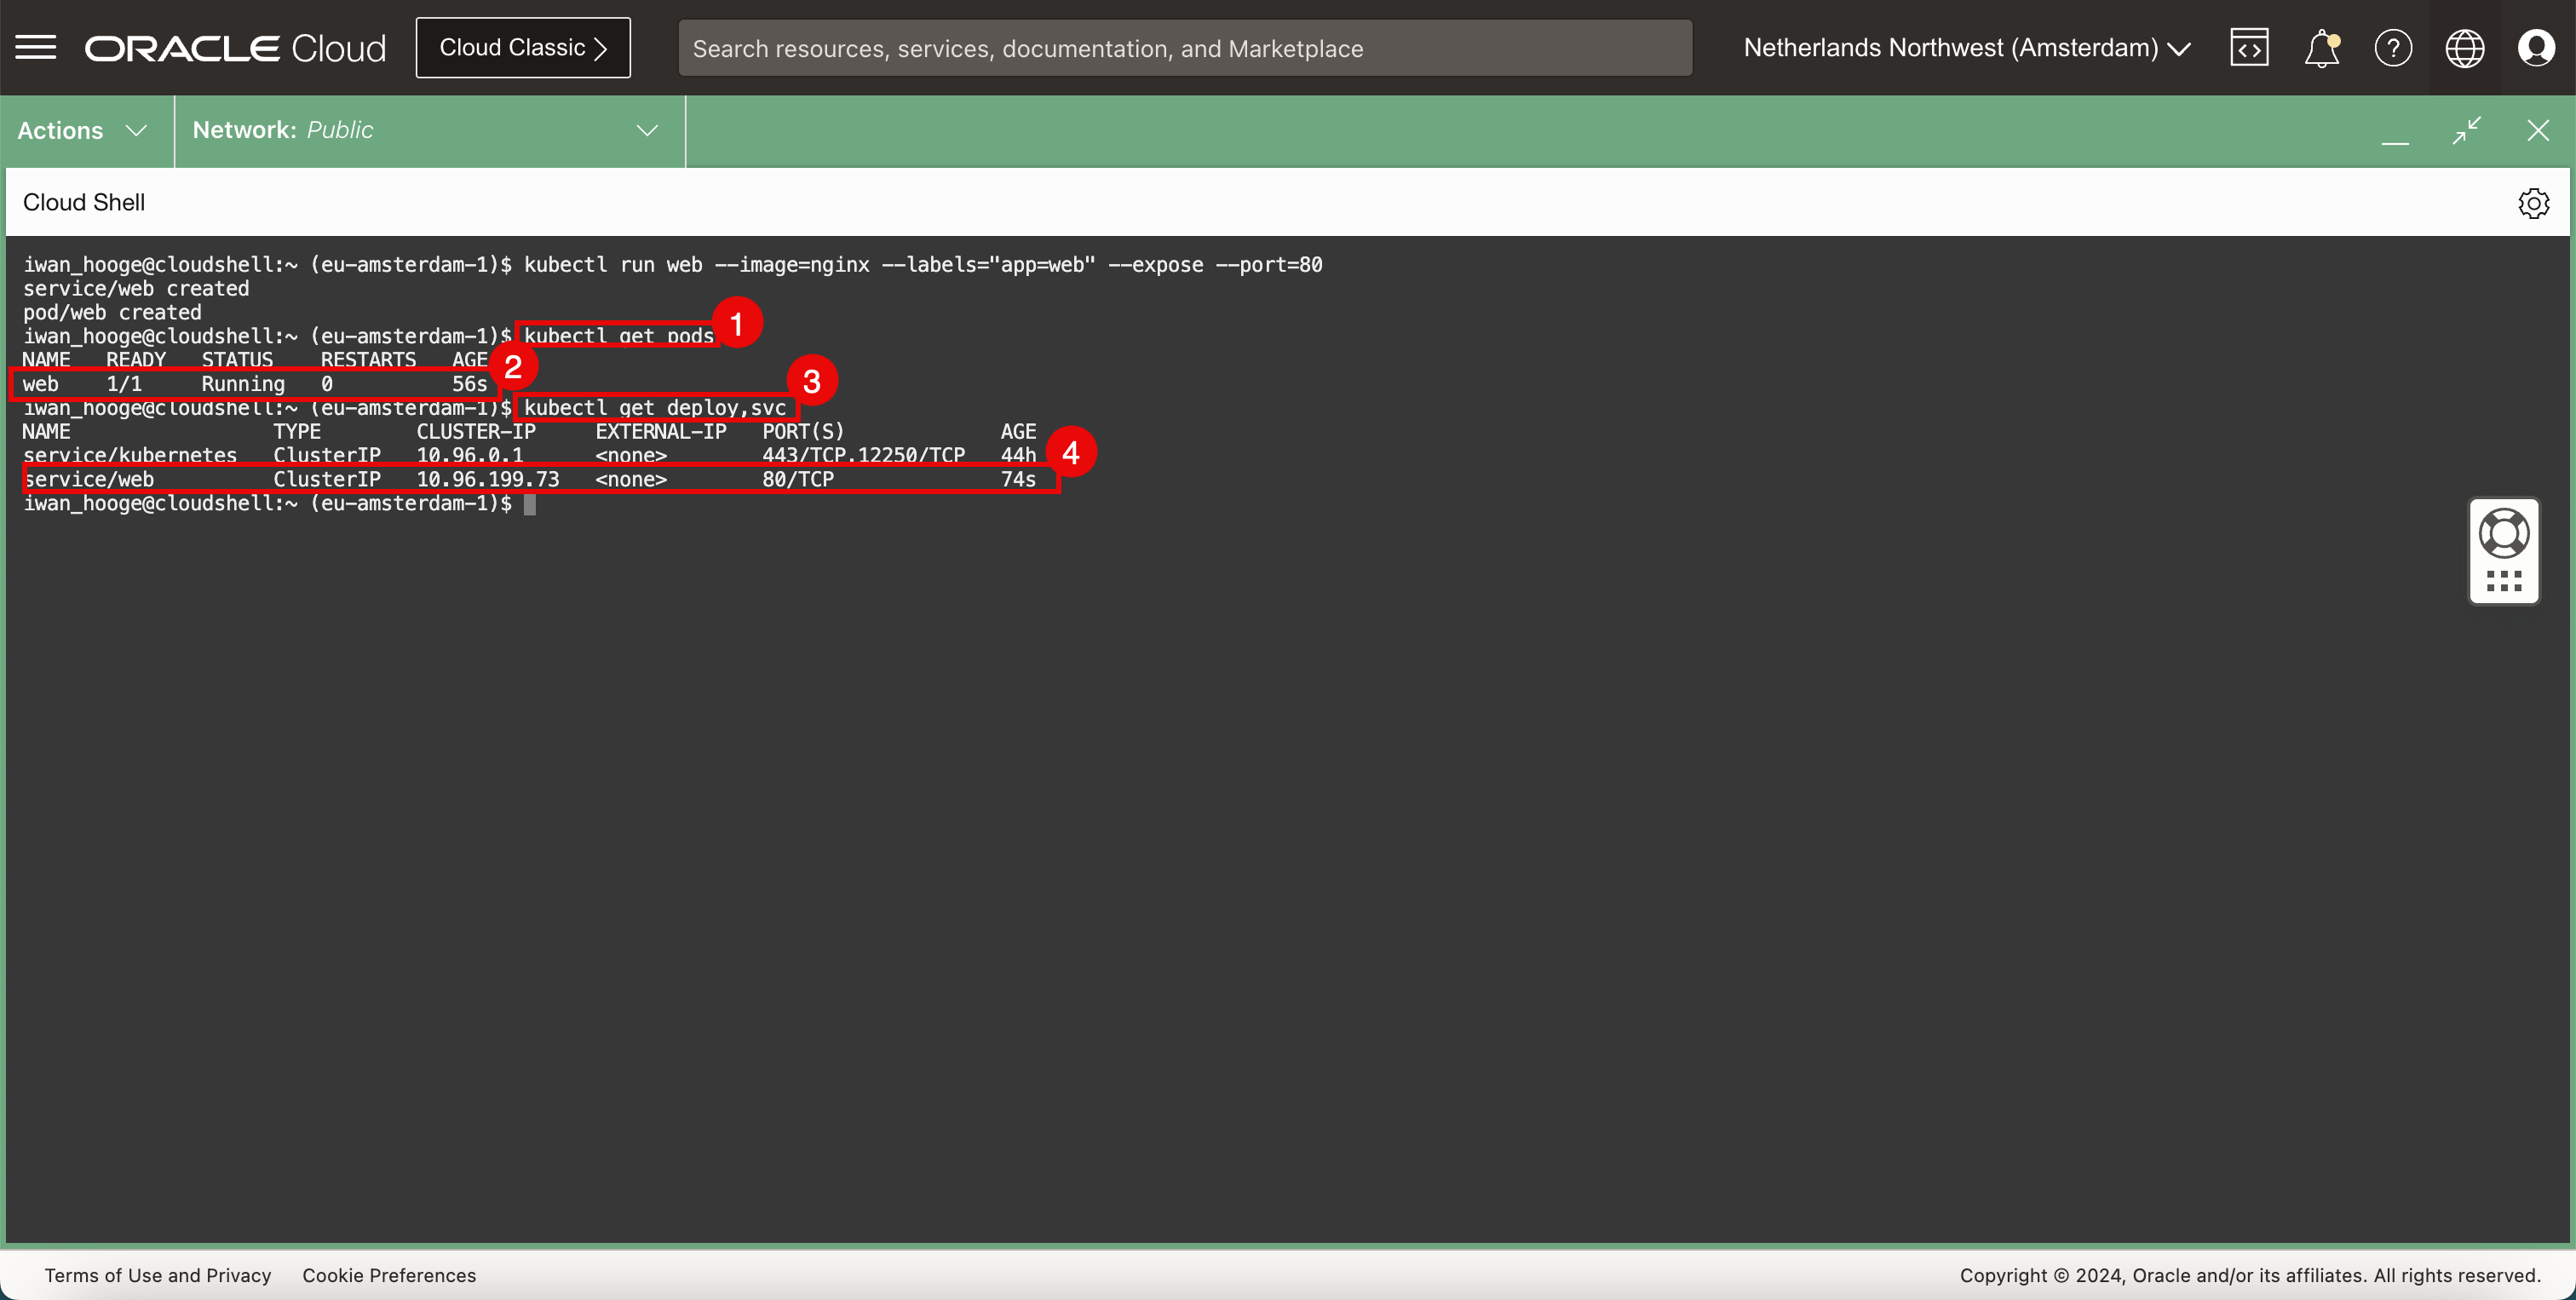
다음 명령을 실행하여 샘플 웹 애플리케이션 및 서비스를 배포합니다.
iwan_hooge@cloudshell:~ (eu-amsterdam-1)$ kubectl run web --image=nginx --labels="app=web" --expose --port=80 service/web created pod/web created iwan_hooge@cloudshell:~ (eu-amsterdam-1)$ -
응용 프로그램과 서비스가 성공적으로 생성되었음을 알 수 있습니다.
-
-
배치된 응용 프로그램을 확인합니다.
-
다음 명령을 실행하여 배치된 응용 프로그램을 확인합니다.
iwan_hooge@cloudshell:~ (eu-amsterdam-1)$ kubectl get pods NAME READY STATUS RESTARTS AGE web 1/1 Running 0 56s -
웹 응용 프로그램이 실행 중인지 확인합니다.
-
다음 명령을 실행하여 배치된 서비스를 확인합니다.
iwan_hooge@cloudshell:~ (eu-amsterdam-1)$ kubectl get deploy,svc NAME TYPE CLUSTER-IP EXTERNAL-IP PORT(S) AGE service/kubernetes ClusterIP 10.96.0.1 <none> 443/TCP,12250/TCP 44h service/web ClusterIP 10.96.199.73 <none> 80/TCP 74s -
웹 서비스가 실행 중인지 확인합니다.
-
-
응용 프로그램에 대한 연결을 테스트하는 여러 가지 방법이 있습니다. 한 가지 방법은 브라우저를 열고 웹 페이지에 액세스 할 수 있는지 테스트하는 것입니다. 그러나 사용 가능한 브라우저가 없을 때 임시 파드를 배포하여 또 다른 빠른 테스트를 할 수 있습니다.
-
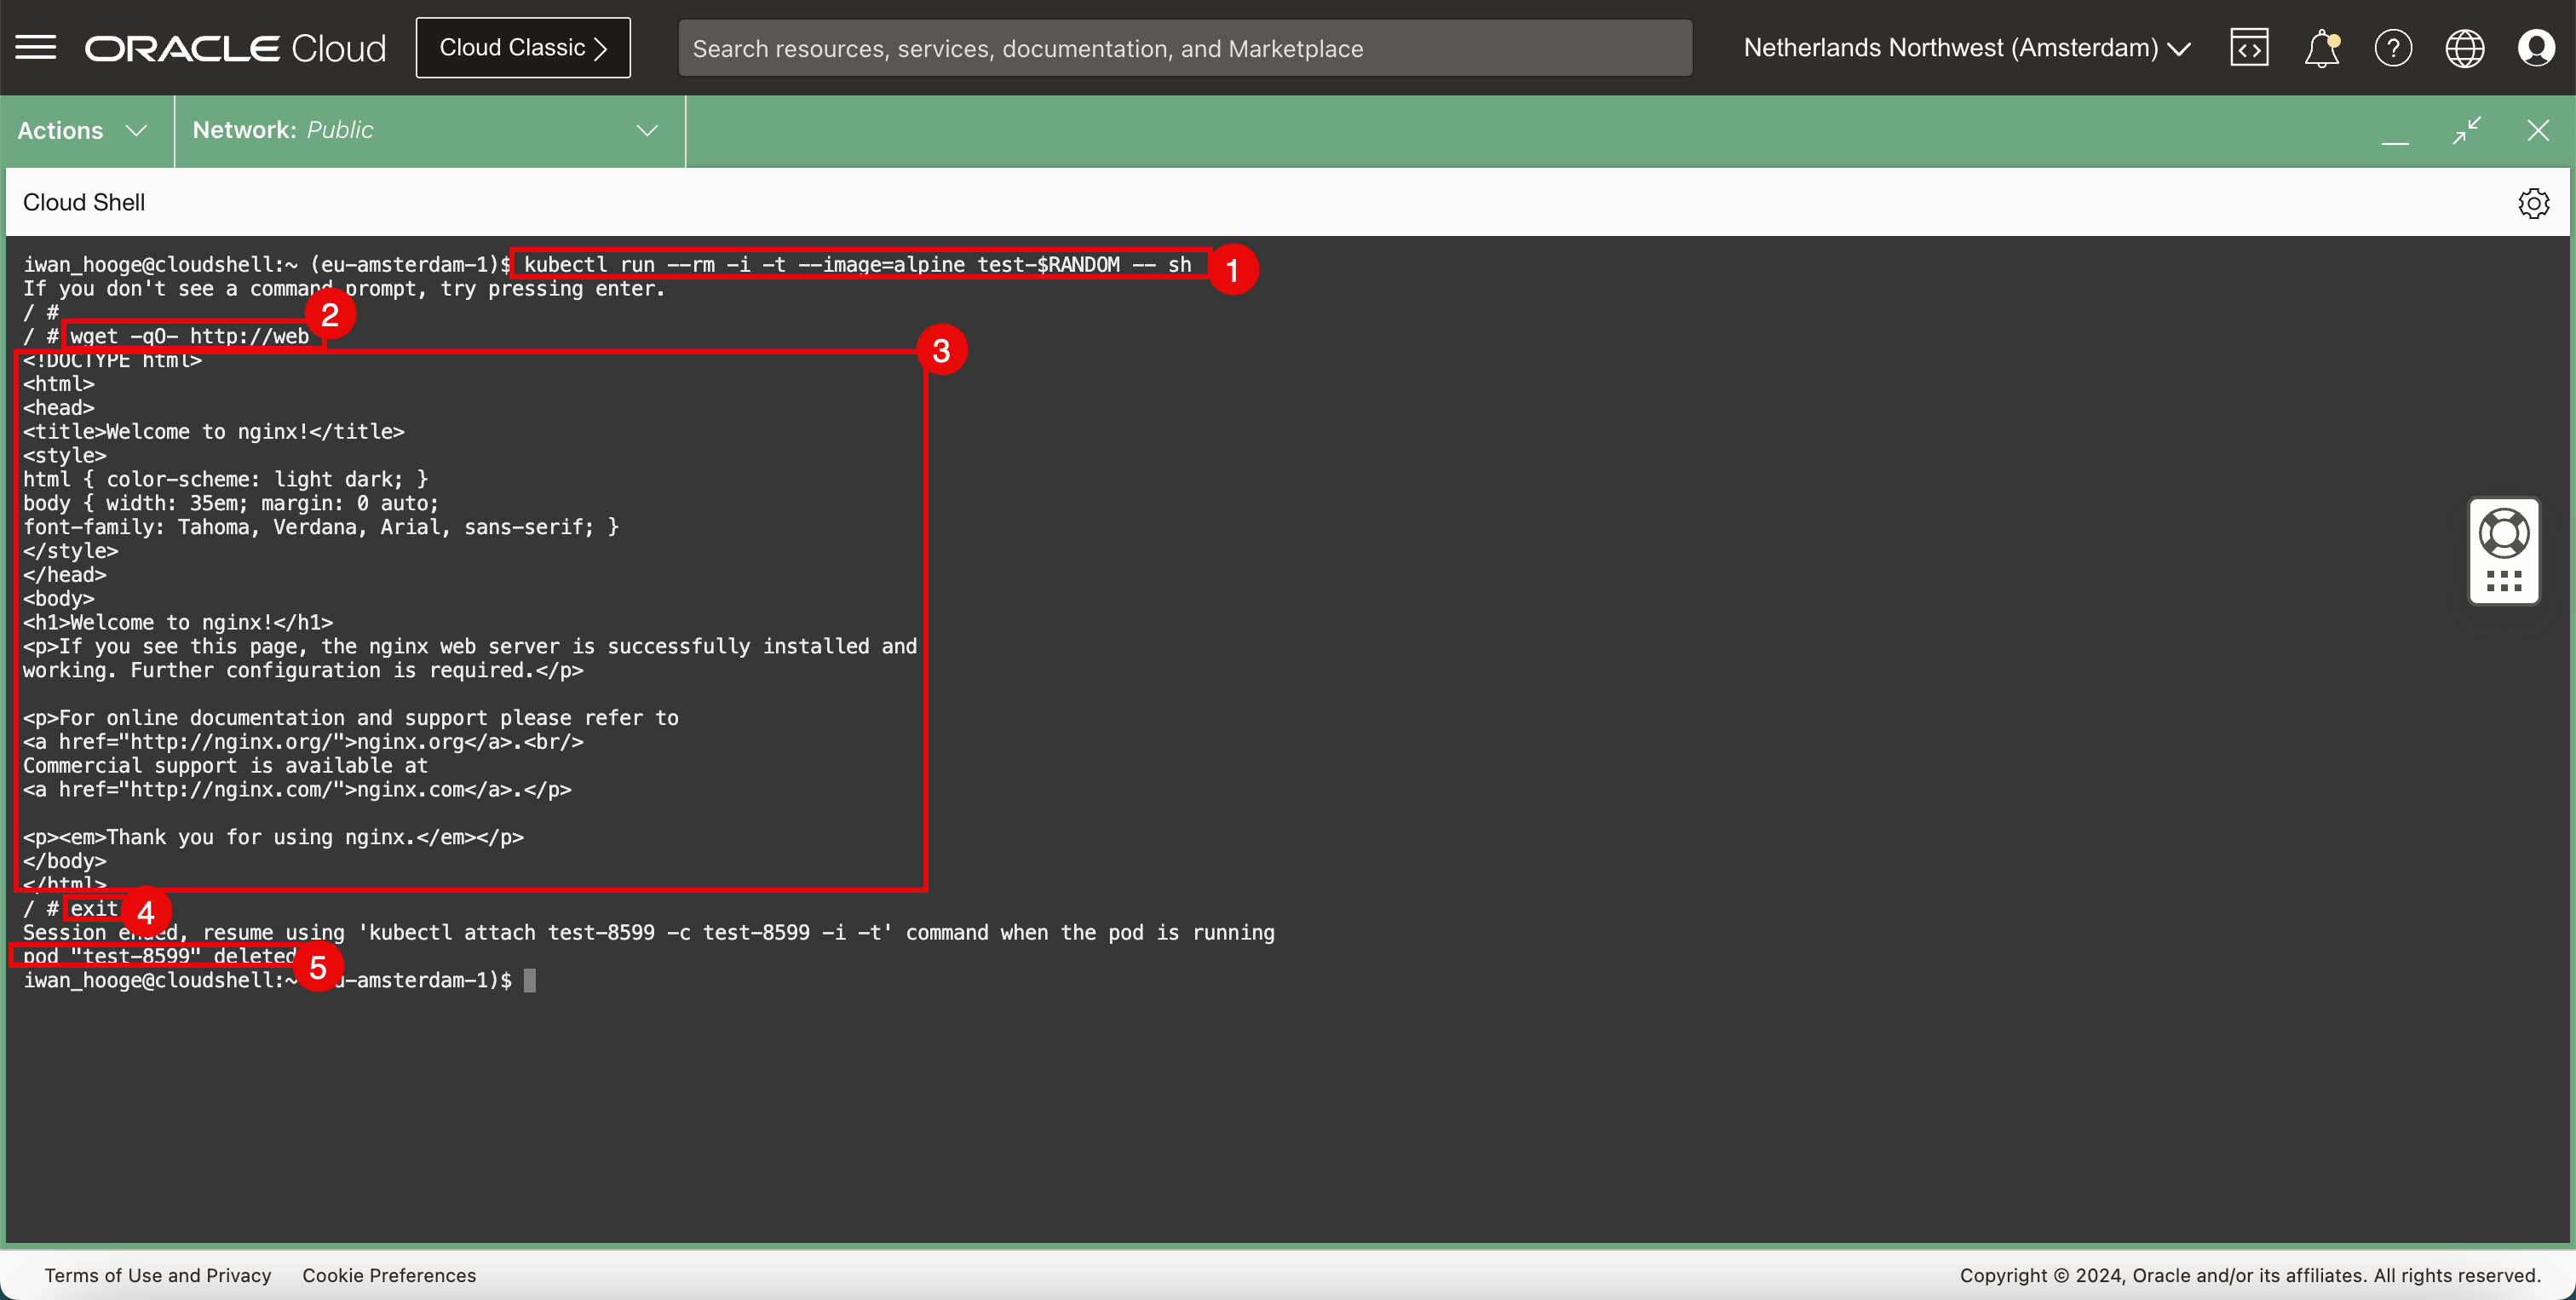
다음 명령을 실행하여 샘플 Pod를 배치하여 웹 애플리케이션 접속을 테스트합니다.
iwan_hooge@cloudshell:~ (eu-amsterdam-1)$ kubectl run --rm -i -t --image=alpine test-$RANDOM -- sh If you don't see a command prompt, try pressing enter. / # -
다음 명령을 실행하여
wget를 사용하여 웹 서버에 대한 연결을 테스트합니다./ # wget -qO- http://web <!DOCTYPE html> <html> <head> <title>Welcome to nginx!</title> <style> html { color-scheme: light dark; } body { width: 35em; margin: 0 auto; font-family: Tahoma, Verdana, Arial, sans-serif; } </style> </head> <body> <h1>Welcome to nginx!</h1> <p>If you see this page, the nginx web server is successfully installed and working. Further configuration is required.</p> <p>For online documentation and support please refer to <a href="http://nginx.org/">nginx.org</a>.<br/> Commercial support is available at <a href="http://nginx.com/">nginx.com</a>.</p> <p><em>Thank you for using nginx.</em></p> </body> </html> -
웹 서버가 반환하는 HTML 코드를 살펴보고 웹 서버와 연결이 작동 중인지 확인합니다.
-
다음 명령을 실행하여 임시 포드를 종료합니다.
/ # exit Session ended, resume using 'kubectl attach test-8599 -c test-8599 -i -t' command when the pod is running pod "test-8599" deleted iwan_hooge@cloudshell:~ (eu-amsterdam-1)$ -
CLI를 종료한 후 즉시 Pod가 삭제됩니다.
-
작업 4: NetworkPolicy 유형의 Kubernetes 서비스 구성
Cilium CNI 플러그인이 제공하는 네트워크 보안 서비스 중 하나는 NetworkPolicy 유형의 서비스입니다. 이것은 두 포드 사이의 연결을 거부하여 포드 사이의 연결을 제어하는 방법입니다.
-
다음 명령을 실행하여 nano 편집기를 열고 새
YAML파일을 만들어 NetworkPolicy를 구현하여 모든 네트워크 트래픽을 거부합니다.iwan_hooge@cloudshell:~ (eu-amsterdam-1)$ nano web-deny-all.yaml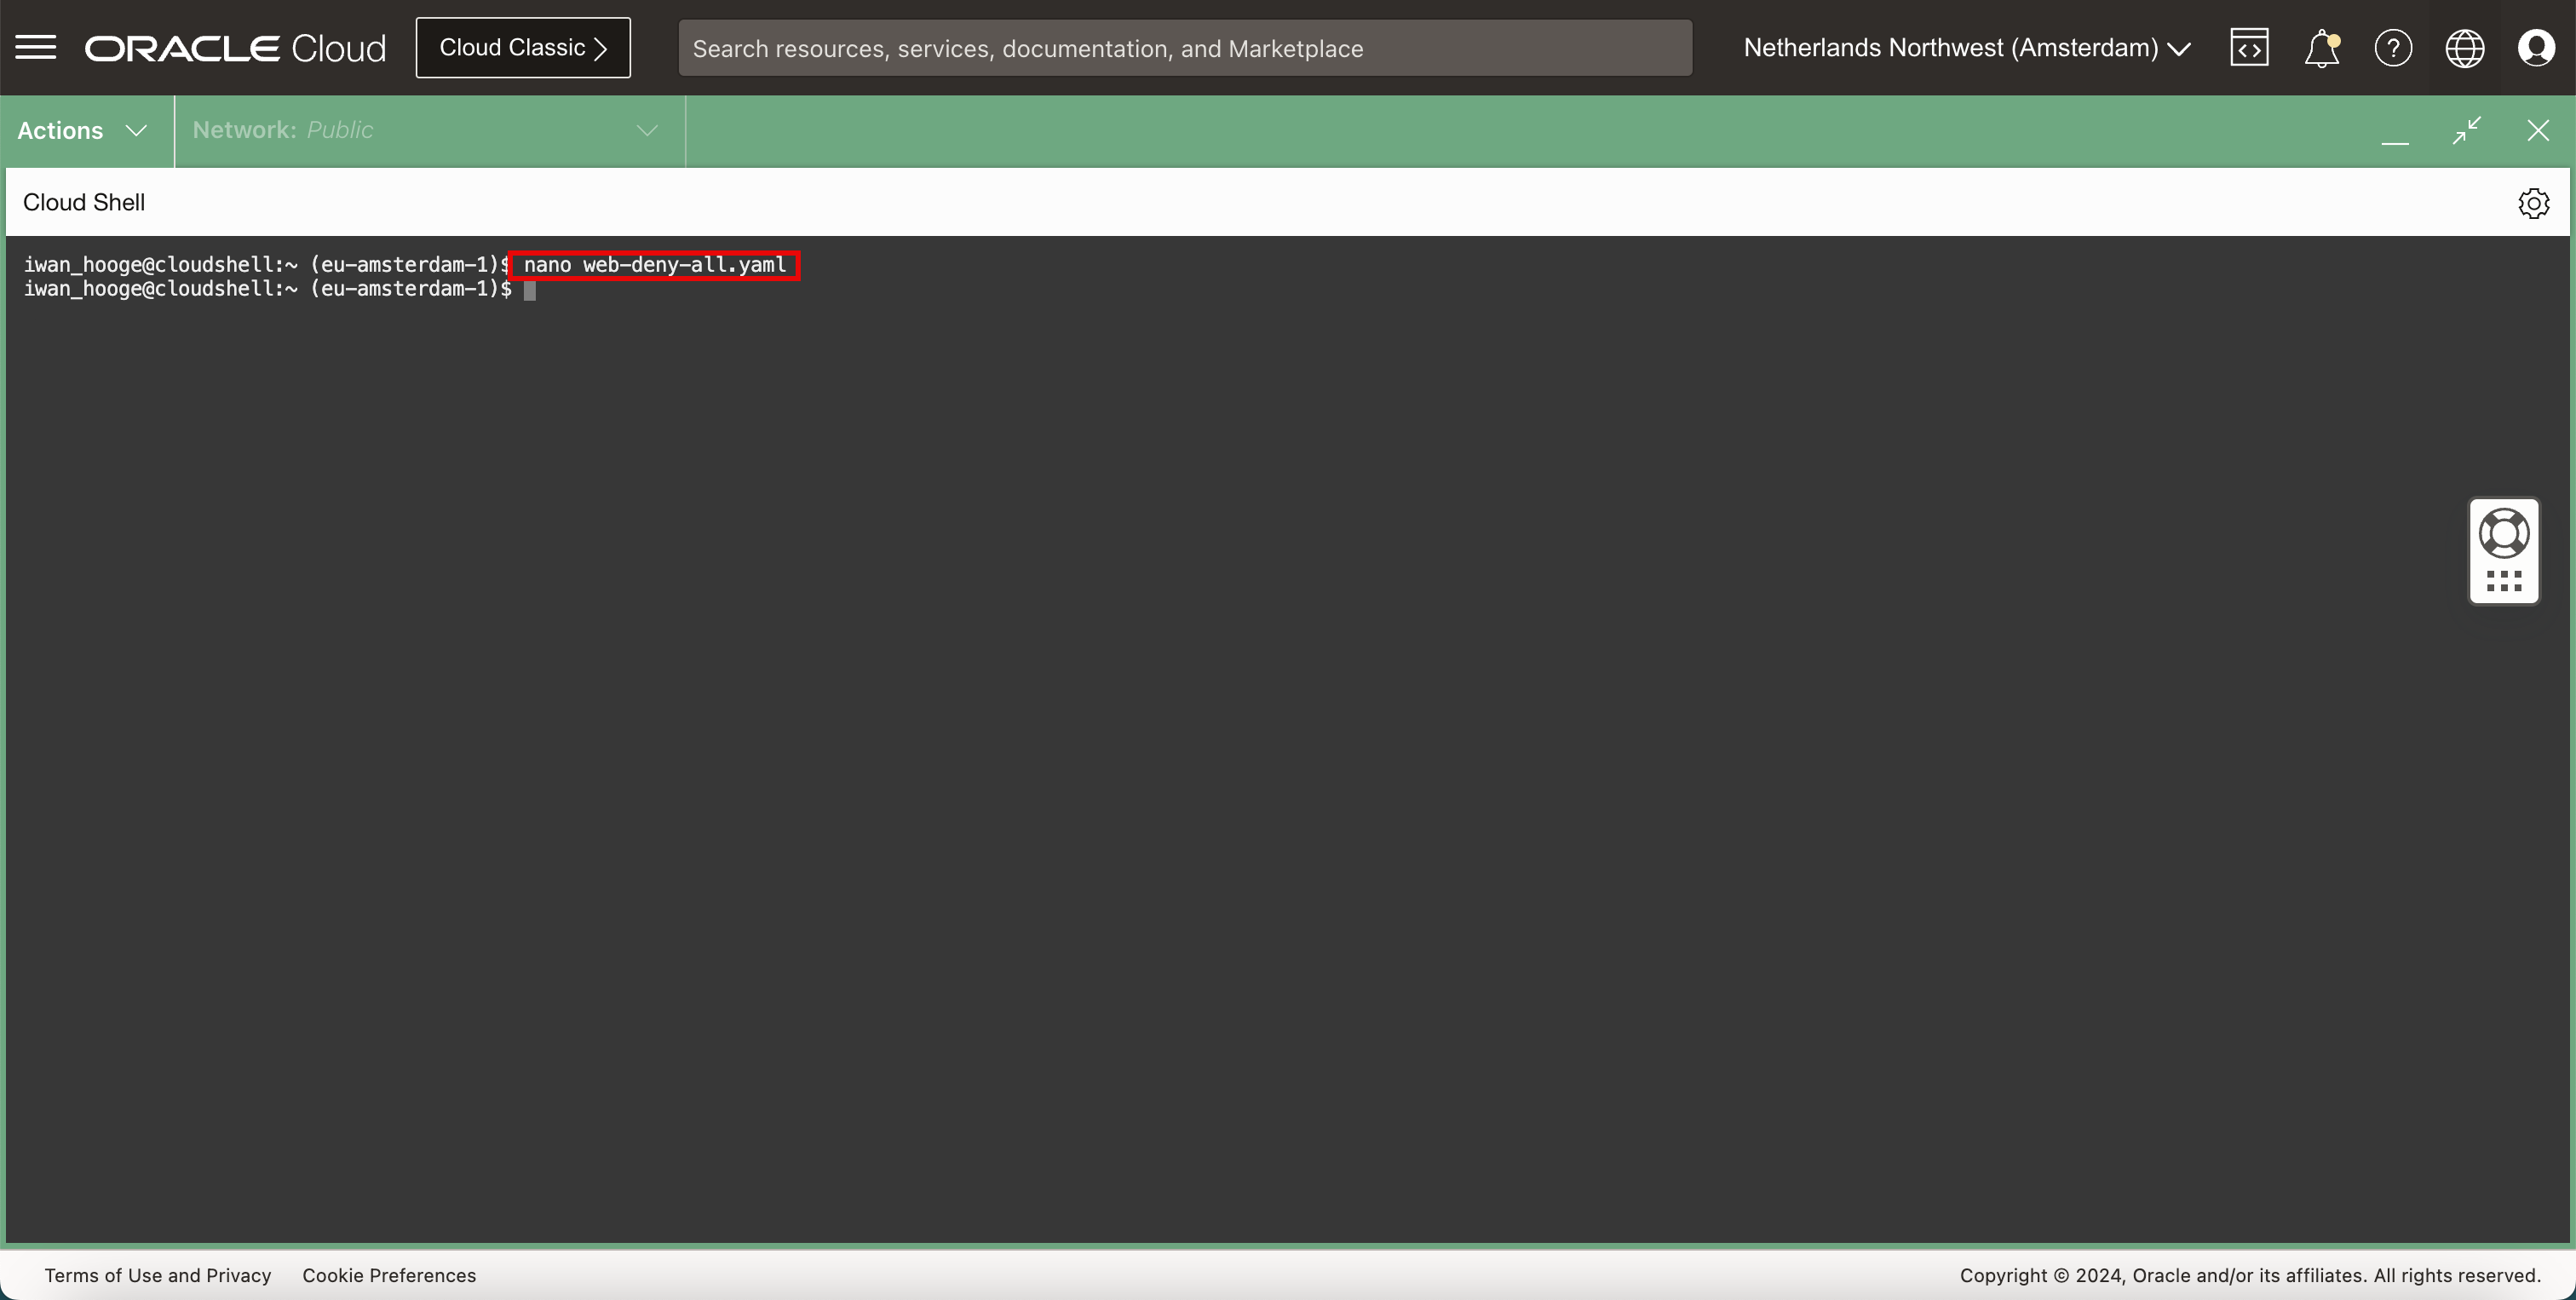
-
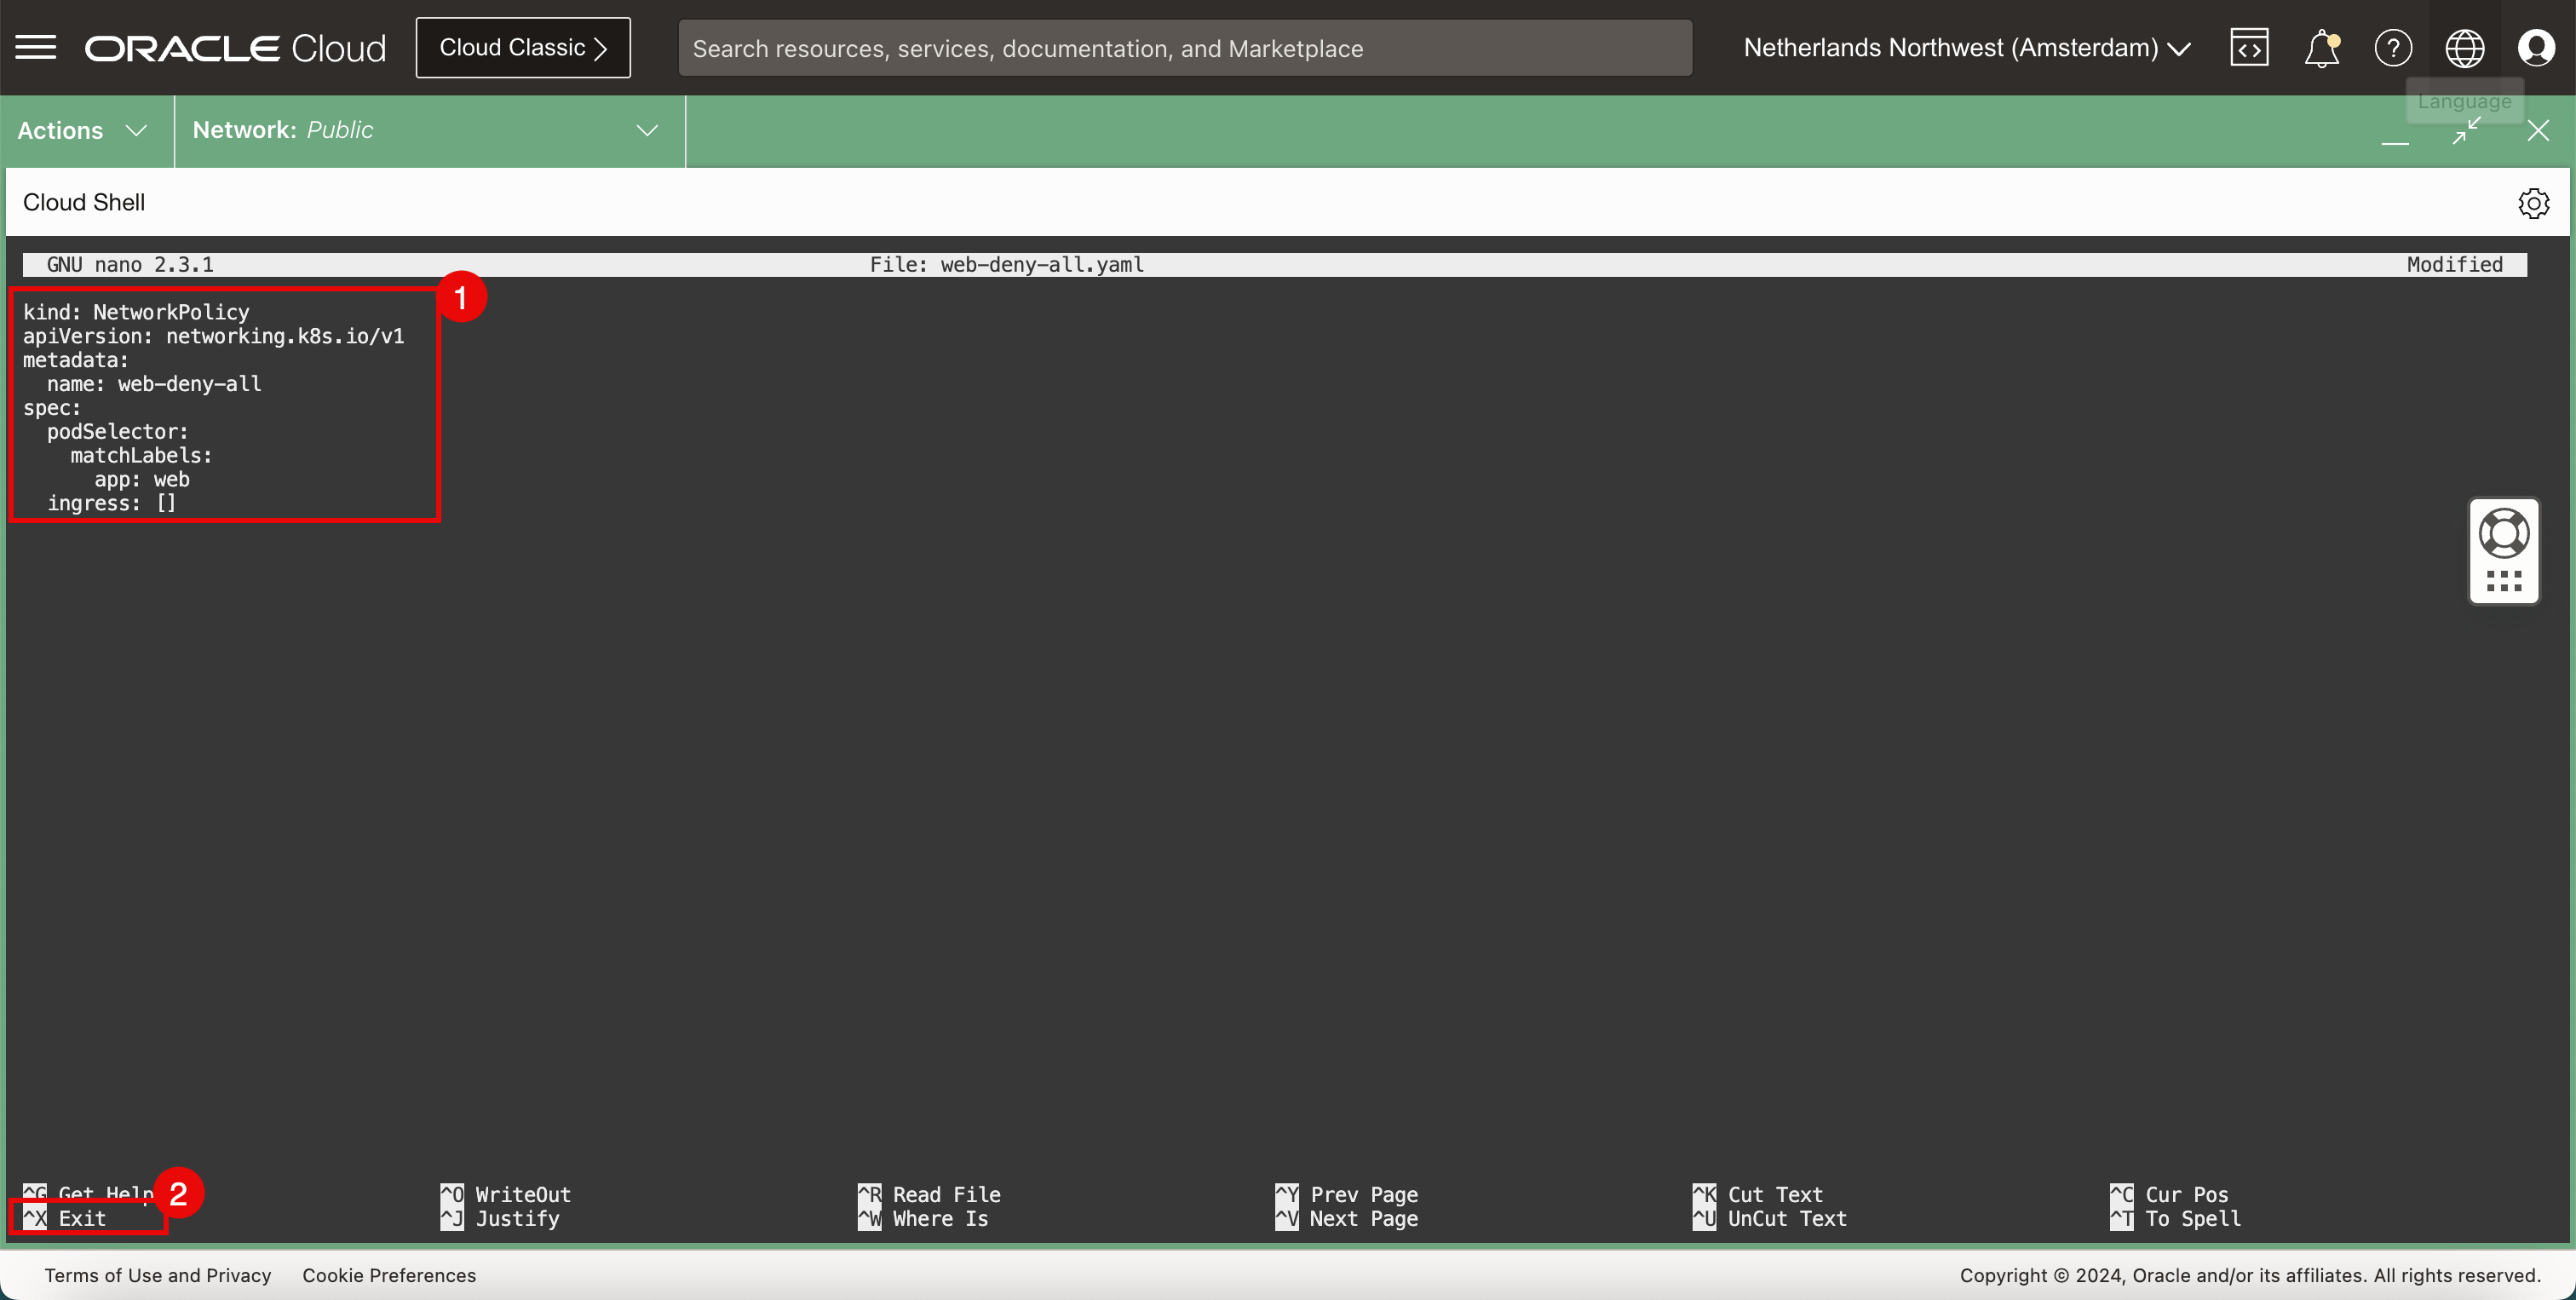
YAML파일에서 다음 내용을 사용합니다.kind: NetworkPolicy apiVersion: networking.k8s.io/v1 metadata: name: web-deny-all spec: podSelector: matchLabels: app: web ingress: [] -
CTRL + X바로가기를 사용하여 나노 편집기를 종료합니다.
-
-
Y(yes)를 입력하여YAML파일을 저장합니다.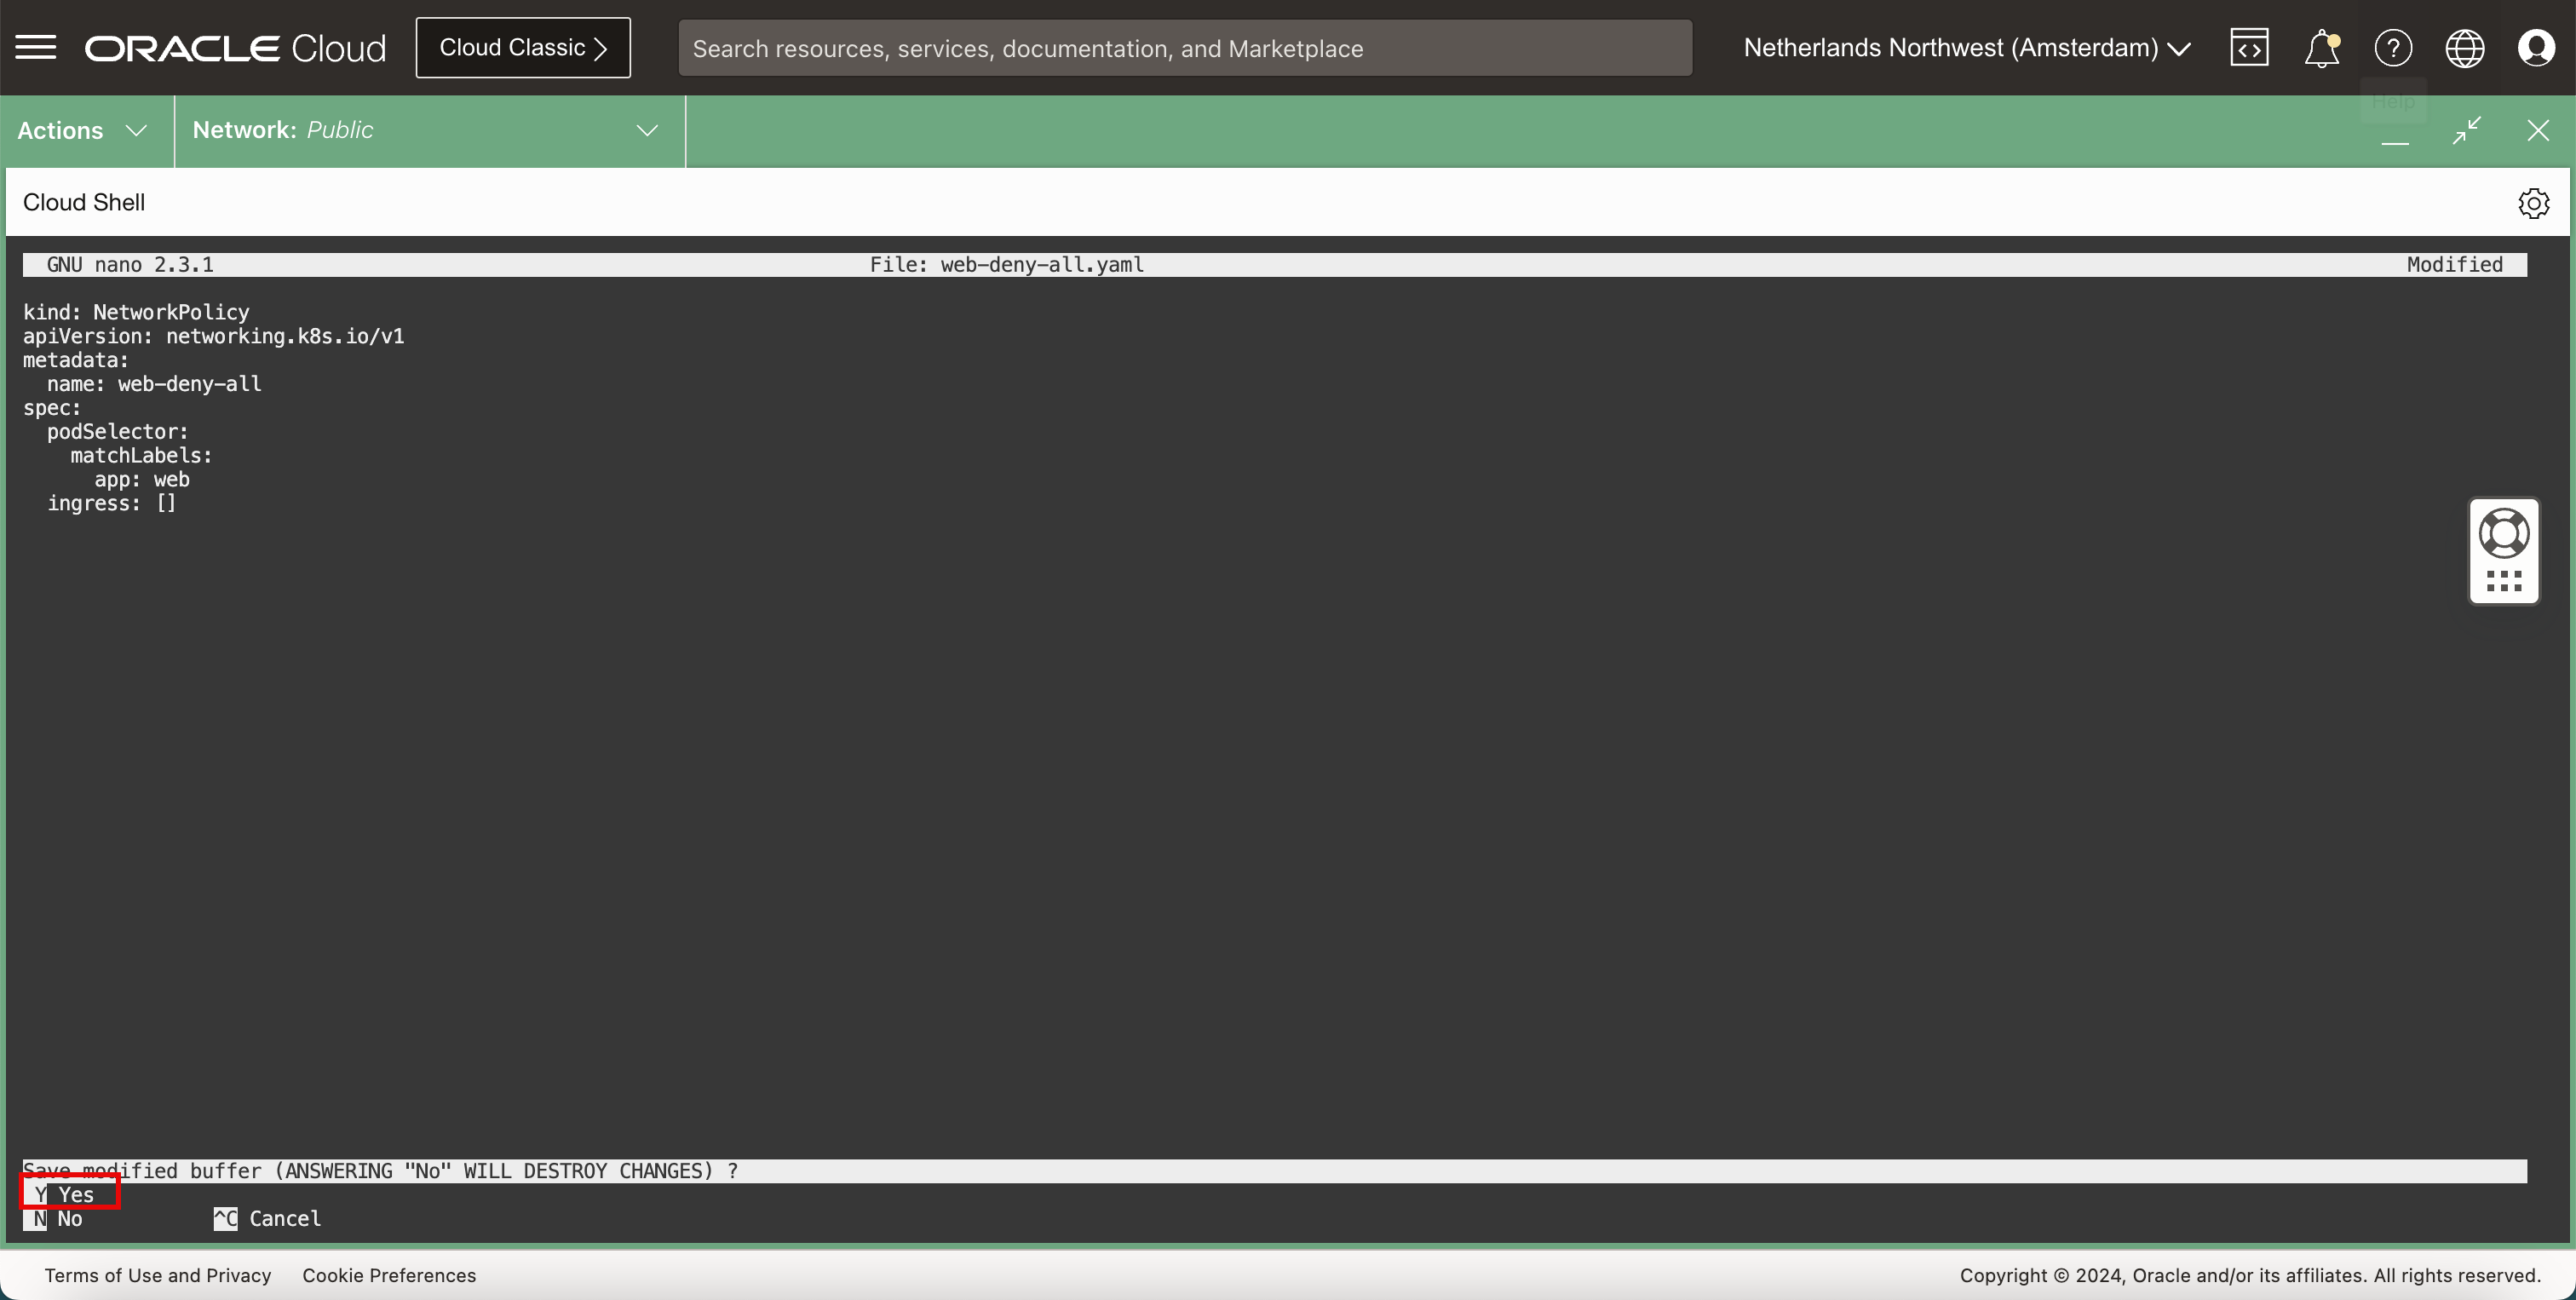
-
YAML파일 이름을 기본값으로 유지합니다.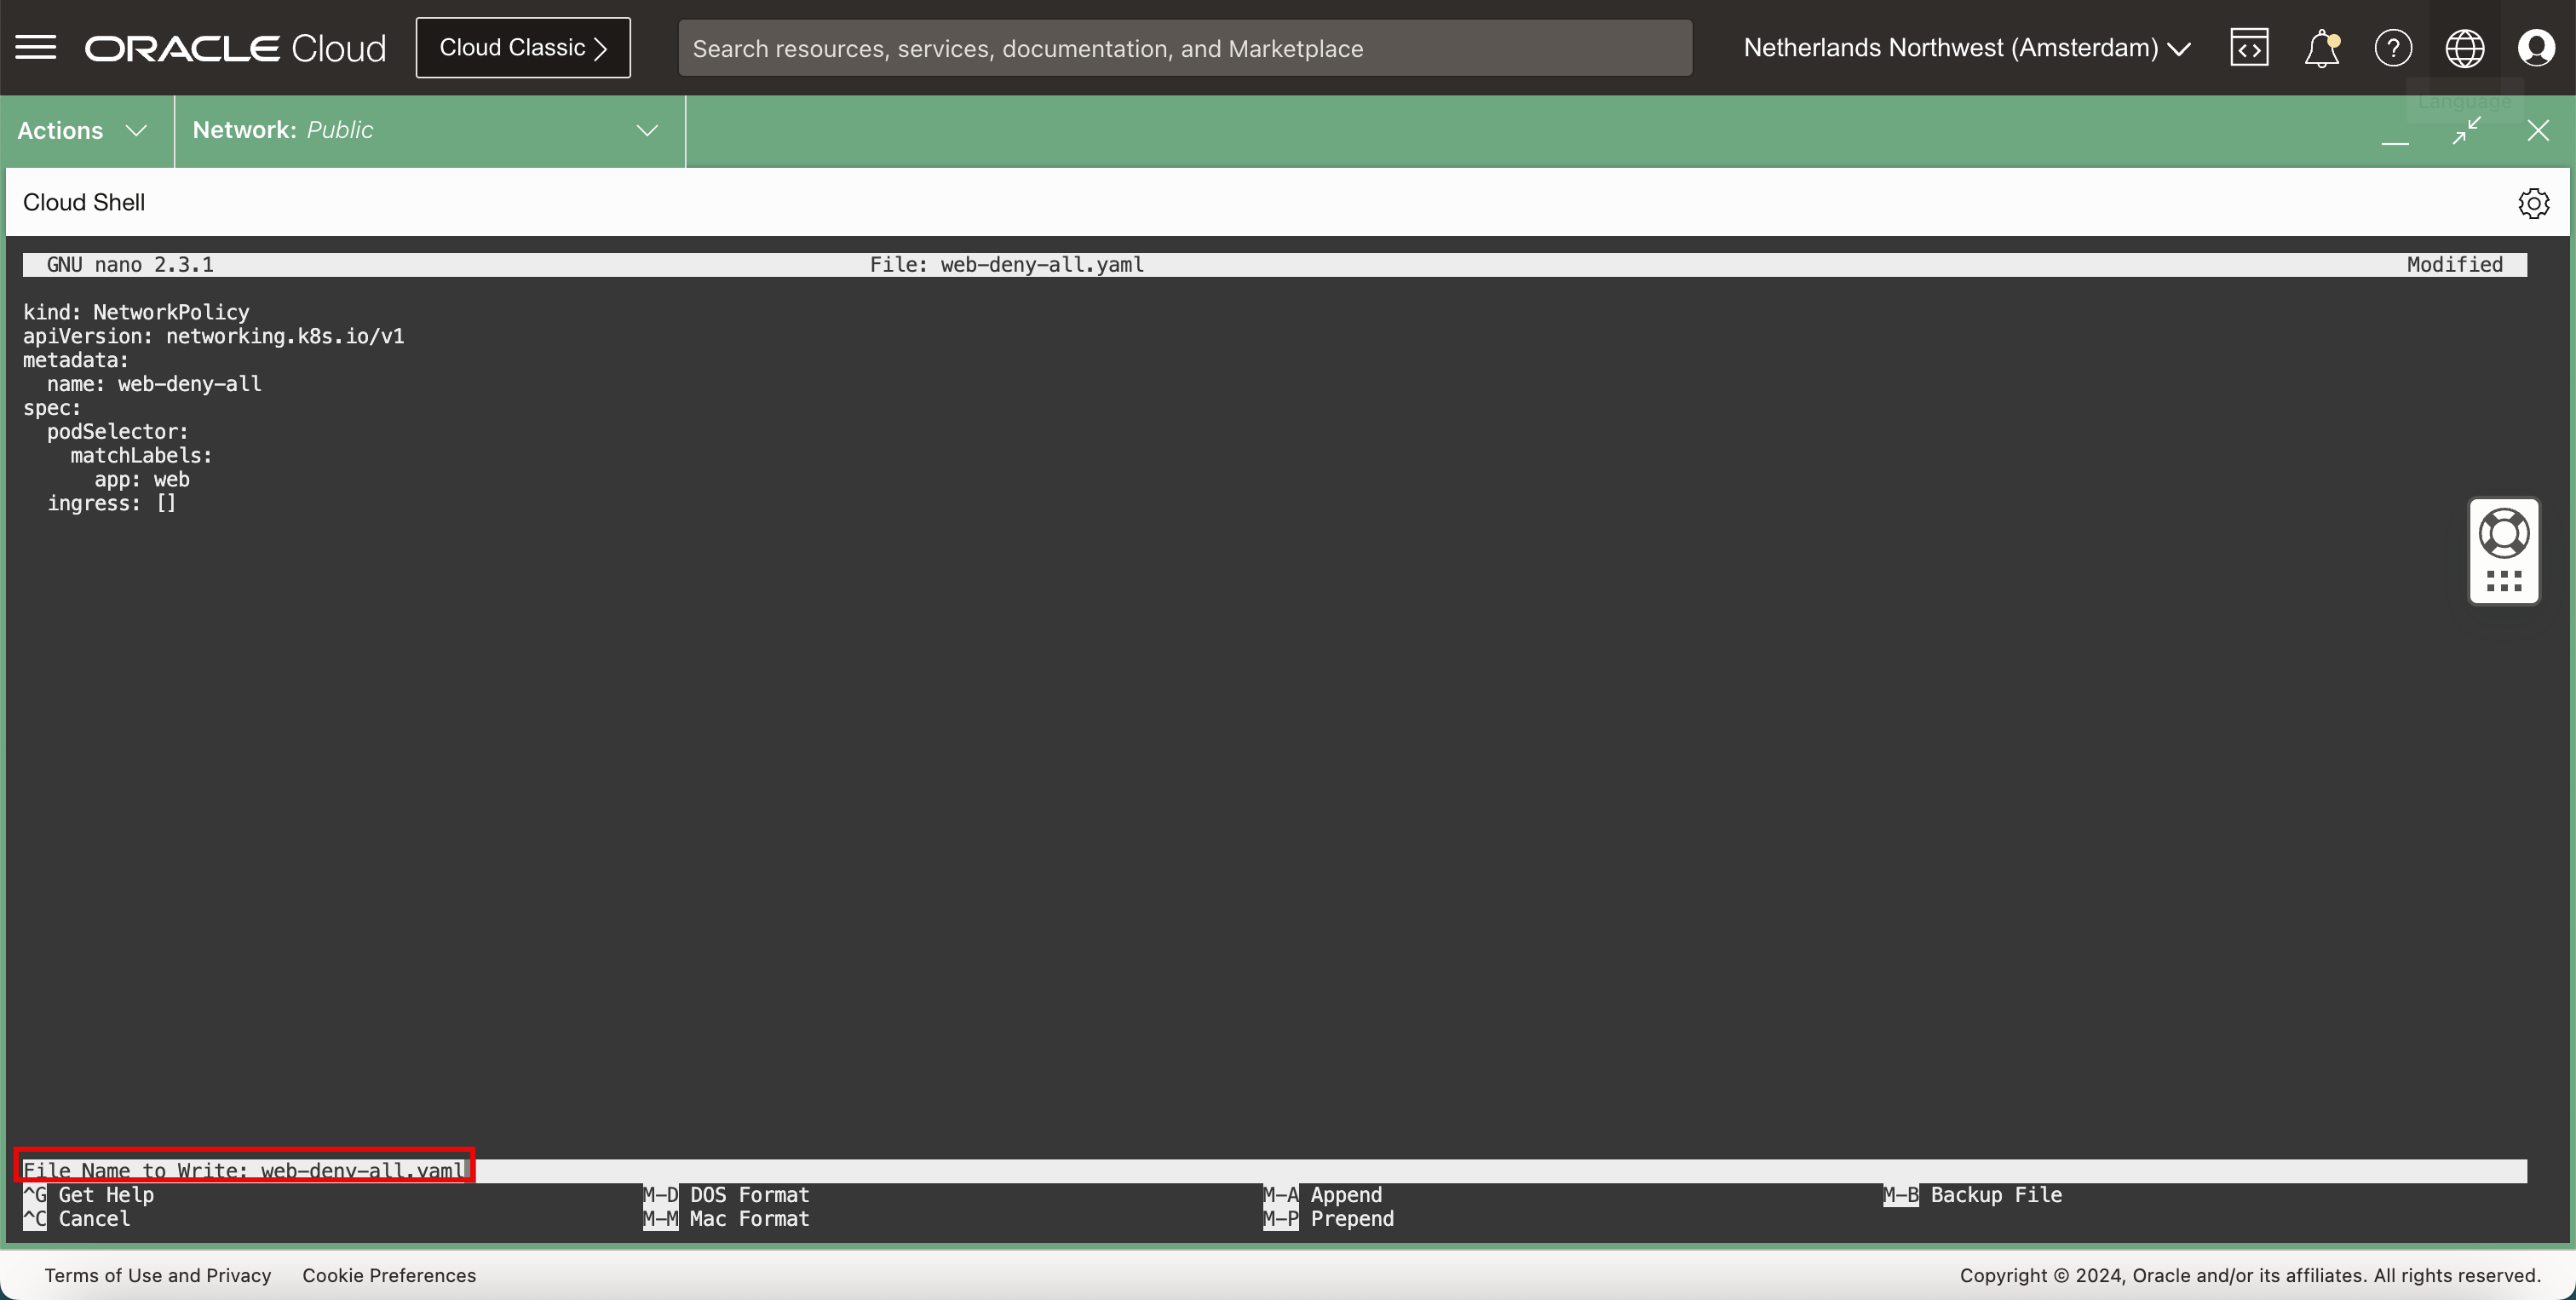
-
YAML파일을 확인합니다.-
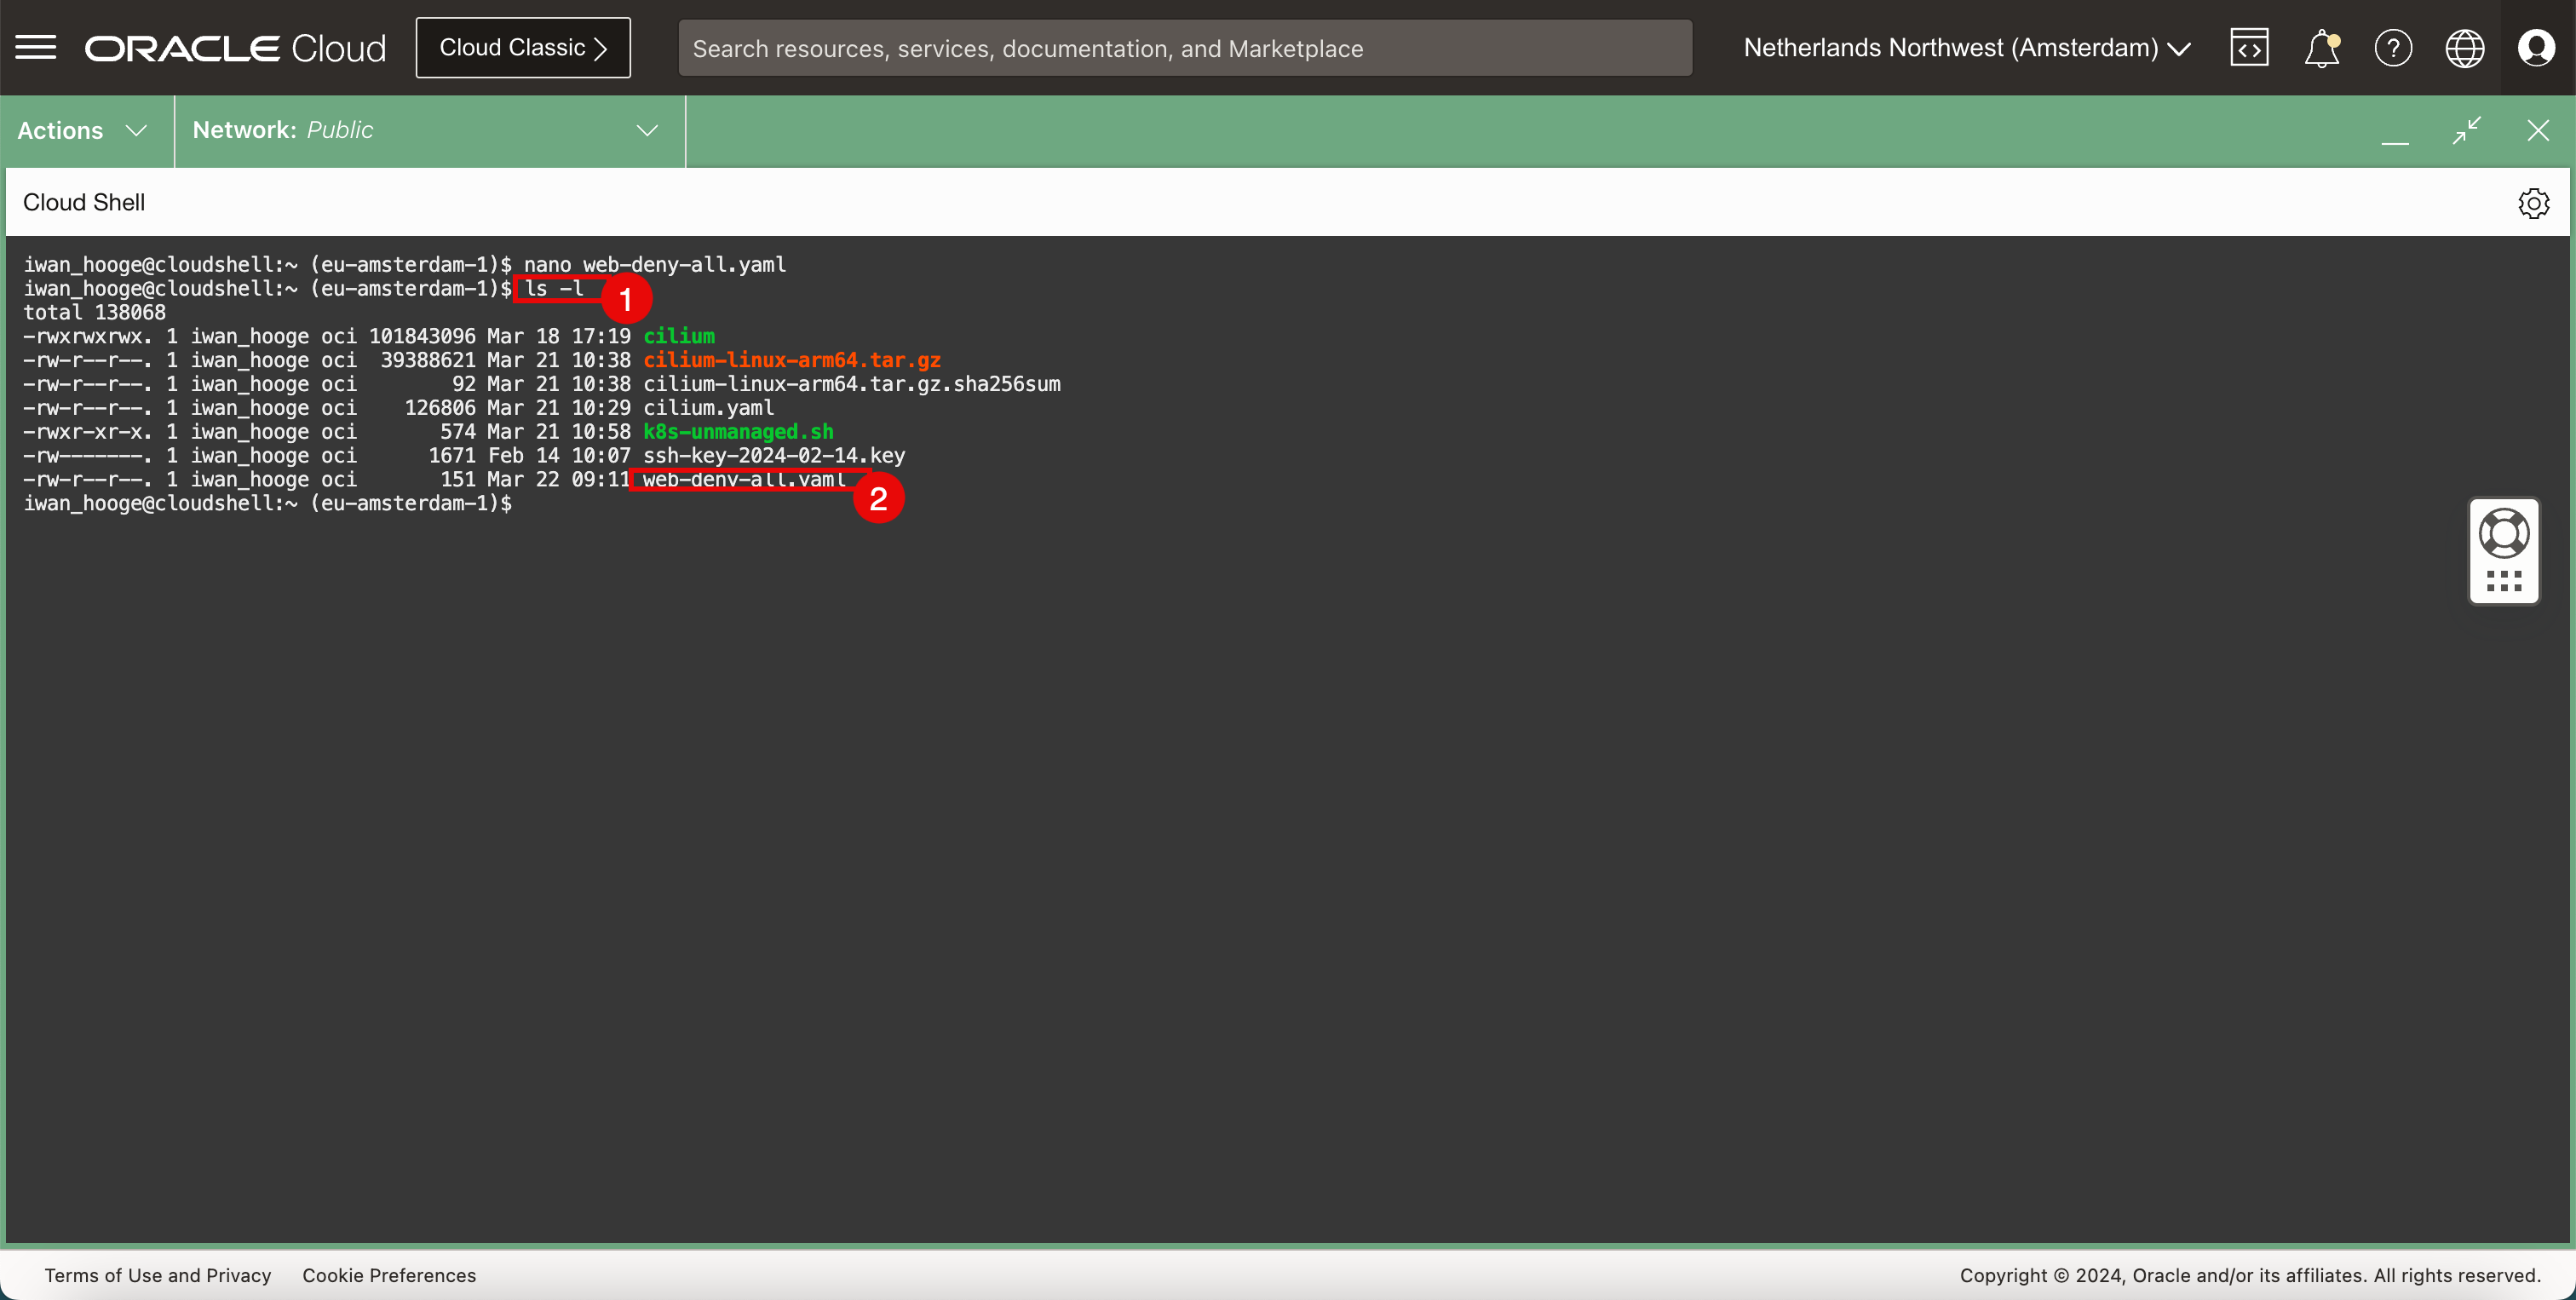
다음 명령을 실행하여 새
YAML파일을 확인합니다.iwan_hooge@cloudshell:~ (eu-amsterdam-1)$ ls -l total 138068 -rwxrwxrwx. 1 iwan_hooge oci 101843096 Mar 18 17:19 cilium -rw-r--r--. 1 iwan_hooge oci 39388621 Mar 21 10:38 cilium-linux-arm64.tar.gz -rw-r--r--. 1 iwan_hooge oci 92 Mar 21 10:38 cilium-linux-arm64.tar.gz.sha256sum -rw-r--r--. 1 iwan_hooge oci 126806 Mar 21 10:29 cilium.yaml -rwxr-xr-x. 1 iwan_hooge oci 574 Mar 21 10:58 k8s-unmanaged.sh -rw-------. 1 iwan_hooge oci 1671 Feb 14 10:07 ssh-key-2024-02-14.key -rw-r--r--. 1 iwan_hooge oci 151 Mar 22 09:11 web-deny-all.yaml -
web-deny-all.yaml파일이 있음을 알 수 있습니다.
-
-
보안 정책을 구현합니다.
-
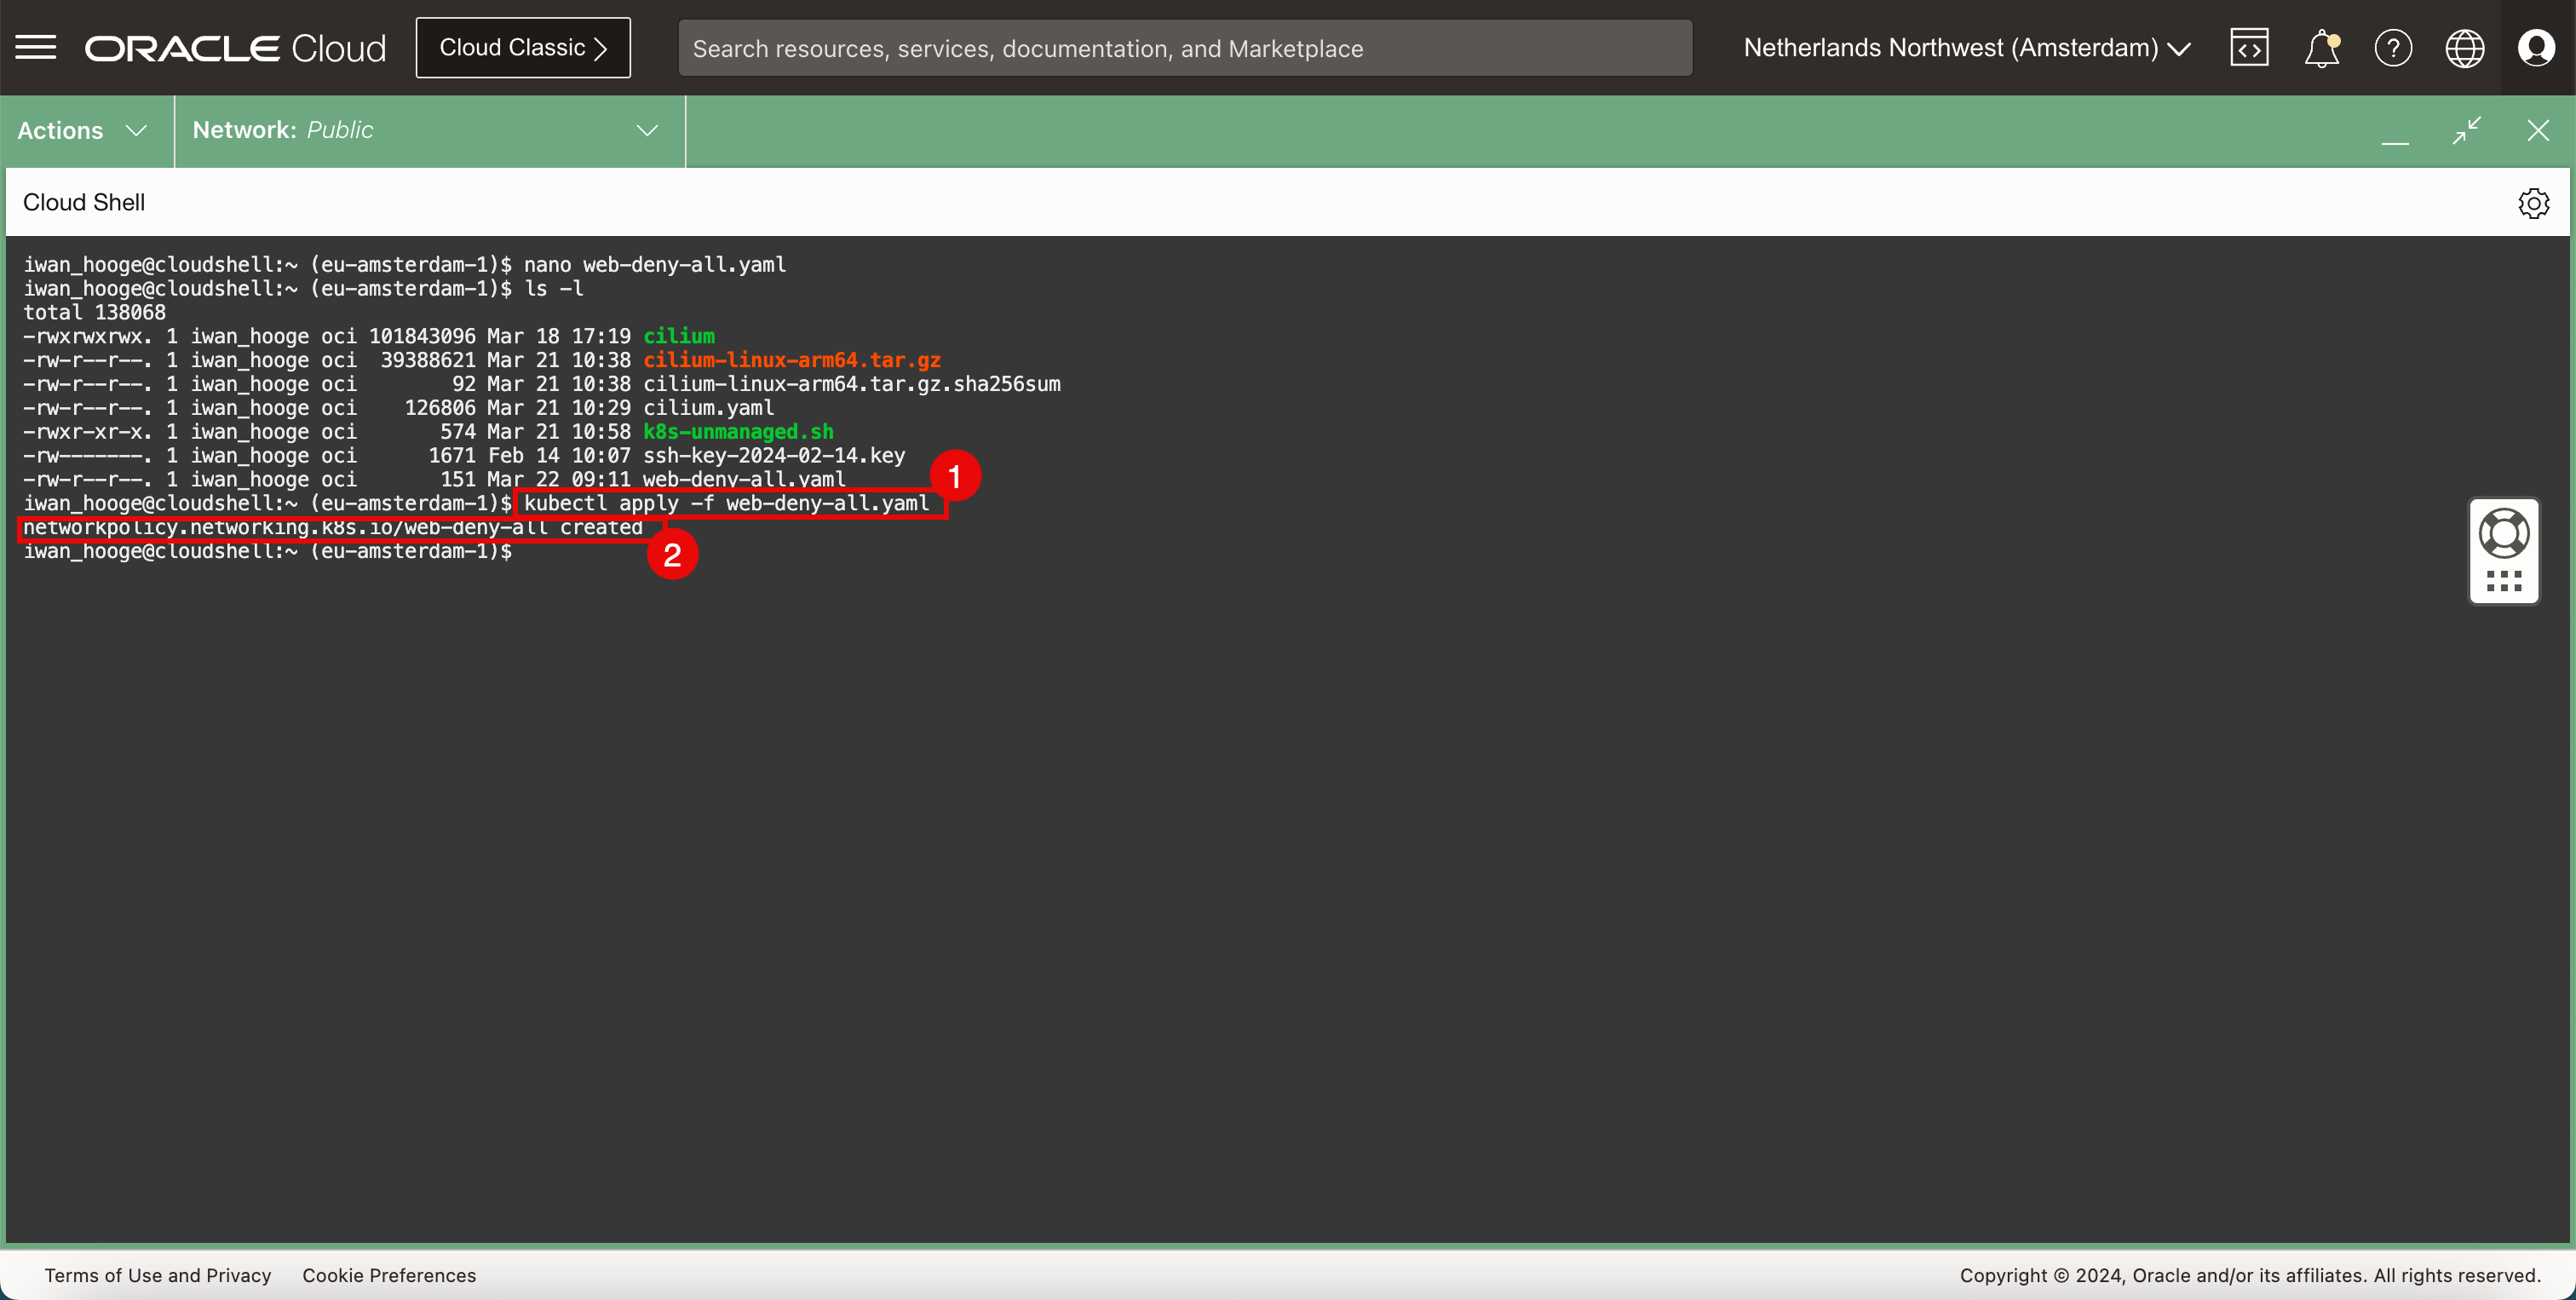
다음 명령을 실행하여 보안 정책을 구현합니다.
iwan_hooge@cloudshell:~ (eu-amsterdam-1)$ kubectl apply -f web-deny-all.yaml networkpolicy.networking.k8s.io/web-deny-all created iwan_hooge@cloudshell:~ (eu-amsterdam-1)$ -
보안 정책이 생성된 것을 확인할 수 있습니다.
-
-
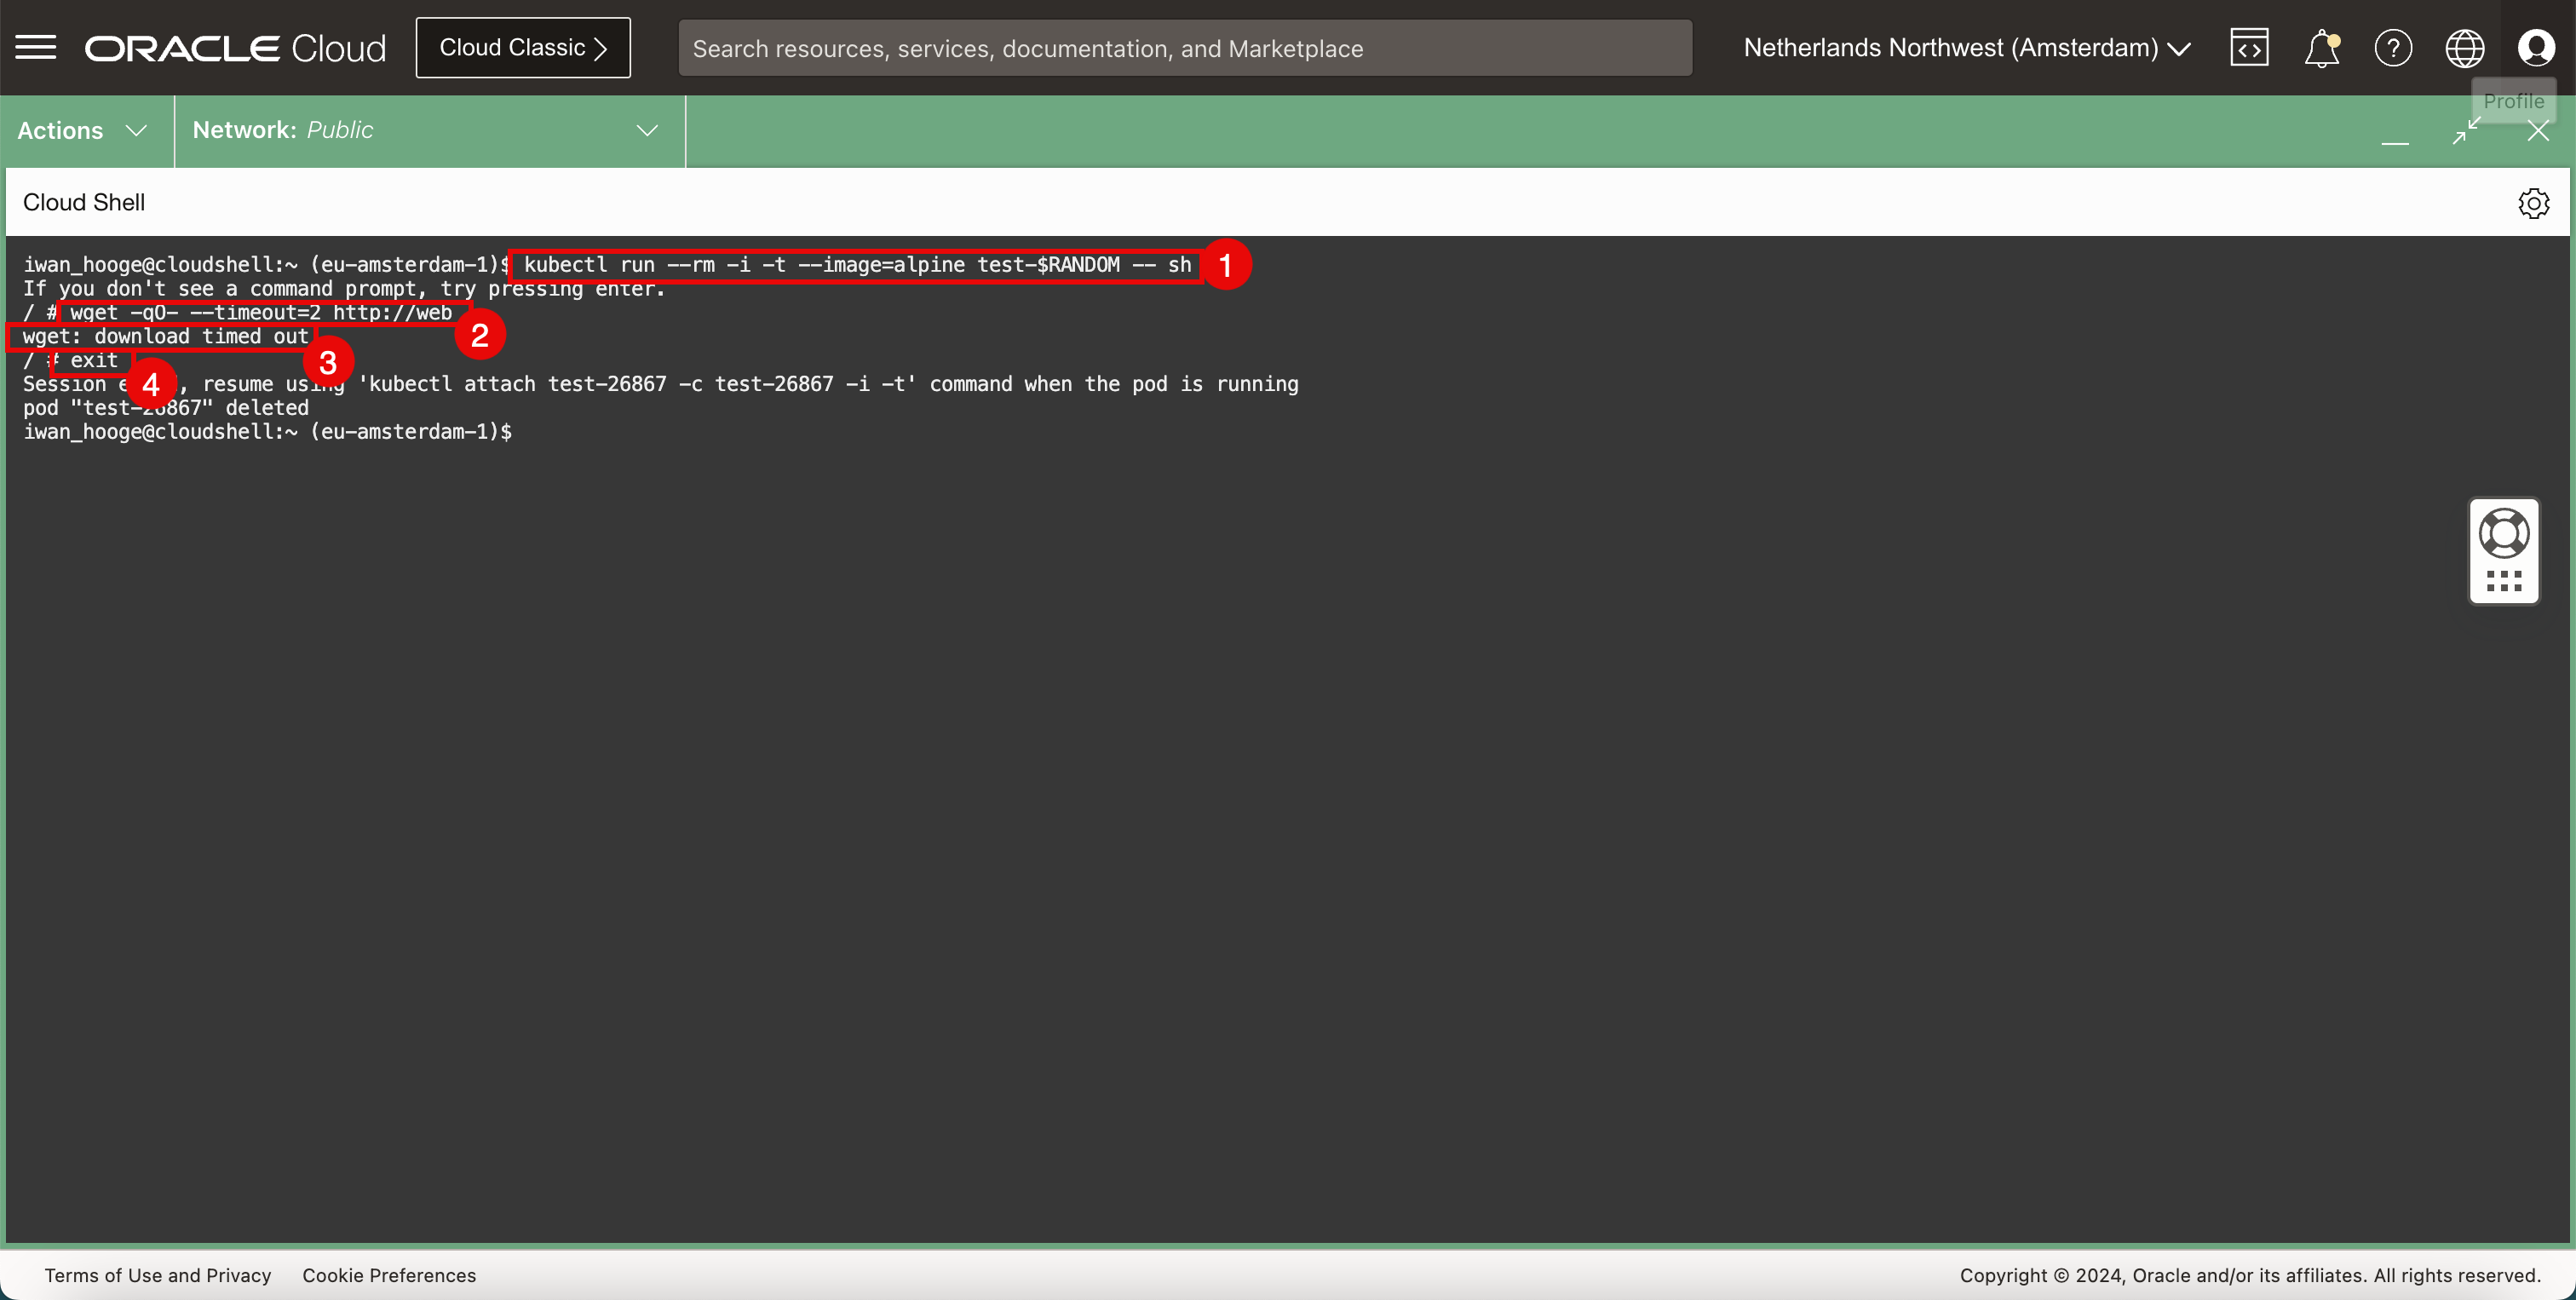
샘플 포드를 배포하여 NetworkPolicy이 배포된 후 웹 애플리케이션 연결을 다시 테스트합니다.
-
다음 명령을 실행하여 샘플 Pod를 배치하여 웹 애플리케이션 접속을 테스트합니다.
iwan_hooge@cloudshell:~ (eu-amsterdam-1)$ kubectl run --rm -i -t --image=alpine test-$RANDOM -- sh If you don't see a command prompt, try pressing Enter. -
다음 명령을 실행하여
wget를 사용하여 웹 서버에 대한 연결을 테스트합니다./ # wget -qO- --timeout=2 http://web wget: download timed out -
요청 시간이 초과되었습니다.
-
다음 명령을 실행하여 임시 포드를 종료합니다.
/ # exit
Session ended, resume using 'kubectl attach test-26867 -c test-26867 -i -t' command when the pod is running
pod "test-26867" deleted
-
-
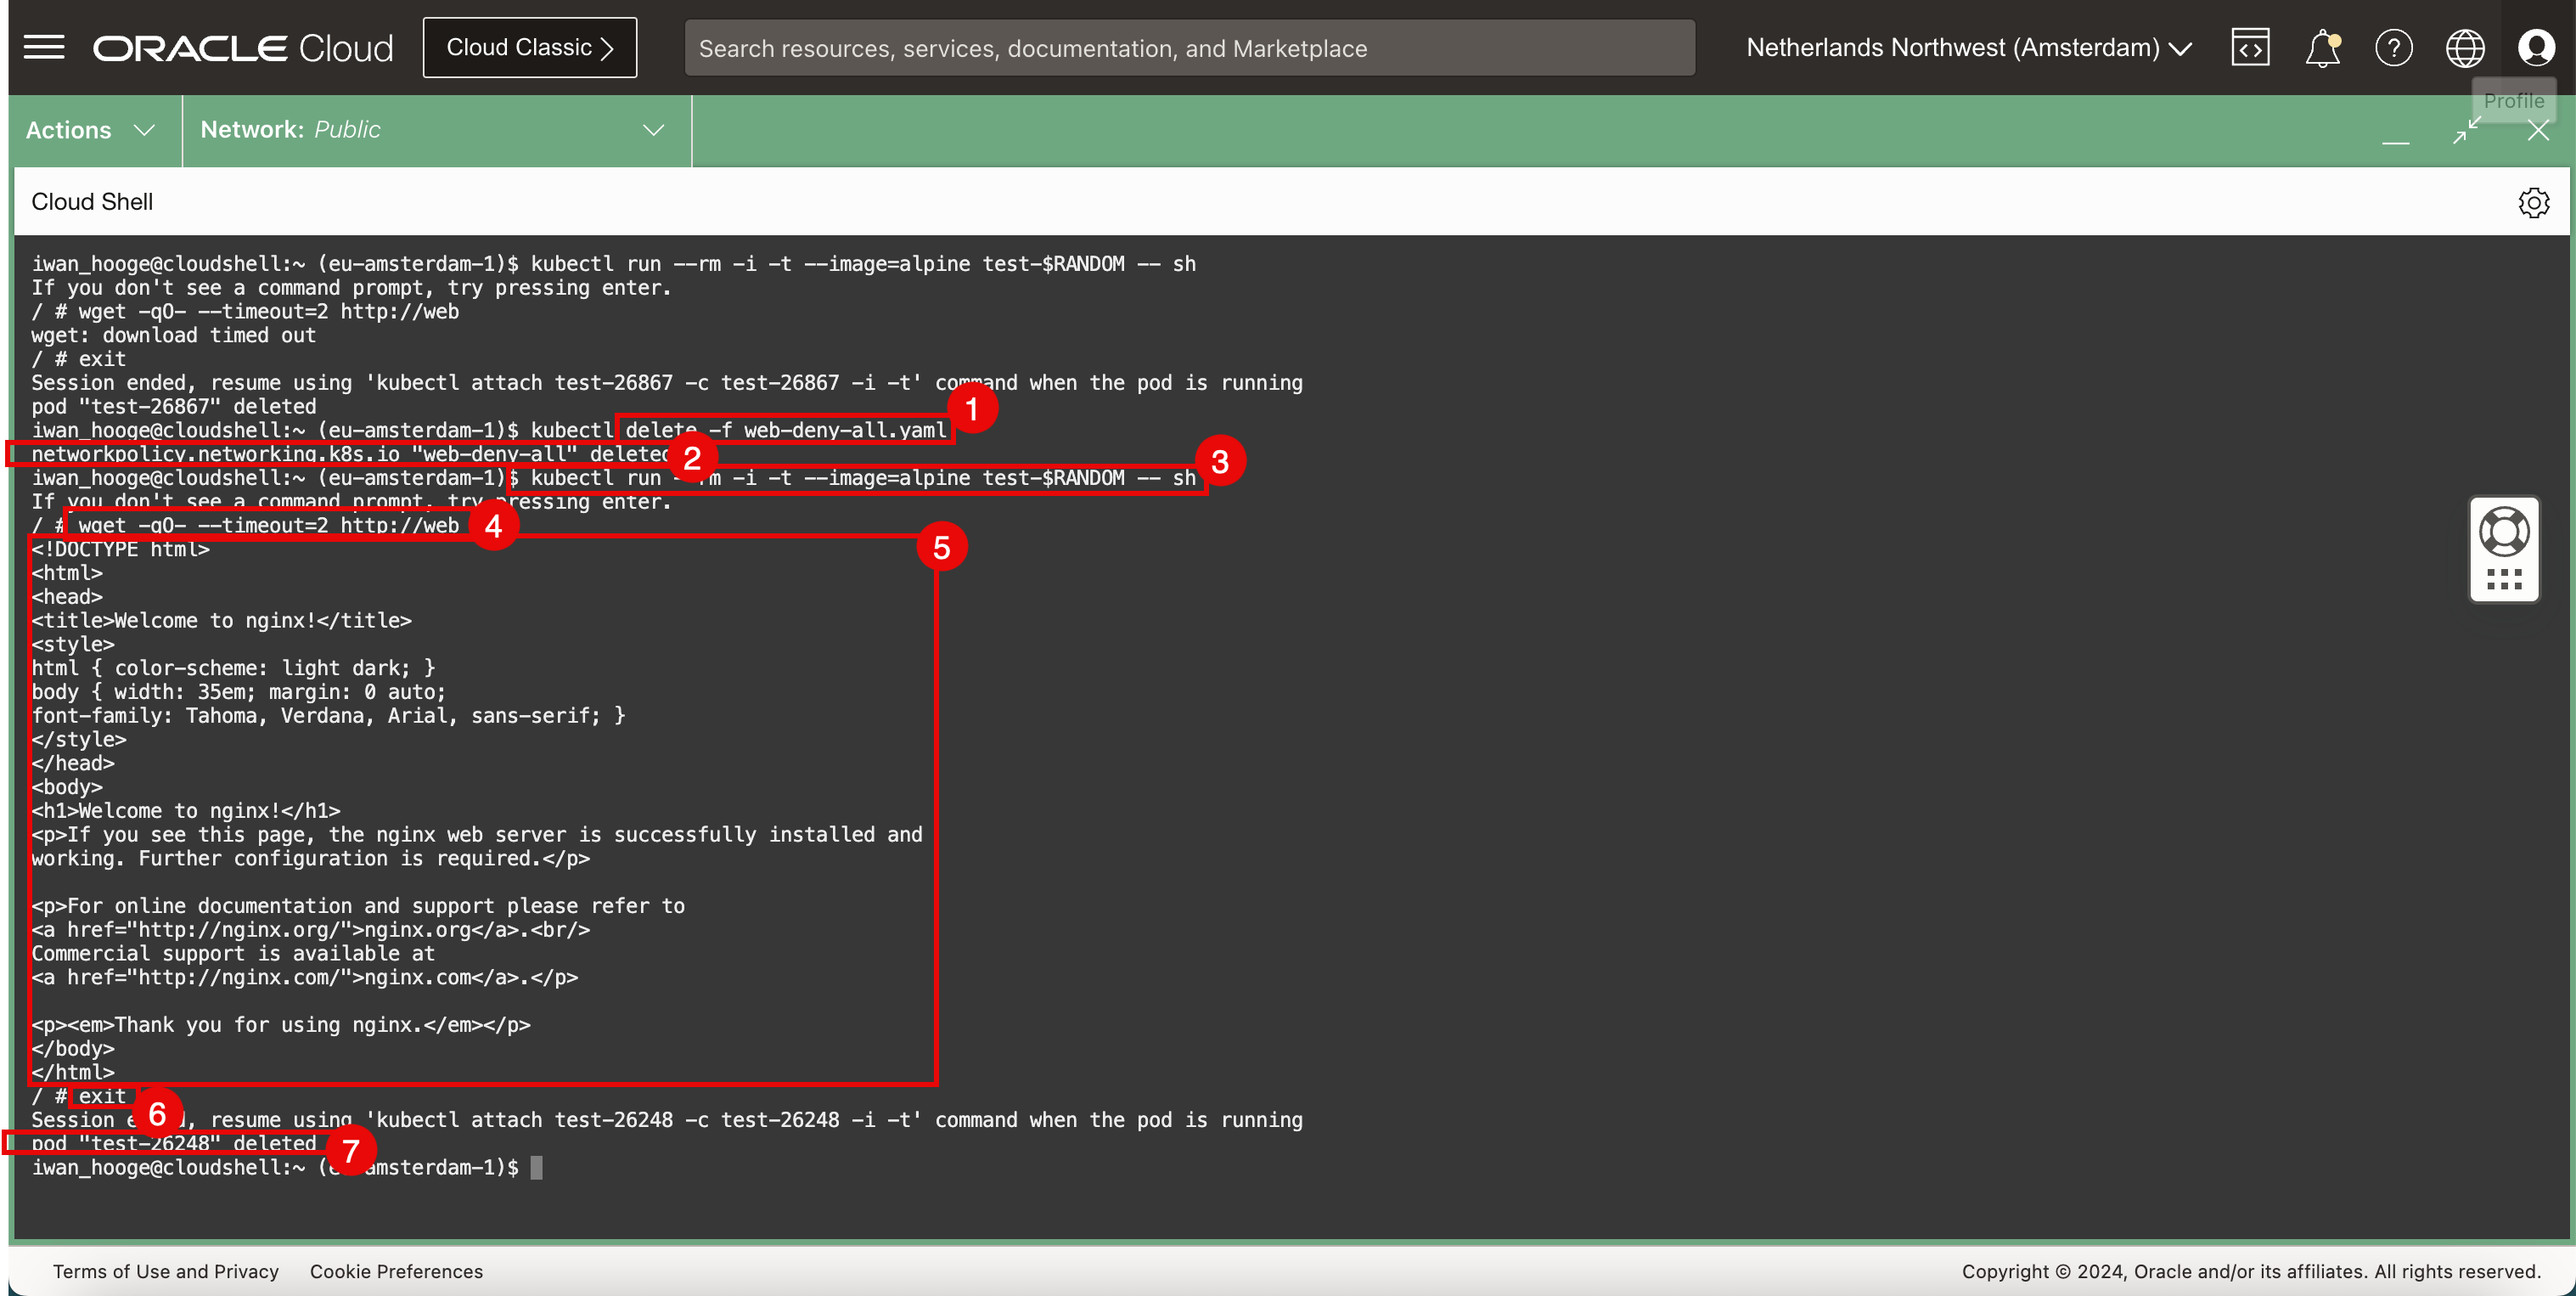
보안 정책을 제거하고 테스트를 다시 수행합니다.
-
다음 명령을 실행하여 보안 정책을 삭제합니다.
iwan_hooge@cloudshell:~ (eu-amsterdam-1)$ kubectl delete -f web-deny-all.yaml -
보안 정책이 제거된 것을 확인할 수 있습니다.
-
다음 명령을 실행하여 샘플 Pod를 배치하여 웹 애플리케이션 접속을 테스트합니다.
iwan_hooge@cloudshell:~ (eu-amsterdam-1)$ kubectl run --rm -i -t --image=alpine test-$RANDOM -- sh If you don't see a command prompt, try pressing enter. -
다음 명령을 실행하여
wget를 사용하여 웹 서버에 대한 연결을 테스트합니다. -
웹 서버가 반환하는 HTML 코드를 확인합니다. 이렇게 하면 웹 서버와 연결이 작동하고 있음을 확인할 수 있습니다.
-
다음 명령을 실행하여 임시 포드를 종료합니다.
/ # exit Session ended, resume using 'kubectl attach test-26248 -c test-26248 -i -t' command when the pod is running pod "test-26248" deleted iwan_hooge@cloudshell:~ (eu-amsterdam-1)$ -
CLI를 종료한 후 즉시 Pod가 삭제됩니다.
-
작업 5: 샘플 웹 응용 프로그램 및 서비스 제거
-
배치된 웹 응용 프로그램을 제거하려면 다음 명령을 실행합니다.
iwan_hooge@cloudshell:~ (eu-amsterdam-1)$ kubectl delete service web --namespace default service "web" deleted -
배치된 웹 서비스를 제거하려면 다음 명령을 실행합니다.
iwan_hooge@cloudshell:~ (eu-amsterdam-1)$ kubectl delete pods -l app=web --namespace default
pod "web" deleted
작업 6: 샘플 애플리케이션 배치 및 LoadBalancer 유형의 Kubernetes 서비스 구성
우리는 Cilium를 사용하여 NetworkPolicy 서비스를 시험했습니다, 우리는 또한 Cilium를 사용하여 LoadBalancer 서비스를 시험합니다.
-
새 샘플 애플리케이션 및 서비스를 배치합니다.
-
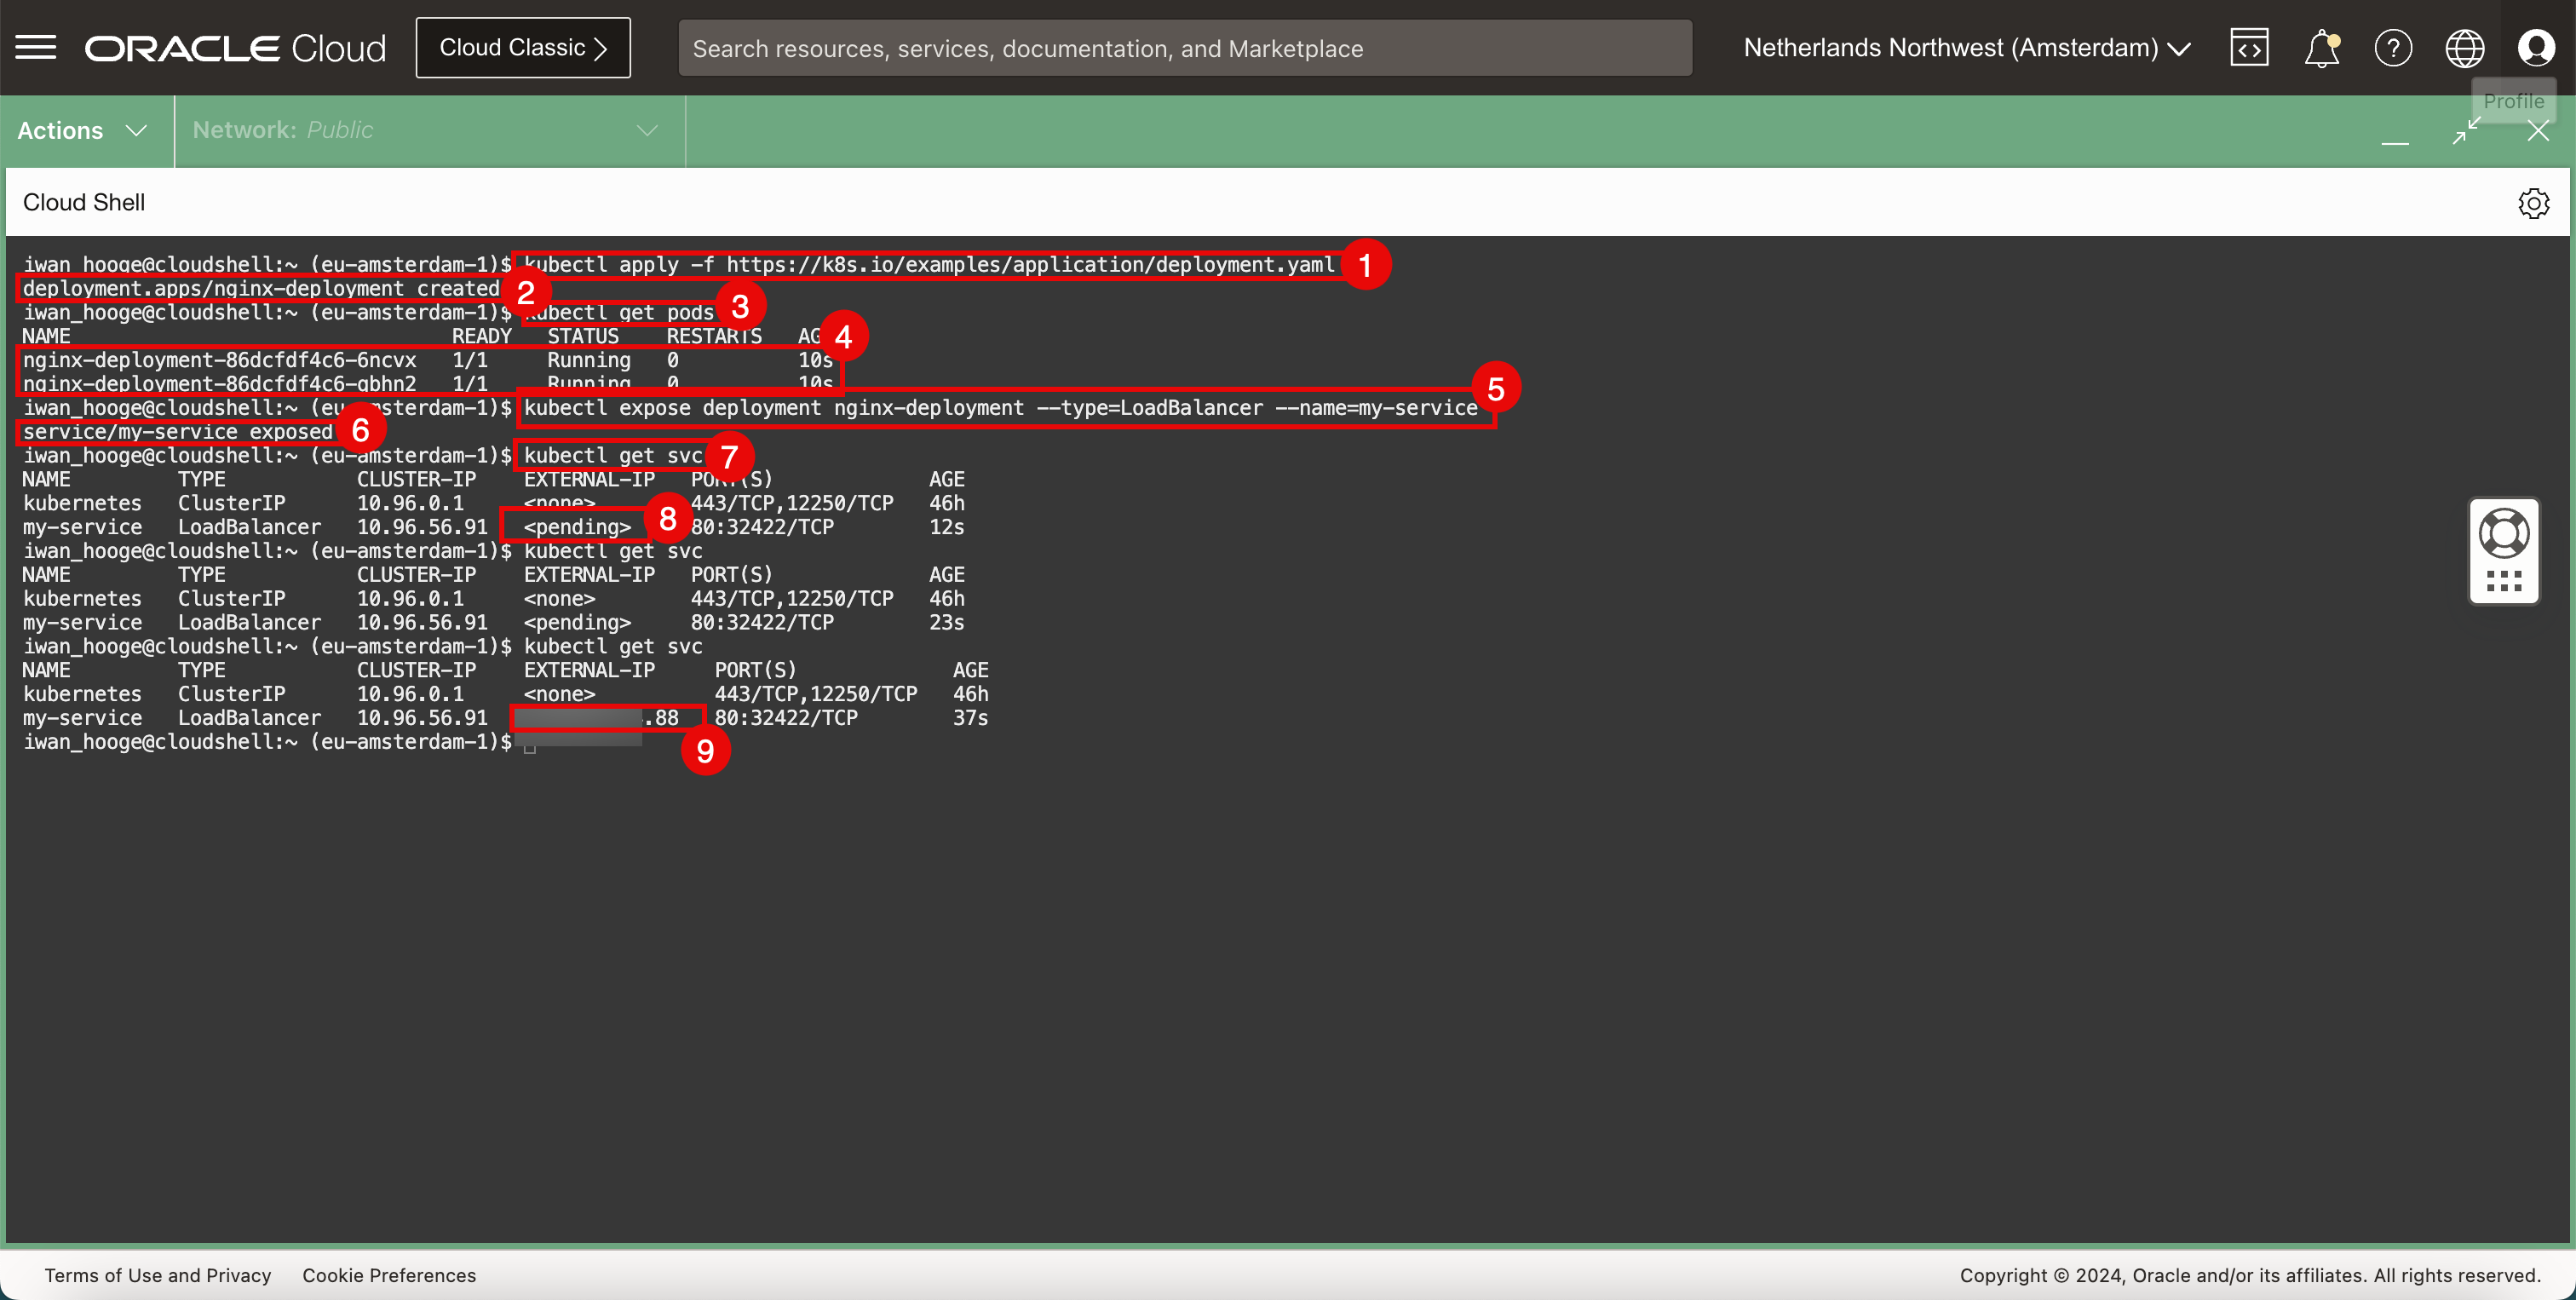
다음 명령을 실행하여 새 샘플 응용 프로그램을 배치합니다.
iwan_hooge@cloudshell:~ (eu-amsterdam-1)$ kubectl apply -f https://k8s.io/examples/application/deployment.yaml deployment.apps/nginx-deployment created -
응용 프로그램이 성공적으로 생성되었는지 확인합니다.
-
다음 명령을 실행하여 배치된 포드를 가져옵니다.
iwan_hooge@cloudshell:~ (eu-amsterdam-1)$ kubectl get pods NAME READY STATUS RESTARTS AGE nginx-deployment-86dcfdf4c6-6ncvx 1/1 Running 0 10s nginx-deployment-86dcfdf4c6-qbhn2 1/1 Running 0 10s -
배치된 포드를 검토합니다.
-
다음 명령을 실행하여 LoadBalancer 서비스에 응용 프로그램을 표시합니다.
iwan_hooge@cloudshell:~ (eu-amsterdam-1)$ kubectl expose deployment nginx-deployment --type=LoadBalancer --name=my-service service/my-service exposed -
서비스가 성공적으로 생성되고 응용 프로그램이 성공적으로 노출되었는지 확인합니다.
-
다음 명령을 실행하여 노출된 서비스 및 IP 주소를 검토합니다.
iwan_hooge@cloudshell:~ (eu-amsterdam-1)$ kubectl get svc NAME TYPE CLUSTER-IP EXTERNAL-IP PORT(S) AGE kubernetes ClusterIP 10.96.0.1 <none> 443/TCP,12250/TCP 46h my-service LoadBalancer 10.96.56.91 <pending> 80:32422/TCP 12s iwan_hooge@cloudshell:~ (eu-amsterdam-1)$ kubectl get svc NAME TYPE CLUSTER-IP EXTERNAL-IP PORT(S) AGE kubernetes ClusterIP 10.96.0.1 <none> 443/TCP,12250/TCP 46h my-service LoadBalancer 10.96.56.91 <pending> 80:32422/TCP 23s -
외부 IP가 보류 중인지 확인합니다.
-
다음 명령을 실행하고 공용 IP 주소가 구성되었는지 확인합니다(
.88로 끝남).iwan_hooge@cloudshell:~ (eu-amsterdam-1)$ kubectl get svc NAME TYPE CLUSTER-IP EXTERNAL-IP PORT(S) AGE kubernetes ClusterIP 10.96.0.1 <none> 443/TCP,12250/TCP 46h my-service LoadBalancer 10.96.56.91 XXX.XXX.XXX.88 80:32422/TCP 37s iwan_hooge@cloudshell:~ (eu-amsterdam-1)$
-
-
인터넷 브라우저에서 공용 IP 주소를 복사하여 붙여넣고 LoadBalancer 서비스 공용 IP 주소를 사용하여 배포된 애플리케이션(기본 웹 사이트가 있는 Nginx 웹 서버)에 연결할 수 있는지 확인합니다.

작업 7: LoadBalancer 유형의 샘플 애플리케이션 및 Kubernetes 서비스 제거
-
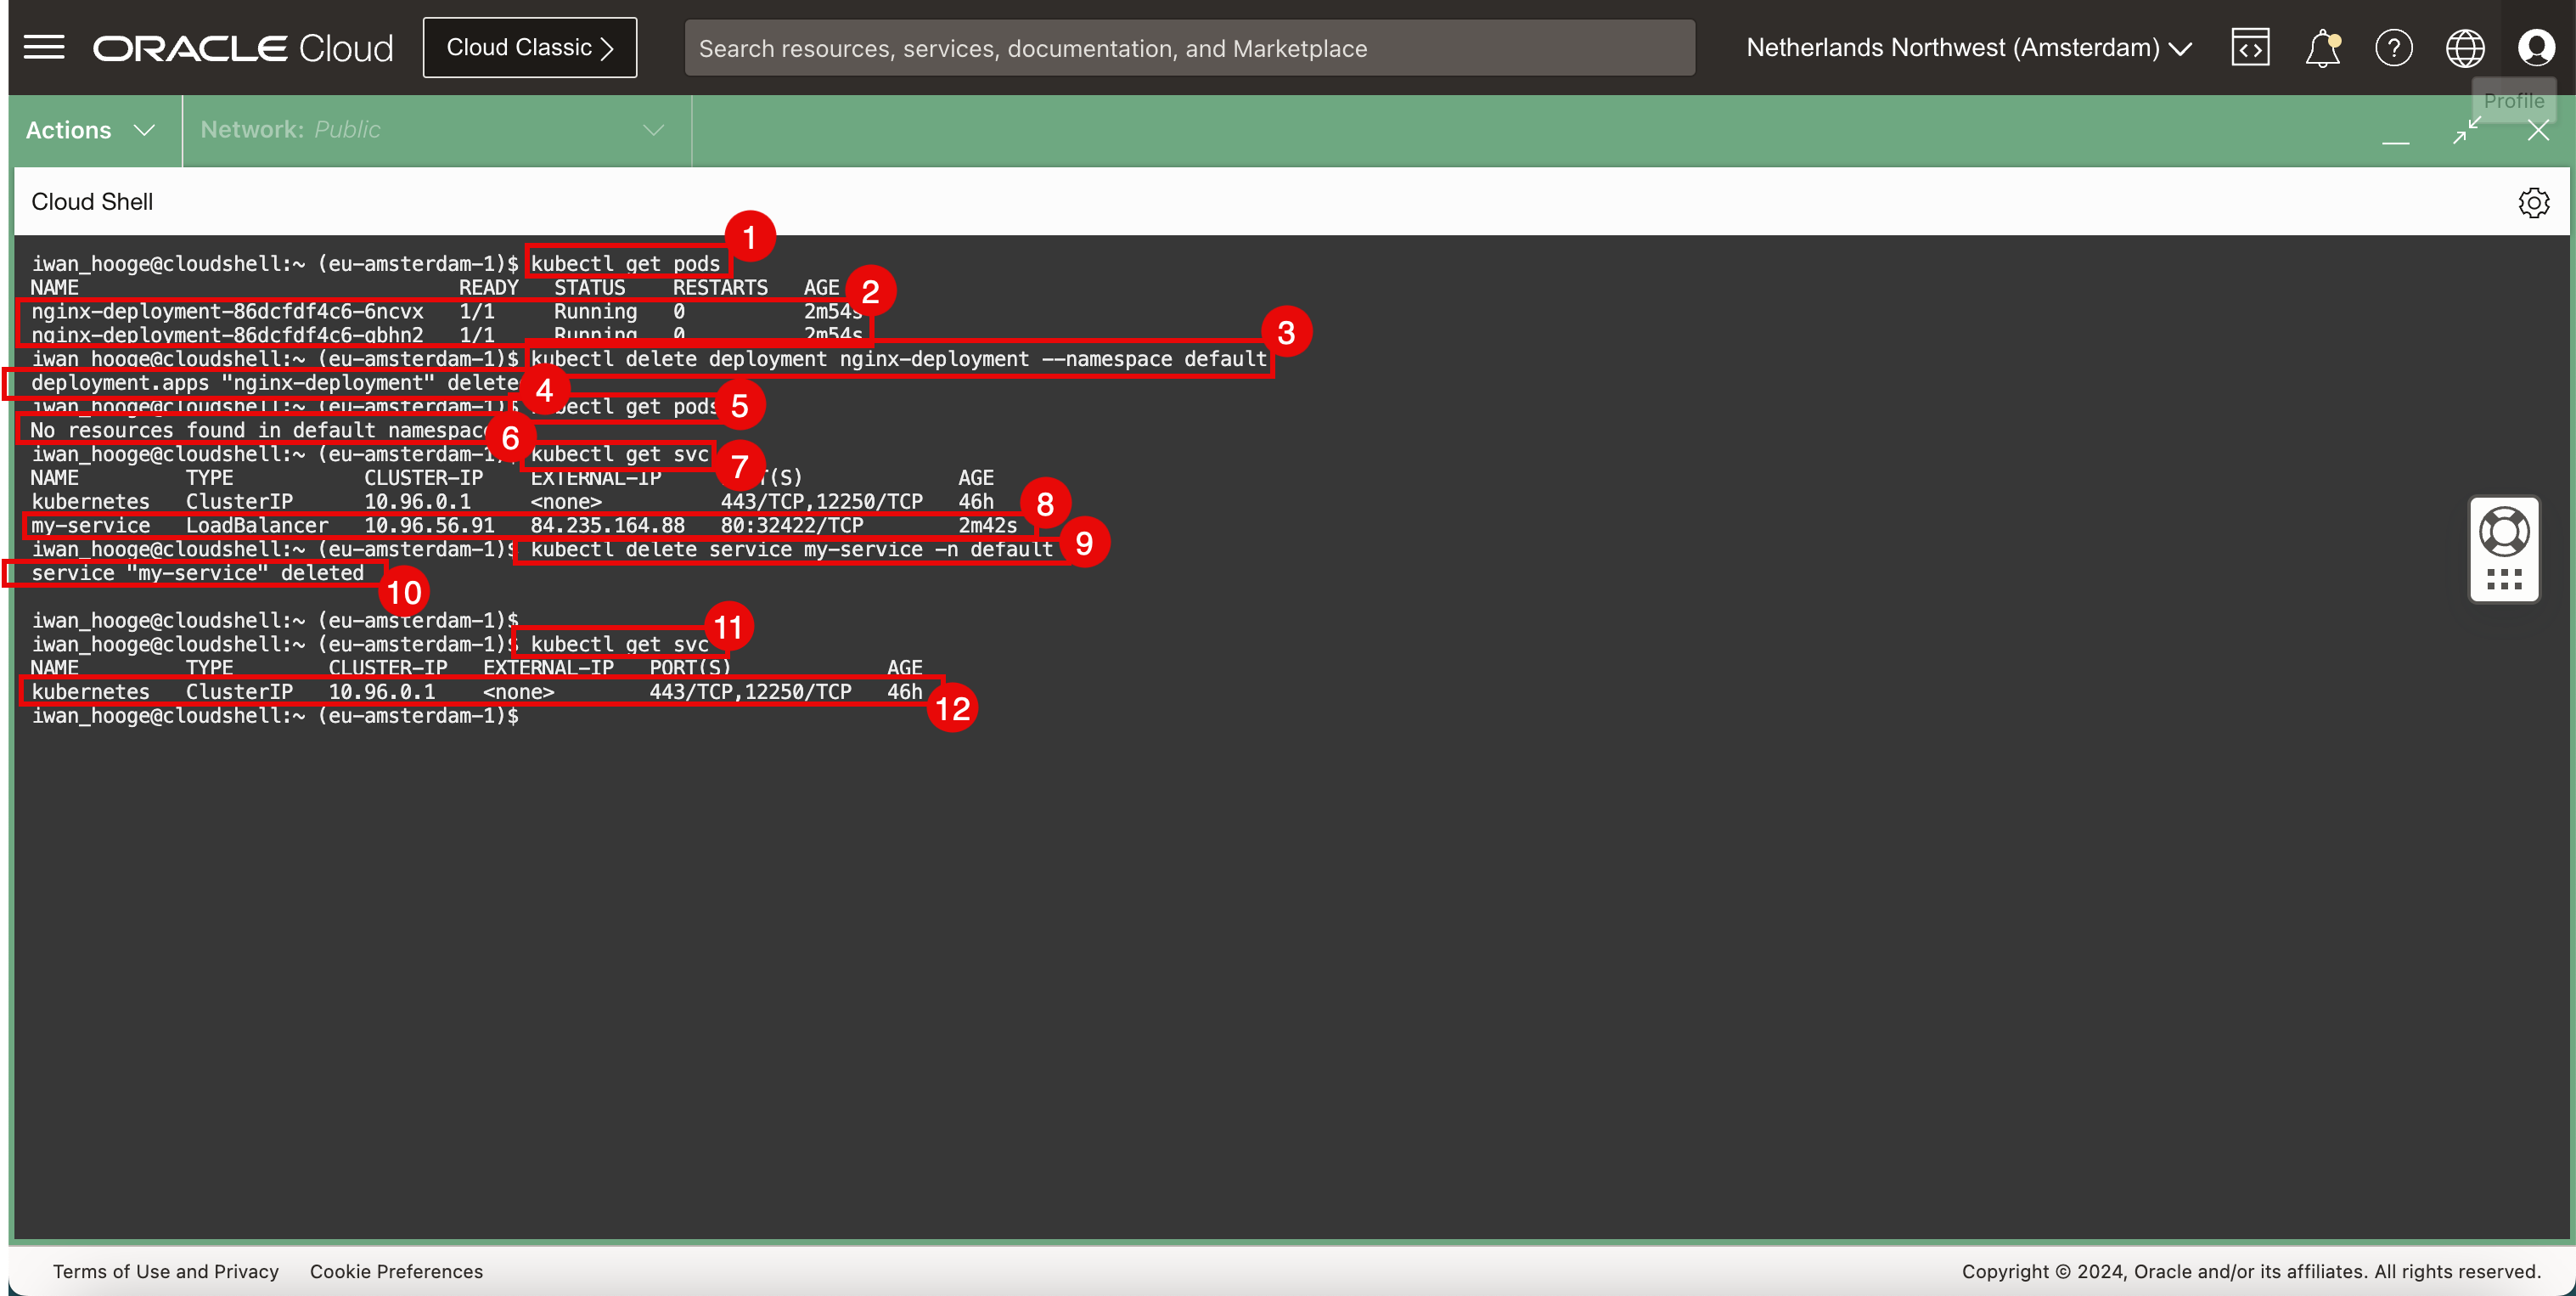
다음 명령을 실행하여 배치된 포드를 가져옵니다.
iwan_hooge@cloudshell:~ (eu-amsterdam-1)$ kubectl get pods NAME READY STATUS RESTARTS AGE nginx-deployment-86dcfdf4c6-6ncvx 1/1 Running 0 2m54s nginx-deployment-86dcfdf4c6-qbhn2 1/1 Running 0 2m54s -
배치된 포드를 검토합니다.
-
배치된 웹 응용 프로그램을 제거하려면 다음 명령을 실행합니다.
iwan_hooge@cloudshell:~ (eu-amsterdam-1)$ kubectl delete deployment nginx-deployment --namespace default deployment.apps "nginx-deployment" deleted -
응용 프로그램이 삭제되었는지 확인합니다.
-
다음 명령을 실행하여 배치된 포드를 가져옵니다.
iwan_hooge@cloudshell:~ (eu-amsterdam-1)$ kubectl get pods No resources found in default namespace. -
포드는 더 이상 배치되지 않고 성공적으로 삭제되었습니다.
-
다음 명령을 실행하여 배치된 서비스를 가져옵니다.
iwan_hooge@cloudshell:~ (eu-amsterdam-1)$ kubectl get svc NAME TYPE CLUSTER-IP EXTERNAL-IP PORT(S) AGE kubernetes ClusterIP 10.96.0.1 <none> 443/TCP,12250/TCP 46h my-service LoadBalancer 10.96.56.91 XXX.XXX.XXX.88 80:32422/TCP 2m42s -
배치된 서비스를 검토합니다.
-
배치된 LoadBalancer 서비스를 제거하려면 다음 명령을 실행합니다.
iwan_hooge@cloudshell:~ (eu-amsterdam-1)$ kubectl delete service my-service -n default service "my-service" deleted -
서비스가 삭제되었는지 확인합니다.
-
다음 명령을 실행하여 배치된 서비스를 가져옵니다.
iwan_hooge@cloudshell:~ (eu-amsterdam-1)$ kubectl get svc NAME TYPE CLUSTER-IP EXTERNAL-IP PORT(S) AGE kubernetes ClusterIP 10.96.0.1 <none> 443/TCP,12250/TCP 46h iwan_hooge@cloudshell:~ (eu-amsterdam-1)$ -
LoadBalancer 서비스가 더 이상 배치되지 않고 성공적으로 삭제되었음을 알 수 있습니다.
관련 링크
확인
- 작성자 - Iwan Hoogendoorn(OCI Network Specialist)
추가 학습 자원
docs.oracle.com/learn에서 다른 실습을 살펴보거나 Oracle Learning YouTube 채널에서 더 많은 무료 학습 콘텐츠에 액세스하십시오. 또한 education.oracle.com/learning-explorer를 방문하여 Oracle Learning Explorer가 되십시오.
제품 설명서는 Oracle Help Center를 참조하십시오.
Use Cilium to Provide Networking Services in Oracle Cloud Infrastructure Container Engine for Kubernetes
F96027-01
April 2024