주:
- 이 사용지침서에서는 Oracle Cloud에 액세스해야 합니다. 무료 계정에 등록하려면 Oracle Cloud Infrastructure Free Tier 시작하기를 참조하십시오.
- Oracle Cloud Infrastructure 인증서, 테넌시 및 구획에 예제 값을 사용합니다. 실습을 완료할 때 이러한 값을 클라우드 환경과 관련된 값으로 대체하십시오.
OCI를 사용하여 온프레미스 MySQL Database를 Oracle HeatWave MySQL 관리 인스턴스로 마이그레이션 GoldenGate
소개
Oracle Cloud Infrastructure GoldenGate(OCI GoldenGate)는 데이터 엔지니어가 하나 이상의 데이터 관리 시스템에서 OCI 데이터베이스로 데이터를 실시간으로 대규모로 이동할 수 있도록 지원하는 완전 관리형 서비스입니다. 컴퓨팅 환경을 할당하거나 관리할 필요 없이 단일 인터페이스에서 데이터 복제 작업을 설계, 실행, 통합관리 및 모니터링할 수 있습니다. OCI GoldenGate는 MySQL 및 Oracle HeatWave MySQL 데이터베이스 서비스를 포함한 여러 소스 및 대상을 지원합니다.
이 자습서에서는 OCI GoldenGate를 사용하여 온프레미스 MySQL 데이터베이스를 Oracle HeatWave MySQL 관리 인스턴스로 마이그레이션하는 방법을 안내합니다.
목표
- OCI GoldenGate을 사용하여 온프레미스 MySQL 데이터베이스를 OCI의 Oracle HeatWave MySQL 관리 인스턴스로 마이그레이션합니다.
필요 조건
-
소스 MySQL 데이터베이스는 온프레미스이고 대상 Oracle Heatwave MySQL 관리 인스턴스이며 OCI 배스천 호스트가 제자리에 있습니다.
-
단방향 복제이므로 대상은 소스보다 높은 버전일 수 있습니다. 양방향 복제의 경우 소스와 대상이 동일한 버전에 있는 것이 좋습니다.
-
소스에서
log_bin(binlog)을 사용으로 설정해야 합니다. -
소스 및 대상 인스턴스의
binlog_expire_logs_second인스턴스 매개변수를 72시간 이상으로 설정해야 합니다. -
DDL(데이터 정의어) 복제를 허용하려면 소스 및 대상 인스턴스의
binlog_row_metadata인스턴스 매개변수를 전체로 설정해야 합니다.주: 이 자습서에서는 소스가 MySQL 버전
5.7.44를 실행하고 있습니다. 여기서binlog_row_metadata매개변수는 지원되지 않습니다. 따라서 DDL 복제는 지원되지 않습니다. -
대상 Oracle Heatwave MySQL 인스턴스에 HA(고가용성)가 있는 경우 GTID(전역 트랜잭션 식별자) 모드가 소스에 있어야 합니다. 그렇지 않은 경우 선택 사항입니다.
-
지원되는 데이터 유형을 검토합니다. 자세한 내용은 MySQL: 지원되는 데이터 유형, 객체 및 작업을 참조하십시오.
-
DDL 복제 제한 사항을 검토합니다. 자세한 내용은 Using DDL Replication을 참조하십시오.
-
대상 인스턴스는 다음 방법 중 하나를 사용하여 소스에서 미리 생성되어야 합니다.
- 방법 1:
util.dumpInstance및util.loadDump와 같은 MySQL 셸 유틸리티를 사용합니다. - 방법 2:
util.copyInstance와 같은 MySQL 셸 유틸리티를 사용합니다. - 방법 3: 초기 Extract 및 Replicat에 OCI GoldenGate를 사용하여 초기 데이터 로드를 수행합니다.
참고: 이 자습서에서는 초기 로드에
util.copyInstance를 사용합니다. - 방법 1:
-
OCI에 MySQL 클라이언트 및 MySQL Shell 유틸리티가 설치된 OCI 배스천 호스트입니다.
-
FastConnect/IPSec/VPN, 수신 규칙 및 업데이트된 보안 목록을 통해 온프레미스 소스, 대상 Oracle Heatwave MySQL, 배스천 및 OCI GoldenGate 간 통신을 허용합니다.
제한
-
열 문제 자동 증가
-
테이블에 기본 키나 고유 키가 아닌 열이 하나 있으면 해당 테이블의 모든 열 조합이 소스와 대상에서 동일하기 때문에 매핑이 실패합니다.
-
데이터 유형, DDL 및 기타 기능 제한 사항.
-
활성-활성 복제를 사용하는 경우 시간 기록 기반 충돌 해결 및 감지가 작동할 수 있도록 시간대가 두 시스템에서 동일해야 합니다.
작업 1: 소스 및 대상 MySQL 인스턴스 생성
-
소스:
-On-premise Hostname: MySQLCI57 OEL 7.9 MySQL version 5.7.44 Intel Hardware Standard.Flex3 with 4 CPUs and 32GB Dedicated VM -
대상:
-OCI Oracle Heatwave MySQL Managed Instance Hostname: MySQLGG1 with HA and no heatwave (4CPU and 32GB) OEL 8 with latest build MySQL version: 8.4.4 Private subnet -
OCI 배스천 호스트:
-OCI
Hostname: Bastion
OEL 8 with Intel hardware Standard.Flex3 with 4CPUs and 32GB
작업 2: 배스천, 온프레미스 및 Oracle Heatwave MySQL 인스턴스 간 연결 테스트
-
OCI 배스천 호스트에 MySQL 클라이언트 및 MySQL Shell 유틸리티를 설치합니다.
-
OCI 배스천에서 소스 온프레미스 MySQL 인스턴스로의 접속을 테스트합니다.
[root@bastion ~]# mysql --host <sourceIP> -uadmin -p mysql: [Warning] Using a password on the command line interface can be insecure. Welcome to the MySQL monitor. Commands end with ; or \g. Your MySQL connection id is 15 Server version: 5.7.44 MySQL Community Server (GPL) Copyright (c) 2000, 2025, Oracle and/or its affiliates. Oracle is a registered trademark of Oracle Corporation and/or its affiliates. Other names may be trademarks of their respective owners. Type 'help;' or '\h' for help. Type '\c' to clear the current input statement. mysql> show databases; +--------------------+ | Database | +--------------------+ | information_schema | | mysql | | performance_schema | | sys | +--------------------+ 4 rows in set (0.00 sec) mysql> select @@version; +-----------+ | @@version | +-----------+ | 5.7.44 | +-----------+ 1 row in set (0.00 sec) -
소스 온프레미스 MySQL에서 Oracle Heatwave MySQL 관리 인스턴스로의 연결을 테스트합니다.
[root@mysqlci57 ~]# mysql --host <targetIP> -u admin -p
mysql: [Warning] Using a password on the command line interface can be insecure.
Welcome to the MySQL monitor.  Commands end with ; or \g.
Your MySQL connection id is 108
Server version: 8.4.4-u5-cloud MySQL Enterprise - Cloud

Copyright (c) 2000, 2023, Oracle and/or its affiliates.

Oracle is a registered trademark of Oracle Corporation and/or its
affiliates. Other names may be trademarks of their respective
owners.

Type 'help;' or '\h' for help. Type '\c' to clear the current input statement.

mysql> select @@version;
+----------------+
| @@version      |
+----------------+
| 8.4.4-u5-cloud |
+----------------+
1 row in set (0.01 sec)
작업 3: OCI에 대한 사용자 생성 GoldenGate
-
소스:
create user 'ggsuser_S'@'%' identified by "<password>"; grant all privileges on airportdb.* to 'ggsuser_S'@'%' with grant option; Grant select, process, replication slave, reload, replication client on *.* to 'ggsuser_S'@'%'; -
대상:
create user 'ggsuser_T'@'%' identified by "<password>";
grant all privileges on airportdb.* to 'ggsuser_T'@'%' with grant option;
Grant select,  process, replication slave, replication client on *.* to 'ggsuser_T'@'%';

Create database ggadmin;  -- you create this db on target side to store the checkpoint table.
grant all privileges on ggadmin.* to 'ggsuser_T'@'%' with grant option;
작업 4: OCI에 대한 소스 데이터베이스에서 필수 매개변수 설정 GoldenGate
대상이 HA가 아닌 독립형인 경우 소스에서 GTID를 설정할 필요가 없습니다. 그러나 대상이 HA인 경우 소스에서 GTID를 설정하는 것이 좋습니다. binlog 모드를 켜야 합니다.
-
/etc/my.cnf파일을 편집하고 다음 행을 추가합니다.server-id=1 log-bin=/var/log/mysql/mysql-bin.log max_binlog_size=100M binlog_format=ROW expire_logs_days=10 -- binlog_row_metadata=FULL <-- this is not supported in Version 5.7.44. So DDL replication will not be possible if source is on v5.7.44. gtid_mode=ON enforce_gtid_consistency=ON -
MySQL 서버를 다시 시작합니다.
Systemctl stop mysqld
Systemctl start mysqld
Systemctl status mysqld
전체 목록 또는 매개변수는 트랜잭션 로그 설정 및 요구사항을 확인하십시오. 자세한 내용은 옵션 B: OCI 컴퓨트에서 자체 배스천 사용을 참조하십시오.
-
다음 명령을 실행하여 지금 이진 로그가 사용으로 설정되었는지 확인합니다.
mysql> show binary logs; +------------------+-----------+ | Log_name | File_size | +------------------+-----------+ | mysql-bin.000001 | 154 | +------------------+-----------+ 1 row in set (0.00 sec) mysql> show variables like 'bin%'; +--------------------------------------------+--------------+ | Variable_name | Value | +--------------------------------------------+--------------+ | bind_address | * | | binlog_cache_size | 32768 | | binlog_checksum | CRC32 | | binlog_direct_non_transactional_updates | OFF | | binlog_error_action | ABORT_SERVER | | binlog_format | ROW | | binlog_group_commit_sync_delay | 0 | | binlog_group_commit_sync_no_delay_count | 0 | | binlog_gtid_simple_recovery | ON | | binlog_max_flush_queue_time | 0 | | binlog_order_commits | ON | | binlog_row_image | FULL | | binlog_rows_query_log_events | OFF | | binlog_stmt_cache_size | 32768 | | binlog_transaction_dependency_history_size | 25000 | | binlog_transaction_dependency_tracking | COMMIT_ORDER | +--------------------------------------------+--------------+ 16 rows in set (0.01 sec) -
다음 명령을 실행하여 GTID 모드(
gtid_mode)가 켜져 있는지 확인합니다.mysql> show variables like 'gtid%'; +----------------------------------+-----------+ | Variable_name | Value | +----------------------------------+-----------+ | gtid_executed_compression_period | 1000 | | gtid_mode | ON | <--- it is now showing ON | gtid_next | AUTOMATIC | | gtid_owned | | | gtid_purged | | +----------------------------------+-----------+ 5 rows in set (0.00 sec) mysql> select @@gtid_executed, @@gtid_purged\G *************************** 1. row *************************** @@gtid_executed: @@gtid_purged: 1 row in set, 1 warning (0.00 sec) mysql> select * from mysql.gtid_executed; Empty set (0.00 sec) <--- this is empty because we just turned it ON. As transactions occur this will get populated
주: 첫번째 query는 GTID에 대해 NULL 값을 표시하는 것이 일반적입니다. 이는 MySQL
versions 5.7에서 GTID 값이mysql.gtid_executed테이블에만 저장되기 때문입니다.
작업 5: 대상 데이터베이스에서 airportdb 스키마(메타 데이터만 해당) 생성
-
소스 데이터베이스에서 스키마 메타 데이터를 추출합니다.
[root@bastion airport-db]# mysqldump --host <SourceIP> -u admin -p --no-data --routines --events airportdb > airportdb.sql mysqldump: [Warning] Using a password on the command line interface can be insecure. -- Warning: column statistics not supported by the server. -
스키마 메타 데이터를 Target Database로 임포트합니다.
[root@bastion opc]#  mysql --host <TargetIP> -u admin -p
mysql: [Warning] Using a password on the command line interface can be insecure.
Welcome to the MySQL monitor.  Commands end with ; or \g.
Your MySQL connection id is 581
Server version: 8.4.4-u5-cloud MySQL Enterprise - Cloud

Copyright (c) 2000, 2025, Oracle and/or its affiliates.

Oracle is a registered trademark of Oracle Corporation and/or its
affiliates. Other names may be trademarks of their respective
owners.

Type 'help;' or '\h' for help. Type '\c' to clear the current input statement.

mysql> create database airportdb;
Query OK, 1 row affected (0.01 sec)

mysql> use airportdb;
Database changed
mysql> source airportdb.sql
작업 6: OCI GoldenGate 배치 설정 및 접속 추가
몇 가지 블로그, OCI GoldenGate 배포 설정 방법에 대한 자습서가 있으므로 몇 가지 단계를 보여드리겠습니다.
-
OCI 콘솔에 로그인하고 GoldenGate Deployments를 선택합니다.
-
배포 생성을 누르고 다음 이미지에 표시된 대로 필요한 정보를 입력합니다.
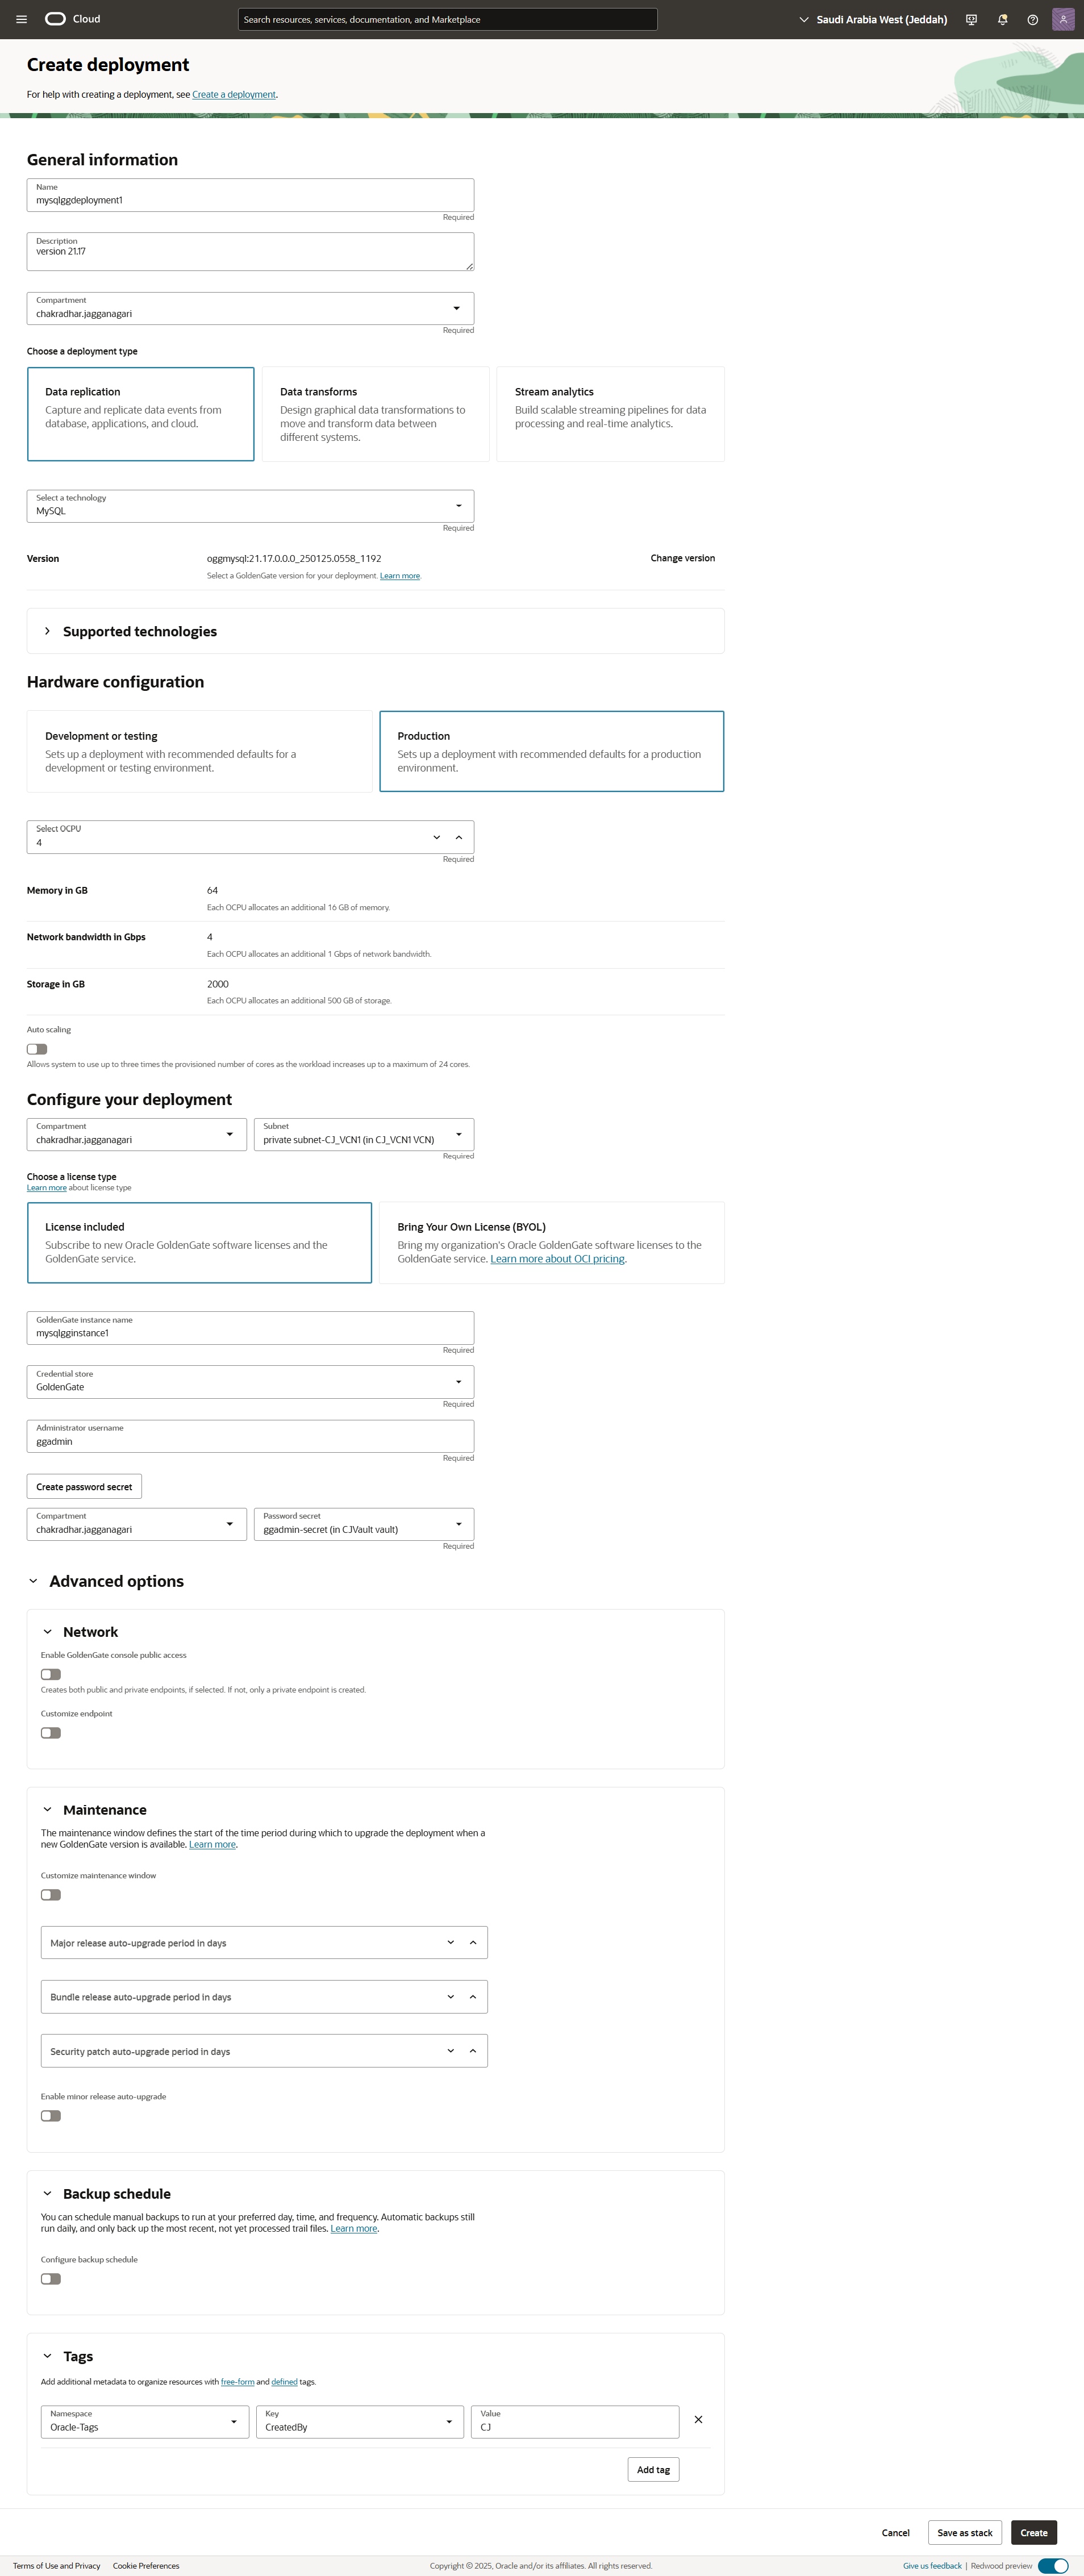
-
배포 생성 페이지에서 소스 및 대상 접속 세부정보를 추가합니다.
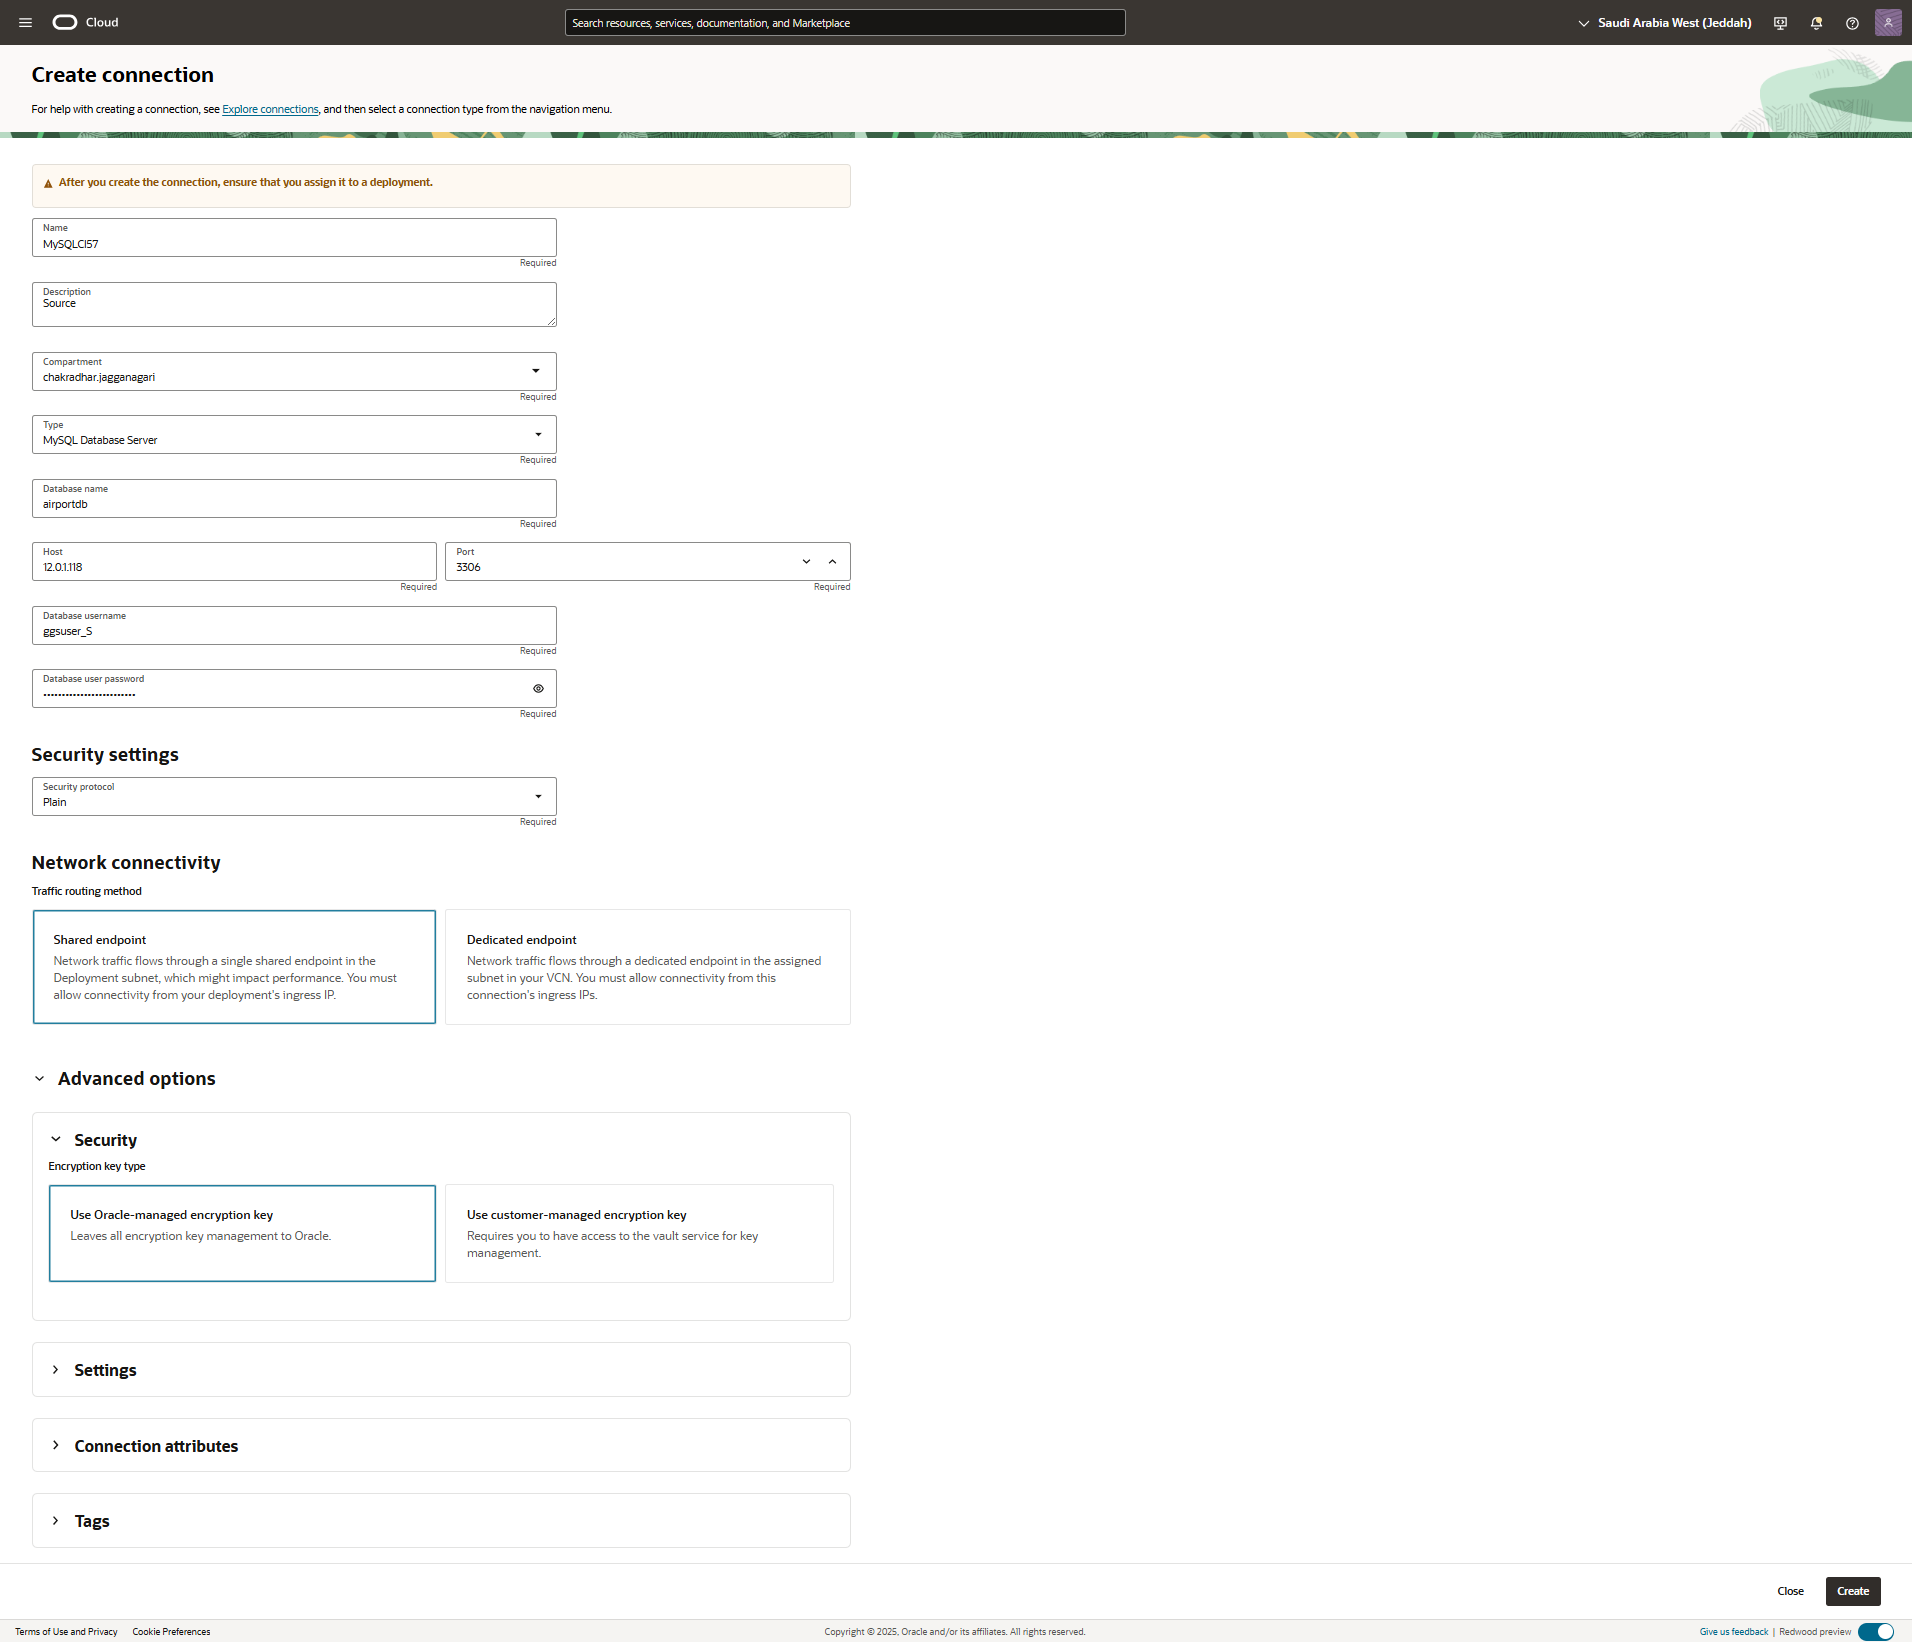
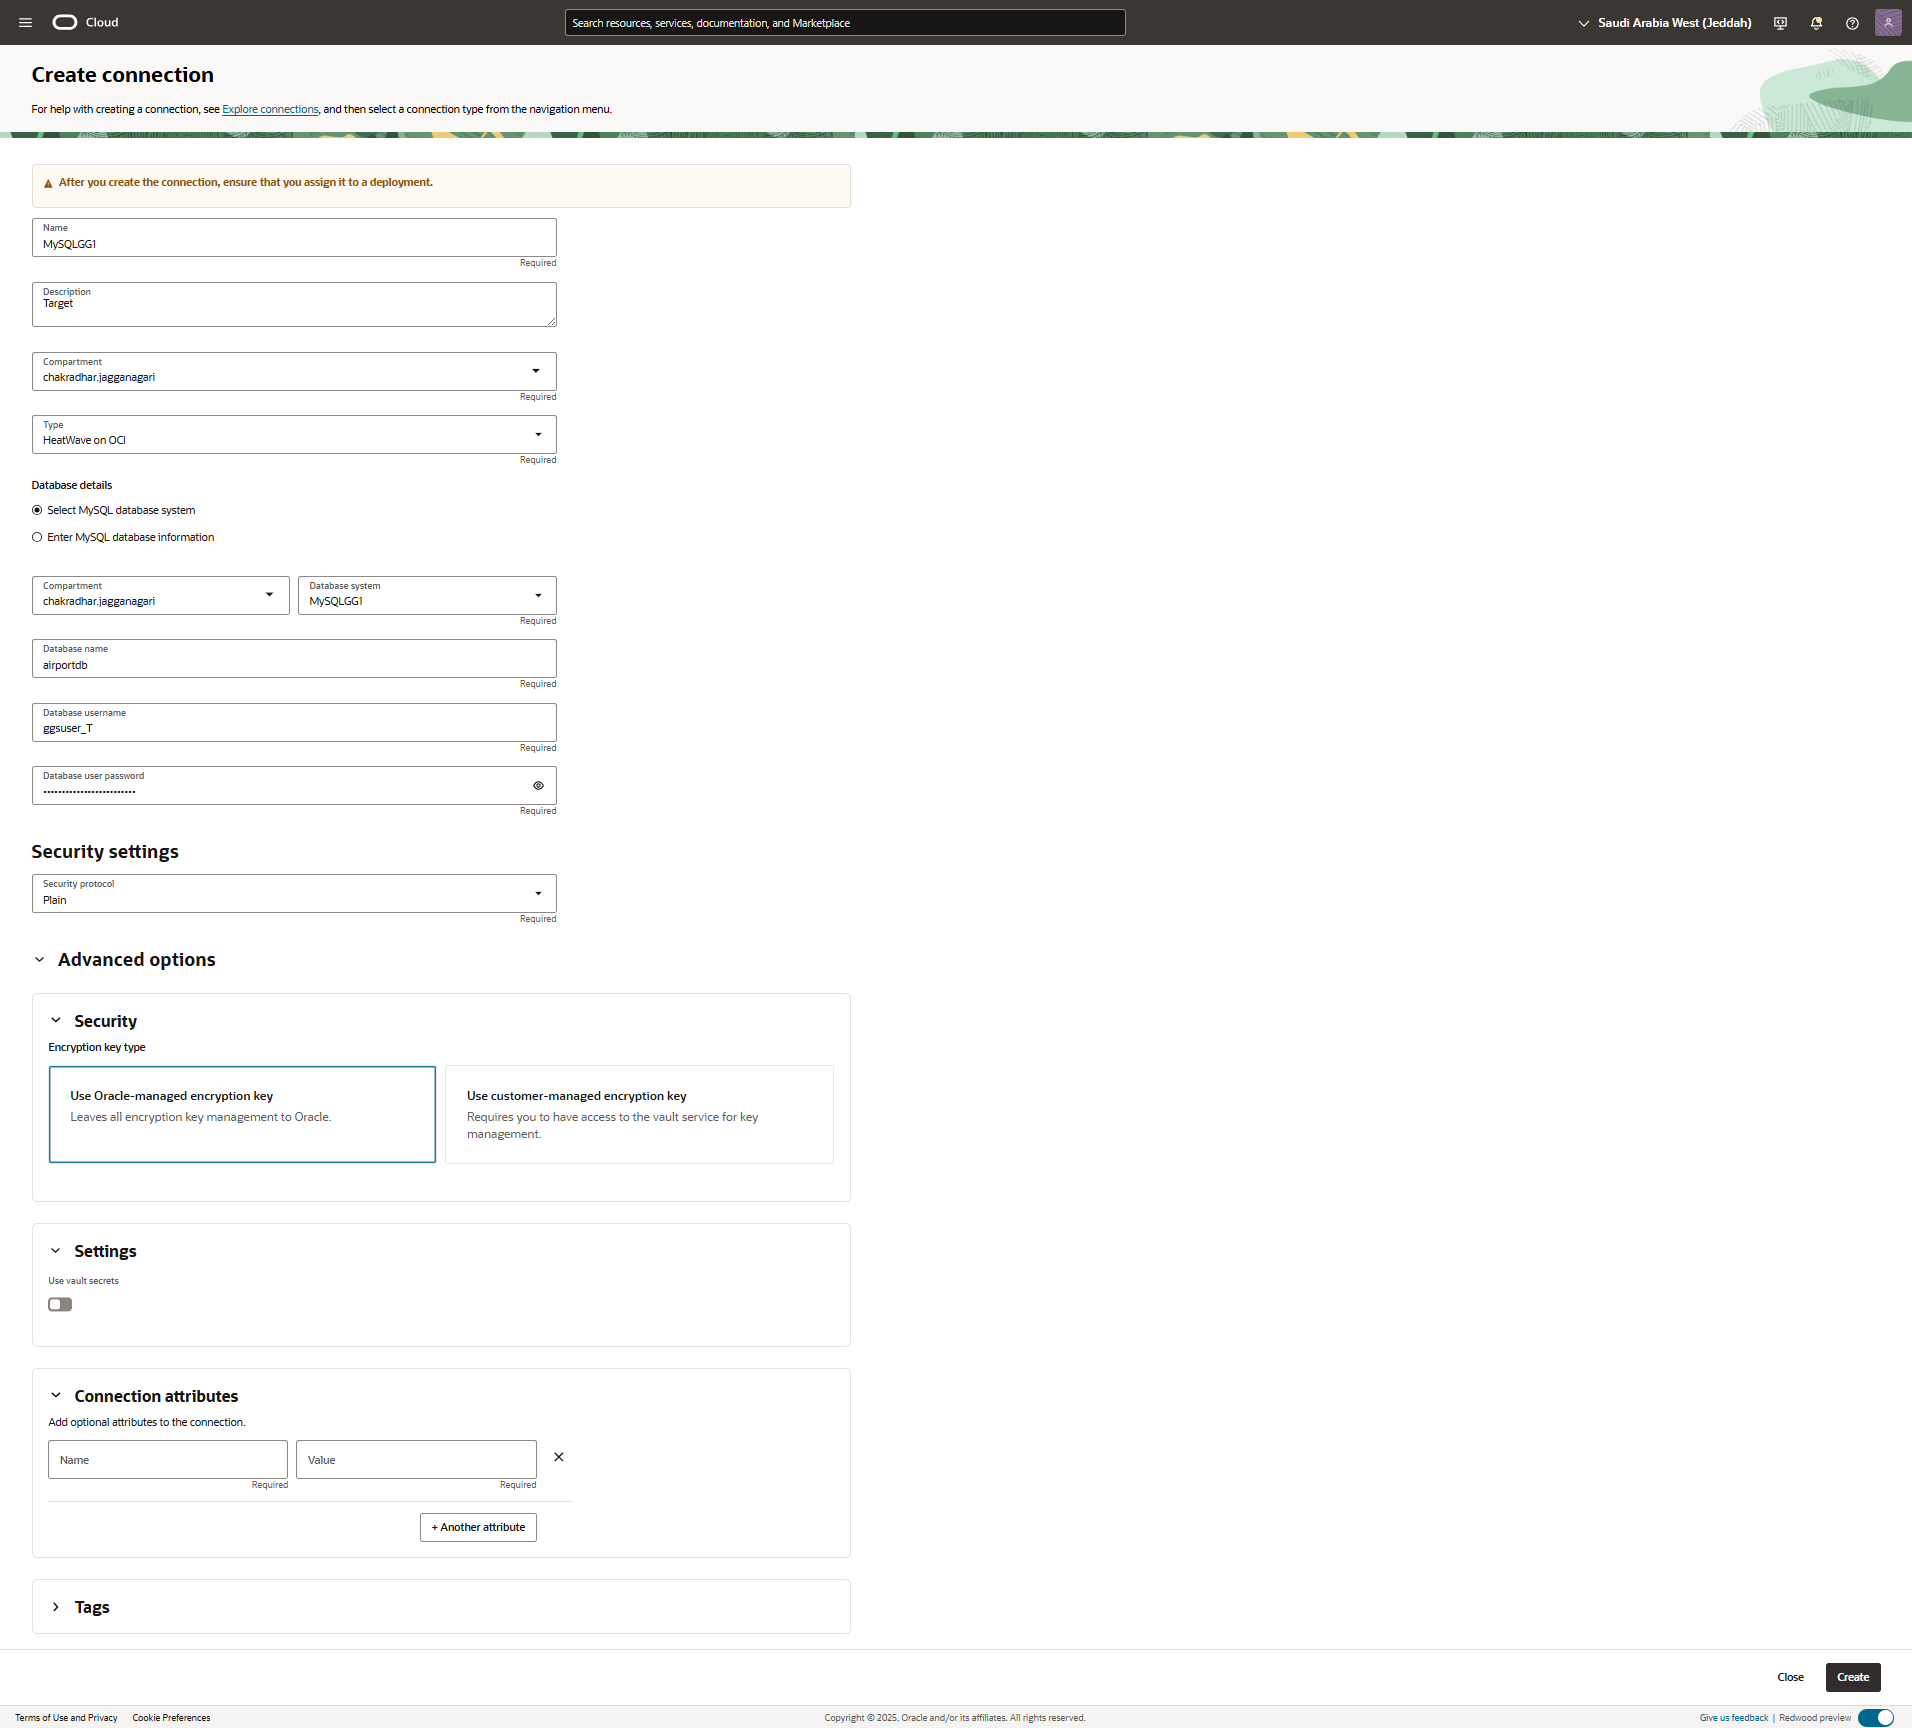

-
OCI GoldenGate 배포에 연결을 지정합니다. 접속 이름을 누른 다음 배포 지정을 누릅니다.
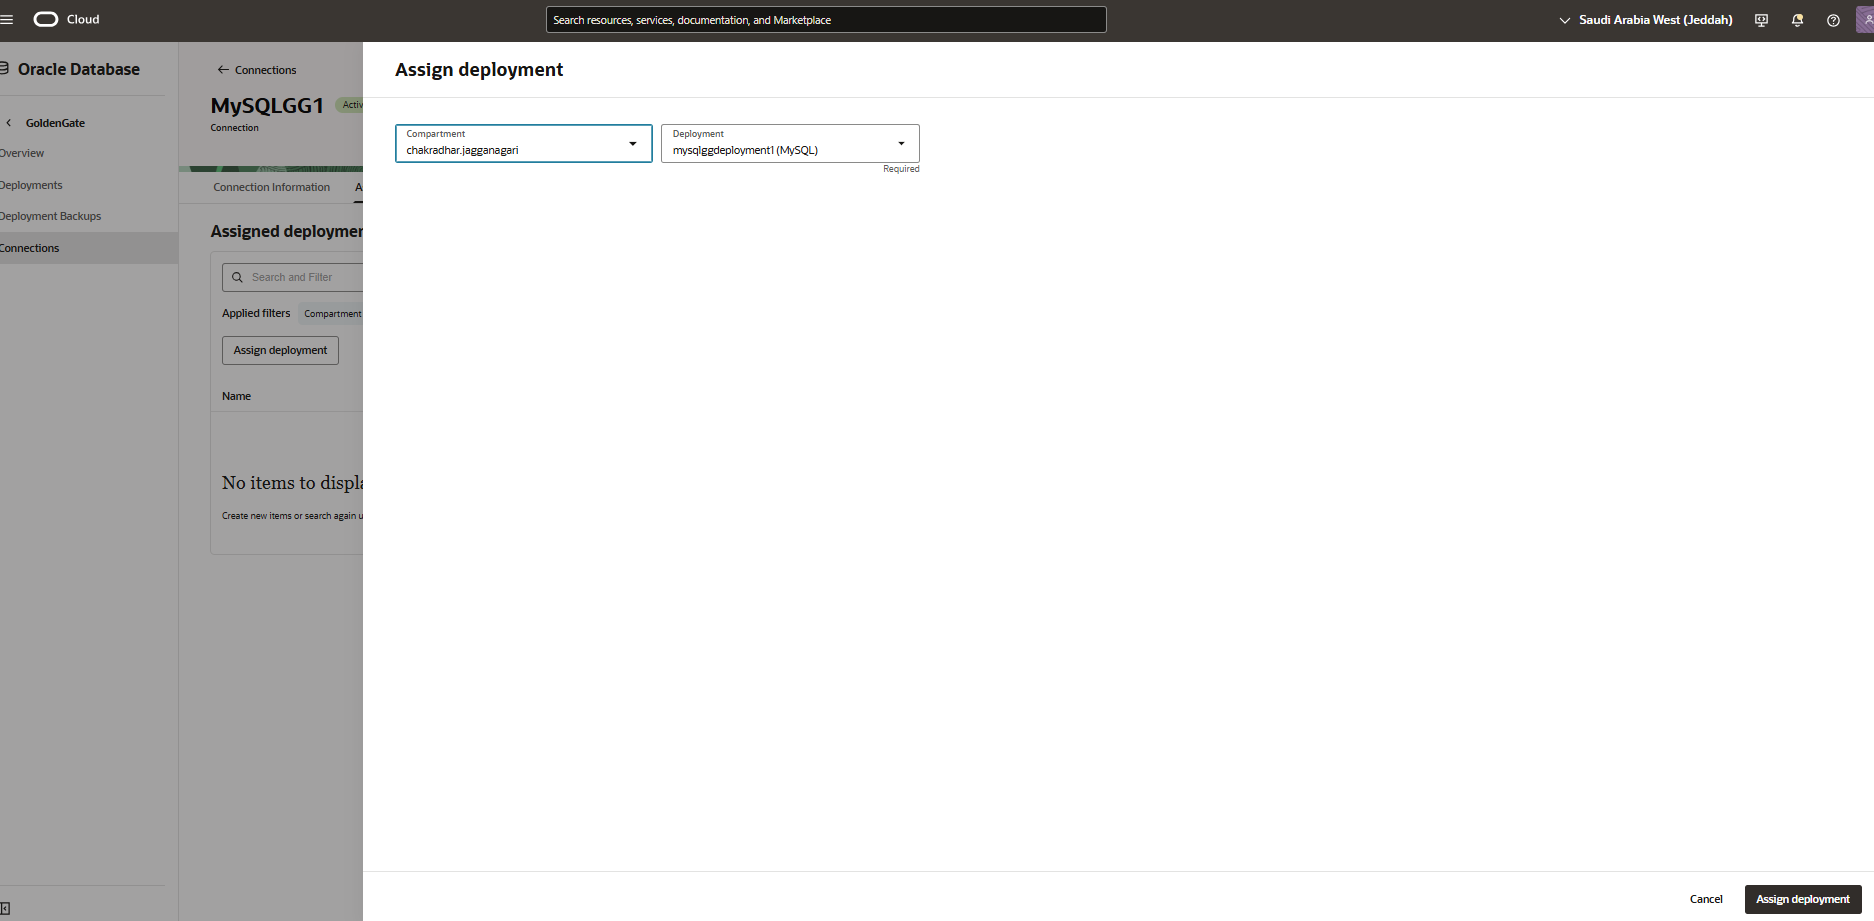


-
OCI 배스천 서비스를 사용하여 포트
443에 대한 포트 전달을 설정한 다음 OCI GoldenGate 콘솔에 로그인합니다.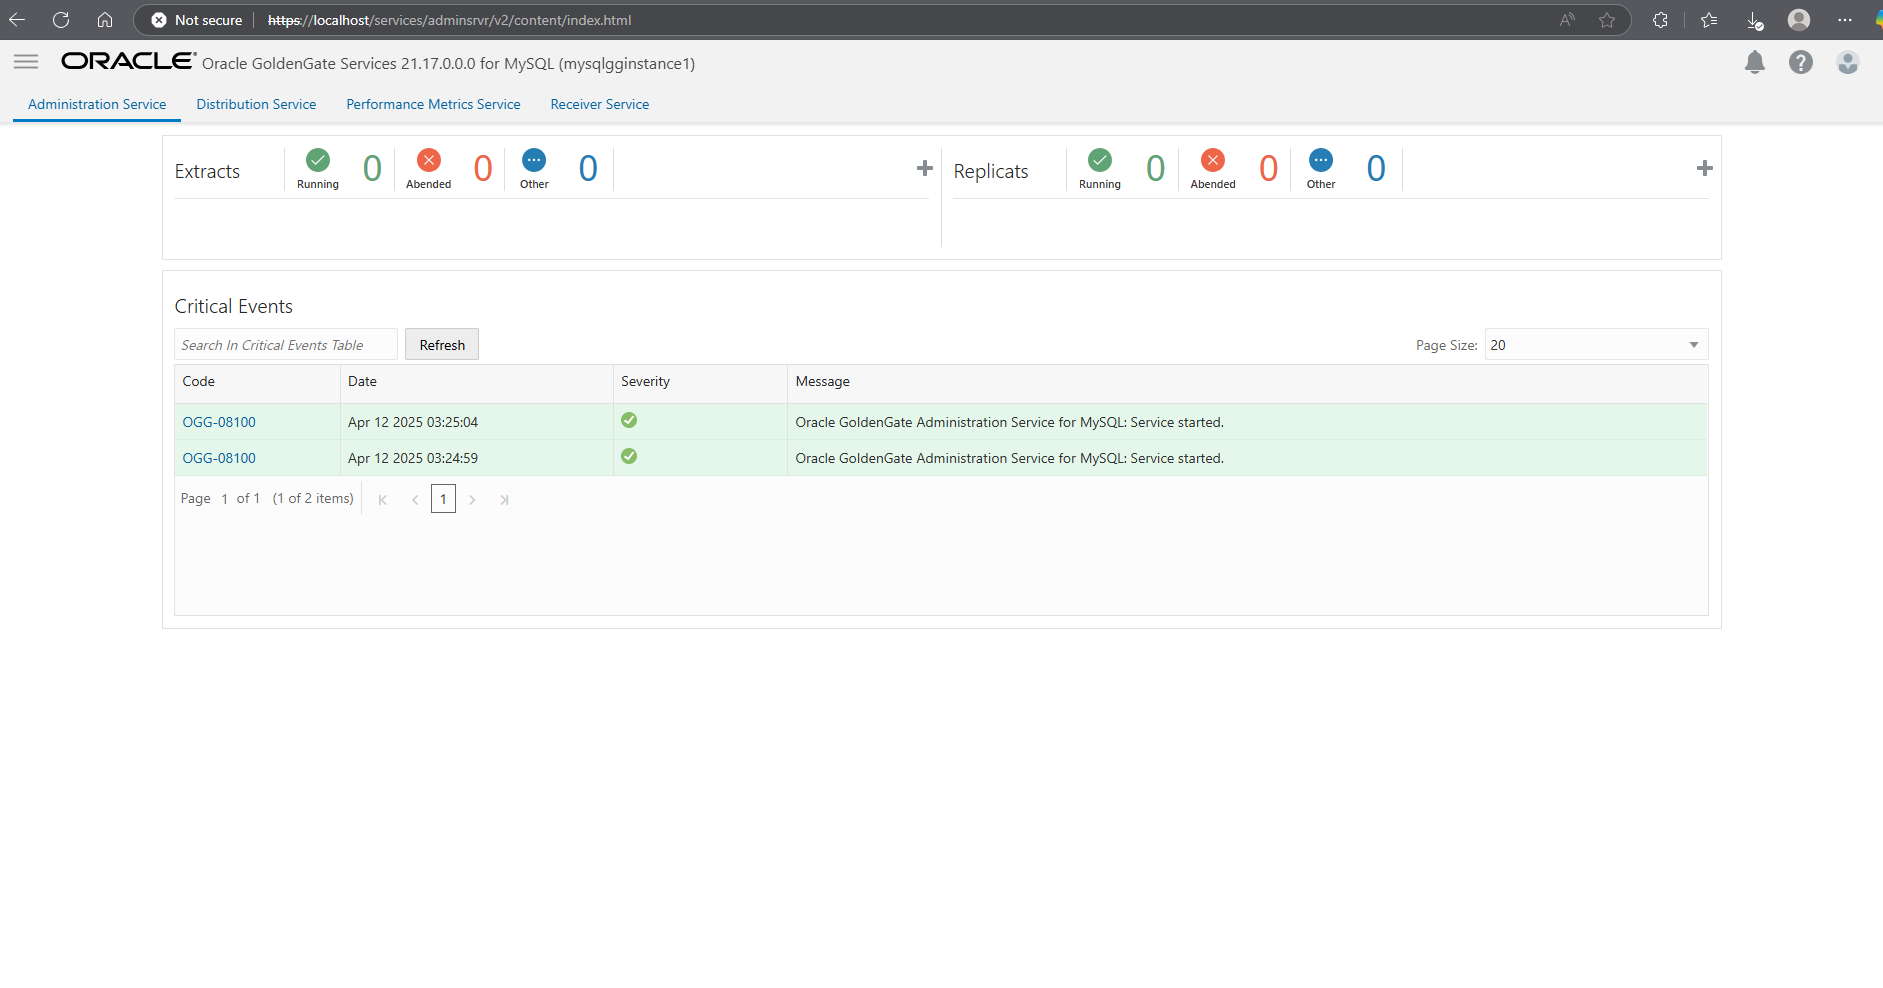
-
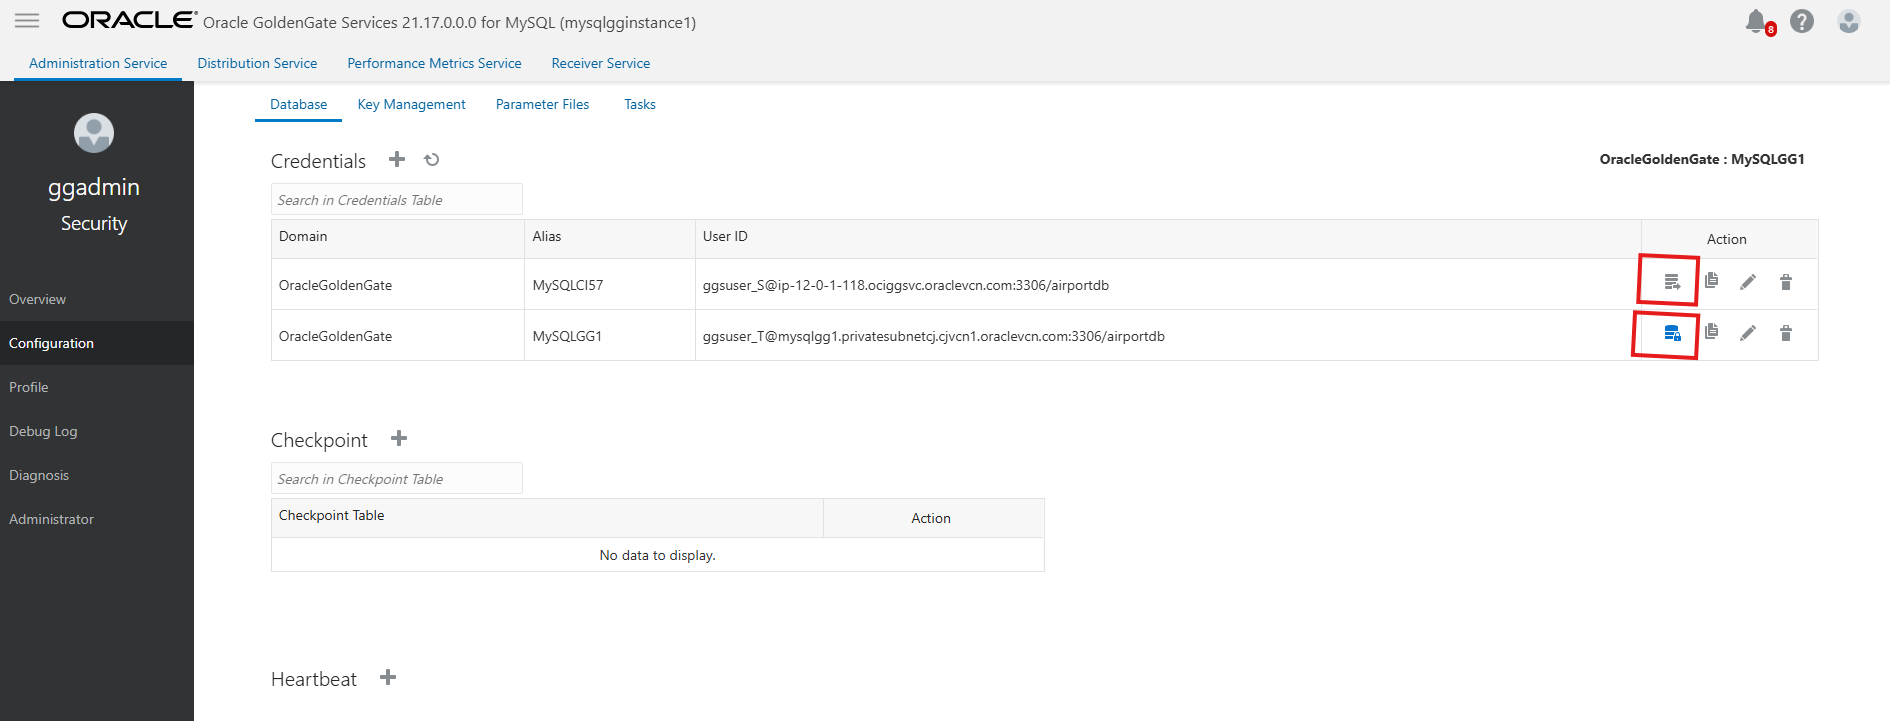
OCI GoldenGate 콘솔에서 데이터베이스 접속을 검증합니다.
-
햄버거 메뉴를 누르면 작업 6.4에서 배치에 추가된 두 개의 연결이 표시됩니다.
-
연결을 눌러 접속을 검증합니다. 접속이 성공하면 체크포인트 +를 눌러 체크포인트 테이블을 생성하는 옵션이 표시됩니다.
OCI에서 OCI GoldenGate 배치를 사용하여 접속을 추가하는 것이 좋습니다. 그러면 IP 주소에 DNS가 자동으로 추가되므로, 이러한 DNS가 없으면 테스트 접속이 실패합니다.
-
작업 7: Extract 및 Replicat 프로세스 생성
-
추출 프로세스를 생성하기 전에 소스 데이터베이스(특히 대상이 HA인 경우)에서
gtid_mode가 ON인지 확인합니다.다음 두 가지 방법으로 Extract를 추가할 수 있습니다.
-
방법 1: 초기 로드(복사 또는 덤프 인스턴스)가 완료된 후 Extract를 추가하고 정확한 인스턴스화 방법을 사용할 수 있습니다. 자세한 내용은 Precise Instantiation for MySQL to MySQL Using MySQL Shell Utilities and Oracle GoldenGate을 참조하십시오.
Extract를 추가하고 시작하려면 다음 이미지와 같이 특정 GTID 또는 binlog에서 데이터 캡처를 수행합니다. Oracle은 이 방법을 사용할 것을 권장합니다.
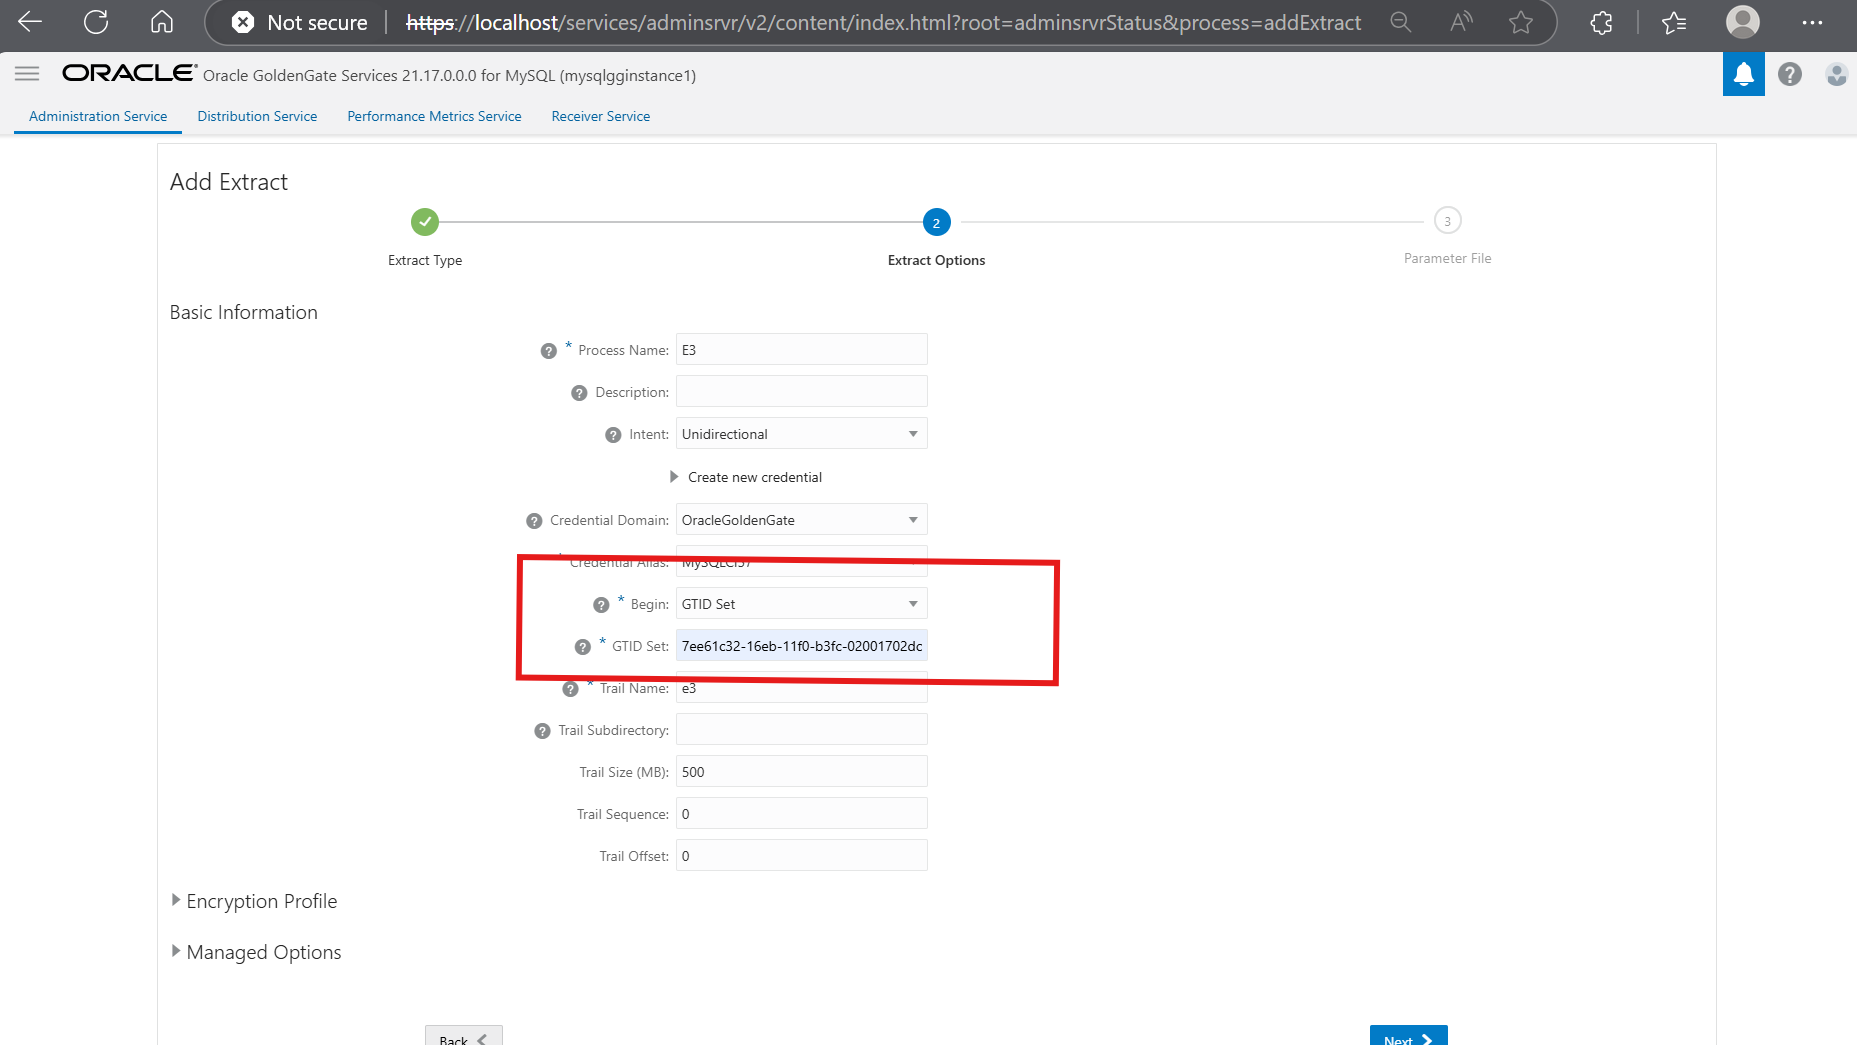
주: 여기서 GTID 세트는
dumpInstance의 JSON 파일 또는copyInstance명령의 출력에서 가져옵니다. -
방법 2: 초기 데이터 로드를 시작하기 전에 처음부터 Extract를 추가한 후 나중에
dumpInstance()의 JSON 파일 또는copyInstance()의 출력에 표시되는 특정gtidexecuted/binlog#및 binlog 위치로 시작하도록 Replicat를 변경할 수 있습니다.데이터 중복 문제를 방지하려면 이 메소드에
HANDLECOLLISION매개변수를 사용하십시오.주: 이 POC의 경우 메소드 2가 사용되었습니다.
추출 매개변수 파일 편집:
EXTRACT ext1
USERIDALIAS  MySQLCI57, DOMAIN OracleGoldenGate
EXTTRAIL e1
--DDL INCLUDE MAPPED  (needed for DDL replication, also need to set  binlog_row_metadata to FULL in mysql config file on source db). But not supported for MySQL V5.7
TRANLOGOPTIONS FETCHPARTIALJSON       (for JSON replication, also need to set binlog_row_value_options to empty string in the mysql config)
TABLE airportdb.*;
주: Extract 매개변수 파일에
DDL INCLUDE MAPPED을 추가하면 MySQLversion 5.7.4에 대해 DDL 복제가 지원되지 않는다는 오류가 표시됩니다.
-
-
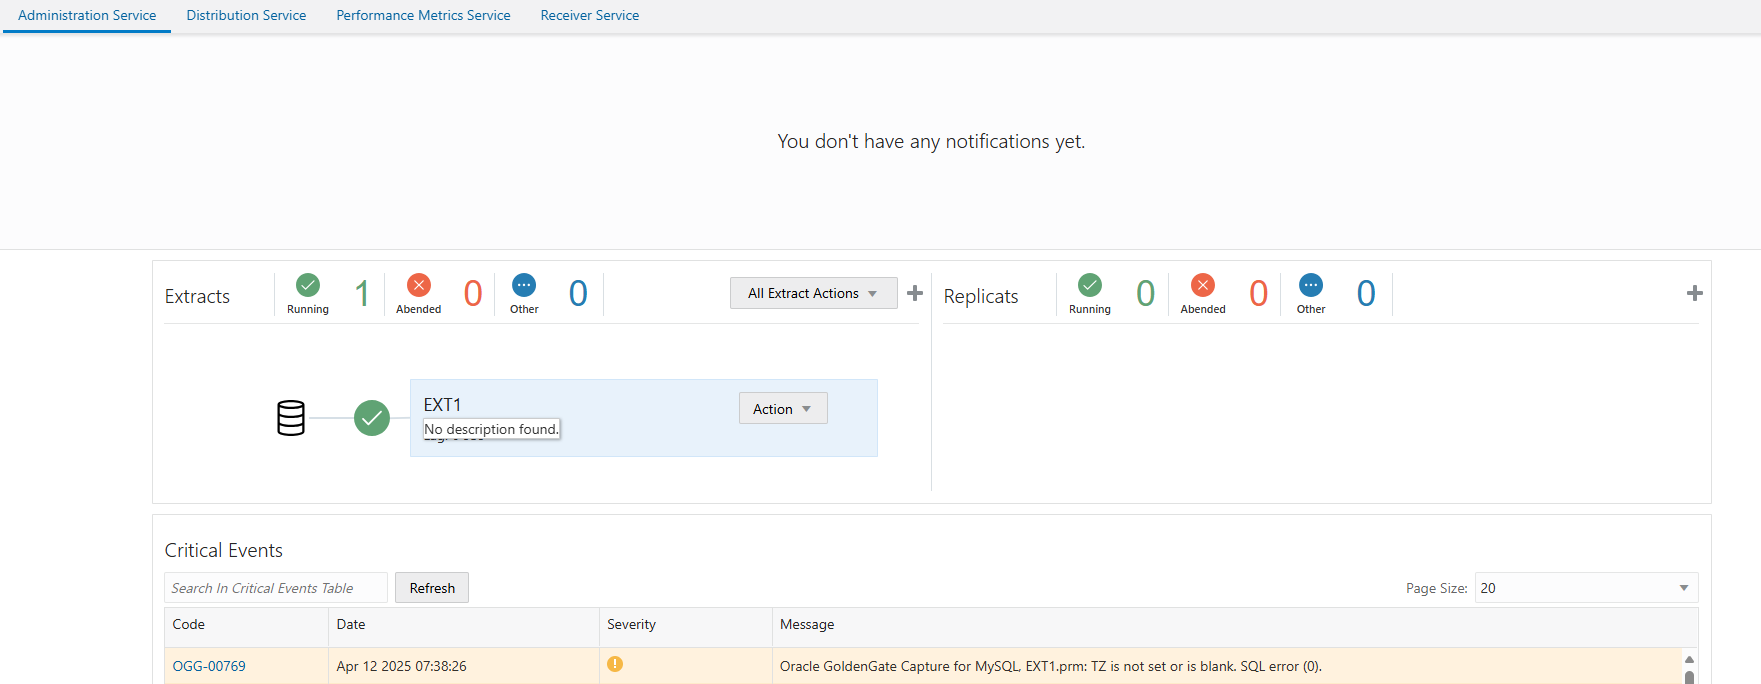
Extract 프로세스를 시작합니다.
-
Extract가 실행 중이며 트레일 파일을 생성하고 있습니다. 이제 Replicat를 생성하십시오.
-
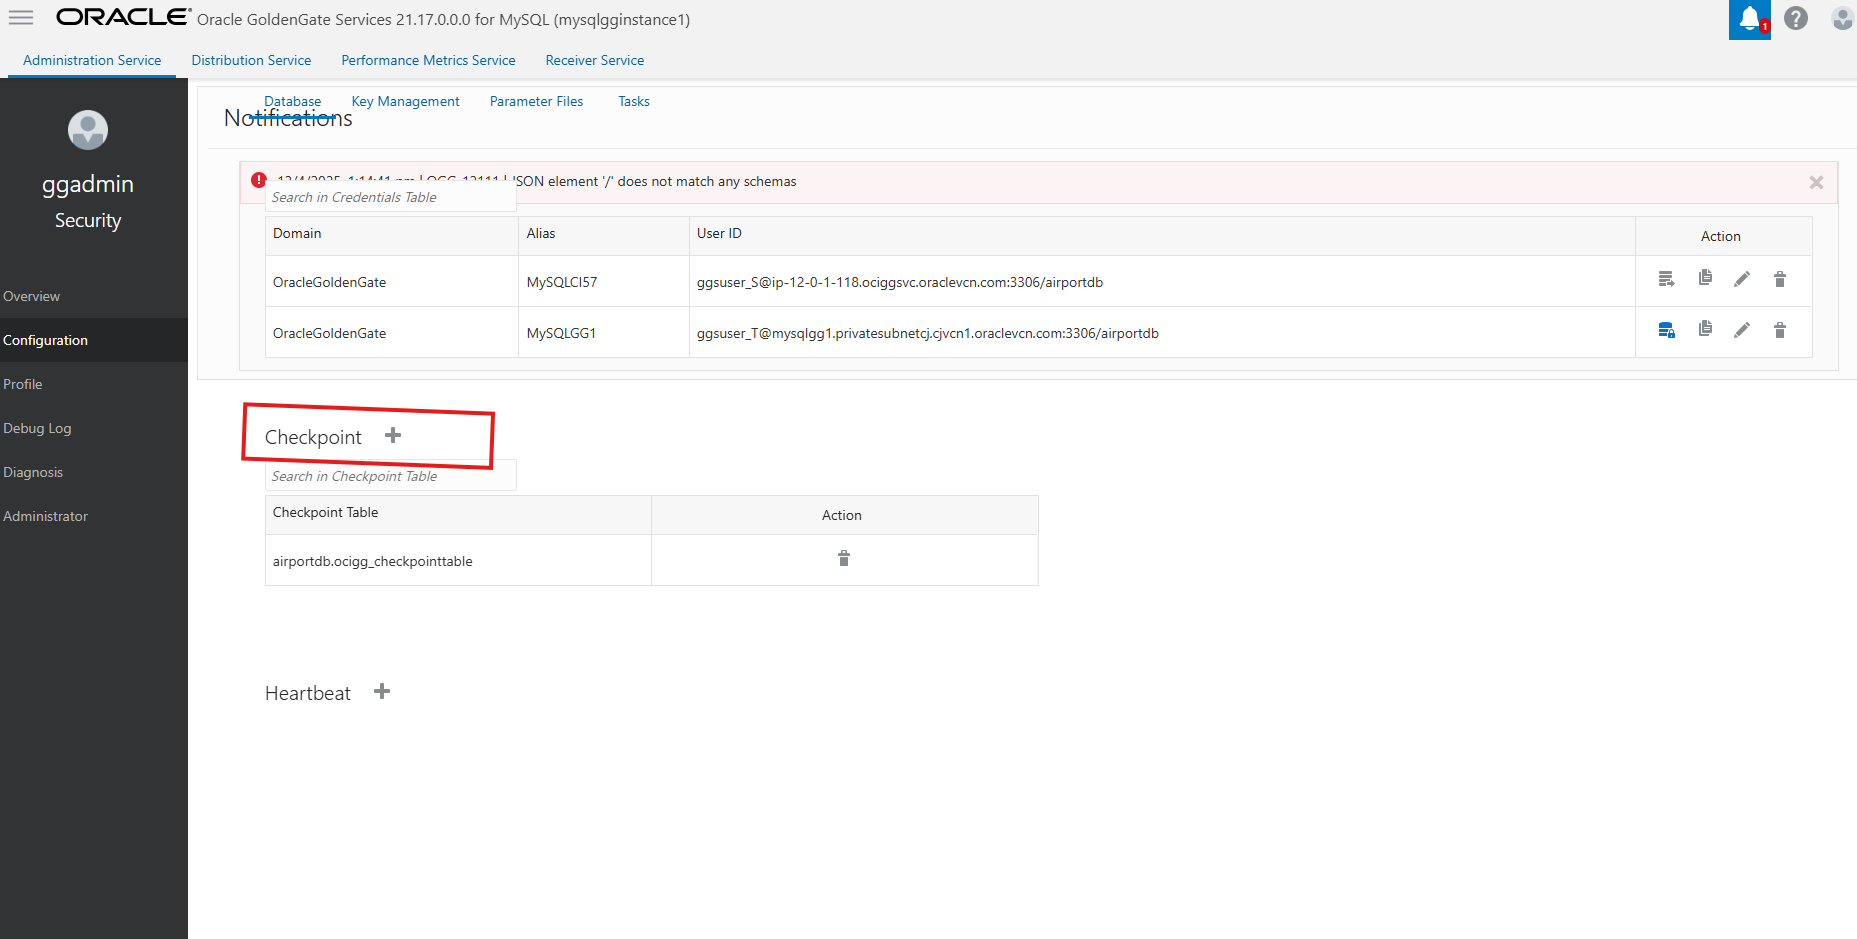
먼저 체크포인트 테이블을 생성합니다. 구성 섹션으로 이동하여 대상 데이터베이스를 선택하고 체크포인트 +를 눌러 체크포인트 테이블을 생성합니다.
-
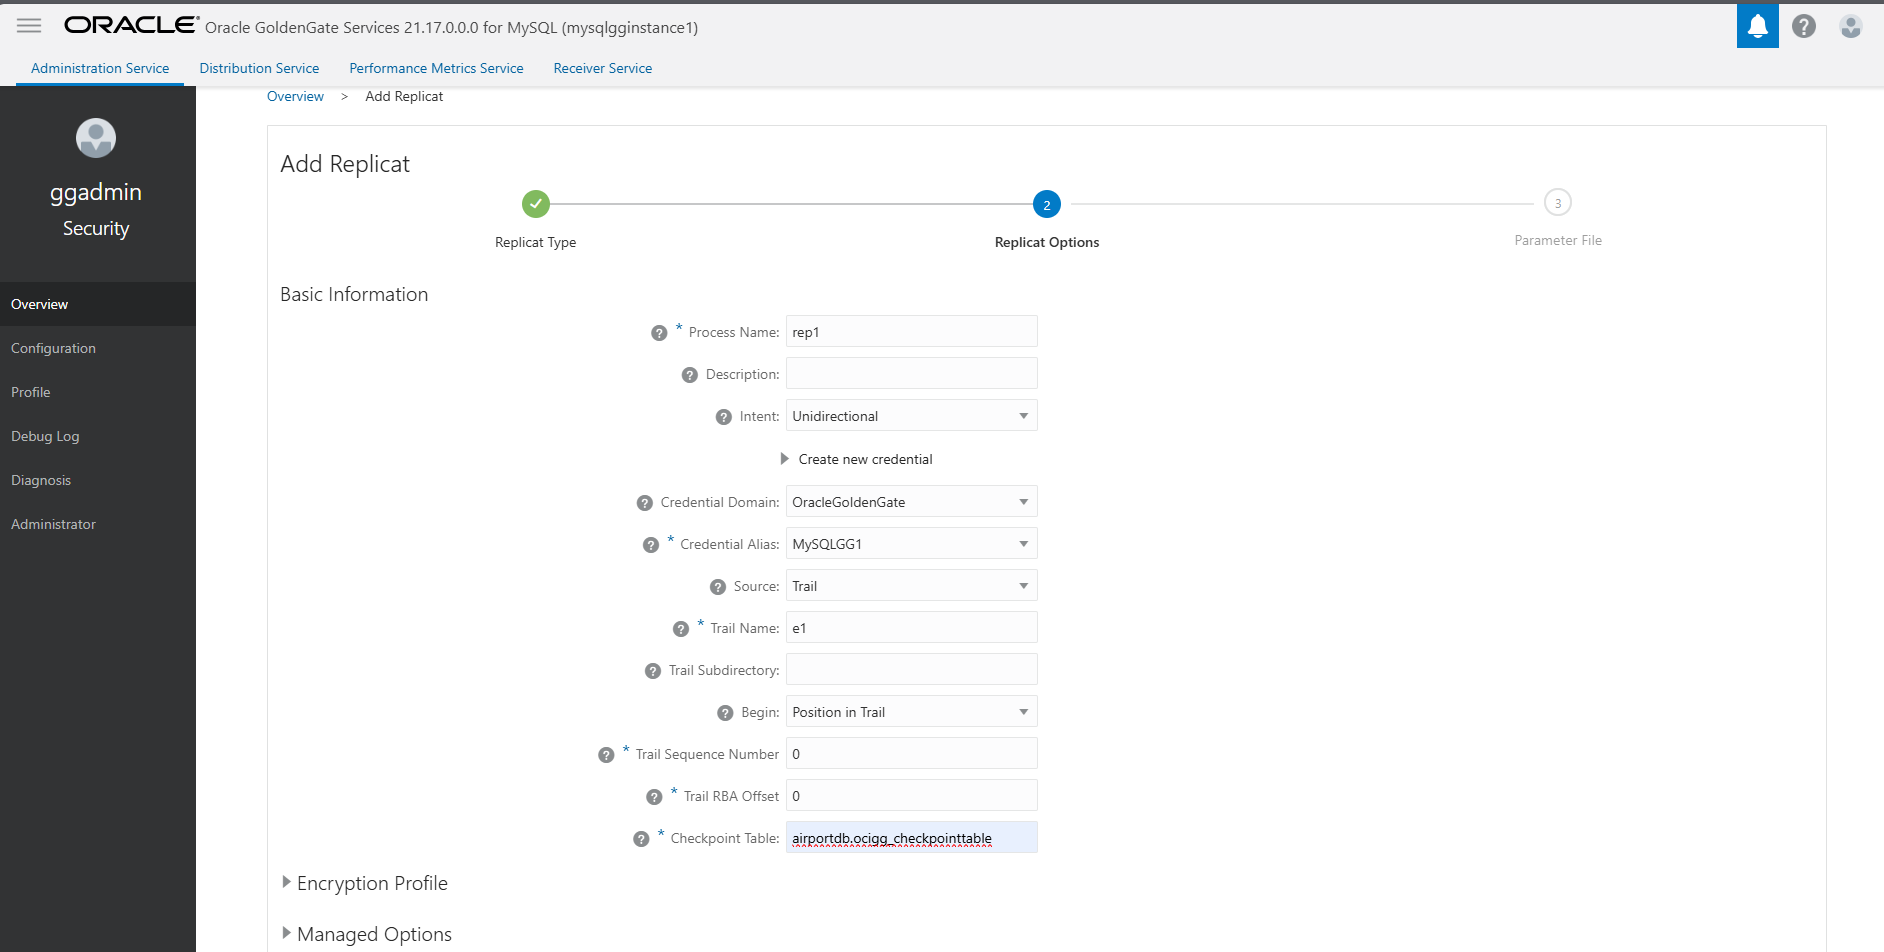
Replicat 프로세스를 생성합니다. 단방향 복제이므로 성능 향상을 위해 병렬 Replicat를 사용할 수 있습니다. 양방향 복제의 경우 클래식 Replicat만 지원됩니다.
Replicat 프로세스를 시작하지 말고 생성만 하면 됩니다. 데이터를 가져온 후에 시작합니다.
-
파라미터 파일을 편집합니다.
PARALLEL매개변수를 추가하거나 기본 병렬화가 사용될 수도 있습니다.REPLICAT rep1 USERIDALIAS MySQLGG1, DOMAIN OracleGoldenGate MAP airportdb.*, TARGET airportdb.*;
-
작업 8: copyInstance()를 사용하여 소스에서 대상으로 데이터 복사
-
copyInstance()의dryRun:"true"옵션을 사용하여 dry run을 수행합니다.Type '\help' or '\?' for help; '\quit' to exit. MySQL SQL > \connect admin@<Source IP> Creating a session to 'admin@<Source IP>' Fetching global names for auto-completion... Press ^C to stop. Your MySQL connection id is 37 Server version: 5.7.44-log MySQL Community Server (GPL) No default schema selected; type \use <schema> to set one. MySQL <Source IP>:3306 ssl SQL > \js Switching to JavaScript mode... MySQL <Source IP>:3306 ssl JS > util.copyInstance('mysql://admin@<Target IP>', {"compatibility":["skip_invalid_accounts","strip_definers","strip_restricted_grants","strip_tablespaces","ignore_wildcard_grants","strip_invalid_grants","create_invisible_pks"], users:"true", threads:2, dryRun:"true"}); Please provide the password for 'admin@<target IP': ******************* Save password for 'admin@<target IP>'? [Y]es/[N]o/Ne[v]er (default No): -
오류가 없는 경우
dryRun옵션을 제거하고 다시 실행하여 데이터 로드를 수행합니다. 최종 출력은 No errors reported와 같아야 합니다.SRC: Starting data dump 100% (59.50M rows / ~59.36M rows), 142.25K rows/s, 9.68 MB/s SRC: Dump duration: 00:07:50s SRC: Total duration: 00:07:50s SRC: Schemas dumped: 2 SRC: Tables dumped: 15 SRC: Data size: 2.03 GB SRC: Rows written: 59502422 SRC: Bytes written: 2.03 GB SRC: Average throughput: 4.33 MB/s 1 thds indexing \ 100% (2.03 GB / 2.03 GB), 7.47 MB/s (161.06K rows/s), 15 / 15 tables done Building indexes - done Executing common postamble SQL - done TGT: 53 chunks (59.50M rows, 2.03 GB) for 15 tables in 2 schemas were loaded in 7 min 51 sec (avg throughput 4.32 MB/s, 126.29K rows/s) TGT: 17 DDL files were executed in 0 sec. TGT: 0 accounts were loaded, 3 accounts failed to load due to unsupported authentication plugin errors TGT: Data load duration: 7 min 51 sec TGT: 1 indexes were built in 0 sec. TGT: Total duration: 7 min 51 sec TGT: 0 warnings were reported during the load. .. .. Dump_metadata: Binlog_file: mysql-bin.000006 Binlog_position: 626 Executed_GTID_set: 7ee61c32-16eb-11f0-b3fc-02001702dcb5:1-3
주:
copyInstance()의 출력에 표시된 실행된 GTID를 기록하고 이를 사용하여 Replicat를 변경합니다.
작업 9: Replicat 변경 및 시작
작업 8의 copyInstance() 출력에 표시된 대로 로그 파일 번호(000006)와 로그 위치 번호(626)를 사용합니다. 이 로그 파일 및 로그 위치는 CSN 000006:000000000000626을 생성하는 형식으로 사용해야 합니다.
Replicat를 변경하고 시작을 눌러 시작합니다. 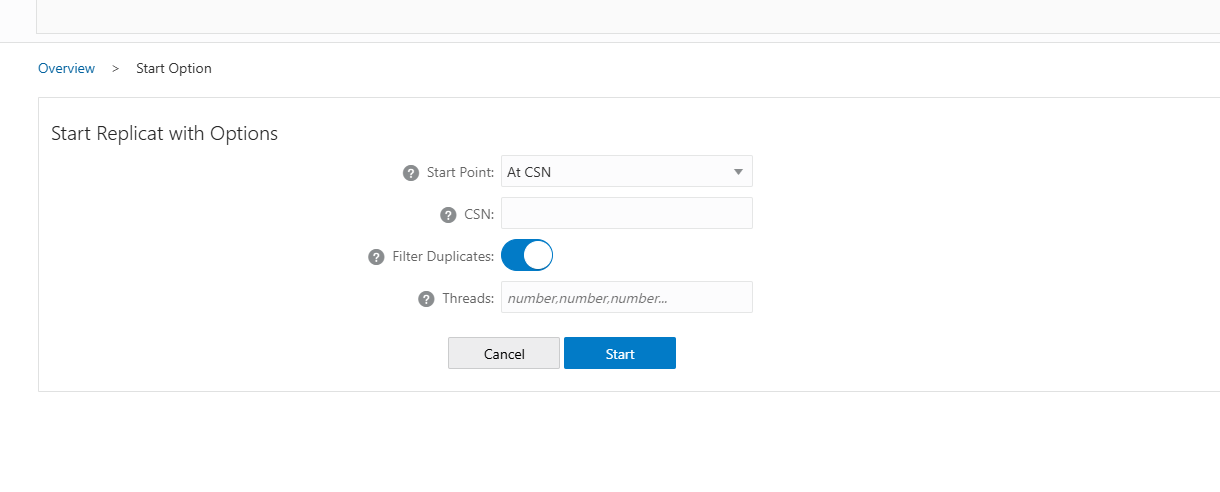
실행 중으로 표시되는 Replicat 상태입니다.
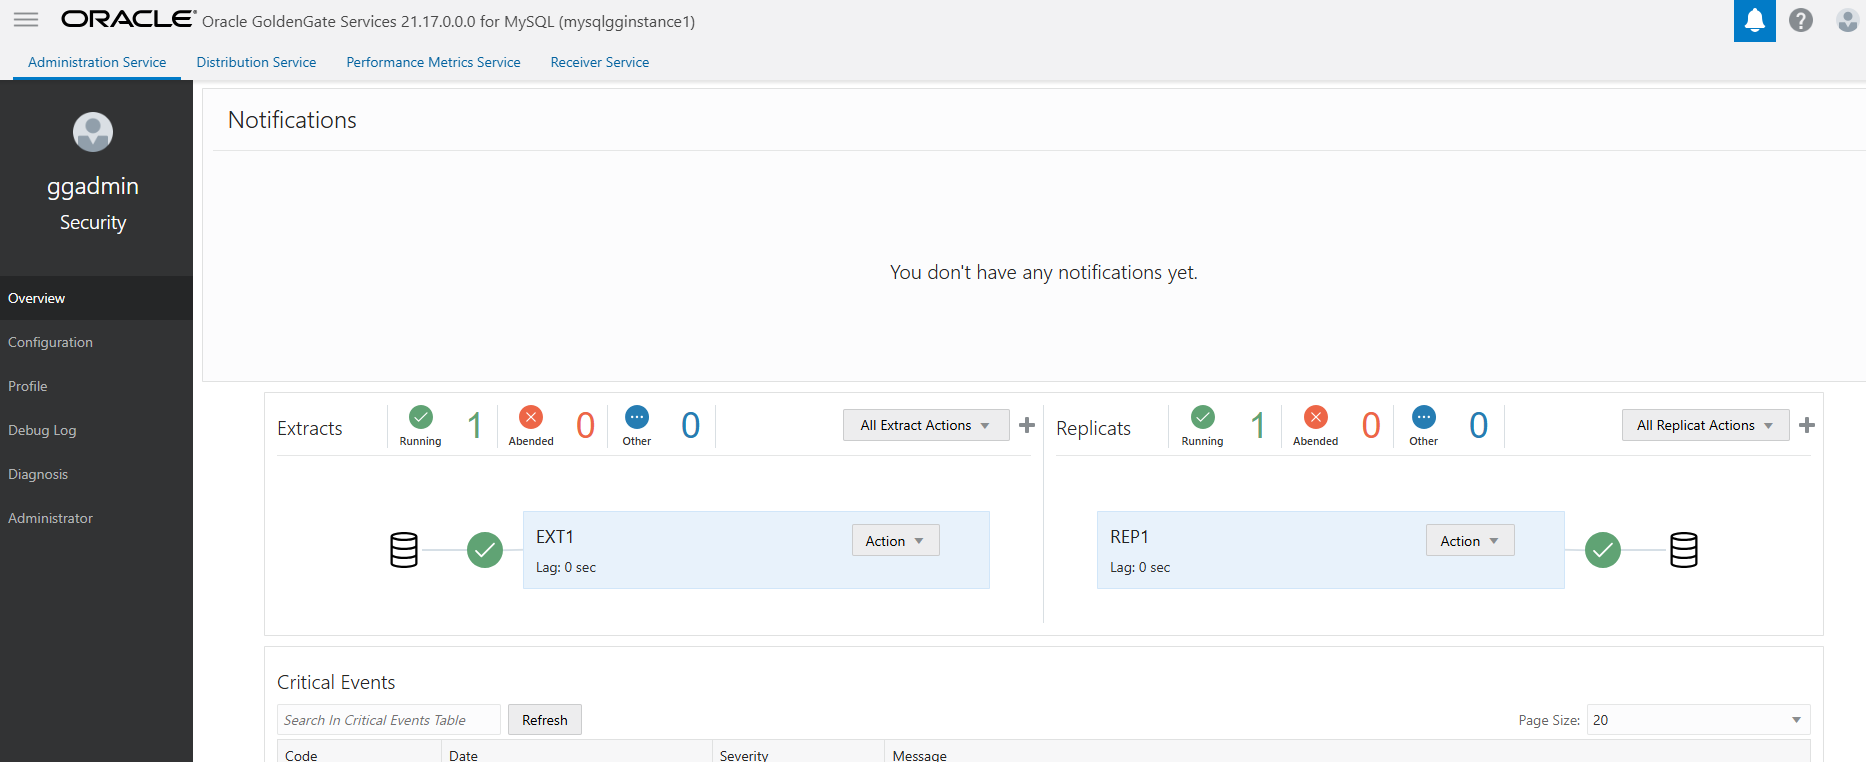
주: 태스크 7에 표시된 대로 Extract를 추가하는 데 메소드 1을 사용한 경우 Replicat를 변경할 필요가 없습니다. 이 POC에서는 방법 2를 사용하여 Extract를 추가했습니다. 두 방법 모두 잘 작동합니다.
작업 10: DML 테스트 실행
소스에서 DML 작업을 수행하여 복제를 테스트합니다.
-
소스:
mysql> select count(*) from passenger; +----------+ | count(*) | +----------+ | 36095 | +----------+ 1 row in set (0.01 sec) mysql> insert into passenger (passportno,firstname,lastname) values ('Pd89UKL','Timothy','London'); Query OK, 1 row affected (0.00 sec) mysql> commit -> ; Query OK, 0 rows affected (0.00 sec) mysql> select count(*) from passenger; +----------+ | count(*) | +----------+ | 36096 | +----------+ 1 row in set (0.00 sec) mysql> select @@version; +------------+ | @@version | +------------+ | 5.7.44-log | +------------+ 1 row in set (0.00 sec) -
대상:
[root@bastion opc]# mysql --host <target IP> -u admin -p
mysql: [Warning] Using a password on the command line interface can be insecure.
Welcome to the MySQL monitor.  Commands end with ; or \g.
Your MySQL connection id is 1249
Server version: 8.4.4-u5-cloud MySQL Enterprise - Cloud

Copyright (c) 2000, 2025, Oracle and/or its affiliates.

Oracle is a registered trademark of Oracle Corporation and/or its
affiliates. Other names may be trademarks of their respective
owners.

Type 'help;' or '\h' for help. Type '\c' to clear the current input statement.

mysql> use airportdb;
Reading table information for completion of table and column names
You can turn off this feature to get a quicker startup with -A

Database changed
mysql> select count(*) from passenger;
+----------+
| count(*) |
+----------+
|    36096 |
+----------+
1 row in set (0.00 sec)

mysql> select @@version
    -> ;
+----------------+
| @@version      |
+----------------+
| 8.4.4-u5-cloud |
+----------------+
1 row in set (0.00 sec)
관련 링크
승인
- 작성자 - Chakradhar Jagganagari(리프트 구현 전문가 - 데이터베이스)
추가 학습 자원
docs.oracle.com/learn에서 다른 랩을 탐색하거나 Oracle Learning YouTube 채널에서 더 많은 무료 학습 콘텐츠에 액세스하세요. 또한 education.oracle.com/learning-explorer를 방문하여 Oracle Learning Explorer가 되십시오.
제품 설명서는 Oracle Help Center를 참조하십시오.
Migrate On-Premises MySQL Database to Oracle HeatWave MySQL Managed Instance using OCI GoldenGate
G34894-01
Copyright ©2025, Oracle and/or its affiliates.