6 Manipulating XML Data in a BPEL Process
This chapter describes how to manipulate XML data in a BPEL process service component. This chapter provides a variety of examples. Topics include how to work with variables, sequences, and arrays; use XPath expressions; and perform tasks such as mathematical calculations. Supported specifications are also referenced.
This chapter includes the following sections:
-
Section 6.1, "Introduction to Manipulating XML Data in BPEL Processes"
-
Section 6.2, "Delegating XML Data Operations to Data Provider Services"
-
Section 6.4, "Initializing a Variable with Expression Constants or Literal XML"
-
Section 6.6, "Accessing Fields in Element and Message Type Variables"
-
Section 6.7, "Moving and Copying Variables in the Structure Window"
-
Section 6.9, "Using Mathematical Calculations with XPath Standards"
-
Section 6.17, "Using Element Variables in Message Exchange Activities in BPEL 2.0"
-
Section 6.20, "Manipulating XML Data Sequences That Resemble Arrays"
-
Section 6.22, "Understanding Document-Style and RPC-Style WSDL Differences"
Note:
Most of the examples in this chapter assume that the WSDL file defining the associated message types is document-literal style rather than the remote procedure call (RPC) style. There is a difference in how XPath query strings are formed for RPC-style WSDL definitions. If you are working with a type defined in an RPC WSDL file, see Section 6.22, "Understanding Document-Style and RPC-Style WSDL Differences."For Oracle BPEL Process Manager samples, see the Oracle SOA Suite samples.
6.1 Introduction to Manipulating XML Data in BPEL Processes
This section provides an introduction to using XML data in BPEL processes.
6.1.1 XML Data in BPEL Processes
In a BPEL process service component, most pieces of data are in XML format. This includes the messages passed to and from the BPEL process service component, the messages exchanged with external services, and the local variables used by the process. You define the types for these messages and variables with the XML schema, usually in one of the following:
-
Web Services Description Language (WSDL) file for the flow
-
WSDL files for the services it invokes
-
XSD file referenced by those WSDL files
Therefore, most variables in BPEL are XML data, and any BPEL process service component uses much of its code to manipulate these XML variables. This typically includes performing data transformation between representations required for different services, and local manipulation of data (for example, to combine the results from several service invocations).
BPEL also supports service data object (SDO) variables, which are not in an XML format, but rather in a memory structure format.
6.1.2 Data Manipulation and XPath Standards in Assign Activities
The starting point for data manipulation in BPEL is the assign activity, which builds on the XPath standard. XPath queries, expressions, and functions play a large part in this type of manipulation.
In addition, more advanced methods are available that involve using XQuery, XSLT, or Java, usually to do more complex data transformation or manipulation.
This section provides a general overview of how to manipulate XML data in BPEL. It summarizes the key building blocks used in various combinations and provides examples. The remaining sections in this chapter discuss and illustrate how to apply these building blocks to perform specific tasks.
You use the assign activity to copy data from one XML variable to another, or to calculate the value of an expression and store it in a variable. A copy element within the activity specifies the source and target of the assignment (what to copy from and to), which must be of compatible types.
Example 6-1 shows the formal syntax for BPEL version 1.1, as described in the Business Process Execution Language for Web Services Specification Version 1.1:
Example 6-1 Assign Activity for BPEL 1.1
<assign standard-attributes>
   standard-elements
   <copy>
      from-spec
      to-spec
   </copy>
</assign>
Example 6-2 shows the formal syntax for BPEL version 2.0, as described in the Web Services Business Process Execution Language Specification Version 2.0. The keepSrcElementName attribute specifies whether the element name of the destination (as selected by the to-spec) is replaced by the element name of the source (as selected by the from-spec) during the copy operation. When keepSrcElementName is set to no (the default value), the name (that is, the namespace name and local name properties) of the original destination element is used as the name of the resulting element. When keepSrcElementName is set to yes, the source element name is used as the name of the resulting destination element.
Example 6-2 Assign Activity for BPEL 2.0
<assign validate="yes|no"? standard-attributes>
   standard-elements
   (
   <copy keepSrcElementName="yes|no"? ignoreMissingFromData="yes|no"?>
      from-spec
      to-spec
   </copy>
   . . .
   . . .
</assign>
This syntax is described in detail in both specifications. The from-spec and to-spec typically specify a variable or variable part, as shown in Example 6-3:
Example 6-3 from-spec and to-spec Attributes
<assign>
   <copy>
      <from variable="c1" part="address"/>
      <to variable="c3"/>
   </copy>
</assign>
When you use Oracle JDeveloper, you supply assign activity details in a Copy Rules dialog that includes a From section and a To section. This reflects the preceding BPEL source code syntax.
XPath standards play a key role in the assign activity. Brief examples are shown here as an introduction; examples with more context and explanation are provided in the sections that follow.
-
XPath queries
An XPath query selects a field within a source or target variable part. The
fromortoclause can include a query attribute whose value is an XPath query string. Example 6-4 provides an example:<from variable="input" part="payload" query="/p:CreditFlowRequest/p:ssn"/>The value of the query attribute must be a location path that selects exactly one node. You can find further details about the
queryattribute and XPath standards syntax in the Business Process Execution Language for Web Services Specification Version 1.1 (section 14.3) or Web Services Business Process Execution Language Specification Version 2.0 (section 8.4), and the XML Path Language (XPath) Specification, respectively. -
XPath expressions
You use an XPath expression (specified in an
expressionattribute in thefromclause) to indicate a value to be stored in a variable. For example:<from expression="100"/>
The expression can be any general expression (that is, an XPath expression that evaluates to any XPath value type). Similarly, the value of an expression attribute must return exactly one node or one object only when it is used in the
fromclause within a copy operation. For more information about XPath expressions, see section 9.1.4 of the XML Path Language (XPath) Specification.
Within XPath expressions, you can call the following types of functions:
-
Core XPath functions
XPath supports a large number of built-in functions, including functions for string manipulation (such as
concat), numeric functions (likesum), and others.<from expression="concat('string one', 'string two')"/>For a complete list of the functions built into XPath standards, see section 4 of the XML Path Language (XPath) Specification.
-
BPEL XPath extension functions
BPEL adds several extension functions to the core XPath core functions, enabling XPath expressions to access information from a process.
-
For BPEL 1.1, the extensions are defined in the standard BPEL namespace
http://schemas.xmlsoap.org/ws/2003/03/business-process/and indicated by the prefixbpws:<from expression= "bpws:getVariableData('input', 'payload', '/p:value') + 1"/>For more information, see sections 9.1 and 14.1 of the Business Process Execution Language for Web Services Specification Version 1.1. For more information about
getVariableData, see Section B.2.57.2, "getVariableData." -
For BPEL 2.0, the extensions are also defined in the standard BPEL namespace
http://schemas.xmlsoap.org/ws/2003/03/business-process/. However, the prefix isbpel:<from>bpel:getVariableProperty('input', 'propertyName')</from>For more information, see section 8.3 of the Web Services Business Process Execution Language Specification Version 2.0. For more information about
getVariableProperty, see Section B.2.57.4, "getVariableProperty (For BPEL 2.0)."
-
-
Oracle BPEL XPath extension functions
Oracle provides some additional XPath functions that use the capabilities built into BPEL and XPath standards for adding new functions.
These functions are defined in the namespace
http://schemas.oracle.com/xpath/extensionand indicated by the prefixora:. -
Custom functions
Oracle BPEL Process Manager functions are defined in the
bpel-xpath-functions-config.xmland placed inside theorabpel.jarfile. For more information, see Section B.7, "Creating User-Defined XPath Extension Functions."
Sophisticated data manipulation can be difficult to perform with the BPEL assign activity and the core XPath functions. However, you can perform complex data manipulation and transformation by using XSLT, Java, or a bpelx operation under an assign activity (See Section 6.15, "Manipulating XML Data with bpelx Extensions") or as a web service. For XSLT, Oracle BPEL Process Manager includes XPath functions that execute these transformations.
For more information about XPath and XQuery transformation code examples, see Chapter 40, "Creating Transformations with the XSLT Mapper."
For more information about the assign activity, see Section A.2.3, "Assign Activity."
6.2 Delegating XML Data Operations to Data Provider Services
You can specify BPEL data operations to be performed by an underlying data provider service through use of the entity variable. The data provider service performs the data operations in a data store behind the scenes and without use of other data store-related features provided by Oracle SOA Suite (for example, the database adapter). This action enhances Oracle SOA Suite runtime performance and incorporates native features of the underlying data provider service during compilation and runtime.
The entity variable can be used with an Oracle Application Development Framework (ADF) Business Component data provider service using SDO-based data.
Before Release 11g, variables and messages exchanged within a BPEL business process were a disconnected payload (a snapshot of data returned by a web service) placed into an XML structure. In some cases, the user required this type of fit. In other cases, this fit presented challenges.
The entity variable addresses the following challenges of pre-11g releases:
-
Extensive data conversion
If the underlying data was not in XML form, data conversion (for example, translating delimited text to XML) was required. If the underlying size of the data was large, the processing potentially impacted performance.
-
Stale snapshot data
Variables (including WSDL messages) in BPEL processes were disconnected payload. In some cases, this was required. In other cases, you wanted a variable to represent the most recent data being modified by other applications outside Oracle BPEL Process Manager. This meant the disconnected data model provided a stale data set that did not fit all needs. The snapshot also duplicated data, which impacted performance when the data size was large.
-
Loss of native data behavior
Some data conversion implementation required data structure enforcement or business data logic beyond the XML schema. For example, the start date needed to be smaller than the end date. When the variable was a disconnected payload, validation occurred only during related web service invocation. Optionally performing the extra business data logic after certain operations, but before web service invocation, was sometimes preferred.
To address these challenges with Release 11g, you create an entity variable during variable declaration. An entity variable acts as a data handle to access and plug in different data provider service technologies behind the scenes. During compilation and runtime, Oracle BPEL Process Manager delegates data operations to the underlying data provider service.
Table 6-1 provides an example of how data conversion was performed in previous releases (using the database adapter as an example) and in release 11g with the entity variable.
Table 6-1 Data Manipulation Capabilities in Previous and Current Releases
| 10.1.x Releases | 11g Release When Using the Entity Variable |
|---|---|
|
Data operations such as explicitly loading and saving data were performed by the database adapter in Oracle BPEL Process Manager. All data (for example, of a purchase order) was saved in the database dehydration store. |
Data operations such as loading and saving data are performed automatically by the data provider service (the Oracle ADF Business Component application), without asking you to code any service invocation. Oracle BPEL Process Manager stores a key (for example, a purchase order ID (POID)) that points to this data. Oracle BPEL Process Manager fetches the key when access to data is requested (the bind entity activity does this). You must explicitly request the data to be bound using the key. Any data changes are persisted by the data provider service in a database that can be different from the dehydration store database. This prevents data duplication. |
|
Data in variables was in document object model (DOM) form |
Data in variables is in SDO form, which provides for a simpler conversion process than DOM, especially when the data provider service understands SDO forms. |
Note:
Only BPEL process service components currently allow the use of SDO-formed variables. If your composite application has an Oracle Mediator service component wired with an SDO-based Java binding component reference, the data form of the variable defaults to DOM. In addition, the features described for 10.1.x releases in Table 6-1 are still supported in release 11g.The WebLogic Fusion Order Demo application describes use of the entity variable. For more information, see Chapter 3, "Introduction to the SOA Sample Application."
6.2.1 How to Create an Entity Variable
This section describes how to create an entity variable and a binding key in Oracle JDeveloper.
In Release 10.1.x of Oracle BPEL Process Manager, all variable data was in DOM form. With Release 11g, variable data in SDO form is also supported. DOM and SDO variables in BPEL process service components are implicitly converted to the required forms. For example, an Oracle BPEL process service component using DOM-based variables can automatically convert these variables as required to SDO-based variables in an assign activity, and vice versa. Both form types are defined in the XSD schema file. No user intervention is required.
Entity variables also support SDO-formed data. However, unlike the DOM and SDO variables, the entity variable with SDO-based data enables you to bind a unique key value to data (for example, a purchase order). Only the key is stored in the dehydration store; the data requiring conversion is stored with the service of the Oracle ADF Business Component application. The key points to the data stored in the service. When the data is required, it is fetched from the data provider service and placed into memory. The process occurs in two places: the bind entity activity and the dehydration store. For example, when Oracle BPEL Process Manager rehydrates, it stores only the key for the entity variable; when it wakes up, it does an implicit bind to get the current data.
6.2.1.1 Understanding How SDO Works in the Inbound Direction
The SDO binding component service provides the outside world with an entry point to the composite application, as shown in Figure 6-1.
You use the SOA Composite Editor and Oracle BPEL Designer to perform the following tasks:
-
Define an SDO binding component service and a BPEL process service component in the composite application.
-
Connect (wire) the SDO service and BPEL process service component.
-
Define the details of the BPEL process service component.
For more information about using the SOA Composite Editor, see Chapter 2, "Developing SOA Composite Applications with Oracle SOA Suite."
6.2.1.2 Understanding How SDO Works in the Outbound Direction
The SDO binding component reference enables messages to be sent from the composite application to Oracle ADF Business Component application external partners in the outside world, as shown in Figure 6-2.
When the Oracle ADF Business Component application is the external partner link to the outside world, there is no SDO binding component reference in the SOA Composite Editor that you drag into the composite application to create outbound communication. Instead, communication between the composite application and the Oracle ADF Business Component application occurs as follows:
-
The Oracle ADF Business Component application is deployed and automatically registered as an SDO service in the Service Infrastructure
-
Oracle JDeveloper is used to browse for and discover this application as an ADF-BC service and create a partner link connection.
-
The
composite.xmlfile is automatically updated with reference details (thebinding.adfproperty) when the Oracle ADF Business Component application service is discovered.
6.2.1.3 Creating an Entity Variable and Choosing a Partner Link
You now create an entity variable and select a partner link for the Oracle ADF Business Component application. The following example describes how the OrderProcessor BPEL process service component receives an ID for an order by using a bind entity activity to point to order data in an Oracle ADF Business Component data provider service in the WebLogic Fusion Order Demo application.
To create an entity variable and choose a partner link:
-
Go to the Structure window of the BPEL process service component in Oracle JDeveloper.
-
Right-click the Variables folder and select Expand All Child Nodes.
-
In the second Variables folder, right-click and select Create Variable.
The Create Variable dialog appears.
-
In the Name field, enter a name.
-
Click the Entity Variable checkbox and select the Search icon to the right of the Partner Link field.
The Partner Link Chooser dialog appears with a list of available services, including the SDO service called ADF-BC Service.
-
Browse for and select the service for the Oracle ADF Business Component application.
-
Click OK to close the Partner Link Chooser and Create Variable dialogs.
The dialog looks as shown in Figure 6-3.
6.2.1.4 Creating a Binding Key
You now create a key to point to the order data in the Oracle ADF Business Component data provider service.
-
In the Component Palette for a BPEL 1.1 project, expand Oracle Extensions.
-
Drag a Bind Entity activity into your BPEL process service component.
The Bind Entity dialog appears.
-
In the Name field, enter a name.
-
To the right of the Entity Variable field, click the Search icon.
The Variable Chooser dialog appears.
-
Select the entity variable created in Section 6.2.1.3, "Creating an Entity Variable and Choosing a Partner Link" and click OK.
-
In the Unique Keys section, click the Add icon.
The Specify Key dialog appears. You use this dialog to create a key for retrieving the order ID from the Oracle ADF Business Component data provider service.
-
Enter the details described in Table 6-2 to define the binding key:
Table 6-2 Specify Key Dialog Fields and Values
Field Value Key Local Part
Enter the local part of the key.
Key Namespace URI
Enter the namespace URI for the key.
Key Value
Enter the key value expression. This expression must match the type of a key. The following examples show expression value keys for a POID key:
-
$inputMsg.payload/tns:poid -
bpws:getVariableData('inputmsg','payload','tns:poid')
The POID key for an entity variable typically comes from another message. If the type of POID key is an integer and the expression result is a string of
ABC, the string-to-integer fails and the bind entity activity also fails at runtime.Figure 6-4 shows the Specify Key dialog after completion.
-
-
Click OK to close the Specify Key dialog.
A name-pair value appears in the Unique Keys table, as shown in Figure 6-5. Design is now complete.
-
Click OK to close the Bind Entity dialog.
After the Bind Entity activity is executed at runtime, the entity variable is ready to be used.
For more information about using SDOs, see Oracle Fusion Middleware Fusion Developer's Guide for Oracle Application Development Framework. This guide describes how to expose application modules as web services and publish rows of view data objects as SDOs. The application module is the ADF framework component that encapsulates business logic as a set of related business functions.
6.3 Using Standalone SDO-based Variables
Standalone SDO-based variables are similar to ordinary BPEL XML-DOM-based variables. The major difference is that the underlying data form is SDO-based, instead of DOM-based. Therefore, SDO-based variables can use some SDO features such as Java API access, an easier-to-use update API, and the change summary. However, SDO usage is also subject to some restrictions that do not exist with XML-DOM-based variables. The most noticeable restriction is that SDO only supports a small subset of XPath expressions.
6.3.1 How to Declare SDO-based Variables
The syntax for declaring an SDO-based variable is similar to that for declaring BPEL variables. Example 6-5 provides details.
Example 6-5 SDO-based Variable Declaration
<variable name="deptVar_s" element="hrtypes:dept" />
<variable name="deptVar_v" element="hrtypes:dept" bpelx:sdoCapable="false" />
If you want to override the automatic detection, use the bpelx:sdoCapable="true|false" switch. For example, variable deptVar_v described in Example 6-5 is a regular DOM-based variable. Example 6-6 provides an example of the schema.
<xsd:element name="dept" type="Dept"/>
   <xsd:complexType name="Dept"
    sdoJava:instanceClass="sdo.sample.service.types.Dept">
      <xsd:annotation>
         <xsd:appinfo source="Key"
          xmlns="http://xmlns.oracle.com/bc4j/service/metadata/">
            <key>
               <attribute>Deptno</attribute>
            </key>
            <fetchMode>minimal</fetchMode>
         </xsd:appinfo>
      </xsd:annotation>
      <xsd:sequence>
         <xsd:element name="Deptno" type="xsd:integer" minOccurs="0"/>
         <xsd:element name="Dname" type="xsd:string" minOccurs="0"
 nillable="true"/>
         <xsd:element name="Loc" type="xsd:string" minOccurs="0" nillable="true"/>
         <xsd:element name="Emp" type="Emp" minOccurs="0" maxOccurs="unbounded"
 nillable="true"/>
      </xsd:sequence>
   </xsd:complexType>
6.3.2 How to Convert from XML to SDO
Oracle BPEL Process Manager supports dual data forms: DOM and SDO. You can interchange the usage of DOM-based and SDO-based variables within the same business process, even within the same expression. The Oracle BPEL Process Manager data framework automatically converts back and forth between DOM and SDO forms.
By using the entity variable XPath rewrite capabilities, Oracle BPEL Process Manager enables some XPath features (for example, variable reference and function calls) that the basic SDO specification does not support. However, there are other limitations on the XPath used with SDO-based variables (for example, there is no support for and, or, and not).
Example 6-7 provides a simple example of converting from XML to SDO.
Example 6-7 XML-to-SDO Conversion
<assign>
        <copy>
            <from>
   <ns0:dept xmlns:ns0="http://sdo.sample.service/types/"
 xmlns:xsi="http://www.w3.org/2001/XMLSchema-instance">
      <ns0:Deptno>10</ns0:Deptno>
      <ns0:Dname>ACCOUNTING</ns0:Dname>
      <ns0:Loc>NEW YORK</ns0:Loc>
      <ns0:Emp>
         <ns0:Empno>7782</ns0:Empno>
         <ns0:Ename>CLARK</ns0:Ename>
         <ns0:Job>MANAGER</ns0:Job>
         <ns0:Mgr>7839</ns0:Mgr>
         <ns0:Hiredate>1981-06-09</ns0:Hiredate>
         <ns0:Sal>2450</ns0:Sal>
         <ns0:Deptno>10</ns0:Deptno>
      </ns0:Emp>
      <ns0:Emp>
         <ns0:Empno>7839</ns0:Empno>
         <ns0:Ename>KING</ns0:Ename>
         <ns0:Job>PRESIDENT</ns0:Job>
         <ns0:Hiredate>1981-11-17</ns0:Hiredate>
         <ns0:Sal>5000</ns0:Sal>
         <ns0:Deptno>10</ns0:Deptno>
      </ns0:Emp>
      <ns0:Emp>
         <ns0:Empno>7934</ns0:Empno>
         <ns0:Ename>MILLER</ns0:Ename>
         <ns0:Job>CLERK</ns0:Job>
         <ns0:Mgr>7782</ns0:Mgr>
         <ns0:Hiredate>1982-01-23</ns0:Hiredate>
         <ns0:Sal>1300</ns0:Sal>
         <ns0:Deptno>10</ns0:Deptno>
      </ns0:Emp>
   </ns0:dept>
            </from>
            <to variable="deptVar_s" />
        </copy>
</assign>
Example 6-8 provides an example of copying from an XPath expression of an SDO variable to a DOM variable.
Example 6-8 Copy from an XPath Expression of an SDO Variable to a DOM Variable
<assign>
        <!-- copy from an XPath expression of an SDO variable to DOM variable -->
        <copy>
            <from expression="$deptVar_s/hrtypes:Emp[2]" />
            <to variable="empVar_v" />
        </copy>
        <!-- copy from an XPath expression of an DOM variable to SDO variable -->
        <copy>
            <from expression="$deptVar_v/hrtypes:Emp[2]" />
            <to variable="empVar_s" />
        </copy>
        <!-- insert a DOM based data into an SDO variable -->
        <bpelx:insertAfter>
            <bpelx:from variable="empVar_v" />
            <bpelx:to variable="deptVar_s" query="hrtypes:Emp" />
        </bpelx:insertAfter>
        <!-- insert a SDO based data into an SDO variable at particular location,
              no XML conversion is needed  -->
        <bpelx:insertBefore>
            <bpelx:from expression="$deptVar_s/hrtypes:Emp[hrtypes:Sal = 1300]" />
            <bpelx:to variable="deptVar_s" query="hrtypes:Emp[6]" />
         </bpelx:insertBefore>
</assign>
Example 6-9 provides an example of removing a portion of SDO data.
<assign>
         <bpelx:remove>
            <bpelx:target variable="deptVar_s" query="hrtypes:Emp[2]" />
        </bpelx:remove>
</assign>
Note:
Thebpelx:append operation is not supported for SDO-based variables for the following reasons:
-
The
<copy>operation on an SDO-based variable has smart update capabilities (for example, you do not have to perform a<bpelx:append>operation before the<copy>operation). -
The SDO data object is metadata driven and does not generally support adding a new property arbitrarily.
6.4 Initializing a Variable with Expression Constants or Literal XML
It is often useful to assign literal XML to a variable in BPEL (for example, to initialize a variable before copying dynamic data into a specific field within the XML data content for the variable). This is also useful for testing purposes when you want to hard code XML data values into the process.
6.4.1 How To Assign a Literal XML Element
Example 6-10 assigns a literal result element to the payload part of the output variable:
Example 6-10 Literal Element Assignment
<assign>
   <!-- copy from literal xml to the variable -->
   <copy>
      <from>
         <result xmlns="http://samples.otn.com">
            <name/>
            <symbol/>
            <price>12.3</price>
            <quantity>0</quantity>
            <approved/>
            <message/>
         </result>
      </from>
      <to variable="output" part="payload"/>
   </copy>
</assign>
6.5 Copying Between Variables
When you copy between variables, you copy directly from one variable (or part) to another variable of a compatible type, without needing to specify a particular field within either variable. In other words, you do not need to specify an XPath query.
6.5.1 How to Copy Between Variables
Example 6-11 shows two assignments being performed, first copying between two variables of the same type and then copying a variable part to another variable with the same type as that part.
Example 6-11 Copying Between Variables
<assign>
   <copy>
      <from variable="c1"/>
      <to variable="c2"/>
   </copy>
   <copy>
      <from variable="c1" part = "address"/>
      <to variable="c3"/>
   </copy>
</assign>
The BPEL file defines the variables shown in Example 6-12:
Example 6-12 Variable Definition
<variable name="c1" messageType="x:person"/>
<variable name="c2" messageType="x:person"/>
<variable name="c3" element="y:address"/>
The WSDL file defines the person message type shown in Example 6-13:
Example 6-13 Message Type Definition
<message name="person" xmlns:x="http://tempuri.org/bpws/example">
   <part name="full-name" type="xsd:string"/>
   <part name="address" element="x:address"/>
</message>
For more information about this code example, see Section 9.3.2 of the Business Process Execution Language for Web Services Specification Version 1.1. For BPEL 2.0, see Section 8.4.4 of Web Services Business Process Execution Language Specification Version 2.0 for a similar example.
For more information, see Section A.2.3, "Assign Activity."
6.5.2 Initializing Variables with an Inline from-spec in BPEL 2.0
A variable can optionally be initialized by using an inline from-spec. Click the Initialize tab in the Create Variable dialog in a BPEL 2.0 project to create this type of variable.
Inline variable initializations are conceptually designed as a virtual sequence activity that includes a series of virtual assign activities, one for each variable being initialized, in the order in which they appear in the variable declarations. Each virtual assign activity contains a single virtual copy operation whose from-spec is as given in the variable initialization. The to-spec points to the variable being created. Example 6-14 provides details.
Example 6-14 Variable Initialization with an Inline from-spec
<variables>
   <variable name="tmp" element="tns:output">
     <from>
       <literal>
         <output xmlns="http://samples.otn.com/bpel2.0/ch8.1">
           <value>1000</value>
         </output>
       </literal>
     </from>
   </variable>
</variables>
For more information, see section 8.1 of Web Services Business Process Execution Language Specification Version 2.0.
6.6 Accessing Fields in Element and Message Type Variables
Given the types of definitions present in most WSDL and XSD files, you must go down to the level of copying from or to a field within part of a variable based on the element and message type. This in turn uses XML schema complex types. To perform this action, you specify an XPath query in the from or to clause of the assign activity.
6.6.1 How to Access Fields Within Element-Based and Message Type-Based Variables
In Example 6-15, the ssn field is copied from the CreditFlow process's input message into the ssn field of the credit rating service's input message.
Example 6-15 Field Copying Levels
<assign>
   <copy>
      <from variable="input" part="payload"
         query="/tns:CreditFlowRequest/tns:ssn"/>
      <to variable="crInput" part="payload" query="/tns:ssn"/>
   </copy>
</assign>
Example 6-16 shows how the BPEL file defines message type-based variables involved in this assignment:
Example 6-16 BPEL File Definition - Message Type-Based Variables in BPEL 1.1
<variable name="input" messageType="tns:CreditFlowRequestMessage"/>
<variable name="crInput"
          messageType="services:CreditRatingServiceRequestMessage"/>
The crInput variable is used as an input message to a credit rating service. Its message type, CreditFlowRequestMessage, is defined in the CreditFlowService.wsdl file, as shown in Example 6-17:
Example 6-17 CreditFlowRequestMessage Definition
<message name="CreditFlowRequestMessage">
<part name="payload" element="tns:CreditFlowRequest"/>
</message>
CreditFlowRequest is defined with a field named ssn. The message type CreditRatingServiceRequestMessage is defined in the CreditRatingService.wsdl file, as shown in Example 6-18:
Example 6-18 CreditRatingServiceRequestMessage Definition
<message name="CreditRatingServiceRequestMessage">
   <part name="payload" element="tns:ssn"/>
</message>
Example 6-19 shows the BPEL 2.0 syntax for how the BPEL file defines message type-based variables involved in the assignment in Example 6-15. Note that /tns:CreditFlowRequest is not required.
Example 6-19 BPEL File Definition - Message Type-Based Variables in BPEL 2.0
<copy>
   <from>$input.payload/tns:ssn</from>
   <to>$crInput.payload</to>
</copy>
A BPEL process can also use element-based variables. Example 6-20 shows how to use element-based variables in BPEL 1.1. The autoloan field is copied from the loan application process's input message into the customer field of a web service's input message.
Example 6-20 Field Copying Levels in BPEL 1.1
 <assign>
      <copy>
        <from variable="input" part="payload"
           query="/tns:invalidLoanApplication/autoloan:
            application/autoloan:customer"/>
        <to variable="customer"/>
      </copy>
</assign>
Example 6-21 shows how to use element-based variables in BPEL 2.0.
Example 6-21 Field Copying Levels in BPEL 2.0
<assign>
   <copy>
      <from>$input.payload/autoloan:application/autoloan:customer</from>
      <to>$customer</to>
   </copy>
</assign>
Example 6-22 shows how the BPEL file defines element-based variables involved in an assignment:
6.7 Moving and Copying Variables in the Structure Window
You can move and copy variables to and from scope activities in the Structure Window of Oracle JDeveloper.
To move variables in the Structure Window:
-
In the Structure window, select the variable to move to a scope activity. Figure 6-6 provides details.
Figure 6-6 Variable to Move in the Structure Window
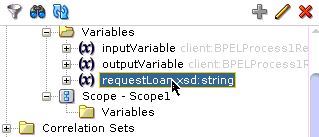
Description of "Figure 6-6 Variable to Move in the Structure Window"
-
Drag the variable to the Variables folder of the scope activity.
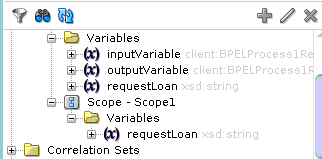
The variable is displayed in the Variables folder of the scope activity, as shown in Figure 6-7.
Figure 6-7 Variable Moved to the Scope Activity in the Structure Window
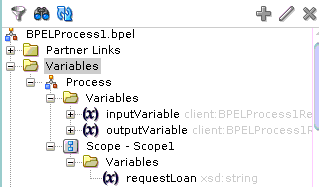
Description of "Figure 6-7 Variable Moved to the Scope Activity in the Structure Window"
-
In the BPEL process, click the Variables icon of the scope activity.
The variable you moved is displayed, as shown in Figure 6-8.
Figure 6-8 Moved Variable in Variables Dialog of the Scope Activity
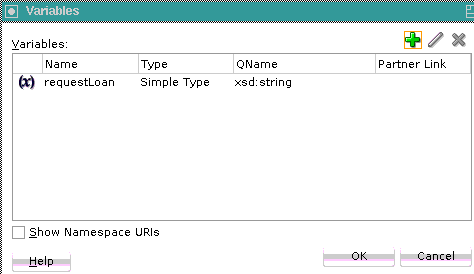
Description of "Figure 6-8 Moved Variable in Variables Dialog of the Scope Activity"
To copy variables in the Structure Window:
-
In the Structure window, select the variable to move to the scope activity. Figure 6-6 provides details.
-
Hold down the Ctrl key.
-
Drag the variable to the Variables folder of the scope activity.
The variable is displayed in both Variables folders, as shown in Figure 6-9.
Figure 6-9 Variable Copied to the Scope Activity in the Structure Window
Description of "Figure 6-9 Variable Copied to the Scope Activity in the Structure Window"
6.8 Assigning Numeric Values
You can assign numeric values in XPath expressions.
6.8.1 How to Assign Numeric Values
Example 6-23 shows how to assign an XPath expression with the integer value of 100.
6.9 Using Mathematical Calculations with XPath Standards
You can use simple mathematical expressions like the one in Section 6.9.1, "How To Use Mathematical Calculations with XPath Standards," which increment a numeric value.
6.9.1 How To Use Mathematical Calculations with XPath Standards
In Example 6-24, the BPEL XPath function getVariableData retrieves the value being incremented. The arguments to getVariableData are equivalent to the variable, part, and query attributes of the from clause (including the last two arguments, which are optional).
Example 6-24 XPath Function getVariableData Retrieval of a Value
<assign>
   <copy>
      <from expression="bpws:getVariableData('input', 'payload',
          '/p:value') + 1"/>
      <to variable="output" part="payload" query="/p:result"/>
   </copy>
</assign>
You can also use $variable syntax in BPEL 1.1, as shown in Example 6-25:
Example 6-25 $variable Syntax Use in BPEL 1.1
<assign>
  <copy>
    <from expression="$input.payload + 1"/>
    <to variable="output" part="payload" query="/p:result"/>
  </copy>
</assign>
Example 6-26 shows how to use $variable syntax in BPEL 2.0.
6.10 Assigning String Literals
You can assign string literals to a variable in BPEL.
6.10.1 How to Assign String Literals
The code in Example 6-27 copies a BPEL 1.1 expression evaluating from the string literal 'GE' to the symbol field within the indicated variable part. (Note the use of the double and single quotes.)
Example 6-27 Expression Copy in BPEL 1.1
<assign>
   <!-- copy from string expression to the variable -->
   <copy>
      <from expression="'GE'"/>
      <to variable="output" part="payload" query="/p:result/p:symbol"/>
   </copy>
</assign>
Example 6-28 shows how to perform this expression in BPEL 2.0.
6.11 Concatenating Strings
Rather than copying the value of one string variable (or variable part or field) to another, you can first perform string manipulation, such as concatenating several strings.
6.11.1 How to Concatenate Strings
The concatenation is accomplished with the core XPath function named concat; in addition, the variable value involved in the concatenation is retrieved with the BPEL XPath function getVariableData. In Example 6-29, getVariableData fetches the value of the name field from the input variable's payload part. The string literal 'Hello ' is then concatenated to the beginning of this value.
Example 6-29 XPath Function getVariableData Fetch of Data
<assign>
   <!-- copy from XPath expression to the variable -->
   <copy>
      <from expression="concat('Hello ',
         bpws:getVariableData('input', 'payload', '/p:name'))"/>
      <to variable="output" part="payload" query="/p:result/p:message"/>
   </copy>
</assign>
Other string manipulation functions available in XPath are listed in section 4.2 of the XML Path Language (XPath) Specification.
6.12 Assigning Boolean Values
You can assign boolean values with the XPath boolean function.
6.12.1 How to Assign Boolean Values
Example 6-30 provides an example of assigning boolean values in BPEL 1.1. The XPath expression in the from clause is a call to XPath's boolean function true, and the specified approved field is set to true. The function false is also available.
Example 6-30 Boolean Value Assignment in BPEL 1.1
<assign>
   <!-- copy from boolean expression function to the variable -->
   <copy>
      <from expression="true()"/>
      <to variable="output" part="payload" query="/result/approved"/>
   </copy>
</assign>
Example 6-31 provides an example of assigning boolean values in BPEL 2.0.
Example 6-31 Boolean Value Assignment in BPEL 2.0
<assign>
   <copy>
      <from>true()</from>
      <to>$output.payload/approved</to>
   </copy>
</assign>
The XPath specification recommends that you use the "true()" and "false()" functions as a method for returning boolean constant values.
If you instead use "boolean(true)" or "boolean(false)", the true or false inside the boolean function is interpreted as a relative element step, and not as any true or false constant. It attempts to select a child node named true under the current XPath context node. In most cases, the true node does not exist. Therefore, an empty result node set is returned and the boolean() function in XPath 1.0 converts an empty node set into a false result. This result can be potentially confusing.
6.13 Assigning a Date or Time
You can assign the current value of a date or time field by using the Oracle BPEL XPath function getCurrentDate, getCurrentTime, or getCurrentDateTime, respectively. In addition, if you have a date-time value in the standard XSD format, you can convert it to characters more suitable for output by calling the Oracle BPEL XPath function formatDate.
For related information, see section 9.1.2 of the Business Process Execution Language for Web Services Specification Version 1.1 and section 8.3.2 of the Web Services Business Process Execution Language Specification Version 2.0.
6.13.1 How to Assign a Date or Time
Example 6-32 shows an example that uses the function getCurrentDate in BPEL 1.1.
Example 6-32 Date or Time Assignment in BPEL 1.1
<!-- execute the XPath extension function getCurrentDate() -->
<assign>
   <copy>
      <from expression="xpath20:getCurrentDate()"/>
      <to variable="output" part="payload"
         query="/invoice/invoiceDate"/>
   </copy>
</assign>
Example 6-33 shows an example that uses the function getCurrentDate in BPEL 2.0.
Example 6-33 Date or Time Assignment in BPEL 2.0
<assign>
   <copy>
      <from>xpath20:getCurrentDate()</from>
      <to>$output.payload/invoiceDate</to>
   </copy>
</assign>
In Example 6-34, the formatDate function converts the date-time value provided in XSD format to the string 'Jun 10, 2005' (and assigns it to the string field formattedDate).
Example 6-34 formatDate Function in BPEL 1.1
<!-- execute the XPath extension function formatDate() -->
<assign>
   <copy>
      <from expression="ora:formatDate('2005-06-10T15:56:00',
         'MMM dd, yyyy')"/>
      <to variable="output" part="payload"
         query="/invoice/formattedDate"/>
   </copy>
</assign>
Example 6-35 shows how the formatDate function works in BPEL 2.0.
6.14 Manipulating Attributes
You can copy to or from something defined as an XML attribute. An at sign (@) in XPath query syntax refers to an attribute instead of a child element.
6.14.1 How to Manipulate Attributes
The code in Example 6-36 fetches and copies the custId attribute from this XML data:
Example 6-36 custId Attribute Fetch and Copy Operations
   <invalidLoanApplication xmlns="http://samples.otn.com">
      <application xmlns = "http://samples.otn.com/XPath/autoloan">
         <customer custId = "111" >
            <name>
               Mike Olive
            </name>
            ...
         </customer>
         ...
      </application>
   </invalidLoanApplication>
The BPEL 1.1 code in Example 6-37 selects the custId attribute of the customer field and assigns it to the variable custId:
Example 6-37 custId Attribute Select and Assign Operations in BPEL 1.1
<assign>
   <!-- get the custId attribute and assign to variable custId -->
   <copy>
      <from variable="input" part="payload"
         query="/tns:invalidLoanApplication/autoloan:application
                /autoloan:customer/@custId"/>
      <to variable="custId"/>
   </copy>
</assign>
Example 6-38 shows the equivalent syntax in BPEL 2.0 for selecting the custId attribute of the customer field and assigning it to the variable custId:
Example 6-38 custId Attribute Select and Assign Operations in BPEL 2.0
<assign>
<copy>
<from>$input.payload/autoloan:application/autoloan:customer/@custId</from>
<to>$custId</to>
</copy>
</assign>
The namespace prefixes in this example are not integral to the example.The WSDL file defines a customer to have a type in which custId is defined as an attribute, as shown in Example 6-39:
6.15 Manipulating XML Data with bpelx Extensions
You can perform various operations on XML data in assign activities. The bpelx extension types described in this section provide this functionality. In Oracle BPEL Designer, you can add bpelx extension types at the bottom of the Copy Rules tab of an assign dialog. After creating a copy rule, you select it and then choose a bpelx extension type from the dropdown list in BPEL 1.1 or the context menu in BPEL 2.0. This changes the copy rule to the selected extension type.
In BPEL 1.1, you select an extension type from the dropdown list, as shown in Figure 6-10.
Figure 6-10 Copy Rule Converted to bpelx Extension in BPEL 1.1
Description of "Figure 6-10 Copy Rule Converted to bpelx Extension in BPEL 1.1"
In BPEL 2.0, you select an extension type by right-clicking the copy rule, selecting Change rule type, and then selecting the extension type, as shown in Figure 6-11.
Figure 6-11 Copy Rule Converted to bpelx Extension in BPEL 2.0
Description of "Figure 6-11 Copy Rule Converted to bpelx Extension in BPEL 2.0"
For more information, see the online Help for this dialog and Section A.2.3, "Assign Activity."
6.15.1 How to Use bpelx:append
The bpelx:append extension in an assign activity enables a BPEL process service component to append the contents of one variable, expression, or XML fragment to another variable's contents. To use this extension, perform one of the following steps at the bottom of the Copy Rules tab:
-
For BPEL 1.1, select a copy rule, then select Append from the dropdown list, as shown in Figure 6-10.
-
For BPEL 2.0, right-click a copy rule, select Change rule type, and then select Append, as shown in Figure 6-11.
Note:
Thebpelx:append extension is not supported with SDO variables and causes an error.6.15.1.1 bpelx:append in BPEL 1.1
Example 6-40 provides an example of bpelx:append in a BPEL project that supports BPEL version 1.1.
Example 6-40 bpelx:append Extension in BPEL 1.1
<bpel:assign>
   <bpelx:append>
      <bpelx:from ... />
      <bpelx:to ... />
   </bpelx:append>
</bpel:assign>
The from-spec query within bpelx:append yields zero or more nodes. The node list is appended as child nodes to the target node specified by the to-spec query.
The to-spec query must yield one single L-Value element node. Otherwise, a bpel:selectionFailure fault is generated. The to-spec query cannot refer to a partner link.
Example 6-41 consolidates multiple bills of material into one single bill of material (BOM) by appending multiple b:parts for one BOM to b:parts of the consolidated BOM.
6.15.1.2 bpelx:append in BPEL 2.0
Example 6-42 provides an example of bpelx:append syntax in a BPEL project that supports BPEL version 2.0. In BPEL 2.0, the functionality is the same as described in Section 6.15.1.1, "bpelx:append in BPEL 1.1," but the syntax is slightly different.
6.15.2 How to Use bpelx:insertBefore
Note:
Thebpelx:insertBefore extension works with SDO variables, but the target must be the variable attribute into which the copied data must go.The bpelx:insertBefore extension in an assign activity enables a BPEL process service component to insert the contents of one variable, expression, or XML fragment before another variable's contents. To use this extension, perform one of the following steps at the bottom of the Copy Rules tab:
-
For BPEL 1.1, select a copy rule, then select InsertBefore from the dropdown list, as shown in Figure 6-10.
-
For BPEL 2.0, right-click a copy rule, select Change rule type, and then select InsertBefore, as shown in Figure 6-11.
6.15.2.1 bpelx:insertBefore in BPEL 1.1
Example 6-43 provides an example of bpelx:insertBefore in a BPEL project that supports BPEL version 1.1.
Example 6-43 bpelx:insertBefore Extension in BPEL 1.1
<bpel:assign>
   <bpelx:insertBefore>
      <bpelx:from ... />
      <bpelx:to ... />
   </bpelx:insertBefore>
</bpel:assign>
The from-spec query within bpelx:insertBefore yields zero or more nodes. The node list is appended as child nodes to the target node specified by the to-spec query.
The to-spec query of the insertBefore operation points to one or more single L-Value nodes. If multiple nodes are returned, the first node is used as the reference node. The reference node must be an element node. The parent of the reference node must also be an element node. Otherwise, a bpel:selectionFailure fault is generated. The node list generated by the from-spec query selection is inserted before the reference node. The to-spec query cannot refer to a partner link.
Example 6-44 shows the syntax before the execution of <insertBefore>. The value of addrVar is:
Example 6-44 Presyntax Execution
<a:usAddress>
       <a:state>CA</a:state>
       <a:zipcode>94065</a:zipcode>
</a:usAddress>
Example 6-45 shows the syntax after the execution:
Example 6-45 Postsyntax Execution
<bpel:assign>
    <bpelx:insertBefore>
        <bpelx:from>
             <a:city>Redwood Shore></a:city>
        </bpelx:from>
        <bpelx:to "addrVar" query="/a:usAddress/a:state" />
    </bpelx:insertBefore>
</bpel:assign>
Example 6-46 shows the value of addrVar:
6.15.2.2 bpelx:insertBefore in BPEL 2.0
Example 6-47 provides an example of bpelx:insertBefore syntax in a BPEL project that supports BPEL version 2.0. In BPEL 2.0, the functionality is the same as described in Section 6.15.2.1, "bpelx:insertBefore in BPEL 1.1," but the syntax is slightly different. An extensionAssignOperation element wraps the bpelx:insertBefore extension.
Example 6-47 bpelx:insertBefore Extension in BPEL 2.0
<assign>
   <extensionAssignOperation>
      <bpelx:insertBefore>
         <bpelx:from>
            <bpelx:literal>
               <a:city>Redwood Shore></a:city>
            </bpelx:literal>
         </bpelx:from>
         <bpelx:to>$addrVar/a:state</bpelx:to>
         </bpelx:insertBefore>
   </extensionAssignOperation>
</assign>
6.15.3 How to Use bpelx:insertAfter
Note:
Thebpelx:insertAfter extension works with SDO variables, but the target must be the variable attribute into which the copied data must go.The bpelx:insertAfter extension in an assign activity enables a BPEL process service component to insert the contents of one variable, expression, or XML fragment after another variable's contents. To use this extension, perform one of the following steps at the bottom of the Copy Rules tab:
-
For BPEL 1.1, select a copy rule, then select InsertAfter from the dropdown list, as shown in Figure 6-10.
-
For BPEL 2.0, right-click a copy rule, select Change rule type, and then select InsertAfter, as shown in Figure 6-11.
6.15.3.1 bpelx:insertAfter in BPEL 1.1
Example 6-48 provides an example of bpelx:insertAfter in a BPEL project that supports BPEL version 1.1.
Example 6-48 bpelx:insertAfter Extension in BPEL 1.1
<bpel:assign>
    <bpelx:insertAfter>
       <bpelx:from ... />
       <bpelx:to ... />
    </bpelx:insertAfter>
</bpel:assign>
This operation is similar to the functionality described for Section 6.15.2, "How to Use bpelx:insertBefore," except for the following:
-
If multiple L-Value nodes are returned by the
to-specquery, the last node is used as the reference node. -
Instead of inserting nodes before the reference node, the source nodes are inserted after the reference node.
This operation can also be considered a macro of conditional-switch + (append or insertBefore).
Example 6-49 shows the syntax before the execution of <insertAfter>. The value of addrVar is:
Example 6-49 Presyntax Execution
<a:usAddress>
       <a:addressLine>500 Oracle Parkway</a:addressLine>
       <a:state>CA</a:state>
       <a:zipcode>94065</a:zipcode>
</a:usAddress>
Example 6-50 shows the syntax after the execution:
Example 6-50 Postsyntax Execution
<bpel:assign>
    <bpelx:insertAfter>
        <bpelx:from>
             <a:addressLine>Mailstop 1op6</a:addressLine>
        </bpelx:from>
        <bpelx:to "addrVar" query="/a:usAddress/a:addressLine[1]" />
    </bpelx:insertAfter>
</bpel:assign>
Example 6-51 shows the value of addrVar:
<a:usAddress>
       <a:addressLine>500 Oracle Parkway</a:addressLine>
       <a:addressLine>Mailstop 1op6</a:addressLine>
       <a:state>CA</a:state>
       <a:zipcode>94065</a:zipcode>
</a:usAddress>
The from-spec query within bpelx:insertAfter yields zero or more nodes. The node list is appended as child nodes to the target node specified by the to-spec query.
6.15.3.2 bpelx:insertAfter in BPEL 2.0
Example 6-52 provides an example of bpelx:insertAfter syntax in a BPEL project that supports BPEL version 2.0. In BPEL 2.0, the functionality is the same as described in Section 6.15.3.1, "bpelx:insertAfter in BPEL 1.1," but the syntax is slightly different. An extensionAssignOperation element wraps the bpelx:insertAfter extension.
Example 6-52 bpelx:insertAfter Extension in BPEL 2.0
<assign>
   <extensionAssignOperation>
      <bpelx:insertAfter>
         <bpelx:from>
            <bpelx:literal>
               <a:addressLine>Mailstop 1op6</a:addressLine>
            </bpelx:literal>
         </bpelx:from>
<bpelx:to>$addrVar/a:addressLine[1]</bpelx:to>
      </bpelx:insertAfter>
   </extensionAssignOperation>
</assign>
6.15.4 How to Use bpelx:remove
The bpelx:remove extension in an assign activity enables a BPEL process service component to remove a variable. In Oracle BPEL Designer, you add the bpelx:remove extension by dragging the remove icon in the upper right corner of the Copy Rules tab to the target variable you want to remove, and releasing the cursor. You can also drag this icon to the center canvas to invoke a dialog, specify the rule, save and close the dialog, and then drag the icon to the target node. Figure 6-12 provides details.
Figure 6-12 Remove Icon in Copy Rules Tab of an Assign Activity
Description of "Figure 6-12 Remove Icon in Copy Rules Tab of an Assign Activity"
After releasing the cursor, the bpelx:remove extension is applied to the target variable. Figure 6-13 provides details.
Figure 6-13 bpelx:remove Extension Applied to a Target Variable
Description of "Figure 6-13 bpelx:remove Extension Applied to a Target Variable"
6.15.4.1 bpelx:remove in BPEL 1.1
Example 6-53 provides an example of bpelx:remove in a BPEL project that supports BPEL version 1.1.
Example 6-53 bpelx:remove Extension in BPEL 1.1
<bpel:assign>
    <bpelx:remove>
       <bpelx:target variable="ncname" part="ncname"? query="xpath_str" />
    </bpelx:remove>
</bpel:assign>
Node removal specified by the XPath expression is supported. Nodes specified by the XPath expression can be multiple, but must be L-Values. Nodes being removed from this parent can be text nodes, attribute nodes, and element nodes.
The XPath expression can return one or more nodes. If the XPath expression returns zero nodes, then a bpel:selectionFailure fault is generated.
The syntax of bpelx:target is similar to and a subset of to-spec for the copy operation.
Example 6-54 shows addrVar with the following value:
<a:usAddress>
       <a:addressLine>500 Oracle Parkway</a:addressLine>
       <a:addressLine>Mailstop 1op6</a:addressLine>
       <a:state>CA</a:state>
       <a:zipcode>94065</a:zipcode>
</a:usAddress>
After executing the syntax shown in Example 6-55 in the BPEL process service component file, the second address line of Mailstop is removed:
Example 6-55 Removal of Second Address Line
<bpel:assign>
    <bpelx:remove>
        <target variable="addrVar"
            query="/a:usAddress/a:addressLine[2]" />
    </bpelx:remove>
</bpel:assign>
After executing the syntax shown in Example 6-56 in the BPEL process service component file, both address lines are removed:
6.15.4.2 bpelx:remove in BPEL 2.0
Example 6-57 provides an example of bpelx:remove syntax in a BPEL project that supports BPEL version 2.0. In BPEL 2.0, the functionality is the same as described in Section 6.15.4.1, "bpelx:remove in BPEL 1.1," but the syntax is slightly different. An extensionAssignOperation element wraps the bpelx:remove.
6.15.5 How to Use bpelx:rename and XSD Type Casting
The bpelx:rename extension in an assign activity enables a BPEL process service component to rename an element through use of XSD type casting. In Oracle BPEL Designer, you add the bpelx:rename extension by dragging the rename icon in the upper right corner of the Copy Rules tab to the target variable you want to rename, and releasing the cursor. The rename icon displays to the right of the remove icon shown in Figure 6-12. After releasing the cursor, the Rename dialog is displayed for renaming the target variable. You can also drag this icon to the center canvas to invoke this dialog, specify the name, save and close the dialog, and then drag the icon to the target node.
6.15.5.1 bpelx:rename in BPEL 1.1
Example 6-58 provides an example of bpelx:rename in a BPEL project that supports BPEL version 1.1.
Example 6-58 bpelx:rename Extension in BPEL 1.1
<bpel:assign>
    <bpelx:rename elementTo="QName1"? typeCastTo="QName2"?>
       <bpelx:target variable="ncname" part="ncname"? query="xpath_str" />
    </bpelx:rename>
</bpel:assign>
The syntax of bpelx:target is similar to and a subset of to-spec for the copy operation. The target must return a list of one more element nodes. Otherwise, a bpel:selectionFailure fault is generated. The element nodes specified in the from-spec are renamed to the QName specified by the elementTo attribute. The xsi:type attribute is added to those element nodes to cast those elements to the QName type specified by the typeCastTo attribute.
Assume you have the employee list shown in Example 6-59:
Example 6-59 xsi:type Attribute
<e:empList>
    <e:emp>
        <e:firstName>John</e:firstName><e:lastName>Dole</e:lastName>
    <e:emp>
    <e:emp xsi:type="e:ManagerType">
        <e:firstName>Jane</e:firstName><e:lastName>Dole</e:lastName>
        <e:approvalLimit>3000</e:approvalLimit>
        <e:managing />
    <e:emp>
    <e:emp>
        <e:firstName>Peter</e:firstName><e:lastName>Smith</e:lastName>
    <e:emp>
    <e:emp>
        <e:firstName>Mary</e:firstName><e:lastName>Smith</e:lastName>
    <e:emp>
</e:empList>
Promotion changes are now applied to Peter Smith in the employee list in Example 6-60:
Example 6-60 Application of Promotion Changes
<bpel:assign>
    <bpelx:rename typeCastTo="e:ManagerType">
       <bpelx:target variable="empListVar"
            query="/e:empList/e:emp[./e:firstName='Peter' and
 ./e:lastName='Smith'" />
    </bpelx:rename>
</bpel:assign>
After executing the above casting (renaming), the data looks as shown in Example 6-61 with xsi:type info added to Peter Smith:
<e:empList>
    <e:emp>
        <e:firstName>John</e:firstName><e:lastName>Dole</e:lastName>
    <e:emp>
    <e:emp xsi:type="e:ManagerType">
        <e:firstName>Jane</e:firstName><e:lastName>Dole</e:lastName>
        <e:approvalLimit>3000</e:approvalLimit>
        <e:managing />
    <e:emp>
    <e:emp xsi:type="e:ManagerType">
        <e:firstName>Peter</e:firstName><e:lastName>Smith</e:lastName>
    <e:emp>
    <e:emp>
        <e:firstName>Mary</e:firstName><e:lastName>Smith</e:lastName>
    <e:emp>
</e:empList>
The employee data of Peter Smith is now invalid, because <approvalLimit> and <managing> are missing. Therefore, <append> is used to add that information. Example 6-62 provides an example.
Example 6-62 Use of append Extension to Add Information
<bpel:assign>
    <bpelx:rename typeCastTo="e:ManagerType">
       <bpelx:target variable="empListVar"
            query="/e:empList/e:emp[./e:firstName='Peter' and
 ./e:lastName='Smith'" />
    </bpelx:rename>
    <bpelx:append>
       <bpelx:from>
          <e:approvalLimit>2500</e:approvalLimit>
          <e:managing />
       </bpelx:from>
       <bpelx:to variable="empListVar"
            query="/e:empList/e:emp[./e:firstName='Peter' and
 ./e:lastName='Smith'" />
    </bpelx:append>
</bpel:assign>
With the execution of both rename and append, the corresponding data looks as shown in Example 6-63:
6.15.5.2 bpelx:rename in BPEL 2.0
Example 6-64 provides an example of bpelx:rename syntax in a BPEL project that supports BPEL version 2.0. In BPEL 2.0, the functionality is the same as described in Section 6.15.5.1, "bpelx:rename in BPEL 1.1," but the syntax is slightly different. An extensionAssignOperation element wraps the bpelx:rename operation.
6.15.6 How to Use bpelx:copyList
The bpelx:copyList extension in an assign activity enables a BPEL process service component to perform a copyList operation of the contents of one variable, expression, or XML fragment to another variable. To use this extension, perform one of the following steps at the bottom of the Copy Rules tab:
-
For BPEL 1.1, select a copy rule, then select CopyList from the dropdown list, as shown in Figure 6-10.
-
For BPEL 2.0, right-click a copy rule, select Change rule type, and then select CopyList, as shown in Figure 6-11.
6.15.6.1 bpelx:copyList in BPEL 1.1
Example 6-65 provides an example of bpelx:copyList in a BPEL project that supports BPEL version 1.1.
Example 6-65 bpelx:copyList Extension in BPEL 1.1
<bpel:assign>
    <bpelx:copyList>
       <bpelx:from ... />
       <bpelx:to ... />
    </bpelx:copyList>
</bpel:assign>
The from-spec query can yield a list of either all attribute nodes or all element nodes. The to-spec query can yield a list of L-value nodes: either all attribute nodes or all element nodes.
All the element nodes returned by the to-spec query must have the same parent element. If the to-spec query returns a list of element nodes, all element nodes must be contiguous.
If the from-spec query returns attribute nodes, then the to-spec query must return attribute nodes. Likewise, if the from-spec query returns element nodes, then the to-spec query must return element nodes. Otherwise, a bpws:mismatchedAssignmentFailure fault is thrown.
The from-spec query can return zero nodes, while the to-spec query must return at least one node. If the from-spec query returns zero nodes, the effect of the copyList operation is similar to the remove operation.
The copyList operation provides the following features:
-
Removes all the nodes pointed to by the
to-specquery. -
If the
to-specquery returns a list of element nodes and there are leftover child nodes after removal of those nodes, the nodes returned by thefrom-specquery are inserted before the next sibling of the last element specified by theto-specquery. If there are no leftover child nodes, anappendoperation is performed. -
If the
to-specquery returns a list of attribute nodes, those attributes are removed from the parent element. The attributes returned by thefrom-specquery are then appended to the parent element.
For example, assume a schema is defined as shown in Example 6-66.
<schema attributeFormDefault="unqualified"
        elementFormDefault="qualified"
        targetNamespace="http://xmlns.oracle.com/Event_jws/Event/EventTest"
        xmlns="http://www.w3.org/2001/XMLSchema">
        <element name="process">
                <complexType>
                        <sequence>
                                <element name="payload" type="string"
                                  maxOccurs="unbounded"/>
                        </sequence>
                </complexType>
        </element>
        <element name="processResponse">
                <complexType>
                        <sequence>
                                <element name="payload" type="string"
                                   maxOccurs="unbounded"/>
                        </sequence>
                </complexType>
        </element>
</schema>
The from variable contains the content shown in Example 6-67.
<ns1:process xmlns:ns1="http://xmlns.oracle.com/Event_jws/Event/EventTest">
            <ns1: payload >a</ns1: payload >
            <ns1: payload >b</ns1: payload >
</ns1:process>
The to variable contains the content shown in Example 6-68.
<ns1:processResponse xmlns:ns1="http://xmlns.oracle.com/Event_
 jws/Event/EventTest">
            <ns1: payload >c</ns1: payload >
</ns1:process>
The bpelx:copyList operation looks as shown in Example 6-69.
<assign>
      <bpelx:copyList>
        <bpelx:from variable="inputVariable" part="payload"
              query="/client:process/client:payload"/>
        <bpelx:to variable="outputVariable" part="payload"
            query="/client:processResponse/client:payload"/>
      </bpelx:copyList>
</assign>
This defines the to variable as shown in Example 6-70.
6.15.6.2 bpelx:copyList in BPEL 2.0
Example 6-71 provides an example of bpelx:copyList syntax in a BPEL project that supports BPEL version 2.0. In BPEL 2.0, the functionality is the same as described in Section 6.15.6.1, "bpelx:copyList in BPEL 1.1," but the syntax is slightly different. An extensionAssignOperation element wraps the bpelx:copyList extension.
6.15.7 How to Use Assign Extension Attributes
You can assign the following attributes to copy rules in an assign activity.
At the bottom of the Copy Rules tab of an assign activity, you right-click a selected copy rule to display a menu for choosing the appropriate attribute. Figure 6-14 provides details.
6.15.7.1 ignoreMissingFromData Attribute
The ignoreMissingFromData attribute suppresses any bpel:selectionFailure standard faults. Table 6-3 describes the syntax differences between BPEL versions 1.1 and 2.0.
6.15.7.2 insertMissingToData Attribute
The insertMissingToData attribute instructs runtime to complete the (XPath) L-value specified by the to-spec, if no items were selected. Table 6-4 describes the syntax differences between BPEL versions 1.1 and 2.0.
6.15.7.3 keepSrcElementName Attribute
The keepSrcElementName attribute enables you to replace the element name of the destination (as selected by the to-spec) with the element name of the source. This attribute was not implemented in BPEL 1.1. Table 6-5 describes the syntax supported in BPEL version 2.0.
6.16 Validating XML Data
You can verify code and identify invalid XML data in a BPEL project.
6.16.1 How to Validate XML Data in BPEL 1.1
-
In an assign activity in Oracle BPEL Designer:
-
From the BPEL Constructs section of the Component Palette, drag an Assign activity into the designer.
-
Double-click the Assign activity.
-
In the General tab, enter a name for the activity and select the Validate checkbox.
-
Click Apply, then OK.
-
Click the Source tab to view the syntax.
<assign name=Assign1" bpelx:validate="yes"
  . . .
</assign>
-
-
In a standalone, extended validate activity in Oracle BPEL Designer that can be used without an assign activity:
-
From the Oracle Extensions section of the Component Palette, drag a Validate activity into the designer.
-
Double-click the Validate icon.
-
Enter a name for the activity.
-
Click the Add icon to select the variable to validate.
-
Select the variable, then click OK.
-
Click Apply, then OK.
-
Click the Source tab to view the syntax.
<bpelx:validate name=Validate1" variables="inputVariable"/>
-
6.16.2 How to Validate XML Data in BPEL 2.0
-
In an assign activity in Oracle BPEL Designer:
-
From the BPEL Constructs section of the Component Palette, drag an Assign activity into the designer.
-
Double-click the Assign activity.
-
In the General tab, enter a name for the activity and select the Validate checkbox.
-
Click Apply, then OK.
-
Click the Source tab to view the syntax. The syntax for validating XML data with the assign activity is slightly different between BPEL versions 1.1 and 2.0.
<assign name="Assign1" validate="yes">
 . . .
</assign>
-
-
In a standalone, extended validate activity in Oracle BPEL Designer that can be used without an assign activity:
-
From the BPEL Constructs section of the Component Palette, drag a Validate activity into the designer.
-
Double-click the Validate icon.
-
Enter a name for the activity.
-
Click the Add icon to select the variable to validate.
-
Select the variable, then click OK.
-
Click Apply, then OK.
-
Click the Source tab to view the syntax. The syntax for validating XML data with the validate activity is slightly different between BPEL versions 1.1 and 2.0.
<validate name="Validate1" variables="inputVariable"/>
-
6.17 Using Element Variables in Message Exchange Activities in BPEL 2.0
You can specify variables in the following message exchange activities:
-
The Input field (for an
inputVariableattribute) and Output field (for anoutputVariableattribute) of an invoke dialog -
The Input field (for a
variableattribute) of a receive activity -
The Output field (for a
variableattribute) of a reply activity
The variables referenced by these fields typically must be message type variables in which the QName matches the QName of the input and output message types used in the operation, respectively.
The one exception is if the WSDL operation in the activity uses a message containing exactly one part that is defined using an element. In this case, a variable of the same element type used to define the part can be referenced by the inputVariable and outputVariable attributes, respectively, in the invoke activity or the variable attribute of the receive or reply activity.
Using a variable in this situation must be the same as declaring an anonymous, temporary WSDL message variable based on the associated WSDL message type.
Copying element data between the anonymous, temporary WSDL message variable and the element variable acts as a single virtual assign activity with one copy operation whose keepSrcElementName attribute is set to yes. The virtual assign must follow the same rules and use the same faults as a real assign activity. Table 6-6 provides details.
Table 6-6 Mapping WSDL Message Parts
| For The... | The... |
|---|---|
|
|
Value of the variable referenced by the attribute sets the value of the part in the anonymous temporary WSDL message variable. |
|
|
Value of the received part in the temporary WSDL message variable sets the value of the variable referenced by the attribute. |
|
Receive activity |
Incoming part's value sets the value of the variable referenced by the variable attribute. |
|
Reply activity |
Value of the variable referenced by the variable attribute sets the value of the part in the anonymous, temporary WSDL message variable that is sent out. For a reply activity sending a fault, the same scenario applies. |
For more information about the keepSrcElementName attribute, see Section 6.15.7.3, "keepSrcElementName Attribute."
6.18 Mapping WSDL Message Parts in BPEL 2.0
The toParts element in invoke and reply activities provides an alternative to explicitly creating multipart WSDL messages from the contents of BPEL variables.
When you use the toParts element, as shown in Example 6-72, an anonymous, temporary WSDL variable is defined based on the type specified by the input message of the appropriate WSDL operation.
The toParts element acts as a single, virtual assign activity. Each toPart acts as a copy operation. One toPart at most exists for each part in the WSDL message definition. Each copy operation copies data from the variable specified in the fromVariable attribute into the part of the anonymous, temporary WSDL variable referenced in the part attribute of the toParts element.
The fromParts element in receive activities, invoke activities, the onEvent branch of scope activities, and the onMessage branch of pick activities is similar to the toParts element. The fromParts element, as shown in Example 6-73, retrieves data from an incoming multipart WSDL message and places the data into individual variables.
Example 6-73 fromParts Element
<fromParts> <fromPart part="payload" toVariable="request"/> </fromParts>
When a WSDL message is received on an invoke activity that uses fromParts elements, the message is placed in an anonymous, temporary WSDL variable of the type specified by the output message of the appropriate WSDL operation.
As with the toParts element, the fromParts element acts as a single virtual assign activity. Each fromPart acts as a copy operation. Each copy operation copies the data at the part of the anonymous, temporary WSDL variable referenced in the part attribute of the fromPart into the variable indicated in the toVariable attribute.
For both the toParts and fromParts elements, the virtual assign activity must follow the same semantics and generate the same faults as a real assign activity.
The presence of a fromParts element in an invoke activity does not require it to have a fromPart for every part in the WSDL message definition. Parts not explicitly represented by fromParts elements are not copied from the anonymous WSDL variable to the variable.
For more information about mapping WSDL message parts with the toParts and fromParts elements, see the Web Services Business Process Execution Language Version 2.0 Specification located at the following URL:
http://www.oasis-open.org
6.18.1 How to Map WSDL Message Parts
This section provides an overview of a simple BPEL process in which a reply activity uses the toParts elements to copy variable contents. The WSDL and BPEL files used in this example are shown later in Example 6-74 and Example 6-75 of Section 6.18.2, "What Happens When You Map WSDL Message Parts."
To map WSDL message parts in BPEL 2.0:
-
Note that the receive activity in Figure 6-15 includes a standard inputVariable variable from the client.
-
Note that the assign activity in Figure 6-16 copies the test-type-variable contents to Var1.
-
Note that the To Parts button at the bottom of the reply activity is enabled in Figure 6-17, instead of the Variable button. You create information for this section by clicking the Add icon. The copy operation copies data from the variable indicated in the From Variable attribute, Var1, into the part of the anonymous, temporary WSDL variable referenced in the Part attribute.
Figure 6-17 To Parts Section Defined at Bottom of a Reply Activity
Description of "Figure 6-17 To Parts Section Defined at Bottom of a Reply Activity"
6.18.2 What Happens When You Map WSDL Message Parts
Example 6-74 shows a .bpel file for a synchronous request with toParts elements defined in a reply activity. This maps to the operation defined in the WSDL file shown in Example 6-75. The copy operation copies data from the variable indicated in the fromVariable attribute into the part of the anonymous, temporary WSDL variable, Var1.
Example 6-74 BPEL File with ToParts Elements in a Reply Activity
<sequence name="main">
<!-- Receive input from requester. This maps to operation defined in WSDL -->
<receive name="receiveInput" partnerLink="test_client"
portType="client:Test" operation="process" variable="inputVariable"
createInstance="yes"/>
<!-- Generate reply to synchronous request -->
<assign name="Assign_1">
<copy>
<from>"test-type-variable"</from>
<to>$Var1</to>
</copy>
</assign>
<reply name="replyOutput" partnerLink="test_client" portType="client:Test"
operation="process">
<toParts>
<toPart part="payload" fromVariable="Var1"/>
</toParts>
</reply>
</sequence>
Example 6-75 WSDL File that Defines the Operation
<wsdl:types>
<schema attributeFormDefault="unqualified" elementFormDefault="qualified"
targetNamespace="http://xmlns.oracle.com/RT_Validate_P_02_jws/ch10_
3toParts_1/Test"
xmlns="http://www.w3.org/2001/XMLSchema">
<element name="process">
<complexType>
<sequence>
<element name="input" type="string"/>
</sequence>
</complexType>
</element>
<element name="processResponse">
<complexType>
<sequence>
<element name="result" type="string"/>
</sequence>
</complexType>
</element>
</schema>
</wsdl:types>
<!-- ~~~~~~~~~~~~~~~~~~~~~~~~~~~~~~~~~~~~~~~~~~~~~~~~~~~~~~~~~~~~~~~~~~~~~
MESSAGE TYPE DEFINITION - Definition of the message types used as
part of the port type defintions
~~~~~~~~~~~~~~~~~~~~~~~~~~~~~~~~~~~~~~~~~~~~~~~~~~~~~~~~~~~~~~~~~~~~~ -->
<wsdl:message name="TestRequestMessage">
<wsdl:part name="payload" element="client:process"/>
</wsdl:message>
<wsdl:message name="TestResponseMessage">
<wsdl:part name="payload" type="xsd:string"/>
</wsdl:message>
<!-- ~~~~~~~~~~~~~~~~~~~~~~~~~~~~~~~~~~~~~~~~~~~~~~~~~~~~~~~~~~~~~~~~~~~~~
PORT TYPE DEFINITION - A port type groups a set of operations into
a logical service unit.
~~~~~~~~~~~~~~~~~~~~~~~~~~~~~~~~~~~~~~~~~~~~~~~~~~~~~~~~~~~~~~~~~~~~~-->
<!-- portType implemented by the Test BPEL process -->
<wsdl:portType name="Test">
<wsdl:operation name="process">
<wsdl:input message="client:TestRequestMessage"/>
<wsdl:output message="client:TestResponseMessage"/>
</wsdl:operation>
</wsdl:portType>
<!-- ~~~~~~~~~~~~~~~~~~~~~~~~~~~~~~~~~~~~~~~~~~~~~~~~~~~~~~~~~~~~~~~~~~~
PARTNER LINK TYPE DEFINITION
~~~~~~~~~~~~~~~~~~~~~~~~~~~~~~~~~~~~~~~~~~~~~~~~~~~~~~~~~~~~~~~~~~~~~-->
<plnk:partnerLinkType name="Test">
<plnk:role name="TestProvider">
<plnk:portType name="client:Test"/>
</plnk:role>
</plnk:partnerLinkType>
</wsdl:definitions>
Example 6-76 shows a .bpel file with toPart elements defined in invoke and reply activities. This maps to the operation defined in the WSDL file shown in Example 6-77. The copy operation in the invoke activity copies data from the variable indicated in the fromVariable attribute into the part of the anonymous, temporary WSDL variable, request. The copy operation in the reply activity copies data from the variable indicated in the fromVariable attribute into the part of the anonymous, temporary WSDL variable, output.
Example 6-76 BPEL File with ToParts Elements
<sequence>
<!-- receive input from requester -->
<receive name="receiveInput" partnerLink="client" portType="tns:Test"
operation="process" variable="input" createInstance="yes"/>
<assign>
<copy>
<from>$input.payload</from>
<to>$request</to>
</copy>
</assign>
<invoke name="invokeDummyService" partnerLink="DummyService"
portType="tns:DummyPortType"
operation="process" outputVariable="response">
<toParts>
   <toPart part="payload" fromVariable="request"/>
</toParts>
</invoke>
<assign>
<copy>
<from>$response</from>
<to>$output</to>
</copy>
</assign>
<!-- respond output to requester -->
<reply name="replyOutput" partnerLink="client"
portType="tns:Test" operation="process">
<toParts>
<toPart part="payload" fromVariable="output"/>
</toParts>
</reply>
</sequence>
Example 6-77 WSDL File that Defines the Operation
<?xml version="1.0"?>
<definitions name="ch10.3toParts"
targetNamespace="http://samples.otn.com/bpel2.0/ch10.3"
xmlns:tns="http://samples.otn.com/bpel2.0/ch10.3"
xmlns:plnk="http://docs.oasis-open.org/wsbpel/2.0/plnktype"
xmlns="http://schemas.xmlsoap.org/wsdl/"
>
<types>
<schema attributeFormDefault="qualified" elementFormDefault="qualified"
targetNamespace="http://samples.otn.com/bpel2.0/ch10.3"
xmlns="http://www.w3.org/2001/XMLSchema">
<element name="input" type="string"/>
<element name="output" type="string"/>
</schema>
</types>
<message name="TestRequestMessage">
<part name="payload" element="tns:input"/>
</message>
<message name="TestResultMessage">
<part name="payload" element="tns:output"/>
</message>
<portType name="Test">
<operation name="process">
<input message="tns:TestRequestMessage"/>
<output message="tns:TestResultMessage"/>
</operation>
</portType>
<plnk:partnerLinkType name="Test">
<plnk:role name="TestProvider" portType="tns:Test"/>
</plnk:partnerLinkType>
</definitions>
Example 6-78 shows a .bpel file with fromParts elements defined in pick and invoke activities. This maps to the operation defined in the WSDL file shown in Example 6-79. The copy operation in the pick activity retrieves data from the variable indicated in the toVariable attribute into the part of the anonymous, temporary WSDL variable, request. The copy operation in the invoke activities retrieves data from the variable indicated in the toVariable attribute into the part of the anonymous, temporary WSDL variable, response.
Example 6-78 BPEL File with FromParts Elements
<sequence>
<!-- receive input from requester -->
<pick createInstance="yes">
<onMessage partnerLink="client" portType="tns:Test"
operation="process">
<fromParts>
   <fromPart part="payload" toVariable="request"/>
</fromParts>
<empty/>
</onMessage>
</pick>
<invoke name="invokeDummyService" partnerLink="DummyService"
portType="tns:DummyPortType"
operation="process" inputVariable="request">
<fromParts>
<fromPart part="payload" toVariable="response"/>
</fromParts>
</invoke>
<assign>
<copy>
<from>concat($response, " ", $response)</from>
<to>$request</to>
</copy>
</assign>
<invoke name="invokeDummyService" partnerLink="DummyService"
portType="tns:DummyPortType"
operation="process2" inputVariable="request">
<fromParts>
<fromPart part="payload" toVariable="response"/>
</fromParts>
</invoke>
<assign>
<copy>
<from>$response</from>
<to>$output.payload</to>
</copy>
</assign>
<!-- respond output to requester -->
<reply name="replyOutput" partnerLink="client"
portType="tns:Test" operation="process" variable="output"/>
</sequence>
Example 6-79 WSDL File that Defines the Operation
<?xml version="1.0"?>
<definitions name="BPEL20TestCh10.4"
        targetNamespace="http://samples.otn.com/bpel2.0/ch10.4"
        xmlns:tns="http://samples.otn.com/bpel2.0/ch10.4"
        xmlns:plnk="http://docs.oasis-open.org/wsbpel/2.0/plnktype"
        xmlns="http://schemas.xmlsoap.org/wsdl/"
        >

  <types>
    <schema attributeFormDefault="qualified" elementFormDefault="qualified"
 targetNamespace="http://samples.otn.com/bpel2.0/ch10.4"
 xmlns="http://www.w3.org/2001/XMLSchema">
      <element name="input" type="string"/>
      <element name="output" type="string"/>
    </schema>
  </types>

  <message name="TestRequestMessage">
    <part name="payload" element="tns:input"/>
  </message>
  <message name="TestResultMessage">
    <part name="payload" element="tns:output"/>
  </message>
  <portType name="Test">
    <operation name="process">
      <input message="tns:TestRequestMessage"/>
      <output message="tns:TestResultMessage"/>
    </operation>
  </portType>

  <plnk:partnerLinkType name="Test">
    <plnk:role name="TestProvider" portType="tns:Test"/>
  </plnk:partnerLinkType>

</definitions>
6.19 Importing Process Definitions in BPEL 2.0
You can use the import element to specify the definitions on which your BPEL process is dependent. When you create a version 2.0 BPEL process, an import element is added to the .bpel file, as shown in Example 6-80.
<process name="Loan Flow"
   . . .
   . . .
   <import namespace="http://xmlns.oracle.com/SOAApplication/SOAProject/LoanFlow"
     location="LoanFlow.wsdl" importType="http://schemas.xmlsoap.org/wsdl/"/>
You can also use the import element to import a schema without a namespace, as shown in Example 6-81.
Example 6-81 Schema Import Without Namespace
<process name="Loan Flow"
   . . .
   . . .
<import location="xsd/NoNamespaceSchema.xsd"
 importType="http://www.w3.org/2001/XMLSchema"/>
You can also use the import element to import a schema with a namespace, as shown in Example 6-82.
Example 6-82 Schema Import With Namespace
<process name="Loan Flow"
   . . .
   . . .
<import namespace="http://www.example.org" location="xsd/TestSchema.xsd"
 importType="http://www.w3.org/2001/XMLSchema"/>
The import element is provided to declare a dependency on external XML schema or WSDL definitions. Any number of import elements can appear as children of the process element. Each import element can contain the following attributes.
-
namespace: Identifies an absolute URI that specifies the imported definitions. This is an optional attribute. If a namespace is specified, then the imported definitions must be in that namespace. If a namespace is not specified, this indicates that external definitions are in use that are not namespace-qualified. The imported definitions must not contain atargetNamespacespecification. -
location: Identifies a URI that specifies the location of a document containing important definitions. This is an optional attribute. This can be a relative URI. If nolocationattribute is specified, the process uses external definitions. However, there is no statement provided indicating where to locate these definitions. -
importType: Identifies the document type to import. This must be an absolute URI that specifies the encoding language used in the document. This is a required attribute.-
If importing XML schema 1.0 documents, this attribute's value must be set to
"http://www.w3.org/2001/XMLSchema". -
If importing WSDL 1.1 documents, the value must be set to
"http://schemas.xmlsoap.org/wsdl/". You can also specify other values for this attribute.
-
For more information, see section 5.4 of the Web Services Business Process Execution Language Specification Version 2.0.
6.20 Manipulating XML Data Sequences That Resemble Arrays
Data sequences are one of the most basic data models used in XML. However, manipulating them can be nontrivial. One of the most common data sequence patterns used in BPEL process service components are arrays. Based on the XML schema, the way you can identify a data sequence definition is by its attribute maxOccurs being set to a value greater than one or marked as unbounded. See the XML Schema Specification at http://www.w3.org/TR for more information.
The examples in this section illustrate several basic ways of manipulating data sequences in BPEL. However, there are other associated requirements, such as performing looping or dynamic referencing of endpoints. The following sections describe a particular requirement for data sequence manipulation.
6.20.1 How to Statically Index into an XML Data Sequence That Uses Arrays
The following two examples illustrate how to use XPath functionality to select a data sequence element when the index of the element you want is known at design time. In these cases, it is the first element.
In Example 6-83, addresses[1] selects the first element of the addresses data sequence:
Example 6-83 Data Sequence Element Selection
<assign>
   <!-- get the first address and assign to variable address -->
   <copy>
      <from variable="input" part="payload"
         query="/tns:invalidLoanApplication/autoloan:application
                /autoloan:customer/autoloan:addresses[1]"/>
      <to variable="address"/>
   </copy>
</assign>
In this query, addresses[1] is equivalent to addresses[position()=1], where position is one of the core XPath functions (see sections 2.4 and 4.1 of the XML Path Language (XPath) Specification). The query in Example 6-84 calls the position function explicitly to select the first element of the address's data sequence. It then selects that address's street element (which the activity assigns to the variable street1).
Example 6-84 position Function Use
<assign>
   <!-- get the first address's street and assign to street1 -->
   <copy>
      <from variable="input" part="payload"
         query="/tns:invalidLoanApplication/autoloan:application
                /autoloan:customer/autoloan:addresses[position()=1]
                /autoloan:street"/>
      <to variable="street1"/>
   </copy>
</assign>
If you review the definition of the input variable and its payload part in the WSDL file, you go several levels down before coming to the definition of the addresses field. There you see the maxOccurs="unbounded" attribute. The two XPath indexing methods are functionally identical; you can use whichever method you prefer.
6.20.2 How to Use SOAP-Encoded Arrays
Oracle SOA Suite provides support for SOAP RPC-encoded arrays. This support enables Oracle BPEL Process Manager to operate as a client calling a SOAP web service (RPC-encoded) that uses a SOAP 1.1 array.
Example 6-85 provides an example of a SOAP array payload named myFavoriteNumbers.
Example 6-85 SOAP Array Payload
<myFavoriteNumbers SOAP-ENC:arrayType="xsd:int2">
<number>3</number>
<number>4</number>
</myFavoriteNumbers>
In addition, ensure that the schema element attributes attributeFormDefault and elementFormDefault are set to "unqualified" in your schema. Example 6-86 provides details:
Example 6-86 Schema Element Attributes
attributeFormDefault="unqualified" elementFormDefault="unqualified"
targetNamespace="java:services" xmlns:s0="http://schemas.xmlsoap.org/wsdl/"
xmlns:xs="http://www.w3.org/2001/XMLSchema">
The following features are not supported:
-
A service published by BPEL that uses a SOAP array
-
Partially-transmitted arrays
-
Sparse arrays
-
Multidimensional arrays
Example 6-87 shows how to prepare SOAP arrays with the bpelx:append tag in a BPEL project.
-
Create a BPEL process in Oracle JDeveloper.
-
Prepare the payload for the invocation. Note that
bpelx:appendin Example 6-87 is used to add items into the SOAP array.<bpws:assign> <bpws:copy> <bpws:from variable="input" part="payload" query="/tns:value"/> <bpws:to variable="request" part="strArray" query="/strArray/JavaLangstring"/> </bpws:copy> </bpws:assign> <bpws:assign> <bpelx:append> <bpelx:from variable="request" part="strArray" query="/strArray/JavaLangstring1"/> <bpelx:to variable="request" part="strArray" query="/strArray"/> </bpelx:append> </bpws:assign> -
Import the following namespace in your WSDL file. Oracle JDeveloper does not understand the
SOAP-ENCtag if the import statement is missing in the WSDL schema element.<xs:import namespace="http://schemas.xmlsoap.org/soap/encoding/" />
6.20.2.1 SOAP-Encoded Arrays in BPEL 2.0
SOAP-encoded arrays are supported in BPEL projects that use version 2.0 of the BPEL specification. Example 6-88 shows a sample assign activity with a SOAP-encoded array in a BPEL 2.0 project.
Example 6-88 SOAP-Encoded Array in an Assign Activity in BPEL 2.0
<assign name="Assign_1">
   <copy>
      <from>$inputVariable.payload</from>
      <to>$Invoke_1_echoArray_InputVariable.strArray/JavaLangstring[1]</to>
   </copy>
   <extensionAssignOperation>
      <bpelx:append>
         <bpelx:from variable="Invoke_1_echoArray_InputVariable"
            part="strArray">
            <bpelx:query>
               JavaLangstring[1]
            </bpelx:query>
         </bpelx:from>
         <bpelx:to variable="Invoke_1_echoArray_InputVariable"
            part="strArray">
         </bpelx:to>
         </bpelx:append>
    </extensionAssignOperation>
   </assign>
Example 6-89 shows a sample invoke activity with a SOAP-encoded array in a BPEL 2.0 project.
6.20.2.2 Declaring a SOAP Array Using a wsdl:arrayType Attribute Inside a Schema
A SOAP-encoded array WSDL can declare a SOAP array using a wsdl:arrayType attribute inside a schema. Example 6-90 provides details.
Example 6-90 SOAP Array Declaration Using a wsdl:arrayType Attribute
<xsd:complexType name="UserObject">
    <xsd:sequence>
        <xsd:element name="userInformation" nillable="true"
          type="n5:ArrayOfKeyValuePair"/>
        <xsd:element name="username" nillable="true" type="xsd:string"/>
    </xsd:sequence>
</xsd:complexType>

<xsd:complexType name="ArrayOfKeyValuePair">
    <xsd:complexContent>
        <xsd:restriction base="soapenc:Array">
            <xsd:attribute ref="soapenc:arrayType"
             wsdl:arrayType="n5:KeyValuePair[]"/>
        </xsd:restriction>
    </xsd:complexContent>
</xsd:complexType>

<xsd:complexType name="KeyValuePair">
    <xsd:sequence>
        <xsd:element name="key" nillable="true" type="xsd:string"/>
        <xsd:element name="value" nillable="true" type="xsd:string"/>
    </xsd:sequence>
</xsd:complexType>
Example 6-91 shows how to create and access a SOAP-encoded array in BPEL 1.1.
Example 6-91 SOAP-encoded Array Access in BPEL 1.1
<bpws:copy>
    <bpws:from>
       <ns1:userInformation soapenc:arrayType="com1:KeyValuePair[1]"
       xmlns:ns1="http://www.schematargetnamespace.com/wsdl/Impl/"
         xmlns:soapenc="http://schemas.xmlsoap.org/soap/encoding/"/>
         <ns1:KeyValuePair
            xmlns:ns1="http://www.schematargetnamespace.com/wsdl/Impl/">
            <key>testkey</key>
            <value>testval1</value>
          </ns1:KeyValuePair>
       </ns1:userInformation>
    </bpws:from>
    <bpws:to variable="Inputvar" part="userObject"
             query="/userObject/userInformation"/>

</bpws:copy>
<!--Update elements with SOAPENC Array-->
<bpws:copy>
    <bpws:from variable="KeyValueVar" part="KeyValuePair"
                query="/KeyValuePair/ns2:key"/>
    <bpws:to variable="Inputvar" part="userObject'
 query="//*[local-name()='KeyValuePair'][1]/*[local-name()='key']"/>
</bpws:copy>

<bpws:copy>
    <bpws:from variable="KeyValueVar" part="KeyValuePair"
                query="/KeyValuePair/client:value"/>
    <bpws:to variable="Inputvar" part="userObject"
   query="//*[local-name()='KeyValuePair'][1]/*[local-name()='value']"/>

</bpws:copy>
<!-- Append elements within SOAPENC Array -->
<bpelx:append>
    <bpelx:from variable="Inputvar" part="userObject"
                query="//*[local-name()='KeyValuePair'][1]"/>
    <bpelx:to variable="Inputvar" part="userObject"
              query="/userObject/userInformation"/>
</bpelx:append>
6.20.3 How to Determine Sequence Size
If you must know the runtime size of a data sequence (that is, the number of nodes or data items in the sequence), you can get it by using the combination of the XPath built-in count() function and the BPEL built-in getVariableData() function.
The code in Example 6-92 calculates the number of elements in the item sequence and assigns it to the integer variable lineItemSize.
6.20.4 How to Dynamically Index by Applying a Trailing XPath to an Expression
Often a dynamic value is needed to index into a data sequence; that is, you must get the nth node out of a sequence, where the value of n is defined at runtime. This section covers the methods for dynamically indexing by applying a trailing XPath into expressions.
6.20.4.1 Applying a Trailing XPath to the Result of getVariableData
The dynamic indexing method shown in Example 6-93 applies a trailing XPath to the result of bwps:getVariableData(), instead of using an XPath as the last argument of bpws:getVariableData(). The trailing XPath makes reference to an integer-based index variable within the position predicate (that is, [...]).
<variable name="idx" type="xsd:integer"/>
...
<assign>
  <copy>
    <from expression="bpws:getVariableData('input','payload'
       )/p:line-item[bpws:getVariableData('idx')]/p:line-total" />
    <to variable="lineTotalVar" />
  </copy>
</assign>
Assume at runtime that the idx integer variable holds 2 as its value. The expression in Example 6-93 within the from is equivalent to that shown in Example 6-94.
Example 6-94 Equivalent Format
<from expression="bpws:getVariableData('input','payload'
       )/p:line-item[2]/p:line-total" />
There are some subtle XPath usage differences, when an XPath used trailing behind the bwps:getVariableData() function is compared with the one used inside the function.Using the same example (where payload is the message part of element "p:invoice"), if the XPath is used within the getVariableData() function, the root element name ("/p:invoice") must be specified at the beginning of the XPath.
Example 6-95 provides details.
Example 6-95 Root Element Name Specification
bpws:getVariableData('input', 'payload','/p:invoice/p:line-item[2]/p:line-total')
If the XPath is used trailing behind the bwps:getVariableData()function, the root element name does not need to be specified in the XPath.
For example:
bpws:getVariableData('input', 'payload')/p:line-item[2]/p:line-total
This is because the node returned by the getVariableData() function is the root element. Specifying the root element name again in the XPath is redundant and is incorrect according to standard XPath semantics.
6.20.4.2 Using the bpelx:append Extension to Append New Items to a Sequence
The bpelx:append extension in an assign activity enables BPEL process service components to append new elements to an existing parent element. Example 6-96 provides an example.
Example 6-96 bpelx:append Extension in an Assign Activity
    <assign name="assign-3">
        <copy>
            <from expression="bpws:getVariableData('idx')+1" />
            <to variable="idx"/>
        </copy>
        <bpelx:append>
            <bpelx:from variable="partInfoResultVar" part="payload" />
            <bpelx:to variable="output" part="payload" />
        </bpelx:append>
        ...
    </assign>
The bpelx:append logic in this example appends the payload element of the partInfoResultVar variable as a child to the payload element of the output variable. In other words, the payload element of the output variable is used as the parent element.
6.20.4.3 Merging Data Sequences
You can merge two sequences into a single data sequence. This pattern is common when the data sequences are in an array (that is, the sequence of data items of compatible types).The two append operations shown in Example 6-97 under assign demonstrate how to merge data sequences:
Example 6-97 Data Sequences Merges with append Operations
<assign>
    <!-- initialize "mergedLineItems" variable
         to an empty element -->
    <copy>
        <from> <p:lineItems /> </from>
        <to variable="mergedLineItems" />
    </copy>
    <bpelx:append>
          <bpelx:from variable="input" part="payload"
                query="/p:invoice/p:lineItems/p:lineitem" />
          <bpelx:to variable="mergedLineItems" />
    </bpelx:append>
    <bpelx:append>
          <bpelx:from variable="literalLineItems"
                query="/p:lineItems/p:lineitem" />
          <bpelx:to variable="mergedLineItems" />
    </bpelx:append>
</assign>
6.20.4.4 Generating Functionality Equivalent to an Array of an Empty Element
The genEmptyElem function generates functionality equivalent to an array of an empty element to an XML structure. This function takes the following arguments:
genEmptyElem('ElemQName',int?, 'TypeQName'?, boolean?)
Note the following issues:
-
The first argument specifies the
QNameof the empty elements. -
The optional second integer argument specifies the number of empty elements. If missing, the default size is
1. -
The third optional argument specifies the
QName, which is thexsi:typeof the generated empty name. Thisxsi:typepattern matches theSOAPENC:Array. If it is missing or is an empty string, thexsi:typeattribute is not generated. -
The fourth optional boolean argument specifies whether the generated empty elements are
XSI - nil, provided the element is XSD-nillable. The default value isfalse. If missing orfalse,xsi:nilis not generated.
Example 6-98 shows an append statement initializing a purchase order (PO) document with 10 empty <lineItem> elements under po:
<bpelx:assign>
    <bpelx:append>
        <bpelx:from expression="ora:genEmptyElem('p:lineItem',10)" />
        <bpelx:to variable="poVar" query="/p:po" />
    </bpelx:append>
</bpelx:assign>
The genEmptyElem function in Example 6-98 can be replaced with an embedded XQuery expression, as shown in Example 6-99.
Example 6-99 Embedded XQuery Expression
ora:genEmptyElem('p:lineItem',10)
== for $i in (1 to 10) return <p:lineItem />
The empty elements generated by this function are typically invalid XML data. You perform further data initialization after the empty elements are created. Using the same example above, you can perform the following:
-
Add attribute and child elements to those empty
lineItemelements. -
Perform
copyoperations to replace the empty elements. For example, copy from a web service result to an individual entry in this equivalent array under a flowN activity.
6.20.5 What You May Need to Know About Using the Array Identifier
For processing in Native Format Builder array identifier environments, information is required about the parent node of a node. Because the reportSAXEvents API is used, this information is typically not available for outbound message scenarios. Setting nxsd:useArrayIdentifiers to true in the native schema enables DOM-parsing to be used for outbound message scenarios. Use this setting cautiously, as it can lead to slower performance for very large payloads. Example 6-100 provides details.
Example 6-100 Array Identifier
<?xml version="1.0" ?>

<xsd:schema xmlns:xsd="http://www.w3.org/2001/XMLSchema"
            xmlns:nxsd="http://xmlns.oracle.com/pcbpel/nxsd"
            targetNamespace="http://xmlns.oracle.com/pcbpel/demoSchema/csv"
            xmlns:tns="http://xmlns.oracle.com/pcbpel/demoSchema/csv"
            elementFormDefault="qualified"
            attributeFormDefault="unqualified" nxsd:encoding="US-ASCII"
nxsd:stream="chars" nxsd:version="NXSD" nxsd:useArrayIdentifiers="true">
  <xsd:element name="Root-Element">
  ....
  </xsd:element>
</xsd:schema>
6.21 Converting from a String to an XML Element
Sometimes a service is defined to return a string, but the content of the string is actually XML data. The problem is that, although BPEL provides support for manipulating XML data (using XPath queries, expressions, and so on), this functionality is not available if the variable or field is a string type. With Java, you use DOM functions to convert the string to a structured XML object type. You can use the BPEL XPath function parseEscapedXML to do the same thing.
For information about parseEscapedXML, see Section B.2.49, "parseEscapedXML."
6.21.1 How To Convert from a String to an XML Element
The parseEscapedXML function takes XML data, parses it through DOM, and returns structured XML data that can be assigned to a typed BPEL variable. Example 6-101 provides an example:
Example 6-101 String to XML Element Conversion
<!-- execute the XPath extension function
parseEscapedXML('<item>') and assign to a variable
-->
<assign>
<copy>
<from expression="oratext:parseEscapedXML(
'<item xmlns="http://samples.otn.com"
sku="006">
<description>sun ultra sparc VI server
</description>
<price>1000
</price>
<quantity>2
</quantity>
<lineTotal>2000
</lineTotal>
</item>')"/>
<to variable="escapedLineItem"/>
</copy>
</assign>
6.22 Understanding Document-Style and RPC-Style WSDL Differences
The examples provided in previous sections of this chapter have been for document-style WSDL files in which a message is defined with an XML schema element, as shown in Example 6-102:
Example 6-102 XML Schema element Definition
<message name="LoanFlowRequestMessage">
<part name="payload" element="s1:loanApplication"/>
</message>
This is in contrast to RPC-style WSDL files, in which the message is defined with an XML schema type, as shown in Example 6-103:
Example 6-103 RPC-Style type Definition
<message name="LoanFlowRequestMessage">
<part name="payload" type="s1:LoanApplicationType"/>
</message>
6.22.1 How To Use RPC-Style Files
This differs from the previous information in this chapter because there is a difference in how XPath queries are constructed for the two WSDL message styles. For an RPC-style message, the top-level element (and therefore the first node in an XPath query string) is the part name (payload in Example 6-103). In document-style messages, the top-level node is the element name (for example, loanApplication).
Example 6-104 and Example 6-105 show what an XPath query string looks like if an application named LoanServices were in RPC style.
Example 6-104 RPC-Style WSDL File
<message name="LoanServiceResultMessage">
   <part name="payload" type="s1:LoanOfferType"/>
</message>

<complexType name="LoanOfferType">
   <sequence>
      <element name="providerName" type="string"/>
      <element name="selected" type="boolean"/>
      <element name="approved" type="boolean"/>
      <element name="APR" type="double"/>
   </sequence>
</complexType>
6.23 Manipulating SOAP Headers in BPEL
BPEL's communication activities (invoke, receive, reply, and onMessage) receive and send messages through specified message variables. These default activities permit one variable to operate in each direction. For example, the invoke activity has inputVariable and outputVariable attributes. You can specify one variable for each of the two attributes. This is enough if the particular operation involved uses only one payload message in each direction.
However, WSDL supports multiple messages in an operation. In the case of SOAP, multiple messages can be sent along the main payload message as SOAP headers. However, BPEL's default communication activities cannot accommodate the additional header messages.
Oracle BPEL Process Manager solves this problem by extending the default BPEL communication activities with the bpelx:headerVariable extension. The extension syntax is as shown in Example 6-106:
Example 6-106 bpelx:headerVariable Extension
<invoke bpelx:inputHeaderVariable="inHeader1 inHeader2 ..."
  bpelx:outputHeaderVariable="outHeader1 outHeader2 ..."
  .../>

<receive bpelx:headerVariable="inHeader1 inHeader2 ..." .../>
<onMessage bpelx:headerVariable="inHeader1 inHeader2 ..." .../>
<reply bpelx:headerVariable="inHeader1 inHeader2 ..." .../>
6.23.1 How to Receive SOAP Headers in BPEL
This section provides an example of how to create BPEL and WSDL files to receive SOAP headers.
To receive SOAP headers in BPEL:
-
Create a WSDL file that declares header messages and the SOAP binding that binds them to the SOAP request. Example 6-107 provides an example.
Example 6-107 WSDL File Contents
<!-- custom header --> <message name="CustomHeaderMessage"> <part name="header1" element="tns:header1"/> <part name="header2" element="tns:header2"/> </message> <binding name="HeaderServiceBinding" type="tns:HeaderService"> <soap:binding style="document" transport="http://schemas.xmlsoap.org/soap/http"/> <operation name="initiate"> <soap:operation style="document" soapAction="initiate"/> <input> <soap:header message="tns:CustomHeaderMessage" part="header1" use="literal"/> <soap:header message="tns:CustomHeaderMessage" part="header2" use="literal"/> <soap:body use="literal"/> </input> </operation> </binding> -
Create a BPEL source file that declares the header message variables and uses
bpelx:headerVariableto receive the headers, as shown in Example 6-108.Example 6-108 bpelx:headerVariable Use
<variables>  <variable name="input"
             messageType="tns:HeaderServiceRequestMessage"/>
  <variable name="event"
             messageType="tns:HeaderServiceEventMessage"/>
  <variable name="output"
             messageType="tns:HeaderServiceResultMessage"/>
  <variable name="customHeader"
             messageType="tns:CustomHeaderMessage"/>
</variables>

<sequence>
  <!-- receive input from requester -->
  <receive name="receiveInput" partnerLink="client"
    portType="tns:HeaderService" operation="initiate"
    variable="input"
    bpelx:headerVariable="customHeader"
 createInstance="yes"/>
6.23.2 How to Send SOAP Headers in BPEL
This section provides an example of how to send SOAP headers.
-
Define a reference in the
composite.xmlfile to refer to theHeaderService. -
Define the custom header variable, manipulate it, and send it using
bpelx:inputHeaderVariable, as shown in Example 6-109.Example 6-109 bpelx:inputHeaderVariable Use
<variables>
  <variable name="input" messageType="tns:HeaderTestRequestMessage"/>
  <variable name="output" messageType="tns:HeaderTestResultMessage"/>
  <variable name="request" messageType="services:HeaderServiceRequestMessage"/>
  <variable name="response" messageType="services:HeaderServiceResultMessage"/>
  <variable name="customHeader"messageType="services:CustomHeaderMessage"/>
    </variables>
...
<!-- initiate the remote process -->
  <invoke name="invokeAsyncService"
    partnerLink="HeaderService"
    portType="services:HeaderService"
    bpelx:inputHeaderVariable="customHeader"
    operation="initiate"
    inputVariable="request"/>
6.24 Declaring Extension Namespaces in BPEL 2.0
You can extend a BPEL version 2.0 process to add custom extension namespace declarations. With the mustUnderstand attribute, you can indicate whether the custom namespaces carry semantics that must be understood by the BPEL process.
If a BPEL process does not support one or more of the extensions with mustUnderstand set to yes, the process definition is rejected.
Extensions are defined in the extensions element. Example 6-110 provides details.
Example 6-110 Extension Namespace Declaration Syntax
<process ...>
  ...
  <extensions>?
    <extension namespace="myURI" mustUnderstand="yes|no" />+
  </extensions>
...
</process>
The contents of an extension element must be a single element qualified with a namespace different from the standard BPEL namespace.
For more information about extension declarations, see the Web Services Business Process Execution Language Version 2.0 Specification located at the following URL:
http://www.oasis-open.org
6.24.1 How to Declare Extension Namespaces
To declare extension namespaces:
-
In a BPEL 2.0 process, click the Extensions icon above Oracle BPEL Designer.
The Extensions dialog is displayed.
-
Select the Extensions folder, then click the Add icon.
The Extension dialog is displayed.
-
In the Namespace field, enter the extension namespace to declare. This namespace must be different from the standard BPEL namespace.
-
If you want the extensions to be recognized by the BPEL process, select the Must Understand checkbox.
-
Click OK.
-
Click Close.
6.24.2 What Happens When You Create an Extension
After you complete your design, the .bpel process looks as shown in Example 6-111.