7 Installing the Software for an Enterprise Deployment
This chapter describes the software installations required for the Oracle WebCenter Content enterprise deployment reference topology. You install Oracle HTTP Server and then Oracle Fusion Middleware.
This chapter includes the following sections:
Note:
Before starting the setup process, read the Oracle Fusion Middleware Release Notes for your platform for additional installation and deployment information.7.1 Overview of the Software Installation Process
The enterprise deployment software installation is divided into two parts. The first part covers the required web tier installations, while the second part addresses the required Oracle Fusion Middleware components. Later chapters describe the required configuration steps to create the Oracle WebCenter Content reference topology.
Where to Obtain and Download the Software
For information about where to obtain the software, see "Obtain the Oracle Fusion Middleware Software" in the Oracle Fusion Middleware Installation Planning Guide.
Select one of the download locations and download Oracle WebCenter Content and Oracle SOA Suite. The ZIP archive files are saved to your system.
After you download each archive file, extract it into a directory of your choice on the machine where you are performing the installation.
Table 7-1 shows what software should be installed on each host or be accessible from each host.
7.2 Installing Oracle HTTP Server
This section covers these topics:
-
Section 7.2.1, "Prerequisites for Installing Oracle HTTP Server"
-
Section 7.2.2, "Installing Oracle HTTP Server on WEBHOST1 and WEBHOST2"
7.2.1 Prerequisites for Installing Oracle HTTP Server
Prior to installing Oracle HTTP Server (OHS), check that your machines meet the following requirements:
-
Ensure that the system, patch, kernel, and other requirements are met as specified in the Oracle Fusion Middleware Installation Guide for Oracle Web Tier.
-
Because Oracle HTTP Server is installed on port 7777 by default, you must make sure that port 7777 is not used by any service on the nodes. To check if this port is in use, run the following command before installing Oracle HTTP Server:
netstat -an | grep 7777
You must free port 7777 if it is in use.
-
On Linux platforms, if the
/etc/oraInst.locfile exists, check that its contents are correct. Specifically, check that the inventory is correct and that you have write permissions for that directory. If the/etc/oraInst.locfile does not exist, you can skip this step. -
Before starting the installation, make sure that the following environment variables are not set:
-
LD_ASSUME_KERNEL
-
ORACLE_INSTANCE
-
7.2.2 Installing Oracle HTTP Server on WEBHOST1 and WEBHOST2
As described in Chapter 4, "Preparing the File System for an Enterprise Deployment," you install Oracle Fusion Middleware in at least two storage locations for redundancy. Follow the same procedure to install Oracle HTTP Server on WEBHOST1 and on WEBHOST2.
To install Oracle HTTP Server on WEBHOST1 and WEBHOST2:
-
Start the installer for Oracle HTTP Server from the installation media:
./runInstaller
-
On the Specify Inventory Directory screen, perform the following steps:
-
Enter
/u02/oracle/oraInventoryon the local private storage volume mounted on each server node. -
Enter the OS group for the user performing the installation.
-
Click Next.
Follow the instructions on the screen to execute
createCentralInventory.shasroot.Click OK.
-
-
On the Welcome screen, click Next.
-
On the Install Software Updates screen, choose Skip Software Updates and click Next.
-
On the Select Installation Type screen, select Install Software - Do Not Configure, and click Next.
-
On the Prerequisite Checks screen, verify that all checks complete successfully, and click Next.
-
On the Specify Installation Location screen, specify the following values:
-
Oracle Middleware Home (installation location):
/u02/oracle/products/fmw_home -
Oracle Home Directory:
web_home
Click Next.
-
-
On the Specify Security Updates screen, choose whether you want to receive security updates from Oracle support and if you do, enter your email address.
-
On the Installation Summary screen, review the selections to ensure they are correct. If they are not, click Back to modify selections on previous screens. When you are ready, click Install.
On UNIX systems, if prompted to run the
oracleRoot.shscript, make sure you run it as therootuser.The Oracle HTTP Server software is installed.
-
On the Installation Completed screen, click Finish to exit.
-
Validate the installation by verifying that the following directories appear in the Middleware home directory after you install Oracle HTTP Server:
-
oracle_common -
web_home
-
7.3 Installing Oracle Fusion Middleware
This section describes how to install Oracle Fusion Middleware software in a Middleware home (MW_HOME) for the Oracle WebCenter Content enterprise deployment reference topology. The software components to be installed include Oracle JRockit, Oracle WebLogic Server, in the WebLogic Server home (WL_HOME), Oracle WebCenter Content, in the WebCenter Content Oracle home (WCC_ORACLE_HOME), and, optionally, Oracle SOA Suite, in the SOA Oracle home (SOA_ORACLE_HOME). As described in Chapter 4, "Preparing the File System for an Enterprise Deployment," you install Oracle Fusion Middleware in at least two storage locations for redundancy.
Note:
Before starting the setup process, read the Oracle Fusion Middleware Release Notes for your platform for additional installation and deployment information.This section covers these topics:
-
Section 7.3.2, "Installing Oracle JRockit in a Middleware Home"
-
Section 7.3.4, "Installing Oracle Fusion Middleware Components"
7.3.1 Creating a Middleware Home Directory
The Middleware home is where you can install Oracle Fusion Middleware products. The Middleware home (MW_HOME) contains the WebLogic Server home (WL_HOME), the Oracle Common home (ORACLE_COMMON_HOME), and, optionally, the JDK home (JAVA_HOME) and one or more Oracle homes for Oracle Fusion Middleware components and products, including Oracle WebCenter Content (WCC_ORACLE_HOME).
A Middleware home can reside on a local file system or on a remote shared disk that is accessible through Network File System (NFS).
Before you install the Oracle Fusion Middleware software, you need to create a Middleware home directory, as follows:
mkdir /u01/oracle/products/fmw_home/
7.3.2 Installing Oracle JRockit in a Middleware Home
To install Oracle JRockit in a Middleware home:
-
Download the version of Oracle JRockit for your platform from the Oracle Technology Network:
http://www.oracle.com/technetwork/middleware/jrockit/downloads/index.html
-
Add execute permissions to Oracle JRockit. For example:
chmod +x jrockit-1.6.0_29-R28.2.0-4.0.1-linux-x64.bin
-
Start the Oracle JRockit installer by issuing this command:
./jrockit-version.binFor example
./jrockit-1.6.0_29-R28.2.0-4.0.1-linux-x64.bin
-
On the Welcome Screen, click Next.
-
On the Choose Product Installation Directories screen, enter a Product Installation Directory value. This is the
JAVA_HOMEvalue, the path to a directory where Oracle JRockit will be installed inside your Middleware home. For example:/u01/oracle/products/fmw_home/JRockit_version -
On the Optional Components Screen, click Next.
-
On the Installation Complete screen, click Done.
7.3.3 Installing Oracle WebLogic Server
Follow the same procedure to install Oracle WebLogic Server on WCCHOST1 and on WCCHOST2.
To install Oracle WebLogic Server on WCCHOST1 or WCCHOST2:
-
To install Oracle WebLogic Server on WCCHOST1 and WCCHOST2 on a 64-bit UNIX operating system, use either of these commands:
JAVA_HOME/bin/java -jar wls103n_generic.jar

JAVA_HOME/bin/java -d64 -jar wls103n_generic.jar
To install Oracle WebLogic Server on WCCHOST1 and WCCHOST2 on a 32-bit UNIX operating system, start the installer for Oracle WebLogic Server like this:
$ ./wls1036_linux32.bin
-
On the Specify Inventory Directory screen, perform the following steps:
-
Enter
/u02/oracle/oraInventoryon the local private storage volume mounted on each server node (this is the recommended location). -
Enter the OS group for the user performing the installation.
-
Click Next.
Follow the instructions on the screen to execute
createCentralInventory.shasroot.Click OK.
-
-
On the Welcome screen, click Next.
-
On the Choose Middleware Home Directory screen, perform the following steps:
-
Select Create a new Middleware Home.
-
For Middleware Home Directory, enter /u01/oracle/products/fmw_home.
For more information, see Section 4.4, "Recommended Locations for Different Directories."
Click Next.
-
-
On the Register for Security Updates screen, enter your contact information so that you can be notified of security updates, and click Next.
-
On the Choose Install Type screen, select Custom, and click Next.
-
On the Choose Products and Components screen, click Next.
-
On the JDK Selection screen, select Oracle JRockit 1.6.0_version SDK, and click Next.
Note:
The examples documented in this guide use Oracle JRockit. Any certified version of Java can be used for this procedure and is fully supported unless otherwise noted. -
On the Choose Product Installation Directories screen, accept the directories ORACLE_BASE/product/fmw_home/wlserver_10.3 and ORACLE_BASE/product/fmw_home/coherence_3.7, and click Next.
-
On the Installation Summary screen, click Next.
The Oracle WebLogic Server software is installed.
-
On the Installation Complete screen, clear the Run Quickstart checkbox, and click Done.
-
Validate the installation by verifying that the following directories and files appear in the
MW_HOME/directory after installing Oracle WebLogic Server:-
coherence_version -
jrockit-jdk1.6.0_version -
modules -
registry.xml -
utils -
domain-registry.xml -
logs -
ocm.rsp -
registry.dat -
wlserver_10.3
-
7.3.4 Installing Oracle Fusion Middleware Components
This section covers these topics:
7.3.4.1 Installing Oracle WebCenter Content
When you install the Oracle WebCenter Content software, you install product bits for the following feature sets on your system:
-
Oracle WebCenter Content (WebCenter Content, which includes Oracle WebCenter Content Server)
-
Oracle WebCenter Content: Inbound Refinery
-
Oracle WebCenter Content: Imaging (which includes the Imaging Viewer Cache and AXF for BPEL)
-
Oracle WebCenter Enterprise Capture
-
Oracle WebCenter Content: Records
To install Oracle WebCenter Content on WCCHOST1 and WCCHOST2:
-
Start the installer for Oracle WebCenter Content:
wcc_media_loc/Disk1/runInstaller -jreLoc jre_locationIf you do not specify the JRE location, the installer either prompts you for the location or returns an error. If you get an error, retry the command with the JRE location included; for example,
MW_HOME/jrockit-jdk1.6.0_version. For more information, see Section 7.3.3, "Installing Oracle WebLogic Server." -
On the Welcome screen, click Next.
-
On the Install Software Updates screen, select Skip Software Updates, and click Next.
-
On the Prerequisite Checks screen, verify that all checks complete successfully, and click Next.
-
On the Specify Installation Location screen (Figure 7-1), provide the installation location for Oracle WebCenter Content. Select the previously installed Middleware home from the drop-down list. For the Oracle home directory, enter the directory name (
wcc_home).Click Next when you are done.
Figure 7-1 Specify Installation Location Screen in the Installation Wizard
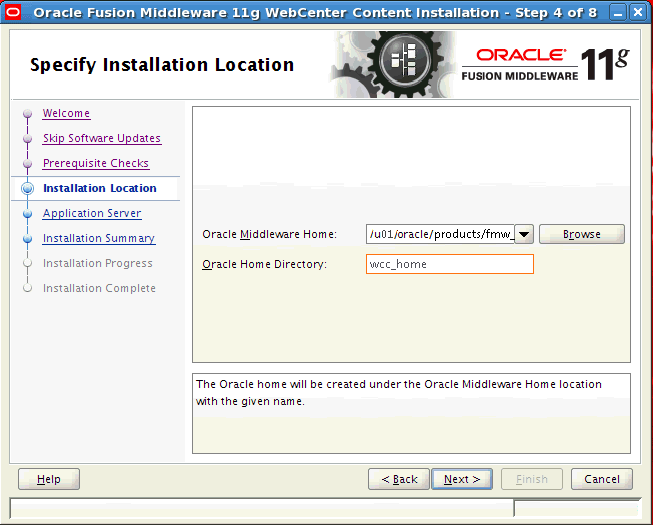
Description of "Figure 7-1 Specify Installation Location Screen in the Installation Wizard"
-
On the Application Server screen, make sure WebLogic Server is selected (which is the default), and click Next.
-
On the Installation Summary screen, click Install. The Oracle WebCenter Content software is installed.
-
On the Installation Complete screen, click Finish.
-
Validate the installation by verifying that the following directories and files appear in the
MW_HOME/directory after installing Oracle WebLogic Server, Oracle Fusion Middleware, and Oracle WebCenter Content:-
coherence_version -
jrockit-jdkversion -
modules -
oracle_common -
registry.xml -
utils -
domain-registry.xml -
logs -
ocm.rsp -
registry.dat -
wlserver_10.3 -
wcc
-
7.3.4.2 Installing Oracle SOA Suite
If you plan to use Oracle SOA Suite with Imaging, such as for the Oracle Application Extension Framework (AXF), you need to install and configure Oracle SOA Suite first. This section describes how to install it. For configuration information, see Section 12.3, "Extending the Domain for Oracle SOA Suite Components."
To install Oracle SOA Suite on WCCHOST1 and WCCHOST2:
-
On Linux platforms, if the
/etc/oraInst.locfile exists, check that its contents are correct. Specifically, check that the inventory directory (oraInventory) is correct and that you have write permissions for that directory. If the/etc/oraInst.locfile does not exist, you can skip this step. -
Start the installer for Oracle SOA Suite from the installation media:
soa_media_loc/Disk1/runInstaller -jreLoc jre_locationIf you do not specify the JRE location, the installer either prompts you for the location or returns an error. If you get an error, retry the command with the JRE location included; for example,
MW_HOME/jrockit-jdk1.6.0_version. For more information, see Section 7.3.3, "Installing Oracle WebLogic Server." -
On the Welcome screen, click Next.
-
On the Install Software Updates screen, select Skip Software Updates, and click Next.
-
On the Prerequisite Checks screen, verify that all checks complete successfully, and click Next.
-
On the Specify Installation Location screen (Figure 7-1), provide the installation location for Oracle SOA Suite. Select the previously installed Middleware home from the drop-down list. For the Oracle home directory, enter the directory name (
soa).Click Next when you are done.
-
On the Application Server screen, make sure WebLogic Server is selected (which is the default), and click Next.
-
On the Installation Summary screen, click Install.
The Oracle SOA Suite software is installed.
-
On the Installation Complete screen, click Finish.
-
Validate the installation by verifying that the following directories and files appear in the
MW_HOME/directory after installing Oracle WebLogic Server, Oracle Fusion Middleware, Oracle WebCenter Content, and Oracle SOA Suite:-
coherence_version -
jrockit-jdkversion -
modules -
oracle_common -
registry.xml -
utils -
domain-registry.xml -
logs -
ocm.rsp -
registry.dat -
soa -
wlserver_10.3 -
wcc
-