8 Creating a Domain for an Enterprise Deployment
This chapter describes how to create a domain using the Fusion Middleware Configuration Wizard, Oracle WebLogic Server Administration Console, and Oracle Enterprise Manager Fusion Middleware Control. You can extend the domain to add Oracle Fusion Middleware components: Oracle SOA Suite, Oracle WebCenter Content and, optionally, Oracle WebCenter Content: Imaging and Oracle WebCenter Content: Inbound Refinery. Later chapters describe how to extend the domain.
This chapter includes the following sections:
-
Section 8.3, "Running the Configuration Wizard on WCCHOST1 to Create a Domain"
-
Section 8.4, "Performing Postconfiguration and Verification Tasks for the Domain"
-
Section 8.5, "Reassociating the Domain with an OPSS Security Store in Oracle Database"
-
Section 8.6, "Verifying Manual Failover of the Administration Server"
-
Section 8.7, "Backing Up the WebLogic Server Domain Configuration"
Note:
Before starting the setup process, read the Oracle Fusion Middleware Release Notes for additional installation and deployment information.8.1 Overview of Creating a Domain
Table 8-1 lists the steps for creating an Oracle WebLogic Server domain, including postconfiguration tasks.
Table 8-1 Steps for Creating a WebLogic Server Domain
| Step | Description | More Information |
|---|---|---|
|
Enabling VIP1 on WCCHOST1 |
Enable ADMINVHN for the WCCHOST1 host |
|
|
Create a WebLogic Server Domain |
Run the Configuration Wizard to create a WebLogic Server domain. |
Section 8.3, "Running the Configuration Wizard on WCCHOST1 to Create a Domain" |
|
Perform postconfiguration and Verification Tasks |
Follow the instructions for postconfiguration and validation tasks. |
Section 8.4, "Performing Postconfiguration and Verification Tasks for the Domain" |
|
Reassociate the File-Based Security Store with an OPSS Database-Based Security Store |
Reassociate the default, file-based policy and credential store with an Oracle Platform and Security Services (OPSS) security store in Oracle Database 11.2.01 or later. |
Section 8.5, "Reassociating the Domain with an OPSS Security Store in Oracle Database" |
|
Verify Administration Server Failover |
Test the manual failover of the Administration Server from WCCHOST1 to WCCHOST2. |
Section 8.6, "Verifying Manual Failover of the Administration Server" |
|
Back Up the Domain |
Back up the newly configured WebLogic Server domain. |
Section 8.7, "Backing Up the WebLogic Server Domain Configuration" |
After this domain is created and configured, you can extend the domain to include Oracle WebCenter Content and Oracle SOA Suite components, as described in the next chapters.
8.2 Enabling VIP1 on WCCHOST1
This step is required for failover of the Administration Server, regardless of whether or not other Oracle Fusion Middleware components are installed later.
You are associating the Administration Server with a virtual host name (ADMINVHN). This virtual host name must be mapped to the appropriate virtual IP address (VIP1) by either a DNS Server or an entry in the custom /etc/hosts file. Check that ADMINVHN is available according to your name resolution system (DNS server or /etc/hosts) in the required nodes in your Oracle WebCenter Content topology. The virtual IP address (VIP1) that is associated to this Virtual Host Name (ADMINVHN) must be enabled on WCCHOST1.
Check that the virtual hosts are enabled as Table 8-2 shows. To enable the virtual IP address, see Section 6.6, "Enabling Virtual IP Addresses."
Table 8-2 Virtual Hosts for the Domain
| Virtual IP Address | Enabled on Host |
|---|---|
|
|
WCCHOST1 |
|
|
WCCHOST1 |
|
|
WCCHOST2 |
|
|
WCCHOST1 |
|
|
WCCHOST2 |
|
|
WCCHOST1 |
|
|
WCCHOST2 |
Note:
This is the DNS name associated with the floating IP address. It is not the DNS name of the virtual host configured on the load balancer.8.3 Running the Configuration Wizard on WCCHOST1 to Create a Domain
Run the Fusion Middleware Configuration Wizard from the Oracle Common home directory to create a domain containing the Administration Server. You will extend the domain to contain other components later.
To run the Configuration Wizard on WCCHOST1 to create a domain:
-
Ensure that the database where you installed the repository is running. For Oracle RAC databases, it is recommended that all instances are running, so that the validation checks later on becomes more reliable.
-
On WCCHOST1, change the directory to the location of the Fusion Middleware Configuration Wizard (created in Chapter 7, "Installing the Software for an Enterprise Deployment"):
cd ORACLE_COMMON_HOME/common/binIn the reference topology,
ORACLE_COMMON_HOMEis the/u01/oracle/products/fmw_home/oracle_commondirectory. -
Start the Configuration Wizard:
./config.sh
-
On the Welcome screen, select Create a new WebLogic Domain, and click Next.
-
The Select Domain Source screen opens (Figure 8-1).
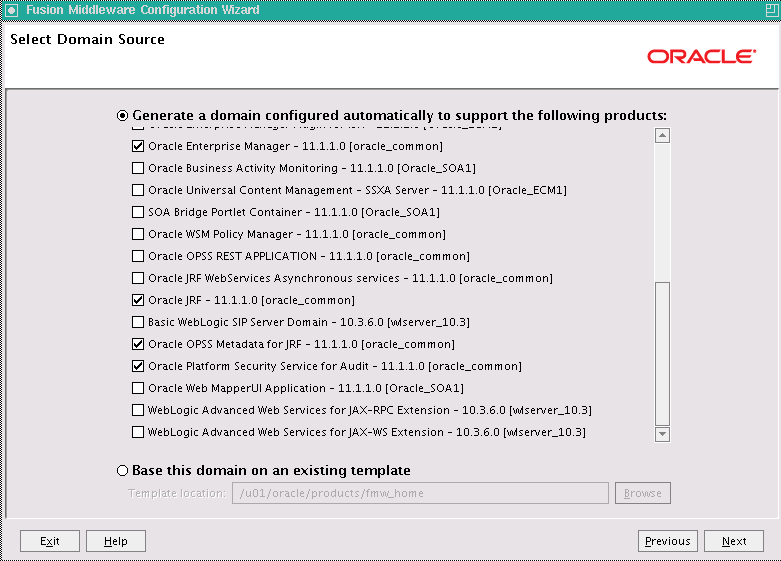
On the Select Domain Source screen, perform the following steps:
-
Select Generate a domain configured automatically to support the following products.
-
Select the following products:
-
Basic WebLogic Server Domain (this should be selected automatically)
-
Oracle Enterprise Manager
-
Oracle JRF (selected automatically)
-
Oracle OPSS Metadata for JRF
-
Oracle Platform Security Services for Audit
-
-
Click Next.
-
-
On the Specify Domain Name and Location screen, enter the name of the new domain, such as
WCCDomain, and the domain and applications directories:-
Domain name:
WCCDomain -
Domain location:
/u01/oracle/config/domains -
Application location:
/u01/oracle/config/applications
The Configuration Wizard adds a subdirectory with the domain name to the domain location, to make the
ASERVER_HOMEdirectory, and to the application location, to make theAPPLICATION_HOMEdirectory.Make sure that these directories match the directory and shared-storage mount points recommended in Chapter 4, "Preparing the File System for an Enterprise Deployment." The Managed Server domain directory for Oracle WebCenter Content should be under the local volume for each server.
Click Next.
-
-
On the Configure Administrator User Name and Password screen, enter the user name and password to be used for the domain's administrator.
Click Next.
-
On the Configure Server Start Mode and JDK screen, perform the following steps:
-
For WebLogic Domain Startup Mode, select Production Mode.
-
For JDK Selection, select JROCKIT SDK1.6.0_version.
Note:
The examples documented in this guide use Oracle JRockit. Any certified version of Java can be used for this procedure and is fully supported unless otherwise noted.Click Next.
-
-
On the Configure JDBC Component Schema screen (Figure 8-2), perform the following steps:
-
Select these schemas:
-
OPSS Schema
-
OPSS Audit Schema
-
OPSS Audit Viewer Schema
Figure 8-2 Configure JDBC Component Schema Screen for OPSS
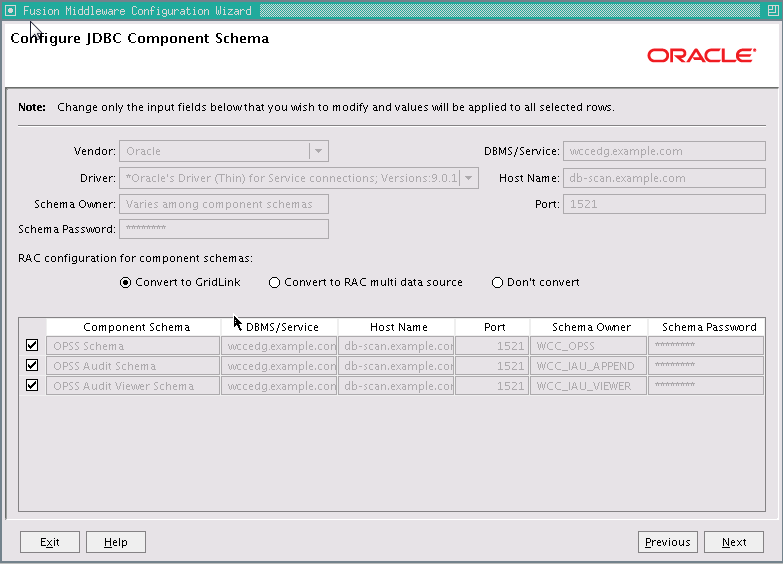
Description of "Figure 8-2 Configure JDBC Component Schema Screen for OPSS"
-
-
For the RAC configuration, you can select Convert to GridLink or Convert to RAC multi data source (described in Appendix A, "Using Multi Data Sources with Oracle RAC"). For the instructions given here, select Convert to GridLink.
After you select a RAC configuration, all selected schemas are grayed.
-
Click Next.
-
-
On the Configure GridLink RAC Component Schema screen (Figure 8-3), perform the following steps:
-
Make sure all three schema rows are selected.
Figure 8-3 Configure GridLink RAC Component Schema Screen for OPSS
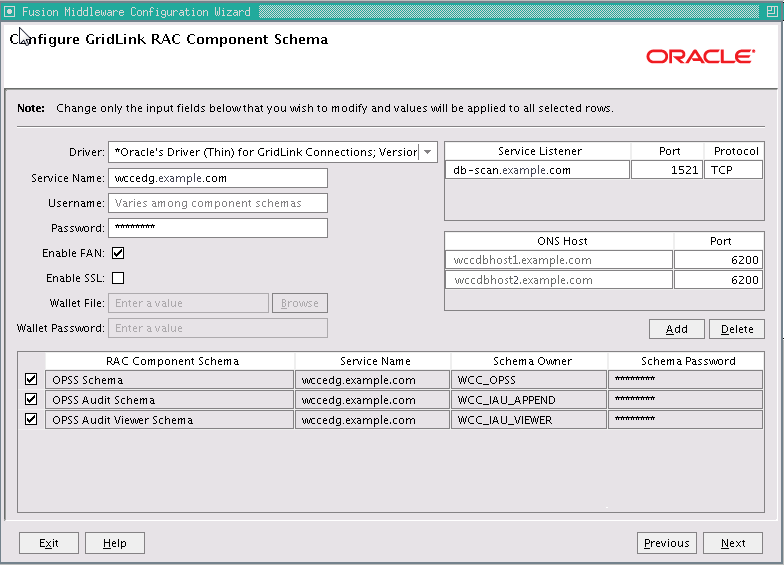
Description of "Figure 8-3 Configure GridLink RAC Component Schema Screen for OPSS"
-
Enter values for the following fields, specifying the connection information for the GridLink RAC database that was seeded through RCU:
-
Driver: Select Oracle's river (Thin) for GridLink Connections; Versions: 11 and later.
-
Service Name: Enter the service name of the Oracle RAC database in lowercase letters, followed by the domain name; for example,
wccedg.example.com. -
Username: Enter the complete user name for the database schema owner of the corresponding component.
This book uses
WCCas the prefix of user names for the database schemas. -
Password: Enter the password for the database schema owner.
-
Select Enable FAN.
-
Enable SSL: Leave this option deselected.
If you select SSL to enable Oracle Notification Service (ONS) notification encryption, provide the appropriate Wallet File and Wallet Password details.
-
Service listener: Enter the Oracle Single Client Access Name (SCAN) address and port for the Oracle RAC database being used. The protocol should be
TCP.Oracle recommends that you use a SCAN address to specify the Service Listener (and OSN Host) so you do not need to update a GridLink data source containing a SCAN address if you add or remove Oracle RAC nodes. To determine the SCAN address, query the
remote_listenerparameter in the database:SQL>show parameter remote_listener; NAME TYPE VALUE ----- ------ ------- remote_listener string db-scan.example.com:1521
Note:
For Oracle Database 11g, use the virtual IP address and port of each database instance listener, as in these examples:wccdbhost1-vip.example.com (port 1521) wccdbhost2-vip.example.com (1521)
For information about configuring multi data sources, see Appendix A, "Using Multi Data Sources with Oracle RAC."
-
ONS Host: Enter here also the SCAN address for the RAC database and the ONS remote port, as reported by the database:
[orcl@WCCDBHOST2~]$ srvctl config nodeapps -s
ONS exists: Local port 6100, remote port 6200, EM port 2016
Note:
For Oracle Database 11g, use the host name and port of each database's ONS service, as in these examples:wccdbhost1.example.com (port 6200) wccdbhost2.example.com (6200)
-
-
Click Next.
-
-
On the Test JDBC Component Schema screen (Figure 8-4), select all three schema rows, then click Test Connections.
The Connection Results Log displays the results. Ensure that the connection to the database that contains the schema was successful. If not, click Previous to return to the previous screen, correct your entry, and then retry the test.
Figure 8-4 Test JDBC Component Schema Screen for OPSS
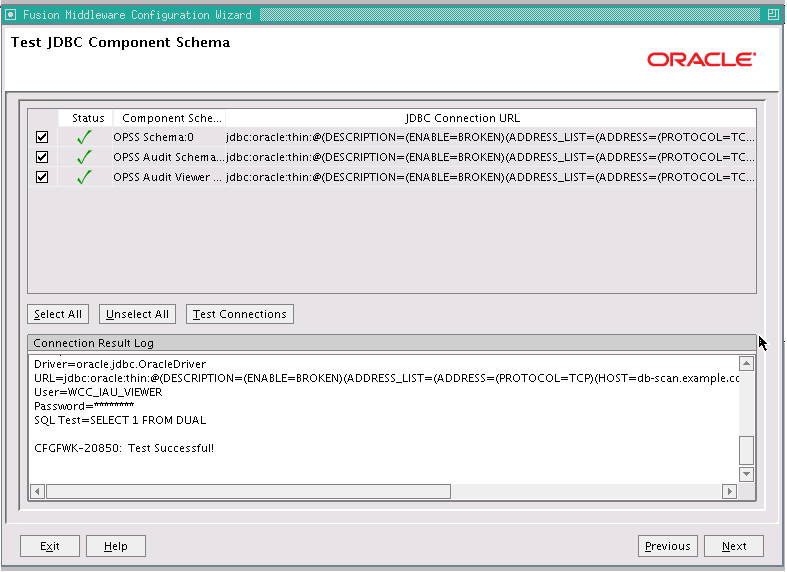
Description of "Figure 8-4 Test JDBC Component Schema Screen for OPSS"
Click Next when the connection is successful.
-
On the Select Optional Configuration screen, select the following:
-
Administration Server
-
Managed Servers, Clusters and Machines
Click Next.
-
-
On the Configure the Administration Server screen, enter the following values:
-
Name:
AdminServer -
Listen address:
ADMINVHN. -
Listen port:
7001 -
SSL listen port:
N/A -
SSL enabled: Leave this checkbox unselected.
Click Next.
-
-
On the Configure Managed Servers screen, click Next.
-
On the Configure Clusters screen, click Next.
-
On the Configure Machines screen, open the Unix Machine tab and then click Add to add the following machine.
Table 8-3 Machine for the Administration Server
Name Node Manager Listen Address ADMINHOST
localhost
Leave all other fields set to their default values. The machine name does not need to be a valid host name or listen address; it is just a unique identifier of a Node Manager location.
Note:
The Node Manager listen address for ADMINHOST must point tolocalhostbecauselocalhostis the relative internal address for whatever machine is active. The Node Manager instance associated with the Administration Server changes when the Administration Server fails over because the Administration Server uses thelocalhostattribute in conjunction with the first host and then again, after failover, in conjunction with the second host.Click Next.
-
On the Assign Servers to Machines screen, assign the Administration Server to a machine as follows:
-
ADMINHOST:
-
AdminServer
-
Click Next.
-
-
On the Configuration Summary screen, click Create.
-
On the Create Domain screen, click Done.
8.4 Performing Postconfiguration and Verification Tasks for the Domain
After configuring the domain with the Configuration Wizard, follow these instructions for postconfiguration and verification.
The section includes the following topics:
-
Section 8.4.1, "Creating boot.properties for the Administration Server on WCCHOST1"
-
Section 8.4.3, "Starting the Administration Server on WCCHOST1"
-
Section 8.4.4, "Validating the Administration Server Configuration"
-
Section 8.4.6, "Copying the Domain Registry File to the Middleware Home on WCCHOST2"
8.4.1 Creating boot.properties for the Administration Server on WCCHOST1
Create a boot.properties file for the Administration Server on WCCHOST1. This file enables the Administration Server to start without prompting you for the administrator user name and password.
To create a boot.properties file for the Administration Server on WCCHOST1:
-
Create the following directory structure on WCCHOST1:
mkdir -p ASERVER_HOME/servers/AdminServer/securityIn the reference topology,
ASERVER_HOMEis the/u01/oracle/config/domains/WCCDomaindirectory. -
In a text editor, create a file called
boot.propertiesin the directory created in the previous step, and enter the following lines into the file:username=admin_user password=admin_password
The values of
admin_userandadmin_password, are the user name and password of the WebLogic Server domain administrator.Note:
When you start the Administration Server, the user name and password entries in the file get encrypted. You start the Administration Server in Section 8.4.3, "Starting the Administration Server on WCCHOST1." For security reasons, you want to minimize the time the entries in the file are left unencrypted. After you edit the file, you should start the server as soon as possible so that the entries get encrypted. -
Save the file, and close the editor.
8.4.2 Starting Node Manager on WCCHOST1
To start Node Manager on WCCHOST1, set the StartScriptEnabled property to true, and then start Node Manager using startNodeManager.sh.
To start Node Manager on WCCHOST1:
-
Run the
setNMProps.shscript, which is located in theORACLE_COMMON_HOME/common/bindirectory, to set theStartScriptEnabledproperty totruebefore starting Node Manager:cd ORACLE_COMMON_HOME/common/bin ./setNMProps.sh File nodemanager.properties not found. Copying required properties file.In the reference topology,
ORACLE_COMMON_HOMEis the/u01/oracle/products/fmw_home/oracle_commondirectory. -
Start Node Manager:
cd WL_HOME/server/bin

export JAVA_OPTIONS=-DDomainRegistrationEnabled=true

nohup ./startNodeManager.sh > nm.out&
In the reference topology,
WL_HOMEis the/u01/oracle/products/fmw_home/wlserver_10.3directory.Note:
It is important to set the-DDomainRegistrationEnabled=trueparameter whenever Node Manager is started, to manage the Administration Server. If there is no Administration Server on the machine and the machine is not an Administration Server failover node, then you can start Node Manager with the following script (without theexportcommand).nohup ./startNodeManager.sh > nm.out&
8.4.3 Starting the Administration Server on WCCHOST1
The Administration Server is started and stopped using Node Manager. However, the first start of the Administration Server with Node Manager requires changing the default user name and password that the Fusion Middleware Configuration Wizard set for Node Manager. You must therefore use the start script for the Administration Server for the first start. In the following procedure, steps 1 through 4 are required for the first start; all subsequent starts require only step 4.
To start the Administration Server on WCCHOST1:
-
On WCCHOST1, start the Administration Server using the start script in the domain directory:
cd ASERVER_HOME/bin

./startWebLogic.sh
In the reference topology,
ASERVER_HOMEis the/u01/oracle/config/domains/WCCDomaindirectory. -
Use the Administration Console to update the Node Manager credentials:
-
Open a web browser and go to
http://ADMINVHN:7001/console. -
Log in as
weblogic. -
Click Lock & Edit.
-
Click domain_name, then Security, and then General, and expand the Advanced options at the bottom.
-
Enter a new user name for Node Manager, or make a note of the existing one, and update the Node Manager password.
-
Save and activate the changes.
-
-
Stop the WebLogic Server Administration Server by issuing the command
stopWebLogic.shlocated under theASERVER_HOME/bindirectory.Alternatively, you can stop the Administration Server process either by using Ctrl+C in the shell where it was started or by the standard process identification and
killcommands in the operating system. -
Start the Oracle WebLogic Scripting Tool (WLST), connect to Node Manager with
nmconnectand the credentials set in the previous steps, and start the Administration Server usingnmstart:cd ORACLE_COMMON_HOME/common/bin ./wlst.shIn the reference topology,
ORACLE_COMMON_HOMEis the/u01/oracle/products/fmw_home/oracle_commondirectory.Once in the WLST shell, execute the following commands (make sure Node Manager is up and running):
wls:/offline>nmConnect("node_admin_user","node_admin_password", "WCCHOST1","5556", "domain_name","ASERVER_HOME") wls:/nm/domain_name> nmStart("AdminServer")
Notes:
-
WCCHOST1 is the address of the node where the domain was created, not the listen address of the Administration Server.
-
The values of
node_admin_userandnode_admin_passwordare the Node Manager credentials that were updated in Step 2e. Independent from the server administrator ID and password, the Node Manager administrator user name and password are used only to authenticate connections between Node Manager and clients. These credentials are stored in theASERVER_HOME/config/nodemanager/nm_password.propertiesfile.
8.4.4 Validating the Administration Server Configuration
To ensure that the Administration Server for the domain you have created is properly configured, validate the configuration by logging in to the WebLogic Server Administration Console and verifying the Administration Server is listed, and then log in to Oracle Enterprise Manager Fusion Middleware Control.
To verify that the Administration Server is properly configured:
-
Open a Web browser and go to
http://ADMINVHN:7001/console. -
Log in as the administrator.
-
Check that you can access Fusion Middleware Control at
http://ADMINVHN:7001/em. -
Log in to Fusion Middleware Control with the user name and password you specified in Section 8.4.1, "Creating boot.properties for the Administration Server on WCCHOST1."
The Administration Server should be up and running.
8.4.5 Disabling Host Name Verification
This step is required if you have not set up the appropriate certificates to authenticate the different nodes with the Administration Server (see Chapter 16, "Setting Up Node Manager for an Enterprise Deployment"). If you have not configured the server certificates, you will receive errors when managing the different WebLogic Server instances. To avoid these errors, disable host name verification for the Administration Server and each Managed Server while setting up and validating the topology, and enable it again once the enterprise deployment topology configuration is complete, as described in Chapter 16, "Setting Up Node Manager for an Enterprise Deployment."
You can disable host name verification for a server as soon as it is up and running, starting with the Administration Server.
To disable host name verification:
-
Log in to the WebLogic Server Administration Console.
-
Click Lock & Edit.
-
In the Domain Structure tree on the left, expand the Environment node.
-
Click Servers.
-
On the Summary of Servers page, click the name of the Administration Server in the Names column of the Servers table.
-
On the settings page for the server, click the SSL tab.
-
Expand the Advanced section of the page.
-
Set Hostname Verification to
None. -
Click Save.
-
Save and activate the changes.
-
This change requires a restart of Node Manager and the Administration Server:
-
Stop the Administration Server with Node Manager, using the following command:
wls:/nm/domain_name>nmKill("AdminServer") -
Stop Node Manager by stopping the process associated with it.
If it is running in the foreground in a shell, use Ctrl+C.
If it is running in the background in the shell, find the associated process and use the
killcommand to stop it. For example:ps -ef | grep NodeManager orcl 9139 9120 0 Mar03 pts/6 00:00:00 /bin/sh ./startNodeManager.sh kill -9 9139
-
Start Node Manager:
cd WL_HOME/server/bin nohup ./startNodeManager.sh > nm.out&In the reference topology,
WL_HOMEis the/u01/oracle/products/fmw_home/wlserver_10.3directory. -
Start the Administration Server again, as follows:
-
Start the Oracle WebLogic Scripting Tool (WLST):
cd ORACLE_COMMON_HOME/common/bin

./wlst.sh
In the reference topology,
ORACLE_COMMON_HOMEis the/u01/oracle/products/fmw_home/oracle_commondirectory. -
In the WLST shell, connect to Node Manager with the
nmConnectcommand and the Node Manager credentials (make sure Node Manager is up and running), and start Node Manager and the Administration Server usingnmStart:wls:/offline>nmConnect("node_admin_user","node_admin_password", "WCCHOST1","5556", "domain_name","ASERVER_HOME") wls:/nm/domain_name> nmStart("AdminServer")The values of
node_admin_userandnode_admin_passwordare the Node Manager credentials. For more information about the credentials, see Section 8.4.3, "Starting the Administration Server on WCCHOST1."In the reference topology,
ASERVER_HOMEis the/u01/oracle/config/domains/WCCDomaindirectory.
-
-
8.4.6 Copying the Domain Registry File to the Middleware Home on WCCHOST2
As explained in Chapter 4, "Preparing the File System for an Enterprise Deployment," the Middleware home on WCCHOST2 is on a separate storage volume (local to WCCHOST2) to provide maximum redundancy for the installation binaries volume. The domain-registry.xml file created on WCCHOST1 during creation of the Administration Server domain is not created on WCCHOST2. You need to copy this file from WCCHOST1.
To copy the domain registry file from the Middleware home on WCCHOST1 to the Middleware home on WCCHOST2:
-
Go to the Middleware home directory on WCCHOST1.
cd MW_HOMEIn the reference topology,
MW_HOMEis the/u01/oracle/products/fmw_homedirectory. -
Copy the
domain-registry.xmlfile to the Middleware home on WCCHOST2, with the following command:scp domain-registry.xml oracle@WCCHOST2:MW_HOME/ -
Copy the
nodemanger.domainsfile from WCCHOST1 to WCCHOST2, with the following command:scp WL_HOME/common/nodemanager/nodemanager.domains oracle@WCCHOST2:WL_HOME/common/nodemanager/In the reference topology,
WL_HOMEis the/u01/oracle/products/fmw_home/wlserver_10.3directory.
8.5 Reassociating the Domain with an OPSS Security Store in Oracle Database
An OPSS security store is the repository of system and application-specific policies, credentials, and keys. This centralization facilitates the administration and maintenance of policy, credential, and key data. Oracle Fusion Middleware allows using different types of security stores for an Oracle WebLogic Server domain. A domain can use a security store based on an XML file (the default), Oracle Database, or Oracle Internet Directory.
For the enterprise deployment topology, a centralized security store is required for policies, credentials, and keys. Oracle recommends that you reassociate the security store for your Oracle WebCenter Content domain with an OPSS security store in Oracle Database 11g Release 2 (11.2).
Reassociating the OPSS security store consists of relocating the policy, credential, and key stores from one repository to another one. Reassociation changes the repository, preserving the integrity of the data stored. For each security artifact, reassociation searches the target store and if it finds a match, updates the matching artifact; otherwise, it creates a new artifact.
The source can be file-based, database-based, or LDAP-based (through a Lightweight Directory Application Protocol provider). The target can be database-based or LDAP-based. The only type of LDAP target supported is Oracle Internet Directory, and the only type of database target supported is Oracle Database 11.2.0.1 or later. For more information about using Oracle Internet Directory, see Section 18.2, "Reassociating the Identity Store with an External LDAP Authentication Provider."
For this operation, You can use either Oracle Enterprise Manager Fusion Middleware Control or the Oracle WebLogic Scripting Tool (WLST) reassociateSecurityStore command, as the following instructions describe.
8.5.1 Preparing to Reassociate the Domain with a Database-Based OPSS Security Store
Before you reassociate the OPSS security store, you need to back up your configuration files, verify that the OPSS schema was created correctly, and create an OPSS data source.
8.5.1.1 Backing Up Configuration Files
To be safe, before you change the OPSS security store, you should back up the relevant configuration files:
-
Back up the domain configuration files:
ASERVER_HOME/WCCDomain/config/config.xml ASERVER_HOME/WCCDomain/config/fmwconfig/jps-config.xml ASERVER_HOME/WCCDomain/config/fmwconfig/system-jazn-data.xml
In the reference topology,
ASERVER_HOMEis the/u01/oracle/config/domains/WCCDomaindirectory. -
Back up the
boot.propertiesfile for the Administration Server:ASERVER_HOME/servers/AdminServer/security/boot.properties
8.5.1.2 Verifying the OPSS Schema in Oracle Database
Before you reassociate the OPSS security store, you need to verify that the OPSS schema was created in Oracle Database by the Repository Creation Utility (RCU), as described in Section 5.4, "Creating Database Schemas."
To verify the OPSS schema in Oracle Database:
-
Log in to SQL*Plus:
ORACLE_HOME/bin/sqlplus sys/password as SYSDBA SQL>
In the reference topology,
ORACLE_HOMEis the/u01/oracle/products/fmw_home/wcc_homedirectory. -
Invoke the following SQL*Plus command to verify that the database schema has been properly created:
SQL>desc WCC_OPSS.jps_dn; Name Null? Type ----------------------------------------- -------- ---------------------------- ENTRYID NOT NULL NUMBER RDN NOT NULL VARCHAR2(1024) PARENTDN NOT NULL VARCHAR2(1024) SQL>
8.5.2 Reassociating the File-Based OPSS Security Store with a Database-Based OPSS Security Store
To reassociate the domain's default, file-based OPSS security store with a database-based OPSS security store:
-
From WCCHOST1, start the
wlstshell:cd ORACLE_COMMON_HOME/common/bin ./wlst.shIn the reference topology,
ORACLE_COMMON_HOMEis the/u01/oracle/products/fmw_home/oracle_commondirectory. -
Connect to the WebLogic Server Administration Server using the following
wlst connectcommand.Syntax:
connect("admin_user","admin_password","t3://hostname:port")For example:
wls:/offline> connect ("weblogic","welcome1","t3://ADMINVHN:7001") Connecting to t3://ADMINVHN:7001 with userid weblogic ... Successfully connected to Admin Server 'AdminServer' that belongs to domain 'WCCDomain'. Warning: An insecure protocol was used to connect to the server. To ensure on-the-wire security, the SSL port or Admin port should be used instead. -
Run the
reassociateSecurityStorecommand, as follows:Syntax:
reassociateSecurityStore(domain="domain_name",servertype="DB_ORACLE",datasourcename="opss_datasource_name", jpsroot="cn=jpsroot_wcc")
For example:
wls:/WCCDomain/serverConfig> reassociateSecurityStore(domain="WCCDomain",servertype="DB_ORACLE",datasourcename="jdbc/OPSSDBDS", jpsroot="cn=jpsroot_wcc")
Output from the command follows:
Location changed to domainRuntime tree. This is a read-only tree with DomainMBean as the root. For more help, use help(domainRuntime) Starting policy store reassociation. The store and ServiceConfigurator setup done. Schema is seeded into the store Data is migrated to the store. Check logs for any failures or warnings during migration. Data in the store after migration has been tested to be available Update of in-memory jps configuration is done Policy store reassociation done. Starting credential store reassociation The store and ServiceConfigurator setup done. Schema is seeded into the store Data is migrated to the store. Check logs for any failures or warnings during migration. Data in the store after migration has been tested to be available Update of in-memory jps configuration is done Credential store reassociation done Starting Keystore reassociation The store and ServiceConfigurator setup done. Schema is seeded into the store Data is migrated to the store. Check logs for any failures or warnings during migration. Data in the store after migration has been tested to be available Update of in-memory jps configuration is done Keystore reassociation done Starting audit store reassociation The store and ServiceConfigurator setup done. Schema is seeded into the store Data is migrated to the store. Check logs for any failures or warnings during migration. Data in the store after migration has been tested to be available Update of in-memory jps configuration is done Audit store reassociation done Jps Configuration has been changed. Please restart the application server. wls:/WCCDomain/serverConfig>
-
Restart the Administration Server after the command completes successfully, as follows:
-
Start the Oracle WebLogic Scripting Tool (WLST):
cd ORACLE_COMMON_HOME/common/bin ./wlst.sh -
Stop the Administration Server, using either the Administration Console or, as follows, the Node Manager
nmKillcommand:wls:/nm/domain_name>nmKill("AdminServer") -
Start the Administration Server using
nmstart:wls:/nm/domain_name> nmStart("AdminServer")
Note:
The Administration Server log will contain some OPSSS audit warning messages that are benign, and you can safely ignore them. -
-
Validate the reassociation of the security store:
-
Log in to Oracle Enterprise Manager Fusion Middleware Control for the new domain, at this URL (in the reference topology):
http://ADMINVHN:7001/em
-
Expand WebLogic Domain, and click WCCDomain.
-
From the WebLogic Domain menu on the WCCDomain page, choose Security and then Security Provider Configuration.
-
In the Security Stores table on the Security Provider Configuration page, verify that the value in the Store Type column is Oracle Database, as Figure 8-5 shows.
Figure 8-5 Oracle Database Security Provider
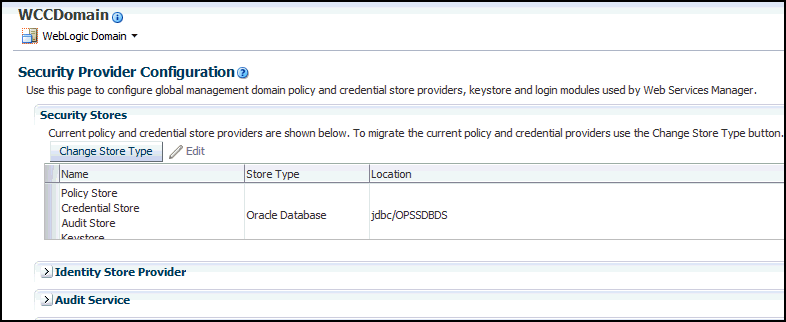
Description of "Figure 8-5 Oracle Database Security Provider"
-
8.6 Verifying Manual Failover of the Administration Server
After configuring the domain, test failover by following the steps in Section 19.8, "Verifying Manual Failover of the Administration Server."
8.7 Backing Up the WebLogic Server Domain Configuration
After you have verified that the domain is working, perform a backup to save your domain configuration. This is a quick backup for the express purpose of immediate restore in case of problems with the steps for extending the domain in later chapters. The backup destination is the local disk. This backup can be discarded once the enterprise deployment setup is complete. At that point, the regular deployment-specific backup and recovery process can be initiated.
The Oracle Fusion Middleware Administrator's Guide provides further details about backups. For information on describing the Oracle HTTP Server data that must be backed up and restored, refer to the "Backup and Recovery Recommendations for Oracle HTTP Server" section in that guide. For information on how to recover components, see the "Recovery of Components" and "Recovery After Loss of Component" sections in the guide. For recommendations specific to recovering from the loss of a host, see the "Recovering Oracle HTTP Server to a Different Host" section in the guide. For information about database backups, see the Oracle Database Backup and Recovery User's Guide.
To back up the installation and configuration at this point:
-
Stop the Administration Server and back up its domain directory to save your domain configuration. The configuration files all exist in the
ASERVER_HOMEdirectory. Run the following command on WCCHOST1 to create the backup:tar -cvpf edgdomainback.tar ASERVER_HOMEIn the reference topology,
ASERVER_HOMEis the/u01/oracle/config/domains/WCCDomaindirectory.To stop the Administration Server, use the WLST
nmKillcommand:-
Start the Oracle WebLogic Scripting Tool (WLST):
cd ORACLE_COMMON_HOME/common/bin

./wlst.sh
In the reference topology,
ORACLE_COMMON_HOMEis the/u01/oracle/products/fmw_home/oracle_commondirectory. -
In the WLST shell, connect to Node Manager with the
nmConnectcommand and the Node Manager credentials (make sure Node Manager is up and running):wls:/offline>nmConnect("node_admin_user","node_admin_password", "WCCHOST1","5556", "domain_name","ASERVER_HOME")The values of
node_admin_userandnode_admin_passwordare the Node Manager credentials. For more information about the credentials, see Section 8.4.3, "Starting the Administration Server on WCCHOST1." -
Stop the Administration Server, using the
nmKillcommand:wls:/nm/domain_name>nmKill("AdminServer")
-
-
Back up the database. This is a full database backup (either hot or cold) using Oracle Recovery Manager (recommended) or operating system tools such as tar for cold backups if possible.
-
Start the Administration Server using
nmstart:wls:/nm/domain_name> nmStart("AdminServer")