15 Installing and Configuring the WebCenter Content User Interface
This chapter describes how to install and configure an Oracle WebCenter Content Managed Server with the WebCenter Content user interface. This interface, for Oracle WebCenter Content Server, is based on the Oracle Application Development Framework (Oracle ADF).
This chapter includes the following sections:
-
Section 15.1, "About Installing and Configuring the WebCenter Content User Interface"
-
Section 15.2, "Preparing to Install and Configure the WebCenter Content User Interface"
-
Section 15.3, "Installing an 11.1.1.6.0 Middleware Home with Oracle ADF 11.1.2"
-
Section 15.4, "Installing the WebCenter Content User Interface Application"
-
Section 15.5, "Deploying the WebCenter Content User Interface Application to a New Domain"
-
Section 15.7, "Accessing the WebCenter Content User Interface"
-
Section 15.8, "Configuring Oracle HTTP Server with the WebCenter Content User Interface Cluster"
15.1 About Installing and Configuring the WebCenter Content User Interface
You can configure Content Server with the WebCenter Content user interface in addition to the native 11g user interface, which Content Server uses by default. The WebCenter Content user interface resides in a separate domain from Content Server and runs on a different port, 16225 by default.
This separate domain requires its own Middleware home, which can reside on the same machine as the Middleware home for Content Server or on a separate machine. You could choose to have multiple instances of the WebCenter Content user interface server interact with the same Oracle WebCenter Content Server (previously known as Oracle UCM Content Server).
For a diagram of the WebCenter Content user interface domain topology, see Figure 1-2.
This chapter uses the following terminology:
-
The first Middleware home contains Oracle WebCenter Content and is referred to as the Oracle WebCenter Content Middleware home (
MW_HOMEin directory paths). -
The first domain contains WebCenter Content and is referred to as the Oracle WebCenter Content domain (WCCDomain). This domain is associated with the Oracle WebCenter Content Middleware home.
-
The second Middleware home contains the WebCenter Content user interface and is referred to as the WebCenter Content user interface Middleware home (
WCCUI_MW_HOMEin directory paths). -
The second domain contains the WebCenter Content user interface and is referred to as the WebCenter Content user interface domain (
WCCUIDomain). This domain is associated with the WebCenter Content user interface Middleware home.
The WebCenter Content user interface domain requires its own Middleware home because changes are made to the Oracle ADF stack that are specifically required for the WebCenter Content user interface.
The two Middleware homes and domains can reside on the same host or on different hosts. The only additional requirement to run both domains on the same host is to use a different Administration Server port for each domain.
To install the WebCenter Content user interface and configure it for Content Server, you need to perform the tasks that the following sections describe.
15.2 Preparing to Install and Configure the WebCenter Content User Interface
Before you can install and configure the WebCenter Content User Interface, you need to install and configure Oracle WebCenter Content 11gR1 and, optionally, Inbound Refinery, as the previous chapters of this book describe.
All of the operations in this section pertain to the Oracle WebCenter Content Middleware home and, therefore, the Oracle WebCenter Content domain (WCCDomain).
Configure Oracle WebCenter Content Server as follows:
-
Section 15.2.1, "Enabling WebCenter Content User Interface Components"
This configuration is required for using the WebCenter Content user interface.
-
Section 15.2.2, "Setting up the Remote Intradoc Client (RIDC)"
This configuration is required for using the WebCenter Content user interface.
-
Section 15.2.3, "Setting Additional Content Server Parameters"
This configuration is optional, to set up additional configuration variables and the search engine for Content Server.
-
Section 15.2.4, "Enabling Full-Text Searching"
This configuration is optional, to set up Oracle Text Search.
-
Section 15.2.5, "Generating Thumbnails and Web-Viewable Renditions"
This configuration is optional, to enhance the WebCenter Content user interface experience.
-
Section 15.2.6, "Configuring Extended Features in Content Server"
This configuration is optional, to set up standard Content Server features.
-
Section 15.8.1, "Configuring Oracle HTTP Server for the WLS_WCCUI Managed Servers"
This configuration is required to set up Oracle HTTP Server.
-
Section 15.8.2, "Validating Access Through the Load Balancer"
This validation is required to test the earlier configuration.
15.2.1 Enabling WebCenter Content User Interface Components
Before you can use the WebCenter Content user interface, you must enable these Content Server components: AutoSuggestConfig, DynamicConverter, and FrameworkFolders. You can enable them through the Content Server Component Manager interface, as follows:
-
Log in to Content Server as a WebCenter Content administrator.
-
From the Administration tray or menu, choose Admin Server, then Component Manager.
-
On the Component Manager page, select all three components under WebCenter Content UI Components:
-
AutoSuggestConfig
-
DynamicConverter
-
FrameworkFolders
-
-
Click Update, and then click OK to confirm enabling the components.
-
Restart the WebCenter Content Managed Servers (WLS_WCC1 and WLS_WCC2), using the WebLogic Server Administration Console (stop and then start).
15.2.2 Setting up the Remote Intradoc Client (RIDC)
The WebCenter Content user interface uses the IDC socket protocol to communicate with Content Server. To enable this communication, you must set the IntradocServerPort and SocketHostAddressSecurityFilter values in the ASERVER_HOME/WCC_Cluster/cs/config/config.cfg configuration file for Content Server, in the Oracle WebCenter Content domain.
In the reference topology, ASERVER_HOME is the /u01/oracle/config/domains/WCCDomain directory.
The following syntax shows how to set these values:
IntradocServerPort=port_number
SocketHostAddressSecurityFilter=IP addresses of permitted UI hosts separated by a bar symbol (|)
AlwaysReverseLookupForHost=Yes
For example:
IntradocServerPort=4444
SocketHostNameSecurityFilter=localhost|localhost.example.com|WEBHOST1|WEBHOST2|
WCCHOST1|WCCHOST2||WCCUIHOST1|WCCUIHOST2|ucminternal.example.com|
load-balancer-host-name
AlwaysReverseLookupForHost=Yes
For more information about the config.cfg file, see "The config Directory" in Oracle Fusion Middleware Developing with Oracle WebCenter Content.
15.2.3 Setting Additional Content Server Parameters
For the WebCenter Content user interface, you can also set Content Server parameters for folders and searching.
To set additional Content Server parameters:
-
From the Content Server Administration menu or tray, choose Admin Server and then General Configuration.
-
Select the Enable Accounts checkbox.
-
In the Additional Configuration Variables area, add the following parameters, if not set already, to go in the
config.cfgfile:-
FoldersIndexParentFolderValues=trueThis parameter enables you to search for content within folders, including subfolders.
-
FldEnforceFolderFileNameUniqueness=trueThis parameter prevents folders from having a child folder with the same name as a child document.
-
FldEnforceCaseInsensitiveNameUniqueness=trueThis parameter makes name-uniqueness checks for folder and file names case-insensitive. It also makes path resolution case-insensitive.
-
SearchIndexerEngineName=OracleTextSearchorSearchIndexerEngineName=DATABASE.METADATAThis parameter enables OracleTextSearch full-text searching or database metadata searching, instead of the default database full-text searching.
-
-
Restart the WLS_WCC Managed Servers.
15.2.4 Enabling Full-Text Searching
For full-text searching, you need to rebuild the Content Server index using OracleTextSearch (SearchIndexerEngineName=ORACLETEXTSEARCH parameter).
To enable full-text searching in the WebCenter Content user interface:
-
Access Content Server with the native user interface:
http://WCCHOST1:16200/cs
-
From the Administration menu or tray, choose Admin Applets and then Repository Manager.
-
Click the Indexer tab.
-
Under Collection Rebuild Cycle, click the Start button.
-
Deselect Use Fast Rebuild.
-
Click the OK button.
15.2.5 Generating Thumbnails and Web-Viewable Renditions
If you want to obtain thumbnail images and web-viewable renditions of files from the WebCenter Content user interface, you can configure Inbound Refinery to provide them. You can set up an Inbound Refinery provider for thumbnails and file conversions, such as PDF Export, through the native 11g user interface.
To configure thumbnails in Content Server:
-
Access Content Server with the native user interface:
http://WCCHOST1:16200/cs
-
From the Administration menu or tray, choose Configure Thumbnail Options.
-
Select Enable this server to create the thumbnail images box.
-
Click the Update button.
For more information about generating thumbnails and web-viewable renditions, see "Configuring Inbound Refinery" in Oracle Fusion Middleware Managing Oracle WebCenter Content.
15.2.6 Configuring Extended Features in Content Server
Some Content Server features are supported but not necessarily required by the WebCenter Content user interface. For example, Access Control Lists (ACLs) and Accounts are not configured out of the box. If these features are enabled on Content Server, however, the WebCenter Content user interface provides access to the additional functionality.
For information about enabling ACLs in Content Server, see "Managing Access Control List Security" in Oracle Fusion Middleware Administering Oracle WebCenter Content.
For information about enabling Accounts in Content Server, see "Managing Accounts" in Oracle Fusion Middleware Administering Oracle WebCenter Content.
These standard Content Server settings are not specific to the WebCenter Content user interface. For information about other extended features in Content Server, see Oracle Fusion Middleware Administering Oracle WebCenter Content.
15.3 Installing an 11.1.1.6.0 Middleware Home with Oracle ADF 11.1.2
Install Oracle Application Development Framework (Oracle ADF) 11gR1 (11.1.2) in an 11gR1 (11.1.1.6.0) Middleware home with Oracle WebLogic Server. This will include installing Oracle WebLogic Server 11gR1 (10.3.6 only) to create the Middleware home followed by installing Oracle ADF and then two Oracle ADF OPatch files. If your site is going to use Oracle WebCenter Content: Desktop with the WebCenter Content user interface, you also need to install a patch to support compatibility mode in Desktop 11.1.1.9.
Note:
You need to follow these steps exactly to enable the WebCenter Content user interface for Content Server 11.1.1.9. Even if you have Oracle Application Development Framework 11gR1 (11.1.2) available, you cannot use it for the WebCenter Content user interface 11.1.1.6.0 domain. Instead, you need to install Oracle ADF 11.1.1.6.0 and then upgrade it with patches to Oracle ADF 11.1.2.4.0, as the following instructions describe.All the operations in this section pertain to the WebCenter Content user interface Middleware home and, therefore, to the WebCenter Content user interface domain. In the following commands, WCCUI_MW_HOME refers to the WebCenter Content user interface Middleware home, which includes the Oracle ADF installation.
For the WebCenter Content user interface domain, perform these steps on both hosts, WCCUIHOST1 and WCCUIHOST2:
-
Install Oracle WebLogic Server 11gR1 (10.3.6) to create a Middleware home. This will be the WebCenter Content user interface Middleware home (
WCCUI_MW_HOME).In the reference topology,
WCCUI_MW_HOMEis the/u01/oracle/products/fmw_homedirectory. -
Install Oracle Application Development Framework 11gR1 (11.1.1.6.0) in
WCCUI_MW_HOME):-
Obtain the Oracle Application Development Framework 11gR1 (11.1.1.6.0) media, as described in "Software Downloads for Oracle WebCenter Content Installation and Configuration" in Oracle Fusion Middleware Installing and Configuring Oracle WebCenter Content.
-
Unzip the ZIP file containing Oracle ADF to a temporary location,
media_loc. -
Run the installer, using the following command:
media_loc/Disk1/runInstaller -jreLoc WCCUI_MW_HOME/jrockit_160_24_D1.1.2-4
-
-
Obtain the Oracle Application Development Framework 11gR1 (11.1.2.4.0) OPatch 16546129 (
p16546129_111160_Generic.zip) from My Oracle Support (formerly OracleMetaLink) athttps://support.oracle.com. -
Unzip the patch ZIP file into a temporary folder,
temp_location, and then run the following command:WCCUI_MW_HOME/oracle_common/OPatch/opatch apply -jre WCCUI_JAVA_HOME/jre -oh WCCUI_MW_HOME/oracle_common/ temp_location/16546129
In the reference topology,
WCCUI_JAVA_HOMEis the/u01/oracle/products/fmw_home/jrockit_160_24_D1.1.2-4directory (the location of the JDK). -
Obtain the Oracle Application Development Framework 11gR1 (11.1.2) OPatch 16546157 (
p16546157_111160_generic.zip) fromhttps://support.oracle.com. -
Unzip the patch ZIP file into a temporary folder,
temp_location, and run the following command:WCCUI_MW_HOME/oracle_common/OPatch/opatch apply -jre WCCUI_JAVA_HOME/jre -oh WCCUI_MW_HOME/oracle_common/ temp_location/16546157
-
(Optional) For MDS customizing of the WebCenter Content user interface, obtain patch number 16020846, version 11.1.2.4.0 (
p16020846_111240_Generic.zip), fromhttps://support.oracle.com. -
(Optional) Unzip the patch ZIP file into a temporary folder,
temp_location, and run the following command:WCCUI_MW_HOME/oracle_common/OPatch/opatch apply -jre WCCUI_JAVA_HOME/jre -oh WCCUI_MW_HOME/oracle_common/ temp_location/16020846
-
(Optional) For Internet Explorer 11 renditions, obtain patch number 19469801, version 11.1.2.4.0 (
p19469801_111240_Generic.zip), fromhttps://support.oracle.com. -
(Optional) Unzip the patch ZIP file into a temporary folder,
temp_location, and run the following command:WCCUI_MW_HOME/oracle_common/OPatch/opatch apply -jre WCCUI_JAVA_HOME/jre -oh WCCUI_MW_HOME/oracle_common/ temp_location/19469801
-
(Optional) For Oracle ADF Help, obtain patch number 18102108, version 11.1.2.4.0 (
p18102108_111240_Generic.zip), fromhttps://support.oracle.com. -
(Optional) Unzip the patch ZIP file into a temporary folder,
temp_location, and run the following command:WCCUI_MW_HOME/oracle_common/OPatch/opatch apply -jre WCCUI_JAVA_HOME/jre -oh WCCUI_MW_HOME/oracle_common/ temp_location/18102108
15.4 Installing the WebCenter Content User Interface Application
You need to install the WebCenter Content User Interface application on WCCHOST1 and on WCCHOST2. The WebCenter Content user interface artifacts are in a ZIP file called WccADFUI.zip, which you can obtain from the WebCenter Content Oracle home in the Oracle WebCenter Content (first) Middleware home. The file location is WCC_ORACLE_HOME/ucm/Distribution/WccADFUI/WccADFUI.zip.
In the reference topology, WCC_ORACLE_HOME is the /u01/oracle/products/fmw_home/wcc_home directory on WCCHOST1 or WCCHOST2.
The WccADFUI.zip file includes these WebCenter Content user interface artifacts:
-
The application EAR file,
WccAdf.ear -
The domain extension configuration template
-
Custom Oracle Weblogic Scripting Tool (WLST) commands for managing the connections to Oracle WebCenter Content Server
-
Support scripts for deployment and management of the application
To install the WebCenter Content user interface application, perform these steps on WCCHOST1 and on WCCHOST2:
-
Create the directory
WCCUI_MW_HOME/oracle_common/webcenter/wccadfin the WebCenter Content user interface (second) Middleware home.In the reference topology,
WCCUI_MW_HOMEis the/u01/oracle/products/fmw_homedirectory on WCCUIHOST1 or WCCUIHOST2. -
Copy the
WCC_ORACLE_HOME/ucm/Distribution/WccADFUI/WccADFUI.zipfile to theWCCUI_MW_HOME/oracle_common/webcenter/wccadfdirectory. -
Expand the ZIP file in the
WCCUI_MW_HOME/oracle_common/webcenter/wccadfdirectory.
15.5 Deploying the WebCenter Content User Interface Application to a New Domain
You need to deploy the WebCenter Content user interface application to a new WebLogic Server domain on WCCUIHOST1 and copy the domain configuration to WCCUIHOST2 before you can use the application with the Content Server application in the Oracle WebCenter Content domain. After configuration of both domains is complete, you can use either the WebCenter Content user interface or the native 11g user interface with Content Server.
Note:
All of the operations in this section pertain to the WebCenter Content user interface Middleware home and, therefore, to the WebCenter Content user interface domain.To deploy the WebCenter Content user interface application to a new domain, you need to perform these tasks:
-
Running the Configuration Wizard on WCCUIHOST1 to Create a Domain
-
Performing Postconfiguration and Verification Tasks for the Domain
-
Registering the WCCUI Managed Servers with MDS and Creating a Metadata Partition
-
Propagating the Domain Configuration to WLS_WCCUI1 and WLS_WCCUI2
-
Associating the WebCenter Content User Interface with Content Server
15.5.1 Registering the MDS Repository
To register the Oracle Metadata Services (MDS) repository in the WebCenter Content user interface application, perform these steps on WCCHOST1:
-
Run WLST from the WebCenter Content user interface Middleware home:
WCCUI_MW_HOME/oracle_common/common/bin/wlst.shIn the reference topology,
WCCUI_MW_HOMEis the/u01/oracle/products/fmw_homedirectory. -
Run the following commands in offline mode:
wls:/offline> archive = getMDSArchiveConfig('WCCADF_EAR_LOCATION')

wls:/offline> archive.setAppMetadataRepository(repository='mds-mds_repo_name', partition='partition_name', type='DB', jndi='jdbc/mds/mds_repo_name')

wls:/offline> archive.save()
In the
getMDSArchiveConfigcommand,WCCADF_EAR_LOCATIONis the directory where theWccADFUI.zipfile was expanded,WCCUI_MW_HOME/oracle_common/webcenter/wccadfin the reference topology.In the
archive.setAppMetadataRepositorycommand,mds_repo_nameis the name of the repository, andpartition_nameis a name for the partition to be created.
For example:
archive =
getMDSArchiveConfig('/u01/oracle/products/fmwhome/ADFMW/oracle_common/webcenter/wccadf/WccAdf.ear')
archive.setAppMetadataRepository(repository='mds-WCCUIMDSREPO', partition='MDS_PARTITION', type='DB', jndi='jdbc/mds/WCCUIMDSREPO')
archive.save()
15.5.2 Running the Configuration Wizard on WCCUIHOST1 to Create a Domain
To run the Fusion Middleware Configuration Wizard on WCCUIHOST1 to create a domain:
-
In the WebCenter Content user interface Middleware home, copy the WebCenter Content user interface domain template,
oracle.ucm.cs_adf_template_11.1.1.jar, from theWCCUI_MW_HOME/oracle_common/webcenter/wccadfdirectory to the following directory:WCCUI_MW_HOME/oracle_common/common/templates/applicationsIn the reference topology,
WCCUI_MW_HOMEis the/u01/oracle/products/fmw_homedirectory. -
Run the Configuration Wizard in the WebCenter Content user interface Middleware home:
WCCUI_MW_HOME/oracle_common/common/bin/config.sh -
On the Welcome screen, select Create a new WebLogic Domain, and click Next.
-
The Select Domain Source screen opens (Figure 15-1).
Figure 15-1 Select Domain Source for the WebCenter Content User Interface
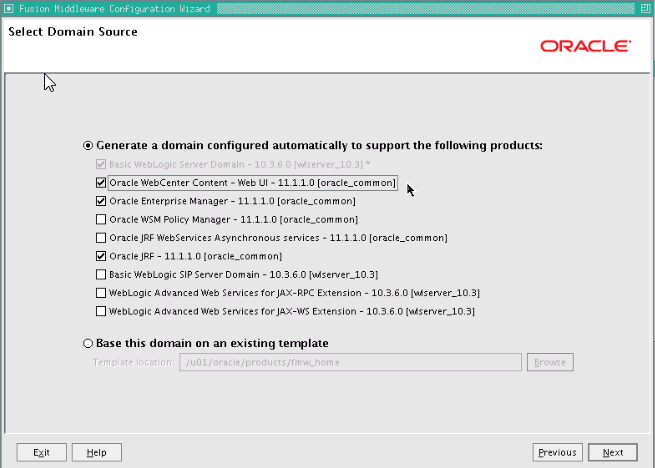
Description of "Figure 15-1 Select Domain Source for the WebCenter Content User Interface"
On the Select Domain Source screen, perform the following steps:
-
Select Generate a domain configured automatically to support the following products.
-
Select the following products:
-
Basic WebLogic Server Domain (this should be selected automatically)
-
Oracle WebCenter Content - Web UI
-
Oracle Enterprise Manager (selected automatically)
-
Oracle JRF (selected automatically)
-
-
Click Next.
-
-
On the Specify Domain Name and Location screen, enter the name of the new domain, such as
WCCUIDomain, and the domain and applications directories:-
Domain name:
WCCUIDomain -
Domain location:
/u01/oracle/config/domains -
Application location:
/u01/oracle/config/applications
The Configuration Wizard adds a subdirectory with the domain name to the domain location, to make the
WCCUI_ASERVER_HOMEdirectory, and to the application location, to make theWCCUI_APPLICATION_HOMEdirectory.Make sure that these directories match the directory and shared-storage mount points recommended in Chapter 4, "Preparing the File System for an Enterprise Deployment." The Managed Server domain directory for WebCenter Content user interface should be under the local volume for each server.
Click Next.
-
-
On the Configure Administrator User Name and Password screen, enter the user name and password to be used for the domain's administrator.
Click Next.
-
On the Configure Server Start Mode and JDK screen, perform the following steps:
-
For WebLogic Domain Startup Mode, select Production Mode.
-
For JDK Selection, select JROCKIT SDK1.6.0_version.
Note:
The examples documented in this guide use Oracle JRockit. Any certified version of Java can be used for this procedure and is fully supported unless otherwise noted.Click Next.
-
-
On the Select Optional Configuration screen, select the following:
-
Administration Server
-
Managed Servers, Clusters and Machines
-
Deployments and Services
Click Next.
-
-
On the Configure the Administration Server screen, enter the following values:
-
Name:
AdminServer -
Listen address:
WCCUIADMINVHN. -
Listen port:
7001The default port number for the Administration Server is
7001. If you are configuring the WebCenter Content user interface domain on the same machine as the Oracle WebCenter Content domain, use a different port number. -
SSL listen port:
N/A -
SSL enabled: Leave this checkbox unselected.
Click Next.
-
-
On the Configure Managed Servers screen, configure WLS_WCCUI1 and WLS_WCCUI2 as Figure 15-2 shows.
Figure 15-2 Configuration Screen for WLS_WCCUI Managed Servers
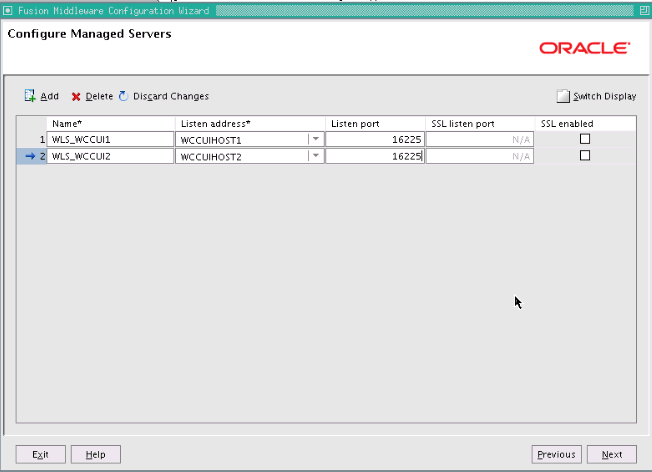
Description of "Figure 15-2 Configuration Screen for WLS_WCCUI Managed Servers"
Click Next.
-
On the Configure Clusters screen, configure WCCUI_Cluster as Figure 15-3 shows.
Figure 15-3 Configure Clusters Screen for WCCUI_Cluster
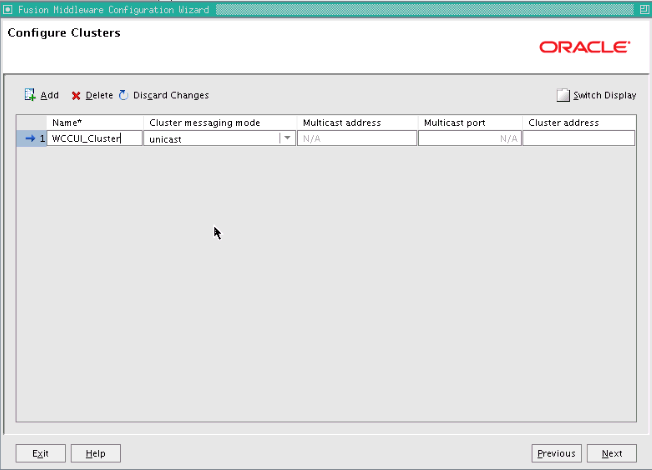
Description of "Figure 15-3 Configure Clusters Screen for WCCUI_Cluster"
Click Next.
-
On the Assign Servers to Clusters screen, assign each Managed Server to WCCUI_Cluster, as Figure 15-4 shows.
Figure 15-4 Assign Managed Servers to WCCUI_Cluster
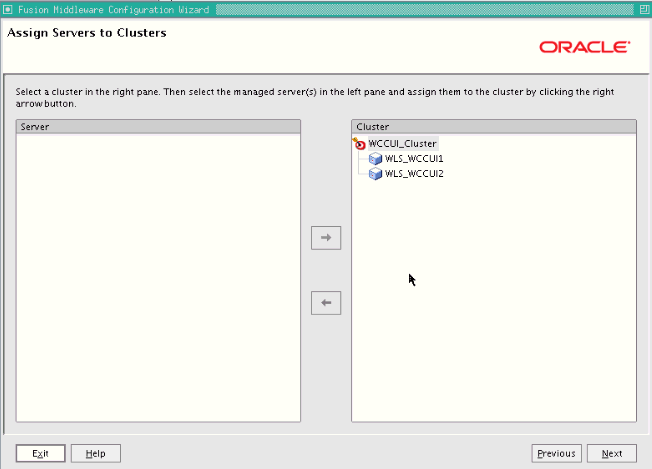
Description of "Figure 15-4 Assign Managed Servers to WCCUI_Cluster"
Click Next.
-
On the Configure Machines screen, open the Unix Machine tab and then click Add to add the WCCUIADMINHOST, WCCUIHOST1, and WCCUIHOST2 machines, configured as Figure 15-5 shows.
Figure 15-5 Configure Machines Screen for WCCUI Hosts
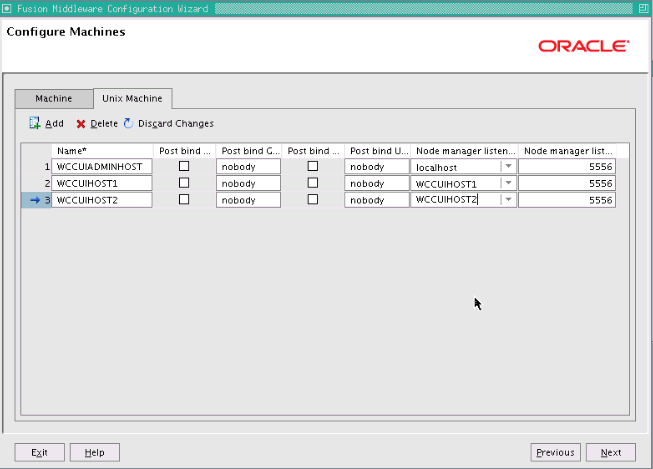
Description of "Figure 15-5 Configure Machines Screen for WCCUI Hosts"
The machine names do not need to be a valid host names or listen addresses. Each name is a unique identifier of a Node Manager location.
Note:
The virtual host machine for the Administration Server must point tolocalhostbecauselocalhostis the relative internal address for whatever machine is active. The Node Manager instance associated with the Administration Server changes when the Administration Server fails over because the Administration Server uses thelocalhostattribute in conjunction with the first host and then again, after failover, in conjunction with the second host.Click Next.
-
On the Assign Servers to Machines screen, assign the Administration Server and Managed Servers to a machines as Figure 15-6 shows.
Figure 15-6 Assign WCCUI Servers to Machines
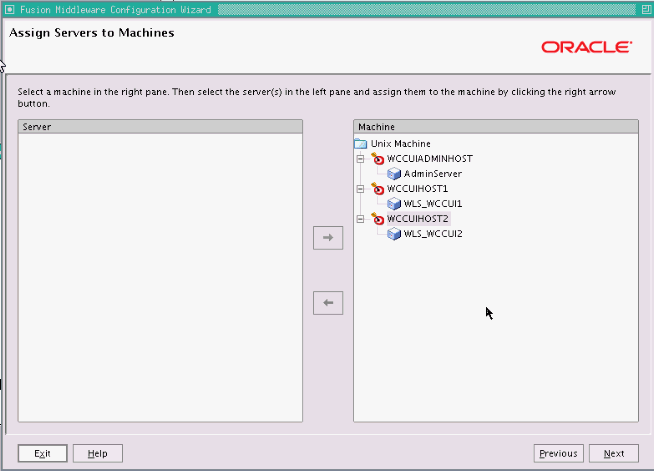
Description of "Figure 15-6 Assign WCCUI Servers to Machines"
Click Next.
-
On the Target Deployments to Clusters or Servers screen, click Next.
-
On the Target Services to Clusters or Servers screen, click Next.
-
On the Configuration Summary screen, click Create.
-
On the Create Domain screen, click Done.
This procedure will create a new domain and a Managed Server for the WebCenter Content user interface application. You will not need any data sources to be set up for this application.
15.5.3 Performing Postconfiguration and Verification Tasks for the Domain
After configuring the domain with the Configuration Wizard, follow these instructions for postconfiguration and verification.
The section includes the following topics:
-
Section 15.5.3.1, "Upgrading the Oracle ADF Shared Libraries to Sherman Update 2"
-
Section 15.5.3.2, "Creating boot.properties for the Administration Server on WCCUIHOST1"
-
Section 15.5.3.4, "Starting the Administration Server on WCCUIHOST1"
-
Section 15.5.3.5, "Validating the Administration Server Configuration"
-
Section 15.5.3.7, "Copying the Domain Registry File to the Middleware Home on WCCUIHOST2"
15.5.3.1 Upgrading the Oracle ADF Shared Libraries to Sherman Update 2
To upgrade the Oracle ADF shared libraries in the WebCenter Content user interface domain to Sherman Update 2:
-
-
Run WLST from the
WCCUI_ORACLE_COMMON_HOME/common/bindirectory, as shown in the following example:cd /u01/oracle/products/fmw_home/oracle_common/common/bin ./wlst.sh Initializing WebLogic Scripting Tool (WLST) ... Welcome to WebLogic Server Administration Scripting Shell Type help() for help on available commands wls:/offline>
In the reference topology,
WCCUI_ORACLE_COMMON_HOMEis the/u01/oracle/products/fmw_home/oracle_commondirectory. -
Run the following command in offline mode:
wls:/offline> upgradeADF('WCCUI_ASERVER_HOME');For example:
wls:/offline> upgradeADF('/u01/oracle/config/domains/WCCUIDomain')
Target Library "jsf#2.0@1.0.0.0_2-0-2" to JRF "WCCUI_Cluster"
Target Library "jsf#2.0@1.0.0.0_2-0-2" to JRF "AdminServer"
In the reference topology,
WCCUI_ASERVER_HOMEis the/u01/oracle/config/domains/WCCUIDomaindirectory.
-
15.5.3.2 Creating boot.properties for the Administration Server on WCCUIHOST1
Create a boot.properties file for the Administration Server on WCCUIHOST1. This file enables the Administration Server to start without prompting you for the administrator user name and password.
To create a boot.properties file for the Administration Server on WCCUIHOST1:
-
Create the following directory structure on WCCUIHOST1:
mkdir -p WCCUI_ASERVER_HOME/servers/AdminServer/securityIn the reference topology,
WCCUI_ASERVER_HOMEis the/u01/oracle/config/domains/WCCUIDomaindirectory. -
In a text editor, create a file called
boot.propertiesin the directory created in the previous step, and enter the following lines into the file:username=admin_user password=admin_password
The values of
admin_userandadmin_password, are the user name and password of the WebLogic Server domain administrator.Note:
When you start the Administration Server, the user name and password entries in the file get encrypted. You start the Administration Server in Section 15.5.3.4, "Starting the Administration Server on WCCUIHOST1." For security reasons, you want to minimize the time the entries in the file are left unencrypted. After you edit the file, you should start the server as soon as possible so that the entries get encrypted. -
Save the file, and close the editor.
15.5.3.3 Starting Node Manager on WCCUIHOST1
To start Node Manager on WCCUIHOST1, set the StartScriptEnabled property to true, and then start Node Manager using startNodeManager.sh.
To start Node Manager on WCCUIHOST1:
-
Run the
setNMProps.shscript, which is located in theWCCUI_ORACLE_COMMON_HOME/common/bindirectory, to set theStartScriptEnabledproperty totruebefore starting Node Manager:cd WCCUI_ORACLE_COMMON_HOME/common/bin ./setNMProps.shIn the reference topology,
WCCUI_ORACLE_COMMON_HOMEis the/u01/oracle/products/fmw_home/oracle_commondirectory. -
Start Node Manager:
cd WCCUI_WL_HOME/server/bin

export JAVA_OPTIONS=-DDomainRegistrationEnabled=true

nohup ./startNodeManager.sh > nm.out&
In the reference topology,
WCCUI_WL_HOMEis the/u01/oracle/products/fmw_home/wlserver_10.3directory.Note:
It is important to set the-DDomainRegistrationEnabled=trueparameter whenever Node Manager is started, to manage the Administration Server. If there is no Administration Server on the machine and the machine is not an Administration Server failover node, then you can start Node Manager with the following script (without theexportcommand).nohup ./startNodeManager.sh > nm.out&
15.5.3.4 Starting the Administration Server on WCCUIHOST1
The Administration Server is started and stopped using Node Manager. However, the first start of the Administration Server with Node Manager requires changing the default user name and password that the Fusion Middleware Configuration Wizard set for Node Manager. You must therefore use the start script for the Administration Server for the first start. In the following procedure, steps 1 through 4 are required for the first start; all subsequent starts require only step 4.
To start the Administration Server on WCCUIHOST1:
-
On WCCUIHOST1, start the Administration Server using the start script in the domain directory:
cd WCCUI_ASERVER_HOME/bin

./startWebLogic.sh
In the reference topology,
WCCUI_ASERVER_HOMEis the/u01/oracle/config/domains/WCCUIDomaindirectory. -
Use the Administration Console to update the Node Manager credentials:
-
Open a web browser and go to
http://WCCUIADMINVHN:7001/console. -
Log in as
weblogic. -
Click Lock & Edit.
-
Click domain_name, then Security, and then General, and expand the Advanced options at the bottom.
-
Enter a new user name for Node Manager, or make a note of the existing one, and update the Node Manager password.
-
Save and activate the changes.
-
-
Stop the WebLogic Server Administration Server by issuing the command
stopWebLogic.shlocated in theWCCUI_ASERVER_HOME/bindirectory.Alternatively, you can stop the Administration Server process either by using Ctrl+C in the shell where it was started or by the standard process identification and
killcommands in the operating system. -
Start the Oracle WebLogic Scripting Tool (WLST), connect to Node Manager with
nmconnectand the credentials set in the previous steps, and start the Administration Server usingnmstart:cd WCCUI_ORACLE_COMMON_HOME/common/bin ./wlst.shIn the reference topology,
WCCUI_ORACLE_COMMON_HOMEis the/u01/oracle/products/fmw_home/oracle_commondirectory.Once in the WLST shell, execute the following commands (make sure Node Manager is up and running):
wls:/offline>nmConnect("node_admin_user","node_admin_password", "WCCUIHOST1","5556", "domain_name","WCCUI_ASERVER_HOME") wls:/nm/domain_name> nmStart("AdminServer")
Notes:
-
WCCUIHOST1 is the address of the node where the domain was created, not the listen address of the Administration Server.
-
The values of
node_admin_userandnode_admin_passwordare the Node Manager credentials that were updated in Step 2e. Independent from the server administrator ID and password, the Node Manager administrator user name and password are used only to authenticate connections between Node Manager and clients. These credentials are stored in theWCCUI_ASERVER_HOME/config/nodemanager/nm_password.propertiesfile.
15.5.3.5 Validating the Administration Server Configuration
To ensure that the Administration Server for the domain you have created is properly configured, validate the configuration by logging in to the WebLogic Server Administration Console and verifying the Administration Server is listed, and then log in to Oracle Enterprise Manager Fusion Middleware Control.
To verify that the Administration Server is properly configured:
-
Open a Web browser and go to
http://WCCUIADMINVHN:7001/console. -
Log in as the administrator.
-
Check that you can access Fusion Middleware Control at
http://WCCUIADMINVHN:7001/em. -
Log in to Fusion Middleware Control with the user name and password you specified in Section 15.5.3.2, "Creating boot.properties for the Administration Server on WCCUIHOST1."
The Administration Server should be up and running.
15.5.3.6 Disabling Host Name Verification
This step is required if you have not set up the appropriate certificates to authenticate the different nodes with the Administration Server (see Chapter 16, "Setting Up Node Manager for an Enterprise Deployment"). If you have not configured the server certificates, you will receive errors when managing the different WebLogic Server instances. To avoid these errors, disable host name verification for the Administration Server and each Managed Server while setting up and validating the topology, and enable it again once the enterprise deployment topology configuration is complete, as described in Chapter 16, "Setting Up Node Manager for an Enterprise Deployment."
You can disable host name verification for a server as soon as it is up and running, starting with the Administration Server.
To disable host name verification:
-
Log in to the WebLogic Server Administration Console.
-
Click Lock & Edit.
-
In the Domain Structure tree on the left, expand the Environment node.
-
Click Servers.
-
On the Summary of Servers page, click the name of a server in the Names column of the Servers table.
-
On the settings page for the server, click the SSL tab.
-
Expand the Advanced section of the page.
-
Set Hostname Verification to
None. -
Click Save.
-
Save and activate the changes.
-
This change requires a restart of Node Manager and the Administration Server:
-
Stop the Administration Server with Node Manager, using the following command:
wls:/nm/domain_name>nmKill("AdminServer") -
Stop Node Manager by stopping the process associated with it.
If it is running in the foreground in a shell, use Ctrl+C.
If it is running in the background in the shell, find the associated process and use the
killcommand to stop it. For example:ps -ef | grep NodeManager orcl 9139 9120 0 Mar03 pts/6 00:00:00 /bin/sh ./startNodeManager.sh kill -9 9139
-
Start Node Manager:
cd WCCUI_WL_HOME/server/bin nohup ./startNodeManager.sh > nm.out&In the reference topology,
WCCUI_WL_HOMEis the/u01/oracle/products/fmw_home/wlserver_10.3directory. -
Start the Administration Server again, as follows:
-
Start the Oracle WebLogic Scripting Tool (WLST):
cd WCCUI_ORACLE_COMMON_HOME/common/bin

./wlst.sh
In the reference topology,
WCCUI_ORACLE_COMMON_HOMEis the/u01/oracle/products/fmw_home/oracle_commondirectory. -
In the WLST shell, connect to Node Manager with the
nmConnectcommand and the Node Manager credentials (make sure Node Manager is up and running), and start Node Manager usingnmStart:wls:/offline>nmConnect("node_admin_user","node_admin_password", "WCCUIHOST1","5556","domain_name","WCCUI_ASERVER_HOME")The values of
node_admin_userandnode_admin_passwordare the Node Manager credentials. For more information about these credentials, see Section 15.5.3.4, "Starting the Administration Server on WCCUIHOST1."In the reference topology,
WCCUI_ASERVER_HOMEis the/u01/oracle/config/domains/WCCUIDomaindirectory. -
Start the Administration Server using
nmStart:wls:/nm/domain_name> nmStart("AdminServer")
-
-
15.5.3.7 Copying the Domain Registry File to the Middleware Home on WCCUIHOST2
As explained in Chapter 4, "Preparing the File System for an Enterprise Deployment," the Middleware home on WCCUIHOST2 is on a separate storage volume (local to WCCUIHOST2) to provide maximum redundancy for the installation binaries volume. The domain-registry.xml file created on WCCUIHOST1 during creation of the Administration Server domain is not created on WCCUIHOST2. You need to copy this file from WCCUIHOST1.
To copy the domain registry file from the Middleware home on WCCUIHOST1 to the Middleware home on WCCUIHOST2:
-
Go to the Middleware home directory on WCCUIHOST1.
cd WCCUI_MW_HOMEIn the reference topology,
WCCUI_MW_HOMEis the/u01/oracle/products/fmw_homedirectory. -
Copy the
domain-registry.xmlfile to the Middleware home on WCCUIHOST2, with the following command:scp domain-registry.xml oracle@WCCUIHOST2:WCCUI_MW_HOME -
Copy the
nodemanger.domainsfile from WCCUIHOST1 to WCCUIHOST2, with the following command:scp WCCUI_WL_HOME/common/nodemanager/nodemanager.domains oracle@WCCUIHOST2:WCCUI_WL_HOME/common/nodemanager/In the reference topology,
WCCUI_WL_HOMEis the/u01/oracle/products/fmw_home/wlserver_10.3directory.
15.5.4 Registering the WCCUI Managed Servers with MDS and Creating a Metadata Partition
You can register the WCCUI Managed Servers with the Oracle Metadata Services (MDS) Repository through Oracle Enterprise Manager Fusion Middleware Control or through the WebLogic Server Scripting Tool (WLST).
To register the WCCUI Managed Servers with the MDS repository and create the metadata partition through Fusion Middleware Control:
-
Go to Oracle Enterprise Manager Fusion Middleware Control at
http://ADMINVHN:7001/em. -
Log in to Fusion Middleware Control with the user name and password you specified in Section 15.5.3.2, "Creating boot.properties for the Administration Server on WCCUIHOST1."
-
Under WebLogic Domain on the left, click WCCUI Domain, then choose Metadata Repositories from the WebLogic Domain menu, as Figure 15-7 shows.
Figure 15-7 WebLogic Domain Menu on WCCUIDomain Page
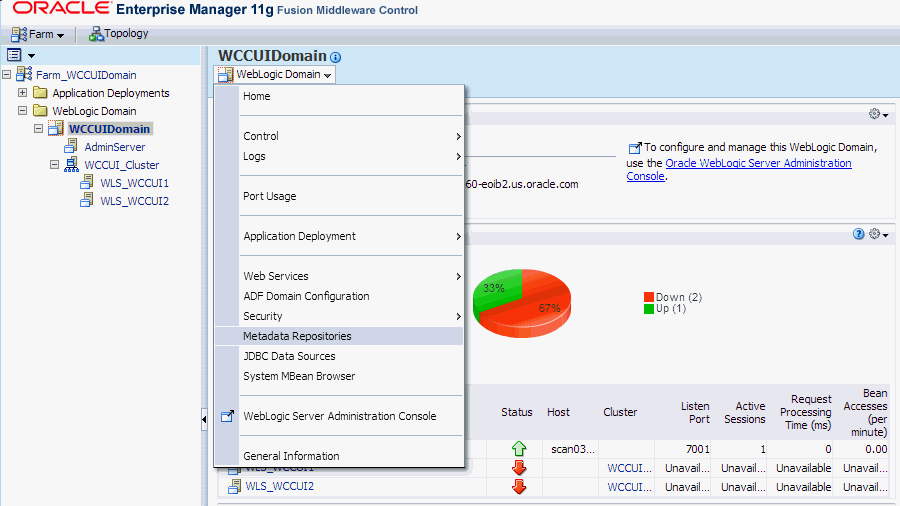
Description of "Figure 15-7 WebLogic Domain Menu on WCCUIDomain Page"
-
On the Metadata Repositories page, click Register under Database-Based Repositories, as Figure 15-8 shows.
-
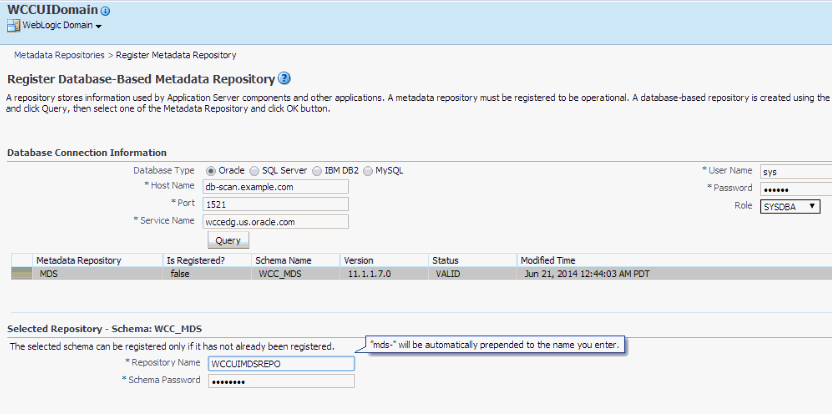
Register the MDS repository on the Register Database-Based Metadata Repository page, as Figure 15-9 shows, and then click OK on the far right.
The Target the Repository dialog box opens.
-
In the Target the Repository dialog box, select WCCUI_Cluster, as Figure 15-10 shows, and click Target.
Figure 15-10 Target the Repository to WCCUI_Cluster
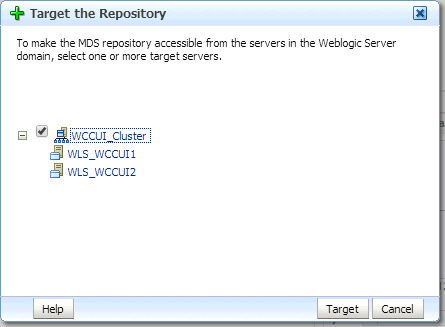
Description of "Figure 15-10 Target the Repository to WCCUI_Cluster"
-
Click Close when you get the message,
Target operation is completed. -
Restart the Administration Server in the WebCenter Content user interface domain, by stopping and then starting it, as described in Section 10.3, "Restarting the Administration Server."

To register the WCCUI Managed Servers with the MDS repository and create the metadata partition through WLST:
-
Run WLST from
WCCUI_MW_HOME/oracle_common/common/bin/wlst.sh, and connect to the WebLogic Server instance in interactive mode:wls:/offline> connect() Please enter your username : weblogic Please enter your password : password Please enter your server URL: [t3://localhost:7001] :t3://host:port of admin server where the WebCenter Content user interface Managed Server is running Connecting to t3://host:7001 with userid weblogic ... Successfully connected to Admin Server 'AdminServer' that belongs to domain 'WCCUIDomain'. Warning: An insecure protocol was used to connect to the server. To ensure on-the-wire security, the SSL port or Admin port should be used instead. wls:/WCCUIDomain/serverConfig>
In the reference topology,
WCCUI_MW_HOMEis the/u01/oracle/products/fmw_homedirectory. -
Run the following command to create a partition:
wls:/WCCUIDomain/serverConfig> createMetadataPartition(repository='mds-WCCUIMDSREPO', partition='MDS_PARTITION')
Location changed to domainRuntime tree. This is a read-only tree with DomainMBean as the root.
For more help, use help(domainRuntime)

Executing operation: createMetadataPartition.

Partition "MDS_PARTITION" in Metadata DB repository "mds-WCCUIMDSREPO" was created successfully.
-
Register the MDS repository with the
registerMetadataDBRepositorycommand:registerMetadataDBRepository('WCCUIMDSREPO', 'Oracle','dbscan.example.com', '1521', 'wccedg.example.com', 'WCCUI_MDS', 'password', 'WLS_WCCUI1')The target server in the preceding command is the WebCenter Content user interface Managed Server.
The sample
registerMetadataDBRepositorycommand has these parameters:-
WCCUIMDSREPOis the name of the metadata repository. -
oracleis the database type. -
dbscan.example.comis the name of the database host -
1521 is the port number for the database.
-
wccedg.example.comis the database service name -
WCCUI_MDSis the schema name -
passwordis the password of the schema owner -
WLS_WCCUI1is the WebCenter Content user interface Managed Server
-
-
Restart the Administration Server in the WebCenter Content user interface domain, by stopping and then starting it, as described in Section 10.3, "Restarting the Administration Server."
If you have installed both domains on the same host, the port for the Administration Server in the WebCenter Content user interface domain will not be the default Administration Server port.
15.5.5 Propagating the Domain Configuration to WLS_WCCUI1 and WLS_WCCUI2
To propagate the domain configuration to WLS_WCCUI1 and WLS_WCCUI2:
-
Stop the Administration Server.
-
Run the following
packcommand on WCCUIHOST1 to create a template pack:cd WCCUI_ORACLE_COMMON_HOME/common/bin ./pack.sh -managed=true -domain=WCCUI_ASERVER_HOME -template=WCCUIDomainTemplateUI.jar -template_name=WCCUIDomainTemplateUI
In the reference topology,
WCCUI_ORACLE_COMMON_HOMEis the/u01/oracle/products/fmw_home/oracle_commondirectory, andWCCUI_ASERVER_HOMEis the/u01/oracle/config/domains/WCCUIDomaindirectory. -
Run the following
unpackcommand on WCCUIHOST1 to create the domain directory for the WLS_WCCUI1 Managed Server:cd WCCUI_ORACLE_COMMON_HOME/common/bin ./unpack.sh -domain= WCCUI_MSERVER_HOME -template=WCCUIDomainTemplateUI.jar -app_dir= WCCUI_APPLICATION_HOME -overwrite_domain=true
In the reference topology,
WCCUI_MSERVER_HOMEis the/u02/oracle/config/domains/WCCUIDomaindirectory, andWCCUI_APPLICATION_HOMEis the/u01/oracle/config/applications/WCCUIDomaindirectory.Notes:
-
Make sure to run
unpackfrom theWCCUI_ORACLE_COMMON_HOME/common/bindirectory, not fromWCCUI_WL_HOME/common/bin. -
The
WCCUI_APPLICATION_HOMEdirectory gets backed up with theunpackcommand. -
The
-overwrite_domainoption in theunpackcommand allows unpacking a Managed Server template into an existing domain and existing applications directories. For any file that is overwritten, a backup copy of the original is created. If any modifications had been applied to the start scripts and EAR files in the Managed Server domain directory, they must be restored after this unpack operation.
-
-
Run the following command on WCCUIHOST1 to copy the template pack created in step 1 to WCCUIHOST2:
scp WCCUIDomainTemplateUI.jar oracle@WCCUIHOST2:WCCUI_ORACLE_COMMON_HOME/common/binIn the reference topology,
WCCUI_ORACLE_COMMON_HOMEis the/u01/oracle/products/fmw_home/oracle_commondirectory. -
Run the following
unpackcommand on WCCUIHOST2 to unpack the propagated template to the WLS_WCCUI2 Managed Server domain directory:cd WCCUI_ORACLE_COMMON_HOME/common/bin ./unpack.sh -domain=/u02/oracle/config/domains/WCCUIDomain -template=WCCUIDomainTemplateUI.jar -app_dir=/u01/oracle/config/applications/WCCUIDomain -overwrite_domain=true << read template from "/u01/oracle/products/fmw_home/oracle_common/common/bin/WCCUIDomainTemplateUI.jar" >> succeed: read template from "/u01/oracle/products/fmw_home/oracle_common/common/bin/WCCUIDomainTemplateUI.jar" << set config option OverwriteDomain to "true" >> succeed: set config option OverwriteDomain to "true" << set config option AppDir to "/u01/oracle/config/applications/WCCUIDomain" >> succeed: set config option AppDir to "/u01/oracle/config/applications/WCCUIDomain" << set config option DomainName to "WCCUIDomain" >> succeed: set config option DomainName to "WCCUIDomain" << write Domain to "/u02/oracle/config/domains/WCCUIDomain" ............................................................................................... >> succeed: write Domain to "/u02/oracle/config/domains/WCCUIDomain" << close template >> succeed: close template -
Start Node Manager on WCCUIHOST2, the Administration Server, and the Managed Servers.
15.5.6 Associating the WebCenter Content User Interface with Content Server
Next you need to associate the WebCenter Content user interface with Content Server through the connection architecture.
To associate the WebCenter Content user interface with Content Server:
-
Set the variable
WCCUI_WL_HOMEto the location of the WebLogic Server installation. For example:WCCUI_WL_HOME=WCCUI_MW_HOME/wlserver_10.3
In the reference topology,
WCCUI_MW_HOMEis the/u01/oracle/products/fmw_homedirectory. -
Go to the following directory:
WCCUI_MW_HOME/oracle_common/webcenter/wccadf/ConnArchWlstResources/common/bin -
Run
manageconnwlst.sh, a custom WLST script (in the preceding directory):./manageconnwlst.sh wls:/offline> connect() Please enter your username :weblogic Please enter your password : Please enter your server URL [t3://localhost:7001] :t3://WCCUIHOST1:16225 Connecting to t3://WCCUIHOST1:16225 with userid weblogic ... Successfully connected to managed Server 'WLS_WCCUI1' that belongs to domain 'WCCUIDomain'. Warning: An insecure protocol was used to connect to the server. To ensure on-the-wire security, the SSL port or Admin port should be used instead. wls:/WCCUIDomain/serverConfig>
-
Update the RIDC connection to the WebCenter Content user interface Managed Server:
wls:/domain_name/serverConfig/updateRIDCConnection('ADF_UI_APP_NAME','WccAdfDefaultConnection',connUrl='idc://contentserver_host:intradoc_port',credUsername='ucm_admin_user')
In the command,
ADF_UI_APP_NAMEis the Oracle WebCenter Content - Web UI application. For example:wls:/WCCUIDomain/serverConfig> updateRIDCConnection('Oracle WebCenter Content - Web UI', 'WccAdfDefaultConnection', connUrl='idc://ucminternal.example.com:6300', credUsername='weblogic')Note:
In this example, the RIDC connection between the WCCUI and WCC managed servers uses the IDC protocol.You can also configure a JAX-WS, HTTP, or HTTPS client connection for Oracle WebCenter Content, to associate the WebCenter Content user interface with Content Server. For more information, see "Associating the WebCenter Content User Interface with Content Server" in Oracle Fusion Middleware Installing and Configuring Oracle WebCenter Content.
At this point the WebCenter Content user interface application instance has been set up and associated with the WebCenter Content Managed Server that was installed on the first machine.
-
Restart the Content Server Managed Server, using the WebLogic Server Administration Console.
-
Restart the WebCenter Content user interface Managed Server, using the WebLogic Server Administration Console for the WebCenter Content user interface domain.
15.6 Configuring the Administrator User
Content Server and the WebCenter Content user interface will need to access the same user directory. Standard LDAP offerings such as Oracle Internet Directory and Active Directory can be shared across domains. You can choose to configure a single sign-on solution using Oracle Access Manager or Oracle Single Sign-On, using the standard guidelines for such integration.
For more information about LDAP options, see Chapter 8, "Creating a Domain for an Enterprise Deployment."
Out of the box, the WebCenter Content user interface requires one WebCenter Content administrator user to function:
-
The administrator user was specified in the
credUsernameparameter of theupdateRIDCConnection()WLST command that was used to connect to the WebCenter Content user interface Managed Server, in Section 15.5, "Deploying the WebCenter Content User Interface Application to a New Domain," Step 9d. -
You will need a user with the chosen name in the LDAP store or stores. Without this administrator user, the WebCenter Content user interface deployment will not work.
-
The user must have
Administratorsrights for the WebCenter Content Managed Server.
15.7 Accessing the WebCenter Content User Interface
You can access the WebCenter Content user interface through the following URL:
http://WCCUIHOST1:16225/wcc
The WebCenter Content user interface application runs on port 16225 by default.
15.8 Configuring Oracle HTTP Server with the WebCenter Content User Interface Cluster
To enable Oracle HTTP Server to route to WCCUI_Cluster, which contain the WLS_WCCUI1 and WLS_WCCUI2 Managed Servers, you must set the WebLogicCluster parameter to the list of nodes in the cluster. Then you can validate access to the Managed Servers through the load balancer.
This section includes the following topics:
-
Section 15.8.1, "Configuring Oracle HTTP Server for the WLS_WCCUI Managed Servers"
-
Section 15.8.2, "Validating Access Through the Load Balancer"
15.8.1 Configuring Oracle HTTP Server for the WLS_WCCUI Managed Servers
To configure Oracle HTTP Server for the WLS_WCCUI Managed Servers:
-
Create a new file named
wccui_vh.confin each of the following directories to define the<VirtualHost>directives for the WebCenter Content user interface:-
/u02/oracle/config/web1/config/OHS/ohs1/moduleconf -
/u02/oracle/config/web2/config/OHS/ohs2/moduleconf
-
-
For each of the web servers on WEBHOST1 and WEBHOST2, add the following lines to the
/u02/oracle/config/web1/config/OHS/ohs1/moduleconf/wccui_vh.confand/u02/oracle/config/web2/config/OHS/ohs2/moduleconf/wccui_vh.conffiles:NameVirtualHost *:7777 <VirtualHost *:7777> ServerName https://wcc.example.com:443 ServerAdmin you@your.address RewriteEngine On RewriteOptions inherit </VirtualHost> ## Added for external access for WCCUI # ADF UI <Location /wcc> WebLogicCluster WCCUIHOST1:16225,WCCUIHOST2:16225 SetHandler weblogic-handler WLCookieName WCC-ADF-JSESSIONID WLProxySSL ON WLProxySSLPassThrough ON </Location>In the reference topology,
ORACLE_INSTANCEis the/u02/oracle/config/web1or/u02/oracle/config/web2directory. -
Restart Oracle HTTP Server on both WEBHOST1 and WEBHOST2:
ORACLE_INSTANCE/admin/bin/opmnctl restartproc ias-component=ohsX
For WEBHOST1, use
ohs1forias-componentand for WEBHOST2 useohs2.
In the reference topology, ORACLE_INSTANCE is the /u02/oracle/config/web1 or /u02/oracle/config/web2 directory.
15.8.2 Validating Access Through the Load Balancer
You should verify URLs to ensure that appropriate routing and failover is working from Oracle HTTP Server to WCCUI_Cluster.
To verify the URLs:
-
While WLS_WCCUI2 is running, stop WLS_WCCUI1 from the WebLogic Server Administration Console.
-
Access
http://wcc.example.com/wccto verify that it is functioning properly. -
Start WLS_WCCUI1 from the WebLogic Server Administration Console.
-
Stop WLS_WCCUI2 from the WebLogic Server Administration Console.
-
Access
http://wcc.example.com/wccto verify that it is functioning properly.
You can verify the cluster node to which you were directed after the traffic balancing provided through your load balancer and then again through the web tier.
15.9 Completing the Workflow Configuration
To complete the workflow configuration for the WebCenter Content user interface, you need to restart the Managed Servers and verify the configuration. The UseDatabaseWfInQueue configuration variable enables the WebCenter Content user interface to filter workflows assigned to a user. The EmailNotificationType configuration variable specifies where the links in notification emails point for workflows and subscriptions in different Content Server user interfaces, and its default value is NativeWebUI.
To complete the workflow configuration:
-
Make sure that the
WCCUI_DOMAIN/ucm/cs/config/config.cfgfile contains theEmailNotificationTypevariable with either of the following settings:-
To generate emails with links that point only to the WebCenter Content user interface, set
EmailNotificationType=ContentUIinconfig.cfg. -
To generate emails with links that point to both the WebCenter Content user interface and the native 11g user interface, set
EmailNotificationType=ContentUI,NativeWebUIinconfig.cfg.
-
-
Restart the Content Server Managed Server, using the WebLogic Server Administration Console.
-
Click the alert that appears on the Content Server home page after restart:
Click to complete workflow setup.Ensure that Content Server returns a success message:
The setup for workflow in queue was successful. -
Restart the WebCenter Content user interface Managed Server, using the WebLogic Server Administration Console for the WebCenter Content user interface domain.
For more information about workflows, see "Managing Workflows" in Oracle Fusion Middleware Managing Oracle WebCenter Content.