14 Extending the Domain to Include Capture
This chapter describes how to extend a domain with Oracle WebCenter Enterprise Capture using the Fusion Middleware Configuration Wizard.
This chapter includes the following sections:
-
Section 14.1, "Overview of Extending the Domain to Include Capture"
-
Section 14.2, "Enabling VIP6 on WCCHOST1 and VIP7 on WCCHOST2"
-
Section 14.5, "Completing Postconfiguration and Verification Tasks for Capture"
-
Section 14.6, "Configuring Oracle HTTP Server for the Capture Cluster"
-
Section 14.7, "Configuring Node Manager for the WLS_CPT Managed Servers"
-
Section 14.8, "Configuring Server Migration for the WLS_CPT Managed Servers"
Note:
Before starting the setup process, read the Oracle Fusion Middleware Release Notes for your platform for additional installation and deployment information.14.1 Overview of Extending the Domain to Include Capture
The Capture system is installed using the WebLogic Server home (WL_HOME) and Oracle home (ORACLE_HOME) locations created in Chapter 7, "Installing the Software for an Enterprise Deployment," on a shared storage.
Extend the domain to include Capture. Table 14-1 lists the steps for configuring Capture and other tasks required for extending the domain with Capture Managed Servers.
This configuration is only for the initial Capture setup. For more information about configuring Capture, such as Capture profiles, see Oracle Fusion Middleware Administering Oracle WebCenter Enterprise Capture.
Table 14-1 Steps for Extending the Domain with Capture
| Step | Description | More Information |
|---|---|---|
|
Prepare for extending the domain for Capture |
Enable a virtual IP address mapping for each of the host names for the Capture WebLogic Server cluster. |
Section 14.2, "Enabling VIP6 on WCCHOST1 and VIP7 on WCCHOST2" |
|
Extend the domain for Capture |
Extend the domain you created in Chapter 8, "Creating a Domain for an Enterprise Deployment." |
|
|
Propagate the domain configuration to the Capture Managed Servers |
Propagate the start scripts and classpath configuration from the Administration Server's domain directory to the Managed Server domain directories. |
Section 14.5.2, "Propagating the Domain Configuration to WLS_CPT1 and WLS_CPT2" |
|
Configure JMS persistence stores |
Configure the location for the JMS persistence stores as a directory that is visible to both Capture Managed Servers. |
Section 14.5.5, "Configuring JMS Persistence Stores for Capture" |
|
Start the Capture Managed Servers |
Start the WLS_CPT1 and WLS_CPT2 Managed Servers. |
|
|
Verify the configuration of GridLink data sources and Oracle Notification Service (ONS) |
Follow these instructions to verify that the configuration of GridLink data sources and ONS is correct. |
Section 14.5.4, "Validating GridLink Data Sources for Capture" |
|
Add the listen addresses for the Capture Managed Servers |
Add the host names of the WLS_CPT1 and WLS_CPT2 Managed Servers (WCCHOST1VHN3 and WCCHOST2VHN3) to the |
|
|
Complete the Capture configuration |
Complete the initial configuration of Capture and performing other postinstallation tasks. |
Section 14.5.3, "Completing the Initial Capture Configuration" |
|
Configure Oracle HTTP Server with the extended domain |
Configure the Oracle HTTP Server with the Managed Servers, and set the WLS Cluster address for CPT_Cluster. |
Section 14.6, "Configuring Oracle HTTP Server for the Capture Cluster" |
|
Set the front-end HTTP host and port for Capture. |
Configure the front-end HTTP host and port for CPT_Cluster. |
|
|
Validate access to WebCenter Content through Oracle HTTP Server |
Verify the URLs to ensure that appropriate routing and failover is working from Oracle HTTP Server to CPT_Cluster. |
Section 14.6.3, "Validating Access Through the Load Balancer" |
|
Configure Node Manager for Capture |
Specify the Capture Managed Server names, host names, and cluster name for migration. |
Section 14.7, "Configuring Node Manager for the WLS_CPT Managed Servers" |
|
Configure server migration for the Capture Managed Servers. |
Specify the Capture Managed Server names, host names, and cluster name for migration. |
Section 14.8, "Configuring Server Migration for the WLS_CPT Managed Servers" |
|
Back up the Capture configuration |
Back up the newly extended domain configuration. |
14.2 Enabling VIP6 on WCCHOST1 and VIP7 on WCCHOST2
The Capture system uses virtual host names as the listen addresses for the Managed Servers on which Capture is running. These virtual host names and corresponding virtual IP addresses are required to enable server migration for the Capture component. If you have not previously done so, you must enable a virtual IP address mapping from VIP6 to WCCHOST1VHN3 on WCCHOST1 and from VIP7 to WCCHOST2VHN3 on WCCHOST2, and you must correctly resolve the host names in the network system used by the topology, with either DNS Server or /etc/hosts resolution.
To enable the virtual IP addresses, follow the procedure described in Section 6.6, "Enabling Virtual IP Addresses" if you have not yet completed it. These virtual IP addresses and virtual host names are required to enable server migration for the Capture servers. You can configure server migration for the Capture servers later for high availability purposes. For more information about configuring server migration, see Chapter 17, "Configuring Server Migration for an Enterprise Deployment."
14.3 Extending the Domain for Capture
You extend the domain configured in Chapter 10, "Extending the Domain to Include WebCenter Content," to include Oracle WebCenter Enterprise Capture. The instructions in this section are based on the assumption that the Capture deployment uses the same database service as the Oracle WebCenter Content deployment (wccedg.example.com). However, a deployment can choose to use a different database service specifically for Capture.
Note:
Before performing these steps, back up the domain as described in the Oracle Fusion Middleware Administrator's Guide.To extend the domain for Capture:
-
Make sure that the database where you installed the repository is running.
For Oracle RAC databases, it is recommended that all instances are running, so that the validation check later on becomes more reliable.
-
Shut down all Managed Servers in the domain.
-
On WCCHOST1, change the directory to the location of the Fusion Middleware Configuration Wizard. This is within the Oracle Common home directory (domain extensions are run from the node where the Administration Server resides).
cd ORACLE_COMMON_HOME/common/bin -
Start the Fusion Middleware Configuration Wizard:
./config.sh
-
On the Welcome screen, select Extend an existing WebLogic domain, and click Next.
-
On the Select a WebLogic Domain Directory screen, select the WebLogic Server domain directory (
ASERVER_HOME), and click Next.In the reference topology,
ASERVER_HOMEis the/u01/oracle/config/domains/WCCDomaindirectory. -
On the Select Extension Source screen (Figure 14-1), make these selections:
-
Select Extend my domain automatically to support the following added products.
-
Select Oracle WebCenter Enterprise Capture.
The following products are grayed out if they were selected when you created the domain (Section 8.3) or extended it for WebCenter Content (Section 10.2), Inbound Refinery (Section 11.2), Oracle SOA Suite components (Section 12.3), or Imaging (Section 13.3).
-
Basic WebLogic Server Domain
-
Oracle SOA Suite
-
Oracle WebCenter Content: Imaging Viewer Cache
-
Oracle WebCenter Content: Imaging
-
Oracle Universal Content Management - Inbound Refinery
-
Oracle Universal Content Management - Content Server
-
Oracle Enterprise Manager Plugin for IBR
-
Oracle Enterprise Manager
-
Oracle WSM Policy Manager
-
Oracle JRF
-
Figure 14-1 Select Extension Source Screen for Capture

Description of "Figure 14-1 Select Extension Source Screen for Capture"
Click Next.
-
-
On the Configure JDBC Component Schema screen, which Figure 14-2 shows, perform the following steps:
-
Select Capture Schema and Capture MDS Schema. Do not select any of the other existing schemas.
-
For the RAC configuration, you can select Convert to GridLink or Convert to RAC multi data source (described in Appendix A, "Using Multi Data Sources with Oracle RAC"). For the instructions given here, select Convert to GridLink.
After you select a RAC configuration, all selected schemas are grayed.
Figure 14-2 Configure JDBC Component Schema Screen for Capture
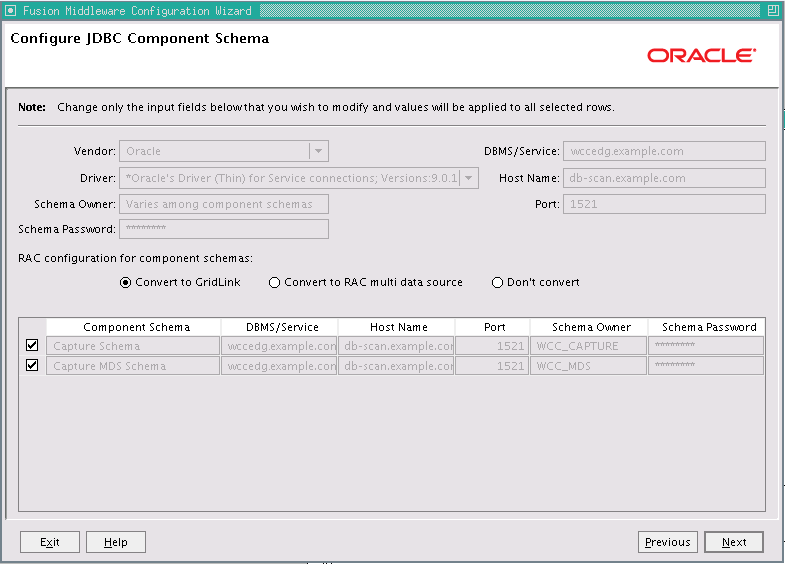
Description of "Figure 14-2 Configure JDBC Component Schema Screen for Capture"
-
Click Next.
-
-
On the Configure GridLink RAC Component Schema screen (Figure 14-3), perform the following steps:
-
Select Capture Schema and Capture MDS Schema. Leave the other data sources as they are.
Figure 14-3 Configure GridLink RAC Component Schema Screen for Capture
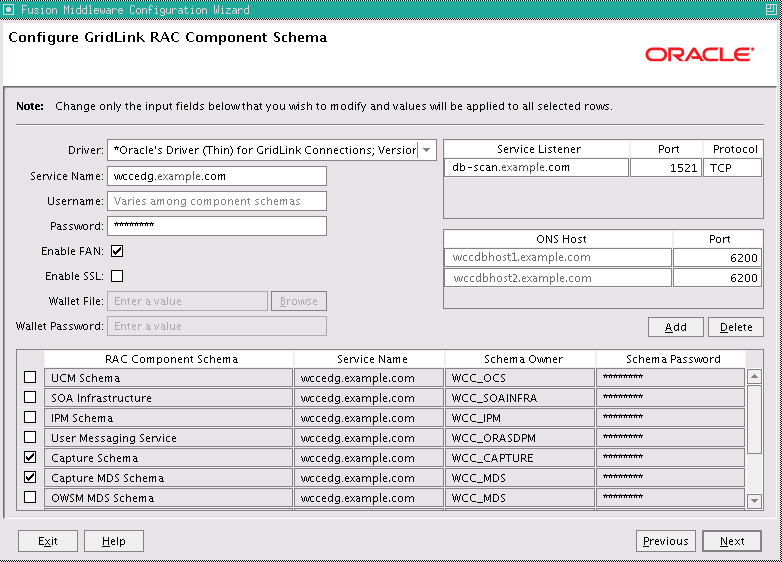
Description of "Figure 14-3 Configure GridLink RAC Component Schema Screen for Capture"
-
Enter values for the following fields, specifying the connection information for the GridLink RAC database that was seeded through RCU:
-
Driver: Select Oracle's Driver (Thin) for GridLinkConnections; Versions: 11 and later.
-
Service Name: Enter the service name of the Oracle RAC database in lowercase letters, followed by the domain name; for example,
wccedg.example.com. -
Username: Enter the complete user name for the database schema owner of the corresponding component.
This book uses
WCCas the prefix of user names for the database schemas. -
Password: Enter the password for the database schema owner.
-
Select Enable FAN.
-
Enable SSL: Leave this option deselected.
If you select SSL to enable Oracle Notification Service (ONS) notification encryption, provide the appropriate Wallet File and Wallet Password details.
-
Service listener: Enter the Oracle Single Client Access Name (SCAN) address and port for the Oracle RAC database being used. The protocol should be
TCP.Oracle recommends that you use a SCAN address to specify the Service Listener (and OSN Host) so you do not need to update a GridLink data source containing a SCAN address if you add or remove Oracle RAC nodes. To determine the SCAN address, query the
remote_listenerparameter in the database:SQL>show parameter remote_listener; NAME TYPE VALUE ----- ------ ------- remote_listener string db-scan.example.com :1521
Note:
For Oracle Database 11g, use the virtual IP address and port of each database instance listener, as in these examples:wccdbhost1-vip.example.com (port 1521) wccdbhost2-vip.example.com (1521)
-
ONS Host: Enter here also the SCAN address for the RAC database and the ONS remote port, as reported by the database:
[orcl@WCCDBHOST1 ~]$ srvctl config nodeapps -s
ONS exists: Local port 6100, remote port 6200, EM port 2016
Note:
For Oracle Database 11g, use the host name and port of each database's ONS service, as in these examples:wccdbhost1.example.com (port 6200) wccdbhost2.example.com (6200)
-
-
Click Next.
Note:
Leave the UCM Schema information as is. -
-
On the Test JDBC Component Schema screen, select the CPT Schema row, then click Test Connections.
The Connection Results Log displays the results. Ensure that the connection to the database that contains the schema was successful. If not, click Previous to return to the previous screen, correct your entry, and then retry the test.
Figure 14-4 Test JDBC Component Schema Screen for Capture
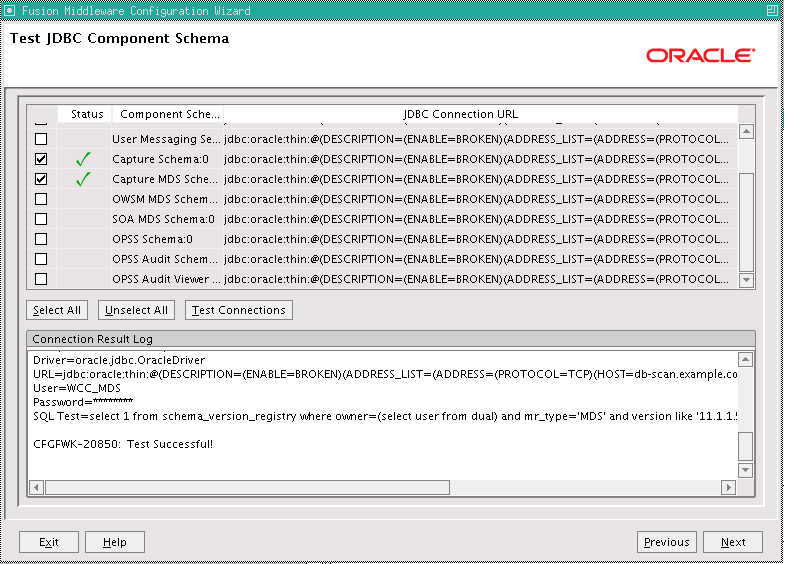
Description of "Figure 14-4 Test JDBC Component Schema Screen for Capture"
Click Next when the connection is successful.
-
On the Optional Configuration screen, select the following options:
-
JMS Distributed Destination
-
Managed Servers, Clusters and Machines
-
Deployment and Services
Click Next.
-
-
On the Select JMS Distributed Destination Type screen, select UDD from the drop-down list for the JMS modules of all Oracle Fusion Middleware components. Click Next. If an override warning appears, click OK to acknowledge it.
-
On the Configure Managed Servers screen, add the required Managed Servers.
A server is created automatically. Rename this to WLS_CPT1 and add a new server called WLS_CPT2. Give these servers the attributes listed in Table 14-2. Do not modify the other servers that appear on this screen; leave them as they are.
Table 14-2 Managed Servers for Capture
Name Listen Address Listen Port SSL Listen Port SSL Enabled WLS_CPT1
WCCHOST1VHN3
16400
n/a
No
WLS_CPT2
WCCHOST2VHN3
16400
n/a
No
Click Next.
-
On the Configure Clusters screen, click Add to add the clusters as shown in Table 14-3. Do not modify the other clusters that appear on this screen; leave them as they are.
Table 14-3 Cluster Configuration for Capture
Name Cluster Messaging Mode Multicast Address Multicast Port Cluster Address CPT_Cluster
unicast
n/a
n/a
Leave empty.
Click Next.
-
On the Assign Servers to Clusters screen, add the following. Do not modify the other assignments that appear on this screen; leave them as they are.
-
CPT_Cluster:
-
WLS_CPT1
-
WLS_CPT2
-
Click Next.
-
-
On the Configure Machines screen, open the Unix Machine tab. You should see the WCCHOST1 and WCCHOST2 machines and have the following entries:
Table 14-4 Machines and Node Manager Listen Addresses
Name Node Manager Listen Address WCCHOST1
WCCHOST1
WCCHOST2
WCCHOST2
ADMINHOST
localhost
Leave all other fields to their default values. Click Next.
-
On the Assign Servers to Machines screen, assign servers to machines as follows:
-
Assign WLS_CPT1 to WCCHOST1.
-
Assign WLS_CPT2 to WCCHOST2.
Click Next.
-
-
On the Target Deployments to Clusters or Servers screen, make sure that targeting is done as follows:
-
The capture deployment is targeted only to CPT_Cluster.
-
EM Application is targeted only to AdminServer.
Click Next.
-
-
On the Target Services to Clusters or Servers screen, select all OPSS-related data sources to be deployed to CPT_Cluster, as Figure 14-5 shows:
-
opss-audit-viewDS
-
opss-audit-DBDS
-
opss-DBDS
Figure 14-5 Target Services to the Capture Cluster
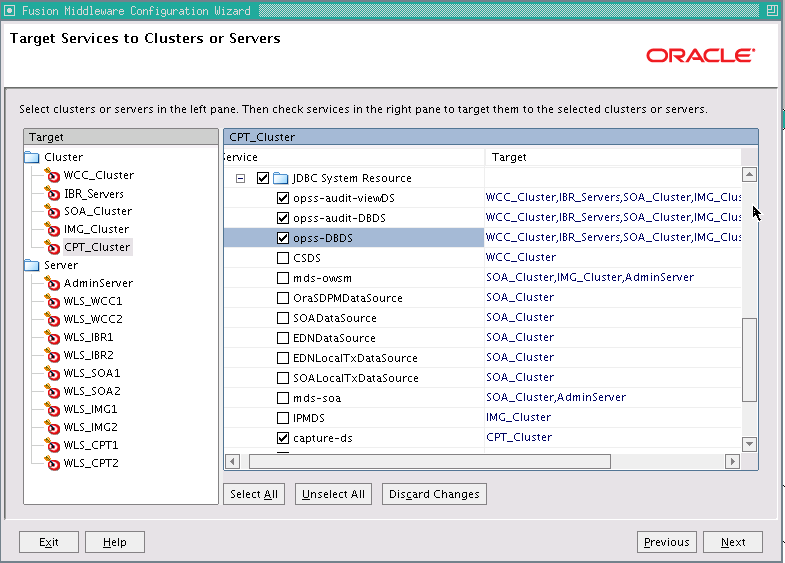
Description of "Figure 14-5 Target Services to the Capture Cluster"
Click Next.
-
-
On the Configuration Summary screen, click Extend.
-
If a dialog box opens warning about conflicts in ports for the domain, click OK. This should be due to preexisting servers in the nodes and the warning can be ignored.
-
On the Creating Domain screen, click Done.
14.4 Restarting the Administration Server
You need to restart the Administration Server to make the domain extension changes take effect, using the Node Manager nmKill and nmStart commands through the Oracle WebLogic Scripting Tool (WLST), as described in Section 10.3, "Restarting the Administration Server." You can use the Administration Console instead of nmKill to stop the Administration Server. Log in to the Administration Console using the credentials for the weblogic user.
14.5 Completing Postconfiguration and Verification Tasks for Capture
The following sections describe how to do postconfiguration and verification tasks for Capture:
-
Section 14.5.1, "Disabling Host Name Verification for the WLS_CPT Managed Servers"
-
Section 14.5.2, "Propagating the Domain Configuration to WLS_CPT1 and WLS_CPT2"
-
Section 14.5.3, "Completing the Initial Capture Configuration"
-
Section 14.5.4, "Validating GridLink Data Sources for Capture"
-
Section 14.5.5, "Configuring JMS Persistence Stores for Capture"
14.5.1 Disabling Host Name Verification for the WLS_CPT Managed Servers
For the enterprise deployment described in this guide, you set up the appropriate certificates to authenticate the different nodes with the Administration Server after you have completed the procedures to extend the domain for Capture. You must disable the host name verification for the WLS_CPT1 and WLS_CPT2 Managed Servers to avoid errors when managing the different WebLogic Server instances. For more information, see Section 8.4.5, "Disabling Host Name Verification."
You enable host name verification again once the enterprise deployment topology configuration is complete. For more information, see Section 16.3, "Enabling Host Name Verification Certificates for Node Manager."
14.5.2 Propagating the Domain Configuration to WLS_CPT1 and WLS_CPT2
Propagate the start scripts and classpath configuration from the Administration Server's domain directory to the Managed Server domain directory.
To propagate the domain configuration to the Capture Managed Servers:
-
Create a copy of the Managed Server domain directory and the Managed Server applications directory.
-
Run the following
packcommand on WCCHOST1 to create a template pack:cd ORACLE_COMMON_HOME/common/bin ./pack.sh -managed=true -domain=ASERVER_HOME -template=edgdomaintemplateCPT.jar -template_name=edgdomain_templateCPT
In the reference topology,
ORACLE_COMMON_HOMEis the/u01/oracle/products/fmw_home/oracle_commondirectory, andASERVER_HOMEis the/u01/oracle/config/domains/WCCDomaindirectory. -
Run the following
unpackcommand on WCCHOST1 to propagate the template created in the preceding step to the WLS_CPT1 domain directory:cd ORACLE_COMMON_HOME/common/bin ./unpack.sh -domain=MSERVER_HOME -template=edgdomaintemplateCPT.jar -app_dir=APPLICATION_HOME -overwrite_domain=true
In the reference topology,
MSERVER_HOMEis the/u02/oracle/config/domains/WCCDomaindirectory, andAPPLICATION_HOMEis the/u01/oracle/config/applications/WCCDomaindirectory.Notes:
-
Make sure to run
unpackfrom theORACLE_COMMON_HOME/common/bin/directory, not fromWL_HOME/common/bin/. -
The
APPLICATION_HOMEdirectory gets backed up with thisunpackcommand. -
The
-overwrite_domainoption in theunpackcommand allows unpacking a Managed Server template into an existing domain and existing applications directories. For any file that is overwritten, a backup copy of the original is created. If any modifications had been applied to the start scripts and EAR files in the Managed Server domain directory, they must be restored after this unpack operation.
-
-
Run the following command on WCCHOST1 to copy the template pack created in step 1 to WCCHOST2:
scp edgdomaintemplateCPT.jar oracle@WCCHOST2:/u01/oracle/products/fmw_home/oracle_common/bin
-
Run the following
unpackcommand on WCCHOST2 to unpack the propagated template to the WLS_CPT2 Managed Server domain directory:cd ORACLE_COMMON_HOME/common/bin ./unpack.sh -domain=/u02/oracle/config/domains/WCCDomain -template=edgdomaintemplateCPT.jar -app_dir=/u01/oracle/config/applications/WCCDomain –overwrite_domain=trueNotes:
-
Make sure to run
unpackfrom theORACLE_COMMON_HOME/common/bin/directory, not fromWL_HOME/common/bin/. -
The
APPLICATION_HOMEdirectory gets backed up with thisunpackcommand.
-
-
Restart the Administration Server to make these changes take effect, stopping it with the
nmKillcommand, or with the Administration Console, and then starting it with thenmStartcommand, as described in Section 10.3, "Restarting the Administration Server."Before the restart, stop all Managed Servers in the domain through the Administration Console, and then start them after the restart. Log in to the Administration Console using the credentials for the
weblogicuser.
14.5.3 Completing the Initial Capture Configuration
To complete the initial configuration of Capture in a WebLogic Server domain, use the weblogic system administrator to do these tasks:
-
Start the Capture Managed Server.
-
Assign roles to Capture users in Fusion Middleware Control.
-
Modify system-level settings through MBeans.
14.5.3.1 About Completing the Initial Capture Configuration
The system administrator who performs the installation and initial configuration must have system administration permissions, including access to Oracle Enterprise Manager Fusion Middleware Control and Oracle WebLogic Server. Before anyone can use Oracle WebCenter Enterprise Capture, the system administrator needs to associate users from the LDAP identity store for the WebLogic Server domain with the Capture roles in Fusion Middleware Control.
To store groups and users, you can use the Oracle Internet Directory policy store. You can manage the policy store through Fusion Middleware Control.
The following Capture roles can be assigned to users:
-
Capture Workspace Manager (
CaptureWorkspaceManager) -
Capture Workspace Viewer (
CaptureWorkspaceViewer) -
Capture User (
CaptureUser)
The system administrator needs to assign the Workspace Manager both the CaptureWorkspaceManager and CaptureUser roles to provide access to the Workspace Console and the client. Only members of the CaptureUser role can use the Capture client. After an account has been granted the CaptureWorkspaceManager role, that account can sign in to the Workspace Console, create a workspace, and grant Capture access to other users who have been assigned Capture roles.
After starting the Capture Managed Server, the system administrator can modify system-level settings in Capture MBeans through Fusion Middleware Control or with Oracle WebLogic Scripting Tool (WLST) commands.
14.5.3.2 Starting the Capture Managed Servers
Start the Capture Managed Servers on WCCHOST1 and WCCHOST2.
To start the Capture Managed Servers:
-
Start the WLS_CPT1 Managed Server:
-
Log in to the WebLogic Server Administration Console at
http://ADMINVHN:7001/console. -
In the Domain Structure tree on the left, expand the Environment node, and then select Servers.
-
On the Summary of Servers page, click the Control tab.
-
Select WLS_CPT1 from the Servers column of the table.
-
Click Start.
-
-
Access
http://WCCHOST1VHN3:16400/dc-consoleto verify the status of WLS_CPT1. The Oracle WebCenter Enterprise Capture Workspace Console login page opens. Enter your WebLogic Server administration user name and password to log in. -
Start the WLS_CPT2 Managed Server:
-
Log in to the WebLogic Server Administration Console at
http://ADMINVHN:7001/console. -
In the Domain Structure tree on the left, expand the Environment node, and then select Servers.
-
On the Summary of Servers page, click the Control tab.
-
Select WLS_CPT2 from the Servers column of the table.
-
Click Start.
-
-
Access
http://WCCHOST2VHN3:16400/dc-consoleto verify the status of WLS_CPT2. The Oracle WebCenter Enterprise Capture Workspace Console login page opens. Enter your WebLogic Server administration user name and password to log in.
14.5.3.3 Assigning Roles to Capture Users
Before anyone uses Capture, the system administrator (weblogic) needs to assign users from the LDAP credential store to the Capture roles in the policy store. You can do this through the Application Roles page in Fusion Middleware Control.
To assign Capture roles to the Workspace Manager:
-
Log in to Oracle Enterprise Manager Fusion Middleware Control.
-
On the left, expand WebLogic Domain.
-
Right-click the domain name, choose Security, and then choose Application Roles.
The Application Roles page opens.
Figure 14-6 Application Roles for Capture

Description of "Figure 14-6 Application Roles for Capture"
-
In the Application Stripe field, choose capture from the drop-down list, and then click the search icon.
The search populates the table with roles for the Capture User, Capture Workspace Manager, and Capture Viewer.
-
Edit the CaptureWorkspaceManager role.
-
Add a user to this role.
-
Edit the CaptureUser role.
-
Add the same user to this role, so that user has both the
CaptureWorkspaceManagerandCaptureUserroles.
For more information about how to assign roles to Capture users, see "Assigning Capture Roles in Oracle Enterprise Manager" in Administering Oracle WebCenter Enterprise Capture.
14.5.3.4 Modifying System-Level Settings Through MBeans
You can modify system-level configuration settings for Capture, including system properties and SMTP settings for email, through the System Configuration page in Fusion Middleware Control. The settings on this page configure the Capture MBeans for the domain, which you can also modify with WLST commands.
For information about how to modify system-level settings in Fusion Middleware control, see "Modifying System Configuration Settings" in Administering Oracle WebCenter Enterprise Capture.
The following WLST commands also enable you to access or modify system-level settings:
-
listCaptureConfig -
getCaptureConfig -
setCaptureConfig
For more information about these commands, see "Oracle WebCenter Enterprise Capture Custom WLST Commands" in Oracle Fusion Middleware WebLogic Scripting Tool Command Reference.
14.5.4 Validating GridLink Data Sources for Capture
After the servers are started, verify that the GridLink data sources are correctly configured and that the ONS setup is correct. Perform this procedure for every GridLink data source created.
To verify the configuration of a GridLink data source for Capture:
-
Log in to the WebLogic Server Administration Console.
-
In the Domain Structure tree, expand Services, then click Data Sources.
-
Click the name of a GridLink data source that was created.
-
Click the Monitoring tab.
-
Click the Testing tab (Figure 14-7), select one of the servers, and click Test Data Source.
Figure 14-7 Testing a GridLink Data Source for Capture
Description of "Figure 14-7 Testing a GridLink Data Source for Capture"
The test should be successful if the configuration is correct.
-
Repeat the test for every WebLogic Server instance that uses the GridLink data source.
To verify the configuration of ONS for a GridLink data source for Capture:
-
In the Domain Structure tree on the Administration Console, expand Services, then click Data Sources.
-
Click the name of a GridLink data source.
-
Click the Monitoring tab.
-
Click the name of the server (
WLS_CPT1). -
Click the ONS tab and then the Testing tab (Figure 14-8).
-
Select a server, and click Test ONS.
Figure 14-8 Testing the ONS Configuration for Capture
Description of "Figure 14-8 Testing the ONS Configuration for Capture"
The test should be successful if the configuration is correct. If the ONS test fails, verify that the ONS service is running in the Oracle RAC database nodes:
[orcl@WCCDBHOST1 ~]$ srvctl status scan_listener
SCAN Listener LISTENER_SCAN1 is enabled
SCAN listener LISTENER_SCAN1 is running on node WCCDBHOST1
SCAN Listener LISTENER_SCAN2 is enabled
SCAN listener LISTENER_SCAN2 is running on node WCCDBHOST2
SCAN Listener LISTENER_SCAN3 is enabled
SCAN listener LISTENER_SCAN3 is running on node WCCDBHOST2


[orcl@WCCDBHOST1 ~]$ srvctl config nodeapps -s
ONS exists: Local port 6100, remote port 6200, EM port 2016


[orcl@WCCDBHOST1 ~]$ srvctl status nodeapps | grep ONS
ONS is enabled
ONS daemon is running on node: WCCDBHOST1
ONS daemon is running on node: WCCDBHOST2
-
Repeat the ONS test for every WebLogic Server instance that uses the GridLink data source.
14.5.5 Configuring JMS Persistence Stores for Capture
Configure the location for the JMS persistence stores as a directory that is visible from both nodes. By default, the JMS servers used by Oracle WebCenter Enterprise Capture are configured with no persistence store and use the WebLogic Server store (/u02/oracle/config/domains/WCCDomain/servers/server_name/data/store/ default). You must change each Capture JMS server persistence store to use a shared base directory.
To configure JMS persistence stores for Capture:
-
Log in to the WebLogic Server Administration Console.
-
In the Domain Structure tree on the left, expand the Services node, and then click the Persistence Stores node.
-
On the Summary of Persistence Stores page, click Lock & Edit.
-
Click New, and then Create File Store.
-
Enter a name (for example,
CPTJMSServer1Store, which allows you identify the service it is created for) and target WLS_CPT1. Enter a directory that is located in shared storage so that it is accessible from both WCCHOST1 and WCCHOST2 (/u01/oracle/config/domains/WCCDomain/CPT_Cluster/jms). -
Click OK and activate the changes.
-
In the Domain Structure tree on the left, expand the Services node, and then click the Messaging->JMS Servers node.
-
On the Summary of JMS Servers page, click the CaptureJmsServer1 JMS server (represented as a hyperlink) in the Name column of the table.
-
On the settings page for the JMS server, click Lock & Edit.
-
In the Persistent Store drop-down list, select CPTJMSServer1Store.
-
Click Save and Activate.
-
Repeat the steps and create
CPTJMSServer2Storefor CaptureJMSServer2.
14.5.6 Adding the Capture Server Listen Addresses to the List of Allowed Hosts in Oracle WebCenter Content
The settings of allowable hosts, configured for Oracle WebCenter Content Server in Section 13.5.11, "Adding the Imaging Server Listen Addresses to the List of Allowed Hosts in Oracle WebCenter Content," also applies to Capture with an addition of listeners for the Capture Managed Servers. If this is the first time Content Server allowable hosts are added (in the case of a non-Imaging Oracle WebCenter Content enterprise deployment setup), then the following configuration needs to be done from Content Server.
Add the host names of the WLS_CPT1 and WLS_CPT2 Managed Servers (WCCHOST1VHN3 and WCCHOST2VHN3, respectively) to the SocketHostNameSecurityFilter parameter list.
To add the Capture server listen addresses to allowed hosts in Oracle WebCenter Content:
-
Open the file
/u01/oracle/config/domains/WCCDomain/WCC_Cluster/cs/config/config.cfgin a text editor. -
Remove or comment out the following line:
SocketHostAddressSecurityFilter=127.0.0.1|WCCHOST1-IP|WCCHOST2-IP|WEBHOST1-IP|WEBHOST2-IP
-
Add the following two lines to include the WLS_CPT1 and WLS_CPT2 listen addresses in the list of addresses that are allowed to connect to Oracle WebCenter Content:
SocketHostNameSecurityFilter=localhost|localhost.example.com|WEBHOST1|
WEBHOST2|WCCHOST1|WCCHOST2|WCCHOST1VHN1|WCCHOST2VHN1|WCCHOST1VHN2|WCCHOST2VHN2|
WCCHOST1VHN3|WCCHOST2VHN3|ucminternal.example.com|load-balancer-host-name
AlwaysReverseLookupForHost=Yes
Note:
The load balancer host name is the one that was used to configure the virtual servers in Section 3.3, "Load Balancers." -
Save the modified
config.cfgfile, and restart the Oracle WebCenter Content servers, using the WebLogic Server Administration Console, for the changes to take effect.
14.6 Configuring Oracle HTTP Server for the Capture Cluster
To enable Oracle HTTP Server to route to CPT_Cluster, which contains the WLS_CPT1 and WLS_CPT2 Managed Servers, you must set the WebLogicCluster parameter to the list of nodes in the cluster.
This section includes the following topics:
-
Section 14.6.1, "Configuring Oracle HTTP Server for the WLS_CPT Managed Servers"
-
Section 14.6.3, "Validating Access Through the Load Balancer"
14.6.1 Configuring Oracle HTTP Server for the WLS_CPT Managed Servers
To configure Oracle HTTP Server for the WLS_CPT Managed Servers:
-
For each of the web servers on WEBHOST1 and WEBHOST2, add the following lines to the
ORACLE_INSTANCE/config/OHS/ohs1/moduleconf/wcc_vh.confandORACLE_INSTANCE/config/OHS/ohs2/moduleconf/wcc_vh.conffiles:# DC-Console <Location /dc-console> WebLogicCluster WCCHOST1VHN3:16400,WCCHOST2VHN3:16400 SetHandler weblogic-handler WLCookieName JSESSIONID WLProxySSL ON WLProxySSLPassThrough ON </Location> # DC-Client <Location /dc-client> WebLogicCluster WCCHOST1VHN3:16400,WCCHOST2VHN3:16400 SetHandler weblogic-handler WLCookieName JSESSIONID WLProxySSL ON WLProxySSLPassThrough ON </Location>In the reference topology,
ORACLE_INSTANCEis the/u02/oracle/config/web1or/u02/oracle/config/web2directory. -
Restart Oracle HTTP Server on both WEBHOST1 and WEBHOST2:
/u02/oracle/config/webN/bin/opmnctl restartproc ias-component=ohsXFor WEBHOST1, use
ohs1forias-componentand for WEBHOST2 useohs2.
14.6.2 Setting the Front-End HTTP Host and Port
You must set the front-end HTTP host and port for the Capture cluster (CPT_Cluster).
To set the front-end HTTP host and port for the Capture cluster:
-
Log in to the WebLogic Server Administration Console.
-
Go to the Change Center section and click Lock & Edit.
-
Expand the Environment node in the Domain Structure tree on the left.
-
Click Clusters.
-
On the Summary of Clusters page, select CPT_Cluster.
-
Open the HTTP tab.
-
Set the following values:
-
Frontend Host:
wcc.example.com -
Frontend HTTPS Port:
443 -
Frontend HTTP Port:
80
-
-
Click Save.
-
Click Activate Changes in the Change Center section of the Administration Console.
-
Restart the servers to make the front-end host directive in the cluster take effect.
14.6.3 Validating Access Through the Load Balancer
Verify URLs to ensure that appropriate routing and failover is working from the HTTP Server to CPT_Cluster.
To verify the URLs:
-
While WLS_CPT2 is running, stop WLS_CPT1 from the WebLogic Server Administration Console.
-
Access
http://wcc.example.com/dc-consoleto verify that it is functioning properly. (You will not be able to retrieve reports or data because the Capture server is down.) -
Start WLS_CPT1 from the WebLogic Server Administration Console.
-
Stop WLS_CPT2 from the WebLogic Server Administration Console.
-
Access
http://wcc.example.com/dc-consoleto verify that it is functioning properly. -
Start WLS_CPT2 from the WebLogic Server Administration Console.
14.7 Configuring Node Manager for the WLS_CPT Managed Servers
Oracle recommends using host name verification for communication between Node Manager and the servers in the domain. This requires the use of certificates for the different addresses communicating with the Administration Server and other servers. For more details, see Chapter 16, "Setting Up Node Manager for an Enterprise Deployment." The procedures in that chapter must be performed for the Oracle WebCenter Content deployment.
The procedures in Section 16.3, "Enabling Host Name Verification Certificates for Node Manager," must be performed for the hosts and Capture Managed Servers in the following table.
| Host Name (HOST) | Virtual IP Address (VIP) | Server Name (WLS_SERVER) |
|---|---|---|
| WCCHOST1 | WCCHOST1VHN3 | WLS_CPT1 |
| WCCHOST2 | WCCHOST2VHN3 | WLS_CPT2 |
For server migration of Capture Managed Servers, you need to associate these servers with the specified virtual host names. Check that these virtual host names are enabled by DNS or /etc/hosts resolution in your system and that they map to the appropriate virtual IP addresses. For more information, see Section 3.4, "IP Addresses and Virtual IP Addresses."
14.8 Configuring Server Migration for the WLS_CPT Managed Servers
Server migration is required for proper failover of the Oracle WebCenter Enterprise Capture components in the event of failure in any of the WCCHOST1 and WCCHOST2 nodes. For more details, see Chapter 17, "Configuring Server Migration for an Enterprise Deployment." For Capture, use the following values for the variables in that chapter:
-
Server names:
-
WLS_SERVER1: WLS_CPT1 -
WLS_SERVER2: WLS_CPT2
-
-
Host names:
-
HOST1: WCCHOST1 -
HOST2: WCCHOST2
-
-
Cluster name:
-
CLUSTER: CPT_Cluster
-
14.9 Backing Up the Installation
After you have verified that the extended domain is working, back up the installation. This is a quick backup for the express purpose of immediate restore in case of problems in the further steps. The backup destination is the local disk. This backup can be discarded once the enterprise deployment setup is complete. At that point, the regular deployment-specific backup and recovery process can be initiated. The Oracle Fusion Middleware Administrator's Guide provides further details. For information on describing the Oracle HTTP Server data that must be backed up and restored, refer to the "Backup and Recovery Recommendations for Oracle HTTP Server" section in that guide. For information on how to recover components, see the "Recovery of Components" and "Recovery After Loss of Component" sections in the guide. For recommendations specific to recovering from the loss of a host, see the "Recovering Oracle HTTP Server to a Different Host" section in the guide. For information on database backup, see the Oracle Database Backup and Recovery Guide.
To back up the installation at this point:
-
Back up Oracle Web Tier on WEBHOST1:
-
Shut down the instance using
opmnctl./u02/oracle/config/webN/bin/opmnctl stopall -
Back up the Middleware home for Oracle Web Tier with the following command (as root):
tar -cvpf BACKUP_LOCATION/web.tar MW_HOME
-
Back up the Oracle instance for Oracle Web Tier with the following command:
tar -cvpf BACKUP_LOCATION/web_instance_name.tar ORACLE_INSTANCE
-
Start the instance using
opmnctl:cd /u02/oracle/config/webN/bin opmnctl startall
-
-
Back up the database. This is a full database backup (either hot or cold) using Oracle Recovery Manager (recommended) or operating system tools such as tar for cold backups if possible.
-
Back up the Administration Server and Managed Server domain directory to save your domain configuration. The configuration files all exist in the
/u01/oracle/config/domains/WCCDomaindirectory. Run the following command on WCCHOST1 to create the backup:tar -cvpf edgdomainback.tar /u01/oracle/config/domains/WCCDomain