13 Extending the Domain to Include Imaging
This chapter describes how to extend a domain with Oracle WebCenter Content: Imaging, using the Fusion Middleware Configuration Wizard.
This chapter includes the following sections:
-
Section 13.1, "Overview of Extending the Domain to Include Imaging"
-
Section 13.2, "Enabling VIP4 on WCCHOST1 and VIP5 on WCCHOST2"
-
Section 13.5, "Completing Postconfiguration and Verification Tasks for Imaging"
-
Section 13.6, "Configuring Oracle HTTP Server with the Imaging Cluster"
-
Section 13.7, "Configuring Node Manager for the WLS_IMG Managed Servers"
-
Section 13.8, "Configuring Server Migration for the WLS_IMG Managed Servers"
Note:
Before starting the setup process, read the Oracle Fusion Middleware Release Notes for your platform for additional installation and deployment information.13.1 Overview of Extending the Domain to Include Imaging
The Imaging system is installed using the WL_HOME and ORACLE_HOME locations created in Chapter 7, "Installing the Software for an Enterprise Deployment," on a shared storage.
Extend the domain to include Imaging. Table 13-1 lists the steps for configuring Imaging and other tasks required for extending the domain with Imaging Managed Servers.
Table 13-1 Steps for Extending the Domain with Imaging
| Step | Description | More Information |
|---|---|---|
|
Prepare for extending the domain for Imaging |
Enable a virtual IP address mapping for each of the host names for the Imaging WebLogic Server cluster. |
Section 13.2, "Enabling VIP4 on WCCHOST1 and VIP5 on WCCHOST2" |
|
Extend the domain for Imaging |
Extend the domain you created in Chapter 8, "Creating a Domain for an Enterprise Deployment," with Oracle WebCenter Content: Imaging. |
|
|
Disable host name verification for Imaging |
Disable host name verification while setting up and validating the topology. |
Section 13.5.1, "Disabling Host Name Verification for the WLS_IMG Managed Servers" |
|
Propagate the domain configuration to the Imaging Managed Servers |
Propagate the start scripts and classpath configuration from the Administration Server's domain directory to the Managed Server domain directories. |
Section 13.5.2, "Propagating the Domain Configuration to WLS_IMG1 and WLS_IMG2" |
|
Configure JMS persistence stores |
Configure the location for the JMS persistence stores as a directory that is visible to both Imaging Managed Servers. |
Section 13.5.3, "Configuring JMS Persistence Stores for Imaging" |
|
Restart the Administration Server for the domain |
Stop and then restart the Administration Server. |
|
|
Start the Imaging Managed Servers |
Start the WLS_IMG1 and WLS_IMG2 Managed Servers. |
|
|
Verify the configuration of GridLink data sources and Oracle Notification Service (ONS) |
Follow these instructions to verify that the configuration of GridLink data sources and ONS is correct. |
Section 13.5.5, "Validating GridLink Data Sources for Imaging" |
|
Configure System MBeans for Imaging |
Configure the |
|
|
Enable the Imaging feature set in WebCenter Content |
Enable the IpmRepository component of Oracle WebCenter Content Server. |
Section 13.5.8, "Enabling the Imaging Feature Set in Oracle WebCenter Content" |
|
Configure the Imaging Viewer Cache |
Set the Imaging viewer to use cached documents. |
|
|
Encrypt cached documents |
Encrypt cached documents if additional security is required. |
|
|
Add the listen addresses for the Imaging Managed Servers |
Add the host names of the WLS_IMG1 and WLS_IMG2 Managed Servers (WCCHOST1VHN2 and WCCHOST2VHN2) to the |
|
|
Create a connection between the Imaging and WebCenter Content Managed Servers |
Create a connection to Oracle WebCenter Content Server. |
|
|
Configure the BPEL CSF credentials |
Configure the required credentials to communicate with Oracle SOA Suite |
|
|
Configure a workflow connection for Imaging |
Create and test a workflow connection. |
|
|
Configure Oracle HTTP Server with the extended domain |
Configure the Oracle HTTP Server with the Managed Servers, and set the WLS Cluster address for IMG_Cluster. |
Section 13.6, "Configuring Oracle HTTP Server with the Imaging Cluster" |
|
Validate access to WebCenter Content through Oracle HTTP Server |
Verify the URLs to ensure that appropriate routing and failover is working from Oracle HTTP Server to IMG_Cluster. |
Section 13.6.2, "Validating Access Through the Load Balancer" |
|
Configure host name verification for communication between Node Manager and the Managed Servers in the domain |
Use certificates for the different addresses communicating with the Administration Server and other servers. |
Section 13.7, "Configuring Node Manager for the WLS_IMG Managed Servers" |
|
Configure server migration for the Imaging Managed Servers. |
Specify the Imaging Managed Server names, host names, and cluster name for migration. |
Section 13.8, "Configuring Server Migration for the WLS_IMG Managed Servers" |
|
Back up the Imaging configuration |
Back up the newly extended domain configuration. |
13.2 Enabling VIP4 on WCCHOST1 and VIP5 on WCCHOST2
The Imaging system uses virtual host names as the listen addresses for the Managed Servers on which Imaging is running. These virtual host names and corresponding virtual IP addresses are required to enable server migration for the Imaging component. If you have not previously done so, you must enable a virtual IP address mapping from VIP4 to WCCHOST1VHN2 on WCCHOST1 and from VIP5 to WCCHOST2VHN2 on WCCHOST2, and you must correctly resolve the host names in the network system used by the topology, with either DNS Server or /etc/hosts resolution.
To enable the virtual IP addresses, follow the procedure described in Section 6.6, "Enabling Virtual IP Addresses" if you have not yet completed it. These virtual IP addresses and virtual host names are required to enable server migration for the Imaging servers. You can configure server migration for the Imaging servers later for high availability purposes. For more information about configuring server migration, see Chapter 17, "Configuring Server Migration for an Enterprise Deployment."
13.3 Extending the Domain with Imaging
You can extend the domain created in Chapter 8, "Creating a Domain for an Enterprise Deployment", and then extended with WebCenter Content, Inbound Refinery, Capture, and Oracle SOA Suite, to include Oracle WebCenter Content: Imaging. The instructions in this section are based on the assumption that the Imaging deployment uses the same database service as the Oracle WebCenter Content deployment (wccedg.example.com). However, a deployment can choose to use a different database service specifically for Imaging.
Note:
Before performing these steps, back up the domain as described in the Oracle Fusion Middleware Administrator's Guide.To extend the domain for Imaging:
-
Make sure that the database where you installed the repository is running.
For Oracle RAC databases, it is recommended that all instances are running, so that the validation check later on becomes more reliable.
-
Shut down all Managed Servers in the domain.
-
On WCCHOST1, change the directory to the location of the Fusion Middleware Configuration Wizard. This is within the Oracle Common home directory (domain extensions are run from the node where the Administration Server resides).
cd ORACLE_COMMON_HOME/common/bin -
Start the Fusion Middleware Configuration Wizard:
./config.sh
-
On the Welcome screen, select Extend an existing WebLogic domain, and click Next.
-
On the Select a WebLogic Domain Directory screen, select the WebLogic Server domain directory (
ASERVER_HOME), and click Next.In the reference topology,
ASERVER_HOMEis the/u01/oracle/config/domains/WCCDomaindirectory. -
On the Select Extension Source screen (Figure 13-1), make these selections:
-
Select Extend my domain automatically to support the following added products.
-
Select these products:
Oracle WebCenter Content: Imaging Viewer Cache
Oracle WebCenter Content: Imaging
(If you select one of the preceding products, the other one is automatically selected.)
Notes:
-
AXF for BPEL is included in Imaging.
-
For information about including Oracle WebCenter Content: AXF for BPM in Imaging, see Installing and Configuring Oracle WebCenter Content.
The following products are grayed out if they were selected when you created the domain (Section 8.3) or extended it for WebCenter Content (Section 10.2), Inbound Refinery (Section 11.2), or Oracle SOA Suite components (Section 12.3).
-
Basic WebLogic Server Domain
-
Oracle SOA Suite
-
Oracle Universal Content Management - Inbound Refinery
-
Oracle Universal Content Management - Content Server
-
Oracle Enterprise Manager Plugin for IBR
-
Oracle Enterprise Manager
-
Oracle WSM Policy Manager
-
Oracle JRF
-
Figure 13-1 Select Extension Source Screen for Imaging
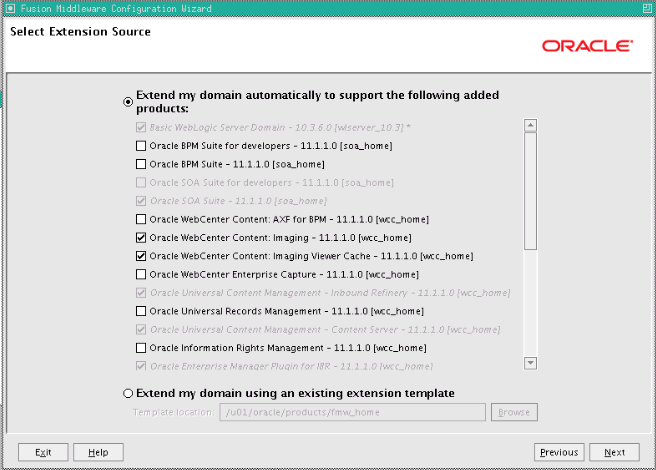
Description of "Figure 13-1 Select Extension Source Screen for Imaging"
Click Next.
-
-
On the Configure JDBC Component Schema screen, which Figure 13-2 shows, perform the following steps:
-
Select IPM Schema only (for Imaging). Do not select any of the other existing schemas.
-
For the RAC configuration, you can select Convert to GridLink or Convert to RAC multi data source (described in Appendix A, "Using Multi Data Sources with Oracle RAC"). For the instructions given here, select Convert to GridLink.
After you select a RAC configuration, all selected schemas are grayed out.
Figure 13-2 Configure JDBC Component Schema Screen for Imaging
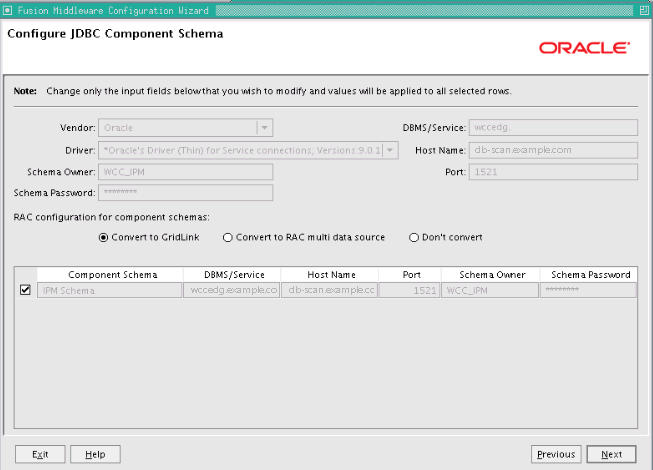
Description of "Figure 13-2 Configure JDBC Component Schema Screen for Imaging"
-
Click Next.
-
-
On the Configure GridLink RAC Component Schema screen (Figure 13-3), perform the following steps:
-
Make sure IPM Schema is selected. Leave the other data sources as they are.
Figure 13-3 Configure GridLink RAC Component Schema Screen for Imaging
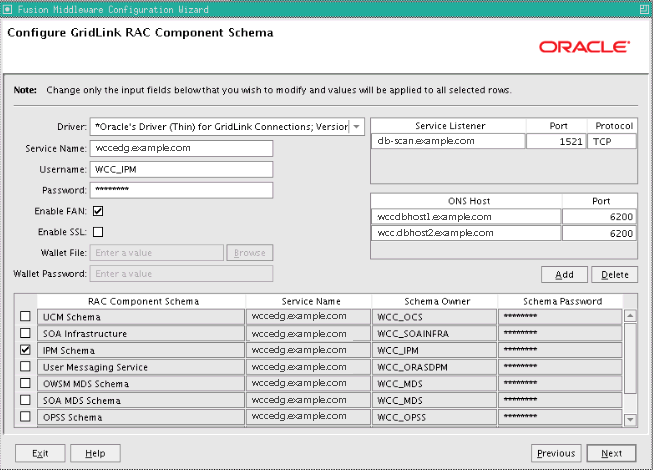
Description of "Figure 13-3 Configure GridLink RAC Component Schema Screen for Imaging"
-
Enter values for the following fields, specifying the connection information for the GridLink RAC database that was seeded through RCU:
-
Driver: Select Oracle's Driver (Thin) for GridLinkConnections; Versions: 11 and later.
-
Service Name: Enter the service name of the Oracle RAC database in lowercase letters, followed by the domain name; for example,
wccedg.example.com. -
Username: Enter the complete user name for the database schema owner of the corresponding component.
This book uses
WCCas the prefix of user names for the database schemas. -
Password: Enter the password for the database schema owner.
-
Select Enable FAN.
-
Enable SSL: Leave this option deselected.
If you select SSL to enable Oracle Notification Service (ONS) notification encryption, provide the appropriate Wallet File and Wallet Password details.
-
Service listener: Enter the Oracle Single Client Access Name (SCAN) address and port for the Oracle RAC database being used. The protocol should be
TCP.Oracle recommends that you use a SCAN address to specify the Service Listener (and OSN Host) so you do not need to update a GridLink data source containing a SCAN address if you add or remove Oracle RAC nodes. To determine the SCAN address, query the
remote_listenerparameter in the database:SQL>show parameter remote_listener; NAME TYPE VALUE ----- ------ ------- remote_listener string db-scan.example.com :1521
Note:
For Oracle Database 11g Release 1 (11.1), use the virtual IP address and port of each database instance listener, as in these examples:wccdbhost1-vip.example.com (port 1521) wccdbhost2-vip.example.com (1521)
-
ONS Host: Enter here also the SCAN address for the RAC database and the ONS remote port, as reported by the database:
[orcl@WCCDBHOST1 ~]$ srvctl config nodeapps -s
ONS exists: Local port 6100, remote port 6200, EM port 2016
Note:
For Oracle Database 11g, use the host name and port of each database's ONS service, as in these examples:wccdbhost1.example.com (port 6200) wccdbhost2.example.com (6200)
-
-
Click Next.
Note:
Leave the UCM Schema, SOA Infrastructure, User Messaging Service, OWSM MDS Schema, and SOA MDS Schema information as is. -
-
On the Test JDBC Component Schema screen, select the IPM Schema row, then click Test Connections.
The Connection Results Log displays the results. Ensure that the connection to the database that contains the schema was successful. If not, click Previous to return to the previous screen, correct your entry, and then retry the test.
Figure 13-4 Test JDBC Component Schema Screen for Imaging
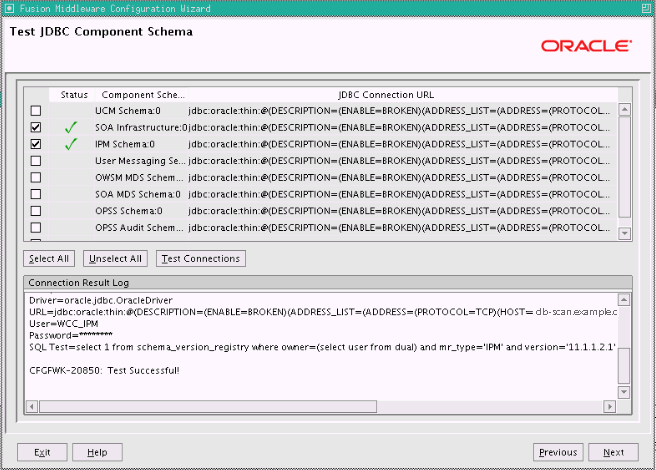
Description of "Figure 13-4 Test JDBC Component Schema Screen for Imaging"
Click Next when the connection is successful.
-
On the Optional Configuration screen, select the following options:
-
JMS Distributed Destination
-
Managed Servers, Clusters and Machines
-
Deployment and Services
Click Next.
-
-
On the Select JMS Distributed Destination Type screen, select UDD from the drop-down list for the JMS modules of all Oracle Fusion Middleware components. Click Next. If an override warning appears, click OK to acknowledge it.
-
On the Configure Managed Servers screen, add the required Managed Servers.
A server is created automatically. Rename this to WLS_IMG1 and add a new server called WLS_IMG2. Give these servers the attributes listed in Table 13-2. Do not modify the other servers that appear on this screen; leave them as they are.
Table 13-2 Managed Servers for Imaging
Name Listen Address Listen Port SSL Listen Port SSL Enabled WLS_IMG1
WCCHOST1VHN2
16000
n/a
No
WLS_IMG2
WCCHOST2VHN2
16000
n/a
No
Click Next.
-
On the Configure Clusters screen, click Add to add the clusters as shown in Table 13-3. Do not modify the other clusters that appear on this screen; leave them as they are.
Table 13-3 Cluster Configuration for Imaging
Name Cluster Messaging Mode Multicast Address Multicast Port Cluster Address IMG_Cluster
unicast
n/a
n/a
Leave empty.
Click Next.
-
On the Assign Servers to Clusters screen, add the following. Do not modify the other assignments that appear on this screen; leave them as they are.
-
IMG_Cluster:
-
WLS_IMG1
-
WLS_IMG2
-
Click Next.
-
-
On the Configure Machines screen, open the Unix Machine tab. You should see the WCCHOST1 and WCCHOST2 machines and have the following entries:
Table 13-4 Machines and Node Manager Listen Addresses
Name Node Manager Listen Address WCCHOST1
WCCHOST1
WCCHOST2
WCCHOST2
ADMINHOST
localhost
Leave all other fields to their default values. Click Next.
-
On the Assign Servers to Machines screen, assign servers to machines as follows:
-
Assign WLS_IMG1 to WCCHOST1.
-
Assign WLS_IMG2 to WCCHOST2.
Click Next.
-
-
On the Target Deployments to Clusters or Servers screen, make sure that targeting is done as follows (see Figure 13-5):
-
The usermessagingserver and usermessagingdriver-email deployments are targeted only to SOA_Cluster. (The usermessaging-xmpp, usermessaging-smpp, and usermessaging-voicexml applications are optional.)
-
WSM-PM should be targeted only to SOA_Cluster.
-
The oracle.rules*, oracle.sdp.* and oracle.soa.* deployments should be targeted only to SOA_Cluster, except for the oracle.soa.workflow.wc library, which should be targeted to both SOA_Cluster and IMG_Cluster.
-
EM Application is targeted only to AdminServer.
Figure 13-5 Target Deployments to the Imaging Cluster
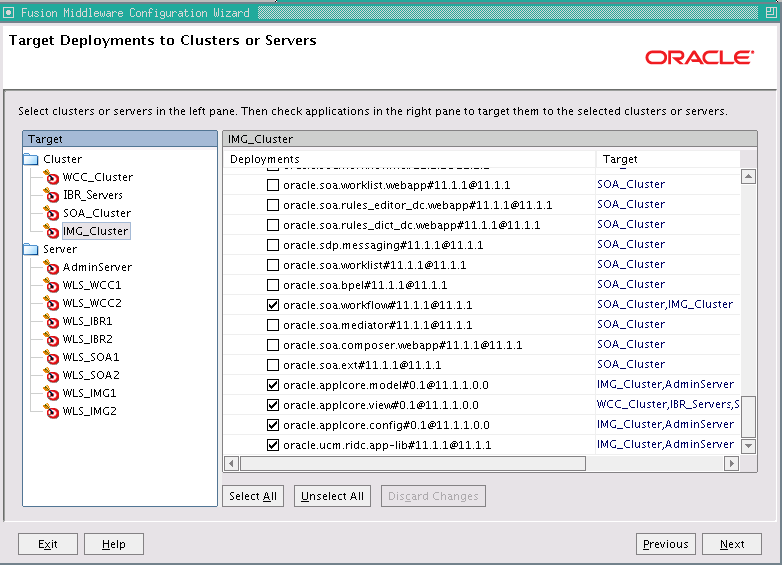
Description of "Figure 13-5 Target Deployments to the Imaging Cluster"
Click Next.
-
-
On the Target Services to Clusters or Servers screen, select all OPSS-related data sources to be targeted to IMG_Cluster:
-
opss-audit-viewDS
-
opss-audit-DBDS
-
opss-DBDS
Click Next.
-
-
On the Configuration Summary screen, click Extend.
-
If a dialog box opens warning about conflicts in ports for the domain, click OK. This should be due to pre-existing servers in the nodes, and the warning can be ignored.
-
On the Creating Domain screen, click Done.
13.4 Restarting the Administration Server
You need to restart the Administration Server to make the domain extension changes take effect, using the Node Manager nmKill and nmStart commands through the Oracle WebLogic Scripting Tool (WLST), as described in Section 10.3, "Restarting the Administration Server." You can use the Administration Console instead of nmKill to stop the Administration Server.
13.5 Completing Postconfiguration and Verification Tasks for Imaging
The following sections describe how to do postconfiguration and verification tasks for Imaging:
-
Section 13.5.1, "Disabling Host Name Verification for the WLS_IMG Managed Servers"
-
Section 13.5.2, "Propagating the Domain Configuration to WLS_IMG1 and WLS_IMG2"
-
Section 13.5.3, "Configuring JMS Persistence Stores for Imaging"
-
Section 13.5.5, "Validating GridLink Data Sources for Imaging"
-
Section 13.5.6, "Validating Deployment of the Imaging Viewer Cache"
-
Section 13.5.8, "Enabling the Imaging Feature Set in Oracle WebCenter Content"
13.5.1 Disabling Host Name Verification for the WLS_IMG Managed Servers
For the enterprise deployment described in this guide, you set up the appropriate certificates to authenticate the different nodes with the Administration Server after you have completed the procedures to extend the domain for Imaging. You must disable the host name verification for the WLS_IMG1 and WLS_IMG2 Managed Servers to avoid errors when managing the different WebLogic Server instances. For more information, see Section 8.4.5, "Disabling Host Name Verification."
You enable host name verification again once the enterprise deployment topology configuration is complete. For more information, see Section 16.3, "Enabling Host Name Verification Certificates for Node Manager."
13.5.2 Propagating the Domain Configuration to WLS_IMG1 and WLS_IMG2
Propagate the start scripts and classpath configuration from the Administration Server's domain directory to the Managed Server domain directory.
To propagate the domain configuration to the Imaging Managed Servers:
-
Create a copy of the Managed Server domain directory and the Managed Server applications directory.
-
Run the following
packcommand on WCCHOST1 to create a template pack:cd ORACLE_COMMON_HOME/common/bin ./pack.sh -managed=true -domain=ASERVER_HOME -template=edgdomaintemplateIMG.jar -template_name=edgdomain_templateIMG
In the reference topology,
ORACLE_COMMON_HOMEis the/u01/oracle/products/fmw_home/oracle_commondirectory, andASERVER_HOMEis the/u01/oracle/config/domains/WCCDomaindirectory. -
Run the following
unpackcommand on WCCHOST1 to propagate the template created in the preceding step to the WLS_IMG1 domain directory:cd ORACLE_COMMON_HOME/common/bin ./unpack.sh -domain=MSERVER_HOME -template=edgdomaintemplateIMG.jar -app_dir=APPLICATION_HOME -overwrite_domain=true
In the reference topology,
MSERVER_HOMEis the/u02/oracle/config/domains/WCCDomaindirectory, andAPPLICATION_HOMEis the/u01/oracle/config/applications/WCCDomaindirectory.Notes:
-
Make sure to run
unpackfrom theORACLE_COMMON_HOME/common/bindirectory, not fromWL_HOME/common/bin. -
The
APPLICATION_HOMEdirectory gets backed up with thisunpackcommand. -
The
-overwrite_domainoption in theunpackcommand allows unpacking a Managed Server template into an existing domain and existing applications directories. For any file that is overwritten, a backup copy of the original is created. If any modifications had been applied to the start scripts and EAR files in the Managed Server domain directory, they must be restored after this unpack operation.
-
-
Run the following command on WCCHOST1 to copy the template pack created in step 1 to WCCHOST2:
scp edgdomaintemplateIMG.jar oracle@WCCHOST2: /u01/oracle/products/fmw_home/oracle_common/common/bin -
Run the following
unpackcommand on WCCHOST2 to unpack the propagated template to the WLS_IMG2 Managed Server domain directory:cd ORACLE_COMMON_HOME/common/bin ./unpack.sh -domain=/u02/oracle/config/domains/WCCDomain -template=edgdomaintemplateIMG.jar -app_dir=/u01/oracle/config/applications/WCCDomain –overwrite_domain=trueNotes:
-
Make sure to run
unpackfrom theORACLE_COMMON_HOME/common/bin/directory, not fromWL_HOME/common/bin/. -
The
APPLICATION_HOMEdirectory gets backed up with thisunpackcommand.
-
-
Restart the Administration Server to make these changes take effect, stopping it with the
nmKillcommand, or with the Administration Console, and then starting it with thenmStartcommand, as described in Section 10.3, "Restarting the Administration Server." Log in to the Administration Console using the credentials for theweblogicuser.
13.5.3 Configuring JMS Persistence Stores for Imaging
Configure the location for the JMS persistence stores as a directory that is visible from both nodes. By default, the JMS servers used by Oracle WebCenter Content: Imaging are configured with no persistence store and use the WebLogic Server store (/u01/oracle/config/applications/WCCDomain/servers/server_name/data/store/ default.).
To change the Imaging JMS server persistence store to use a shared base directory:
-
Log in to the WebLogic Server Administration Console.
-
In the Domain Structure tree on the left, expand the Services node, and then click the Persistence Stores node.
-
On the Summary of Persistence Stores page, click Lock & Edit.
-
Click New, and then Create File Store.
-
Enter a name (for example,
IMGJMSServer1Store, which allows you identify the service it is created for) and target WLS_IMG1. Enter a directory that is located in shared storage so that it is accessible from both WCCHOST1 and WCCHOST2 (/u01/oracle/config/domains/WCCDomain/IMG_Cluster/jms). -
Click OK and activate the changes.
-
In the Domain Structure tree on the left, expand the Services node, and then click the Messaging->JMS Servers node.
-
On the Summary of JMS Servers page, click IpmJmsServer1 JMS Server (represented as a hyperlink) in the Name column of the table.
-
On the settings page for the JMS server, click Lock & Edit.
-
In the Persistent Store drop-down list, select IMGJMSServer1Store.
-
Click Save and Activate.
-
Repeat the steps and create IMGJMSServer2Store for IpmJmsServer2.
13.5.4 Starting the Imaging Managed Servers
Start the Imaging Managed Servers on WCCHOST1 and WCCHOST2.
To start the Imaging Managed Servers:
-
Start the WLS_IMG1 Managed Server:
-
Log in to the WebLogic Server Administration Console at
http://ADMINVHN:7001/console. -
In the Domain Structure tree on the left, expand the Environment node, and then select Servers.
-
On the Summary of Servers page, open the Control tab.
-
Select WLS_IMG1 from the Servers column of the table.
-
Click Start.
-
-
Access
http://WCCHOST1VHN2:16000/imagingto verify the status of WLS_IMG1. The Oracle WebCenter Content: Imaging login page opens. Enter your WebLogic Server administration user name and password to log in. -
Start the WLS_IMG2 Managed Server:
-
Log in to the WebLogic Server Administration Console at
http://ADMINVHN:7001/console. -
In the Domain Structure tree on the left, expand the Environment node, and then select Servers.
-
On the Summary of Servers page, open the Control tab.
-
Select WLS_IMG2 from the Servers column of the table.
-
Click Start.
-
-
Access
http://WCCHOST2VHN2:16000/imagingto verify the status of WLS_IMG2. The Oracle WebCenter Content: Imaging login page opens. Enter your WebLogic Server administration user name and password to log in.
Note:
These instructions are based on the assumption that the host name verification displayed previously for the Oracle WSM or Oracle SOA Suite Managed Servers in WCCHOST2 and that the Node Manager is already running on WCCHOST2.13.5.5 Validating GridLink Data Sources for Imaging
After the servers are started, verify that the GridLink data sources are correctly configured and that the ONS setup is correct. Perform this procedure for every GridLink data source created.
To verify the configuration of a GridLink data source for Imaging:
-
Log in to the WebLogic Server Administration Console.
-
In the Domain Structure tree, expand Services, then click Data Sources.
-
Click the name of a GridLink data source that was created.
-
Click the Monitoring tab.
-
Click the Testing tab (Figure 13-6), select one of the servers, and click Test Data Source.
Figure 13-6 Testing a GridLink Data Source for Imaging
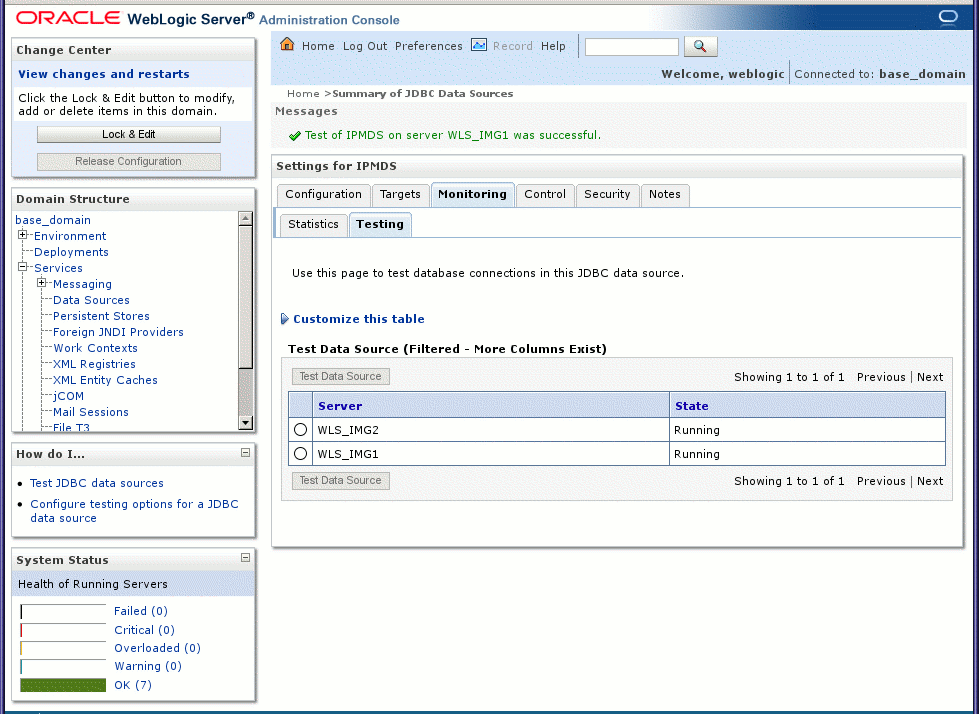
Description of "Figure 13-6 Testing a GridLink Data Source for Imaging"
The test should be successful if the configuration is correct.
-
Repeat the test for every WebLogic Server instance that uses the GridLink data source.
To verify the configuration of ONS for a GridLink data source for Imaging:
-
In the Domain Structure tree on the Administration Console, expand Services, then click Data Sources.
-
Click the name of a GridLink data source.
-
Click the Monitoring tab.
-
Click the name of the server (
WLS_IMG1). -
Click the ONS tab and then the Testing tab (Figure 13-7).
-
Select a server, and click Test ONS.
Figure 13-7 Testing the ONS Configuration for Imaging
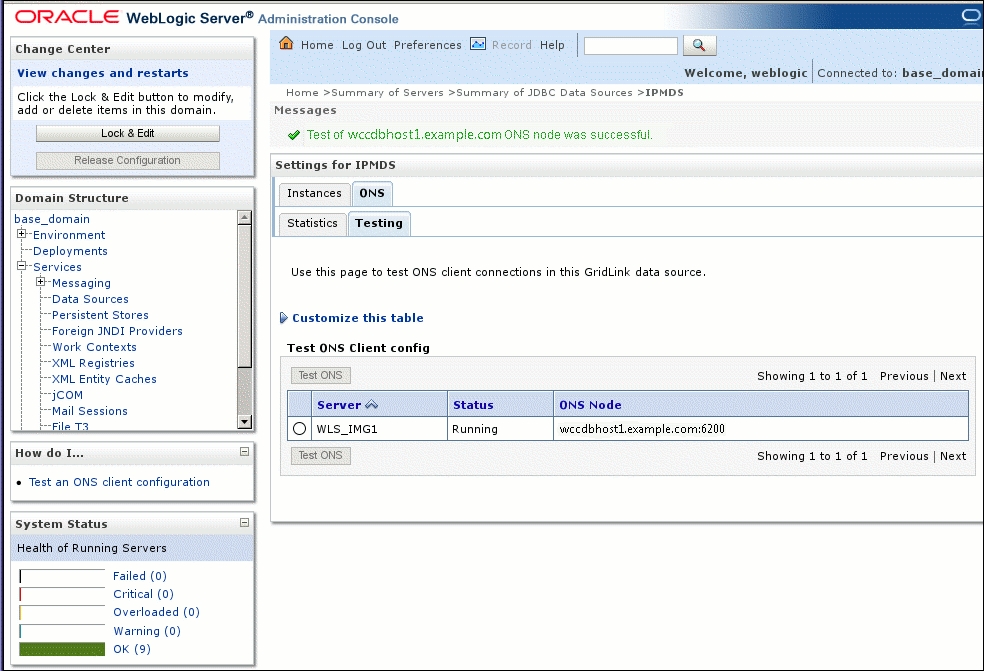
Description of "Figure 13-7 Testing the ONS Configuration for Imaging"
The test should be successful if the configuration is correct. If the ONS test fails, verify that the ONS service is running in the Oracle RAC database nodes:
[orcl@WCCDBHOST1 ~]$ srvctl status scan_listener
SCAN Listener LISTENER_SCAN1 is enabled
SCAN listener LISTENER_SCAN1 is running on node WCCDBHOST1
SCAN Listener LISTENER_SCAN2 is enabled
SCAN listener LISTENER_SCAN2 is running on node WCCDBHOST2
SCAN Listener LISTENER_SCAN3 is enabled
SCAN listener LISTENER_SCAN3 is running on node WCCDBHOST2


[orcl@WCCDBHOST1 ~]$ srvctl config nodeapps -s
ONS exists: Local port 6100, remote port 6200, EM port 2016


[orcl@WCCDBHOST1 ~]$ srvctl status nodeapps | grep ONS
ONS is enabled
ONS daemon is running on node: WCCDBHOST1
ONS daemon is running on node: WCCDBHOST2
-
Repeat the ONS test for every WebLogic Server instance that uses the GridLink data source.
13.5.6 Validating Deployment of the Imaging Viewer Cache
After the Imaging servers are started, verify that the Viewer Cache was deployed correctly.
To validate deployment of the Imaging Viewer Cache:
-
In the WebLogic Server Administration Console, click Deployments under Domain Structure on the left.
-
In the
imaging-vcrow of the Deployments table, confirm that the State value isActiveand the Health value isOK.If the State or Health value is different for
imaging-vc, you need to redeploy the feature before proceeding.
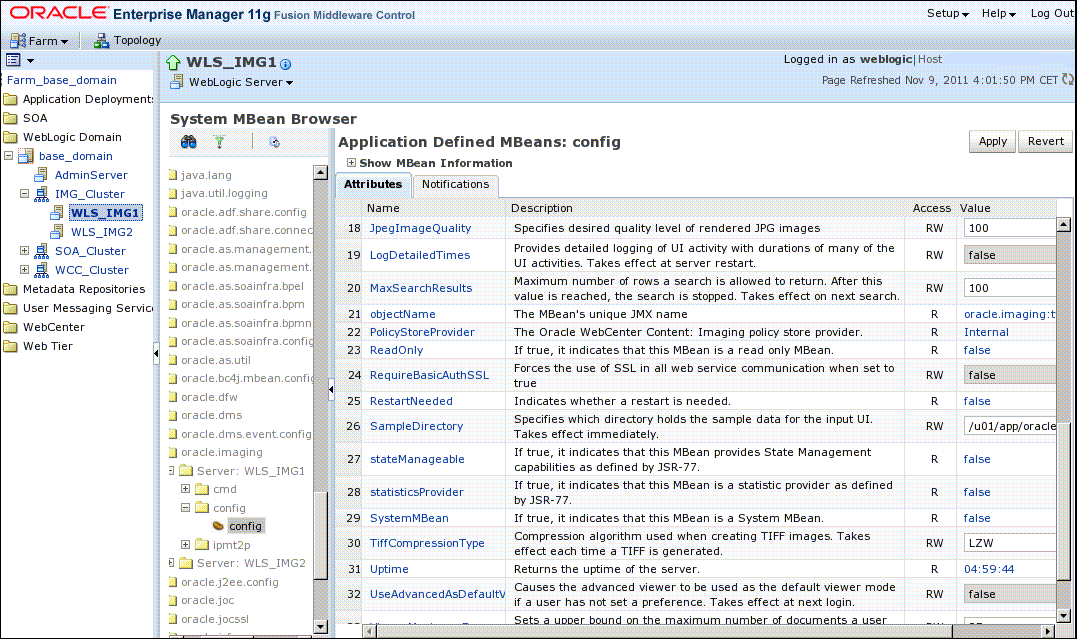
13.5.7 Configuring System MBeans for Imaging
You can configure the following system MBeans for Imaging:
-
InputDirectories -
SampleDirectory -
GDFontPath
To configure system MBeans for Imaging:
-
Log in to Oracle Enterprise Manager Fusion Middleware Control at
http://ADMINVHN:7001/em(Figure 13-8). -
In the navigation tree on the left, expand the farm domain name, then WebLogic Domain, then the domain name, then IMG_Cluster, and then WLS_IMG1.
-
At the top, click the WebLogic Server drop-down menu, and choose System MBean Browser.
-
Expand Application Defined MBeans and then oracle.imaging.
-
Expand Server: WLS_IMG1 and then config.
-
Click the config bean link.
-
On the right, set the InputDirectories MBean to specify the path to the input files:
ASERVER_HOME/IMG_Cluster/input_files.In the reference topology,
ASERVER_HOMEis the/u01/oracle/config/domains/WCCDomaindirectory.All Oracle WebCenter Content servers involved must be able to resolve this location (that is, through the NFS mount point).
-
Set the SampleDirectory MBean:
ASERVER_HOME/IMG_Cluster/input_files/Samples.To process input files, the input agent must have the appropriate permissions for the input directory, and the input directory must allow file locking. The input agent requires that the user account that is running the WebLogic Server service have read and write privileges for the input directory and for all files and subdirectories in the input directory. These privileges are required so that the input agent can move the files to the various directories as it works on them. File locking on the share is needed by the input agent to coordinate actions between servers in the cluster.
-
Set the GDFontPath MBean to specify the path to the GD fonts for the X Windows System. Check with your system administrator. The default is likely
/usr/share/X11/fonts/TTFor/usr/lib/X11/fonts/TTF. -
Validate that the changes are reflected on the 2nd Managed Server (WLS_IMG2). If not, add those changes to WLS_IMG2.
-
Click Apply.
13.5.8 Enabling the Imaging Feature Set in Oracle WebCenter Content
Enable the Imaging feature set in the Oracle WebCenter Content Server Component Manager.
To enable the Imaging feature set in Oracle WebCenter Content:
-
Log in to Content Server at
http://WCCHOST1:16200/cs. -
From the Administration tray or menu, choose Admin Server, then Component Manager.
-
On the Component Manager page, under Integration, select IpmRepository.
-
Click Update to enable the IpmRepository component, and confirm the action:
-
In the paragraph at the top of the Component Manager page, click advanced component manager.
-
On the Advanced Component Manager page, verify that IpmRepository is in the Enabled Components box.
-
-
Restart the Managed Server, as described in Section 8.4.3, "Starting the Administration Server on WCCHOST1," and then restart all Managed Servers in the Oracle WebCenter Content cluster, using the WebLogic Server Administration Console.
13.5.9 Configuring the Imaging Viewer Cache
The Imaging viewer can cache documents on the server outside of the repository to increase rendering speed on the client machine. Security for the cached documents is controlled by authentication for the server on which they are stored. If the server is considered secure, no additional security is necessary.
If additional security is required, you can encrypt cached documents, as described in Section 13.5.10, "Encrypting Cached Documents." For information about when to use the precache option and how to optimize ingestion and rendering when processing a large number of documents, see "Balancing Ingestion and Rendering When Viewer Cache is Enabled" in Oracle Fusion Middleware Administering Oracle WebCenter Content: Imaging.
To set the Imaging viewer to use cached documents, you need to set the following system MBeans:
-
ViewerCachePath -
ViewerCacheDays -
ViewerCacheEnablePrecache
To configure these MBeans for the Imaging Viewer Cache, use the method described in Section 13.5.7, "Configuring System MBeans for Imaging," as follows:
-
Set the ViewerCachePath MBean to the location where documents should be cached, and click Apply:
ASERVER_HOME/IMG_Cluster/ViewerCacheIn the reference topology,
ASERVER_HOMEis the/u01/oracle/config/domains/WCCDomaindirectory.Note:
The ViewerCachePath MBean should be set to a location available to all servers in the cluster. If the directory path is not available to all servers, then each server will cache documents locally, resulting in multiple instances of the entire cache. -
Set the ViewerCacheDays MBean to
30, and click Apply.Note:
This configuration value specifies the number of days cached images should be retained before they are purged from the cache. Setting ViewerCacheDays equal to0prevents the cache from being purged. -
Set the ViewerCacheEnablePrecache MBean to
true, and click Apply.Note:
This configuration value specifies whether documents should be cached as soon as they are ingested into Imaging (precached). -
If you are going to encrypt cached document, configure Imaging to encrypt them, as Section 13.5.10, "Encrypting Cached Documents," describes.
Note:
This is an additional option to encrypt the page images in the cache. The password credential must exist on the domain before you set the ViewerCacheEnableEncryption MBean. To add a password credential, use the method described in Section 13.5.10, "Encrypting Cached Documents."
For information about moving the viewer cache to a new location, see "Changing the Viewer Cache Path" in Installing and Configuring Oracle WebCenter Content.
13.5.10 Encrypting Cached Documents
If additional security is required, you can configure Imaging to encrypt cached documents. Encryption makes additional processing necessary to decrypt a document for viewing and reduces rendering speed. Even if Imaging is configured to encrypt the cached documents, there is a brief period of time during caching when generated documents are not encrypted.
To enable encryption of cached documents, add a new password credential to the domain through Oracle Enterprise Manager Fusion Middleware Control, and set the ViewerCacheEnableEncryption MBean.
To enable encryption of cached documents:
-
Log in to Fusion Middleware Control at
http://ADMINVHN:7001/em(Figure 13-8). -
Select the WebLogic Server domain for Oracle WebCenter Content.
-
From the WebLogic Domain menu, choose Security and then Credentials.
-
Select the map oracle.imaging. If no map named
oracle.imagingexists, click Create Map, enteroracle.imagingfor the map name, and then select it. -
On the
oracle.imagingmap, click Create Key. Name the keyviewer.cache, and select the type Password. -
Enter a user name. The user name does not need to exist in any system.
-
Enter a password, confirm it, and then click OK.
-
Set the ViewerCacheEnableEncryption MBean to
true, as described in Section 13.5.7, "Configuring System MBeans for Imaging."
For information about disabling encryption, see "Disabling Encryption of Cached Documents" in Installing and Configuring Oracle WebCenter Content.
13.5.11 Adding the Imaging Server Listen Addresses to the List of Allowed Hosts in Oracle WebCenter Content
Add the host names of the WLS_IMG1 and WLS_IMG2 Managed Servers (WCCHOST1VHN2 and WCCHOST2VHN2, respectively) to the SocketHostNameSecurityFilter parameter list.
To add the Imaging server listen addresses to allowed hosts in Oracle WebCenter Content:
-
Open the file
/u01/oracle/config/domains/WCCDomain/WCC_Cluster/cs/config/config.cfgin a text editor. -
Remove or comment out the following line:
SocketHostAddressSecurityFilter=127.0.0.1|WCCHOST1-IP|WCCHOST2-IP|WEBHOST1-IP|WEBHOST2-IP
-
Add the following lines to include the WLS_IMG1 and WLS_IMG2 listen addresses in the list of addresses that are allowed to connect to Oracle WebCenter Content:
SocketHostNameSecurityFilter=localhost|localhost.example.com|WEBHOST1| WEBHOST2|WCCHOST1|WCCHOST2|WCCHOST1VHN1|WCCHOST2VHN1|WCCHOST1VHN2|WCCHOST2VHN2| ucminternal.example.com|load-balancer-host-name
AlwaysReverseLookupForHost=Yes
Notes:
-
You can use IP addresses (listen addresses) in the value of
SocketHostAddressSecurityFilter, as suggested in Section 19.13.13, "Improving Performance with Very Intensive Document Uploads from Oracle WebCenter Content: Imaging to Oracle WebCenter Content." -
The load balancer host name is the one that was used to configure the virtual servers in Section 3.3, "Load Balancers."
-
-
Save the modified
config.cfgfile, and restart the Oracle WebCenter Content servers, using the WebLogic Server Administration Console, for the changes to take effect.
13.5.12 Creating a Connection to Content Server
Create a connection to Oracle WebCenter Content Server connection in Imaging.
To create a Content Server connection:
-
Log in to the WLS_IMG1 Imaging console at
http://WCCHOST1VHN2:16000/imaging. -
On the left, click Manage Connections, and then Create Content Server Connection.
-
Enter a name and description for the new connection, and then click Next.
-
On the Connection Settings screen, make these changes:
-
Unselect Use Local Content Server.
-
Set the Content Server port to 6300.
-
Add the
ucminternal.example.comload balancer address under Content Server Pool.
If you get a
Permission deniederror, go back to Section 13.5.11, "Adding the Imaging Server Listen Addresses to the List of Allowed Hosts in Oracle WebCenter Content," and add name of the host that was denied to the list of allowable hosts.Click Next.
-
-
On the Connection Security screen, leave the default selections for the WebLogic Server user, and then click Next.
-
Review the connection details and click Submit.
13.5.13 Configuring a BPEL CSF Credential
When connecting to a BPEL system from Oracle WebCenter Content: Imaging, you need to configure the required credential to communicate with Oracle SOA Suite.
To add a BPEL CSF credential:
-
On WCCHOST1, change the directory to the
common/bin/location under the WebCenter Content Oracle home in WCCHOST1 (where your Administration Server resides):cd WCC_ORACLE_HOME/common/bin(
WCC_ORACLE_HOMEis the Oracle home for Oracle WebCenter Content, which isMW_HOME/wcc_homein the EDG topology.) -
Run the Oracle WebLogic Scripting Tool (WLST):
./wlst.sh
-
Run
connect()and supply the user name, password, and Administration Server URL (t3://ADMINVHN:7001).wls:/offline> connect()
-
Create a CSF (Credential Store Framework) credential. This credential is the credential that Imaging will use to connect to the BPEL system. It should be a BPEL admin user. CSF credentials are user name/password pairs that are keyed by an alias and stored inside a named map in the CSF. Because of its integration with OWSM web services, Imaging is currently leveraging the standard OWSM CSF map named
oracle.wsm.security. To create a credential, use thecreateCredWLST command:wls:/domain_name/serverConfig> createCred(map="oracle.wsm.security", key="basic.credential", user="weblogic", password="password_for_credential")The
keyvalue in the command is the alias, which is used for theCredential Aliasproperty of the BPEL connection definition in the Imaging administration user interface (also theConnection.CONNECTION_BPEL_CSFKEY_KEYproperty in the API). The aliasbasic.credentialis used in the example because it is a standard default name used by OWSM and BPEL. However, the alias can be anything as long as it is unique within the map.Note:
A new map will need to be created or the existing one updated if a different user or password, or both, is later used when integrating the Oracle SOA Suite system with a central LDAP and single sign-on (SSO) system. For details on the sample users created, see Chapter 18, "Integrating with Oracle Identity Management." -
Restart the Oracle SOA Suite and Imaging Managed Servers, using the WebLogic Server Administration Console.
13.5.14 Configuring a Workflow Connection
Create and test a workflow connection for Imaging.
To configure a workflow connection:
-
Log in to the WLS_IMG1 imaging console at
http://WCCHOST1VHN2:16000/imaging. -
Under Manage Connections, click the Add icon and then Create Workflow Connection.
-
On the Workflow Connection Basic Information page, enter a name for the connection. The name will display in the Manage Connections panel. This field is required. Optionally, enter a brief description of the connection. The connection type defaults to Workflow Connection.
-
Click Next.
-
In the Workflow Connection Settings page, perform the following steps:
-
In the HTTP Front End Address field, specify the host name or IP address, domain, and port number of the workflow server:
http://wccinternal.example.com:80. This field is required. -
In the Credential Alias field, provide the credential alias created earlier,
basic.credential, as described in Section 13.5.13, "Configuring a BPEL CSF Credential." -
In the Provider field, enter your two Oracle SOA Suite server listen addresses separated by a comma:
t3://SOAHOST1VHN1,SOAHOST2VHN1:8001 -
Click the Test Connection button to confirm the connection parameters and see what composites exist on that BPEL machine.
-
Click Next.
-
-
Modify the security grants if desired.
-
Click Next.
-
Click Submit.
13.6 Configuring Oracle HTTP Server with the Imaging Cluster
To enable Oracle HTTP Server to route to IMG_Cluster, which contains the WLS_IMG1 and WLS_IMG2 Managed Servers, you must set the WebLogicCluster parameter to the list of nodes in the cluster.
This section includes the following topics:
-
Section 13.6.1, "Configuring Oracle HTTP Server for the WLS_IMG Managed Servers"
-
Section 13.6.2, "Validating Access Through the Load Balancer"
13.6.1 Configuring Oracle HTTP Server for the WLS_IMG Managed Servers
To configure Oracle HTTP Server for the WLS_IMG Managed Servers:
-
For each of the web servers on WEBHOST1 and WEBHOST2, add the following lines to the
ORACLE_INSTANCE/config/OHS/ohs1/moduleconf/wcc_vh.confandORACLE_INSTANCE/config/OHS/ohs2/moduleconf/wcc_vh.conffiles:# Oracle WebCenter Content: Imaging Application <Location /imaging > WebLogicCluster WCCHOST1VHN2:16000,WCCHOST2VHN2:16000 SetHandler weblogic-handler WLProxySSL ON WLProxySSLPassThrough ON </Location> -
For each of the web servers on WEBHOST1 and WEBHOST2, add the following lines to the
ORACLE_INSTANCE/config/OHS/ohs1/moduleconf/wccinternal_vh.confandORACLE_INSTANCE/config/OHS/ohs2/moduleconf/wccinternal_vh.conffiles:# Oracle WebCenter Content: Imaging Application <Location /imaging/ws > WebLogicCluster WCCHOST1VHN2:16000,WCCHOST2VHN2:16000 SetHandler weblogic-handler WLProxySSL OFF WLProxySSLPassThrough OFF </Location> # AXF WS Invocation <Location /axf-ws > WebLogicCluster WCCHOST1VHN2:16000,WCCHOST2VHN2:16000 SetHandler weblogic-handler WLProxySSL OFF WLProxySSLPassThrough OFF </Location>In the reference topology,
ORACLE_INSTANCEis the/u02/oracle/config/web1or/u02/oracle/config/web2directory.Note:
Components such as Capture use these URIs over the internal load-balancer URL (wccinternal.example.com) for internal references, such as in a Capture profile configuration for Imaging. -
Restart Oracle HTTP Server on both WEBHOST1 and WEBHOST2:
ORACLE_INSTANCE/bin/opmnctl restartproc ias-component=ohsXFor WEBHOST1, use
ohs1forias-component, and for WEBHOST2, useohs2.
13.6.2 Validating Access Through the Load Balancer
Verify URLs to ensure that appropriate routing and failover is working from the HTTP Server to IMG_Cluster.
To verify the URLs:
-
While WLS_IMG2 is running, stop WLS_IMG1 from the WebLogic Server Administration Console.
-
Access
http://wcc.example.com/imagingto verify that it is functioning properly. (You will not be able to retrieve reports or data because the Imaging server is down.) -
Start WLS_IMG1 from the WebLogic Server Administration Console.
-
Stop WLS_IMG2 from the WebLogic Server Administration Console.
-
Access
http://wcc.example.com/imagingto verify that it is functioning properly. -
Start WLS_IMG2 from the WebLogic Server Administration Console.
13.7 Configuring Node Manager for the WLS_IMG Managed Servers
Oracle recommends using host name verification for communication between Node Manager and the servers in the domain. This requires the use of certificates for the different addresses communicating with the Administration Server and other servers. For more details, see Chapter 16, "Setting Up Node Manager for an Enterprise Deployment."
The procedures in that chapter must be performed for the Oracle WebCenter Content deployment. The procedures in Section 16.3, "Enabling Host Name Verification Certificates for Node Manager," must be performed for the hosts and Oracle SOA Suite Managed Servers in the following table.
| Host Name (HOST) | Virtual IP Address (VIP) | Server Name (WLS_SERVER) |
|---|---|---|
| WCCHOST1 | WCCHOST1VHN2 | WLS_IMG1 |
| WCCHOST2 | WCCHOST2VHN2 | WLS_IMG2 |
For server migration of the Imaging Managed Servers, you need to associate these servers with the specified virtual host names. Check that these virtual host names are enabled by DNS or /etc/hosts resolution in your system and that they map to the appropriate virtual IP addresses. For more information, see Section 3.4, "IP Addresses and Virtual IP Addresses."
13.8 Configuring Server Migration for the WLS_IMG Managed Servers
Server migration is required for proper failover of the Oracle WebCenter Content: Imaging components in the event of failure in any of the WCCHOST1 and WCCHOST2 nodes. For more details, see Chapter 17, "Configuring Server Migration for an Enterprise Deployment." For Imaging, use the following values for the variables in that chapter:
-
Server names:
-
WLS_SERVER1: WLS_IMG1
-
WLS_SERVER2: WLS_IMG2
-
-
Host names:
-
HOST1: WCCHOST1
-
HOST2: WCCHOST2
-
-
Cluster name:
-
CLUSTER: IMG_Cluster
-
13.9 Backing Up the Installation
After you have verified that the extended domain is working, back up the installation. This is a quick backup for the express purpose of immediate restore in case of problems in the further steps. The backup destination is the local disk. This backup can be discarded once the enterprise deployment setup is complete. At that point, the regular deployment-specific backup and recovery process can be initiated. The Oracle Fusion Middleware Administrator's Guide provides further details. For information on describing the Oracle HTTP Server data that must be backed up and restored, refer to the "Backup and Recovery Recommendations for Oracle HTTP Server" section in that guide. For information on how to recover components, see the "Recovery of Components" and "Recovery After Loss of Component" sections in the guide. For recommendations specific to recovering from the loss of a host, see the "Recovering Oracle HTTP Server to a Different Host" section in the guide. For information about database backup, see the Oracle Database Backup and Recovery User's Guide.
To back up the installation at this point:
-
Back up Oracle Web Tier on WEBHOST1:
-
Shut down the instance using
opmnctl./u02/oracle/config/webN/bin/opmnctl stopall -
Back up the Middleware home for Oracle Web Tier with the following command (as root):
tar -cvpf BACKUP_LOCATION/web.tar MW_HOME
-
Back up the Oracle instance for Oracle Web Tier with the following command:
tar -cvpf BACKUP_LOCATION/web_instance_name.tar ORACLE_INSTANCE
-
Start the instance with
opmnctl:cd /u02/oracle/config/webN/bin opmnctl startall
-
-
Back up the database. This is a full database backup (either hot or cold) using Oracle Recovery Manager (recommended) or operating system tools such as tar for cold backups if possible.
-
Back up the Administration Server and Managed Server domain directory to save your domain configuration. The configuration files all exist in the
/u01/oracle/config/domains/WCCDomaindirectory. Run the following command in WCCHOST1 to create the backup:tar -cvpf edgdomainback.tar /u01/oracle/config/domains/WCCDomain