1 Getting Started with Capture
This chapter describes how to get started using the Oracle WebCenter Enterprise Capture client. First the basics of Capture are introduced, including how Capture works with batches, documents, and profiles. After starting the client application, you learn how to navigate its panes. Lastly, you identify your Capture role by learning the main ways users use the client to scan, import, index, and work with document batches.
This chapter covers the following main topics:
1.1 Understanding Capture basics
This section describes what you need to know about Capture to start using it.
1.1.1 About the Capture client
The Capture client is Capture's user application for:
-
Scanning and importing (capturing) documents
-
Reviewing, editing, and indexing documents
-
Releasing documents so that they can be further processed, checked into a content repository, or attached to business application records
The Capture client is a Java applet that is automatically downloaded when you connect to the Capture server through your browser or from a business application.
1.1.2 About batches and documents
Batches and documents are the primary drivers of work in Capture.
-
As a client user, you scan or import groups of pages in batches using a client profile, which is defined by an administrator known as a Capture workspace manager. See Section 1.1.3.
-
A batch contains one or more documents, which may be related (for example, multiple documents for a customer) or unrelated (for example, documents divided by separator sheets). A document may consist of scanned images or an electronic file such as a Microsoft Word or a PDF file. See Section 1.1.4.
-
A batch can be locked or released (unlocked). A lock icon displays when a batch is locked by you or another user. Releasing a batch removes the batch icon's lock and depending on the client profile settings, frees the batch for another user or a system processor to work on. See Section 1.1.6.
-
If the client profile includes indexing, each document can be assigned metadata (index) values. A customer document might be assigned metadata values such as a customer ID and name. Documents of different types in a batch typically have different sets of metadata fields available. A document profile identifies the set of metadata fields to complete for a selected document.
1.1.3 About client profiles
A client profile is a group of settings you select to instruct Capture how to scan, import, or index a batch's documents. A client profile controls such things as scanner settings, how documents are created and separated in the batch, whether metadata fields are available and required, and what happens next to batches after you release them.
1.1.4 Which document types you can scan or import into Capture
In Capture, a document consists of one of the following:
-
One or more images obtained from a scanner or imported from a file.
-
A non-image, electronic file such as a Microsoft Word or a PDF file. When you import non-image files, the client profile determines if they are retained in their original format, converted to an image format, or prevented from being imported.
1.1.5 Understanding whether you can capture and index batches
The selected client profile determines whether you can use it to capture documents only, capture and index documents, or index documents only. You can tell the client profile's type by the toolbar buttons and panes that display when you select a document in the batch pane:
-
If no metadata pane displays, the client profile is capture-only. Capture-only profiles do not include indexing.
-
If metadata fields display in the lower left pane and capture buttons display in the batch pane, the client profile is capture-and-index.
-
If metadata fields display in the lower left pane but no capture buttons display in the batch pane, the client profile is index-only. You can assign metadata values to documents in index-only batches, but cannot append, insert, or replace pages.
1.1.6 About processing and releasing batches
When you are done working on a batch's documents, you release the batch, which unlocks it from your use. What happens next depends on client profile settings:
-
The batch may be removed from the batch pane list and committed elsewhere such as to a content repository, or it may be placed in a queue for further processing such as document conversion or bar code recognition.
-
The batch may remain in the list but unlocked (no lock icon displays). This allows you or another user to lock the batch for use and make further changes.
1.2 Starting the Capture client
Start the Capture client in one of the following ways:
-
Enter a web address in a browser.
For example, you might enter a URL with the following format in a browser address field:
http://hostname:16400/dc-client -
Begin scanning in another application, such as a business application.
For example, you might click a Scan button from a record in your business application, to scan a document and attach it to the selected business record.
Note:
If prompted, sign in to Capture by entering a user ID and a password.1.3 Navigating the Capture client
The Capture client provides a single window with three distinct work areas, or panes. You perform actions on batches, documents, and pages in these panes:
-
Batch pane
The batch pane in the upper left is fixed, while its other panes change, depending on your selection in the batch pane's tree. See Section 1.3.1.
When you select a batch in the batch pane, Batch Information displays in the right pane to view or edit. For example, change the batch's status or priority, or include a note as a reminder or for others to view. See Section 1.3.4.
-
Document pane
When you select a document in the batch pane, the right pane displays the document pane, containing the batch's documents, their thumbnail images, and document options in a top toolbar. See Section 1.3.2.
-
Metadata pane
The lower left pane, the metadata pane, displays metadata fields for indexing documents. Note that the metadata pane displays only when indexing is configured for the selected client profile. See Section 1.3.3.
Figure 1-2 Capture Client Window Displaying Batch, Document, and Metadata Panes
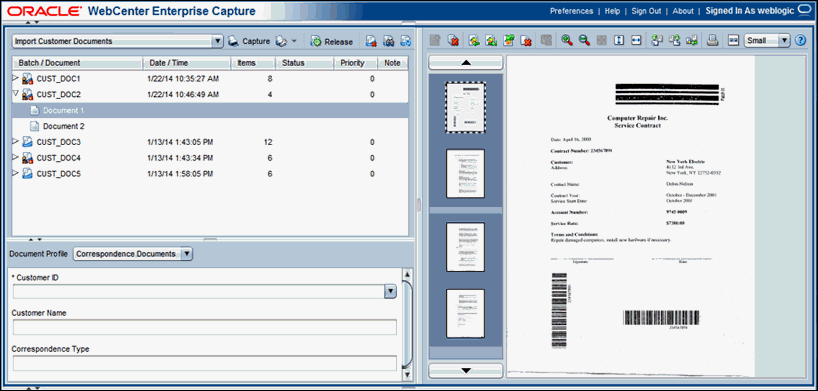
Description of "Figure 1-2 Capture Client Window Displaying Batch, Document, and Metadata Panes"
1.3.1 About the Batch pane
The batch pane always displays in the upper left pane, listing batches and their documents in a hierarchical batch list tree. Use the batch pane to select batches and documents, and to perform actions on batches by clicking batch toolbar buttons above the tree.
-
To select a batch, click its name. You can edit its batch information in the right pane. See Section 1.3.4.
-
To select a document, expand the batch by clicking the triangle before the batch name, then select a document.
Figure 1-4 Document Selected in Batch Pane
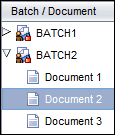
Description of "Figure 1-4 Document Selected in Batch Pane"
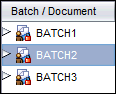
Table 1-1 describes the batch pane toolbar buttons and keyboard shortcuts.
Table 1-1 Batch Pane Buttons and Keyboard Shortcuts
| Batch Pane Buttons | Button Name | Shortcut | Description |
|---|---|---|---|
|
|
Client Profiles |
Select a profile to apply its settings when scanning or importing batches. A client profile must always be selected when creating, updating, or releasing batches. |
|
|
|
Capture |
F9 |
Begin scanning or importing documents, using the selected client profile, capture settings, and capture source. |
|
|
Capture Settings/ Capture Source |
Ctrl+S (Settings) Ctrl+Alt+S (Source) |
This button has two functions:
|
|
|
Release |
F10 |
Unlock one or more selected batches, which synchronizes their data with the Capture server and automatically forwards the batch for post-processing, if configured in the batch's client profile. |
|
|
Delete Batch |
Permanently remove one or more selected batches, including their documents and metadata. |
|
|
|
Search |
F7 |
Specify criteria to search for batches and filter the batch list. Filtering remains (even during batch refreshes) until you select the client profile again or clear the search criteria. You can search based on batch name, creation date, status, priority, or processing state. Note that client profile settings can affect the batches displayed. |
|
|
Refresh Batch List |
F5 |
Reload the list of batches to reflect recent batch changes. Note that filtering remains during batch refreshes. |
|
Select First Document |
Home |
Keyboard shortcut that selects the first document in the batch when a document is currently selected. |
|
|
Select Last Document |
End |
Keyboard shortcut that selects the last document in the batch when a document is currently selected. |
Table 1-2 describes batch list icons, which indicate whether you can work on a batch.
| Batch List Icon | Icon Name | Description |
|---|---|---|
|
Locked to You |
Indicates that the batch is locked to you, the user currently using the workstation. You can have multiple batches locked and open to you at once. Other users cannot access these batches until you release them. |
|
|
Locked to Another User |
Indicates that the batch is locked by another user. If you attempt to expand a batch locked to another user, a message displays, indicating the user who locked it and the workstation name. |
|
|
Unlocked |
Indicates that the batch is unlocked and ready for you or another user to select it to work on. |
|
|
Processing |
Indicates that the batch is currently undergoing processing and cannot be accessed. For example, depending on client profile settings, the batch's documents might be undergoing conversion, bar code recognition, or commit processing. You can click the Batch Refresh button to check if the batch is still in the processing state. |
|
|
Error |
Indicates that the batch contains one or more documents with errors. See Section A.1. |
1.3.2 About the Document pane
Use the document pane to review and edit selected documents. This pane displays in the right pane whenever a document is selected in the batch pane. It displays details for the batch's documents, including a scrollable thumbnail view of document pages, in which:
-
The selected thumbnail's page also displays as an adjacent full page view, allowing you to carefully review pages and further magnify them if needed. A dotted outline indicates the selected thumbnail.
-
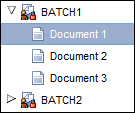
A light-colored bar between pages identifies the end of one document and the start of the next.
-
You can drag and drop thumbnails from image documents to move pages within or between documents.
Note:
You cannot move pages contained in non-image documents.
Toolbar buttons along the top of the pane allow you to make changes to documents or their pages, as listed in Table 1-3. Note that the document pane must be selected to use keyboard shortcuts.
Table 1-3 Document Pane Buttons and Keyboard Shortcuts
| Button | Name | Shortcut | Description |
|---|---|---|---|
|
|
Create New Document |
Ctrl+E |
Create a new document, using the current page and all pages below it, until the next document. |
|
|
Remove/Delete Documents |
Ctrl+Alt+D |
Depending on your selection, either:
See Section 3.3.2. |
|
|
Insert Pages |
Scan or import new pages into the batch, inserting them before the selected page. See Section 3.4.1.
|
|
|
|
Append Pages |
Ctrl+Alt+A |
Scan or import pages to add to the batch. See Section 3.4.2.
|
|
|
Replace Page |
Delete the selected page and replace it with the page you scan or import. See Section 3.4.3. |
|
|
|
Delete Pages |
Ctrl+D |
Delete one or more selected pages. See Section 3.4.4. |
|
|
Database Lookup |
Ctrl+L |
Perform a database search for the selected metadata field. This button is active only when configured for the metadata field. Enter a search value and click the Database Lookup toolbar button or press Ctrl+L. If multiple matching values display in a results list, select a value. |
|
|
Zoom In |
Ctrl+I |
Increases the magnification of the selected page view. Click repeatedly to further zoom in. |
|
|
Zoom Out |
Ctrl+O |
Decreases the magnification of the selected page view. Click repeatedly to further zoom out. |
|
|
Fit to Window |
Ctrl+W |
Changes the page display so that the entire page fits in the window. |
|
|
Fit to Height |
Changes the page display so that the entire height fits in the window. |
|
|
|
Fit to Width |
Changes the page display so that the entire width fits in the window. |
|
|
|
Rotate Left |
Rotates the selected page to the left 90 degrees. The page is saved as last rotated (applies to images only). |
|
|
|
Rotate Right |
Ctrl+R |
Rotates the selected page to the right 90 degrees. The page is saved as last rotated (applies to images only). |
|
|
Flip |
Rotates the selected page upside down 180 degrees. The page is saved as last rotated (applies to images only). |
|
|
|
Print Page |
Prints the selected page to the selected printer. |
|
|
|
View thumbnails horizontally/vertically |
Switches the thumbnail display between a vertical and horizontal orientation. |
|
|
|
Thumbnail size |
Displays thumbnails using a small, medium, or large view. |
|
|
|
Help |
F1 |
Displays help for the selected window. |
|
Next Document |
Ctrl+Alt+N |
Keyboard shortcut that selects the next document. |
|
|
Previous Document |
Ctrl+Alt+P |
Keyboard shortcut that selects the previous document. |
|
|
Next Page |
Ctrl+N |
Keyboard shortcut that moves the thumbnail selection to the next page. |
|
|
Previous Page |
Ctrl+P |
Keyboard shortcut that moves the thumbnail selection to the previous page. |
|
|
Display Document First Page |
Home |
Keyboard shortcut that moves the thumbnail selection to the first page of the document. This shortcut works only when the cursor focus is in the thumbnail area. |
|
|
Display Document Last Page |
End |
Keyboard shortcut that moves the thumbnail selection to the last page of the document. This shortcut works only when the cursor focus is in the thumbnail area. |
|
|
Select All Document Pages |
Ctrl + A |
Keyboard shortcut that selects all thumbnail pages in the selected document. This shortcut works only when the cursor focus is in the thumbnail area. |
1.3.3 About the Metadata pane
Use the metadata pane to index documents by completing their metadata values.
-
The metadata pane displays when the selected client profile includes indexing and a document is selected in either the batch or document pane.
-
Values you enter in the metadata fields apply to all pages in the selected document. To ensure standard input, metadata fields may use input masks or special formatting, numeric or date fields, choice lists, or database lookups, as described in Chapter 4. An asterisk indicates a required metadata field. See Section 4.1.1.
For example, you might enter an account number or look up a value from the database, which might auto populate related metadata fields.
-
Use the Document Profile field to identify the set of metadata fields to complete for the selected document.
For example, a batch of customer documents might contain correspondence and customer agreement document profiles. While indexing, you would select a Correspondence document profile each time you encounter a correspondence document and complete its fields, then select the Customer Agreement document profile each time you encounter an agreement document.
-
To move between metadata fields using keyboard shortcuts, press Tab to move to the next metadata field, and Shift-Tab to move to the previous metadata field.
1.3.4 About the Batch Information pane
Whenever you select a batch in the left batch pane, batch information displays in the right pane. Use the batch information to add or edit notes about the batch, and change its status or priority. You can also view the name of the user who created the batch and when it was created and last modified. See Chapter 5.
1.4 Capture client uses
This section introduces ways that production, knowledge, and business users use Capture.
Capture users typically fall into one of the following categories:
-
Production users launch Capture in their browser to process large volumes of batches and their documents. See Section 1.4.1 and Section 1.4.2 for scanning, and Section 1.4.4 for indexing.
-
Knowledge workers launch Capture in their browser to scan, import, and/or index documents occasionally as part of their job. See Section 1.4.1 and Section 1.4.3.
-
Business application users launch Capture indirectly from their business application to quickly scan and attach documents related to business application records. See Section 1.4.5.
1.4.1 Scenario 1: Scanning and indexing documents
This scenario applies to both a production user assigned to scan entire boxes of paper document folders and a user who scans document batches on an occasional basis. Regardless, the user must know the client profiles to use for different types of document batches. For example, this user might select:
-
A client profile called Separator Pages to scan batches that have separator pages placed between documents.
-
A client profile called Simplex or Duplex to scan batches that are composed of only single or double-sided documents.
-
A client profile called Prompt that prompts the user to specify how documents are comprised.
Within the client, the user chooses a client profile configured for the type of batch to scan and begins capturing a batch. The user reviews and indexes each document, then releases the batch. See Section 2.2 for more information.
1.4.2 Scenario 2: Scanning documents only
In this case, the user's task is to scan batches of documents without indexing them. When scanning in Capture, a capture-only batch contains one document only, which may be separated into multiple documents and indexed later. For example, these batches may be separated and indexed by users who index only (Section 1.4.4) or through an automated process such as bar code recognition or intelligent data recognition.
Within the client, the user chooses a client profile configured for capture only and begins capturing a batch. The user reviews each document, then releases the batch. See Section 2.2 for more information.
1.4.3 Scenario 3: Importing document files
This case involves creating batches by importing electronic files, either multiple image files or non-image files such as Microsoft Word or PDF files.
Within the client, the user chooses a client profile configured for the type of batch to import and begins capturing a batch by selecting files to import. The user reviews and indexes each document (if configured), then releases the batch. See Section 2.3 for more information.
1.4.4 Scenario 4: Indexing documents only
In this case, the user's task is to assign metadata values to previously captured documents. For example, batches might have been scanned by production users, imported as electronic files, or imported as part of a bulk process.
Within the client, the user chooses an index-only client profile, then selects a batch to index. Typically, the batch list is filtered to display only batches that need indexing. If the documents are unorganized within the batch, all batch pages are assigned to the first document. The user creates new documents if needed. After indexing each document, the user releases the batch. See Section 4.1.1 for more information.
1.4.5 Scenario 5: Scanning or importing documents via business application
This scenario begins from a business application rather than the Capture client. After completing customer entry fields, the user needs to scan or import a related document and attach it to the selected customer record.
The user clicks a Scan or Import button from a business application record. The client window displays and Capture immediately begins scanning or prompting for import, using the settings in a preselected client profile. Once captured, the batch is displayed. Often, metadata fields are automatically populated with values entered for the business application record.
Typically, the user reviews and indexes the documents, then releases the batch. The user returns to the business application record or another web page, and the document becomes attached to the business application record. See Section 2.2.5 for details.
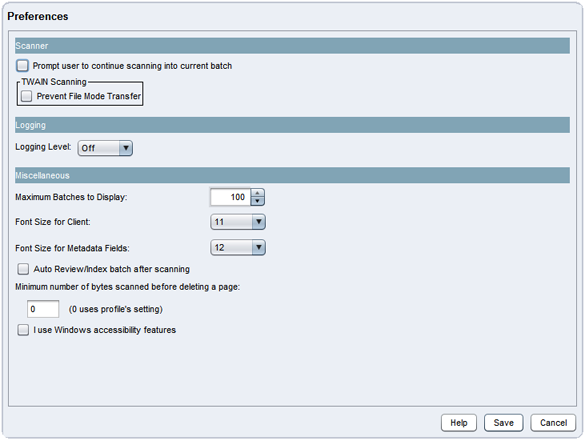
1.5 Setting preferences
Use preferences to select scanning settings, accessibility features, logging options, and other settings. To view and edit Capture client preferences:
-
Click the Preferences link in the upper right area of the client window.
-
Set other preferences as needed.
-
For accessibility-related preferences, see Client Accessibility Features.
-
For scanning-related preferences, see Section 2.2.8.
-
For logging preferences, see Section A.1.1.
-
For miscellaneous preferences, see Section 5.2.4.
-
-
Click Save.
1.5.1 Resizing the window panes
You can resize the left and right panes as well as the batch and metadata panes. To resize, move the cursor over the pane separation. When the cursor changes to a double-headed arrow, click and drag to resize.
After resizing, the new dimensions are automatically saved and displayed the next time you open the client.