11 Managing Your Contacts
This chapter describes connections, which you can use to establish a social network with your work friends and associates.
This chapter includes the following topics:
Permissions:
To perform the tasks in this chapter, you need the application-level permissionPeople Connections: Connect with People. To work with connections lists, you also need the application-level permission People Connections: Update People Connections Data.11.1 About Connections
Connections provides a means of collecting your business friends and contacts into a social network, where you can manage your own connections and view the connections of others. Using People Connections preferences, you can grant differing levels of access to those who are and are not your connections. For example, you can enable access to views of your profile, message board, activity stream, and feedback to just your connections, leaving the unconnected without access. For your profile, you can limit view privileges to just your connections or enable your connections to view certain sections of your profile, while hiding those sections from users who are not your connections. For your message board and feedback, you can give everyone view access, but limit post access to just your connections or to a limited set of your connections through a connections list.
See Also:
For information about setting your Connections preferences, see Section 11.2, "Setting Connections Preferences."When you connect with other users, you give them access to your People Connections views, and gain access to theirs.
Note:
People Connections encompasses Connections, Profile, Activity Stream, Message Board, and Feedback. For more information, see:Before you begin to build your social network, your system administrator can set global application defaults that affect what all users may see and do with their own and other users' connections.
WebCenter Portal provides the following Connections views that can be added to a portal page:
-
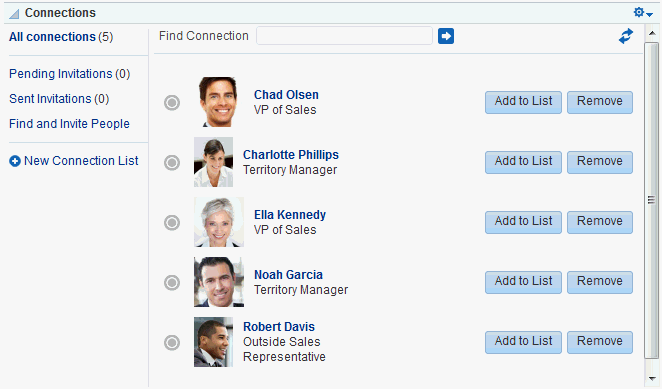
Connections for viewing and managing your connections, creating connections lists, and sending and responding to invitations to connect (Figure 11-1)
-
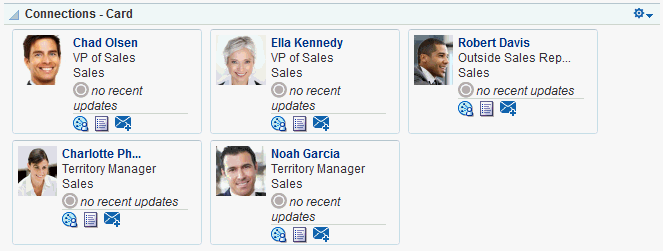
Connections - Card for photos, status messages, and instant contact options to your connections (Figure 11-2)
-
Connections - Detailed View for photos and quick access to your connections and to features for inviting new connections, managing existing connections, and organizing your connections into lists (Figure 11-3). This is the same view you see when you click the Connections tab on the Profile page.
-
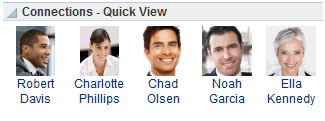
Connections - Quick View for photos and quick access to your connections (Figure 11-4). This is the same view you see on the right side of the main Profile page.

For information about using Connections features, see Section 11.4, "Viewing Connections," Section 11.5, "Adding Contacts," Section 11.6, "Removing Contacts," and Section 11.7, "Creating and Managing Groups of Contacts."
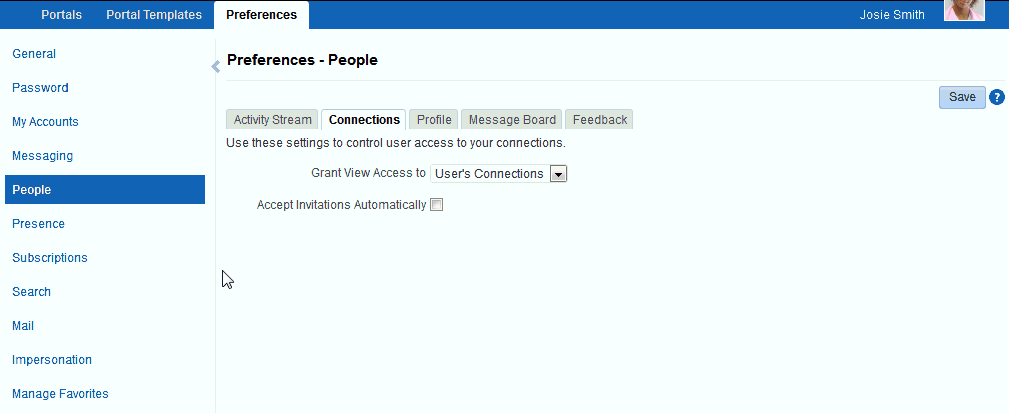
11.2 Setting Connections Preferences
You use Connections preferences to specify who can view information about the people you have connected with and whether to accept invitations to be others' connections automatically.
To set Connections preferences:
-
Click Preferences.
-
Click People to display People Connections preferences.
-
Click the Connections tab (Figure 11-5).
-
From the Grant View Access to list, select the users who can view your list of connections:
-
Everyone—All users, including users who are not logged in, can see information about your connections.
-
Authenticated Users—Only users who are logged in can view your connections.
-
User's Connections—Only you and your connections can view your connections.
-
User Only—Only you can view your connections.
Note:
If the Grant View Access to list is disabled in your view contact your system administrator. -
-
To automatically accept invitations to connect with another user, select Accept Invitations Automatically.
Deselect this check box to leave yourself the option of accepting, refusing, or ignoring an invitation to connect with another user.
-
When you are done, click Save.
11.3 Viewing Another User's Profile
You access other users' profiles the same way you access your profile. For information, see Section 6.2, "Viewing a Profile."
11.4 Viewing Connections
You can view your connections in any Connections view, including on the Connections tab of your Profile page, which you can navigate to by clicking your user name wherever it appears in the application.
This section describes how to access the Connections page and view or search through your connections. It includes the following subsections:
11.4.1 Viewing Your Connections
To view your connections:
-
Go to the Home portal, and open your profile page, for example, by clicking on your user name in the UI.
You can also use the following URL to navigate to a Profile page:
http://host:port/webcenter/portal/profile/userName
Tip:
ForuserName:-
When
userNamematches the current user or is not specified, this URL navigates to your view of the Profile page. -
When
userNameis not the current user's, it navigates to the specified user's view of the Profile page.
-
-
On the Profile page, click the Connections tab (Figure 11-6).
Figure 11-6 Connections Tab on Profile Page

Description of ''Figure 11-6 Connections Tab on Profile Page''
11.4.2 Searching Through Your Connections
The Connections search feature provides an efficient way to locate a particular connection in an otherwise long list of connections.
To search through your connections:
-
Go to the Connections page (as described in Section 11.4.1, "Viewing Your Connections.")
-
In the Filter field, type the text you want to search for in your connections, and click
 next to the Filter field.
Tip:
You can search for part or all of a name, email, title, or department.
To exit the search, click ![]() next to the Filter field.
next to the Filter field.
11.5 Adding Contacts
This section includes the following subsections:
11.5.1 Inviting Others to Connect
Connecting to another user potentially provides view access to that user's personal Profile and Activity Stream, and view and post access to the user's Message Board. The level of access you have to a connection is determined by the People Connections defaults set by your system administrator, the individual user's People Connections preference settings, and properties set on the Connections view.
See Also:
For information about Connections Preferences, see Section 11.2, "Setting Connections Preferences."You can issue invitations from the Connections - Detailed View or from the Connections tab on your Profile page. This section describes the Connections tab method.
To invite another user to connect:
-
Go to the Connections tab (as described in Section 11.4.1, "Viewing Your Connections."
-
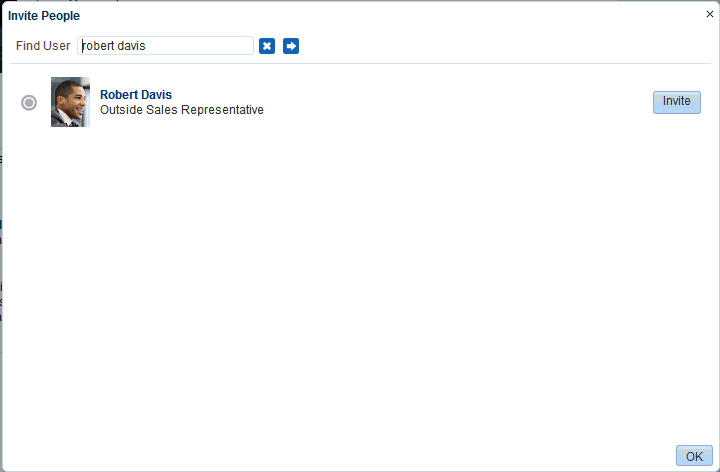
On the Connections tab, click the Invite People link to open the Invite People dialog (Figure 11-7).
-
In the Find User field, type the user name of the person you want to invite to be your connection, then click
. -
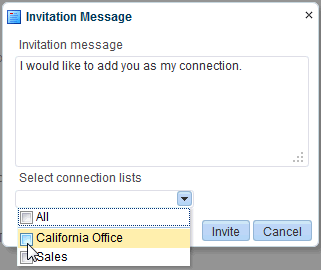
Click the Invite link next to the user of interest to open the Invitation Message dialog (Figure 11-8).
-
Use the default message, or type a new one.
-
Optionally, from the Select connection lists list, select one or more connections lists to which to add the user once the invitation is accepted.
-
Click Invite.
If the person you have invited set preferences to automatically accept all invitations, you are connected immediately. Otherwise, the invitation becomes available in the recipient's view of the Connections tab of the recipient's Profile page or in the Connections - Detailed View.
11.5.2 Viewing Invitations to Connect
You can view the invitations you have sent and received in the Connections - Detailed View and on the Connections tab of your Profile page. This section describes the Connections tab method. It includes the following subsections:
11.5.2.1 Viewing Invitations You Have Sent
To view invitations you have sent:
-
Go to the Connections tab (as described in Section 11.4.1, "Viewing Your Connections."
-
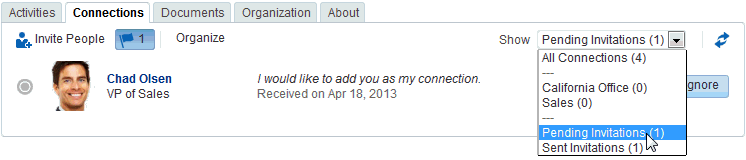
From the Show menu, select Sent Invitations.
The Connections page refreshes, now showing a list of the pending invitations to connect that you have sent (Figure 11-9).
Note:
In the Show menu, the number next to Sent Invitations represents the number of pending invitations you have sent.

11.5.2.2 Viewing Invitations You Have Received
To view invitations you have received:
-
Go to the Connections tab (as described in Section 11.4.1, "Viewing Your Connections."
-
From the Show menu, select Pending Invitations.
Tip:
Alternatively, click .
.The Connections page refreshes, now showing a list of the pending invitations to connect that you have received (Figure 11-10).
Tip:
In the Show menu, the number next to Pending Invitations represents the number of pending invitations you have received.
11.5.3 Responding to Invitations to Be a Connection
Connections provides two methods for responding to an invitation to connect:
-
You can set your Connections preferences to accept such invitations automatically. For information, see Section 11.2, "Setting Connections Preferences."
-
You can manually accept, decline, or ignore such invitations through the Connections - Detailed View or on the Connections tab of your Profile page.
This section describes the manual method of responding to invitations to connect from the Connections tab.
To respond to invitations to connect:
-
Go to the Connections tab (as described in Section 11.4.1, "Viewing Your Connections."
-
From the Show menu, select Pending Invitations to display a list of your pending invitations.
Tip:
Alternatively, click. -
Next to a given invitation, click your desired response (Figure 11-11).
Figure 11-11 Pending Invitations View Showing Accept, Decline, and Ignore Buttons

Description of ''Figure 11-11 Pending Invitations View Showing Accept, Decline, and Ignore Buttons''
-
Accept—Make the connection.
-
Decline—Refuse the connection, with notification. When you decline an invitation to connect, the issuer becomes aware of this by watching his sent invitations.
-
Ignore—Remove the connection, without responding. When you ignore an invitation to connect, the issuer does not become aware of this by watching his sent invitations.
Once you respond to an invitation, it is removed from the list of received invitations. The users whose invitations you accept appear in your view of the Connections tab.
-
-
Optionally, return to your default view of the Connections tab by selecting All Connections from the Show menu.
11.6 Removing Contacts
Included in the process of managing your connections is the occasional necessity of removing connections: they may leave your group or the company, or there may no longer be a compelling reason to stay connected.
Controls for removing a connection are available through the Connections tab of your Profile page and the Connections viewer and Connections - Detailed View. This section describes the Connections tab method.
To remove one of your connections:
-
Go to the Connections tab (as described in Section 11.4.1, "Viewing Your Connections."
-
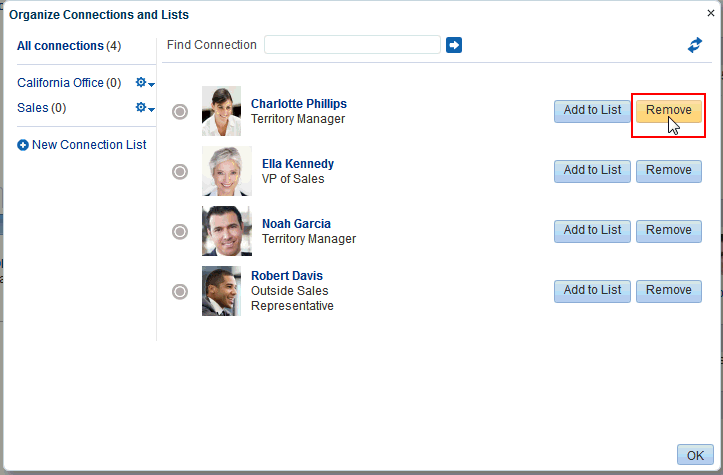
Click Organize to open the Organize Connections and Lists dialog.
-
Click the Remove button next to the connection to remove (Figure 11-12).
-
In the confirmation dialog, click Yes to remove the selected connection.
-
Click OK to close the Organize Connections and Lists dialog.
11.7 Creating and Managing Groups of Contacts
Connections provides a means of grouping your connections into lists for managing the display of your connections and your connections activities. For example:
-
You can select a list and view just its members on the Connections tab or in the Connections viewer or Connections - Detailed View.
-
You can configure Activity Stream preferences to show activities only from specified connections lists (for more information, see Section 24.3, "Setting Activity Stream Preferences").
This section describes how to create and manage lists of connections. It includes the following subsections:
11.7.1 Creating a Connections List
You can create a connections list using the Connections viewer and Connections - Detailed View and on the Connections tab of your Profile page. This section describes the Connections tab method.
To create a list of connections:
-
Go to the Connections tab (as described in Section 11.4.1, "Viewing Your Connections."
-
Click Organize to open the Organize Connections and Lists dialog.
-
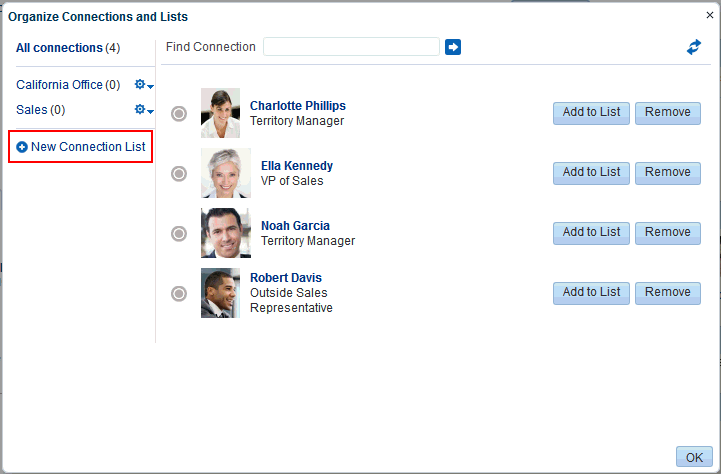
Click New Connection List (Figure 11-13) to open the Create List dialog.
-
Enter a name for your list of connections, and click Save and Close to create the list and open it in the Organize Connections and Lists dialog.
Tip:
To view all of your connections, click All connections.See Also:
For information about adding connections to a list, see Section 11.7.2, "Adding a Connection to a List."
11.7.2 Adding a Connection to a List
You can add connections to a Connections list on the Connections tab of your Profile page and the Connections viewer and Connections - Detailed View. This section describes the Connections tab method.
To add a connection to a Connections list:
-
Go to the Connections tab (as described in Section 11.4.1, "Viewing Your Connections."
-
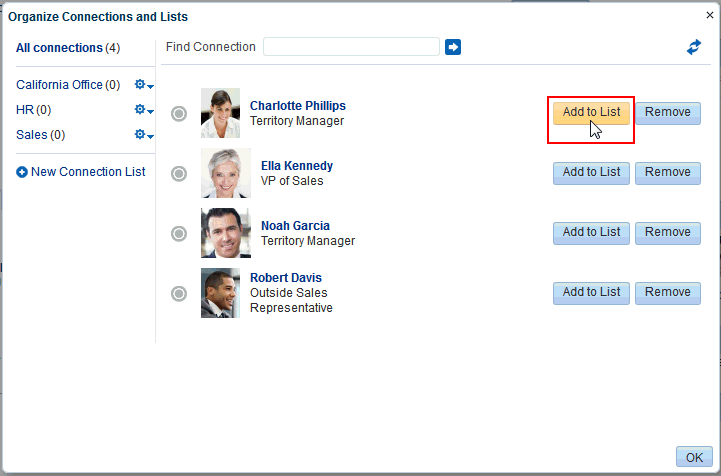
Click Organize to open the Organize Connections and Lists dialog.
-
Click Add to List (Figure 11-14) next to the user.
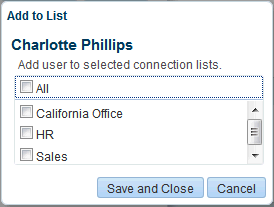
-
In the Add to List dialog (Figure 11-15), select one or more lists, then click Save and Close.
Tip:
Click All to add the selected user to all of your Connections lists. -
Repeat steps 3 and 4 until you are done.
-
Click OK to close the Organize Connections and Lists dialog.
11.7.3 Removing a Connection from a List
To remove a connection from a list:
-
Go to the Connections tab (as described in Section 11.4.1, "Viewing Your Connections."
-
Click Organize to open the Organize Connections and Lists dialog.
-
Select the list from which to remove a connection (Figure 11-16) to display the connections list.
Figure 11-16 Organize Connections and Lists Dialog with California Office List Selected
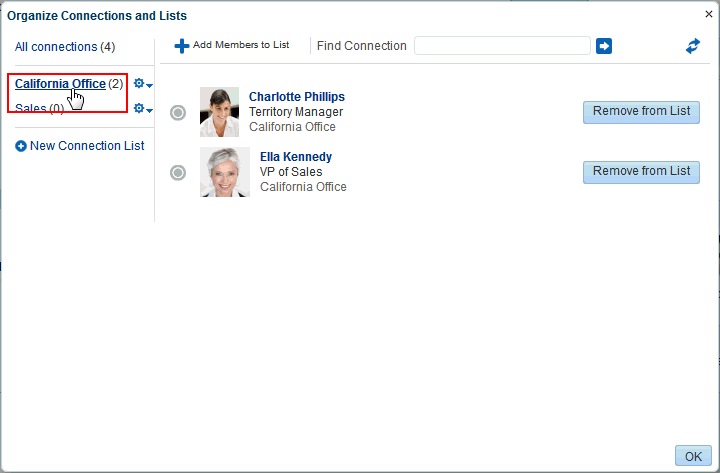
Description of ''Figure 11-16 Organize Connections and Lists Dialog with California Office List Selected''
-
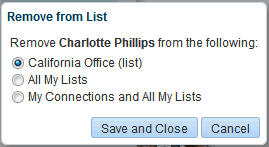
Click Remove from List next to the user to open the Remove from List dialog (Figure 11-17).
-
Select to remove the selected user from the current list or from all lists of which the user is a member, or select My Connections and All My Lists to remove the selected user from all lists and remove the user from your connections.
-
Click Save and Close.
-
Repeat steps 3 through 5 until you are done.
-
Click OK to close the Organize Connections and Lists dialog.
11.7.4 Deleting a Connections List
When you delete a Connections list, you are not deleting the connections you added to the list. You are deleting only the selected grouping, that is, the list itself. The connections that were on the deleted list continue to be your connections.
You can delete a Connections list from the Connections tab of your Profile page and from the Connections viewer and Connections - Detailed View. This section describes the Connections tab method.
To delete a connections list:
-
Go to the Connections tab (as described in Section 11.4.1, "Viewing Your Connections."
-
Click Organize to open the Organize Connections and Lists dialog.
-
Click the Actions icon next to the Connections list you want to delete, and select Delete List from the resulting menu (Figure 11-18).
Figure 11-18 Delete List Option on Actions Menu
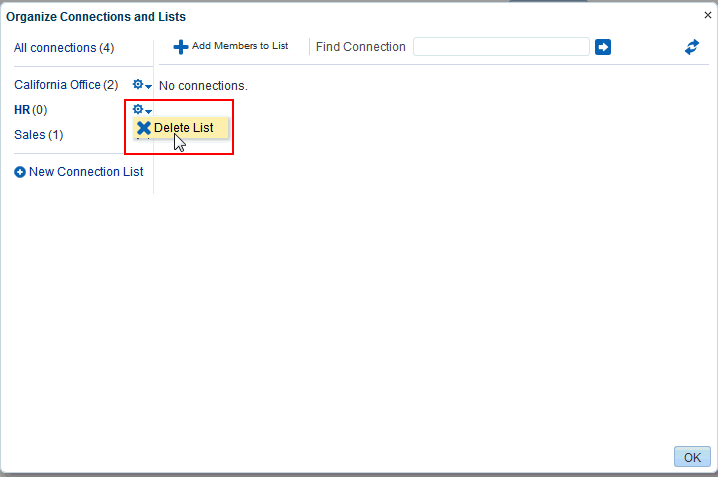
Description of ''Figure 11-18 Delete List Option on Actions Menu''
-
In the resulting confirmation dialog, click Yes to delete the list.
-
Click OK to close the Organize Connections and Lists dialog.