9 Using Oracle Data Integrator Console
This chapter describes how to work with Oracle Data Integrator Console. An overview of the Console user interface is provided.
This chapter includes the following sections:
9.1 Introduction to Oracle Data Integrator Console
Oracle Data Integrator Console is a web-based console for managing and monitoring an Oracle Data Integrator run-time architecture and for browsing design-time objects.
This section contains the following topic:
9.1.1 Oracle Data Integrator Console Concepts
Oracle Data Integrator Console is a web-based console available for different types of users:
-
Administrators use Oracle Data Integrator Console to create and import repositories and to configure the Topology (data servers, schemas, and so forth).
-
Production operators use Oracle Data Integrator Console to manage scenarios and Load Plans, monitor sessions and Load Plan runs, and manage the content of the error tables generated by Oracle Data Integrator.
-
Business users and developers browse development artifacts in this interface, using, for example, the Data Lineage and Flow Map features.
This web interface integrates seamlessly with Oracle Fusion Middleware Control Console and allows Fusion Middleware administrators to drill down into the details of Oracle Data Integrator components and sessions.
Note:
Oracle Data Integrator Console is required for the Fusion Middleware Control Extension for Oracle Data Integrator. It must be installed and configured for this extension to discover and display the Oracle Data Integrator components in a domain.9.1.2 Oracle Data Integrator Console Interface
Oracle Data Integrator Console is a web interface using the ADF-Faces framework.
Figure 9-1 shows the layout of Oracle Data Integrator Console.
Figure 9-1 Oracle Data Integrator Console
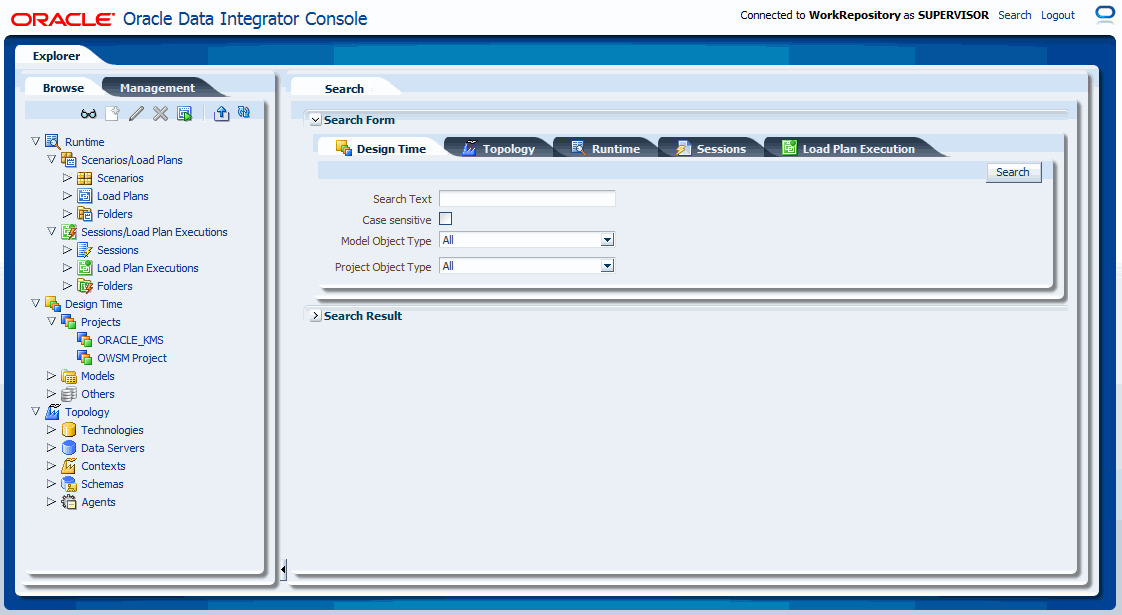
Description of "Figure 9-1 Oracle Data Integrator Console"
Oracle Data Integrator Console displays the objects available to the current user in two Navigation tabs in the left panel:
-
Browse tab displays the repository objects that can be browsed and edited. In this tab you can also manage sessions and error tables.
-
Management tab is used to manage the repositories and the repository connections. This tab is available to connection users having Supervisor privileges, or to any user to set up the first repository connections.
The right panel displays the following tabs:
-
Search tab is always visible and allows you to search for objects in the connected repository.
-
One Master/Details tab is displayed for each object that is being browsed or edited. Note that it is possible to browse or edit several objects at the same time.
The search field above the Navigation tabs allows you to open the search tab when it is closed.
Working with the Navigation Tabs
In the Navigation tabs, you can browse for objects contained in the repository. When an object or node is selected, the Navigation Tab toolbar displays icons for the actions available for this object or node. If an action is not available for this object, the icon is grayed out. For example, you can edit and add data server objects under the Topology node in the Browse Tab, but you cannot edit Projects under the Designer node. Note that the number of tabs that you can open at the same time is limited to ten.
9.2 Using Oracle Data Integrator Console
This section explains the different types of operations available in Oracle Data Integrator Console. It does not focus on each type of object that can be managed with the console, but gives keys to manage objects with the console.
This section includes the following topics:
Note:
Oracle Data Integrator Console uses the security defined in the master repository. Operations that are not allowed for a user will appear grayed out for this user.In addition, the Management tab is available only for users with Supervisor privileges.
9.2.1 Connecting to Oracle Data Integrator Console
Oracle Data Integrator console connects to a repository via a Repository Connection, defined by an administrator.
Note that you can only connect to Oracle Data Integrator Console if it has been previously installed. See Installing and Configuring Oracle Data Integrator for more information about installing Oracle Data Integrator Console.
Note:
The first time you connect to Oracle Data Integrator Console, if no repository connection is configured, you will have access to the Management tab to create a first repository connection. See "Creating a Repository Connection" for more information. After your first repository connection is created, the Management tab is no longer available from the Login page, and is available only for users with Supervisor privileges.Connecting to Oracle Data Integrator Console
To connect to Oracle Data Integrator Console:
-
Open a web browser, and connect to the URL where Oracle Data Integrator Console is installed. For example:
http://odi_host:8001/odiconsole/. -
From the Repository list, select the Repository connection corresponding to the master or work repository you want to connect.
-
Provide a User ID and a Password.
-
Click Sign In.
9.2.2 Generic User Operations
This section describes the generic operations available in Oracle Data Integrator Console for a typical user.
This section includes the following operations:
Note:
Creating, editing, and deleting operations are not allowed for Scenarios and Load Plans. For more information on the possible actions that can be performed with these objects in ODI Console, see "Managing Scenarios and Sessions" and "Managing Load Plans".To view an object:
-
Select the object in the Browse or Management Navigation tab.
-
Click View in the Navigation tab toolbar. The simple page or the Master/Detail page for the object opens.
To edit an object:
-
Select the object in the Browse or Management Navigation tab.
-
Click Update in the Navigation tab toolbar. The edition page for the object opens.
-
Change the value for the object fields.
-
Click Save in the edition page for this object.
To create an object:
-
Navigate to the parent node of the object you want to create in the Browse or Management Navigation tab. For example, to create a Context, navigate to the Topology > Contexts node in the Browse tab.
-
Click Create in the Navigation tab toolbar. An Add dialog for this object appears.
-
Provide the values for the object fields.
-
Click Save in the Add dialog of this object. The new object appears in the Navigation tab.
To delete an object:
-
Select the object in the Browse or Management Navigation tab.
-
Click Delete in the Navigation tab toolbar.
-
Click OK in the confirmation window.
To search for an object:
-
In the Search tab, select the tab corresponding to the object you want to search:
-
Design Time tab allows you to search for design-time objects
-
Topology tab allows you to search for topology objects
-
Runtime tab allows you to search for run-time objects such as Load Plans, Scenarios, Scenario Folders, or Session Folders
-
Sessions tab allows you to search for sessions
-
Load Plan Execution tab allows you to search for Load Plan runs
-
-
Set the search parameters to narrow your search.
For example when searching design-time or topology objects:
-
In the Search Text field, enter a part of the name of the object that you want to search.
-
Select Case sensitive if you want the search to be case sensitive (this feature is not provided for the sessions or Load Plan execution search.
-
Select in Models/Project (Designer tab) or Topology (Topology tab) the type of object you want to search for. Select All to search for all objects.
-
-
Click Search.
-
The Search Results appear, grouped by object type. You can click an object in the search result to open its master/details page.
9.2.3 Managing Scenarios and Sessions
This section describes the operations related to scenarios and sessions available in Oracle Data Integrator Console.
This section includes the following operations:
To import a scenario:
-
Select the Browse Navigation tab.
-
Navigate to Runtime > Scenarios/Load Plans > Scenarios.
-
Click Import in the Navigation tab toolbar.
-
Select an Import Mode and select an export file in Scenario XML File.
-
Click Import Scenario.
-
If prompted, enter the Export Key used when this scenario was exported. If you do not enter an Export Key, any encrypted sensitive (cipher) data will be stripped from the imported object. For more information about the Export Key, see, "Export Keys" in Developing Integration Projects with Oracle Data Integrator.
To export a scenario:
-
Select the Browse Navigation tab.
-
Navigate to Runtime > Scenarios/Load Plans > Scenarios.
-
Click Export in the Navigation tab toolbar.
-
In the Export Scenario dialog, set the parameters as follows:
-
From the Scenario Name list, select the scenario to export.
-
In the Encoding Java Charset field, enter the Java character set for the export file.
-
In the Encoding XML Charset field, enter the encoding to specify in the export file.
-
In the XML Version field, enter the XML Version to specify in the export file.
-
In the Export Key field, enter the AES KEY for any sensitive data encryption needed during the export. The export key string is minimum 8 characters long and maximum 100 characters long. It should have at least one special character (@#$%+/=) or digit, one alphabetic lower or upper case character.
-
In the Confirm Export Key field, enter the export key again.
-
Optionally, select Save export key for later exports to save the export key for all future exports.
-
Optionally, select Include Dependant objects to export linked child objects.
-
-
Click Export Scenario.
To execute a scenario:
-
Select the Browse Navigation tab.
-
Navigate to Runtime > Scenarios/Load Plans > Scenarios.
-
Select the scenario you want to execute.
-
Click Execute in the Navigation tab toolbar.
-
Select an Agent, a Context, and a Log Level for this execution.
-
Click Execute Scenario.
Note that you can perform a normal or an immediate kill of a running session. Sessions with the status Done, Warning, or Error cannot be killed.
To kill a session:
-
Select the Browse Navigation tab.
-
Navigate to Runtime > Sessions/Load Plan Executions > Sessions.
-
Select the session you want to stop.
-
Click Kill in the Navigation tab toolbar.
To restart a session:
-
Select the Browse Navigation tab.
-
Navigate to Runtime > Sessions/Load Plan Executions > Sessions.
-
Select the session you want to restart.
-
Click Restart in the Navigation tab toolbar.
-
In the Restart Session dialog, set the parameters as follows:
-
Agent: From the list, select the agent you want to use for running the new session.
-
Log Level: From the list, select the log level. Select Log Level 6 in the Execution or Restart Session dialog to enable variable tracking. Log level 6 has the same behavior as log level 5, but with the addition of variable tracking.
-
-
Click Restart Session.
To clean stale sessions:
-
Select the Browse Navigation tab.
-
Navigate to Runtime > Sessions/Load Plan Executions > Sessions.
-
Click Clean in the Navigation tab toolbar.
-
In the Clean Stale Sessions dialog, select the Agent for which you want to clean stale sessions.
-
Click OK.
Managing Data Statistics and Erroneous Records
Oracle Data Integrator Console allows you to browse the details of a session, including the record statistics. When a session detects erroneous data during a flow or static check, these errors are isolated into error tables. You can also browse and manage the erroneous rows using Oracle Data Integrator Console.
Note:
Sessions with erroneous data detected finish in Warning status.To view the erroneous data:
-
Select the Browse Navigation tab.
-
Navigate to a given session using Runtime > Sessions/Load Plan Executions > Sessions. Select the session and click View in the Navigation tab toolbar.
The Session page is displayed.
-
In the Session page, go to the Relationships section and select the Record Statistics tab.
This tab shows each physical table targeting in this session, as well as the record statistics.
-
Click the number shown in the Errors column. The content of the error table appears.
-
You can filter the errors by Constraint Type, Name, Message Content, Detection date, and so forth. Click Filter Result to apply a filter.
-
Select a number of errors in the Query Results table and click Delete to delete these records.
-
Click Delete All to delete all the errors.
-
Note:
Delete operations cannot be undone.9.2.4 Managing Load Plans
This section describes the operations related to Load Plans available in Oracle Data Integrator Console.
This section includes the following operations:
To import a Load Plan:
-
Select the Browse Navigation tab.
-
Navigate to Runtime > Scenarios/Load Plans > Load Plans.
-
Click Import in the Navigation tab toolbar.
-
In the Import Load Plan dialog, select an Import Mode and select an export file in the Select Load Plan XML File field.
-
Click Import.
-
If prompted, enter the Export Key used when this scenario was exported. If you do not enter an Export Key, any encrypted sensitive (cipher) data will be stripped from the imported object. For more information about the Export Key, see, "Export Keys" in Developing Integration Projects with Oracle Data Integrator.
Note:
When you import a Load Plan that has been previously exported, the imported Load Plan does not include the scenarios referenced by the Load Plan. Scenarios used in a Load Plan need to be imported separately. See "Importing a Scenario" for more information.To export a Load Plan:
-
Select the Browse Navigation tab.
-
Navigate to Runtime > Scenarios/Load Plans > Load Plans.
-
Select the Load Plan to export.
-
Click Export in the Navigation tab toolbar.
-
In the Export dialog, set the parameters as follows:
-
From the Load Plan Name list, select the Load Plan to export.
-
In the Encoding Java Charset field, enter the Java character set for the export file.
-
In the Encoding XML Charset field, enter the encoding to specify in the export file.
-
In the XML Version field, enter the XML Version to specify in the export file.
-
In the Export Key field, enter the AES KEY for any sensitive data encryption needed during the export. The export key string is minimum 8 characters long and maximum 100 characters long. It should have at least one special character (@#$%+/=) or digit, one alphabetic lower or upper case character.
-
In the Confirm Export Key field, enter the export key again.
-
Optionally, select Save export key for later exports to save the export key for all future exports.
-
Optionally, select Include Dependant objects to export linked child objects.
-
-
Click Export.
Note:
The export of a Load Plan does not include the scenarios referenced by the Load Plan. Scenarios used in a Load Plan need to be exported separately. See "Exporting a Scenario" for more information.To run a Load Plan:
-
Select the Browse Navigation tab.
-
Navigate to Runtime > Scenarios/Load Plans > Load Plans.
-
Select the Load Plan you want to execute.
-
Click Execute in the Navigation tab toolbar.
-
Select a Logical Agent, a Context, a Log Level, and if your Load Plan uses variables, specify the Startup values for the Load Plan variables.
-
Click Execute.
Note that you can perform a normal or an immediate kill of a Load Plan run. Any running or waiting Load Plan Run can be stopped.
To stop a Load Plan Run:
-
Select the Browse Navigation tab.
-
Navigate to Runtime > Sessions/Load Plan Executions > Load Plan Executions.
-
Select the Load Plan run you want to stop.
-
Click Kill in the Navigation tab toolbar.
A Load Plan can only be restarted if the selected run of the current Load Plan instance is in Error status and if there is no other instance of the same Load Plan currently running.
To restart a Load Plan Run:
-
Select the Browse Navigation tab.
-
Navigate to Runtime > Sessions/Load Plan Executions > Load Plan Executions.
-
Select the Load Plan run you want to restart.
-
In the Restart Load Plan Dialog, select the Physical Agent that restarts the Load Plan. Optionally, select a different log level.
-
Click Restart in the Navigation tab toolbar.
9.2.5 Purging the Log
This section describes how to purge the log in Oracle Data Integrator Console by removing past sessions and/or Load Plan runs from the log.
To purge the log:
-
Select the Browse Navigation tab.
-
Navigate to Runtime > Sessions/Load Plan Executions.
-
Click Purge in the Navigation tab toolbar.
-
In the Purge Sessions/Load Plan Executions dialog, set the purge parameters listed in Table 9-1.
Table 9-1 Purge Log Parameters
Parameter Description Purge Type
Select the objects to purge.
From ... To
Sessions and/or Load Plan runs in this time range will be deleted.
When you choose to purge session logs only, then the sessions launched as part of the Load Plan runs are not purged even if they match the filter criteria.When you purge Load Plan runs, the Load Plan run which matched the filter criteria and the sessions launched directly as part of the Load Plan run and its child/grand sessions will be deleted.
Context
Sessions and/or Load Plan runs executed in this context will be deleted.
Agent
Sessions and/or Load Plan runs executed by this agent will be deleted.
Status
Session and/or Load Plan runs in this status will be deleted.
User
Sessions and/or Load Plan runs executed by this user will be deleted.
Name
Sessions and/or Load Plan runs matching this session name will be deleted. Note that you can specify session name masks using % as a wildcard.
Purge scenario reports
If you select Purge scenario reports, the scenario reports (appearing under the execution node of each scenario) will also be purged.
Only the sessions and/or Load Plan runs matching the specified filters will be removed:
-
When you choose to purge session logs only, then the sessions launched as part of the Load Plan runs are not purged even if they match the filter criteria.
-
When you purge Load Plan runs, the Load Plan run which matched the filter criteria and the sessions launched directly as part of Load Plan run and its child/grand sessions will be deleted.
-
When a Load Plan run matches the filter, all its attached sessions are also purged irrespective of whether they match the filter criteria or not.
-
-
Click OK.
Oracle Data Integrator Console removes the sessions and/or Load Plan runs from the log.
9.2.6 Using Data Lineage and Flow Map
This section describes how to use the Data Lineage and Flow Map features available in Oracle Data Integrator Console.
-
Data Lineage provides graph displaying the flows of data from the point of view of a given datastore. In this graph, you can navigate back and forth and follow this data flow.
-
Flow Map provides a map of the relations that exist between the data structures (models, sub-models and datastores) and design-time objects (projects, folders, packages, mappings). This graph allows you to draw a map made of several data structures and their data flows.
This section includes the following operations:
To view the Data Lineage:
-
Select the Browse Navigation tab.
-
Navigate to Design Time > Models > Data Lineage.
-
Click View in the Navigation tab toolbar.
-
In the Data Lineage page, select a Model, then a Sub-Model and a datastore in this model.
-
Select Show Mappings if you want that mappings are displayed between the datastores nodes.
-
Select the prefix to add in your datastores and mapping names in the Naming Options section.
-
Click View to draw the Data Lineage graph. This graph is centered on the datastore selected in step 4.
In this graph, you can use the following actions:
-
Click Go Back to return to the Data Lineage options and redraw the graph.
-
Use the Hand tool and then click a datastore to redraw the lineage centered on this datastore.
-
Use the Hand tool and then click a mapping to view this mapping's page.
-
Use the Arrow tool to expand/collapse groups.
-
Use the Move tool to move the graph.
-
Use the Zoom In/Zoom Out tools to resize the graph.
-
Select View Options to change the display options have the graph refreshed with this new option.
-
To view the Flow Map:
-
Select the Browse Navigation tab.
-
Navigate to Design Time > Models > Flow Map.
-
Click View in the Navigation tab toolbar.
-
In the Data Lineage page, select one or more Model. Select All to select all models.
-
Select one of more Projects. Select All to select all projects.
-
In the Select the level of details of the map section, select the granularity of the map. The object that you select here will be the nodes of your graph.
Check Do not show Projects, Folders... if you want the map to show only data structure.
-
Optionally, indicate the grouping for the data structures and design-time objects in the map, using the options in the Indicate how to group Objects in the Map section.
-
Click View to draw the Flow Map graph.
In this graph, you can use the following actions:
-
Click Go Back to return to the Flow Map options and redraw the graph.
-
Use the Hand tool and then click a node (representing a datastore, an mapping, and so forth) in the map to open this object's page.
-
Use the Arrow tool to expand/collapse groups.
-
Use the Move tool to move the graph.
-
Use the Zoom In/Zoom Out tools to resize the graph.
-
9.2.7 Performing Administrative Operations
This section describes the different administrative operations available in Oracle Data Integrator Console. These operations are available for a user with Supervisor privileges.
This section includes the following operations:
Creating a Repository Connection
A repository connection is a connection definition for Oracle Data Integrator Console. A connection does not include Oracle Data Integrator user and password information.
To create a repository connection:
-
Navigate to the Repository Connections node in the Management Navigation tab.
-
Click Create in the Navigation tab toolbar. A Create Repository Connection dialog for this object appears.
-
Provide the values for the repository connection:
-
Connection Alias: Name of the connection that will appear on the Login page.
-
Master JNDI URL: JNDI URL of the datasource to connect the master repository database.
-
Supervisor User Name: Name of the Oracle Data Integrator user with Supervisor privileges that Oracle Data Integrator Console will use to connect to the repository. This user's password must be declared in the WLS or WAS Credential Store.
-
Work JNDI URL: JNDI URL of the datasource to connect the work repository database. If no value is given in this field. The repository connection will allow connection to the master only, and the Navigation will be limited to Topology information.
-
JNDI URL: Check this option if you want to use the environment naming context (ENC). When this option is checked, Oracle Data Integrator Console automatically prefixes the data source name with the string
java:comp/env/to identify it in the application server's JNDI directory. Note that the JNDI Standard is not supported by Oracle WebLogic Server and for global data sources. -
Default: Check this option if you want this Repository Connection to be selected by default on the login page.
-
-
Click Save. The new Repository Connection appears in the Management Navigation tab.
Testing a Data Server or a Physical Agent Connection
This sections describes how to test the data server connection or the connection of a physical agent in Oracle Data Integrator Console.
To test the data server connection:
-
Select the Browse Navigation tab.
-
Navigate to Topology > Data Servers.
-
Select the data server whose connection you want to test.
-
Click Test Connection in the Navigation tab toolbar.
-
In the Test Connection dialog, select the:
-
Physical Agent that will carry out the test
-
Transaction on which you want to execute the command. This parameter is only displayed if there is any On Connect/Disconnect command defined for this data server. The transactions from 0 to 9 and the Autocommit transaction correspond to connection created by sessions (by procedures or knowledge modules). The Client Transaction corresponds to the client components (ODI Console and Studio).
-
-
Click Test.
A dialog showing "Connection successful!" is displayed if the test has worked. If not, an error message is displayed.
To test the physical agent connection:
-
Select the Browse Navigation tab.
-
Navigate to Topology > Agents > Physical Agents.
-
Select the physical agent whose connection you want to test.
-
Click Test Connection in the Navigation tab toolbar.
A dialog showing "Connection successful!" is displayed if the test has worked. If not, an error message is displayed.
Oracle Data Integrator Console provides you with features to perform management operations (create, import, export) on repositories. These operations are available from the Management Navigation tab, under the Repositories node. These management operations reproduce in a web interface the administrative operations available via the Oracle Data Integrator Studio and allow setting up and maintaining your environment from the ODI Console.
See "Administering Repositories" and "Exporting and Importing" in Developing Integration Projects with Oracle Data Integrator for more information on these operations.
Oracle Data Integrator Console allows you to add JDBC datasources and create templates to deploy physical agents into WebLogic Server.
See "Setting Up a Topology" for more information on Java EE agents, datasources and templates.
To add a datasource to a physical agent:
-
Select the Browse Navigation tab.
-
Navigate to Topology > Agents > Physical Agents.
-
Select the agent you want to manage.
-
Click Edit in the Navigation tab toolbar.
-
Click Add Datasource
-
Provide a JNDI Name for this datasource and select the Data Server Name. This datasource will be used to connect to this data server from the machine into which the Java EE agent will be deployed.
-
Click OK.
-
Click Save to save the changes to the physical agent.
To create a template for a physical agent:
-
Select the Browse Navigation tab.
-
Navigate to Topology > Agents > Physical Agents.
-
Select the agent you want to manage.
-
Click Edit in the Navigation tab toolbar.
-
Click Agent Deployment.
-
Follow the steps of the Agent Deployment wizard. This wizard reproduces in a web interface the Server Template Generation wizard. See "Deploying an Agent in a Java EE Application Server" for more details.
9.3 ODI Domain
An ODI domain contains the Oracle Data Integrator components that can be managed using Enterprise Manager. An ODI domain contains:
-
One master repository and one or more work repositories attached to it.
-
One or several run-time agents attached to the master repositories. These agents must be declared in the master repositories to appear in the domain. These agents may be Standalone agents, Standalone Colocated agents, or Java EE agents. See "Setting Up a Topology" for information about how to declare the agents in the master repositories.
-
One or several Oracle Data Integrator Console applications. An Oracle Data Integrator Console application is used to browse master and work repositories.
The Master Repositories and Agent pages display both application metrics and information about the master and work repositories. You can also navigate to Oracle Data Integrator Console from these pages, for example to view the details of a session. In order to browse Oracle Data Integrator Console, the connections to the work and master repositories must be declared in Oracle Data Integrator Console. See Installing and Configuring Oracle Data Integrator for information on how to create and configure a domain.
9.4 Oracle Enterprise Manager Fusion Middleware Control
Oracle Enterprise Manager Fusion Middleware Control organizes a wide variety of performance data and administrative functions into distinct, Web-based home pages for the farm, cluster, domain, servers, components, and applications.
Oracle Data Integrator provides a plug-in that integrates with Oracle Enterprise Manager Fusion Middleware Control. Using this plug-in, Oracle Enterprise Manager Fusion Middleware Control can be used in conjunction with ODI Console to obtain information about your ODI agents, repositories, sessions, and load plan executions.
This section includes the following topics:
9.4.1 Configuring Oracle Fusion Middleware Control with ODI Plug-in
From Oracle Enterprise Manager Fusion Middleware Control, expand the ODI menu item and click on your agent name in the Deployments pane.
Figure 9-2 shows the agents in the Deployment pane.
Figure 9-2 ODI Console Within Oracle Enterprise Manager Fusion Middleware Control
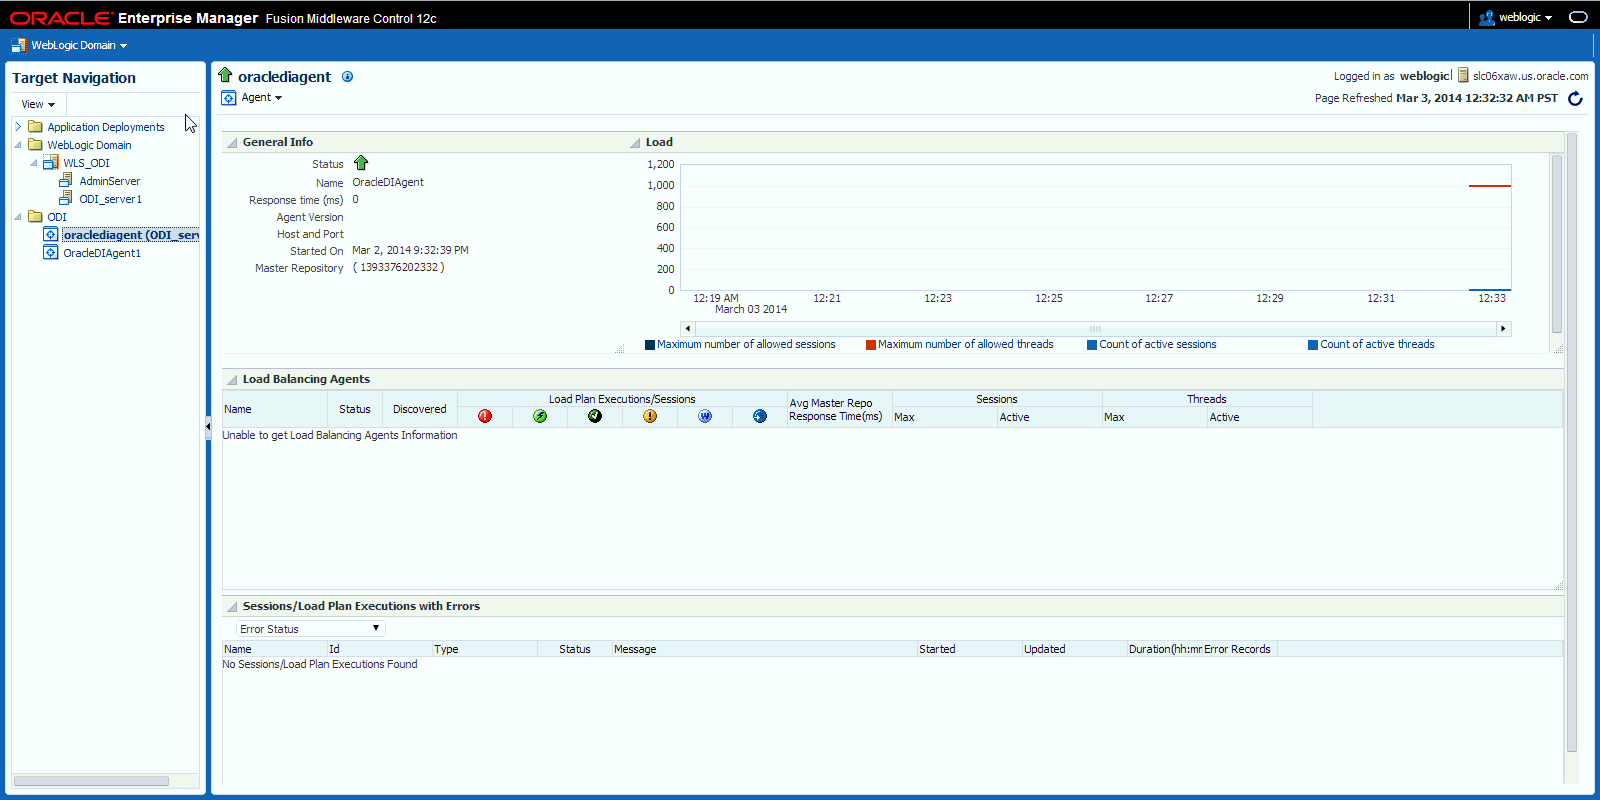
Description of "Figure 9-2 ODI Console Within Oracle Enterprise Manager Fusion Middleware Control"
Note:
To use Oracle Enterprise Manager with Oracle Data Integrator Console, and your agent resides in a separate domain, you must first create the appropriate Credential Store Entries for Oracle Enterprise Manager. See "Specifying Supervisor Credentials" in Installing and Configuring Oracle Data Integrator for more information.Domain discovery is performed with the following process:
-
Oracle Enterprise Manager parses the repository connections declared in Oracle Data Integrator Console, tries to connect all the master repositories available in this domain and retrieves their status and the list of agents. Even if an agent or repository is down, it will appear in the Oracle Enterprise Manager.
-
Any agent on the domain will appear in the domain with its status and will start posting notifications (if started).
Note:
If you want Oracle Enterprise Manager to drill down into Oracle Data Integrator Console using a different URL than the one detected by Oracle Enterprise Manager, you will need to reconfigure this in Oracle Enterprise Manager. Reconfiguration is not mandatory but may be needed when using a firewall for HTTP load balancing to Oracle Data Integrator Console.For more information on using Oracle Enterprise Manager, see Administering Oracle Fusion Middleware.
9.4.2 Configuring Oracle Data Integrator Console
You can configure Oracle Data Integrator Console from Fusion Middleware Control to define the linking between Fusion Middleware Control and Oracle Data Integrator Console.
By default, the fields on this page are populated with the Oracle Data Integrator Console host, the Oracle Data Integrator Console managed server port, and the default context root. If your Oracle Data Integrator Console must be accessed with a different configuration, you can change the configuration on this page.
The steps for this process are:
-
Navigate to the ODI Agent home page.
-
From the Agent menu, select Administration > ODI Console Administration.
-
Enter the following parameters:
-
Host: The name of the server where your application is deployed
-
Port: The HTTP listener port number
-
Context Root: The Web application's context root
-
Protocol: The protocol for the connection
-
-
Select Enable ODI-ESS Integration features in EM to activate the ODI-ESS Integration features in Fusion Middleware Control.
9.4.3 Managing Oracle Data Integrator
The following provides a summary of the tasks performed when managing Oracle Data Integrator Console.
9.4.4 Configuring ODI Standalone Agents
You can modify Oracle Data Integrator Standalone agent information. By default, the fields on this page are populated with information about the standalone agent.
The steps for this process are:
-
Navigate to the Standalone Agent home page.
-
From the Agent menu, select Administration > ODI Standalone Agent Configuration.
-
Enter new values to modify the ODI Standalone Agent configuration.
-
Click Apply to modify the configuration or click Revert to revert to the previous settings.
9.4.5 Configuring Master Repository
You can modify Master Repository Configuration parameters for standalone agents.
The steps for this process are:
-
Navigate to the Standalone Agent home page.
-
From the Agent menu, select Administration > Master Repository Configuration.
-
Enter new values to modify the Master Repository configuration.
-
Click Apply to modify the configuration or click Revert to revert to the previous settings.
9.4.6 Searching Sessions
You can search for sessions that have been executed in the managed ODI domain.
The steps for this process are:
9.4.7 Searching Load Plan Executions
You can search for Load Plan runs that have been executed in the managed ODI domain.
The steps for this process are:
9.5 Management Pack for Oracle Data Integrator
The Management Pack for Oracle Data Integrator leverages Oracle Enterprise Manager Cloud Control best-in-class application performance management, service level management and configuration management capabilities to provide a centralized management solution for Oracle Data Integrator Enterprise Edition.
The Management Pack for ODI provides a consolidated view of the ODI infrastructure and enables you to monitor and manage all the components centrally from Oracle Enterprise Manager Cloud Control.
Using the Management Pack for ODI, you can:
-
Manage multiple Oracle Data Integrator domains from a single location. See "ODI Domain" for more information regarding Oracle Data Integrator domains.
-
Monitor the availability and performance of Oracle Data Integrator components, access historical data, track logs, and receive notifications of potential problems.
-
Trace end-to-end Oracle Data Integrator Sessions activity, review execution statistics, and drill-down from a particular step or task into a detailed report of the Oracle Database activity.
-
Control Service Level Agreements (SLA) with robust and scalable alerting capabilities.
-
Obtain real-time and historical performance statistics for the Oracle Data Integrator Standalone (11g), Standalone Colocated (12c), and Java EE (11g and 12c) agents.
-
Discover and model dependencies between Oracle Data Integrator and various components such as databases or other Oracle Fusion Middleware.
-
Capture Oracle Data Integrator components configuration and track changes over time. Compare configuration parameters over time.
For information regarding the tasks you need to perform when managing Oracle Data Integrator, see the "Configuring and Monitoring Oracle Data Integrator" chapter in Oracle Enterprise Manager Cloud Control Getting Started with Oracle Fusion Middleware Management Plug-in.