5 Getting Started with the Development Tools
This chapter includes the following sections:
5.1 About Development Tools
ADF Desktop Integration provides several tools to configure Excel workbooks so that they can integrate with your Fusion web application. Using these tools you configure the workbook and corresponding worksheets to display, and edit, data from the Fusion web application in the integrated Excel workbook. The tools are available in the Oracle ADF tab and in the ADF Desktop Integration Designer task pane.
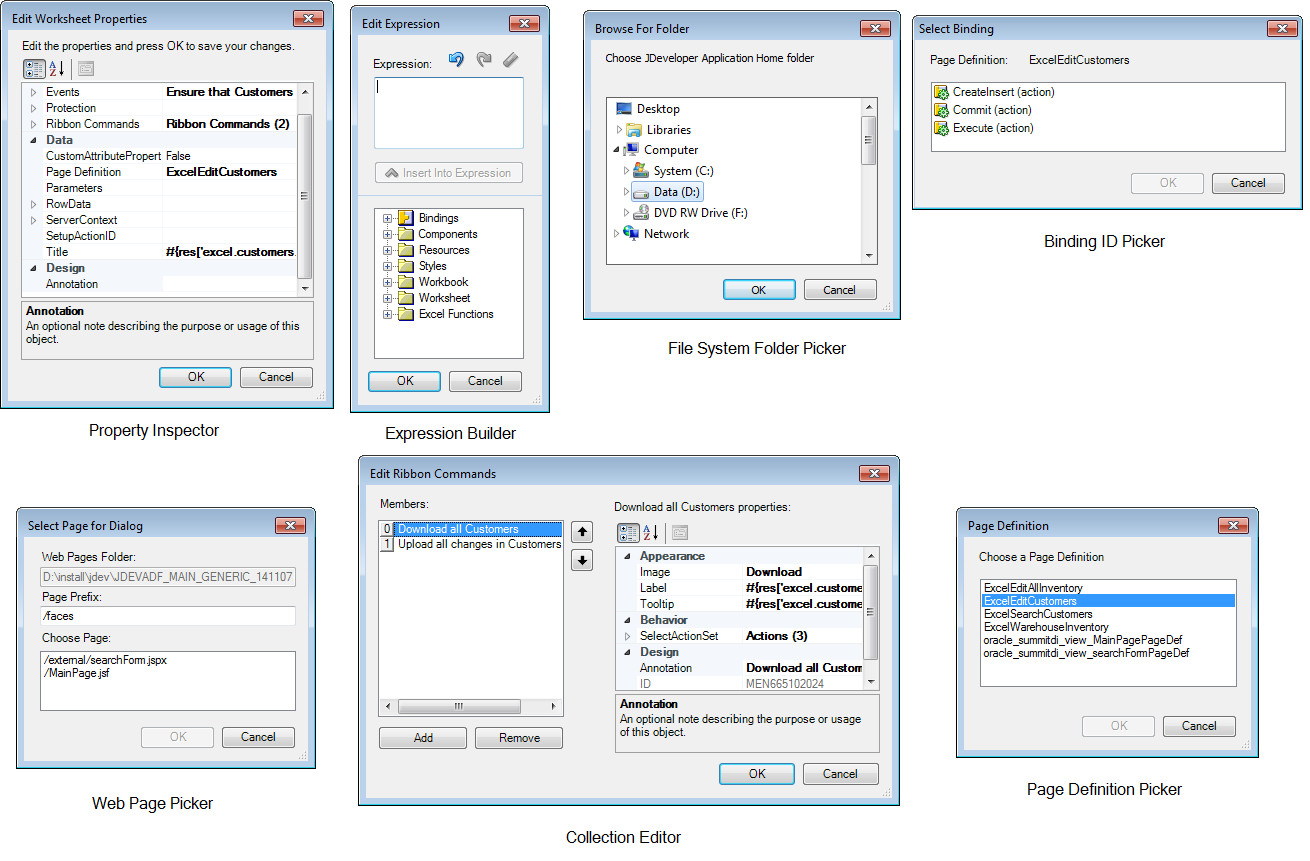
ADF Desktop Integration development tools include the following tools, also shown in Figure 5-1:
Bindings Palette
Components Palette
Property Inspector
Binding ID Picker
Expression Builder
Web Page Picker
File System Folder Picker
Page Definition Picker
Collection Editors
Figure 5-1 ADF Desktop Integration Development Tools
ADF Desktop Integration provides two modes, design mode and the test mode, in which you can work while you configure the Excel workbook.
In design mode, you use the tools provided by Oracle ADF in Excel to design and configure the integrated Excel workbook. In test mode, you can view and test the changes you made in the design mode, in the same way that the end user views the published integrated Excel workbook.
5.1.1 ADF Desktop Integration Development Tools Use Cases and Examples
You use the development tools to configure and design the integrated Excel workbook. For example, as shown in Figure 5-2, in EditCustomers-DT.xlsx an ADF Table component is inserted in the integrated Excel workbook using the Customers binding from the Bindings palette.
Figure 5-2 ADF Desktop Integration Components and Bindings

Other ADF Desktop Integration components, such as ADF Input Text, ADF Input Date and ADF Label, can be inserted from the Components palette, and configured using the Property Inspector and Expression Builder.
5.1.2 Additional Functionality for ADF Desktop Integration Development Tools
After adding the desired components and configuring your workbook, you may find that you need additional functionality such as changing the appearance of the workbook, and localizing it. The following sections describe other functionality that you can use:
Interactivity: You add one or more action sets to your integrate Excel workbook for it to integrate with your Fusion web application. For more information, see Adding Interactivity to Your Integrated Excel Workbook .
Localization: You can customize the integrated Excel workbook as part of the process to internationalize and localize with the Fusion web application. For more information, see Internationalizing Your Integrated Excel Workbook.
Styles: You can configure the display of your components using several predefined Excel styles. For more information, see Working with Styles.
EL Expressions: You can use EL expressions with the ADF Desktop Integration components. For more information, see ADF Desktop Integration EL Expressions.
5.2 Designer Ribbon Tab
You use the Oracle ADF tab, also called as Designer Ribbon tab, for various tasks such as configuring the integrated workbook and worksheets properties, insert Oracle ADF components and edit their properties, run the workbook in test mode, and publish the workbook. The Oracle ADF tab, also shown in Figure 5-3, provides various buttons in design mode.
Figure 5-3 Oracle ADF Tab in Design Mode

Tip:
Press Alt+C to access the Oracle ADF tab and view the shortcut keys for Oracle ADF tab ribbon commands from the keyboard.
You can use Oracle ADF tab buttons to invoke the actions described in Table 5-1.
Table 5-1 Oracle ADF Tab Options
| In this group... | Click this button... | To... | Mode when the button is available... |
|---|---|---|---|
Workbook |
Display the Edit Workbook Properties dialog to view and edit integrated Excel workbook properties. The button is also used to enable ADF Desktop Integration in a non-integrated Excel workbook. |
Design |
|
Workbook |
Display the Edit Worksheet Properties dialog to view and edit the current worksheet properties. |
Design |
|
Workbook |
Open the About ADF Desktop Integration dialog that provides version and property information of integrated Excel workbook. The dialog also provides access to the diagnostic report described in Generating an ADF Desktop Integration Diagnostic Report. The button is also available in non-integrated Excel workbooks after ADF Desktop Integration is installed. |
Design, Test |
|
Workbook |
Open the Save Workbook Definition as dialog that exports the current workbook definition as |
Design |
|
Workbook |
Open the Choose Workbook Definition File to Import dialog that imports the workbook integration metadata from the saved |
Design |
|
ADF Components |
Display a dropdown list of Oracle ADF components that you can insert in the selected cell. |
Design |
|
ADF Components |
Display the property inspector window to view and edit component properties of the selected component. |
Design |
|
ADF Components |
Delete the selected component from the Excel worksheet. |
Design |
|
ADF Components |
Any modifications that you made to the page definition files in the JDeveloper project now become available in the Excel workbook. For more information, see How to Reload a Page Definition File in an Excel Workbook. |
Design |
|
Test |
 |
Validate the Excel workbook configuration against ADF Desktop Integration validation rules. For more information about validating a workbook, see Validating the Integrated Excel Workbook Configuration. |
Design |
Test |
Switch the Excel workbook from design mode to test mode. This button is active only when you are in design mode. |
Design |
|
Test |
Switch the Excel workbook from test mode to design mode. This button is active only when you are in test mode. For more information about switching between design mode and test mode, see Testing Your Integrated Excel Workbook. |
Test |
|
Logging |
Display a window that shows the most recent client-side log entries. For more information, see About Client-Side Logging. |
Design, Test |
|
Logging |
Display the Set Output Level dialog to choose client-side log output level. For more information, see About Client-Side Logging. |
Design, Test |
|
Logging |
Create a new temporary logging listener to act as a client-side log output file. For more information, see About Client-Side Logging. |
Design, Test |
|
Logging |
Reload the ADF Desktop Integration configuration file. For more information, see About Client-Side Logging. |
Design, Test |
|
Publish |
Publish the Excel workbook after you complete the integration between the Excel workbook and the Fusion web application. For more information about publishing an integrated Excel workbook, see Deploying Your Integrated Excel Workbook . |
Design |
Tip:
For quick and easy access, you can add Oracle ADF tab buttons to the Excel Quick Access toolbar.
5.3 ADF Desktop Integration Designer Task Pane
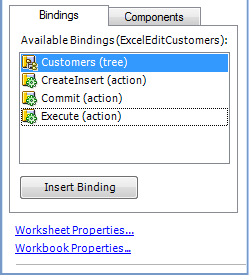
The development tools in ADF Desktop Integration Designer Task Pane are organized in two palettes, the Bindings palette and the Component palette. You use the Bindings palette of ADF Desktop Integration Designer task pane to insert a predefined binding into the integrated Excel workbook. ADF Desktop Integration inserts an Oracle ADF component that references the binding you selected, and prepopulates the properties of the Oracle ADF component with appropriate values. Similarly, you use the Components palette to insert an Oracle ADF component in the integrated Excel workbook. Figure 5-4 displays the ADF Desktop Integration Designer task pane.
Figure 5-4 ADF Desktop Integration Designer Task Pane
You can hide or show the ADF Desktop Integration Designer task pane through launcher buttons (highlighted by the red boxes in Figure 5-5) available in the bottom-right corner of the Workbook and ADF Components group on the Oracle ADF tab.
Figure 5-5 ADF Desktop Integration Designer Task Pane Launcher Buttons

Table 5-2 lists the view tabs and links that appear in the task pane, provides a brief description of each item.
Table 5-2 Overview of ADF Desktop Integration Designer Task Pane
| Task Pane UI Element | Description |
|---|---|
Workbook Properties |
Click to display the Edit Workbook Properties dialog. This dialog enables you to view and edit properties that affect the whole workbook. Examples include properties that reference the directory paths to page definition files, the URL for your Fusion web application, and so on. |
Worksheet Properties |
Click to display the Edit Worksheet Properties dialog. This dialog enables you to view and edit properties specific to the active worksheet. An example is the file name of the page definition file that you associate with the worksheet. |
About |
Click to display the About dialog. This dialog provides the version and property information that can be useful when troubleshooting an integrated Excel workbook. For example, it provides information about the underlying Microsoft .NET and Oracle ADF frameworks that support an integrated Excel workbook. The dialog also provides access to the diagnostic report described in Generating an ADF Desktop Integration Diagnostic Report. After a successful login, it also provides access to the server's current client installer. |
5.4 Using the Bindings Palette
The bindings palette presents the available Oracle ADF bindings that you can insert into the Excel worksheet. The page definition file for the current Excel worksheet determines what Oracle ADF bindings appear in the bindings palette. Figure 5-6 shows a bindings palette populated with Oracle ADF bindings in the ADF Desktop Integration Designer task pane. Note that the bindings palette does not display bindings that an integrated Excel workbook cannot use, so the bindings that appear may differ from those that appear in the page definition file viewed in JDeveloper. Check the log for ignored bindings (see Generating Log Files for an Integrated Excel Workbook).
Figure 5-6 Oracle ADF Bindings Palette in the ADF Desktop Integration Designer Task Pane
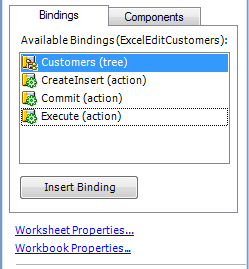
You use the bindings palette in design mode to insert a binding. When you attempt to insert a binding, ADF Desktop Integration prompts you to select and insert an Oracle ADF component appropriate for the binding you selected. ADF Desktop Integration also prepopulates the properties of the Oracle ADF component with appropriate values. For example, if you insert a binding, such as the Customers (tree) binding illustrated in Figure 5-6, a Select Component dialog appears where you can select and insert an ADF Table component.
To insert an Oracle ADF binding, select the cell to anchor the Oracle ADF component that is going to reference the binding in the Excel worksheet, and then insert the binding in one of the following ways:
Double-click the Oracle ADF control binding you want to insert.
Select the binding that you want to insert, and drag it to the desired cell.
Select the control binding and click Insert Binding in the ADF Desktop Integration Designer task pane.
A Select Component dialog appears that prompts you to select one Oracle ADF component from a list of Oracle ADF components where multiple Oracle ADF components can be associated with the binding. After you select an Oracle ADF component from the list, a property inspector appears
If you choose the Oracle ADF component as ADF Input Text, ADF Output Text, or ADF Label, the binding name is assigned to the Value property. If you choose the Oracle ADF component as ADF Button or ADF Ribbon Command, the binding name is assigned to the Label property. If you choose the Oracle ADF component as ADF Table or ADF Read-only Table, the binding name is assigned to the TreeID property.
5.5 Using the Components Palette
The components palette displays the available ADF Desktop Integration components that you can insert into an Excel worksheet. Figure 5-7 shows the components palette as it appears in the ADF Desktop Integration Designer task pane.
Figure 5-7 Oracle ADF Components Palette in the ADF Desktop Integration Designer Task Pane
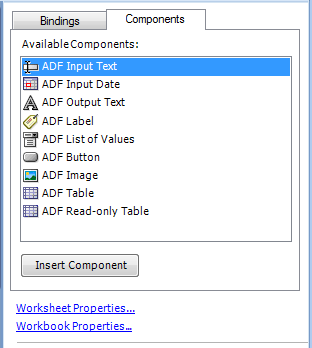
You use the components palette in design mode to insert an Oracle ADF component. First, select the cell to anchor the Oracle ADF component in the Excel worksheet, and then insert the Oracle ADF component in one of the following ways:
Double-click the Oracle ADF component you want to insert.
Select the component that you want to insert, and drag it to the desired cell.
Select the component and click Insert Component in the ADF Desktop Integration Designer task pane.
In all of the above cases, the Oracle ADF component's property inspector appears. Use the property inspector to specify values for the component before you complete its insertion into the Excel worksheet.
Note:
The ADF Desktop Integration components are also available in the Insert Component dropdown list of Oracle ADF tab.
5.6 Using the Property Inspector
The property inspector is a dialog that enables you to view and edit the properties of Oracle ADF components, Excel worksheets, or the Excel workbook. You can open the property inspector in one of the following ways:
Select the component or binding, and click the Edit Properties icon in the Oracle ADF tab.
Select the component or binding, right-click and choose Edit ADF Component Properties.
Double-click the component or binding.
To open the property inspector of an ADF Table or ADF Read-only Table, double-click any cell that is part of the table.
Note:
ADF Button does not support the right-click or double-click action, click the button to open the property inspector dialog.
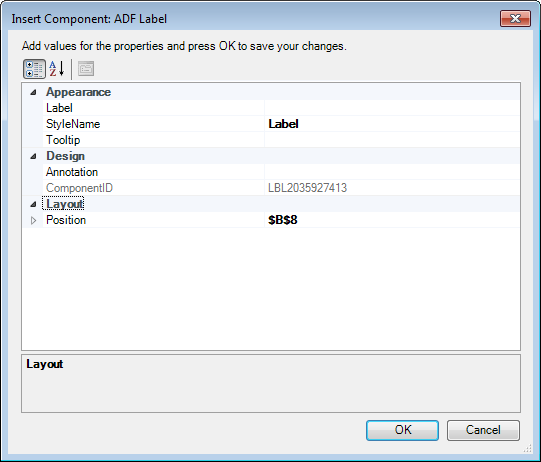
The property inspector also appears automatically after you insert an Oracle ADF binding or component into an Excel worksheet. Figure 5-8 shows a property inspector where you can view and edit the properties of an ADF Label component.
At design time, you can edit key properties of certain Oracle ADF components by editing the Excel cell where the component appears. For example, you can edit the Value property of ADF Label and ADF Input Text components by editing the value displayed in the cell.
Note:
The property inspector does not validate the values you enter for a property, or combinations of properties. Invalid values may cause runtime errors. To avoid runtime errors, make sure you specify valid values for properties in the property inspector.
You can display the properties in an alphabetical list or in a list where the properties are grouped by categories such as Behavior, Data, and so on. Table 5-3 describes the buttons that you can use to change how properties display in the property inspector.
Table 5-3 Buttons to Configure Properties Display in Property Inspector
| Button | Description |
|---|---|
Use this button to display the properties according to category. |
|
Use this button to display the properties in an alphabetical list. |
In Figure 5-8, the property inspector displays the properties grouped by category.
Figure 5-8 Property Inspector Window for ADF Label Component
5.7 Using the Binding ID Picker
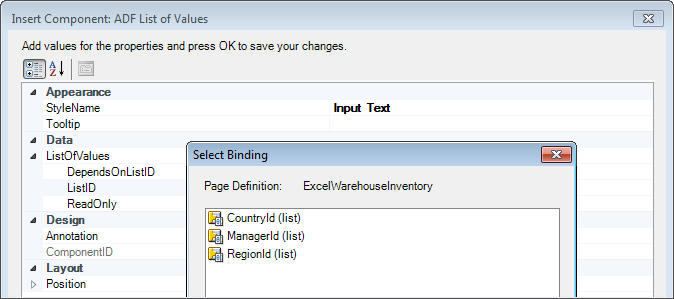
The binding ID picker is a dialog that enables you to select Oracle ADF bindings at design time to configure the behavior of Oracle ADF components at runtime. You invoke the binding ID picker from the property inspector. The binding ID picker filters the Oracle ADF bindings that appear, based on the type of binding that the Oracle ADF component property accepts. For example, the ListID property for an ADF List of Values component supports list bindings. Therefore, the binding ID picker filters the bindings from the page definition file so that only list bindings appear, as illustrated in Figure 5-9.
Figure 5-9 Binding ID Picker
For more information about ADF Desktop Integration component properties and the bindings they support, see ADF Desktop Integration Component Properties and Actions.
5.8 Using the Expression Builder
You use the expression builder to write Expression Language, or EL, expressions that configure the behavior of components at runtime in the Excel workbook. You invoke the expression builder from the property inspector of component properties that support EL expressions. For example, the Label property in Figure 5-10 supports EL expressions and, as a result, you can invoke the expression builder to set a value for this property.
You can reference bindings in the EL expressions that you write. Note that the expression builder does not filter bindings. It displays all bindings that the page definition file exposes. See Table 4-1 to identify the types of bindings that each ADF Desktop Integration component supports.
To add an expression in the Expression box, select the item and click Insert Into Expression. You can also double-click the item to add it in the Expression box. Table 5-4 describes the folders available in the expression builder.
Figure 5-10 Expression Builder
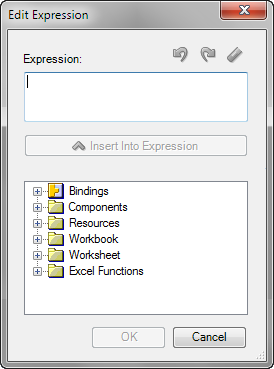
Table 5-4 Expression Builder Folders
| Folder Name | Description |
|---|---|
Bindings |
Lists the bindings supported in ADF Desktop Integration from the current worksheet's page definition. |
Components |
Lists the ADF components available in the current worksheet. |
Resources |
Lists the resource bundles registered in |
Styles |
Lists all Excel styles defined in the current workbook. For more information, see Working with Styles. |
Workbook |
Lists parameters defined in |
Worksheet |
Lists the |
Excel Functions |
Lists sample Excel functions that you can use with ADF Desktop Integration. For more information, see Excel's documentation. |
For more information about using the expression builder, see Applying Styles Dynamically Using EL Expressions. For information about the syntax of EL expressions in ADF Desktop Integration, and guidelines on how you write these expressions, see ADF Desktop Integration EL Expressions.
5.9 Using the Web Page Picker
Use the web page picker to select a web page from your Fusion web application. At runtime, an Oracle ADF component, for example an Oracle ADF Button component, can invoke the web page that you associate with the Oracle ADF component.
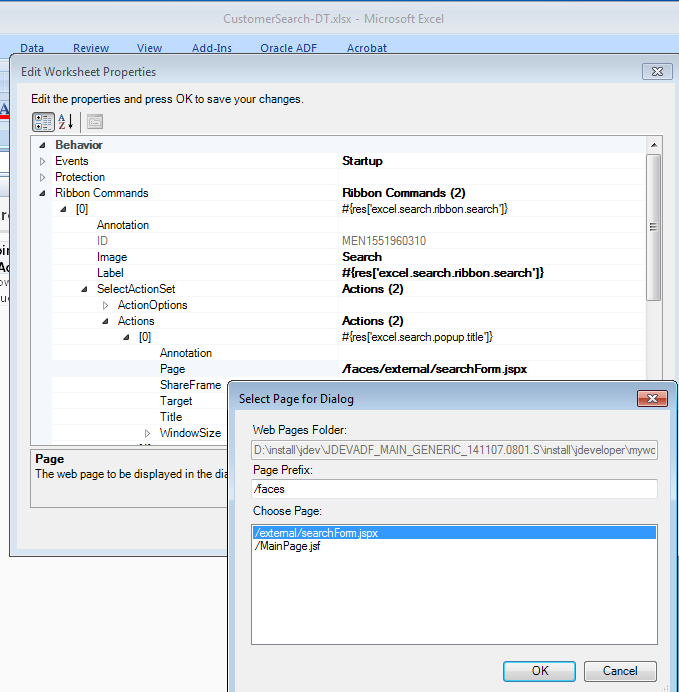
You can invoke the web page picker when you add a Dialog action to an action set in the Action Collector Editor. You use the web page picker to specify a web page for the Page property of the Dialog action, as illustrated in Figure 5-11.
Figure 5-11 Web Page Picker Dialog
For more information about displaying web pages in your integrated Excel workbook, see Displaying Web Pages from a Fusion Web Application.
5.10 Using the File System Folder Picker
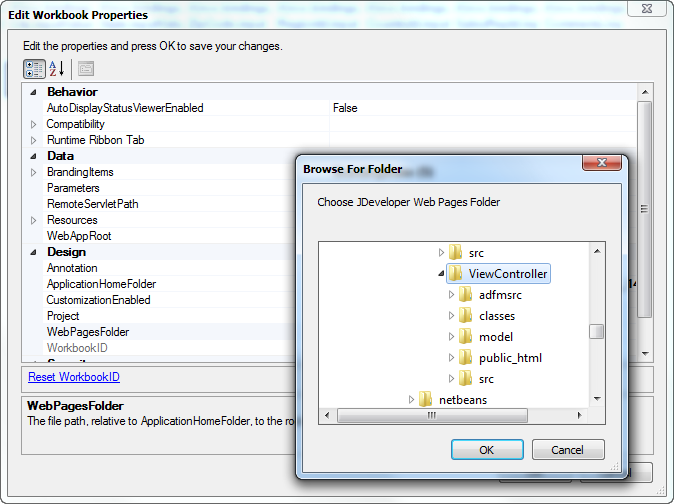
Use the file system folder picker to navigate over the Windows file system and select folders. You use this picker to specify values for the following workbook properties:
ApplicationHomeFolderWebPagesFolder
The first time you open an Excel workbook the picker appears so that you can set values for the previously listed properties. For more information about opening an Excel workbook for the first time and the properties you set, see How to Configure a New Integrated Excel Workbook.
Figure 5-12 shows the file system folder picker selecting a value for the WebPagesFolder workbook property.
Figure 5-12 File System Folder Picker
5.11 Using the Page Definition Picker
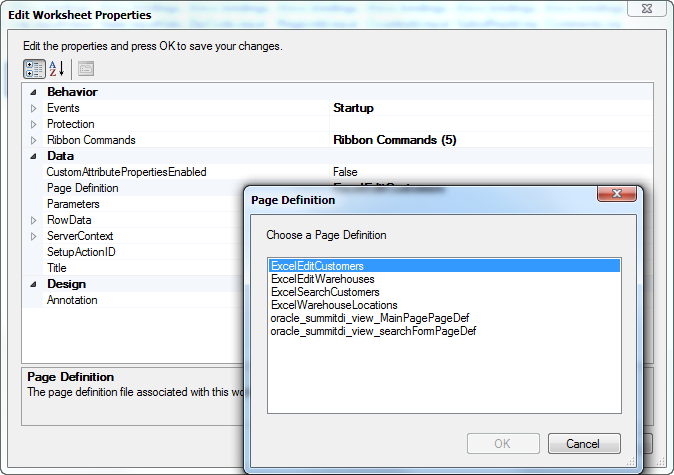
Use the page definition picker to select the page definition ID of a page definition file and associate the file with a worksheet. The picker appears the first time that you activate a non-integrated worksheet in an integrated Excel workbook. It can also be invoked when you attempt to set a value for the worksheet property, PageDefinition, as illustrated in Figure 5-13.
Figure 5-13 Page Definition Picker
For more information about page definition files, see Working with Page Definition Files for an Integrated Excel Workbook.
5.12 Using the Collection Editors
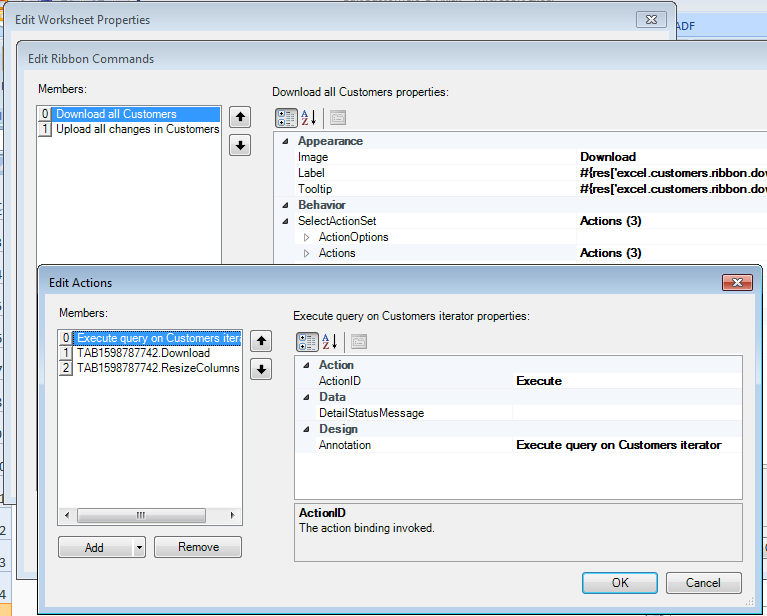
ADF Desktop Integration uses collection editors to manage the properties of elements in a collection. The title that appears in a collection editor's title bar describes what the collection editor enables you to configure. Examples of titles for collection editors include Edit CachedAttributes, Edit Columns, and the Edit Actions. These collection editors allow you to configure collections of cached data, table columns in the ADF Table component, and actions in an action set. Figure 5-14 shows the collection editor.
Figure 5-14 Collection Editor
Tip:
Write a description in the Annotation field for each element that you add to the Edit Action dialog. The description you write appears in the Members list view and, depending on the description you write, may be more meaningful than the default entry that ADF Desktop Integration generates.
5.13 Using the Cell Context Menu
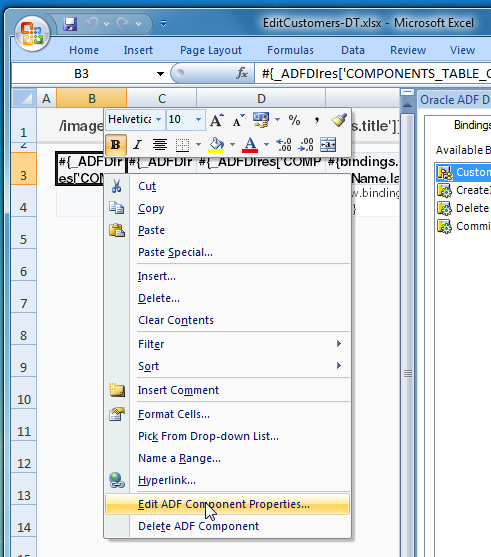
When working with ADF components at design time, right-click any cell of the component to get menu options to edit or delete the component. Some keyboards feature a key that invokes the context menu. Using this key, you will see the edit and delete menu options as well. Figure 5-15 shows the context menu options of an ADF Table component.
Figure 5-15 Context Menu Options of the ADF Table Component
5.14 Removing ADF Desktop Integration Components
At design time, you can remove the inserted ADF Desktop Integration components (or bindings) from the integrated workbooks using the Delete ribbon command, or the Delete ADF Component context menu option (see Figure 5-15).
When you remove a component, ADF Desktop Integration prompts you to confirm your action, as shown in Figure 5-16.
Figure 5-16 Removing ADF Desktop Integration Component
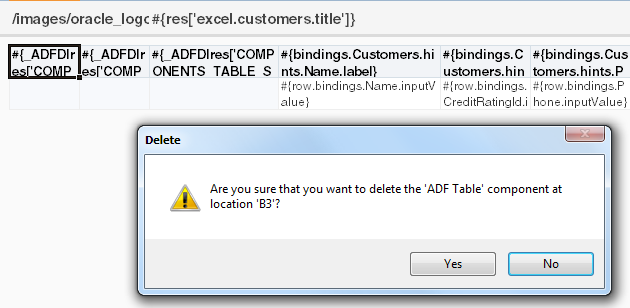
You can also remove multiple components by selecting a range of cells anchoring the components (see Figure 5-17), or select individual component cells using the Ctrl key, and then click the Delete ribbon button.
Figure 5-17 Removing Multiple ADF Desktop Integration Components
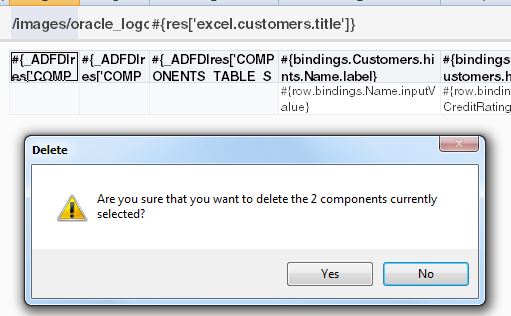
While removing the components, make a note of the following:
To delete a component that occupies more than one cell (such as a table component, or a component in a merged cell), you need not select the entire component. If the selected range intersects any cell of the component, it will be removed.
Do not delete cells or clear cells of the workbook if your selection includes one or more ADF Desktop Integration components. Always use the Delete ribbon command to remove a ADF Desktop Integration component.
If you delete a cell adjacent to a cell that contains an ADF component and this shifts the latter cell into the position of the deleted cell, ADF Desktop Integration offers to delete the ADF component.
ADF Desktop Integration context menu options are not available if multiple cells are selected when the context menu is invoked.
After removing ADF Desktop Integration components, you should validate the integrated Excel workbook configuration in order to find any references to the deleted components. For more information about validating the workbook, see Validating the Integrated Excel Workbook Configuration.
5.15 Exporting and Importing Excel Workbook Integration Metadata
Workbook integration metadata, also known as the workbook definition, is a set of information that describes how a given workbook is integrated with a particular Fusion web application. It includes the placement and configuration of components as well as workbook- and worksheet-level properties. Workbook integration metadata is defined by Oracle ADF. It does not include settings of a workbook that are native to Excel.
You can export the integration metadata of your Excel workbook to an XML file with a name and location that you specify. The XML file contains child elements for each worksheet in the workbook, resources such as the relative path to the remote servlet, and so on. The exported XML file enables you to do the following actions:
Edit or analyze the Excel workbook integration metadata. For example, you might write a program to search the xml file for custom policy violations.
Using an XML editor, copy or move components between worksheets and workbooks.
Copy action-set definitions between buttons or events.
Perform global search and replace operations.
Quickly rearrange, or copy, columns of table components.
5.15.1 How to Export Workbook Integration Metadata
The following procedure describes how you export XML configuration metadata from an integrated Excel workbook.
Before you begin:
It may be helpful to have an understanding of workbook integration metadata. For more information, see Exporting and Importing Excel Workbook Integration Metadata.
To export workbook integration metadata from an integrated Excel workbook:
Note:
The exported XML file does not contain any native Excel settings such as named styles, named ranges, cell properties, content in unbound cells, and so on. The file name comprises the full name of the design-time workbook suffixed with -workbook-defintion.xml. For example, the exported XML file name of EditCustomers-DT.xlsx is EditCustomers-DT.xlsx-workbook-definition.xml.
Publishing a workbook also exports the workbook definition. For more information about publishing a workbook, see Publishing Your Integrated Excel Workbook.
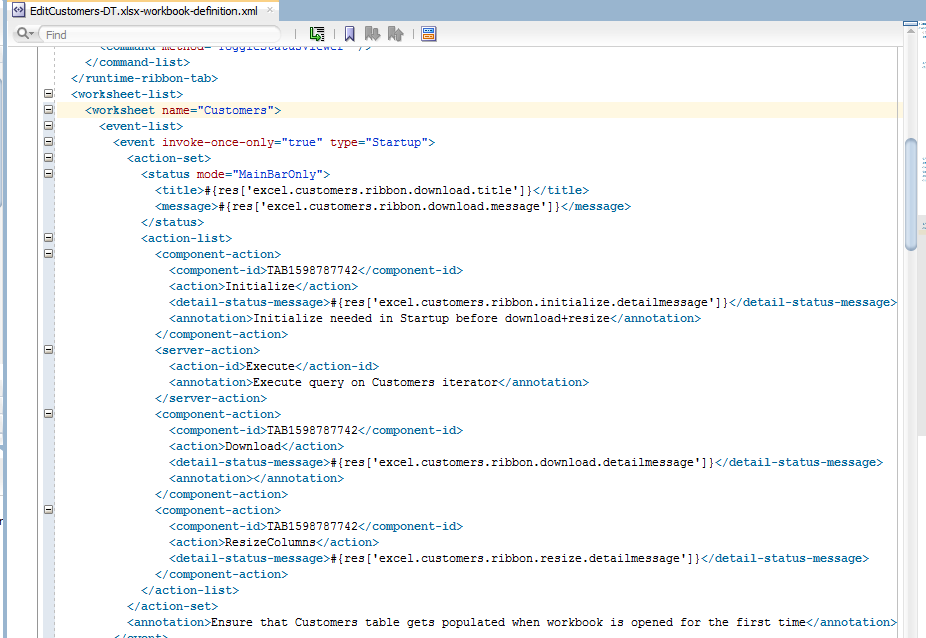
After exporting the workbook definition, you can edit the XML file in any XML editor, such as JDeveloper. Figure 5-18 shows the workbook definition of EditCustomers-DT.xlsx in JDeveloper. While editing the workbook definition file in JDeveloper, JDeveloper automatically validates your changes against the workbook definition schema. It will display warnings that help you avoid problems later on.
Figure 5-18 Editing Workbook Definition in JDeveloper
5.15.2 How to Import Workbook Integration Metadata
After editing, you can import the workbook definition file into the original workbook from which it was exported, or into an empty integrated workbook to create a copy of the source integrated Excel workbook. Note that the empty workbook must be enabled with ADF Desktop Integration before you import the metadata.
The following procedure describes how to import XML configuration metadata to an integrated Excel workbook.
Before you begin:
It may be helpful to have an understanding of workbook integration metadata. For more information, see Exporting and Importing Excel Workbook Integration Metadata.
Before you import the integration metadata from an XML file, perform basic XML validations such as whether the XML code is well formed and the XML file contains the root element. You may import the workbook definition into the same workbook from which it was exported, or import it in a new workbook.
To import workbook integration metadata to an integrated Excel workbook:
The changes made in the workbook definition appear automatically in the integrated Excel workbook. If you use this method to create a new (and independent) integrated Excel workbook from an existing one, make sure to reset the workbook ID after the import is complete so that the two integrated Excel workbooks do not share the same workbook ID. For more information, see How to Reset the Workbook ID.
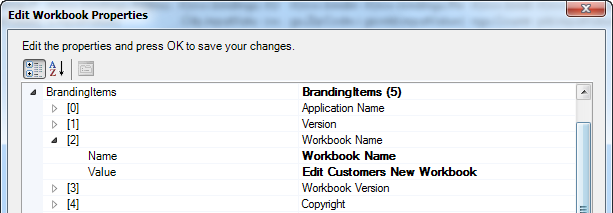
For example, Figure 5-19 shows the branding value of workbook changed to Edit Customers New Workbook in the workbook definition file.
Figure 5-19 Editing Branding Value in the Workbook Definition
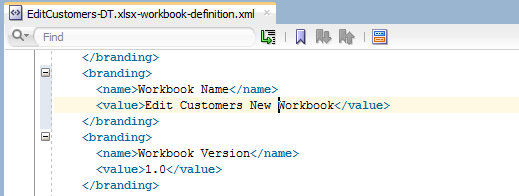
Figure 5-20 shows the changed branding workbook value in the Edit Workbook Properties dialog after importing the workbook definition.
Figure 5-20 Updated Branding Value in Edit Workbook Properties Dialog
5.15.3 What You May Need to Know About Exporting and Importing Excel Workbook Integration Metadata
The workbook integration metadata XML file uses the adfdi-workbook-definition.xsd XML schema document, which defines the XML namespace as http://xmlns.oracle.com/adf/desktopintegration/workbook. The schema is integrated into JDeveloper through the ADF Desktop Integration add-in. You can find a copy of the schema at <MW_HOME>\jdeveloper\adfdi\etc\adfdi-workbook-definition.xsd, where MW_HOME is the Middleware Home directory.
While importing the workbook integration metadata, make a note of following points:
When the import process is initiated, the schema version number (
schema-versionattribute of<workbook>) of the XML file is compared against the schema version number of the installed ADF Desktop Integration client.If both values match, the workbook integration metadata is imported to the workbook. If the schema version of the XML file is lower than the schema version of the installed client, the XML file is migrated to use the installed client's schema. No prompt appears when the file is migrated, but a log of the same is maintained. If the schema version of the XML file is greater than the schema version of the installed client, the import process fails and an error message appears.
After verifying the schema version, the imported XML file is validated against the schema of the installed client. If the validation fails, the validation failure details are logged, an error is reported to the user, and the import process aborts. If the schema validation succeeds, the import process continues.
If an element is missing in the imported XML file, the default value of the element is used in the integrated Excel workbook.
All pre-existing worksheet and component metadata is removed before the import.
If the imported worksheet's name matches an existing worksheet in the integrated workbook, that worksheet is used. Otherwise, a new worksheet is created.
All non-integrated worksheets of the integrated Excel workbook are not affected by the import.
If the imported component does not have valid origin information, the import process attempts to place that component on the first unused row in the target integrated worksheet.
After the XML file is imported, the integrated Excel workbook's Workbook ID is replaced with the Workbook ID of the XML file. If the workbook ID is missing in the XML file, a new ID is generated.