5 Upgrading Oracle SOA Suite and Business Process Management from a Previous 12c Release

The upgrade procedures vary depending on your starting point and the components in your existing domain. If you are upgrading from a previous 12c release, use these steps to upgrade to this release.

Select one of the following upgrade paths:.

5.1 Upgrading to SOA Suite and Business Process Management 12c from a Previous 12c Release

Follow these steps to upgrade your Oracle SOA Suite and Business Process Management 12c deployment to this 12c release.

If you are already running Oracle SOA Suite 12c, and want to upgrade to this version of Oracle SOA Suite and Business Process Management, you must complete the following tasks.

Note:

If your Oracle SOA Suite 12c domain includes Business Activity Monitor (BAM), see Upgrading Oracle SOA Suite with Business Activity Monitoring (BAM) 12c from a Previous 12c Release
  1. Complete the Oracle Fusion Middleware pre-upgrade checklist and perform any tasks related to your environment. Pre-Upgrade Checklist
    Before you begin any upgrade, you must make sure that you have satisfied the required prerequisites for upgrading to this version of Oracle Fusion Middleware. Also, make sure that you have created a complete backup before attempting any upgrades.
  2. Complete any SOA-specific pre-upgrade tasks for your deployment. Performing SOA-Specific Pre-Upgrade Tasks
    If your upgrade will include other components, review the component-specific pre-upgrade procedures.
  3. Run the Pre-Upgrade Readiness Check again, if needed.
    As part of the Oracle Fusion Middleware Pre-Upgrade Checklist, you completed an initial pre-upgrade readiness check. Run the readiness check again just before you begin the upgrade.

    Change directory to ORACLE_HOME/oracle_common/upgrade/bin on Unix operating systems or ORACLE_HOME\oracle_common\upgrade\bin on Windows operating systems.

    On UNIX operating systems:

    ./ua —readiness

    On Windows operating systems:

    ua.bat

  4. Start the Upgrade Assistant, again, to upgrade your schemas:

    You can upgrade all schemas in the domain or individually select schemas to upgrade.

    On UNIX operating systems:

    ./ua

    On Windows operating systems:

    ua.bat

    Complete the Upgrade Assistant screens as described in the standard upgrade procedure:Upgrading Schemas with the Upgrade Assistant

  5. Start the Reconfiguration Wizard to reconfigure the domain.

    On UNIX operating systems:

    ORACLE_HOME/oracle_common/common/bin

    On Windows operating systems:

    ORACLE_HOME\oracle_common\common\bin

    where ORACLE_HOME is your Oracle home directory.

    On UNIX operating systems:

    ./reconfig.sh -log=<log_file> -log_priority=ALL

    On Windows operating systems:

    reconfig.cmd -log=<log_file> -log_priority=ALL

    Complete the Reconfiguration Wizard screens as described in the standard reconfiguration procedure: Reconfiguring the Domain

  6. Start the Upgrade Assistant again to update the domain’s component configurations.
    Complete the Upgrade Assistant screens as described in the standard component configuration procedure: Upgrading the Domain Component Configurations Using the Upgrade Assistant

5.2 Upgrading Oracle SOA Suite with Business Activity Monitoring (BAM) 12c from a Previous 12c Release

If your existing 12c (12.1.3) deployment includes SOA Suite with Business Activity Monitoring (BAM), you will need to complete the following tasks to upgrade to the 12c (12.2.1) release.

  1. Complete all required pre-upgrade tasks.
    You must complete the pre-upgrade tasks before you begin this process. Refer to the Pre-Upgrade Checklist and any SOA-specific tasks that may be required for your deployed applications.

    Note:

    Due to the complexity of the BAM 12c upgrade, it is strongly encouraged that you back up your environment before beginning this upgrade process.
  2. Run a pre-upgrade readiness check using the Upgrade Assistant in -readiness mode.
    Launch the Upgrade Assistant from the 12.2.1 Oracle home to review your 12.1.3 domain for upgrade readiness.

    UNIX operating system users, navigate to oracle_common/upgrade/bin of the 12.2.1 Oracle home

    Execute the following command: ./ua — readiness

  3. Upgrade the 12.1.3 schemas to 12.2.1 using the Upgrade Assistant 12c (12.2.1).
    Launch the Upgrade Assistant from the 12.2.1 Oracle home to upgrade the 12.1.3 schemas.

    UNIX operating system users, navigate to oracle_common/upgrade/bin of the 12.2.1 Oracle home

    Execute the following command: ./ua

    Complete the Upgrade Assistant screens as described in the standard upgrade process:Upgrading Schemas with the Upgrade Assistant

  4. Upgrade the domain configurations using the Reconfiguration Wizard 12c (12.2.1).
    Launch the Reconfiguration Wizard from the 12.2.1 Oracle home to upgrade the 12.1.3 domain.

    UNIX operating system users, navigate to:

    oracle_common/common/bin of the 12.2.1 Oracle home

    Execute the following command: ./reconfig.sh

    Complete the Reconfiguration Wizard screens as described in the standard reconfiguration process: Reconfiguring the Domain Using the Reconfiguration Wizard

    IMPORTANT: You must complete these additional tasks while running the Reconfiguration Wizard:

    1. On the Component Datasources screen, change the BAM Leasing Schema schema owner name to your newly created schema name. The schema owner name may incorrectly show DEV_WLS_RUNTIME.
    2. Complete the Reconfiguration Wizard Managed Server screen as described in Targeting Server Groups Using the Reconfiguration Wizard

5.3 Targeting Server Groups Using the Reconfiguration Wizard

When upgrading from a previous 12c release, you must manually target your servers to the appropriate server groups using the Reconfiguration Wizard.

If you are upgrading a domain that was created in a previous 12c release (such as 12.1.3), you MUST target your servers to the correct Server Groups during the domain reconfiguration phase of the upgrade. Failure to target these servers may result in a failed upgrade and excess downtime.
  1. Launch the Reconfiguration Wizard.

    (UNIX) ORACLE_HOME/oracle_common/common/bin

    (Windows) ORACLE_HOME\oracle_common\common\bin

    where ORACLE_HOME is your Oracle home directory.

    (UNIX) ./reconfig.sh -log=<log_file> -log_priority=ALL

    (Windows) reconfig.cmd -log=<log_file> -log_priority=ALL

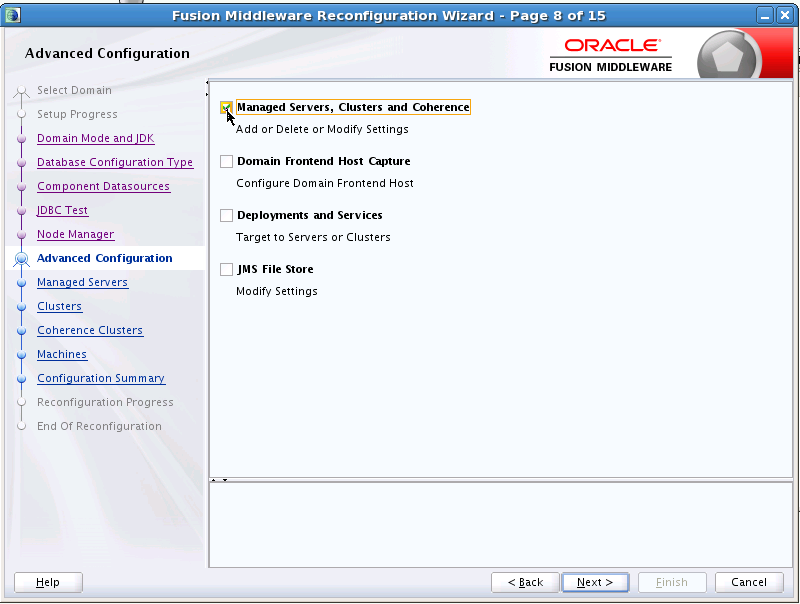
  2. Navigate to the Advanced Configuration screen and select Managed Servers, Clusters, and Coherence.
    This screen shows the Advanced Configuration options when reconfiguring the domain with the Reconfiguration Wizard.
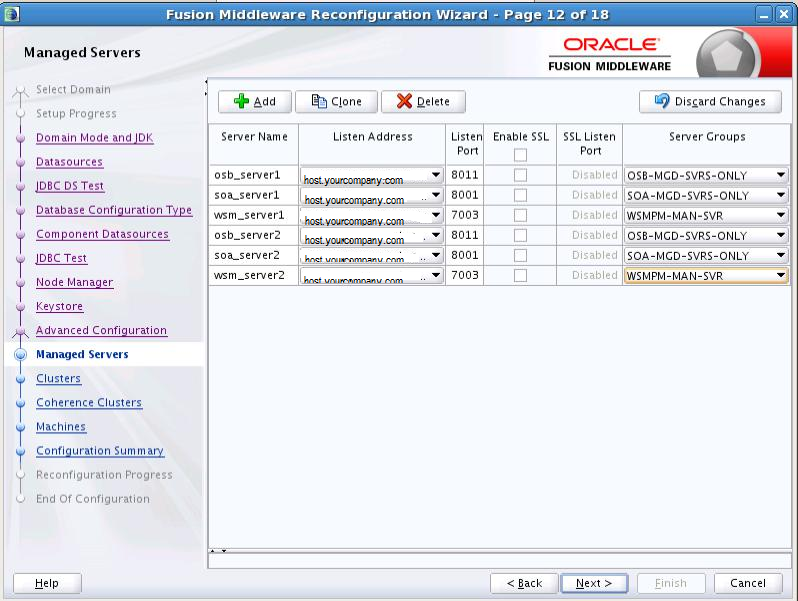
  3. On the Managed Servers screen, target each server to the correct Server Group by selecting the correct group name from the Server Groups drop-down menu.
    This screen shows the servers and their targets.

    Note:

    When OWSMPM is in its own cluster and not part of SOA or OSB clusters, you should target only SOA-MGD-SVRS-ONLY user extensible server group to the SOA cluster, target only OSB-MGD-SVRS-ONLY to the OSB cluster and target WSMPM-MAN-SVER server group to OWSM . When upgrading 12.1.3 to 12.2.1, you also need to target BAM-MGD-SVRS-ONLY to BAM cluster.
    Component and Server Server Group
    SOA (soa_server1) SOA-MGD-SVRS-ONLY
    Oracle Service Bus — OSB (osb_server1) OSB-MGD-SVRS-ONLY
    Business Activity Monitoring — BAM (bam_server1) BAM-MGD-SVRS-ONLY
    Managed File Transfer — MFT (mft_server1) MFT-MGD-SVRS-ONLY
Each of the servers should now be targeted to the correct server group and should not show as Unspecified.