4 Upgrading to SOA Suite and Business Process Management 12c (12.2.1)
Note:
Oracle strongly recommends that you create a copy of your actual production environment, upgrade the cloned environment, verify that the upgraded components work as expected, and then (and only then) upgrade your production environment.
Identifying potential upgrade issues in a cloned environment can eliminate unnecessary downtime of your production environment.
Complete this - and all other required pre-upgrade steps - before you start the upgrade. For more information see Oracle Fusion Middleware 12c Pre-Upgrade Checklist and Performing SOA-Specific Pre-Upgrade Tasks.
- Installing Oracle SOA Suite and Business Process Management 12c
- Generating Log Files During SOAINFRA Schema Upgrade (Recommended)
- Upgrading Schemas with the Upgrade Assistant
Follow these tasks to upgrade your schemas with the Upgrade Assistant. - Reconfiguring the Domain Using the Reconfiguration Wizard
The Reconfiguration Wizard is a new tool in 12c. It is run in conjunction with the Upgrade Assistant to upgrade your domain to 12c. - Upgrading the Domain Component Configurations Using the Upgrade Assistant
Use the Upgrade Assistant to update any remaining WebLogic component configurations within the domain. - Upgrading Oracle Business Process Managment (BPM) Web Forms
- Managing Your Upgraded Oracle Fusion Middleware 12c Software
4.1 Installing Oracle SOA Suite and Business Process Management 12c
Before you can upgrade your existing SOA and Business Process Management (BPM) 11g components, you must first install the SOA Suite and Business Process Management 12c (12.2.1) distributions. Follow the instructions described in Installing and Configuring Oracle SOA Suite and Business Process Management.
Note:
If your SOA domain has other SOA-integrated components, you must install those distributions as well. See the Oracle Fusion Middleware documentation library for a complete list of installation guides. Be sure to review any of the component-specific chapters in this book to determine if additional pre-upgrade steps for your additional installations.
During the installation process, you will be instructed to configure the newly installed domain. When upgrading, however, do not use the Configuration Wizard to configure the SOA 12.2.1 domain. The Configuration Wizard is used to configure a new domain installation. During an upgrade, however, you will be upgrading your existing domain using the Reconfiguration Wizard described later in this guide.
4.2 Generating Log Files During SOAINFRA Schema Upgrade (Recommended)
To facilitate troubleshooting the upgrade, Oracle recommends that you generate log files when upgrading _SOAINFRA schema. Logging is disabled by default.
To enable logging:
- Create the soainfra user directory with the name
UPGRADE_DIR - Enable debugging logs by calling function
set_LogLevel(1)orALTER PROCEDURE log_debug COMPILE PLSQL_CCFLAGS = 'debug_on:TRUE';
You can also launch the Upgrade Assistant with logging parameters as shown in the UNIX example below:
./ua [-logLevel <log_level>] [-logDir <log_directory>]
For more information on generating and using log files, see Launching the Upgrade Assistant with Optional Arguments.
4.3 Upgrading Schemas with the Upgrade Assistant
Follow these tasks to upgrade your schemas with the Upgrade Assistant.
- About Upgrading Schemas using the Upgrade Assistant
The Upgrade Assistant provides two options for upgrading schemas: Individually Selected Schemas and All Schemas Used By a Domain. - Identifying Schemas that Can be Upgraded with the Upgrade Assistant
The Upgrade Assistant identifies and includes all the schemas that are available for an upgrade. You can also select the schemas you want to upgrade. If you want to review the list of available schemas before you begin the upgrade, query the schema version registry. - Starting the Upgrade Assistant
The Upgrade Assistant is used to upgrade schemas, component configurations and standalone system components. - Upgrading SOA Schemas with the Upgrade Assistant
- Verifying the Schema Upgrade
- Verifying the Instance Upgrade (if applicable)
- Checking for Invalid Database Objects
- Upgrading Partitioned Schema Tables from 11g
If you are upgrading an Oracle SOA 11g installation that includes schemas partitioned as described in the Oracle SOA Suite 11g Administration Guide, and you want to continue with this specific table partitioning strategy in SOA 12c (12.2.1), then you must complete these required steps to upgrade your partitioned schema tables.
4.3.1 About Upgrading Schemas using the Upgrade Assistant
The Upgrade Assistant provides two options for upgrading schemas: Individually Selected Schemas and All Schemas Used By a Domain.
Individually Selected Schemas
This option enables you to choose which component schemas to upgrade. Select this option when you have component schemas within the domain that you do not want to upgrade.
For example, if you want to make a trial run of Upgrade Assistant by creating schemas with RCU that are outside the domain, and then use Upgrade Assistant to upgrade them.
All Schemas Used By a Domain
This option allows the Upgrade Assistant to detect all of the available schemas within the specified domain and include them in the upgrade.
4.3.2 Identifying Schemas that Can be Upgraded with the Upgrade Assistant
The Upgrade Assistant identifies and includes all the schemas that are available for an upgrade. You can also select the schemas you want to upgrade. If you want to review the list of available schemas before you begin the upgrade, query the schema version registry.
Tip:
Compare the information you collect from the schema version registry and the corresponding schemas to determine whether there are schemas in your domain that are not available for an upgrade yet.
If you are using an Oracle database, connect to the database as a user having Oracle DBA privileges, and run the following from SQL*Plus to get the current version numbers:
SET LINE 120
COLUMN MRC_NAME FORMAT A14
COLUMN COMP_ID FORMAT A20
COLUMN VERSION FORMAT A12
COLUMN STATUS FORMAT A9
COLUMN UPGRADED FORMAT A8
SELECT MRC_NAME, COMP_ID, OWNER, VERSION, STATUS, UPGRADED FROM SCHEMA_VERSION_REGISTRY ORDER BY MRC_NAME, COMP_ID ;
The following report is generated when saved to a SQL script, for example version.sql.
If the number in the "VERSION" is at 11.1.1.6.0 or higher, and the STATUS column is 'VALID', then the schema is supported for upgrade.
If an upgrade is not needed for a schema, the schema_version_registry table retains the schemas at their pre-upgrade version after the 12.2.1 upgrade.
Notes about the schemas that need to be upgraded
-
For most components, the only schema version starting points that are valid for upgrading are 11g Release 1 (11.1.1.6, 1.1.1.7, 11.1.1.8, or 11.1.1.9) or 12c (12.1.2 or 12.1.3). If your schemas are not at a supported version, then you must upgrade them before using the 12c (12.2.1) upgrade procedures.
Some components, such as Oracle Enterprise Data Quality and Oracle Golden Gate Veridata, support an upgrade from versions other than the standard Oracle Fusion Middleware supported versions.
Refer to your component-specific installation and upgrade documentation for additional information about the schemas that are required for your upgrade.
-
If you used a file-based policy store in 11g, then you must reassociate the file-based policy store with a database-based security store before running the Upgrade Assistant.
For more information see Reassociating a File-Based Policy Store Before Upgrade.
-
If you used an OID-based policy store in 11g, make sure that you have created new 12c OPSS schemas before upgrade.
-
If you are upgrading an ORASDPM schema that was created using RCU 11g (11.1.1.1.4 or earlier), and you subsequently upgraded ORASDPM to 11g (11.1.1.6 or later), the FMW user will need to grant the CREATE TABLE privilege to user <prefix>_ORASDPM before upgrading to 12c (12.2.1).
grant CREATE TABLE to <prefix>_ORASDPM;
Where <prefix> is the name given to the schema when it was created. -
You can only upgrade schemas for products that are available for upgrade in the Oracle Fusion Middleware 12c (12.2.1) release. Do not attempt to upgrade a domain that includes components that are not yet available for upgrade to 12c (12.2.1) .
4.3.3 Starting the Upgrade Assistant
The Upgrade Assistant is used to upgrade schemas, component configurations and standalone system components.
Note:
The Upgrade Assistant should be run by a non-SYSDBA user whenever possible. The steps to create a non-SYSDBA user are described in Creating a Non-SYSDBA User.4.3.4 Upgrading SOA Schemas with the Upgrade Assistant
The Upgrade Assistant displays a sequence of screens listed in Table 4-1 when upgrading schemas. Perform the respective action(s) for each of the screens. When Oracle SOA is selected, the _IAU, _MDS, _OPSS, _SOAINFRA, and _UMS schemas will be included in the upgrade.
Note:
If you are upgrading an ORASDPM schema that was created using RCU 11g (11.1.1.1.4 or earlier), and you subsequently upgraded ORASDPM to 11g (11.1.1.6 or later), the FMW user will need to grant the CREATE TABLE privilege to user <prefix>_ORASDPM before upgrading to 12c (12.2.1).grant CREATE TABLE to <prefix>_ORASDPM;Where <prefix> is the name given to the schema when it was created.
Table 4-1 Upgrade Assistant Screens: Upgrading Schemas
| Screen | Description and Action Required |
|---|---|
|
This screen provides an overview of the Upgrade Assistant and some information about important pre-upgrade tasks. |
|
|
Select Individually Selected Schemas. |
|
|
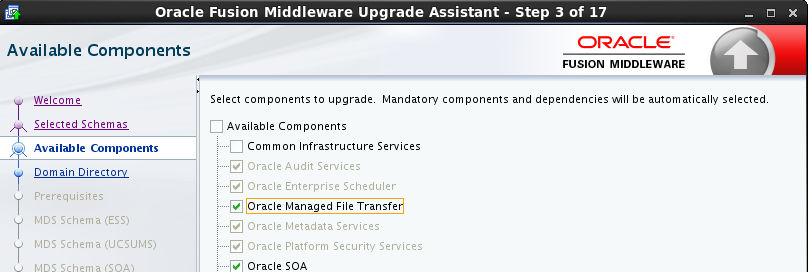
Available Components |
This screen provides a list of installed Oracle Fusion Middleware components that have schemas that can be upgraded. When you select a component, the schemas and any dependencies are automatically selected. For example, when Oracle SOA is selected, the When Managed File Transfer is selected, Audit Services, Enterprise Scheduler and Platform Security Services will be included in the upgrade.
|
|
This screen appears if you selected Oracle Platform Security Services or Oracle Audit Services on the Available Components screen. Enter the absolute path to the existing WebLogic domain directory, or click Browse to navigate to and select the 11g domain directory you are upgrading. |
|
|
Check that the prerequisites for schema upgrade are met. You must select each prerequisite before you click Next. CAUTION: Upgrade Assistant will NOT verify that these prerequisites have been met. |
|
|
Use this screen to enter database connection details for each of the schemas you are upgrading.
Notes:
|
|
|
Review the status of the Upgrade Assistant as it examines each component, verifying that the component is ready for upgrade. Verify that the Source Version displayed for each schema is listing the correct version number for the schema to be upgraded. |
|
|
Review the summary of the options that you have selected for schema upgrade. Verify that the correct Source and Target versions are listed for each schema you intend to upgrade. Click Upgrade to upgrade the schemas, or click Back if you wish to change the configurations. |
|
|
Review the status of the current upgrade process. NOTE: The progress bar on this screen displays the progress of the current upgrade procedure. It does not indicate the time remaining for the upgrade. Click Next when the upgrade is complete. |
|
|
Click Close if the Upgrade was successful. If the upgrade failed or if you canceled the upgrade before it completed successfully, you should review the log files, restore the backed up environment, and restart the Upgrade Assistant. |
4.3.5 Verifying the Schema Upgrade
Use the following SQL command to verify that the schema version in schema_version_registry has been properly updated.
SET LINE 120
COLUMN MRC_NAME FORMAT A14
COLUMN COMP_ID FORMAT A20
COLUMN VERSION FORMAT A12
COLUMN STATUS FORMAT A9
COLUMN UPGRADED FORMAT A8
SELECT MRC_NAME, COMP_ID, OWNER, VERSION, STATUS, UPGRADED FROM SCHEMA_VERSION_REGISTRY ORDER BY MRC_NAME, COMP_ID ;
Check that the number in the VERSION column matches the latest version number for that schema. See Schemas That Require an Upgrade to verify that the updated version number is correct for your schema(s).
In the query result, the STATUS field will be either UPGRADING or UPGRADED during the schema patching operation, and will become VALID when the operation is completed.
If the status appears as INVALID, the schema update failed. You should examine the logs files to determine the reason for the failure.
4.3.6 Verifying the Instance Upgrade (if applicable)
If instances were upgraded as part of your schema upgrade, verify that there were no errors with the instances.
-
If the Upgrade Assistant reports that there are no additional instances to be upgraded, then simply close the Upgrade Assistant UI and continue with the remaining upgrade procedures (launching the Reconfiguration Wizard for example).
-
If the Upgrade Assistant reports that there was an error during the instance upgrade, then correct the error(s) and resubmit the database job to complete the upgrade. You can also use the Report Upgrade Summary administration script (Option 1) to check the
UPGRADE ERROR COUNTsection of the report. For more information, see Resolving Instance Upgrade Errors. -
If there are still closed instances to be upgraded, then you will be notified that the upgrade of the closed instances will continue in the background after you close the Upgrade Assistant. Do not close the Upgrade Assistant until UA reports it is finished and you see the following:
Oracle SOA
1. The Upgrade Assistant has successfully upgraded all active instances. You can now close the Upgrade Assistant.
2. The automated upgrade of closed instances will continue in the background after the Upgrade Assistant is exited and until the SOA server is started,at which point the upgrade will stop. You can schedule the upgrade of any remaining closed instances for a time when the SOA server is less busy.
Close the Upgrade Assistant and use the instance data administration scripts to administer and monitor the overall progress of this automated upgrade. For more information see "Administering and Monitoring the Upgrade of SOA Instance Data" in Upgrading SOA Suite and Business Process Management.
4.3.7 Checking for Invalid Database Objects
If you are using an Oracle database, you should recompile database objects after running the Upgrade Assistant by connecting to the database as SYS and running the following from SQL*Plus:
SQL>@?/rdbms/admin/utlrp.sql
This will compile the database objects that were upgraded by Upgrade Assistant.
Then issue the following query to ensure there are no longer any invalid database objects:
SELECT owner, object_name FROM all_objects WHERE status='INVALID';
None of the database objects for the upgraded schema should be invalid at this point. If there are any, run the utlrp.sql command again and check again. If the problem persists, you should file a service request.
4.3.8 Upgrading Partitioned Schema Tables from 11g
If you are upgrading an Oracle SOA 11g installation that includes schemas partitioned as described in the Oracle SOA Suite 11g Administration Guide, and you want to continue with this specific table partitioning strategy in SOA 12c (12.2.1), then you must complete these required steps to upgrade your partitioned schema tables.
Note:
This procedure is required only if you plan to use the existing Oracle SOA 11g table partitioning strategy in your upgraded 12c environment. If you are upgrading from a previous 12c release, you will not need to complete this procedure.Understanding the Upgrade of Partitioned Schema Tables
COMPOSITE_INSTANCE partitions (which all other/existing partitions should already be aligned). The new 12c Fabric Table that will drive the equi-partitoning strategy is called "SCA_FLOW_INSTANCE".Before You Begin
-
To align the new SOA 12c Fabric tables, dummy/empty
RANGEpartitions will be added which are modeled on the now obsolete 11gcomposite_instancetable. This means that approximately 10 new Fabric tables will be recreated into partitioned tables. -
You can convert
RANGEpartitioning toINTERVAL-RANGEpartitioning during this process as Oracle Fusion Middleware SOA Suite 12c now supports both.You can chose to continue with
RANGEpartitioning or convert toINTERVAL-RANGEpartitioning as part of this process. AnINTERVAL-RANGEtable can house bothRANGEandINTERVAL-RANGEpartitions with the first partition always being aRANGEpartition (called a transition point). Note that when the tables are converted toINTERVAL-RANGE, there will still be the existingRANGEpartitions until newINTERVAL-RANGEpartitions are automatically allocated. -
The 11g SOA strategy did not provide any recommendations on the use of a MAXVALUE partitions. If you choose to convert to
INTERVAL-RANGEpartitioning and theMAXVALUEpartition is not empty, then the table will need to be rebuilt. However, if theMAXVALUEpartition is empty then it will just be dropped as part of the conversion toINTERVAL-RANGE. However, if theMAXVALUEpartition is empty, then it will be dropped as part of the conversion. (INTERVAL-RANGEpartitioning does not allow aMAXVALUEpartition as partitions are automatically allocated.) -
The process involves the use of the TRS (Table Recreation Scripts) utility. You will be required to edit some of the generated scripts. The editing is required to correct the DDL syntax, as the generated DDL can vary between installations and RDBMS versions or may have been customized.
-
The verification scripts in 12.2.1 are upgrade-aware and consider the instances in both the 12c
sca_flow_instanceand 11gcomposite_instancetables.
Note:
Oracle recommends that you create a complete backup of the schemas and database before starting this process. Oracle also recommends that you execute this procedure in a test environment before attempting in production (including the verification scripts).Process Overview
The upgrade of partitioned schema tables happens in two phases:
Phase 1: Generate the DDL script.
-
Correct partition keys
-
Honor any DDL changes
-
Partition new 12c Fabric tables
Creates Dummy
RANGEpartitions modeled against “composite_instance” -
Handle MAXVALUE partition (if interval required)
Phase 2: Edit and run the DDL script.
-
Edit the DDL script.
-
Execute DDL script.
-
Check Log files.
Phase 1: Generating the DDL Script
-
As SYSDBA, create TRS_DIR and grant read, write to <soainfra>..
SQL > create directory TRS_DIR as ‘/../../..’;
SQL>  grant read,write on directory TRS_DIR to <soainfra>
-
Enable debug mode.
ALTER PROCEDURE debug_purge  COMPILE PLSQL_CCFLAGS = 'debug_on:TRUE' ║ REUSE SETTINGS;
ALTER PROCEDURE log_info COMPILE PLSQL_CCFLAGS = 'debug_on:TRUE' REUSE  ║  SETTINGS;
-
Navigate to the following directory:
12C_mwhome/soa/common/sql/soainfra/sql/oracle/122100/trs12/
-
Edit trs_migrate_exec.sql for any changes you require. The table below describes the parameters and available options:
Parameter Options range_interval R (range) or I (interval) interval_clause 'NUMTOYMINTERVAL(1, ''MONTH'')‘ Specified by SQL conversion functions-
NUMTODSINTERVAL converts n to an INTERVAL DAY TO SECOND literal.
-
NUMTOYMINTERVAL converts number n to an INTERVAL YEAR TO MONTH literal.
partition G (group1 or 2) or P (partial) Identifies 11g partitioning strategy
drop_flag Drop original tables; true, false redo_flag Generate redo; true false DOP Degree of parallel sql_trace SQL Trace; true, false If true, ensure the soainfra user has been granted "alter session" privilege.
The following shows a sample code snippet. Make sure to provide your own parameter options.set echo on; set serverout on; DECLARE range_interval varchar2(1) := 'I'; interval_clause varchar2(40) := 'NUMTOYMINTERVAL(1, ''MONTH'')'; partition varchar2(1) := 'G'; drop_flag boolean := true; redo_flag boolean := false; DOP number := 0; sql_trace boolean := false; BEGIN trs_mig.trs_migrate (range_interval, interval_clause, partition, drop_flag, redo_flag, DOP, sql_trace); END; /
-
-
Run trs_migrate_exec.sql to generate the DDL script.
Phase 2: Editing and Executing the DDL Script
4.4 Reconfiguring the Domain Using the Reconfiguration Wizard
The Reconfiguration Wizard is a new tool in 12c. It is run in conjunction with the Upgrade Assistant to upgrade your domain to 12c.
When you use the Reconfiguration Wizard to reconfigure a WebLogic Server domain, the following items are automatically updated, depending on the applications in the domain:
-
WLS core infrastructure
-
Domain version
Note:
The Reconfiguration Wizard does not update any of your own applications that are included in the domain.-
The domain version number in the config.xml file for the domain is updated to the Administration Server's installed WebLogic Server version.
-
Reconfiguration templates for all installed Oracle products are automatically selected and applied to the domain. These templates define any reconfiguration tasks that are required to make the WebLogic domain compatible with the current WebLogic Server version.
-
Start scripts are updated.
Note:
Once the domain reconfiguration process starts, it is irreversible. Prior to running the Reconfiguration Wizard, ensure that you have backed up the domain as described in Backing Up the Domain. If an error or other interruption occurs while running the Reconfiguration Wizard, you must restore the domain by copying the files and directories from the backup location to the original domain directory. This is the only way to ensure that the domain has been returned to its original state prior to reconfiguration.- Backing Up the Domain
Prior to running the Reconfiguration Wizard, make a backup copy of the domain directory. - Starting the Reconfiguration Wizard
- Reconfiguring the Domain
4.4.1 Backing Up the Domain
Prior to running the Reconfiguration Wizard, make a backup copy of the domain directory.
4.4.2 Starting the Reconfiguration Wizard
Start the Reconfiguration Wizard in graphical mode by doing the following:
4.4.3 Reconfiguring the Domain
The Reconfiguration Wizard displays a sequence of screens listed in Table 4-2. Perform the respective action(s) for each of the screens. Note that you may not see every screen listed below. In addition, you may need to complete additional screens based on your environment setup. For more information, see Reconfiguring WebLogic Domains.
Table 4-2 Reconfiguration Wizard Screens
| Reconfiguration Wizard Screen | Description and Action Required |
|---|---|
|
Enter the absolute path to the existing domain directory, or click Browse to navigate to and select the domain directory. |
|
|
Shows the progress of applying the reconfiguration templates. |
|
|
Domain mode cannot be changed. Select the JDK to use in the domain or click Browse to navigate to the JDK you want to use. Note that Oracle Fusion Middleware 12c requires Java SE 7. For more information, see Verifying Certification and System Requirements. |
|
|
Use the RCU Data option to connect to the Server Table (_STB) schema. The Repository Creation Utility (RCU) will automatically use service table schema to load the other 12c schema credentials automatically. Always verify the data on the JDBC screens that follow. NOTE: For any existing 11g datasource, the reconfiguration will preserve the existing values. For new datasources where the schema was created by 12c RCU, the default connection data will be retrieved from the _STB schema. If no connection data for a given schema is found in the _STB schema, then the default connection data is used. For more information, click Help, or refer to Database Configuration Type. |
|
|
This screen is displayed if you created custom data sources for a database-based OPSS security store or Audit Data store in 11g. Use this screen to configure the JDBC data sources defined in your domain source. For information about the fields on this page, click Help, or refer to JDBC Data Sources. |
|
|
Test the data source connections you configured on the JDBC Data Sources screen. For information about the fields on this page, click Help, or refer to JDBC Data Sources Test. |
|
|
Specify the data source settings for each of the schemas listed on the screen, by selecting the check box adjacent to each schema name. Notes:
|
|
|
Test the configurations that you specified for the data sources in the previous screen. Select the check boxes adjacent to the names of the schemas to test, and click Test Selected Connections. The result of the test is indicated in the Status column. Click Next when the test is successful for all the schemas. |
|
|
This screen is displayed only if the domain you are reconfiguring is currently using a per-host Node Manager. Use this screen to select the Node Manager configuration to use for the reconfigured domain. The resulting configuration depends on the combination of options you select for Node Manager Type and Node Manager Configuration. For information on per-domain and per-host Node Manager configurations, see Default Node Manager Configuration. |
|
|
The categories that are listed on this screen depend on the resources defined in the templates you selected for the domain during domain configuration. For example, when the SOA Suite and BPM template is being applied to the domain, select the Managed Servers, Clusters and Coherence if one or more of the following applies:
For information on using the other advanced configuration options, such as Node Manager, Deployments and Services, Domain Front End Host Capture and JMS File Store, see the online help. |
|
|
You must specify the actual hostname for the Listen Address for each managed server in your domain. Do not use the default You must specify the actual hostname as hostname.company.com When upgrading from 12.1.3 to 12.2.1, you must assign the server to the appropriate Server Groups. |
|
|
If you have created servers as part of the upgrade process, then select the server name in the Servers list box and target them to the correct Node Manager Machine. Otherwise, no action is required on this screen when you are upgrading or reconfiguring the domain. |
|
|
Cluster Upgrades Only: If you are upgrading clusters, use this screen to assign Managed Servers to clusters. Note that only Managed Servers are displayed in the Server list box. The Administration Server is not listed because it cannot be assigned to a cluster.
Note: SOA UPGRADES ONLY: When OWSMPM is in its own cluster and not part of SOA or OSB clusters, you should target only SOA-MGD-SVRS-ONLY user extensible server group to the SOA cluster, target only OSB-MGD-SVRS-ONLY to the OSB cluster and target WSMPM-MAN-SVER server group to OWSM . When upgrading 12.1.3 to 12.2.1, you also need to target BAM-MGD-SVRS-ONLY to BAM cluster. |
|
|
Review the configuration summary. Click Reconfig to reconfigure the domain, or click Back to change the configurations. |
|
|
Review the reconfiguration progress. Click Next when the process is complete. |
|
|
Review the final status of the reconfiguration process. Click Finish to exit the Reconfiguration Wizard. |
4.5 Upgrading the Domain Component Configurations Using the Upgrade Assistant
Use the Upgrade Assistant to update any remaining WebLogic component configurations within the domain.
Follow the instructions in the following sections to upgrade any additional domain component configurations using the Upgrade Assistant.
Note:
Do not start the Administration Server before launching the Upgrade Assistant.
- Starting the Upgrade Assistant
The Upgrade Assistant is used to upgrade schemas, component configurations and standalone system components. - Upgrading SOA Component Configurations
4.5.1 Starting the Upgrade Assistant
The Upgrade Assistant is used to upgrade schemas, component configurations and standalone system components.
Note:
The Upgrade Assistant should be run by a non-SYSDBA user whenever possible. The steps to create a non-SYSDBA user are described in Creating a Non-SYSDBA User.4.5.2 Upgrading SOA Component Configurations
The Upgrade Assistant displays a sequence of screens listed in Table 4-3 when upgrading WebLogic Component Configurations. Perform the respective action(s) for each of the screens.
NOTE: The screens you see are based on your environment. You may or may not see all of the screens described below. For more information on using the Upgrade Assistant screens, see the online help.
Note:
Additional configuration tasks may be required.
After the Upgrade Assistant has successfully completes the upgrade of your schemas and component configurations, you may need to perform the tasks described in Performing Post Upgrade Tasks to ensure that your components continue to function as expected.
Table 4-3 Upgrade Assistant Screens: Upgrading WebLogic Component Configurations
| Screen | Description and Action Required |
|---|---|
|
This screen provides an overview of the Upgrade Assistant and some information about important pre-upgrade tasks. Click Next to continue. |
|
|
Select the All Configurations Used by a Domain option to upgrade component configurations for a managed WebLogic Server domain. You must enter the domain directory for the domain that you are upgrading now. Click Next. |
|
|
This screen is displayed if your 11g environment has multiple WebLogic Server domains, but the OWSM Policy Manager is only in one WLS domain and the OWSM agents are in other domains. Provide the credentials for the WebLogic Administration Server domain where the Oracle Web Services Manager (OWSM) Policy Manager is deployed. For information about the fields on this page, click Help, or refer to OWSM Policy Manager. |
|
|
This screen provides a list of components that will be included in the domain component configuration upgrade. |
|
|
Check if the prerequisites for component configurations upgrade are met. CAUTION: The Upgrade Assistant will not validate that these prerequisites have been performed. |
|
|
This screen is presented if there are remote managed servers hosting UMS 11g configuration files. You must provide the credentials to these servers so that the Upgrade Assistant can access the configuration files. NOTE: You may be required to manually copy the UMS configuration files if the Upgrade Assistant is unable to locate them. See Upgrade Assistant: Copying UMS Configuration Files. |
|
|
Review the status of the Upgrade Assistant as it examines each component, verifying that the component is ready for upgrade. |
|
|
Review the summary of the options that you have selected for schema upgrade. Click Upgrade to upgrade the schemas, or click Back if you wish to change the configurations. |
|
|
Review the status of the upgrade process. Click Next when the upgrade is complete. |
|
|
Click Close if the Upgrade was successful. If the upgrade failed or if you canceled the upgrade before it completed successfully, you should review the log files, restore the backed up environment, and restart the Upgrade Assistant. |
4.6 Upgrading Oracle Business Process Managment (BPM) Web Forms
Most Oracle Business Process Management (BPM) Web Forms developed with BPM 11g (11.1.1.7.0) are compatible with 12c. There are a small number of cases where manual spacings are specified between elements and these forms may not work correctly in 12c. These forms must be upgraded manually. Without manual intervention, these forms will be in suspended mode. Those forms which do not use these manual layouts will work fine without migration.
To upgrade BPM Web Forms, a user with administrative privileges should navigate to the following URL and enter the administrator credentials when prompted.
http://hostname:port/workflow/DefaultToDoTaskFlow/migratewebforms
Loading this page starts the upgrade and shows the upgraded forms. If there are any errors, check the log file and if the error is recoverable, you can try loading the page again. If the error is not recoverable, try to deploy the BPM composite with the failed forms.
Note:
The URL can be launched multiple times, but the upgrade should not be run when there are active users using the web forms.
4.7 Managing Your Upgraded Oracle Fusion Middleware 12c Software
Table 4-4 lists some common administration tasks you will likely want to perform after upgrading to Oracle SOA Suite and Business Process Management 12c (12.2.1). In addition, the component-specific administration guides may provide additional configuration tasks to perform after an upgrade.
Table 4-4 Basic Administration Tasks
| Task | Description | More Information |
|---|---|---|
|
Performing additional post-upgrade configuration steps for your component. |
In addition to the post-upgrade tasks described Performing Post Upgrade Tasks, you may also need to perform additional configuration tasks to ensure your newly upgraded components function as expected. |
|
|
Getting familiar with Fusion Middleware administration tools |
Get familiar with the various tools available which you can use to manage your environment. |
|
|
Configuring Secure Sockets Layer (SSL) |
Learn how to set up secure communications among between Oracle Fusion Middleware components using SSL. |
|
|
Monitoring Oracle Fusion Middleware |
Learn how to keep track of the status of Oracle Fusion Middleware components. |