3 Upgrading to the 12c Infrastructure from the 11g Release
- Completing the Pre-Upgrade Tasks for Infrastructure (Required)
It is important to complete all the standard Oracle Fusion Middleware pre-upgrade tasks associated with your environment before upgrading from Oracle Fusion Middleware 11g Application Developer installation to Oracle Fusion Middleware 12c Infrastructure. Most pre-upgrade tasks are required for all Fusion Middleware components, while some are specific to Infrastructure. - Installing Oracle Fusion Middleware Infrastructure on APPHOST
Install the Infrastructure distribution components in a new Oracle home on the same host on which you have installed 11g. - Installing Oracle HTTP Server
If your domain includes Oracle HTTP Server instances that are associated with the domain, you must install Oracle HTTP Server on the machines where Oracle HTTP Server instances and the Administration Server are running. - Stopping Servers and Processes
Before running the Upgrade Assistant, shut down all Oracle Fusion Middleware Managed Servers, Administration Servers, and system components (such as OHS) that may be using the schemas or configurations you want to update. Failure to do so may result in an incomplete or failed upgrade. - Using the Schema Version Registry to Identify Existing 11g Schemas
When the schemas are created in your database, RCU creates and maintains a table calledschema_version_registry. This table contains schema information such as version number, component name and ID, date of creation and modification, and custom prefix. When you run the Upgrade Assistant. it identifies schemas for which an upgrade is available. You can upgrade multiple schemas in a single session of running the Upgrade Assistant. - Creating the Required Schemas Before You Upgrade
Before you upgrade, you must install one or more schemas in a supported database. - About Upgrading Schemas using the Upgrade Assistant
The Upgrade Assistant provides two options for upgrading schemas: Individually Selected Schemas and All Schemas Used By a Domain. - Identifying Schemas that Can be Upgraded with the Upgrade Assistant
The Upgrade Assistant identifies and includes all the schemas that are available for an upgrade. You can also select the schemas you want to upgrade. If you want to review the list of available schemas before you begin the upgrade, query the schema version registry. - Starting the Upgrade Assistant
The Upgrade Assistant is used to upgrade schemas, component configurations and standalone system components. - Upgrading Schemas with the Upgrade Assistant
If you run the Upgrade Assistant from an Oracle home that contains components with any schemas, then the Schemas upgrade option is shown. The Upgrade Assistant only lists the components that are candidates for schema upgrade. You can select the schemas you want to upgrade from the component list. - Upgrade Assistant Screens
- Reconfiguring the Domain using the Reconfiguration Wizard
The Reconfiguration Wizard reconfigures the domain while retaining the location of the domain. Use the Reconfiguration Wizard to upgrade your domain to the latest version. - Upgrading the Domain Component Configurations Using the Upgrade Assistant
Follow the instructions in this section to upgrade any additional domain component configurations, such as OWSM policy metadata structure and adapter configurations, using the Upgrade Assistant. - Troubleshooting the Infrastructure Upgrade
If the Infrastructure upgrade fails, troubleshoot the cause using the log file and guidelines in this topic. - Performing the Post-Upgrade Tasks
After you upgrade Oracle Fusion Middleware 11g Application Developer to Oracle Fusion Middleware 12c Infrastructure, you must complete the post-upgrade tasks.
3.1 Completing the Pre-Upgrade Tasks for Infrastructure (Required)
It is important to complete all the standard Oracle Fusion Middleware pre-upgrade tasks associated with your environment before upgrading from Oracle Fusion Middleware 11g Application Developer installation to Oracle Fusion Middleware 12c Infrastructure. Most pre-upgrade tasks are required for all Fusion Middleware components, while some are specific to Infrastructure.
Caution:
In addition to completing the pre-upgrade tasks required for Infrastructure, you must also complete all of the applicable pre-upgrade tasks described in Pre-Upgrade Checklist.
You must back up your existing environment. If the upgrade fails for any reason, you will have to restart the upgrade process from the source backup.
For more information, see Backup and Recovery Strategies for Upgrade in Planning an Upgrade of Oracle Fusion Middleware.
For Infrastructure-specific pre-upgrade tasks, see the following:
- Maintaining Your Custom setDomainEnv Settings (Optional)
Every domain includes dynamically generated domain and server startup scripts, such assetDomainEnv. Oracle recommends that you do not modify these startup scripts, as any changes you make to them will be overwritten during subsequent domain upgrade operations. - Using No-Auth SSL Mode in OID Security Store
The SSL protocol provides transport layer security with authenticity, integrity, and confidentiality, for a connection between a client and server. The SSL authentication mode is controlled by the attributeorclsslauthenticationin the instance-specific configuration entry. By default, Oracle Internet Directory (OID) uses SSL No Authentication Mode (orclsslauthentication=1). - Removing the Server Instance Scope from OWSM Policy Sets
The Server Instance Scope in policy sets was not recommended in 11g (11.1.1.7.0) and is not supported in 12c. However, if you have policy sets that use the Server Instance Scope, they are disabled during the upgrade to 12c. Therefore, you must remove the Server Instance Scope from all the 11g policy sets before upgrading to 12c. - Cloning Predefined Documents and Migrating OWSM Policy Attachments
When upgrading, it is important to note that any predefined documents that have not been customized for your environment are replaced with read-only versions, and new, predefined, read-only documents are added. However, any existing predefined documents that have been customized and any user-created custom policies in the repository are not overwritten.
3.1.1 Maintaining Your Custom setDomainEnv Settings (Optional)
Every domain includes dynamically generated domain and server startup scripts, such as setDomainEnv. Oracle recommends that you do not modify these startup scripts, as any changes you make to them will be overwritten during subsequent domain upgrade operations.
Caution:
Changes made to the setDomainEnv script - or any other startup script - before an upgrade are overwritten by the new, regenerated scripts during the domain reconfiguration process. Create a separate file to store your customized domain settings before you upgrade.
For example, if you want to customize server startup parameters that apply to all servers in a domain, you can create a file called setUserOverrides.cmd (Windows) or setUserOverrides.sh (UNIX) and configure it to add custom libraries to the WebLogic Server classpath, specify additional java command line options for running the servers, or specify additional environment variables, for instance. Any custom settings you add to this file are preserved during domain upgrade operation and are carried over to the remote servers when using the pack and unpack commands.
setUserOverrides file:
# add custom libraries to the WebLogic Server system claspath
  if [ "${POST_CLASSPATH}" != "" ] ; then
    POST_CLASSPATH="${POST_CLASSPATH}${CLASSPATHSEP}${HOME}/foo/fooBar.jar"
    export POST_CLASSPATH
  else
    POST_CLASSPATH="${HOME}/foo/fooBar.jar"
    export POST_CLASSPATH
  fi

# specify additional java command line options for servers
JAVA_OPTIONS="${JAVA_OPTIONS}  -Dcustom.property.key=custom.value"
If the setUserOverrides file exists during a server startup, the file is included in the startup sequence and any overrides contained within this file take effect. You must store the setUserOverrides file in the domain_home/bin directory.
Note:
If you are unable to create the setUserOverrides script before an upgrade, you need to reapply your settings as described in Re-apply Customizations to Startup Scripts.
3.1.2 Using No-Auth SSL Mode in OID Security Store
The SSL protocol provides transport layer security with authenticity, integrity, and confidentiality, for a connection between a client and server. The SSL authentication mode is controlled by the attribute orclsslauthentication in the instance-specific configuration entry. By default, Oracle Internet Directory (OID) uses SSL No Authentication Mode (orclsslauthentication=1).
If you are upgrading to 12c Infrastructure, and using OID as the security policy store with Oracle WebLogic Server, then you may need to modify the default SSL mode. In Oracle Internet Directory 11g, SSL interoperability mode is enabled by default. But Oracle Internet Directory is fully compliant with the JDK's SSL, provided SSL interoperability mode is disabled.
The default use of No-Auth SSL mode in Oracle Internet Directory (OID) is discouraged for production environments due to the susceptibility to Man-in-the-Middle (MITM) attacks.
However, if No-Auth SSL is required, and WebLogic Server is the client, the following system properties must be applied to the weblogic.properties file before you upgrade:
-
-Dweblogic.security.SSL.AllowAnonymousCipher=true
-
-Dweblogic.security.SSL.ignoreHostnameVerification=true
Note:
Setting these properties can make the WebLogic Server susceptible to MITM attacks, since anonymous cipher suites are enabled, and the client connections are without Hostname Verification checking.
Oracle strongly recommends that you to use either server or client/server SSL authentication when using OID with WebLogic Server 12c.
3.1.3 Removing the Server Instance Scope from OWSM Policy Sets
The Server Instance Scope in policy sets was not recommended in 11g (11.1.1.7.0) and is not supported in 12c. However, if you have policy sets that use the Server Instance Scope, they are disabled during the upgrade to 12c. Therefore, you must remove the Server Instance Scope from all the 11g policy sets before upgrading to 12c.
For instructions, see Editing a Policy Set in Security and Administrator's Guide for Web Services in the Oracle Fusion Middleware 11g Release 1 (11.1.1.7.0) documentation library.
3.1.4 Cloning Predefined Documents and Migrating OWSM Policy Attachments
When upgrading, it is important to note that any predefined documents that have not been customized for your environment are replaced with read-only versions, and new, predefined, read-only documents are added. However, any existing predefined documents that have been customized and any user-created custom policies in the repository are not overwritten.
To ensure that you always get all of the latest policies, Oracle recommends that you clone any predefined documents that you have modified and migrate any policy attachments. For details, see Upgrading the OWSM Repository in Securing Web Services and Managing Policies with Oracle Web Services Manager.
3.2 Installing Oracle Fusion Middleware Infrastructure on APPHOST
Install the Infrastructure distribution components in a new Oracle home on the same host on which you have installed 11g.
Note:
Do not use the Configuration Wizard to configure Oracle Fusion Middleware Infrastructure 12c.
Follow the instructions described in Table 3-1 to install Oracle Fusion Middleware Infrastructure.
Table 3-1 Oracle Fusion Middleware Infrastructure Installation Roadmap
| Task | Description | More Information |
|---|---|---|
|
Prepare your system for the 12c install. |
Before you install Infrastructure 12c, verify that the minimum system and network requirements are met. |
Roadmap for Verifying Your System Environment in Installing and Configuring the Oracle Fusion Middleware Infrastructure. |
|
Obtain the Infrastructure distribution. |
Obtain the Oracle Fusion Middleware Infrastructure distribution ( |
Understanding and Obtaining the Oracle Fusion Middleware Infrastructure Distribution in Installing and Configuring the Oracle Fusion Middleware Infrastructure. |
|
Start the Infrastructure 12c installer. |
Start the Infrastructure installer from the location where you downloaded it. |
Starting the Installation Program in Installing and Configuring the Oracle Fusion Middleware Infrastructure. |
|
Navigate the installer screens. |
Use the installer to install Infrastructure 12c. |
Navigating the Installation Screens in Installing and Configuring the Oracle Fusion Middleware Infrastructure. |
3.3 Installing Oracle HTTP Server
If your domain includes Oracle HTTP Server instances that are associated with the domain, you must install Oracle HTTP Server on the machines where Oracle HTTP Server instances and the Administration Server are running.
For more information about installing Oracle HTTP Server, see Installing the Oracle HTTP Server Software in Installing and Configuring Oracle HTTP Server. Do not configure Oracle HTTP Server during the installation. You need to configure the HTTP server during the upgrade reconfiguration process.
Note:
-
You have a standalone Oracle HTTP Server
- plan to upgrade your Oracle HTTP Server at another time (not with the Infrastructure upgrade)
- You have Oracle HTTP Server on multiple nodes
3.4 Stopping Servers and Processes
Before running the Upgrade Assistant, shut down all Oracle Fusion Middleware Managed Servers, Administration Servers, and system components (such as OHS) that may be using the schemas or configurations you want to update. Failure to do so may result in an incomplete or failed upgrade.
If you are running the Node Manager, you should also stop the Node Manager. You can do this by closing the console window in which the Node Manager is running, or by using the stopNodeManager WLST command.
For instructions to stop an Oracle Fusion Middleware environment, see Stopping an Oracle Fusion Middleware Environment in Administering Oracle Fusion Middleware.
3.5 Using the Schema Version Registry to Identify Existing 11g Schemas
When the schemas are created in your database, RCU creates and maintains a table called schema_version_registry. This table contains schema information such as version number, component name and ID, date of creation and modification, and custom prefix. When you run the Upgrade Assistant. it identifies schemas for which an upgrade is available. You can upgrade multiple schemas in a single session of running the Upgrade Assistant.
To determine which of your 11g or 12c schemas can be upgraded to 12.2.1, see Identifying Schemas that Can be Upgraded with the Upgrade Assistant in Upgrading with the Upgrade Assistant.
3.6 Creating the Required Schemas Before You Upgrade
Before you upgrade, you must install one or more schemas in a supported database.
- Determining Which Schemas to Create
You must create the required schemas depending upon whether your 11g schemas were file-based or database-based. - Creating the Required Schemas with the Repository Creation Utility (RCU)
The Repository Creation Utility (RCU) enables you to create the required schemas in a database and also manage the corresponding tablespaces.
3.6.1 Determining Which Schemas to Create
You must create the required schemas depending upon whether your 11g schemas were file-based or database-based.
Consider the following scenarios:
-
If you did not use a database in 11g, then you must install and configure a supported database, and also create one or more of the database schemas as described in Database Schema Requirement for Infrastructure 12c.
-
If you were already using a database to host the schemas for your Application Developer 11g domain, then use the schema version registry to list the Oracle Fusion Middleware 11g schemas that are already available in your database, as described in Using the Schema Version Registry to Identify Existing 11g Schemas.
You need not create the schemas listed in the Schema Version Registry manually. Instead, you can later use the Upgrade Assistant to upgrade the 11g schemas during the upgrade process.
However, you must still create the required schemas, as described in Database Schema Requirement for Infrastructure 12c.
Note:
As of release 12c, the Service Table (_STB) schema is required for all Infrastructure installations. The Service Table schema must be upgraded each time the infrastructure is upgraded. You cannot use an older version schema with a new Infrastructure installation.
3.6.2 Creating the Required Schemas with the Repository Creation Utility (RCU)
The Repository Creation Utility (RCU) enables you to create the required schemas in a database and also manage the corresponding tablespaces.
Note:
When you create the new schemas, be sure to use a unique schema prefix. This prefix enables you to differentiate between any schemas previously installed or upgraded in the database, as opposed to those that you have created specifically for Oracle Fusion Middleware 12c.
Note:
Edition-based redefinition (EBR) enables you to support multiple versions of a database schema on the same database and at the same time. For more information on creating an edition on the server for redefinition, see Creating an Edition on the Server for Editions-Based Redefinition in Planning an Upgrade of Oracle Fusion Middleware.3.7 About Upgrading Schemas using the Upgrade Assistant
The Upgrade Assistant provides two options for upgrading schemas: Individually Selected Schemas and All Schemas Used By a Domain.
Individually Selected Schemas
This option enables you to choose which component schemas to upgrade. Select this option when you have component schemas within the domain that you do not want to upgrade.
For example, if you want to make a trial run of Upgrade Assistant by creating schemas with RCU that are outside the domain, and then use Upgrade Assistant to upgrade them.
All Schemas Used By a Domain
This option allows the Upgrade Assistant to detect all of the available schemas within the specified domain and include them in the upgrade.
3.8 Identifying Schemas that Can be Upgraded with the Upgrade Assistant
The Upgrade Assistant identifies and includes all the schemas that are available for an upgrade. You can also select the schemas you want to upgrade. If you want to review the list of available schemas before you begin the upgrade, query the schema version registry.
Tip:
Compare the information you collect from the schema version registry and the corresponding schemas to determine whether there are schemas in your domain that are not available for an upgrade yet.
If you are using an Oracle database, connect to the database as a user having Oracle DBA privileges, and run the following from SQL*Plus to get the current version numbers:
SET LINE 120
COLUMN MRC_NAME FORMAT A14
COLUMN COMP_ID FORMAT A20
COLUMN VERSION FORMAT A12
COLUMN STATUS FORMAT A9
COLUMN UPGRADED FORMAT A8
SELECT MRC_NAME, COMP_ID, OWNER, VERSION, STATUS, UPGRADED FROM SCHEMA_VERSION_REGISTRY ORDER BY MRC_NAME, COMP_ID ;
The following report is generated when saved to a SQL script, for example version.sql.
If the number in the "VERSION" is at 11.1.1.6.0 or higher, and the STATUS column is 'VALID', then the schema is supported for upgrade.
If an upgrade is not needed for a schema, the schema_version_registry table retains the schemas at their pre-upgrade version after the 12.2.1 upgrade.
Notes about the schemas that need to be upgraded
-
For most components, the only schema version starting points that are valid for upgrading are 11g Release 1 (11.1.1.6, 1.1.1.7, 11.1.1.8, or 11.1.1.9) or 12c (12.1.2 or 12.1.3). If your schemas are not at a supported version, then you must upgrade them before using the 12c (12.2.1) upgrade procedures.
Some components, such as Oracle Enterprise Data Quality and Oracle Golden Gate Veridata, support an upgrade from versions other than the standard Oracle Fusion Middleware supported versions.
Refer to your component-specific installation and upgrade documentation for additional information about the schemas that are required for your upgrade.
-
If you used a file-based policy store in 11g, then you must reassociate the file-based policy store with a database-based security store before running the Upgrade Assistant.
For more information see Reassociating a File-Based Policy Store Before Upgrade.
-
If you used an OID-based policy store in 11g, make sure that you have created new 12c OPSS schemas before upgrade.
-
If you are upgrading an ORASDPM schema that was created using RCU 11g (11.1.1.1.4 or earlier), and you subsequently upgraded ORASDPM to 11g (11.1.1.6 or later), the FMW user will need to grant the CREATE TABLE privilege to user <prefix>_ORASDPM before upgrading to 12c (12.2.1).
grant CREATE TABLE to <prefix>_ORASDPM;
Where <prefix> is the name given to the schema when it was created. -
You can only upgrade schemas for products that are available for upgrade in the Oracle Fusion Middleware 12c (12.2.1) release. Do not attempt to upgrade a domain that includes components that are not yet available for upgrade to 12c (12.2.1) .
3.9 Starting the Upgrade Assistant
The Upgrade Assistant is used to upgrade schemas, component configurations and standalone system components.
Note:
The Upgrade Assistant should be run by a non-SYSDBA user whenever possible. The steps to create a non-SYSDBA user are described in Creating a Non-SYSDBA User.3.10 Upgrading Schemas with the Upgrade Assistant
If you run the Upgrade Assistant from an Oracle home that contains components with any schemas, then the Schemas upgrade option is shown. The Upgrade Assistant only lists the components that are candidates for schema upgrade. You can select the schemas you want to upgrade from the component list.
Table 4-1 shows the screens that are displayed when you run the Upgrade Assistant to upgrade schemas and they vary depending on the options you select.
Table 3-2 Upgrading Schemas: Navigating the Upgrade Assistant Screens
| Screen Title | When does the screen appear? | Description |
|---|---|---|
|
Always. |
This screen provides an overview of the Upgrade Assistant and some information about important pre-upgrade tasks. |
|
|
Always. |
Select the schema upgrade operation that you want to perform on this screen. The options on the screens change depending on what you select from the following:
|
|
|
When you select Individually Selected Schemas. |
This screen provides a list of installed Oracle Fusion Middleware components that have schemas that can be upgraded. When you select a component, the schemas and any dependencies are automatically selected. |
|
|
When you select All Schemas Used by a Domain. |
This screen is read-only, and it displays all the components and schemas found in the specific domain directory that are included in the upgrade. |
|
|
Always. |
This screen requires you to acknowledge that all prerequisites have been met before you continue with the upgrade. Check the boxes before you continue. |
|
|
Always. |
Enter the information required to connect to the selected schema and the database that hosts the schema on this screen. The screen name changes based on the type of schema selected ("MDS Schema", for example). Since the component ID or schema name is changed for UCSUMS schema as of release 12.1.2, the Upgrade Assistant does not automatically recognize the possible schemas and display them in a drop-down list. You must manually enter the name in a text field. The name can be either prefix_ |
|
|
Always. |
This screen displays the status of the Upgrade Assistant as it examines each component, verifying that the component is ready for upgrade.
Note: Issues detected during the Examination phase can be fixed without restoring from backup. |
|
|
Always. |
Review a summary of the options you have selected and to start the upgrade process on this screen. |
|
|
Always. |
This screen displays the status of the upgrade process. |
|
|
When the upgrade is successful. |
The upgrade is successful. The Post-Upgrade Actions window describes the manual tasks you must perform to make the component function in the new installation. |
|
|
When the upgrade fails. |
The upgrade failed for the specified component(s). You must restart the Upgrade Assistant. The Upgrade Assistant logs are available at
ORACLE_HOME/oracle_common/upgrade/logs.
Note: If the upgrade fails you must restore your pre-upgrade environment from backup, fix the issues and then restart the Upgrade Assistant. You cannot fix the issues and restart the Upgrade Assistant because the files are modified during this operation. |
For SOA Suite and BPM Upgrades Only:
The upgrade of active and closed SOA instance data to 12c (12.2.1) happens automatically as part of the SOA schema upgrade process with the Upgrade Assistant. For more information, see Administering and Monitoring the Upgrade of SOA Instance Data.
3.11 Upgrade Assistant Screens
This section describes all of the Upgrade Assistant screens.
Note:
The screens you will see while using the Oracle Fusion Middleware Upgrade Assistant vary depending upon the type of Oracle Fusion Middleware software you are upgrading. Not all screens will be shown to you.
- Welcome
- Schemas
- All Schemas Used by Domain
- All Configurations Used by a Domain
- Standalone Components
- Available Components
- All Schemas Component List
- WebLogic Server Component List
- Prerequisites
- Edition-Based Redefinition (EBR) Database Upgrade
- Schema Credentials Screen
- Instance Directories
- Node Manager
- User Messaging Service Configuration
- Examine
- Examine Failure
- Upgrade Summary
- Upgrade Progress
- Upgrade Success
- Upgrade Failure
- Cancel Upgrade
3.11.1 Welcome
The Oracle Fusion Middleware Upgrade Assistant is used to upgrade component schemas, component configurations, and standalone system component configurations from Fusion Middleware 11g and 12c releases to the latest Fusion Middleware 12c release.

3.11.2 Schemas
Select Individually Selected Schemas to upgrade selected schemas for your installed components. The Upgrade Assistant will identify components that are candidates for a schema upgrade and then you can select which schemas to include in the upgrade
CAUTION: Upgrade only those schemas that will be used to support your 12.2.1.0.0 components. Do not upgrade schemas that are currently being used to support 11g or 12c components that are not included in the Oracle Fusion Middleware 12.2.1 release.

3.11.3 All Schemas Used by Domain
As of release 12.2.1, the Oracle Fusion Middleware Upgrade Assistant (UA) provides an option for upgrading all schemas used by a specified domain (sometimes referred to as Domain Assisted Schema Upgrade or DASU). When you select All Schemas Used By a Domain, the Upgrade Assistant discovers and selects all components that have schemas available to upgrade. In addition, where possible, the Upgrade Assistant pre-populates the connection information on schema input screens.
Also, you must browse and provide the 11g domain in the Domain Directory field.

3.11.4 All Configurations Used by a Domain
Select the All Configurations Used by a Domain option to upgrade component configurations for a managed WebLogic Server domain. Click Browse and use the navigation tree to select a valid domain directory. A domain directory contains a config directory, which contains a config.xml file.

3.11.5 Standalone Components
Select the Standalone System Component Configurations option when you will be upgrading a standalone system component, such as Oracle HTTP Server (OHS).

You will be prompted to select one of the following:
| Option | Description |
|---|---|
|
Create a New Domain |
Standalone system components will have a separate standalone domain in 12c. A standalone domain is a container for system components, such as Oracle HTTP Server. It has a directory structure similar to an Oracle WebLogic domain, but it does not contain an Administration Server or Managed Servers. It can contain one or more instances of system components of the same type, such as Oracle HTTP Server, or a mix of types. Management tools, such as the Configuration Wizard, pack and unpack, WLST, and Node Manager can operate on standalone domains. |
|
Update an Existing Domain |
Once a standalone domain has been created for a system component, you can select this option to extend that domain for another standalone system component. This option is also used when upgrading from 12.1.2 or 12.1.3. You must provide the location of the existing 12c domain. |
3.11.6 Available Components
If you selected the Individually Selected Schemas option in the previous screen to select individual schemas to be upgraded - instead of upgrading all schemas used by the domain - this screen displays the components with schemas that can be upgraded. If you select a component that requires another schema, the Upgrade Assistant will automatically select those schemas for you.
Figure 3-2 List of Components with Schemas Available for Upgrade

Description of "Figure 3-2 List of Components with Schemas Available for Upgrade"
3.11.7 All Schemas Component List
If you selected All Schemas Used by the Domain, then this screen provides a list of schemas that will be included in the WebLogic domain upgrade. The names of the components are provided along with the schemas located within the domain.
Review the list carefully to verify that the correct schemas will be upgraded. If you do not see the components or schemas you want to upgrade, you may have selected the wrong domain. Use the Back button to specify a different domain.
If there are components or schemas listed that you do not want included, navigate back to the All Schemas screen and select Individually Selected Schemas instead of All Schemas Used by the Domain. The Individually Selected Schemas option allows you to select only those schemas you want included in the upgrade.
Figure 3-3 Component List for All Schema Used by the Domain Upgrade

Description of "Figure 3-3 Component List for All Schema Used by the Domain Upgrade"
3.11.8 WebLogic Server Component List
When All Configurations Used by a Domain is selected for upgrade, the domain's components are listed on this read-only screen. Review the list of components before you proceed.
Figure 3-4 Component List for WebLogic Component Configurations

Description of "Figure 3-4 Component List for WebLogic Component Configurations"
3.11.9 Prerequisites
This screen requires you to acknowledge that all prerequisites have been met before you continue with the upgrade. You must check the boxes before you can continue.
WARNING:
The Upgrade Assistant will not verify that the prerequisites have been met.

3.11.10 Edition-Based Redefinition (EBR) Database Upgrade
Use this screen to select the child edition from edition drop down list for edition-based redefinition databases. You must create the child edition before starting the upgrade.
For more information on creating an edition on the server for edition-based redefinition, see "Creating an Edition on the Server for Edition-Based Redefinition" in Planning an Upgrade of Oracle Fusion Middleware.

3.11.11 Schema Credentials Screen
Use this screen to enter information required to connect to the selected schema and the database that hosts the schema. If the schema that is to be upgraded was created by RCU in a prior Fusion Middleware release then you will see a drop-down menu listing the possible schema names as shown below. Click Connect to connect to the database then select the schema to be upgraded.
NOTE: Most schemas will have this information pre-populated. If, however, the Upgrade Assistant is unable to detect the connection details, then they must be entered manually as shown below.
Figure 3-7 Select Schemas - Dropdown Menu

Description of "Figure 3-7 Select Schemas - Dropdown Menu"

The following table describes the elements that appear on this screen.
| Element | Description |
|---|---|
|
Database Type |
Select the database type from the drop-down menu. The types of databases available in the menu varies, depending on the schema you are about to upgrade. The database type chosen for upgrade must be identical to the database type that was selected when RCU originally created the schema. If you select Oracle Edition-Based Redefinition (EBR) as the database type, the schema that you are upgrading also must have been created by RCU using the EBR database type. In particular, Upgrade Assistant never converts schemas from one database type to another. |
|
Database Connect String |
Enter the location of the database. For example, if you are selecting an Oracle database, the following URL format could be used: host:port/db_service_name If you are using a Microsoft SQL Server or IBM DB2 database, then select the database type from the drop-down menu, and review the text below the field, which provides the syntax required for each database type. NOTE: The Upgrade Assistant accepts other valid forms of connection strings. For example, the Oracle Database TNS style connection string may also be used. |
|
DBA User Name |
Enter the database user name used to connect to the database. NOTE: The DBA user must have sufficient privileges to run the Upgrade Assistant, but the user does NOT have to have SYS/SYSDBA privileges. A non-sysdba user can now be used. On certain database platforms user names are case sensitive, and the DBA user name might consist of lower case letters. The Upgrade Assistant connects to the name the user enters and does not convert the user name to upper case. |
|
DBA Password |
Enter the password associated with the specified DBA database user. |
|
Schema User Name |
Select the schema user name from the drop-down list or enter the user name of the schema, for example, DEV_MDS. Note that all Oracle Fusion Middleware schema names consist solely of upper case characters on all database platforms. Also, all schema names are stored as upper case in the For WebLogic Server domain, UMS, and Veridata schemas you need to manually enter the 11g schema user name and password. |
|
Schema Password |
Enter the password associated with the specified schema user name. |
|
Edition Name |
When Oracle Database enabled for edition-based redefinition is selected as the database type, you must specify the existing edition name. NOTE: Before upgrading an EBR-enabled schema from Fusion Middleware 11g release or from a previous 12c release, you must first connect to the database server and create an edition on the database server for 12c (12.2.1). The new edition for 12.2.1 must be a child of your 11.1.1.6.0, 11.1.1.7.0, 12.1.2, or 12.1.3 edition. For more information on creating an edition on the server for edition-based redefinition, see "Creating an Edition on the Server for Edition-Based Redefinition" in Planning an Upgrade of Oracle Fusion Middleware. |
3.11.12 Instance Directories
When upgrading system components, such as OHS, you must provide the directory locations of the 11g instances that will be used as a starting point for creating new 12c component instances.
Use the Add button to include more than one instance, if needed.
NOTE: You cannot use the Upgrade Assistant to upgrade Oracle 10g instances to Oracle 12c. You must first upgrade Oracle 10g instances to 11g. For more information on migrating 10g to 11g, see the 11g upgrade documentation for your components.

3.11.13 Node Manager
Use this screen to specify the credentials of the Node Manager that will be used to create a domain during the upgrade of standalone system components.
Note that the fields displayed in the screenshot may not appear during your upgrade. The conditions that trigger the fields to display are described in the table below.
The user name and password are only used to authenticate connections between Node Manager and clients. They are independent from the server Administrator ID and password.

| Element | Description |
|---|---|
|
User Name |
The user name used to access Node Manager. |
|
Password |
The password used to access Node Manager. You will need to re-enter the password for confirmation. |
|
Listen Address |
Enter the DNS name or IP address upon which Node Manager listens in the Listen Address field. |
|
Listen Port |
The listening port number of Node Manager. |
3.11.14 User Messaging Service Configuration
Figure 3-11 User Messaging Service Configuration

Description of "Figure 3-11 User Messaging Service Configuration "
Use this screen to specify the login credentials of the remote managed servers hosting your UMS 11g configuration files. The Upgrade Assistant automatically copies remote configuration files if all necessary prerequisites are met and the required login information is provided as described in the table below.
If the UMS configuration files are not locally accessible on the machine where the upgrade is being executed, then you must manually enter the login credentials for each managed server (ums_server1,ums_server2 for example).
In some cases, the configuration files must be copied to the machine where the upgrade is being executed (in most cases to the AdminServer machine). The Upgrade Assistant will attempt to copy the files, but if it cannot locate them, then you will have to manually copy them to the Admin Server.
For more information, see "Copying UMS Configuration Files" in Upgrading to the Oracle Fusion Middleware Infrastructure.
You will only need to copy the files manually if you receive a message stating that the Upgrade Assistant is not able to copy the configuration files. Once you have copied the files, you can restart the Upgrade Assistant and proceed with the upgrade.
| Element | Description |
|---|---|
|
Username |
Provide the Operating System user who installed the product. This user will be used to fetch the remote configuration files. NOTE: This user must have permission to connect via The Username field is shown if:
|
|
Password |
Provide the password associated with this user. |
|
Managed Servers |
If the Upgrade Assistant was unable to automatically detect the managed servers, then you must provide a comma separated list containing the names of the remote managed servers that contain the configuration files. For example: ums_server1,ums_server2 |
|
Managed Servers Addresses |
Provide a comma separated list containing the complete hostnames or IP addresses for the nodes where the remote managed servers are running. The order of this list has to correspond with the list of managed server names provided above. For example:
where:
|
3.11.15 Examine

The Upgrade Assistant examines each component to be sure it meets a minimum set of criteria before you begin the upgrade process.
This screen displays the status of the Upgrade Assistant as it examines each component, verifying that the component is ready for upgrade.
The Upgrade Assistant examines each component to be sure it meets a minimum set of criteria before you begin the upgrade process.
unavailable.
Note:
Issues detected during the Examination phase may be resolved and the Upgrade Assistant can be started again. Once the Upgrade phase has started, however, you will need to restore your pre-upgrade environment from backup before starting the Upgrade Assistant again.The description of the Status indicators for the components is listed in the following table:
| Status | Description |
|---|---|
|
in progress... |
The Upgrade Assistant is examining the upgrade items for the component. |
|
pending... |
The component will be examined when the Upgrade Assistant finishes the preceding component. |
|
failed |
Upgrade items were missing or did not meet upgrade criteria. The Upgrade Assistant cannot upgrade the component until the issues have been resolved. Click View Log to troubleshoot the errors and then restart the Upgrade Assistant. |
|
succeeded |
Upgrade items were found and are valid for upgrade. |
Canceling the examination process has no effect on the schemas or configuration data; the only consequence is that the information the Upgrade Assistant has collected must be collected again in a future upgrade session.
3.11.16 Examine Failure

This dialog box appears when one of more of your components failed the examination phase and you selected to continue with the upgrade. If there was an examination failure, you should consider canceling the upgrade (click No) and review the log files.Since the upgrade has not yet started, you can resolve the issues detected during the examination phase and restart the Upgrade Assistant without restoring from backup.
UMS Upgrades Only:
During the configuration upgrade you can get this error during the examination phase. For User Messaging Service, the way to recover is to copy the UMS config files manually and restart the Upgrade Assistant.
If you can get an error during the upgrade phase , the way to recover is to restore backups and copy the config files manually and restart the Upgrade Assistant.
3.11.17 Upgrade Summary

Reviewing the Upgrade Summary
Expand and collapse the tree to show or hide details about the data provided in the wizard screens, such as schema details, Oracle WebLogic Server connection details, and Oracle WebLogic domain directory information.
The Summary screen also displays the Source Version of the schema being upgraded and the resulting Target Version post upgrade. Make sure that both versions are correct before proceeding with the upgrade.
Starting the Upgrade Process
Click Upgrade to start the upgrade process.
If you are upgrading a schema, verify that you have a backup of the database that hosts the schema.
Save Response File
The Save Response File option creates a file that can be used as input to the Upgrade Assistant. The response file collects all the information that you have entered through the Upgrade Assistant's graphical user interface screens, and enables you to perform a silent upgrade at a later time. The silent upgrade performs exactly the same function that the Upgrade Assistant wizard performs, but you do not have to manually enter the data again.
3.11.18 Upgrade Progress

This screen shows the status of the current upgrade process and the projected Target Version of the component after a successful upgrade.
Note that the progress bar is NOT a measure of time remaining for the upgrade. The progress bar is a moving graphical display of completed upgrade steps for each component being upgraded. In some cases, the progress bar does not move at a steady pace. It might move very quickly over a certain portion of the progress bar, and move very slowly, or even appear to freeze, for another component that is performing a long-running database operation. That does not mean that the upgrade progress is stalled, it simply indicates that a long-running operation is being performed. Different upgrade operations, especially during a schema upgrade, will operate at different paces.
Caution: Allow the Upgrade Assistant enough time to perform the upgrade. Do not cancel the upgrade operation unless absolutely necessary. Doing so may result in an unstable environment.
The status of each component upgrade is indicated by one of the following messages that can appear next to the component name. The following table describes each status message.
| Status | Description |
|---|---|
|
in progress... |
The Upgrade Assistant is upgrading the component's upgrade items. |
|
pending... |
The component will be upgraded when the Upgrade Assistant finishes the preceding component. |
|
upgrade not necessary |
The component was upgraded previously by the Upgrade Assistant or the component was just installed and is already at the latest version. No action will be taken on this component. |
|
skipped |
The component is dependent on another component which has a status of "failed". When the status is "skipped" no upgrade is attempted for that component. |
|
failed |
Upgrade items were missing or did not meet upgrade criteria. The component cannot be upgraded. Click View Log to troubleshoot the errors. |
|
succeeded |
Upgrade items were upgraded successfully. |
If any components are not upgraded successfully, refer to the Upgrade Assistant log files for more information.
3.11.19 Upgrade Success

The upgrade was successful. The Post-Upgrade Actions window describes the manual tasks you must perform to make the component function in the new installation. This is an optional window that will only show up if a component has post-upgrade steps.
In addition, be sure to do the following:
-
View the
postupgrade.txtfile in the Oracle home:On Unix systems:
ORACLE_HOME/oracle_common/upgrade/logs
On Windows systems:
ORACLE_HOME\oracle_common\upgrade\logs
-
Review the upgrade topics specific to your Oracle Fusion Middleware environment for any additional post-upgrade tasks.
3.11.20 Upgrade Failure

The upgrade of one or more components has failed. The component cannot be upgraded at this time. Click View Log to troubleshoot the errors.
You will have to fix the issues in the pre-upgrade environment before starting the Upgrade Assistant again. Restore your pre-upgrade environment from backup (making sure to keep the original backup files in a separate location), fix the issues, and restart the Upgrade Assistant.
3.11.21 Cancel Upgrade

You get the above Confirm Cancel screen when you click Cancel while the upgrade plugin is actively running (that is, you are on the Upgrade page and the progress bar is less than 100%).

You get the above Confirm Cancel screen on clicking Cancel when no upgrade plugins are actively running.
Important Note: If you cancel a schema upgrade, you must restore a backup of the database that hosts the schema and its environment (the pre-upgrade directory structure).
3.12 Reconfiguring the Domain using the Reconfiguration Wizard
The Reconfiguration Wizard reconfigures the domain while retaining the location of the domain. Use the Reconfiguration Wizard to upgrade your domain to the latest version.
Navigate to the following 12c directory to launch the Reconfiguration Wizard:
On the UNIX operating system:
ORACLE_HOME/oracle_common/common/bin/reconfig.sh
On the Windows operating system:
ORACLE_HOME\oracle_common\common\bin\reconfig.cmd
To start the Reconfiguration Wizard, see Starting the Reconfiguration Wizard.
Table 3-3 Reconfiguration Wizard Screens
| Reconfiguration Wizard Screen | Description and Action Required |
|---|---|
|
Enter the absolute path to the existing 12c domain directory, or click Browse to navigate to and select the domain directory. 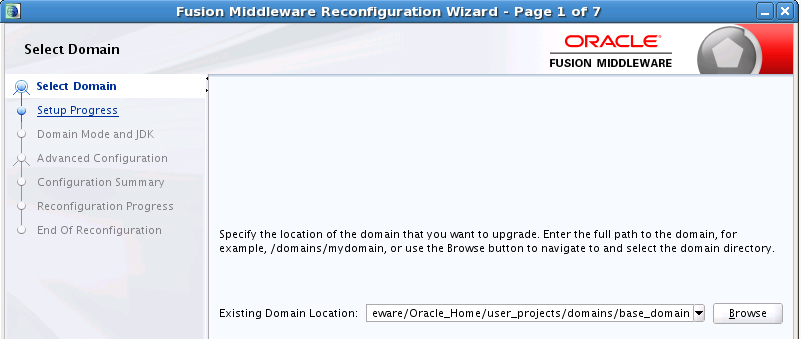 |
|
|
Shows the progress of the application of reconfiguration templates. |
|
|
Domain mode cannot be changed. This setting is imported from the mode specified when the domain was created using the Configuration Wizard. Note: Oracle recommends that you run a trial upgrade on a development domain first before upgrading a production domain. Any upgrade issues or errors should be resolved before upgrading the production environment.Select the JDK to use in the domain or click Browse to navigate to the JDK you want to use. Note that Oracle Fusion Middleware 12c requires Java SE 8. For more information, see Verifying Certification and System Requirements in Planning an Installation of Oracle Fusion Middleware. |
|
|
Use this screen to review the configuration of the JDBC data sources defined in your domain source. You should see the OPSS data source automatically configured in this screen. 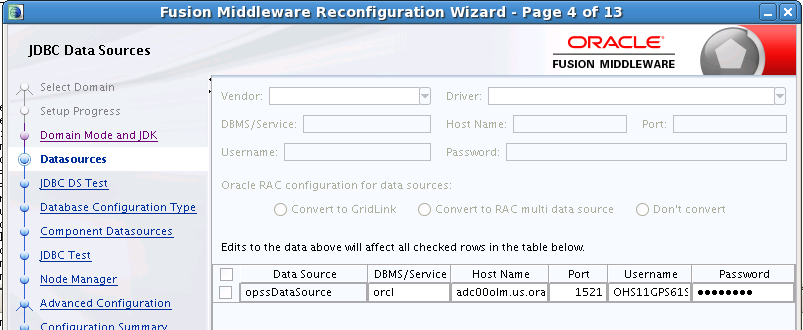 For information about the fields on this page, click Help, or refer to JDBC Data Sources in Upgrading Oracle WebLogic Server. |
|
|
Test the data source connections you configured on the JDBC Data Sources screen.  For information about the fields on this page, click Help, or refer to JDBC Data Sources Test in Upgrading Oracle WebLogic Server. |
|
|
If you have provided the data source connection details in the previous screen, the database connection details automatically populate. If the information was not provided on this screen, select RCU Data and provide the database credentials to retrieve the schema information for all schemas that are included in the domain. If you select this option, the fields on this screen are activated. Fill in each field, using the connection information that you specified for the STB component in the Repository Creation Utility (RCU). When you have provided the connection information, click Get RCU Configuration to retrieve the schema information. 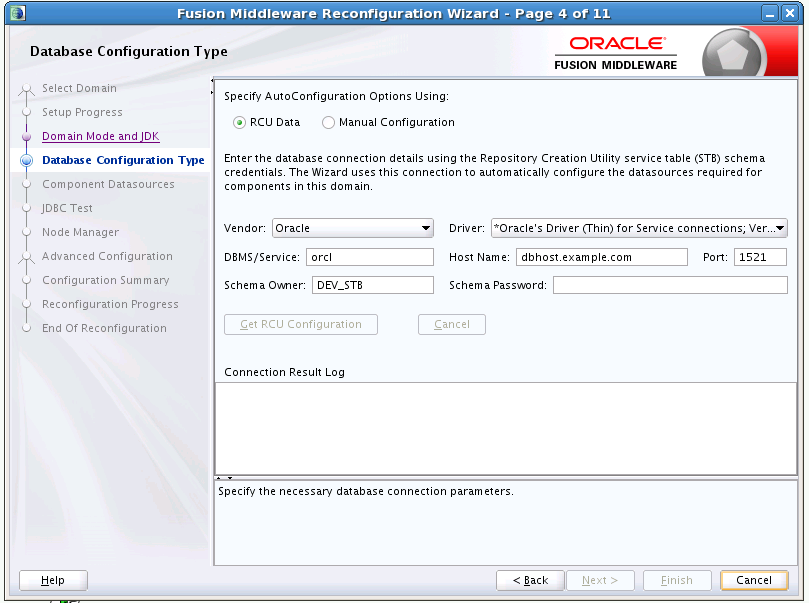 For more information, click Help, or refer to Database Configuration Type in Upgrading Oracle WebLogic Server. |
|
|
By default, the schema information is displayed if you have selected Get RCU Data on the previous screen and the schema owner is the same for all schemas. If you need to make changes to the data source settings for any of the schemas listed on the screen, select the check box adjacent to each schema name. The changes you make in the fields at the top of the screen updates the schema (or schemas) you have selected below. Make sure that you select only those schemas you want to modify. 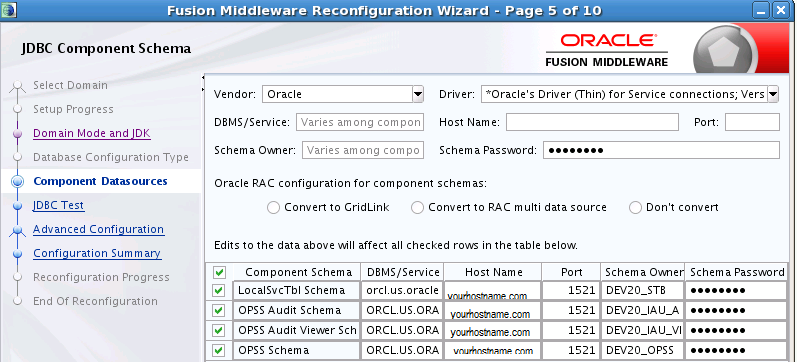 Note: For information about the fields on this page, click Help, or refer to JDBC Component Schema in Upgrading Oracle WebLogic Server. |
|
|
Test the configurations that you specified for the data sources in the previous screen. Select the check boxes adjacent to the names of the schemas to test, and click Test Selected Connections. The result of the test is indicated in the Status column. Click Next when the test is successful for all the schemas. |
|
|
This screen is displayed only if the domain you are reconfiguring is currently using a Per Domain Default Location Node Manager. Select Migrate Existing Configuration and provide the location of the per domain default location. Enable Apply Oracle Recommended Defaults. Provide Node Manager Credentials. This is a new User that is being created to administer the Node Manager. The password is required during start-up, for any components now handled by the Node Manager (including the OHS). Note: When upgrading a domain and changing from a per-host Node Manager configuration to a per-domain Node Manager configuration, if you are using custom scripts to start and stop the WebLogic Server environment, you must manually update the scripts to change the Node Manager home location to the new domain-based location.For more information on configuring the Node Manager, see Default Node Manager Configuration in Administering Node Manager for Oracle WebLogic Server. 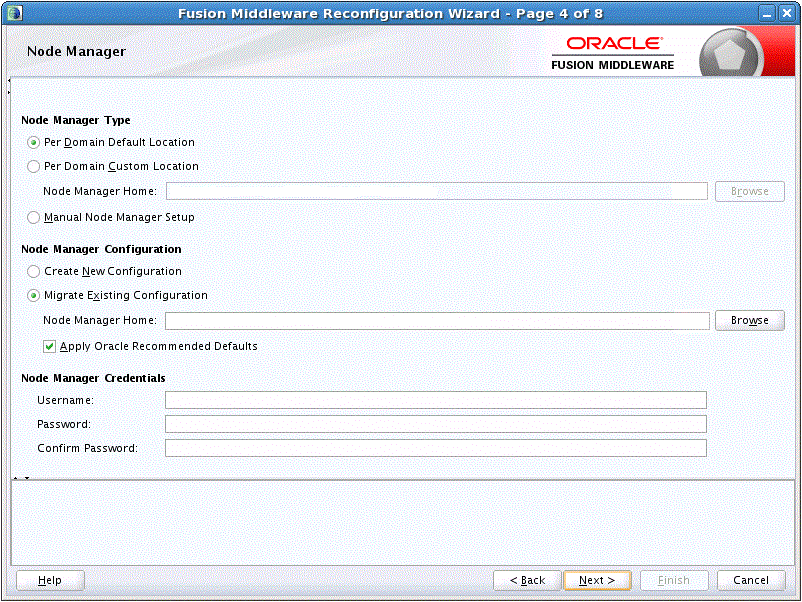 |
|
|
Select all categories (if any) for which you want to perform advanced configuration. For each category you select, the appropriate configuration screen is displayed to allow you to perform advanced configuration. If you do not select any items on this screen, the Configuration Summary screen is displayed next. 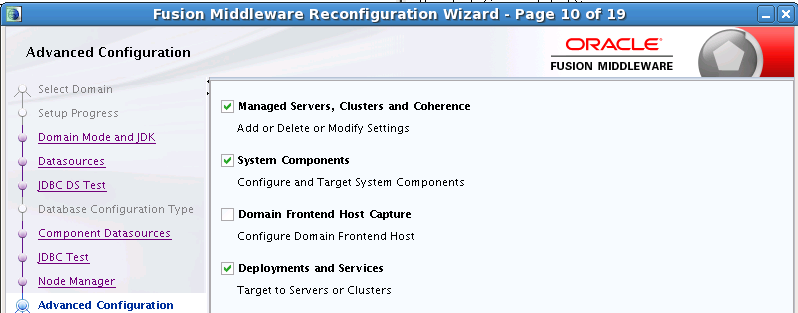 Note: If Node Manager is available and you do not select it, you must manually configure Node Manager as described in Completing the Node Manager Configuration in Upgrading Oracle WebLogic Server.The Node Manager advanced option is available only if you are reconfiguring a domain that is currently using a per-host Node Manager configuration. It enables you to switch to a per-domain Node Manager or continue using the existing per-host Node Manager. |
|
|
Use this screen to review the settings for an existing Managed Server(s), if any. |
|
|
Use this screen to review the settings for an existing Cluster(s), if any. |
|
|
This screen is displayed only if you included Coherence in the WebLogic Server installation. It lists the Coherence cluster that is automatically added to the domain. |
|
|
In a WebLogic domain, the machine definitions identify physical units of hardware and are associated with the WebLogic Server instances or system components (such as OHS servers) that they host. Use this screen to review the Host/Port settings of the existing Node Manager details that are included in the reconfiguration as part of the upgrade. Make sure that an actual Listen Address is provided. Do not use Local Host. 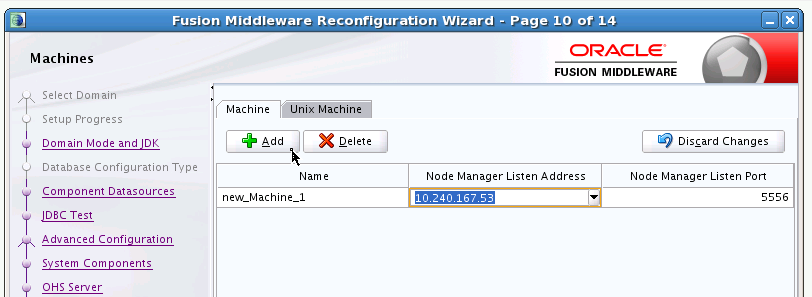 |
|
|
Use this screen to review the current settings for the existing OHS component that is being Reconfigured as part of the co-located upgrade process. To prevent upgrade errors, do not make any changes to the OHS setting on this screen. You can also use this screen to add or delete system components. 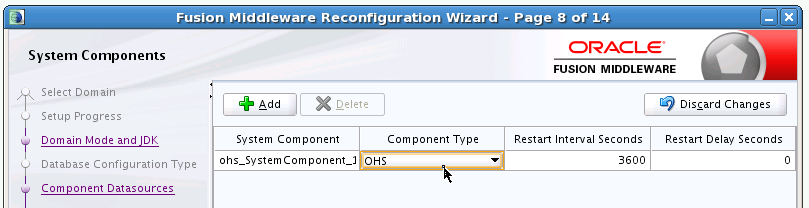 |
|
|
Use this screen to confirm that the Reconfiguration Wizard is picking up the correct Port details (that come from their Source Installation) for each OHS in the domain. Note: If you are reconfiguring a domain that includes more than one OHS instance, the System Component toggle option appears at the at the top of this screen. Select this option to flip between the different instances, in order to update their configuration details during reconfiguration.Though the OHS servers can have the same Host details, each one must be assigned unique Port details. If they do not already show different Port Details on this screen, these details must be edited to make them different. 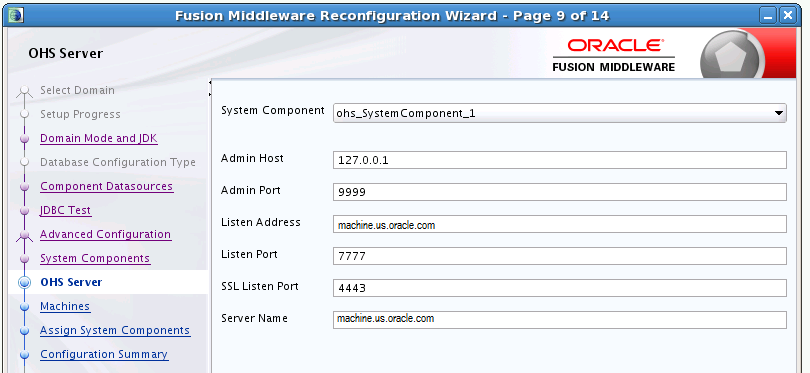 |
|
|
Use this screen to review the assignment of system components to machines that you defined. Note: This screen show the OHS component being assigned to the Node Manager. This reconfigures the OHS Instance to assign it to the 12c Node Manager, which is required to Start/Stop the OHS instances.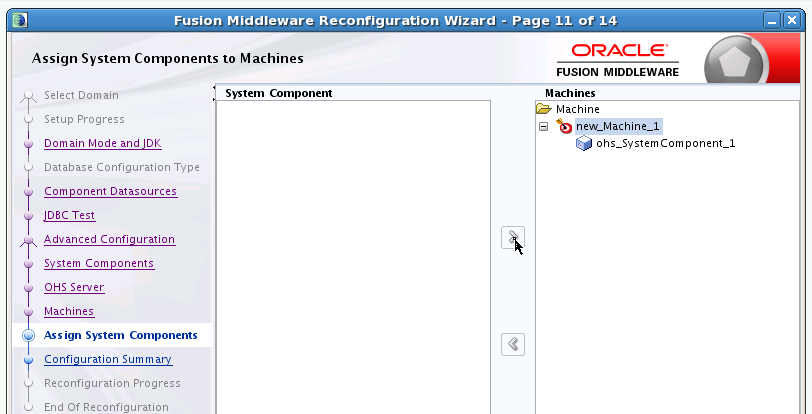 |
|
|
Applications associated with the product for which you are configuring the domain are targeted automatically to the Managed Server created for that product or to the cluster to which that Managed Server is assigned. In this screen, you can target applications to additional servers and clusters. Use this screen to review the deployment targeting in the domain. 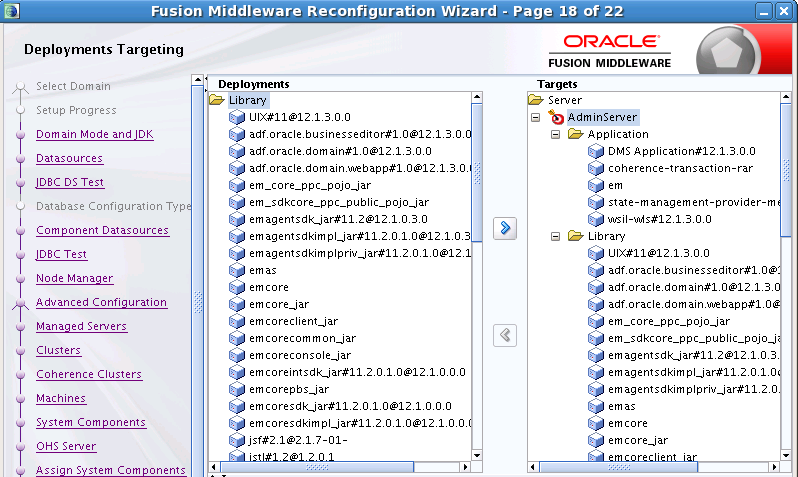 |
|
|
Services that are associated with the product for which you are configuring the domain are targeted automatically, to the Managed Server created for that product or to the cluster to which that Managed Server is assigned. In this screen, you can target services to additional servers and clusters. Use this screen to review the service targeting in the domain. 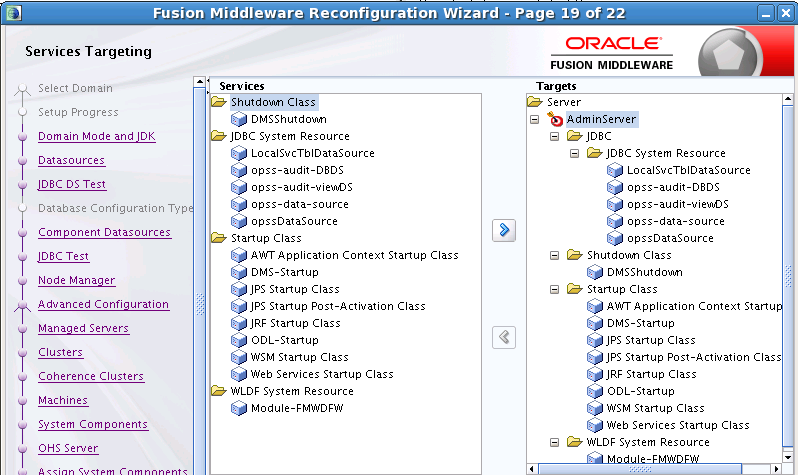 |
|
|
Review the detailed configuration settings of the domain before continuing. You can limit the items that are displayed in the right-most panel by selecting a filter option from the View drop-down list. Click Reconfig to reconfigure the domain, or click Back if you wish to change the configurations. |
|
|
Review the reconfiguration progress. Click Next when the process is complete. 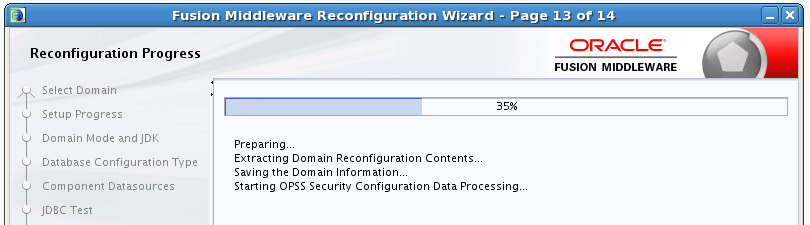 |
|
|
Review the final status of the reconfiguration process. Click Finish to exit the Reconfiguration Wizard. |
3.13 Upgrading the Domain Component Configurations Using the Upgrade Assistant
Follow the instructions in this section to upgrade any additional domain component configurations, such as OWSM policy metadata structure and adapter configurations, using the Upgrade Assistant.
- Task 1: Starting the Upgrade Assistant
The Upgrade Assistant is used to upgrade schemas, component configurations and standalone system components. - Task 2: Upgrading Component Configurations
If you are running the Upgrade Assistant from an Oracle home that contains managed WebLogic domain components, thenAll Configurations Used by a Domainupgrade option is available. You can select the schemas you want to upgrade from the component list.
3.13.1 Task 1: Starting the Upgrade Assistant
The Upgrade Assistant is used to upgrade schemas, component configurations and standalone system components.
Start the Upgrade Assistant on the host where Administration Server is running:
3.13.2 Task 2: Upgrading Component Configurations
If you are running the Upgrade Assistant from an Oracle home that contains managed WebLogic domain components, then All Configurations Used by a Domain upgrade option is available. You can select the schemas you want to upgrade from the component list.
The Upgrade Assistant displays a sequence of screens listed in Table 4-3 when upgrading WebLogic Component Configurations. Perform the respective action(s) for each of the screens.
Table 3-4 Upgrade Assistant Screens: Upgrading Component Configurations
| Screen | Description and Action Required |
|---|---|
|
This screen provides an overview of the Upgrade Assistant and some information about important pre-upgrade tasks. Click Next to continue. |
|
| All Configurations | Select All Configurations Used by a Domain to upgrade component configurations for a managed WebLogic Server domain. Click Browse and use the navigation tree to select a valid domain directory. A domain directory contains a config directory, which contains a config.xml file.
Click Next. |
| WebLogic Server Component List |
This screen provides a list of components that are included in the WebLogic domain’s component configuration upgrade. The name of the domain is provided along with the list of components located within the domain. Review the list of components before you proceed. |
|
Check if the prerequisites for component configurations upgrade are met. Check the boxes to continue. |
|
|
Use this screen to specify the login credentials of the remote managed servers hosting your UMS 11g configuration files. The Upgrade Assistant automatically copies remote configuration files if all necessary prerequisites are met and the required login information is provided. Note: If the Upgrade Assistant is unable to locate the managed servers or the configuration files, you will have to manually copy the files and then restart the Upgrade Assistant. For more information, see Error while Copying User Messaging Service (UMS) Configuration Files. |
|
|
Review the status of the Upgrade Assistant as it examines each component, verifying that the component is ready for upgrade. 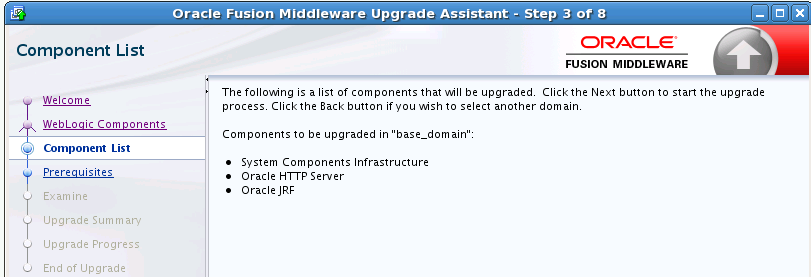 |
|
|
Review the summary of the options that you have selected for schema upgrade. Click Upgrade to upgrade the schemas, or click Back if you wish to change the configurations. |
|
|
This screen shows you the progress of the upgrade. The Upgrade Progress status bar represents the number of upgrade processes that have been completed. It is NOT meant to identify time remaining. Allow the Upgrade Assistant enough time to perform the upgrade. Do not cancel the upgrade operation unless absolutely necessary. Click Next when the upgrade is complete. |
|
|
Click Close if the Upgrade was successful. |
|
| Upgrade Failure | If the upgrade failed or if you canceled the upgrade before it completed successfully, review the log files, restore the backed up environment, and restart the Upgrade Assistant. Click View Log to troubleshoot the errors. |
3.14 Troubleshooting the Infrastructure Upgrade
If the Infrastructure upgrade fails, troubleshoot the cause using the log file and guidelines in this topic.
Caution:
As with most Fusion Middleware errors, errors that are detected in the Examine phase can be fixed and the Upgrade Assistant can continue to run. Errors that occur during the Upgrade phase, however, must be corrected using the restored backup files and the upgrade process must be started from the beginning. Do not attempt to rerun an upgrade that errors during the Upgrade phase. The environment should be considered unstable and will need to be restored to its pre-upgrade state.
For more information, see General Troubleshooting Guidelines in Upgrading with the Upgrade Assistant.
- Error while Reconfiguring the Domain using Reconfiguration Wizard
- Authentication Failure — JSchException: Auth Fail
When Running the Upgrade Assistant to upgrade Weblogic Component Configurations, if you provide incorrect login credentials for a UMS server, you an exception in the Upgrade Assistant log files as shown in this topic. - Error while Copying User Messaging Service (UMS) Configuration Files
If the Upgrade Assistant fails to automatically copy the UMS configuration files, you must stop the upgrade and manually copy the configuration files before attempting to upgrade UMS. This process is required only if the Upgrade Assistant fails to automatically copy the configuration files or if you prefer to copy the configuration files manually.
3.14.1 Error while Reconfiguring the Domain using Reconfiguration Wizard
If an error occurs while reconfiguring your domain, refer to the Important Notes About the Domain Upgrade Process in Upgrading Oracle WebLogic Server.
3.14.2 Authentication Failure — JSchException: Auth Fail
When Running the Upgrade Assistant to upgrade Weblogic Component Configurations, if you provide incorrect login credentials for a UMS server, you an exception in the Upgrade Assistant log files as shown in this topic.
[upgrade.UCSUMS.UCSUMS_CONFIGURATION_PLUGIN] [tid: 110] [ecid:
88ab893d-a523-4a83-b5a6-f7b1cf8cb029-00000001,0] [[
com.jcraft.jsch.JSchException: Auth fail
The resolution to this error depends on when the error occurred:
If this error occurred during the Examine phase (before Upgrade phase): Verify that the username and password you entered are valid for all managed servers and directories and that the username provided has privileges for ssh. Once you have corrected the error, retry the connection.
If this error occurred during the Upgrade phase, your upgrade operation did not succeed and you need to restore your files from backup and start the upgrade again. Make sure that you use the correct server login credentials when prompted.
Caution:
Errors that occur during the Upgrade phase are non-reentrant, meaning you cannot simply correct the error and continue through the upgrade. Once you click Upgrade, if an error occurs then the environment must be restored from backup before you start the upgrade process again.3.14.3 Error while Copying User Messaging Service (UMS) Configuration Files
If the Upgrade Assistant fails to automatically copy the UMS configuration files, you must stop the upgrade and manually copy the configuration files before attempting to upgrade UMS. This process is required only if the Upgrade Assistant fails to automatically copy the configuration files or if you prefer to copy the configuration files manually.
This section describes the location of the UMS configuration files that are copied from the remote managed server nodes to the Admin server while upgrading UMS from 11g to 12c. Note that the Upgrade Assistant can automatically copy the remote configuration files, if all necessary prerequisites are met and the required login information is provided. For more information about using Upgrade Assistant to copy configuration files, see Oracle Fusion Middleware Upgrading with the Upgrade Assistant.
However, if the Upgrade Assistant cannot locate your files, then you must copy the configuration files from the remote managed server to the same location on the Administration server running the upgrade. The configuration files that must be copied include the UMS server configuration files (appconfig.xml), driver configuration files (driverconfig.xml), and the user preferences files (businessterms.xml). These files are located in the /applications folder for each managed server, as shown in Table 3-5.
After manually copying the configuration files from the managed server to the Administration server, you must start the Upgrade Assistant again using the procedures from Upgrading the Domain Component Configurations Using the Upgrade Assistant
Table 3-5 Configuration File locations
| Configuration file | Location |
|---|---|
|
UMS Server |
DOMAIN_HOME/config/fmwconfig/servers/MANAGED_SERVER_NAME/applications/usermessagingserver/configuration/appconfig.xml |
|
Driver Configuration ( |
DOMAIN_HOME/config/fmwconfig/servers/MANAGED_SERVER_NAME/applications/usermessagingdriver-DRIVER_NAME/configuration/driverconfig.xml |
|
User Preferences ( |
<DOMAIN_HOME/config/fmwconfig/servers/MANAGED_SERVER_NAME/applications/usermessagingserver/configuration/businessterms.xml |
Note:
If there are multiple drivers deployed in a domain, then you must ensure that configuration files for all drivers are copied. This can be achieved by replacing the DRIVER_NAME with as many drivers deployed in that domain.
3.15 Performing the Post-Upgrade Tasks
After you upgrade Oracle Fusion Middleware 11g Application Developer to Oracle Fusion Middleware 12c Infrastructure, you must complete the post-upgrade tasks.
For post-upgrade tasks, see Tasks to Perform After Upgrade.