3 Upgrading an Oracle WebCenter Domain to 12c (12.2.1)
The procedures outlined in the following sections describe the high-level process of upgrading a basic WebCenter 11g domain to 12c. Most upgrades follow these general procedures, but the actual upgrade procedures you will perform depend on which components are being upgraded. There may be additional pre- or post- upgrade procedures associated with your components. Therefore, you will need to locate the upgrade procedures for each component in your pre-upgrade environment to complete the domain upgrade.
For example, if your Oracle WebCenter 11g domain includes Oracle WebCenter Content and WebCenter Portal, you would need to follow the procedures described in Upgrading Oracle WebCenter Content to 12c and Upgrading Oracle WebCenter Portal 11g Installations.
Table 3-1 Standard Upgrade Procedures
| Step | Task |
|---|---|
|
I |
Performing a Readiness Check with the Upgrade Assistant As part of your pre-upgrade testing, you ran a readiness check on your pre-upgrade environment. If any changes were made to the pre-upgrade environment , Oracle recommends that you run the pre-upgrade readiness check again. |
|
2 |
|
|
3 |
Reconfiguring the WebCenter Domain with the Reconfiguration Wizard |
|
4 |
Upgrading the Component Configuration with the Upgrade Assistant |
|
5 |
3.1 Performing a Readiness Check with the Upgrade Assistant
The Upgrade Assistant Readiness Check performs a read-only, pre-upgrade review of your existing Oracle Fusion Middleware schemas and Oracle WebLogic component configurations.
Caution:
Do not start the readiness check until you have completed the required pre-upgrade tasks. Specifically, make sure that you have disabled all obsolete components or the readiness check will fail.
3.2 Upgrading Schemas with the Upgrade Assistant
The Upgrade Assistant allows you to upgrade individually selected schemas or all schemas associated with a domain. The option you select determines which Upgrade Assistant screens you will use.
To determine which schemas can be upgraded to this version, see Determining Which Schemas Can be Upgraded for WebCenter.
For more information about using the Upgrade Assistant to upgrade schemas, see "Upgrading Schemas with the Upgrade Assistant".
To launch the Upgrade Assistant:
| Screen | Description | Sample Screen |
|---|---|---|
|
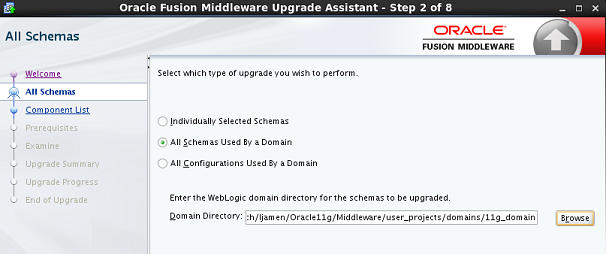
Upgrade Options |
You have three options on this screen. When upgrading schemas (not configurations), you can select Individually Selected Schemas or All Schemas Used by a Domain. Select Individually Selected Schemas only when the domain uses schemas that cannot be upgraded to this version of Fusion Middleware or schemas that you do not want to upgrade at this time. |
 |
|
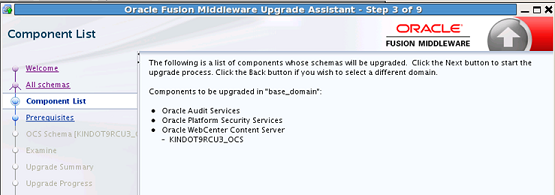
Component List |
UA automatically detects the products installed in the domain directory. The Component List varies depending on what you currently have deployed in your domain. |
 |
|
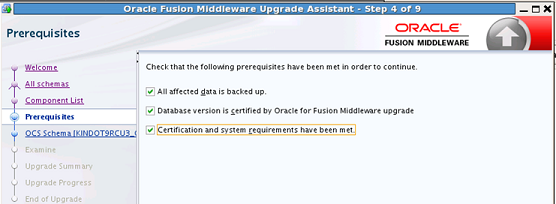
Prerequisites |
You must read and select each option before you continue. Note that Upgrade Assistant does not validate that they prerequisites have been met. |
 |
|
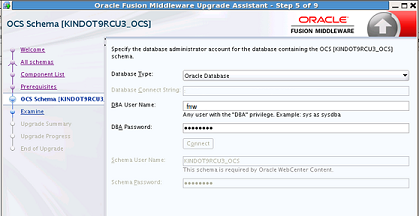
Schema Credentials |
Provide the connection details for the schema. Be sure to use the correct schema prefix for the schemas you are upgrading. The default prefix is DEV_. |
 |
|
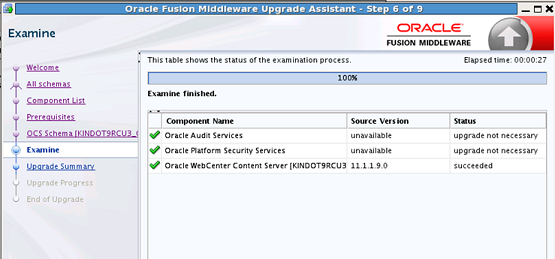
Examine |
The Examine phase scans the component versions to determine if an upgrade is needed. |
 |
|
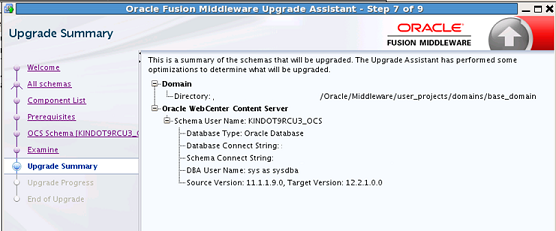
Upgrade Summary |
Review the summary and then click Upgrade to begin the actual upgrade process. |
 |
|
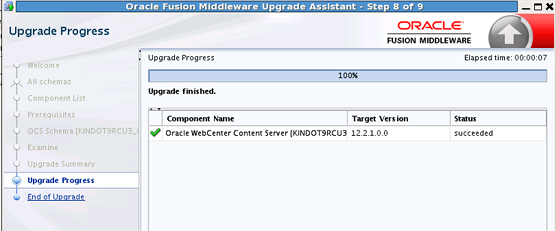
Upgrade Progress |
Monitor the upgrade progress from this screen. |
 |
|
End of Upgrade |
This screen returns the upgrade status: Success or Failure. Review the log report if the upgrade fails for any reason. |
 |
3.3 Reconfiguring the WebCenter Domain with the Reconfiguration Wizard
Note:
Do not start the domain reconfiguration process until you have created all of the required schemas. See Creating Schemas for WebCenter 12c
Start the Reconfiguration Wizard in graphical mode by doing the following:
Reconfiguration Screens:
| Screen | Description | Screen |
|---|---|---|
|
Select Domain |
Provide the location of the 11g domain to be reconfigured. |
 |
|
Reconfiguration Setup Progress |
During the reconfiguration setup process, the WebLogic Server core infrastructure is reconfigured for 12c, templates are applied, and views are created and validated. |
 |
|
Domain Mode and JDK |
The JDK and other information can be provided on this screen (if not auto-populated with the JDK you want to use). |
 |
|
Database Configuration Type |
Use this screen to provide the 11g database details for the prefix_MDS schema, 12c database details to load the new prefix_STB schema, and to ensure prefix_OCS and prefix_MDS schemas are pointing to the 11g environment. |
 |
|
JDBC Component Schema |
Once you provide the correct STB schema credentials and 11g schema owners, the information should auto-populate. Individual schema passwords must be updated in the auto-populated screen. |
 |
|
JDBC Component Schema Test |
The Reconfiguration Wizard uses the information you provide to conduct a test connection. |
 |
|
Node Manager |
Even though there was no node manager configuration in 11g, it must be configured for 12c. Provide the required details as shown below: |
 |
|
Reconfiguration Progress |
Monitor the progress and status of the domain reconfiguration. |
 |
3.4 Upgrading the Component Configuration with the Upgrade Assistant
The Upgrade Assistant is used to update the location of the WebCenter component binaries in the 11g domain to point to the new 12c binaries. This ensures that when the Administration and managed servers start they will use the upgraded binaries
If you already upgraded schemas, you will run the Upgrade Assistant again to upgrade the component configurations. Navigate to the 12c Upgrade Assistant.
On UNIX operating systems:
./ua
On Windows operating systems:
ua.bat
Provide the required information in each of the Upgrade Assistant screens. The screens you see will vary depending on the upgrade options you select.
| Screen | Description | Sample Screen |
|---|---|---|
|
All Configurations |
Use this screen to provide the location of the 11g domain so that the Upgrade Assistant can update the location of WebCenter binaries in the 11g domain. This enables the Administration server to pick up the 12c binaries when it is started. Provide the location of the 11g domain. |
 |
|
Component List |
The Upgrade Assistant scans the domain and identifies the components that will be upgraded. |
 |
|
Examine |
Reviews the components in the domain and determines if an upgrade is necessary. |
 |
|
Upgrade Summary |
Review the information and click Upgrade. |
 |
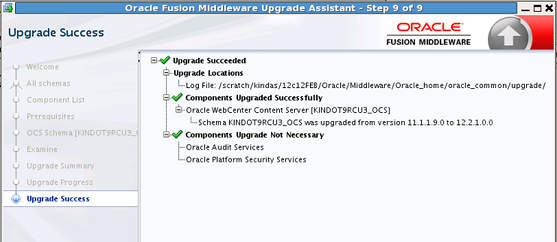
|
Upgrade Success |
The 11g domain configurations are now upgraded for 12c. |
 |
3.5 Performing Post-Upgrade Configuration Tasks
You may have to perform additional configuration tasks after an upgrade depending on which components are in your deployment.
Note:
You may have additional post-upgrade tasks if your deployment contains the following:
3.5.1 Starting and Stopping Administration Server
You can start and stop the Oracle WebLogic Server Administration Server using the WLST command line or a script. When you start or stop the Administration Server, you also start or stop the processes running in the Administration Server, including the WebLogic Server Administration Console and Fusion Middleware Control.
For example, to start an Administration Server, use the following script:
DOMAIN_HOME/bin/startWebLogic.sh
To stop an Administration Server, use the following script:
DOMAIN_HOME/bin/stopWebLogic.sh
       username password [admin_url]
3.5.2 Starting and Stopping the Node Manager
You can start Node Manager using the WLST command line or a script.
To start Node Manager, use the following script:
(UNIX) DOMAIN_HOME/bin/startNodeManager.sh
(Windows) DOMAIN_HOME\bin\startNodeManager.cmd
To stop Node Manager, close the command shell in which it is running.
3.5.3 Starting and Stopping the Managed Servers
To start or stop a WebLogic Server Managed Server using Fusion Middleware Control:
-
From the navigation pane, expand the domain.
-
Select the Managed Server.
-
From the WebLogic Server menu, choose Control, then Start Up or Shut Down.
Alternatively, you can right-click the server, then choose Control, then Start Up or Shut Down.
You can use a script or WLST to start and stop a WebLogic Server Managed Server.
For example, to start a WebLogic Server Managed Server, use the following script:
(UNIX) DOMAIN_HOME/bin/startManagedWebLogic.sh
           managed_server_name admin_url
(Windows) DOMAIN_HOME\bin\startManagedWebLogic.cmd
           managed_server_name admin_url
When prompted, enter your user name and password.
To stop a WebLogic Server Managed Server, use the following script:
(UNIX) DOMAIN_HOME/bin/stopManagedWebLogic.sh
            managed_server_name admin_url username password
(Windows) DOMAIN_HOME\bin\stopManagedWebLogic.cmd
            managed_server_name admin_url username password
3.5.4 Verifying the New Applications Work as Expected
Once all of the servers have been successfully started and stopped, open your component applications and make sure that everything is working as expected. Use your component-specific Administration and Developers guides to help you navigate the new features of your upgraded environment.