2 Pre-Upgrade Tasks for Oracle WebCenter Components
Complete the standard Oracle Fusion Middleware Pre-Upgrade checklist before you begin the pre-upgrade tasks that are specific to Oracle WebCenter. The tasks you preform depend on which components are being upgraded.
- Pre-Upgrade Checklist
Refer to the Pre-Upgrade Checklist before you begin the upgrade process. The checklist identifies tasks that can be performed before you begin your upgrade to ensure you have a successful upgrade and limited downtime. - Performing the Oracle WebCenter Pre-Upgrade Tasks
2.1 Pre-Upgrade Checklist
Refer to the Pre-Upgrade Checklist before you begin the upgrade process. The checklist identifies tasks that can be performed before you begin your upgrade to ensure you have a successful upgrade and limited downtime.
Note:
The pre-upgrade procedures you perform depend on the configuration of your existing system, the components you are upgrading, and the environment you want to create at the end of the upgrade and configuration process. You do not need to complete any tasks that do not pertain to your configurations or use cases.
Table 2-1 Tasks to Perform Before You Upgrade to Oracle Fusion Middleware 12c
| Task | Description | Documentation |
|---|---|---|
|
Create a complete backup of your pre-upgrade environment. |
Required Back up all system-critical files and database(s) that contain any schemas that are to be upgraded before you begin your upgrade. If the upgrade fails, you need to restore your pre-upgrade environment and begin the upgrade again. |
|
|
Clone your production environment to use as an upgrade testing platform. |
Optional In addition to creating a complete backup of your system files, Oracle strongly recommends that you clone your production environment. This environment can be used to test the upgrade. |
|
|
Verify that you are installing and upgrading your product on a supported hardware and software configuration. NOTE: Do not attempt an upgrade if you are unable to use the latest supported operating system. As with all supported configurations, failure to comply with these requirements may cause your upgrade to fail. |
Required As part of the upgrade planning process, you already verified that your hardware and software configurations (including operating systems) are supported by the latest certifications and requirements documents. Just before you start the upgrade, Oracle recommends that you verify this information again, as the certification requirements may have changed. Make sure that you have applied the latest patches to your components before you upgrade. |
|
| Verify that you are running a 64-bit operating system. Most Oracle Fusion Middleware 12c components require a 64-Bit operating system. | Required only if you are currently running a 32-bit operating system. | Migrating from a 32-Bit to a 64-Bit Operating System |
|
Remove any outdated or unused data before you upgrade. |
Optional To optimize performance, consider purging data and objects that will not be used in the upgraded environment. |
|
| Oracle Database Users: Before upgrading an Edition-Based Redefinition (EBR) enabled schema, you must connect to the database server and create an edition on the database server for 12c (12.2.1). | Required only if you are using an Edition-Based Redefinition (EBR) database. | Creating an Edition on the Server for Edition-Based Redefinition (Optional) |
| Create a new Non-SYSDBA user to avoid running the upgrade as SYS AS SYSDBA. |
Optional Oracle recommends that you create a non-SYSDBA user to run Upgrade Assistant with only those privileges required by the Upgrade Assistant. |
Creating a Non-SYSDBA User |
|
Some of the security algorithms used in Fusion Middleware 12c require additional policy files for the JDK. |
Optional If you plan to use enhanced encryption (such as AES 256). Oracle recommends that you apply the required policy files to the JDK before you upgrade. |
|
|
Maintain custom domain environment settings. NOTE: Oracle recommends that you do not modify the startup scripts, such as setDomainEnv, as any changes made to them are overwritten during subsequent domain upgrade and reconfiguration operations. |
Optional If you modified any of the startup scripts in your existing domain, you will need to copy them to another directory during the upgrade. Startup scripts are overwritten during the upgrade and any changes you have made will be overwritten. |
Maintaining Custom Domain Environment Settings |
| Download and install the new 12c products in to a new Oracle home before you upgrade. |
Required Install the 12c (12.2.1) versions of the products you already have in your pre-upgrade environment. |
Downloading and Installing the 12c Oracle Fusion Middleware Products |
| Depending on your upgrade starting point, you may be required to create new 12c schemas before an upgrade. |
Required for 11g upgrades only Oracle Fusion Middleware 12c requires that you use the Repository Creation Utility (RCU) to create new schemas before you can upgrade your existing environment. |
Creating the Required Schemas Before an Upgrade |
| Understand the schema requirements when using an OID-based security store. | If you are using an OID-based security store, you need to create a 12c OPSS schema before you upgrade. | Creating the 12c OPSS Schema for an OID-based Security Store |
| If you are using a file-based policy store, Oracle recommends that you reassociate it to a database-based policy store. |
Optional This step is not required if you are upgrading from a previous 12c release. |
Reassociating File-based Policy Stores to Database-based Policy Stores |
| Run the Readiness Check on your production environment before you begin the upgrade. |
Optional The Upgrade Assistant can be run in -readiness mode to detect potential issues that could prevent a successful upgrade. |
Running a Pre-Upgrade Readiness Check |
| If you are upgrading any other components, refer to the component-specific upgrade documentation. |
Optional If you are upgrading more than one Oracle Fusion Middleware product suite, use the component-specific upgrade documentation to complete your upgrade. |
Locating Your Component-Specific Upgrade Documentation |
- Creating a Complete Backup (Required)
Before you install any new 12c distributions and begin upgrading your Oracle Fusion Middleware 11g or 12c deployment, be sure you have backed up all system-critical files; including all of the databases that host your Oracle Fusion Middleware schemas. - Cloning Your Production Environment for Testing
Oracle strongly recommends that you create a copy of your actual production environment, upgrade the cloned environment, verify that the upgraded components work as expected, and then (and only then) upgrade your production environment. - Verifying Certification and System Requirements
The certification matrix and system requirements documents should be used in conjunction with each other to verify that your environment meets the necessary requirements for installation. - Migrating from a 32-Bit to a 64-Bit Operating System
Most Oracle Fusion Middleware 12c components require a 64-Bit operating system. If you are running a 32-bit environment, then you must migrate your 32-bit environment to a 64-bit software environment before you upgrade. - Purging Unused Data
Purging unused data before an upgrade can optimize the upgrade process. Automated purge scripts are available for some components and can run before an upgrade to purge unused and obsolete data. - Creating an Edition on the Server for Edition-Based Redefinition (Optional)
Before upgrading an Edition-Based Redefinition (EBR) enabled schema, you must connect to the database server and create an edition on the database server for 12c. - Creating a Non-SYSDBA User
Oracle recommends that you create a non-SYSDBA user to run the Upgrade Assistant. The user created using this procedure has the privileges required to complete the upgrade. - Using Enhanced Encryption (AES 256)
The Java platform defines a set of APIs spanning major security areas, including cryptography, public key infrastructure, authentication, secure communication, and access control. These APIs allow developers to easily integrate security mechanisms into their application code If you plan to use enhanced encryption (such as AES 256), Oracle recommends that you apply these policy files to the JDK before you upgrade. - Maintaining Custom Domain Environment Settings
Every domain includes dynamically generated domain and server startup scripts, such assetDomainEnv. Oracle recommends that you do not modify these startup scripts, as any changes made to them are overwritten during subsequent domain upgrade and reconfiguration operations. - Downloading and Installing the 12c Oracle Fusion Middleware Product Distributions
Oracle Fusion Middleware product distributions are available for download on Oracle Technology Network (OTN) and Oracle Software Delivery Cloud. - Creating the Required Schemas Before Upgrade
Before you upgrade, you may be required to create new schemas for your 12c deployment. To determine which additional schemas need to be created for 12c, compare the component schemas you have in your existing environment to the schemas required for your upgrade. - Creating the 12c OPSS Schema for an OID-based Security Store
The only supported LDAP-based OPSS security store is Oracle Internet Directory (OID). An LDAP-based policy store is typically used in production environments. If you are using an OID-based security store in 11g, you must create the new 12c schemas using the Repository Creation Utility (RCU). - Reassociating File-based Policy Stores to Database-based Policy Stores
Oracle Fusion Middleware 12c uses database-based policy stores. A database-based policy store is recommended for a production environment. If you are using a file-based or OID-based policy store, you must reassociate the store to a database-based store prior to upgrade. - Upgrading Security Stores to the Latest Version
Upgrading to the latest version of the OPSS security store enables you to use enhanced security features. The OPSS security store is a part of Oracle Fusion Middleware product installation so you can use the Upgrade Assistant o upgrade the OPSS schema. - Running a Pre-Upgrade Readiness Check
The Upgrade Assistant can be run in the -readiness mode to perform a read-only, pre-upgrade check on your domain. If issues are detected, you can correct them before starting the actual upgrade. - Locating the Component-Specific Upgrade Documentation
The component specific upgrade documentation provides specific upgrade procedures and information for every individual component. If you are upgrading more than one product suite, consult the upgrade guides for all of the components you are upgrading.
2.1.1 Creating a Complete Backup (Required)
Before you install any new 12c distributions and begin upgrading your Oracle Fusion Middleware 11g or 12c deployment, be sure you have backed up all system-critical files; including all of the databases that host your Oracle Fusion Middleware schemas.
Performing a complete database backup prior to performing a schema upgrade is a prerequisite for running Upgrade Assistant. In the Upgrade Assistant prerequisites GUI screen, you will be required to acknowledge that backups have been performed, before proceeding with the actual upgrade.
Note:
Your system backup must include the SYSTEM.SCHEMA_VERSION_REGISTRY$ table.
Each Fusion Middleware schema has a row in SYSTEM.SCHEMA_VERSION_REGISTRY$ table. If you run the Upgrade Assistant to update an existing schema and it does not succeed, you must restore the original schema before you can try again. Make sure you back up your existing database schemas before you run the Upgrade Assistant.
2.1.2 Cloning Your Production Environment for Testing
Oracle strongly recommends that you create a copy of your actual production environment, upgrade the cloned environment, verify that the upgraded components work as expected, and then (and only then) upgrade your production environment.
Note:
It is beyond the scope of this document to describe the cloning procedures for all components and operating systems. Cloning procedures are component and operating system-specific. At a high level, you will install the pre-upgrade version of your component domain on a test machine, create the required schemas using the Repository Creation Utility (RCU), and perform the upgrade.-
Uncover and correct any upgrade issues.
-
Practice completing an end-to-end upgrade.
-
Understand the upgrade performance and how purge scripts can help.
-
Understand the time required to complete the upgrade.
-
Understand the database resource usage (such as temporary tablespace; PGA, etc).
Note:
You can run the pre-upgrade Readiness Check on the cloned production environment to help identify potential upgrade issues with your data, but you must perform a complete test upgrade on a cloned environment to ensure a successful upgrade.2.1.3 Verifying Certification and System Requirements
The certification matrix and system requirements documents should be used in conjunction with each other to verify that your environment meets the necessary requirements for installation.
Note:
When checking the certification, system requirements, and interoperability information, be sure to check specifically for any 32-bit or 64-bit system requirements. It is important for you to download software specifically designed for the 32-bit or 64-bit environment, explicitly.WARNING:
Make sure that your current environment has been patched to the latest patch set BEFORE you begin the upgrade. Certifications are based on fully patched environments unless stated otherwise.- Verify Your Environment Meets Certification Requirements
Oracle has tested and verified the performance of your product on all certified systems and environments. Make sure that you are installing your product on a supported hardware or software configuration - Verify System Requirements and Specifications
It is important to verify that the system requirements such as disk space, available memory, specific platform packages and patches, and other operating system-specific items are met. - Verify that the database hosting Oracle Fusion Middleware is supported
You must have a supported Oracle database configured with the required schemas before you run Fusion Middleware 12c. - Verify that the JDK is certified for this release of Oracle Fusion Middleware.
Before you can install any Oracle Fusion Middleware product using a generic installer, you must download and install a supported JDK on your system.
2.1.3.1 Verify Your Environment Meets Certification Requirements
Oracle has tested and verified the performance of your product on all certified systems and environments. Make sure that you are installing your product on a supported hardware or software configuration
Whenever new certifications occur, they are added to the proper certification document right away. New certifications can occur at any time, and for this reason the certification documents are kept outside of the documentation libraries and are available on Oracle Technology Network. For more information, see Certification Matrix for 12c (12.2.1).
2.1.3.2 Verify System Requirements and Specifications
It is important to verify that the system requirements such as disk space, available memory, specific platform packages and patches, and other operating system-specific items are met.
The Oracle Fusion Middleware System Requirements and Specifications document should be used to verify that the requirements of the certification are met. For example, if the certification document indicates that your product is certified for installation on 64-Bit Oracle Linux 7, this document should be used to verify that your Oracle Linux 7 system has met the required minimum specifications, like disk space, available memory, specific platform packages and patches, and other operating system-specific items. This document is updated as needed and resides outside of the documentation libraries. The latest version is available on Oracle Technology Network.
For a complete description of the system requirements for installing and upgrading to Oracle Fusion Middleware 12c, see Review System Requirements and Specifications.
Note:
When you install the Oracle Fusion Middleware Release 12c software in preparation for upgrade, you should use the same user account that you used to install and configure the Oracle Fusion Middleware 11g software. On UNIX operating systems, this will ensure that the proper owner and group is applied to new Oracle Fusion Middleware 12c files and directories2.1.3.3 Verify that the database hosting Oracle Fusion Middleware is supported
You must have a supported Oracle database configured with the required schemas before you run Fusion Middleware 12c.
It is assumed that you understand the Oracle Database requirements when upgrading and ensure that the database hosting Oracle Fusion Middleware is supported and has sufficient space to perform an upgrade.
2.1.3.4 Verify that the JDK is certified for this release of Oracle Fusion Middleware.
Before you can install any Oracle Fusion Middleware product using a generic installer, you must download and install a supported JDK on your system.
Make sure that the JDK is installed outside of the Oracle home. The Oracle Universal Installer validates that the designated Oracle home directory is empty, and the install does not progress until an empty directory is specified. If you install JDK under Oracle home, you may experience issues in future operations. Therefore, Oracle recommends that you use install the JDK in the /home/oracle/products/jdk directory. You can then use the java -jar command to run the installer JAR file.
For more information on the difference between generic and platform-specific installers, see Understanding the Difference Between Generic and Platform-Specific Distributions in the Oracle Fusion Middleware Download, Installation, and Configuration Readme Files.
To download the required JDK, use your browser to navigate to the following URL and download the Java SE JDK:
http://www.oracle.com/technetwork/java/javase/downloads/index.html
2.1.4 Migrating from a 32-Bit to a 64-Bit Operating System
Most Oracle Fusion Middleware 12c components require a 64-Bit operating system. If you are running a 32-bit environment, then you must migrate your 32-bit environment to a 64-bit software environment before you upgrade.
Note:
When checking the certification, system requirements, and interoperability information, be sure to check specifically for any 32-bit or 64-bit system requirements. It is important for you to download software specifically designed for the 32-bit or 64-bit environment, explicitly.Make sure to validate the migration to ensure all your Oracle Fusion Middleware 11g software is working properly on the 64-bit machine, and only then perform the upgrade to Oracle Fusion Middleware 12c.
In these tasks, host refers to the 32-bit source machine and target refers to the new 64-bit target machine.
Note:
These steps assume that your database is located on a separate host and will not be moved.Caution:
These steps are provided as an example of the operating system upgrade process and may or may not include all of the procedures you must perform to update your specific operating system. Consult your operating system's upgrade documentation for more information.- Procure the Hardware that Supports your Upgrade's 64-bit Software Requirement
Make sure that you have supported target hardware in place before you begin the upgrade process. - Stop all processes, including the Administration Server, Managed Servers, and Node Manager
You must stop all processes, including the Administration Server, Managed Servers, and Node Manager, if they are started on the host. - Back up all Files from the 32-bit Host Machine
Make sure that you have created a complete backup of your entire 11g deployment before you begin the upgrade process. These files can be used if there is an issue during the migration and you have to restart the process. - Set up the Target 64-bit Machine with the 11g Host Name and IP Address
The host name and IP address of the target machine must be made identical to the host. This require you to change the IP address and name of the source machine or decommission the source machine to avoid conflicts in the network. - Restore the 11g Backup from 32-bit Host to 64-bit Host
Restore the files you backed up in Task 3 using the same directory structure that was used in 11g. The directory structure on the target machine must be identical to the structure of the host machine. - Install the 12c Product Distribution(s) on the Target Machine
Oracle recommends an Out-of-Place approach for upgrade. Therefore, you must install the 12c product distributions in a new Oracle home on the target machine. - Upgrade the Target 64-bit Environment Using the Standard Upgrade Procedure
After installing the product on the target machine, you must upgrade each component individually using an upgrade utility specified in the component-specific upgrade guide and complete any post-upgrade tasks.
2.1.4.1 Procure the Hardware that Supports your Upgrade's 64-bit Software Requirement
Make sure that you have supported target hardware in place before you begin the upgrade process.
2.1.4.2 Stop all processes, including the Administration Server, Managed Servers, and Node Manager
You must stop all processes, including the Administration Server, Managed Servers, and Node Manager, if they are started on the host.
For example, to stop the Administration Server, enter the following command:
DOMAIN_HOME/bin/stopWebLogic.sh username password [admin_url]2.1.4.3 Back up all Files from the 32-bit Host Machine
Make sure that you have created a complete backup of your entire 11g deployment before you begin the upgrade process. These files can be used if there is an issue during the migration and you have to restart the process.
Note:
If the upgrade from 32-bit to 64-bit takes place on the same machine, there is a risk of corrupting the source environment if the upgrade fails.For more information on backing up your 11g files, see Backing Up Your Environment in Oracle® Fusion Middleware Administrator's Guide.
During the upgrade you must have access to the contents of the following:
-
11g Domain Home
-
11g
/nodemanagerdirectory located inMW_HOME/wlserver_10.3/common/
Some of the backup and recovery procedures described in Backing Up Your Environment in Oracle® Fusion Middleware Administrator's Guide are product-specific. Do not proceed with the upgrade until you have a complete backup.
2.1.4.4 Set up the Target 64-bit Machine with the 11g Host Name and IP Address
The host name and IP address of the target machine must be made identical to the host. This require you to change the IP address and name of the source machine or decommission the source machine to avoid conflicts in the network.
The process of changing an IP address and host name vary by operating system. Consult your operating system's administration documentation for more information.
2.1.4.5 Restore the 11g Backup from 32-bit Host to 64-bit Host
Restore the files you backed up in Task 3 using the same directory structure that was used in 11g. The directory structure on the target machine must be identical to the structure of the host machine.
For detailed information about restoring your 11g files to the 64-bit target machine, see Recovering Your Environment in Oracle® Fusion Middleware Administrator's Guide.
2.1.4.6 Install the 12c Product Distribution(s) on the Target Machine
Oracle recommends an Out-of-Place approach for upgrade. Therefore, you must install the 12c product distributions in a new Oracle home on the target machine.
For detailed instructions on how to obtain 12c distributions, identify an installation user, and understand the directory structure for installation and configuration, see Planning an Installation of Oracle Fusion Middleware. Refer to the component-specific installation guides for the component(s) you are installing.
2.1.4.7 Upgrade the Target 64-bit Environment Using the Standard Upgrade Procedure
After installing the product on the target machine, you must upgrade each component individually using an upgrade utility specified in the component-specific upgrade guide and complete any post-upgrade tasks.
For a complete upgrade procedure, see the component-specific upgrade guide for the component(s) you are upgrading.
Note:
The Node Manager upgrade procedure requires access to the original Node Manager files. Use the 11g Node Manger files that were backed up from the 32–bit source machine as part of Back up all Files from the 32-bit Host Machine.2.1.5 Purging Unused Data
Purging unused data before an upgrade can optimize the upgrade process. Automated purge scripts are available for some components and can run before an upgrade to purge unused and obsolete data.
For Oracle Data Integrator (ODI) Components
Purge the execution logs to avoid exporting and importing excessive data as part of work repository export/import in the next step. See Purging the Logs
For SOA Suite Components
Note:
If a large amount of data needs to be purged, consider partitioning tables or employing other data optimization strategies. Using scripts to remove large amounts of data may impact performance.See Developing a Purging and Partitioning Methodology and Developing a Database Growth Management Strategy
2.1.6 Creating an Edition on the Server for Edition-Based Redefinition (Optional)
Before upgrading an Edition-Based Redefinition (EBR) enabled schema, you must connect to the database server and create an edition on the database server for 12c.
Edition-based redefinition enables you to upgrade an application's database objects while the application is in use, thus minimizing or eliminating down time. This is accomplished by changing (redefining) database objects in a private environment known as an edition. Only when all changes have been made and tested do you make the new version of the application available to users.
Note:
This task must be completed by an Oracle Database user with DBA privileges.Before upgrading an Edition-Based Redefinition (EBR) enabled schema, you must connect to the database server and create an edition on the database server for 12c. The new edition for 12c must be a child of your existing 11g or 12c edition.
To create an edition on the database server, log in as an SYS user (or another Oracle user that has DBA privileges) and enter the following command:
create edition Oracle_FMW_12_2_1 as child of Oracle_FMW_11_1_1_7_0;
Where, Oracle_FMW_11_1_1_7_0 is an example of the edition name you specified in RCU 11.1.1.7 when the 11.1.1.7 schemas were created. Be sure to provide the actual name used when creating the edition.
If the edition is created successfully, you get the following message:
Edition created.
During the upgrade, you are prompted to launch the Reconfiguration Wizard to reconfigure your existing domain. Before running the Reconfiguration Wizard, you must specify the database default edition. Use the following SQL to manually setup the default edition name for the database, for example:
ALTER DATABASE DEFAULT EDITION = Oracle_FMW_12_2_1;
2.1.7 Creating a Non-SYSDBA User
Oracle recommends that you create a non-SYSDBA user to run the Upgrade Assistant. The user created using this procedure has the privileges required to complete the upgrade.
Note:
The v$xatrans$ table does not exist by default. You must run the XAVIEW.SQL script to create this table before creating the user. Moreover, grant on v$xatrans$ table is required only for Oracle Identity Manager. If you do not require Oracle Identity Manager for configuration or if you do not have the v$xatrans$ table, then remove the following line from the script:grant select on v$xatrans$ to FMW with grant option;
Note:
If you are upgrading an ORASDPM schema that was created using RCU 11g (11.1.1.1.4 or earlier), and you subsequently upgraded ORASDPM to 11g (11.1.1.6 or later), the FMW user will need to grant the CREATE TABLE privilege to user <prefix>_ORASDPM before upgrading to 12c (12.2.1).grant CREATE TABLE to <prefix>_ORASDPM;
Where <prefix> is the name given to the schema when it was created.
welcome1 is the password. Make sure that you specify your actual password when granting privileges.
create user FMW identified by welcome1;
grant dba to FMW;
grant execute on DBMS_LOB to FMW with grant option;
grant execute on DBMS_OUTPUT to FMW with grant option;
grant execute on DBMS_STATS to FMW with grant option;
grant execute on sys.dbms_aqadm to FMW with grant option;
grant execute on sys.dbms_aqin to FMW with grant option;
grant execute on sys.dbms_aqjms to FMW with grant option;
grant execute on sys.dbms_aq to FMW with grant option;
grant execute on utl_file to FMW with grant option;
grant execute on dbms_lock to FMW with grant option;
grant select on sys.V_$INSTANCE to FMW with grant option;
grant select on sys.GV_$INSTANCE to FMW with grant option;
grant select on sys.V_$SESSION to FMW with grant option;
grant select on sys.GV_$SESSION to FMW with grant option;
grant select on dba_scheduler_jobs to FMW with grant option;
grant select on dba_scheduler_job_run_details to FMW with grant option;
grant select on dba_scheduler_running_jobs to FMW with grant option;
grant select on dba_aq_agents to FMW with grant option;
grant execute on sys.DBMS_SHARED_POOL to FMW with grant option;
grant select on dba_2pc_pending to FMW with grant option;
grant select on dba_pending_transactions to FMW with grant option;
grant execute on DBMS_FLASHBACK to FMW with grant option;
grant execute on dbms_crypto to FMW with grant option;
grant execute on DBMS_REPUTIL to FMW with grant option;
grant execute on dbms_job to FMW with grant option;
grant select on pending_trans$ to FMW with grant option;
grant select on dba_scheduler_job_classes to fmw with grant option;
grant select on SYS.DBA_DATA_FILES to FMW with grant option;
grant select on SYS.V_$ASM_DISKGROUP to FMW with grant option;
grant select on v$xatrans$ to FMW with grant option;
grant execute on sys.dbms_system to FMW with grant option;
grant execute on DBMS_SCHEDULER to FMW with grant option;
grant select on dba_data_files to FMW with grant option;
grant execute on UTL_RAW to FMW with grant option;
grant execute on DBMS_XMLDOM to FMW with grant option;
grant execute on DBMS_APPLICATION_INFO to FMW with grant option;
grant execute on DBMS_UTILITY to FMW with grant option;
grant execute on DBMS_SESSION to FMW with grant option;
grant execute on DBMS_METADATA to FMW with grant option;
grant execute on DBMS_XMLGEN to FMW with grant option;
grant execute on DBMS_DATAPUMP to FMW with grant option;
grant execute on DBMS_MVIEW to FMW with grant option;
grant select on ALL_ENCRYPTED_COLUMNS to FMW with grant option;
grant select on dba_queue_subscribers to FMW with grant option;
grant execute on SYS.DBMS_ASSERT to FMW with grant option;
Note:
Oracle Database 11.2.0.3 Database Users ONLY: You must apply Oracle Patch 13036331 before you begin the upgrade. Go to My Oracle Support to download the patch.
If you do not apply this patch, then you will have to grant additional privileges for some schemas.
2.1.8 Using Enhanced Encryption (AES 256)
The Java platform defines a set of APIs spanning major security areas, including cryptography, public key infrastructure, authentication, secure communication, and access control. These APIs allow developers to easily integrate security mechanisms into their application code If you plan to use enhanced encryption (such as AES 256), Oracle recommends that you apply these policy files to the JDK before you upgrade.
Some of the security algorithms used in Fusion Middleware 12c require additional policy files for the JDK. For more information, see Java Cryptography Architecture Oracle Providers Documentation.
If you do not apply these policy files to the JDK before you begin the upgrade, the upgrade can fail and you need to restore the entire pre-upgrade environment and start the upgrade from the beginning.
2.1.9 Maintaining Custom Domain Environment Settings
Every domain includes dynamically generated domain and server startup scripts, such as setDomainEnv. Oracle recommends that you do not modify these startup scripts, as any changes made to them are overwritten during subsequent domain upgrade and reconfiguration operations.
To maintain your custom domain-level environment settings, creating a separate file to store the custom domain information before you upgrade.
For example, if you want to customize server startup parameters that apply to all servers in a domain, you can create a file called setUserOverrides.cmd (Windows) or setUserOverrides.sh (UNIX) and configure it to add custom libraries to the WebLogic Server classpath, specify additional java command line options for running the servers, or specify additional environment variables, for instance. Any custom settings you add to this file are preserved during domain upgrade operation and are carried over to the remote servers when using the pack and unpack commands.
setUserOverrides file:
# add custom libraries to the WebLogic Server system claspath
  if [ "${POST_CLASSPATH}" != "" ] ; then
    POST_CLASSPATH="${POST_CLASSPATH}${CLASSPATHSEP}${HOME}/foo/fooBar.jar"
    export POST_CLASSPATH
  else
    POST_CLASSPATH="${HOME}/foo/fooBar.jar"
    export POST_CLASSPATH
  fi

# specify additional java command line options for servers
JAVA_OPTIONS="${JAVA_OPTIONS}  -Dcustom.property.key=custom.value"
If the setUserOverrides file exists during a server startup, the file is included in the startup sequence and any overrides contained within this file take effect. You must store the setUserOverrides file in the domain_home/bin directory.
Note:
If you are unable to create the setUserOverrides script before an upgrade, you need to reapply your settings as described in Re-apply Customizations to Startup Scripts.
2.1.10 Downloading and Installing the 12c Oracle Fusion Middleware Product Distributions
Oracle Fusion Middleware product distributions are available for download on Oracle Technology Network (OTN) and Oracle Software Delivery Cloud.
For more information on which site you should visit to obtain your distribution, see the Oracle Fusion Middleware Download, Installation, and Configuration Readme Files page.
After you have downloaded all the necessary software, you can proceed to install and configure your software.
To get started with your installations, refer to the Install, Patch, and Upgrade common tasks page in the Oracle Fusion Middleware 12c (12.2.1) Documentation Library on OTN.
Note:
You must install the Fusion Middleware Infrastructure distribution before installing the component-specific distributions.2.1.10.1 Installing the Required Oracle Fusion Middleware Distributions for WebCenter
Before you can perform and upgrade to WebCenter 12c, you must install - but do not configure - the following Fusion Middleware distributions in your existing 11g domain:
| Distribution | Installation Guide |
|---|---|
|
Oracle Fusion Middleware Infrastructure |
Installing and Configuring the Oracle Fusion Middleware Infrastructure |
|
Oracle WebCenter Content (if you are upgrading Content or Enterprise Capture) |
|
|
Oracle WebCenter Portal (if you are upgrading Portal) |
|
|
Oracle SOA Suite and Business Process Management |
WebCenter Content Imaging Upgrades Only: You must install Oracle SOA Suite 12c before upgrading Oracle WebCenter Content Imaging. If the 12c SOA binaries are not present, the upgrade will fail. Installing and Configuring Oracle SOA Suite and Business Process Management |
2.1.11 Creating the Required Schemas Before Upgrade
Before you upgrade, you may be required to create new schemas for your 12c deployment. To determine which additional schemas need to be created for 12c, compare the component schemas you have in your existing environment to the schemas required for your upgrade.
Refer to the component-specific upgrade guides in order to identify the schemas that are required for your components. The Upgrade Assistant identifies all of the schemas that are available for an upgrade, and includes all the schemas in the upgrade. It also allows you to select the schemas that should be upgraded. For more information about , see Identifying Schemas that Can be Upgraded with the Upgrade Assistant.
If you are upgrading from 11g, note the following:
-
In 12c, there is a new schema that must be created before you can upgrade from 11g. The new Service Table schema (prefix
_STB) stores basic schema configuration information that can be accessed and used by other Oracle Fusion Middleware components during the domain creation. For more information, see Understanding the Service Table Schema.Note:
If you have not created the Service Table schema, you might encounter the error message UPGAST-00328 : The schema version registry table does not exist on this database. If that happens is it necessary to create the service table schema in order to run Upgrade Assistant. -
An OPSS schema is also required for 12c if your 11g environment is not already using an OPSS schema.
-
The audit schema includes two additional schemas which also need to be created before running 12c. When upgrading audit services (
_IAU), make sure that you select_IAU_APPENDand_IAU_VIEWERin addition to_IAU.
2.1.11.1 Creating Schemas for WebCenter 12c
You must create the following schemas in 12c before you can upgrade Oracle WebCenter:
-
Service Table (_STB)
Oracle Fusion Middleware 12c introduces a new required schema called Service Table (_STB). This schema is automatically created when you run the Repository Creation Utility (RCU) and must be created before you can upgrade your existing 11g deployment. For more information, see Understanding the Service Table Schema.
-
Oracle Platform Security Services (_OPSS)
WebCenter does not use the _OPSS schema directly, but requires that the OPSS schema be upgraded as part of the upgrade process. If you do not have an Oracle Platform Security Services (_OPSS) schema in your 11g environment, you must create one for 12c.
-
Audit Schemas (OPSS_AUDIT_VIEWER)
If you used an XML-based OPSS_AUDIT schema in 11g, then you will need to create a new 12c OPSS_AUDIT_VIEWER schema or the domain reconfiguration will fail.
To create the new schemas, you will use the Oracle Repository Creation Utility (RCU).
- Create the Service Table schema (and any other required schemas) by navigating the RCU screens. Select Create Repository and then select the appropriate load option.
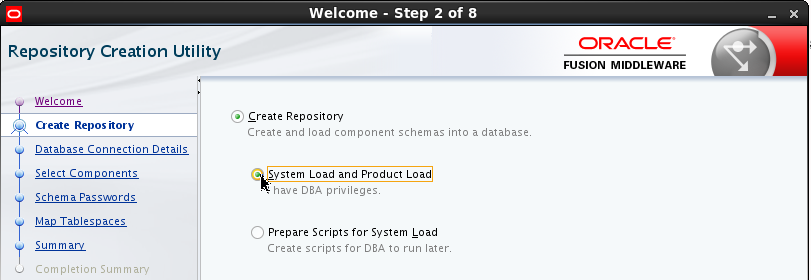 NOTE: If you do not have DBA privleges, select Prepare Scripts for System Load.
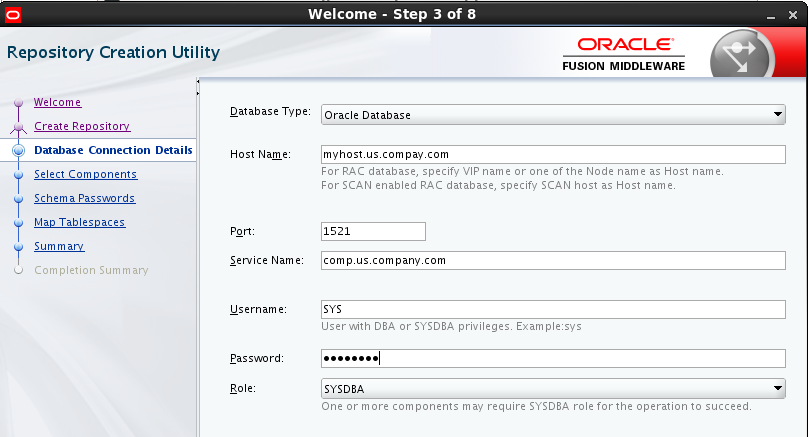
 - Provide the connection details for the database that hosts the 11g schemas.
- Choose Select Existing Prefix to select the prefix that was used to create the 11g schemas. Use the drop-down menu to select the 11g prefix.
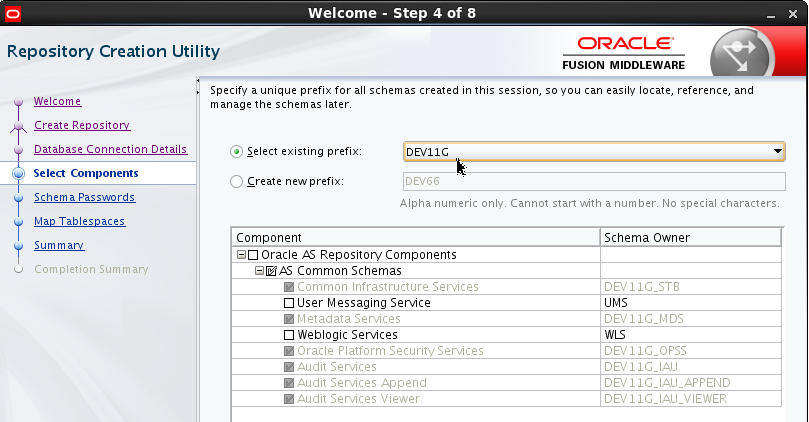 By default, the Common Infrastructure Services schema, DEV11G_STB will be greyed out, but it will be created and saved with the other DEV11G schemas already in the repository.
2.1.11.2 Determining Which Schemas Can be Upgraded for WebCenter
This table describes the WebCenter schemas that can be upgraded to 12c.Your environment may or may not use all of these schemas.
Table 2-2 WebCenter Schemas that can be upgraded
| Component Name | Schema(s) | Schema Version Before Upgrade | Schema Version After Upgrade | Dependencies |
|---|---|---|---|---|
|
Oracle Enterprise Capture |
|
11.1.1.8.0 11.1.1.9.0 |
12.2.1 |
Metadata Services (_MDS_ Capture is an ADF application and therefore requires the MDS schema be upgraded before the WebCenter servers are started. Oracle Platform Security Services (_OPSS) Capture does not use the OPSS schema directly, but requires that the OPSS schema be upgraded as part of the upgrade process. |
|
Oracle Portal |
|
11.1.1.6.0 |
12.2.1 |
None. |
|
WebCenter Portal (previously WebCenter Spaces) |
|
11.1.1.6.0 11.1.1.7.0 |
12.2.1 |
The |
|
Discussions (WebCenter Suite) |
|
11.1.1.7.0 |
12.2.1 |
None. |
|
Discussions Crawler |
|
11.1.1.8.0 |
12.2.1 |
The Note: You need to specify the password for the |
|
Activity Graph and Analytics |
|
11.1.1.7.0 |
12.2.1 |
None. |
|
Portlets |
|
11.1.1.2.0 |
12.2.1 |
None. |
|
Oracle Content Server 11g - Complete |
|
11.1.1.6.0 11.1.1.7.0 11.1.1.8.0 11.1.1.9.0 |
12.2.1 |
None. |
2.1.12 Creating the 12c OPSS Schema for an OID-based Security Store
The only supported LDAP-based OPSS security store is Oracle Internet Directory (OID). An LDAP-based policy store is typically used in production environments. If you are using an OID-based security store in 11g, you must create the new 12c schemas using the Repository Creation Utility (RCU).
You do not need to reassociate an OID-based security store before upgrade. While the Upgrade Assistant is running, select the OPSS schema. The Upgrade Assistant upgrades the OID-based security store automatically.
Note:
The 12c OPSS database schema is required so that you can reference the 12c schema during the reconfiguration of the domain. Your domain continues to use the OID-based security store after the upgrade is complete.
2.1.13 Reassociating File-based Policy Stores to Database-based Policy Stores
Oracle Fusion Middleware 12c uses database-based policy stores. A database-based policy store is recommended for a production environment. If you are using a file-based or OID-based policy store, you must reassociate the store to a database-based store prior to upgrade.
To reassociate file-based policy stores to database-based policy store, you must create an OPSS schema in the database and also create a data source in the WebLogic server.
If you are already using database-based policy store, then you do not have to perform these tasks.
- Creating 11g OPSS and IAU Schemas
To use a database repository for the Oracle Platform Security Services (OPSS) security store, you must create the required schema and seed some initial data using the Oracle Fusion Middleware Repository Creation Utility (RCU). This setup is also required before reassociating the OPSS security store to a DB-based security store. - Reassociating the 11g Policy Store with the Database-Based Policy Store and OPSS Schema
The OPSS security store is the repository of system and application-specific policies, credentials, keys, and audit services. OPSS delegates the identity store service to the identity providers that are configured in the WebLogic server. Out-of-the-box, the OPSS security store is file-based. You must reassociate it to a database-based security store. - Validating that the Policy Store Reassociation is Successful
Reassociation modifies the domain configuration file:DOMAIN_HOME/config/fmwconfig/jps-config.xml. It deletes any configuration for the old store provider, inserts a configuration for the new store provider, and moves the policy and credential information from the source to the destination store.
2.1.13.1 Creating 11g OPSS and IAU Schemas
To use a database repository for the Oracle Platform Security Services (OPSS) security store, you must create the required schema and seed some initial data using the Oracle Fusion Middleware Repository Creation Utility (RCU). This setup is also required before reassociating the OPSS security store to a DB-based security store.
Create new 11g Oracle Platform Security Services (OPSS) and Audit Schemas (IAU) schemas in a supported Database using the 11g Repository Creation Utility.
For more information about creating 11g schemas, see Obtaining and Running Repository Creation Utility in the 11g version of the Oracle Fusion Middleware Repository Creation Utility User's Guide.
2.1.13.2 Reassociating the 11g Policy Store with the Database-Based Policy Store and OPSS Schema
The OPSS security store is the repository of system and application-specific policies, credentials, keys, and audit services. OPSS delegates the identity store service to the identity providers that are configured in the WebLogic server. Out-of-the-box, the OPSS security store is file-based. You must reassociate it to a database-based security store.
For complete information about reassociating the 11g OPSS schema with database-based repository, see Reassociating the OPSS Security Store.
2.1.13.3 Validating that the Policy Store Reassociation is Successful
Reassociation modifies the domain configuration file: DOMAIN_HOME/config/fmwconfig/jps-config.xml. It deletes any configuration for the old store provider, inserts a configuration for the new store provider, and moves the policy and credential information from the source to the destination store.
2.1.13.3.1 Validating the Policy Store Reassociation using the Enterprise Manager Fusion Middleware Control
To verify that the policy store reassociation is successful:
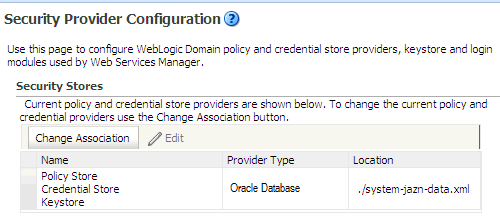
- Verify that the Provider Type is set to Oracle Database. If the Provider Type displays File, the reassociation is unsuccessful.
2.1.13.3.2 Validating the Policy Store Reassociation by Viewing the jps-config.xml File
<jpsContext name="default"
<serviceInstanceRef ref="credstore.db"/>
<serviceInstanceRef ref="keystore.db"/>
<serviceInstanceRef ref="policystore.db"/>
<serviceInstanceRef ref="audit"/>
<serviceInstanceRef ref="idstore.ldap"/>
<serviceInstanceRef ref="trust"/>
<serviceInstanceRef ref="pdp.service"/>
</jpsContext>

<serviceInstance provider="policystore.provider" name="policystore.db"
 <property value="DB_ORACLE" name="policystore.type"/>
 <propertySetRef ref="props.db.1"/>
</serviceInstance>

<propertySet name="props.db.1">
  <property value="cn=soa_domain" name="oracle.security.jps.farm.name"/>
  <property value="cn=jpsroot" name="oracle.security.jps.ldap.root.name"/>
  <property value="jdbc/opss" name="datasource.jndi.name"/>
</propertySet>
2.1.14 Upgrading Security Stores to the Latest Version
Upgrading to the latest version of the OPSS security store enables you to use enhanced security features. The OPSS security store is a part of Oracle Fusion Middleware product installation so you can use the Upgrade Assistant o upgrade the OPSS schema.
Before upgrading the OPSS security store, it is important to create a back up so that it can be recovered in case the upgrade fails. For details about backing up the security store, see Backing Up and Recovering the OPSS Security Store.
SELECT VERSION, STATUS, UPGRADED
FROM SCHEMA_VERSION_REGISTRY
WHERE OWNER=’schema_name’;
where, schema_name is the name of the OPSS schema. For example, DEV_OPSS.
2.1.15 Running a Pre-Upgrade Readiness Check
The Upgrade Assistant can be run in the -readiness mode to perform a read-only, pre-upgrade check on your domain. If issues are detected, you can correct them before starting the actual upgrade.
Note:
You can run the readiness check while the system is online. Depending on the comprehensiveness of the checks, the readiness checks can take more time to complete.-readiness mode:
-
On a UNIX system, change directory to
ORACLE_HOME/oracle_common/upgrade/bin. on Unix operating systems orORACLE_HOME\oracle_common\upgrade\binon Windows operating systems. -
Enter the following command to start the Upgrade Assistant.
On UNIX operating systems:
./ua -readinessOn Windows operating systems:
ua.bat -readinessProvide the required information in each of the Upgrade Assistant screens. The screens you see will vary depending on the upgrade options you select.
Table 2-3 Upgrade Assistant Screens: Readiness Check
Screen When Screen Appears Description Welcome Always.
This screen provides an overview of the readiness check.
Readiness Check Type:
-
Individually Selected Schemas
-
Domain Based
Always.
Readiness checks are only performed on schemas or component configurations that are at a supported upgrade starting point. There are two options to choose from. These options are described below:
-
Use the Individually Selected Schemas option to be able to select the schemas you want to review prior to upgrade.
-
Use the Domain Based option to let the Upgrade Assistant perform a readiness check per domain.
Available Components When Individually Selected Schemas option is selected.
This screen lists the available components for which the schemas will be selected. If you select something here, readiness check will be performed on that component's schema.
All Schemas Component List Any time a schema readiness check is done.
This screen is shown any time a schema readiness check is done. This could be when you select Individually Selected Schemas or Domain Based with the Include checks for all schemas option. Schema Credentials Always.
Use this screen to enter information required to connect to the selected schema and the database that hosts the schema. If the schema that is to be upgraded was created by RCU in a prior Fusion Middleware release then you will see a drop-down menu listing the possible schema names.
Readiness Summary Always.
This screen provides a high-level overview of the readiness checks to be performed based on your selections.
Click Save Response File if you plan to run the Upgrade Assistant again in —response (or silent) mode.
Readiness Check Always.
This screen displays the current status of the readiness check. Depending on what you have selected to check, the process can take several minutes.
For a detailed report, click View Readiness Report. This button appears only after all the readiness checks are complete.
Caution:
To prevent performance degradation, consider running the readiness check during off-peak hours.Readiness Success If the readiness check completes successfully.
You can now review the complete report.
If the readiness check encounters an issue or error, review the log file to identify the issues, correct the issues, and then restart the readiness check.
-
2.1.16 Locating the Component-Specific Upgrade Documentation
The component specific upgrade documentation provides specific upgrade procedures and information for every individual component. If you are upgrading more than one product suite, consult the upgrade guides for all of the components you are upgrading.
The following table helps you determine which upgrade-specific tasks you will need to complete for your 12c upgrade:
Table 2-4 Component-Specific Upgrade Documentation
| Product Area | If you are upgrading... | Use this upgrade document... |
|---|---|---|
|
Oracle WebLogic Server - Standalone |
An Oracle WebLogic Server that is not being managed by or registered to an existing Fusion Middleware 11g domain. |
|
|
Custom Oracle Application Developer Framework Applications with Oracle WebLogic Server (referred to as Infrastructure in 12c) |
A managed 11g WebLogic Server domain that has been deployed with a set of custom Oracle Application Developer Framework applications. |
|
|
Oracle HTTP Server - Managed or Standalone |
An Oracle HTTP Server that is configured to work with a WebLogic domain for management functions is a managed server. An Oracle HTTP Server that is not managed by or registered to an Oracle WebLogic domain is a standalone server. |
|
|
Oracle SOA Suite and BPM |
SOA Suite components including: Business Process Management (BPM), Oracle Service Bus (OSB), Enterprise Security Services (ESS), Managed File Transfer (MFT), Business Activity Monitoring (BAM), and workflow instance data. |
|
|
User Messaging Service |
User Messaging Service. |
|
|
Oracle Data Integrator |
Data Integrator. |
|
| Oracle WebCenter | WebCenter suite components including Content, Portal and Sites. | Upgrading Oracle WebCenter |
| Oracle Business Intelligence | Oracle Business Intelligence including BI Enterprise Edition, BI Publisher, and Essbase. | Upgrading Oracle Business Intelligence |
| Oracle Forms | Oracle Forms. | Upgrading Oracle Forms |
2.2 Performing the Oracle WebCenter Pre-Upgrade Tasks
This section includes pre-upgrade tasks that apply to Oracle WebCenter products being upgraded to 12c (12.2.1). Perform only those tasks that apply to your environment.
The pre-upgrade tasks for Oracle WebCenter include the following:
| Pre-Upgrade Task | More Information |
|---|---|
|
Disable all deprecated or obsolete components before upgrade. |
|
|
Install Oracle Fusion Middleware 12c distributions into a new Oracle Home:
|
Installing the Required Oracle Fusion Middleware Distributions for WebCenter |
|
Create the required WebCenter schemas for 12c |
|
|
Complete the pre-upgrade tasks for Oracle WebCenter Content (if you will be upgrading Content or WebCenter Content Web UI.) |
|
|
Complete the pre-upgrade tasks for Oracle WebCenter Enterprise Capture (if you will be upgrading Enterprise Capture). |
Performing Pre-Upgrade Tasks for Oracle WebCenter Enterprise Capture |
|
Complete the pre-upgrade tasks for Oracle WebCenter Portal (if you will be upgrading WebCenter Portal) |