21 Determining Components at Runtime
dynamicComponent with forms and tables, and how to create the AttributesModel to support it. If your application uses the full Fusion technology stack, then your model is created for you, and you can use data controls to create the dynamic component. For more information, see the "Creating a Basic Databound Page" and "Creating ADF Databound Tables" chapters of Developing Fusion Web Applications with Oracle Application Development Framework.This chapter incudes the following sections:
21.1 About Determining Components at Runtime
There may be cases when you don't know the exact components needed at runtime. For example, your business objects may contain attributes that are only valid for certain instances, and you only want to display those attributes when necessary. Using standard components, you might need to incorporate expensive logic to determine whether or not to display certain fields.
Another example of needing a dynamic interface might be when multiple pages share the same data source. If the attributes on the object are likely to change, it would require a change to all the pages bound to it.
ADF Faces provides a dynamic component (af:dynamicComponent) that determines what components to display, and their values, at runtime. This component will only display the needed attributes for each rendered instance. Additionally, when you make changes to the associated business service, those changes will be reflected by the dynamic component, without any change needed to the UI code.
You can use the dynamic component in either a form or a table. At runtime, the needed components will be rendered within the form or table, in place of the dynamic component. The component that is rendered is based on the attribute's data type. For example, if the attribute is a String, then an inputText component is used. If it is a Date, then the inputDate component is used. Following are the components supported by the dynamic component:
-
inputText -
inputDate -
inputListOfValues -
selectOneChoice -
selectManyChoice -
selectOneListbox -
selectManyListbox -
selectOneRadio -
selectBooleanRadio -
selectBooleanCheckbox -
selectManyCheckbox
For a form, the dynamic component is wrapped in an iterator component. Like the collection-based components, the iterator is bound to the complete collection, in this case, a collection of attributes in the AttributesModel object. The iterator stamps through each instance on this model, copying the data for the current instance into its var attribute. The dynamic component then accesses that var value for each instance using its attributeModel attribute, and uses that information to determine the type of component to use, how to configure it, and its value.
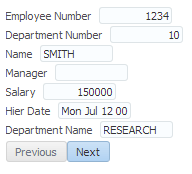
For example, say you want to create a form that displays employee data, as shown in Figure 21-1.
Figure 21-1 Form Created with a Dynamic Component

You can create an AttributesModel that contains information about each of the attributes to display, as well as a way to access the values for each instance, and then create a form using just the dynamic component, as shown in the following example.
<af:panelFormLayout id="pf1">
  <af:iterator value="#{TestDynCompBean.attributesModel.attributes}"
               var="attr" id="dyit1">
    <af:dynamicComponent value="#{TestDynCompBean.value[attr.name]}" id="dyipt3"
                         attributeModel="#{attr}"/>
  </af:iterator>
</af:panelFormLayout>
For static table, each column and the component inside that column, is statically defined in the page at design time. For a dynamic table, both the number of columns and component inside that column are dynamically defined at runtime, using the following components:
-
af:table: Defines a table, including how to get the value, using the var attribute (for more information, see Using Tables, Trees, and Other Collection-Based Components). -
af:iterator: Defines the collection of attributes. A column, and a component in each column, will be built for each attribute. -
af:column: Defines a column that will be stamped once for each attribute. If there are 10 attributes in the iterator, then there will be 10 columns, all stamped from this same column definition. -
af:dynamicComponent: Defines the component for that column. The type, value, and so on, are obtained from that attribute.
The following example shows a dynamic component used in a table.
<af:table value="#{TestDynCompBean.values}" var="row"
          varStatus="vs" rowSelection="single"
          id="t1" width="100%">
  <af:iterator value="#{TestDynCompBean.attributesModel.attributes}" id="itr1"
               var="col">
    <af:column headerText="#{col.label}" id="c1">
      <af:dynamicComponent value="#{row[col.name]}"
                           attributeModel="#{col}" id="dc1"/>
    </af:column>
  </af:iterator>
</af:table>
You can also use the dynamic component to create groupings of attributes. For example, say you are using a dynamic component to create a form that displays attributes for an employee. You want the employee information (such as first name, last name, salary, etc.) to be in one group, and you want the department information (such as department name, department number, etc.) in another group. You might create a category named "Employee Info" and another category named "Department Info." In the AttributesModel, you assign some attributes on the Employee object to be in the categories. These categories are held in the hierarchicalAttributes property of the AttributesModel object.
To create the groups on the page, you use a switcher component with two facets. The first facet will handle all attributes that belong to a category and the second will handle the "flat" group (that is, attributes that do not belong to a category).
When using groups, instead of being bound to attributes property in the AttributesModel, the main iterator is bound to hierarchicalAttributes property, which defines the root level attributes. As the iterator iterates over the collection, those category values are held in the variable named attr. In the first group, the iterator is bound to the variable attr, and so iterates through those, holding the value of the descriptors (the list of child attributes belonging in that category) in the variable nestedAttr. The child dynamic component then accesses this variable to determine the type of component and value to display for each record, as shown in the following example
<af:panelFormLayout id="pf1">
  <af:iterator value="#{TestDynCompBean.attributesModel.hierarchicalAttributes}"
               var="attr" id="dyit1">
    <af:switcher id="sw" facetName="#{attr.descriptorType}"
                 defaultFacet="ATTRIBUTE">
      <f:facet name="GROUP">
        <af:group id="gg" title="#{attr.label}">
          <af:outputText value="#{attr.label}" id="ot2"/>
          <af:iterator id="it2" value="#{attr.descriptors}" var="nestedAttr">
            <af:dynamicComponent
                 value="#{TestDynCompBean.value[nestedAttr.name]}" id="ndync1"
                 attributeModel="#{nestedAttr}" />
          </af:iterator>
        </af:group>
      </f:facet>
      <f:facet name="ATTRIBUTE">
        <af:dynamicComponent value="#{TestDynCompBean.value[attr.name]}"
                             id="iinerit1" attributeModel="#{attr}"/>
      </f:facet>
    </af:switcher>
  </af:iterator>
</af:panelFormLayout>
The main iterator iterates through the root level attributes in the attributeModel. For any root attributes that do not belong to a group (i.e. an Attribute-typed root attribute), a dynamic component is created for it in the ATTRIBUTE facet. For any root attributes that do have attributes under it (i.e. a Group-type root attribute), the attributes are added to the GROUP facet. In that facet, another iterator iterates through each regular attribute in that group, and creates a dynamic component based on each regular attribute.
21.2 Creating the Model for a Dynamic Component
The AttributesModel class is a collection of attributes, each attribute described by a BaseAttributeDescriptor object. This object provides the metadata used by the dynamic component to determine how to display the data, including the component type, the name, label, and description. You will need to extend the BaseAttributeDescriptor class and the AttributesModel class to provide the needed information for your dynamic components.
If you want to use groups with your dynamic component, then you must also create a GroupAttributeDescriptor object.
21.2.1 How to Create the Model Without Groups
To create the model, you need to create the BaseAttributeDescriptor object, the AttributesModel object, and a managed bean for the page that the dynamic component and iterator can use to access the data and metadata for the attributes.
Before you begin:
It may be helpful to have an understanding of how dynamic components determine what they should display. For more information, see About Determining Components at Runtime.
To create the model:
21.2.2 How to Create the Model Using Groups
If you want to use groups with your dynamic component, then you must also create a GroupAttributeDescriptor object, which holds the metadata required for the group information, including the list of attributes that belong to it. You will also need to supply the logic needed by the iterator and dynamic component to display the groups.
Before you begin:
It may be helpful to have an understanding of how dynamic components determine what they should display. For more information, see About Determining Components at Runtime.
To create the model using groups:
21.3 Adding a Dynamic Component as a Form to a Page
When you use the dynamic component in a form, you need to include an iterator. The iterator is what access the AttributesModel to get the attributes and their definitions. The dynamic component then gets the information for each instance the iterator stamps out, and determines what component to use, and how to configure it.
If you want to group your attributes in the form, then you also need to use a switcher component with two facets. One facet will display the groups with their associated attributes, while the other facet will display any attributes not associated with a group.
21.3.1 How to Add a Dynamic Component as a Form without Groups to a Page
To use a dynamic component in a form, you use the panelFormLayout component, an iterator, and the dynamic component. If you want to provide a way to navigate between records in the form, then you also need to use buttons.
Before you begin:
It may be helpful to have an understanding of how dynamic components determine what they should display. For more information, see About Determining Components at Runtime.
To add a dynamic component as a form without groups to a page:
21.3.2 How to Add a Dynamic Component as a Form with Groups to a Page
When you want to group attributes on form using a dynamic component, you need to place the attributes that are part of a group in one part of the form, and the attributes that don't belong to a group, in another. You use the facets of a switcher component to separate the two.
The switcher component is a child of an iterator component. But instead of being bound to the attributes of the AttributesModel, this iterator is bound to the hierarchicalAttributes of the model, and stores those objects in its variable. Another iterator, in the facet of the switcher, is then bound to the descriptors included in the hierarchicalAttributes object. It is from this iterator that the dynamic component gets its information.
Before you begin:
It may be helpful to have an understanding of how dynamic components determine what they should display. For more information, see About Determining Components at Runtime.
To add a dynamic component as a form with groups to a page:
21.4 Adding a Dynamic Component as a Table to a Page
When you use the dynamic component in a table, you need the table's columns to be wrapped in an iterator. The iterator is what access the AttributesModel to get the attributes and their definitions. The column uses this information to determine its header text. The dynamic component then gets the information for each attribute instance the iterator stamps out, and determines what component to use, and how to configure it, and at the same time, uses the variable on the table to determine the data to display.
If you want to group your attributes in the table, then you also need to use a switcher component with two facets. One facet will display the groups with their associated attributes, while the other facet will display any attributes not associated with a group.
21.4.1 How to Add a Dynamic Component as a Table Without Groups to a Page
To use a dynamic component in a table, you bind the table component to the data. Instead of a column component, the direct child of the table is an iterator bound to the attributes property of the AttributesModel. The column is a child of the iterator. The dynamic component is a child to the column.
Before you begin:
It may be helpful to have an understanding of how dynamic components determine what they should display. For more information, see About Determining Components at Runtime.
To add a dynamic component as a table without groups to a page:
The following example shows the declarative code created for a dynamic table.
<af:table value="#{TestDynCompBean}" var="row" rowBandingInterval="0" id="t1">
  <af:iterator value="#{TestDynCompBean.attributesModel.attributes}"
               var="column" id="i1">
    <af:column headerText="#{column.label}" id="c1">
      <af:dynamicComponent attributeModel="#{column}" value="#{row[column.name]}"
                           id="dc1"/>
    </af:column>
  </af:iterator>
</af:table>
21.4.2 How to Add a Dynamic Component as a Table with Groups to a Page
When you group attributes in a table using a dynamic component, the groups display as parent columns. Figure 21-2 shows the Employee object with certain attributes included in the Employee Personal and Department Info groups.
Figure 21-2 Table with Dynamic Component that Uses Groups

You use a switcher component to separate the attributes that belong to groups from the ones that do not. But instead of being bound to the attributes of the AttributesModel, this main iterator is bound to the hierarchicalAttributes of the model, and stores those objects in its variable. Another iterator, in the facet of the switcher, is then bound to the descriptors included in the hierarchicalAttributes object. It is from this iterator that the dynamic component gets its information and the component can display the groups of attributes.
The hierarchicalAttributes of the AttributeModel defines the root-level attributes of the AttributeModel. If a root level attribute is a normal attribute, meaning the attribute type of ATTRIBUTE, then this attribute does not belong to any group, and the table will render one column for the attribute. If a root level attribute is a grouped attribute, meaning the attribute type is GROUP, then there will be a list of regular attributes that belong to this group. The iterator in the facet will iterate through this group, and each attribute inside that group will be stamped as a column. For example, Employee Personal is a GROUP-type attribute, and it contains 3 regular attributes: Employee Number, Name and Salary, as shown in Figure 21-2.
Before you begin:
It may be helpful to have an understanding of how dynamic components determine what they should display. For more information, see About Determining Components at Runtime.
To add a dynamic component as a table with groups to a page:
The following example shows the declarative code created for a dynamic table with groups.
<af:table value="#{TestDynCompBean}" var="row" rowBandingInterval="0" id="t2">
  <af:iterator value="#{TestDynCompBean.attributesModel.heirarchicalAttributes}"
               var="column" id="i2">
    <af:column headerText="#{column.label}" id="c2">
      <af:switcher defaultFacet="ATTRIBUTE"
                   facetName="#{column.descriptorType}" id="s1">
        <f:facet name="GROUP">
          <af:iterator value="#{column.descriptors}" var="nestedCol" id="i3">
            <af:column headerText="#{nestedCol.label}" id="c3">
              <af:dynamicComponent attributeModel="#{nestedCol}"
                                   value="#{row[nestedCol.name]}" id="dc2"/>
            </af:column>
          </af:iterator>
        </f:facet>
        <f:facet name="ATTRIBUTE">
          <af:dynamicComponent attributeModel="#{column}"
                               value="#{row[column.name]}" id="dc3"/>
        </f:facet>
      </af:switcher>
    </af:column>
  </af:iterator>
</af:table>
21.5 Using Validation and Conversion with Dynamic Components
You add conversion and validation to dynamic components by adding the needed converter or validator tag, and specifying the attribute to validate or convert. Instead of the enabled attribute, dynamic components use the disabled attribute.
Before you begin:
It may be helpful to have an understanding of how dynamic components determine what they should display. For more information, see About Determining Components at Runtime.
To use a validator or converter with a dynamic component:
21.6 Using Dynamic and Static Components Together
When you create a dynamic form, you essentially create a block of components that are rendered dynamically. It is possible place static components before and after that block of components, but you can not place static components within that block.
Even so, you can create complex forms with a number of different dynamic and static components. And you can have static components interspersed with dynamic components at a fairly granular level.
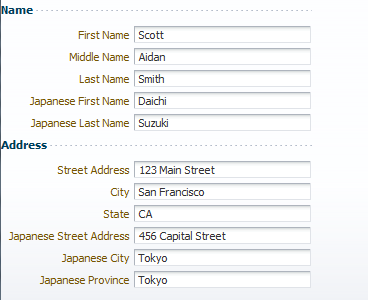
For example, say you have a form where you need to display name and address information, both in English and in Japanese. For the interest of this example, let's say the Japanese information will be displayed using dynamic components, while the English will be displayed with static components. Figure 21-3 shows how you might organize the fields by having the dynamic Japanese content display after the static content.
Figure 21-3 Dynamic Components Can Be Placed After Static Components

The following example shows how you might create the form using static inputText components and dynamic components that access the attributes in the Name and Address groups.
<panelFormLayout ... >
  <af:group title="Name">
    <af:inputText value="#{myBean.firstName} id="it1" label="First Name"/>
    <af:inputText value="#{myBean.middleName} id="it2" label="Middle Name"/>
    <af:inputText value="#{myBean.lastName} id="it3" label="Last Name"/>
    <af:iterator
             value="#{DynCompBean.attributesModel.hierarchicalAttributes("Name")}"
                 var="attr" id="iter1">
      <af:dynamicComponent id="dc1"
                           value="#{DynCompBean.value[attr.name]}"
                           attributeModel="#{attr}"/>
    </af:iterator>
  </af:group>
  <af:group title="Address">
    <af:inputText value="#{myBean.streetAddress}" id="it4"
                  label="Street Address"/>
    <af:inputText value="#{myBean.City.inputValue}" id="it5" label="City"/>
    <af:inputText value="#{myBean.State.inputValue}" id="it6" label="State"/>
    <af:iterator
          value="#{DynCompBean.attributesModel.hierarchicalAttributes("Address")}"
          var="attr" id="iter1">
      <af:dynamicComponent id="dc1"
                         value="#{DynCompBean[attr.name].inputValue}"
                         attributeModel="#{attr}"/>
    </af:iterator>
  </af:group>
</panelFormLayout>
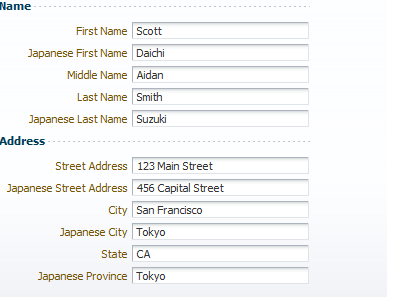
Now say that instead of having the Japanese name and address information separate from the English, you want them interspersed, as shown in Figure 21-4.
Figure 21-4 Dynamic Components Can Be Placed With Static Components

In this case, you would not use groups in the dynamic component, but instead would access only the needed attribute (and not all attributes), as shown in the following example.
<af:group title="Name">
  <af:inputText value="#{myBean.firstName} id="it1" label="First Name"/>
  <af:iterator value="#{DynCompBean.attributesModel.attributes("Japanese First Name")}"
               var="attr" id="iter1">
    <af:dynamicComponent id="dc1" value="#{DynCompBean.value[attr.name]}"
                         attributeModel="#{attr}"/>
  </af:iterator>
  <af:inputText value="#{myBean.middleName} id="it2" label="Middle Name"/>
  <af:inputText value="#{myBean.lastName} id="it3" label="Last Name"/>
  <af:iterator value="#{DynCompBean.attributesModel.attributes("Japanese Last Name")}"
               var="attr" id="iter1">
    <af:dynamicComponent id="dc1" value="#{DynCompBean.value[attr.name]}"
                         attributeModel="#{attr}"/>
  </af:iterator>
</af:group>
<af:group title="Address">
  <af:inputText value="#{myBean.streetAddress}" id="it4" label="Street Address"/>
  <af:iterator value="#{DynCompBean.attributesModel.attributes("Japanese Street Address")}"
               var="attr" id="iter1">
    <af:dynamicComponent id="dc1" value="#{DynCompBean.value[attr.name]}"
                         attributeModel="#{attr}"/>
  </af:iterator>
. . .
</af:group>