20 Developing Shared Libraries
This chapter includes the following topics:
20.1 Developing Shared Libraries for Use in WebCenter Portal
Out-of-the-box, WebCenter Portal provides tools targeted at knowledge workers and developers to quickly and easily create portals, intranets, extranets, and self-service applications that offer users a more effective and efficient way to access and interact with information, business applications, and process. WebCenter Portal can be customized using browser-based tools and also using JDeveloper.
To help you understand how you can develop, test, deploy, and use your own ADF task flows, data controls, and managed beans in WebCenter Portal, Figure 20-1 shows the development lifecycle of a single task flow (called mytaskflow). Development steps 1 through 5 are described in Packaging and Deploying ADF Components for Use in WebCenter Portal.
Figure 20-1 Development Lifecycle for an ADF Task Flow
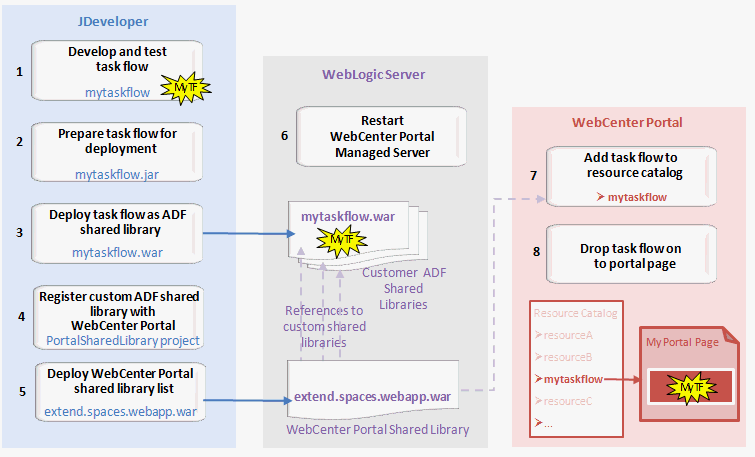
Description of "Figure 20-1 Development Lifecycle for an ADF Task Flow"
20.2 Packaging and Deploying ADF Components for Use in WebCenter Portal
This section describes how you can package and deploy your ADF task flows, data controls, and managed beans in your own custom shared libraries (WAR files) for use in WebCenter Portal.
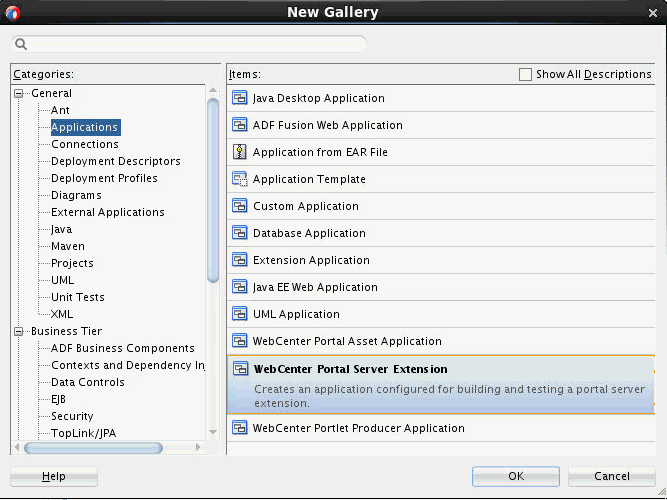
WebCenter Portal provides a JDeveloper template called WebCenter Portal Server Extension that enables you to specify one or more custom shared libraries that you want to use with WebCenter Portal.
You can also use the same WebCenter Portal Server Extension template as a starter template to build and deploy ADF library components, such as task flows, data controls, and managed beans for use in WebCenter Portal.
This section includes the following topics:
20.2.1 Understanding the WebCenter Portal Server Extension Template
The WebCenter Portal Server Extension template creates a workspace with two projects:
-
PortalSharedLibrary – A project that when deployed creates
extend.spaces.webapp.war, a shared library that:-
References one or more custom shared libraries for WebCenter Portal.
-
Wraps the ADF Library JAR created from the PortalExtension project (only if used).
Note:
Do not add any code to this project; this project only contains descriptor files that reference other shared libraries and/or includes ADF Library JARs.
-
-
PortalExtension – A starter project in which you create custom ADF components, such as task flows, data controls, and managed beans. You can deploy this project to an ADF Library, which is added to the
extend.spaces.webapp.warshared library.The components you create in a PortalExtension project typically require Java, ADF, and other related software development skills.
This section describes:
20.2.1.1 How the WebCenter Portal Server Extension Workspace Is Organized
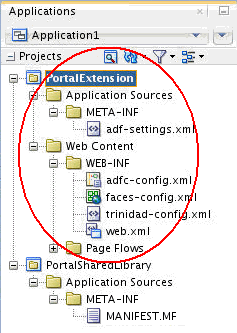
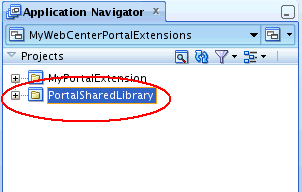
The WebCenter Portal Server Extension workspace contains two default projects, PortalExtension and PortalSharedLibrary, each containing specific libraries and default files (Figure 20-2).
Figure 20-2 WebCenter Portal Server Extension Workspace in Application Navigator
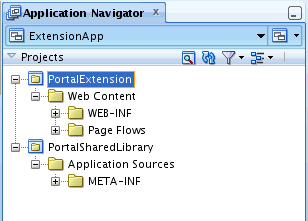
Description of "Figure 20-2 WebCenter Portal Server Extension Workspace in Application Navigator"
20.2.1.2 The PortalSharedLibrary Project
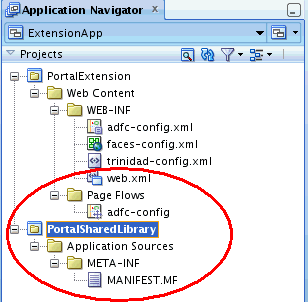
The PortalSharedLibrary project, shown in Figure 20-3, enables you to register one or more custom shared libraries that you want to use in WebCenter Portal and also provides a convenient mechanism for deploying task flows, data controls, and managed beans (developed in the PortalExtension project) to a managed server running WebCenter Portal.
The PortalSharedLibrary project includes a WAR deployment profile called extend.spaces.webapp. When you deploy to extend.spaces.webapp.war, all the custom shared libraries that you register (in weblogic.xml) and any ADF library that you create and using a PortalExtension project are automatically included as dependencies of extend.spaces.webapp.war.
See Using Additional Shared Libraries with WebCenter Portal and Deploying Extensions to the WebCenter Portal Shared Library (extend.spaces.webapp.war).
Note:
Do not add any code to the PortalSharedLibrary project; this project only contains descriptor files that reference other shared libraries or include ADF Library JARs.
For general information on shared libraries, see General Documentation for Shared Library Deployment.
20.2.1.2.1 Versioning extend.spaces.webapp.war
The PortalSharedLibrary project contains a MANIFEST.MF file. Each time you update and deploy extend.spaces.webapp.war, edit this MANIFEST.MF file to increment the shared library implementation version. With each iteration, you must increment the Implementation-Version number in the MANIFEST.MF file, as shown in the example Manifest File for extend.spaces.webapp. The default implementation version is 12.2.1.0.1.
Manifest File for extend.spaces.webapp
Manifest-Version: 1.0
Ant-Version: Apache Ant 1.7.1
Created-By: 23.7-b01 (Oracle Corporation)
Extension-List: bpmSpaces
bpmSpaces-Extension-Name: oracle.bpm.spaces
Package:
Specification-Version: 2.0
Implementation-Version: 12.2.1.0.1
Implementation-Label: 12.2.1.0.1
Implementation-Vendor: Oracle
Implementation-Patch-Number:
Implementation-Patch-List:
Implementation-Title: Oracle WebCenter Spaces App Extension View V2
Extension-Name: extend.spaces.webapp
For detailed steps on how to change the implementation version, see Deploying Extensions to the WebCenter Portal Shared Library (extend.spaces.webapp.war).
20.2.1.3 The PortalExtension Project
The PortalExtension project is a standard ADF project where you can create custom components like task flows, data controls, and managed beans.
A PortalExtension project is deployed to an ADF Library. This library is automatically added as a dependency to the extend.spaces.webapp.war shared library file generated from the PortalSharedLibrary project. See Developing ADF Library Components for WebCenter Portal Using the PortalExtension Project.
For more information on ADF Libraries, see General Documentation for ADF Library Development.
20.2.2 Understanding Shared Library Development for WebCenter Portal
WebCenter Portal includes the standard shared library extend.spaces.webapp.war. This WAR file can include a deployment descriptor (weblogic.xml) which references other shared libraries containing custom ADF library components.
If you have custom code or task flows deployed in several shared libraries from multiple sources that you want to use in WebCenter Portal you can list them in extend.spaces.webapp.war, as illustrated in Figure 20-5.
Figure 20-5 Reference Multiple Custom Shared Libraries in extend.spaces.webapp.war
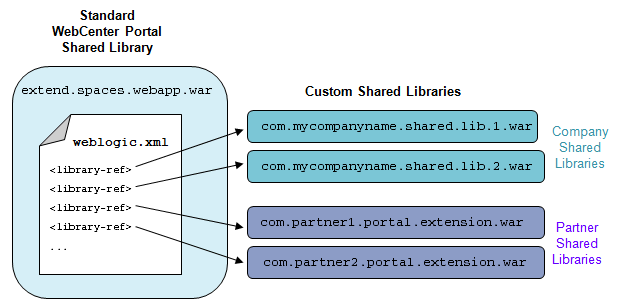
Description of "Figure 20-5 Reference Multiple Custom Shared Libraries in extend.spaces.webapp.war"
This development model provides an easy way to use additional shared libraries in WebCenter Portal from multiple contributors, including developers, customers, and partners.
Whenever you deploy a new shared library that includes extensions for WebCenter Portal you must register the name of your shared library with WebCenter Portal and redeploy extend.spaces.webapp.war. For details, see Using Additional Shared Libraries with WebCenter Portal.
This Guide does not attempt to teach you how to develop ADF task flows, data controls, and managed beans and package them into custom shared libraries since those techniques and procedures are not specific to WebCenter Portal. If you are new to shared library development, Oracle recommends that you familiarize yourself with the documentation listed at:
This Guide explains how to reference shared libraries that you want to use in WebCenter Portal using the WebCenter Portal Server Extension template. Table 20-1 provides an overview of the ADF library and shared library development processes, highlighting information that is specific to WebCenter Portal and pointing to other documentation where applicable.
Table 20-1 Developing and Deploying ADF Libraries and Shared Libraries for WebCenter Portal
| Subject | WebCenter Portal Documentation | General Documentation |
|---|---|---|
|
Creating ADF library components |
WebCenter Portal supports several component types deployed to ADF Library JARs: task flows, data controls, and managed beans Create task flows, data controls, or managed beans for WebCenter Portal the same way as any standard ADF Library component. Alternatively, use the starter project supplied with WebCenter Portal. See Developing ADF Library Components for WebCenter Portal Using the PortalExtension Project. |
About Reusable Components in Developing Fusion Web Applications with Oracle Application Development Framework describes various types of reusable ADF components, such as a task flows, that you can deploy to an ADF Library JAR. Note that Extension Libraries does not apply to WebCenter Portal. See also, Creating Reusable Components in Developing Fusion Web Applications with Oracle Application Development Framework. |
|
- Naming conventions |
Every ADF Library JAR file that you want to use with WebCenter Portal must have a unique file name. You cannot add two ADF Library JAR files with the same name even if their content is completely different. |
See also, Naming Conventions in Developing Fusion Web Applications with Oracle Application Development Framework. |
|
- Managing connections |
If your ADF Library JAR uses a connection, you must manually register that connection with WebCenter Portal using the same connection name and details (just including the connection within the ADF Library JAR does not expose that connection in WebCenter Portal). To create connections for WebCenter Portal, you must use Fusion Middleware Control or WLST commands. To add a WebCenter Portal specific connection, refer to Managing Tools and Services in Administering Oracle WebCenter Portal. To add a database connection, refer to Creating and Managing JDBC Data Sources in the Administering Oracle Fusion Middleware. To add a web service connection, configure the ADFConnections MBean using the System MBean Browser. Refer to System MBean Browser in Administering Oracle WebCenter Portal and Web Service Connection in the Administering Oracle ADF Applications. |
See also, Naming Considerations for Connections in Developing Fusion Web Applications with Oracle Application Development Framework. |
|
- Including descriptors |
Descriptors in custom shared libraries, such as |
|
|
- Versioning |
Each time you redeploy the WebCenter Portal shared library WAR file ( For details, see Versioning extend.spaces.webapp.war and Deploying Extensions to the WebCenter Portal Shared Library (extend.spaces.webapp.war). |
|
|
Packaging components into ADF Library JAR |
Package your task flow, data control, or managed bean into a standard ADF Library JAR. Alternatively, use the starter PortalExtension project. For details, see Developing ADF Library Components for WebCenter Portal Using the PortalExtension Project. |
Packaging a Reusable ADF Component into an ADF Library in Developing Fusion Web Applications with Oracle Application Development Framework describes how to package a reusable component, such as a task flow, to a ADF Library JAR file. Note that How to Place and Access JDeveloper JAR Files does not apply to WebCenter Portal. |
|
Adding ADF library components to a shared library |
To use ADF Library components in WebCenter Portal, you must:
Note: You can add ADF Library components directly to the WebCenter Portal shared library WAR ( |
Adding ADF Library Components into Projects in Developing Fusion Web Applications with Oracle Application Development Framework describes how to deploy ADF library components, such as a task flow, to a project. The information in this section does not apply to WebCenter Portal. |
|
Using ADF library components |
An ADF Library adapter in WebCenter Portal's resource catalog automatically picks up any task flows, data controls and managed beans that you deploy and reference through
|
What You May Need to Know About Using ADF Library Components in Developing Fusion Web Applications with Oracle Application Development Framework describes how various different ADF Library component types appear in JDeveloper. For WebCenter Portal, only the information pertaining to task flows, data controls, and managed beans applies. |
|
Creating a shared library WAR |
The WebCenter Portal Server Extension template provides a deployment profile for the WebCenter Portal shared library WAR For details, see Creating a WebCenter Portal Server Extension Workspace. |
Creating Shared Java EE Libraries in Developing Applications for Oracle WebLogic Server describes how to create a shared library WAR file. |
|
Deploying a shared library WAR |
The WebCenter Portal Server Extension template enables you to redeploy the WebCenter Portal shared library WAR For details, see Deploying Extensions to the WebCenter Portal Shared Library (extend.spaces.webapp.war). |
Deploying Shared Java EE Libraries and Dependent Applications in Developing Applications for Oracle WebLogic Server describes how to deploy any shared library WAR file. |
|
Reverting to a previous library version |
Use the WebLogic Server Administration Console to revert to a previous shared library WAR version or remove unwanted versions. For details, see Reverting to a Previous WebCenter Portal Shared Library Version. |
Removing an ADF Library JAR from a Project in Developing Fusion Web Applications with Oracle Application Development Framework describes how to remove ADF Library components in JDeveloper. The information in this section does not apply to WebCenter Portal. |
20.2.2.1 General Documentation for ADF Library Development
-
For information about creating ADF task flows, data controls, and managed beans, refer to Developing Fusion Web Applications with Oracle Application Development Framework.
-
See also, Reusing Application Components in Developing Fusion Web Applications with Oracle Application Development Framework.
20.2.2.2 General Documentation for Shared Library Deployment
-
For additional information on versioning of shared libraries, see Deploying Shared Java EE Libraries and Dependent Applications in Developing Applications for Oracle WebLogic Server.
-
See also, Deploying Shared Java EE Libraries and Dependent Applications in Developing Applications for Oracle WebLogic Server.
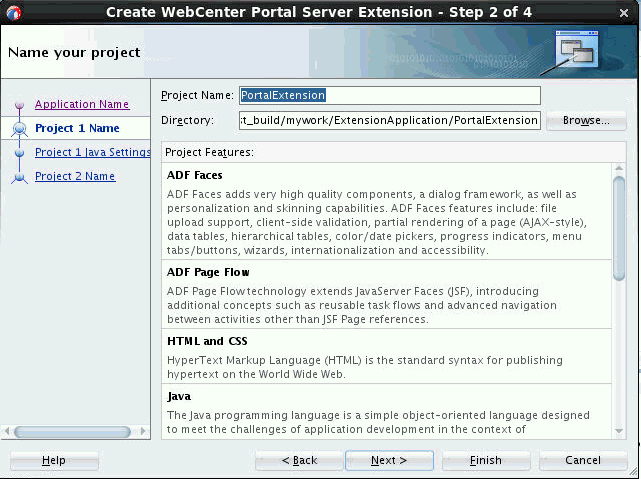
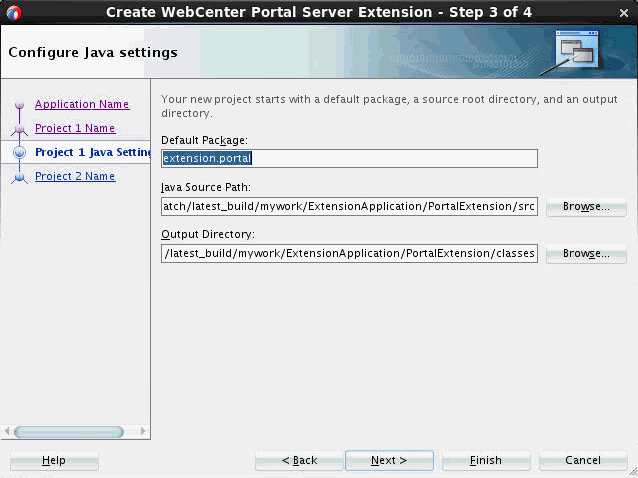
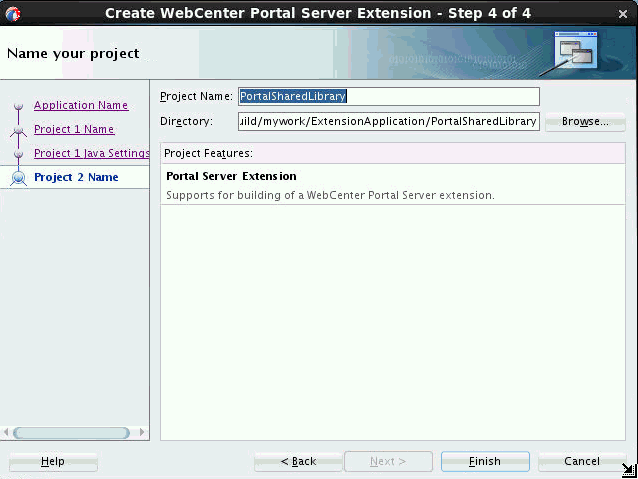
20.2.3 Creating a WebCenter Portal Server Extension Workspace
This section explains how to create a WebCenter Portal Server Extension workspace in JDeveloper in which you can:
-
Register one or more custom shared libraries to use with WebCenter Portal.
-
Create and deploy a custom ADF component for WebCenter Portal such as a task flow, data control, or managed bean.
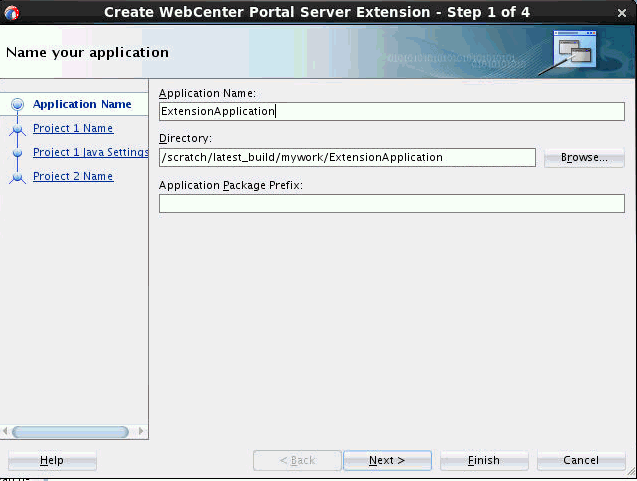
To create a WebCenter Portal Server Extension workspace:
20.2.4 Using Additional Shared Libraries with WebCenter Portal
If you have one or more shared libraries containing custom task flows, data controls or managed beans that you want to use in WebCenter Portal, you must register them in the weblogic.xml file associated with WebCenter Portal's shared library extend.spaces.webapp.war.
-
Select the PortalSharedLibrary project (Figure 20-11).
If you have not created a WebCenter Portal Extension workspace yet, refer to Creating a WebCenter Portal Server Extension Workspace.
-
If the deployment descriptor
weblogic.xmldoes not exist yet underPortalSharedLibrary\Web Content\WEB-INF,create the deployment descriptor as follows:-
Select New > Deployment Descriptors > WebLogic Deployment Descriptor
-
Select OK.
-
Select
weblogic.xmlfrom the list (Figure 20-12).Figure 20-12 Create WebLogic Deployment Descriptor weblogic.xml
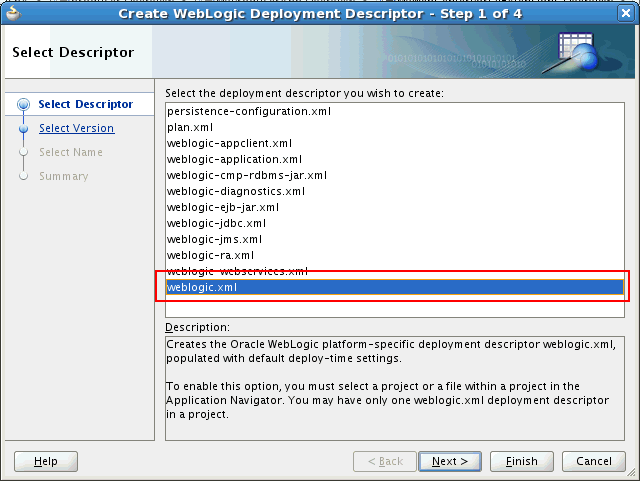
Description of "Figure 20-12 Create WebLogic Deployment Descriptor weblogic.xml" -
Select Finish.
-
-
Open
weblogic.xml(underPortalSharedLibrary\Web Content\WEB-INF).Initially, no additional shared libraries are listed in the file.
-
In the Overview page, select Libraries.
-
Specify the Library Name for each shared library that you want to use in WebCenter Portal.
You can register a single shared library or multiple shared libraries, as shown in Figure 20-13.
Click the Help icon for more information, if required.
Figure 20-13 weblogic.xml - Multiple Shared Library References

Description of "Figure 20-13 weblogic.xml - Multiple Shared Library References" -
Ensure each shared library that you reference is deployed on the WebCenter Portal managed server (named
WC_Portalby default). -
Redeploy a new version of the WebCenter Portal shared library WAR (
extend.spaces.webapp.war) that includes your shared library references.Remember to increment the version number in
MANIFEST.MF. For details, see Deploying Extensions to the WebCenter Portal Shared Library (extend.spaces.webapp.war).
20.2.5 Deploying Extensions to the WebCenter Portal Shared Library (extend.spaces.webapp.war)
This section explains how to deploy extensions to the WebCenter Portal shared library (extend.spaces.webapp.war) where your extensions are either:
-
Existing shared libraries containing task flows, data controls, or managed beans that you have registered in
weblogic.xml. -
An ADF Library JAR created from the PortalExtension project and included in the WebCenter Portal shared library.
See Developing ADF Library Components for WebCenter Portal Using the PortalExtension Project
This section includes the following topics:
20.2.5.1 Deploying Extensions Directly to the Portal Server
Before deploying extensions to WebCenter Portal from JDeveloper:
-
Verify that you have at least the WebLogic
Monitorrole.For information on roles, see Users, Groups, And Security Roles in Securing Resources Using Roles and Policies for Oracle WebLogic Server.
-
Ensure a connection exists to the WebCenter Portal server.
For information about creating a connection see Creating a WebCenter Portal Server Connection.
-
Review background information on shared libraries in Creating Shared Java EE Libraries and Optional Packages in Developing Applications for Oracle WebLogic Server.
To deploy extensions for WebCenter Portal from JDeveloper:
-
In JDeveloper, open the workspace containing extensions to be deployed.
See also Using Additional Shared Libraries with WebCenter Portal and Developing ADF Library Components for WebCenter Portal Using the PortalExtension Project.
-
In the Application Navigator, navigate to the
PortalSharedLibrary>Application Sources>META-INFfolder. -
Open the
MANIFEST.MFfile in a text editor. -
Increment the
Implementation-Versionnumber. The default version isImplementation-Version: 12.2.1.0.1.Note:
You must increment the shared library
Implementation-Versionnumber each time you update and redeploy the WebCenter Portal shared libraryextend.spaces.webapp.war. Otherwise, an error is reported from WebLogic Server in the Deployment - Log tab. For more information, see The PortalSharedLibrary Project. -
In the Application Navigator, right-click the PortalSharedLibrary project, select Deploy, and then select extend.spaces.webapp (Figure 20-14).
Note:
Note that
extend.spaces.webappis the name of the deployment profile for the shared library that you are deploying to the server. The shared library created by a subsequent deployment action is calledextend.spaces.webapp.war.Figure 20-14 Selecting the Shared Library extend.spaces.webapp
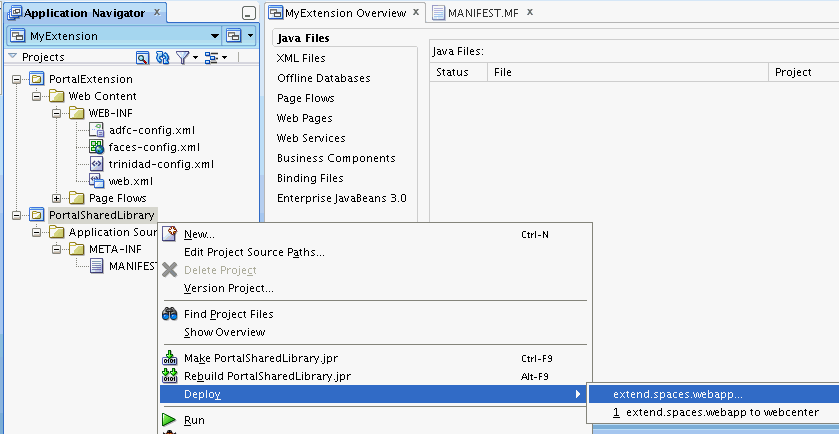
Description of "Figure 20-14 Selecting the Shared Library extend.spaces.webapp" -
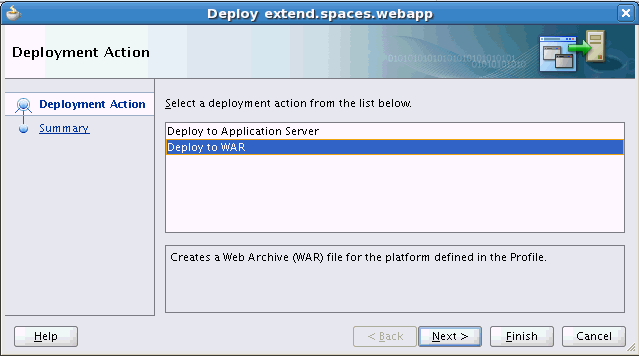
In the Deploy dialog, select Deploy to Application Server and click Next (Figure 20-15).
Figure 20-15 Portal Extension Deployment Actions
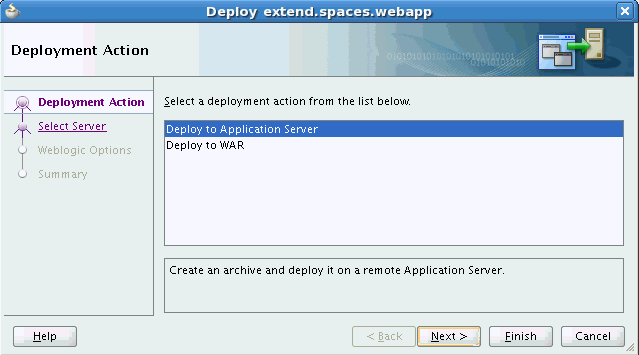
Description of "Figure 20-15 Portal Extension Deployment Actions" -
Select the connection that points to the WebLogic Server where you want to deploy the shared library, for example,
WC_Portal, and click Next. -
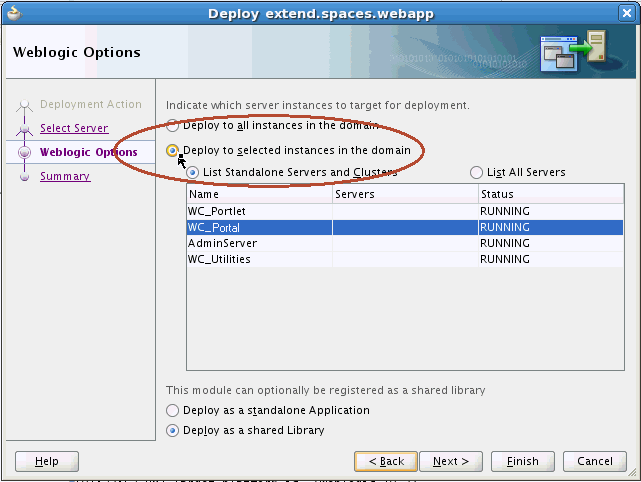
In the Deploy extend.spaces.webapp dialog, select Deploy to selected instances in the domain, as shown in Figure 20-16.
-
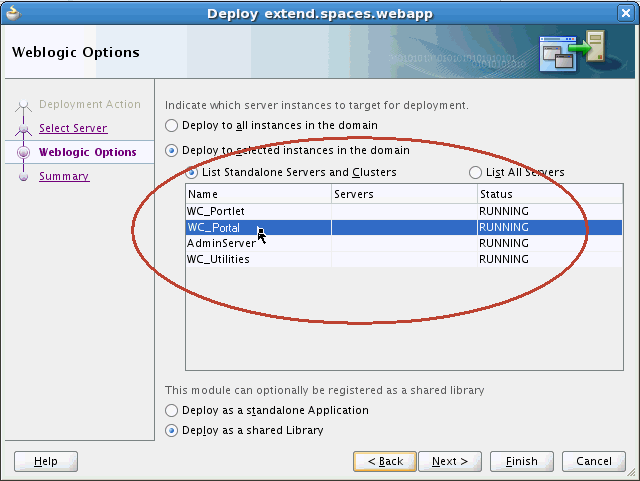
In the list of servers, select the managed server on which WebCenter Portal is deployed, as shown in Figure 20-17.
Note:
The name of the managed server depends on how the system administrator set up the server. By default, the name is
WC_Portal; however, this name might be different on your system.Figure 20-17 Selecting the Managed Server
Description of "Figure 20-17 Selecting the Managed Server" -
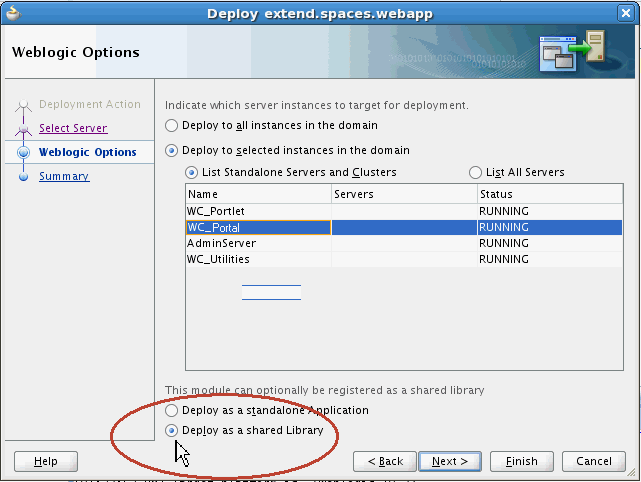
Select Deploy as a shared library, as shown in Figure 20-18
Note:
This step is critical: you must select Deploy as a shared library, otherwise, the deployment will not be successful.
Figure 20-18 Selecting Deploy As Shared Library
Description of "Figure 20-18 Selecting Deploy As Shared Library" -
Click Next.
-
On the Deployment Summary screen, verify the deployment options, and click Finish to deploy the portal extension to the server.
-
Open the Deployment -Log tab to examine for any deployment issues. If deployment is successful, you should see this log entry: "
Application Deployed Successfully," as shown in Figure 20-19. -
To verify the new deployment, log in to the WebLogic Server Administration Console, navigate to the Deployments Overview page, and check the implementation version displayed.
-
Log in to the WebLogic Server Administration Console.
-
Click Deployments, and locate extend.spaces.webapp.
-
Note the entries for the
extend.spaces.webappshared library and verify the one with the implementation version that you updated previously in theMANIFEST.MFfile. See also Versioning extend.spaces.webapp.war.
Note:
WebLogic Server only uses the latest shared library version when an application starts up. If you go through several "change-build-deploy-test" iterations, incremental versions are retained by default. You can use the Administration Console to remove unwanted shared library versions if you want, but it is recommended that you retain the first version (
extend.spaces.webapp(12.2.1,12.2.1)) as a backup so you can revert to the default behavior if necessary. -
-
(Optional) Create any connections that your custom ADF Library components may require:
-
To add a database connection, refer to Creating and Managing JDBC Data Sources in Administering Oracle Fusion Middleware.
-
To add a web service connection, configure the ADFConnections MBean using the System MBean Browser in Fusion Middleware Control. Refer to System MBean Browser in Administering Oracle WebCenter Portal and Web Service Connection in Administering Oracle ADF Applications.
-
To add a connection type specific to WebCenter Portal, for example to a portlet producer or content repository connection, refer to Managing Tools and Services in Administering Oracle WebCenter Portal.
-
-
Restart the managed server on which WebCenter Portal is running.
This step is required for the task flows, data controls, and managed beans in the shared library to show up in the WebCenter Portal Resource Registry. For more information, see Starting and Stopping Managed Servers for WebCenter Portal Application Deployments in Administering Oracle WebCenter Portal.
Note:
The name of the managed server depends on how the system administrator set up the server. By default, the name is
WC_Portal; however, this name might be different on your system. -
Log in to WebCenter Portal and verify that all newly deployed task flows, data controls, or managed beans are available in the Resource Registry.
Once successfully deployed components are added to the Resource Registry, you can add them to resource catalogs where they are made available for drag and drop onto portal pages. See also, About the Resource Registry in Building Portals with Oracle WebCenter Portal.
20.2.5.2 Deploying Extensions to an Archive
If you do not have a connection to the portal server or permissions to deploy the extend.spaces.webapp shared library on the portal server, you can deploy extensions to the extend.spaces.webapp shared library to an archive (.war file) and give the .war file to an administrator for deployment to a managed server running WebCenter Portal.
To deploy extensions to the extend.spaces.webapp shared library to an archive:
For More Information
See "Deploying Applications" in JDeveloper Online Help. See also Creating Shared Java EE Libraries and Optional Packages in Developing Applications for Oracle WebLogic Server.
20.2.5.3 Reverting to a Previous WebCenter Portal Shared Library Version
If there is a problem with the latest WebCenter Portal shared library or you want to revert to a previous version for some reason, you can undeploy (remove) the current version and revert to the previous version, using the WebLogic Server Administration Console.
You can remove unwanted shared library versions too. If you go through several "change-build-deploy-test" iterations, each incremental version is retained by default. As WebCenter Portal only uses the latest shared library version you can clean up or delete previous versions if you want.
Before undeploying the latest version, you must shut down the managed server on which WebCenter Portal is running. Once you have removed the latest version, you can restart the managed server.
Note: Oracle recommends that you do not delete the original extend.spaces.webapp shared library (version 12.2.1) as this enables you to revert to the out-the-box version if necessary.
20.2.6 Developing ADF Library Components for WebCenter Portal Using the PortalExtension Project
Developing an ADF Library for WebCenter Portal is exactly the same as any other ADF Library. If you are not familiar with ADF library development, refer to the documentation links in General Documentation for ADF Library Development.
Development teams typically build and deploy ADF libraries to a set of well defined shared libraries that they can reuse across multiple applications, such as WebCenter Portal.
To help you get started, Oracle provides the PortalExtension project in which you can build ADF libraries containing task flows, data controls, and managed beans and deploy them to WebCenter Portal's own shared library extend.spaces.webapp.war.
If you want to use the PortalExtension project, follow these steps:
