24 Administering A/B Testing

Oracle WebCenter Sites: A/B Testing feature equips the marketers to experiment with design and content variations on website pages. Before making permanent changes to the website, marketers can determine which variations produce the optimal results.

A/B test functionality for this Oracle WebCenter Sites product is provided through an integration with Google Analytics. To use the A/B test functionality for this Oracle product, you must first register with Google for a Google Analytics account that will allow you to measure the performance of an “A/B” test.  In addition, you acknowledge that as part of an “A/B” test, anonymous end user information (that is, information of end users who access your website for the test) will be delivered to and may be used by Google under Google’s terms that govern that information.

For information about how marketers create and run A/B tests, see Working with A/B Testing in Using Oracle WebCenter Sites.

For information about administering A/B Testing, see these sections:

24.1 Configuring Google Analytics with Oracle WebCenter Sites

To configure a connection between Google Analytics and WebCenter Sites, you must have a Google Analytics account and a Google Services account. This topic provides you information on how to configure these accounts.

24.1.1 Create a Google Analytics Account

  1. Create a new Google Analytics account if you do not have one. On the http://google.com/analytics page, click the Sign in (top right) and choose Google Analytics. Follow the on-screen instructions.
  2. Set up a property to specify where you’ll send data and set up reporting views. To set up a property in the account you have created:
    You need Edit permission to set up a property.
    1. Sign in to your Analytics account.
    2. On the Admin tab, in the ACCOUNT column, use the dropdown menu to select the account to which you want to add the property.
    3. If you have several accounts, use the search box to help you find the right one.
    4. In the PROPERTY column, select Create new property from the dropdown menu.
      If you don't have the Edit permission on the account, you won't see the Create new property option.
    5. Check that you've selected the correct account in the ACCOUNT column.
    6. Select Website.
    7. Enter the Website or App Name. If you plan on tracking more than one app in your account, use a specific and descriptive name that includes the edition or version number. This will help you keep your app properties organized.
    8. Enter the Web Site URL. You cannot create a property if your URL isn’t formatted correctly.

24.1.2 Create a Google Services Account
Note: Steps and screens shown in this section may not match the Google Analytics interface at the time when you create an account. If you see new fields and require help, contact product support.
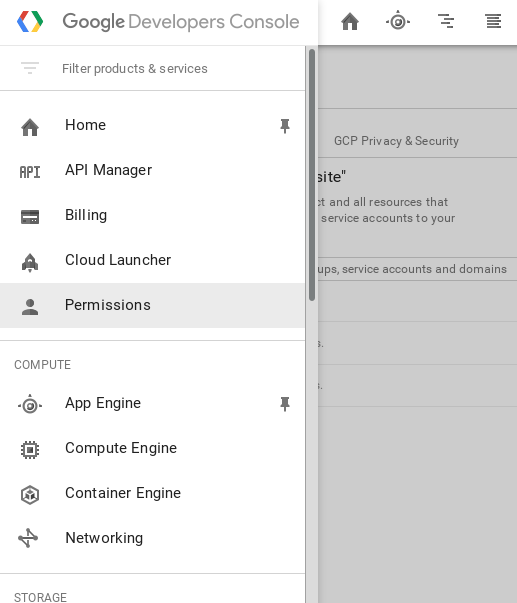
  1. Go to https://console.developers.google.com/ and click the Products and Services icon on the left-hand side, top corner.
  2. Click Permissions and then the Service Accounts tab.In the Google Developers Console, the Permissions option is selected on the left-hand side.
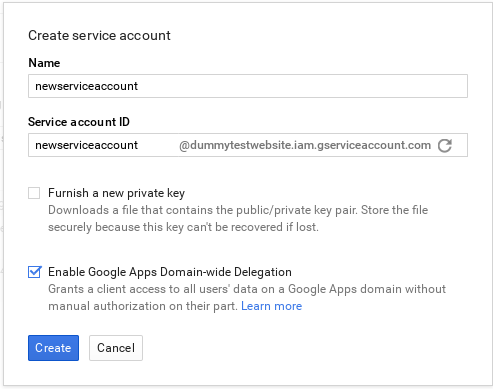
  3. Click the Create service account button on the page to open the dialog.
  4. Enter values for the fields: a unique name and select domain-wide delegation.Shows the Create service account dialog with a sample name and Id.
    You will now see an entry for what you created in the list. Shows the newly created service account.
  5. Click the button on the right-hand side for the row that shows the option to create key. It is the last field/button that looks like 3 dots.
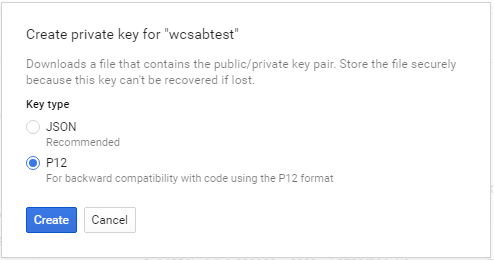
    The dialog lets you to create either a JSON or P12 key that you can save.
  6. Select the P12 option and click the Create button.Shows the two options under Key type. P12 is selected.
  7. Save the file to your machine. The email address will be displayed in the list as well. These are the two values you need to connect in addition to the GA account details.
  8. Go to API Manager on the left-hand side menu (the same place where the permissions are).
  9. In the Google APIs list, search for Analytics API and then click it.
  10. Enable the API.
    You will now see the API in the enabled API list.
  11. Log in to your Google Analytics account at: https://www.google.com/analytics/web/.
  12. Click Admin, then Account, and then User Management.
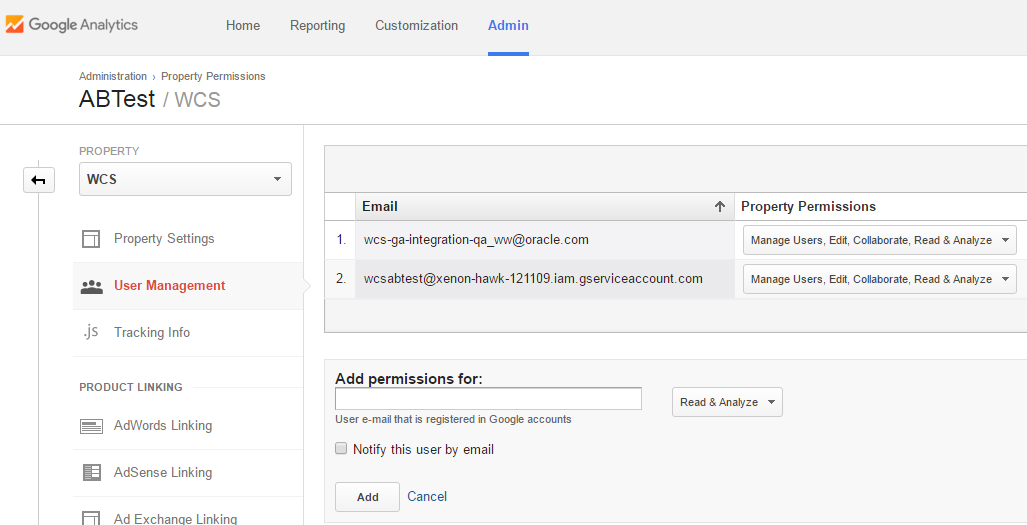
  13. Add permissions for the service email address and assign it the edit permission.
  14. Add permissions for the email address (in addition to the service account).
Shows the ABTest page on which you can add permissions for your service email address and the email address.

24.2 Enabling A/B Testing

Before the A/B Testing feature can be used, an administrator must do the following:
  1. If not already enabled, enable the A/B Testing asset WCS_ABTest. For more information, see Enabling Asset Types for a Site.

  2. Assign the MarketingAuthor role to any user that will be able to “promote the winner” of an A/B test, and assign the MarketingEditor role to any user that will be able to view A/B test reports and stop tests. See Configuring Users, Profiles, and Attributes.

Other actions must be taken by users and developers as prerequisites for A/B testing. For a complete list, see Before You Begin A/B Testing in Using Oracle WebCenter Sites.

24.3 Considering Dependencies in A/B Testing

A/B Testing is fully integrated with WebCenter Sites dependency tracking. When a contributor makes a variant page (that is, a 'B' page, or more, for testing), there could be dependencies placed on the assets within the pages. For instance, if the contributor checks in a new image that must pass through workflow, the page has a new dependency because of the added asset on the B variant. The change to the B variant would then require the new dependency (or dependencies) to be met. These dependencies must all be met before the WCS_ABTest asset (which describes all of the tested variants) can be published.

24.4 About Publishing A/B Tests

You publish an A/B test as you would publish any other asset. You can set an A/B test to run in a specified time period, so the test may not start running when published. If you specify a start date, then the published test will not start until that specified date. If you do not specify a start date, then it will start 30 seconds (by default) after it is published.

Note:

Do not edit the A/B test publishing goals at the production stage.

There is a system event that runs every 30 seconds to check whether to start or stop tests, as necessary. The event is called RefreshActiveABTests and you can see and configure this in the SystemEvents table.