3 Getting Started with ADF Faces and JDeveloper
This chapter includes the following sections:
3.1 About Developing Declaratively in JDeveloper
The ADF framework provides a visual and declarative approach to Java EE development. It supports rapid application development based on ready-to-use design patterns, metadata-driven and visual tools.
Using JDeveloper with ADF Faces and JSF provides a number of areas where page and managed bean code is generated for you declaratively, including creating EL expressions and automatic component binding. Additionally, there are a number of areas where XML metadata is generated for you declaratively, including metadata that controls navigation and configuration.
At a high level, the development process for an ADF Faces view project usually involves the following:
-
Creating a View Page using either Facelets or JavaServer Pages (JSPs).
-
Deploying the application. See Deploying ADF Applications in Administering Oracle ADF Applications. If your application uses ADF Faces with the ADF Model layer, ADF Controller, and ADF Business Components, see Deploying Fusion Web Applications in Developing Fusion Web Applications with Oracle Application Development Framework.
Ongoing tasks throughout the development cycle will likely include the following:
JDeveloper also includes debugging and testing capabilities. See Testing and Debugging ADF Components in Developing Fusion Web Applications with Oracle Application Development Framework.
3.2 Creating an Application Workspace
An application workspace is a directory that helps the ADF application developer to gather various source code files and resources and work with them as a cohesive unit. It is the one of the first steps in building a new application.
The first steps in building a new application are to assign it a name and to specify the directory where its source files will be saved. You can either create an application that just contains the view layer, or you can add an ADF Faces project to an existing application.
Note:
This document covers only how to create the ADF Faces project in an application, without regard to the business services used or the binding to those services. For information about how to use ADF Faces with the ADF Model layer, ADF Controller, and ADF Business Components, see Getting Started with Your Web Interface in Developing Fusion Web Applications with Oracle Application Development Framework.
3.2.1 How to Create an ADF Faces Application Workspace
You create an application workspace using the Create Application wizard.
To create an application:
-
In the menu, choose File > New > Application.
-
In the New Gallery, select Custom Application and click OK.
-
In the Create Custom Application dialog, set a name, directory location, and package prefix of your choice and click Next.
-
In the Name Your Project page, you can optionally change the name and location for your view project. On the Project Features tab, shuttle ADF Faces to Selected. The necessary libraries and metadata files for ADF Faces will be added to your project. Click Next.
-
In the Configure Java Settings page, optionally change the package name, Java source path, and output directory for any Java classes you might create. Click Finish.
Tip:
You can also add ADF Faces to an existing project (for example, a view project in a JEE web application). To do so:
-
Right-click the project and choose Project Properties.
-
In the Project Properties dialog, select Features, then click the Add (green plus) icon, and shuttle ADF Faces to the Selected pane.
-
3.2.2 What Happens When You Create an Application Workspace
When you create an application workspace using the Custom template, and then select ADF Faces for your project, JDeveloper creates a project that contains all the source and configuration files needed for an ADF Faces application. Additionally, JDeveloper adds the following libraries to your project:
-
JSF 2.2
-
JSTL 1.2
-
JSP Runtime
Once the projects are created for you, you can rename them. Figure 3-1 shows the workspace for a new ADF Faces application.
Figure 3-1 New Workspace for an ADF Faces Application
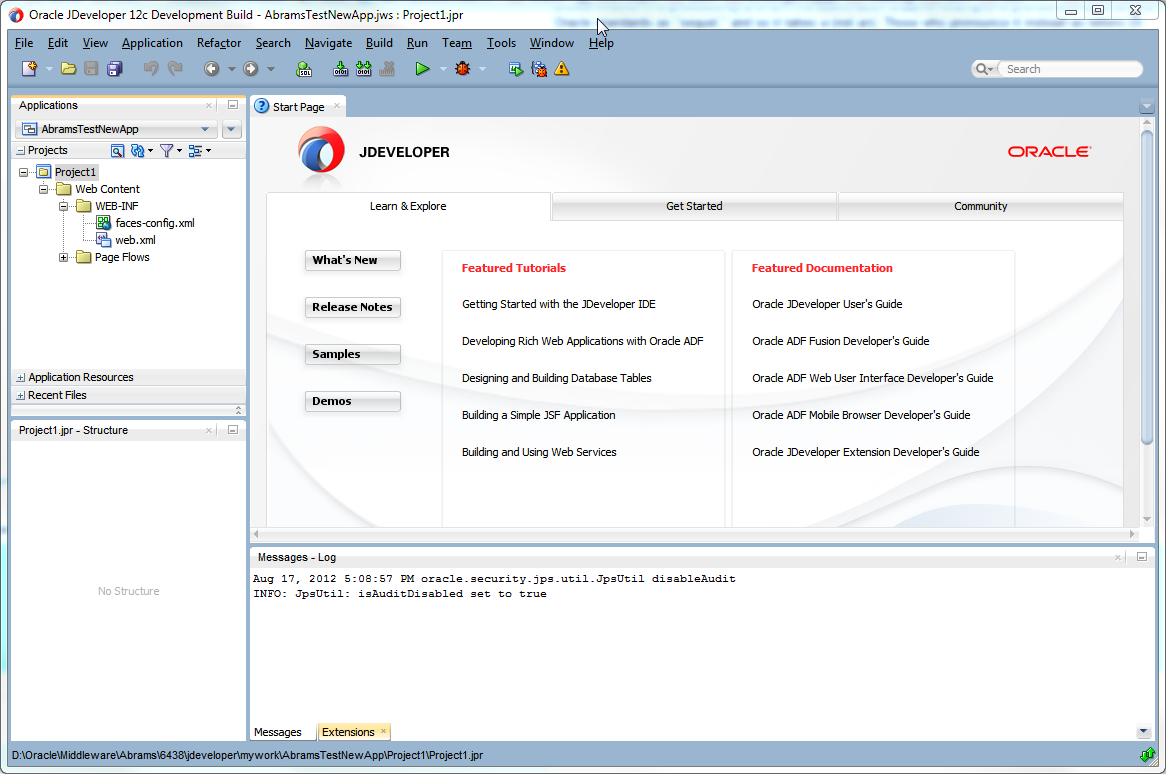
Description of "Figure 3-1 New Workspace for an ADF Faces Application"
JDeveloper also sets configuration parameters in the configuration files based on the options chosen when you created the application. In the web.xml file, these are configurations needed to run a JSF application (settings specific to ADF Faces are added when you create a JSF page with ADF Faces components). Following is the web.xml file generated by JDeveloper when you create a new ADF Faces application.
<?xml version = '1.0' encoding = 'windows-1252'?>
<web-app xmlns="http://java.sun.com/xml/ns/javaee"
         xmlns:xsi="http://www.w3.org/2001/XMLSchema-instance"
         xsi:schemaLocation="http://java.sun.com/xml/ns/javaee
         http://java.sun.com/xml/ns/javaee/web-app_3_0.xsd"
         version="3.0">
  <servlet>
    <servlet-name>Faces Servlet</servlet-name>
    <servlet-class>javax.faces.webapp.FacesServlet</servlet-class>
    <load-on-startup>1</load-on-startup>
  </servlet>
  <servlet-mapping>
    <servlet-name>Faces Servlet</servlet-name>
    <url-pattern>/faces/*</url-pattern>
  </servlet-mapping>
</web-app>
Configurations required for specific ADF Faces features are covered in the respective chapters of this guide. For example, any configuration needed in order to use the Change Persistence framework is covered in Allowing User Customization on JSF Pages. For comprehensive information about configuring an ADF Faces application, see ADF Faces Configuration.
3.3 Defining Page Flows
Defining the page flow of your ADF Faces application refers to how the UI elements are arranged in pages, designing the right sequence of pages, how pages interact with each other and how they can be modularized and communicate with each other as well. Navigation cases and rules are used to define the page flow.
Once you create your application workspace, often the next step is to design the flow of your UI. As with standard JSF applications, ADF Faces applications use navigation cases and rules to define the page flow. These definitions are stored in the faces-config.xml file. JDeveloper provides a diagrammer through which you can declaratively define your page flow using icons.
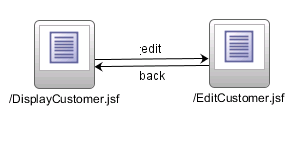
Figure 3-2 shows the navigation diagram created for a simple page flow that contains two pages: a DisplayCustomer page that shows data for a specific customer, and an EditCustomer page that allows a user to edit the customer information. There is one navigation rule that goes from the display page to the edit page and one navigation rule that returns to the display page from the edit page.
Figure 3-2 Navigation Diagram in JDeveloper
Note:
If you plan on using ADF Model data binding and ADF Controller, then you use ADF task flows to define your navigation rules. See “Getting Started with ADF Task Flows" in Developing Fusion Web Applications with Oracle Application Development Framework.
Best Practice:
ADF Controller extends the JSF default controller. While you can technically use the JSF controller and ADF Controller in your application, you should use only one or the other.
With the advent of JSF 2.0, you no longer need to create a navigation case for simple navigation between two pages. If no matching navigation case is found after checking all available rules, the navigation handler checks to see whether the action outcome corresponds to a view ID. If a view matching the action outcome is found, an implicit navigation to the matching view occurs. For information on how navigation works in a JSF application, see the Java EE 6 tutorial (http://download.oracle.com/javaee/index.html).
3.3.1 How to Define a Page Flow
You use the navigation diagrammer to declaratively create a page flow using Facelets or JSPX pages. When you use the diagrammer, JDeveloper creates the XML metadata needed for navigation to work in your application in the faces-config.xml file.
Before you begin:
It may be helpful to have an understanding of page flows. For information, see Defining Page Flows.
To create a page flow:
Tip:
You can also use the overview editor to create navigation rules and navigation cases by clicking the Overview tab. For help with the editor, click Help or press F1.
Additionally, you can manually add elements to the faces-config.xml file by directly editing the page in the source editor. To view the file in the source editor, click the Source tab.
Once the navigation for your application is defined, you can create the pages and add the components that will execute the navigation. For information about using navigation components on a page, see Working with Navigation Components.
3.3.2 What Happens When You Use the Diagrammer to Create a Page Flow
When you use the diagrammer to create a page flow, JDeveloper creates the associated XML entries in the faces-config.xml file. This code shows the XML generated for the navigation rules displayed in Figure 3-2.
<navigation-rule>
  <from-view-id>/DisplayCustomer</from-view-id>
  <navigation-case>
    <from-outcome>edit</from-outcome>
    <to-view-id>/EditCustomer</to-view-id>
  </navigation-case>
</navigation-rule>
<navigation-rule>
  <from-view-id>/EditCustomer</from-view-id>
    <navigation-case>
      <from-outcome>back</from-outcome>
      <to-view-id>/DisplayCustomer</to-view-id>
    </navigation-case>
</navigation-rule>
3.4 Creating a View Page
The JSF pages you create for your ADF Faces application using JavaServer Faces can be Facelets documents (.jsf) or JSP documents written in XML syntax (.jspx).You can define the look and feel for the new page, and you can specify whether or not components on the page are exposed in a managed bean, to allow programmatic manipulation of the UI components.
From the page flows you created during the planning stages, you can double-click the page icons to create the actual JSF page files. You can choose to create either a Facelets page or a JSP page. Facelet pages use the extension *.jsf. Facelets is a JSF-centric declarative XML view definition technology that provides an alternative to using the JSP engine.
If instead you create a JSP page for an ADF Faces application, you create an XML-based JSP document, which uses the extension *.jspx. Using an XML-based document has the following advantages:
-
It simplifies treating your page as a well-formed tree of UI component tags.
-
It discourages you from mixing Java code and component tags.
-
It allows you to easily parse the page to create documentation or audit reports.
Best Practice:
Use Facelets to take advantage of the following:
-
The Facelets layer was created specifically for JSF, which results in reduced overhead and improved performance during tag compilation and execution.
-
Facelets is considered the primary view definition technology in JSF 2.0.
-
Some future performance enhancements to the JSF standard will only be available with Facelets.
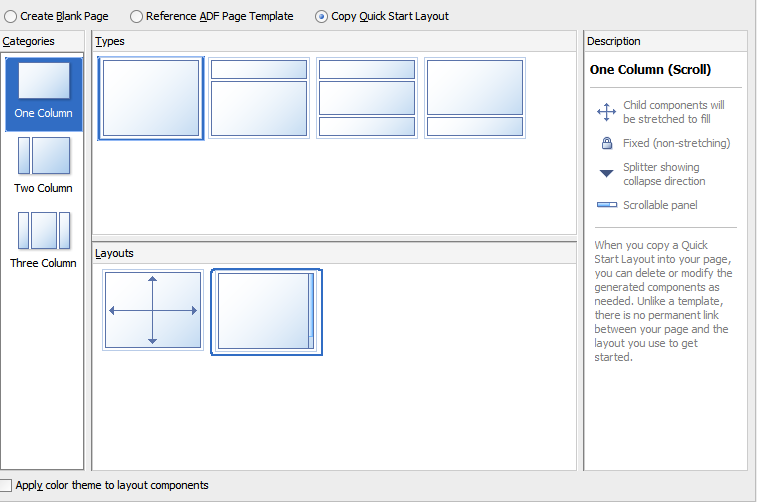
ADF Faces provides a number of components that you can use to define the overall layout of a page. JDeveloper contains predefined quick start layouts that use these components to provide you with a quick and easy way to correctly build the layout. You can choose from one, two, or three column layouts, and then determine how you want the columns to behave. For example, you may want one column's width to be locked, while another column stretches to fill available browser space. Figure 3-4 shows the quick start layouts available for a two-column layout with the second column split between two panes. For information about the layout components, see Organizing Content on Web Pages.
Best Practice:
Creating a layout that works correctly in all browsers can be time consuming. Use a predefined quick layout to avoid any potential issues.
Along with adding layout components, you can also choose to apply a theme to the chosen quick layout. These themes add color styling to some of the components used in the quick start layout. To see the color and where it is added, see Quick Start Layout Themes. For information about themes, see Customizing the Appearance Using Styles and Skins
When you know you want to use the same layout on many pages in your application, ADF Faces allows you to create and use predefined page templates. When creating templates, the template developer can not only determine the layout of any page that will use the template, but can also provide static content that must appear on all pages, as well as create placeholder attributes that can be replaced with valid values for each individual page.
For example, ADF Faces ships with the Oracle Three-Column-Layout template. This template provides areas for specific content, such as branding, a header, and copyright information, and also displays a static logo and busy icon, as shown in Figure 3-5.
Figure 3-5 Oracle Three Column Layout Template
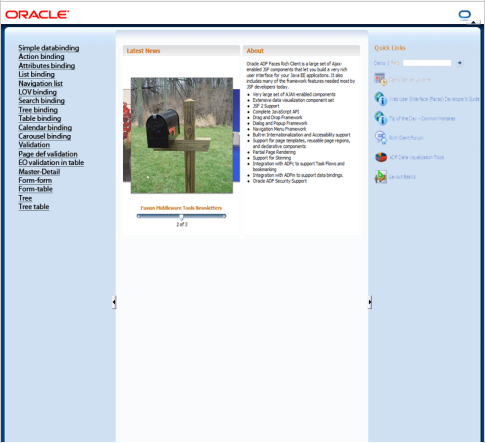
Description of "Figure 3-5 Oracle Three Column Layout Template"
Whenever a template is changed, for example if the layout changes, any page that uses the template will also be automatically updated. For information about creating and using templates, see Using Page Templates.
Best Practice:
Use templates to ensure consistency and so that in the future, you can easily update multiple pages in an application.
At the time you create a JSF page, you can also choose to create an associated backing bean for the page. Backing beans allow you to access the components on the page programmatically. For information about using backing beans with JSF pages, see What You May Need to Know About Automatic Component Binding.
Best Practice:
Create backing beans only for pages that contain components that must be accessed and manipulated programmatically. Use managed beans instead if you need only to provide additional functionality accessed through EL expressions on component attributes (such as listeners).
Once your page files are created, you can add UI components and work with the page source.
3.4.1 How to Create JSF Pages
You create JSF pages (either Facelets or JSP) using the Create JSF Page dialog.
Before you begin:
It may be helpful to have an understanding of the different options when creating a page. See Creating a View Page.
To create a JSF page:
Note:
While a Facelets page can use any extension you'd like, a Facelets page must use the .jsf extension to be customizable. See Allowing User Customization on JSF Pages.
3.4.2 What Happens When You Create a JSF Page
When you use the Create JSF Page dialog to create a JSF page, JDeveloper creates the physical file and adds the code necessary to import the component libraries and display a page. The code created depends on whether or not you chose to create a Facelets or JSP page.
The following shows the code for a Facelets page when it is first created by JDeveloper.
<?xml version='1.0' encoding='UTF-8'?>
<!DOCTYPE html>
<f:view xmlns:f="http://java.sun.com/jsf/core" xmlns:af="http://xmlns.oracle.com/adf/faces/rich">
    <af:document title="DisplayCustomer.jsf" id="d1">
        <af:form id="f1"></af:form>
    </af:document>
</f:view>
Below is the code for a .jspx page when it is first created by JDeveloper.
<?xml version='1.0' encoding='UTF-8'?>
<jsp:root xmlns:jsp="http://java.sun.com/JSP/Page" version="2.1" xmlns:f="http://java.sun.com/jsf/core"
          xmlns:af="http://xmlns.oracle.com/adf/faces/rich">
    <jsp:directive.page contentType="text/html;charset=UTF-8"/>
    <f:view>
        <af:document title="EditCustomer" id="d1">
            <af:form id="f1"></af:form>
        </af:document>
    </f:view>
</jsp:root>
If you chose to use one of the quick layouts, then JDeveloper also adds the components necessary to display the layout. For example, the code below is what JDeveloper generates when you choose a two-column layout where the first column is locked and the second column stretches to fill up available browser space, and you also choose to apply themes.
<?xml version='1.0' encoding='UTF-8'?>
<jsp:root xmlns:jsp="http://java.sun.com/JSP/Page" version="2.1" xmlns:f="http://java.sun.com/jsf/core"
          xmlns:af="http://xmlns.oracle.com/adf/faces/rich">
    <jsp:directive.page contentType="text/html;charset=UTF-8"/>
    <f:view>
        <af:document title="EditCustomer" id="d1">
            <af:form id="f1">
                <af:panelGridLayout id="pgl1">
                    <af:gridRow height="100%" id="gr1">
                        <af:gridCell width="100px" halign="stretch"
                                     valign="stretch" id="gc1">
                            <!-- Left -->
                        </af:gridCell>
                        <af:gridCell width="100%" halign="stretch"
                                     valign="stretch" id="gc2">
                            <af:decorativeBox theme="dark" id="db2">
                                <f:facet name="center">
                                    <af:decorativeBox theme="medium" id="db1">
                                        <f:facet name="center">
                                            <!-- Content -->
                                        </f:facet>
                                    </af:decorativeBox>
                                </f:facet>
                            </af:decorativeBox>
                        </af:gridCell>
                    </af:gridRow>
                </af:panelGridLayout>
            </af:form>
        </af:document>
    </f:view>
</jsp:root>
If you chose to automatically create a backing bean using the Managed Bean tab of the dialog, JDeveloper also creates and registers a backing bean for the page, and binds any existing components to the bean, as shown in the code below.
package view.backing;

import oracle.adf.view.rich.component.rich.RichDocument;
import oracle.adf.view.rich.component.rich.RichForm;

public class MyFile {
    private RichForm f1;
    private RichDocument d1;

    public void setF1(RichForm f1) {
        this.f1 = f1;
    }

    public RichForm getF1() {
        return f1;
    }

    public void setD1(RichDocument d1) {
        this.document1 = d1;
    }

    public RichDocument getD1() {
        return d1;
    }
}
Tip:
You can access the backing bean source from the JSF page by right-clicking the page in the editor, and choosing Go to and then selecting the bean from the list.
Additionally, JDeveloper adds the following libraries to the view project:
-
ADF Faces Runtime 11
-
ADF Common Runtime
-
ADF DVT Faces Runtime
-
ADF DVT Faces Databinding Runtime
-
ADF DVT Faces Databinding MDS Runtime
-
Oracle JEWT
JDeveloper also adds entries to the web.xml file. Following is the web.xml file created once you create a JSF page.
<?xml version = '1.0' encoding = 'windows-1252'?>
<web-app xmlns="http://java.sun.com/xml/ns/javaee" xmlns:xsi="http://www.w3.org/2001/XMLSchema-instance"
         xsi:schemaLocation="http://java.sun.com/xml/ns/javaee
         http://java.sun.com/xml/ns/javaee/web-app_3_0.xsd"
         version="3.0">
  <servlet>
    <servlet-name>Faces Servlet</servlet-name>
    <servlet-class>javax.faces.webapp.FacesServlet</servlet-class>
    <load-on-startup>1</load-on-startup>
  </servlet>
  <servlet>
    <servlet-name>resources</servlet-name>
    <servlet-class>
      org.apache.myfaces.trinidad.webapp.ResourceServlet
    </servlet-class>
  </servlet>
  <servlet>
    <servlet-name>BIGRAPHSERVLET</servlet-name>
    <servlet-class>oracle.adf.view.faces.bi.webapp.GraphServlet</servlet-class>
  </servlet>
  <servlet>
    <servlet-name>BIGAUGESERVLET</servlet-name>
    <servlet-class>oracle.adf.view.faces.bi.webapp.GaugeServlet</servlet-class>
  </servlet>
  <servlet>
    <servlet-name>MapProxyServlet</servlet-name>
    <servlet-class>oracle.adf.view.faces.bi.webapp.MapProxyServlet</servlet-class>
  </servlet>
  <servlet-mapping>
    <servlet-name>Faces Servlet</servlet-name>
    <url-pattern>/faces/*</url-pattern>
  </servlet-mapping>
  <servlet-mapping>
    <servlet-name>resources</servlet-name>
    <url-pattern>/adf/*</url-pattern>
  </servlet-mapping>
  <servlet-mapping>
    <servlet-name>resources</servlet-name>
    <url-pattern>/afr/*</url-pattern>
  </servlet-mapping>
  <servlet-mapping>
    <servlet-name>BIGRAPHSERVLET</servlet-name>
    <url-pattern>/servlet/GraphServlet/*</url-pattern>
  </servlet-mapping>
  <servlet-mapping>
    <servlet-name>BIGAUGESERVLET</servlet-name>
    <url-pattern>/servlet/GaugeServlet/*</url-pattern>
  </servlet-mapping>
  <servlet-mapping>
    <servlet-name>MapProxyServlet</servlet-name>
    <url-pattern>/mapproxy/*</url-pattern>
  </servlet-mapping>
  <servlet-mapping>
    <servlet-name>resources</servlet-name>
    <url-pattern>/bi/*</url-pattern>
  </servlet-mapping>
  <context-param>
    <param-name>javax.faces.FACELETS_VIEW_MAPPINGS</param-name>
    <param-value>*.jsf;*.xhtml</param-value>
  </context-param>
  <context-param>
    <param-name>javax.faces.STATE_SAVING_METHOD</param-name>
    <param-value>client</param-value>
  </context-param>
  <context-param>
    <param-name>javax.faces.PARTIAL_STATE_SAVING</param-name>
    <param-value>false</param-value>
  </context-param>
  <context-param>
    <description>If this parameter is true, there will be an automatic check of the modification date of your JSPs, and saved state will be discarded when JSP's change. It will also automatically check if your skinning css files have changed without you having to restart the server. This makes development easier, but adds overhead. For this reason this parameter should be set to false when your application is deployed.</description>
    <param-name>org.apache.myfaces.trinidad.CHECK_FILE_MODIFICATION</param-name>
    <param-value>false</param-value>
  </context-param>
  <context-param>
    <description>Whether the 'Generated by...' comment at the bottom of ADF Faces HTML pages should contain version number information.</description>
    <param-name>oracle.adf.view.rich.versionString.HIDDEN</param-name>
    <param-value>false</param-value>
  </context-param>
  <context-param>
    <description>Security precaution to prevent clickjacking: bust frames if the ancestor window domain(protocol, host, and port) and the frame domain are different. Another options for this parameter are always and never.</description>
    <param-name>org.apache.myfaces.trinidad.security.FRAME_BUSTING</param-name>
    <param-value>differentOrigin</param-value>
  </context-param>
  <context-param>
    <param-name>javax.faces.VALIDATE_EMPTY_FIELDS</param-name>
    <param-value>true</param-value>
  </context-param>
  <context-param>
    <param-name>oracle.adf.view.rich.geometry.DEFAULT_DIMENSIONS</param-name>
    <param-value>auto</param-value>
  </context-param>
  <context-param>
    <param-name>javax.faces.FACELETS_SKIP_XML_INSTRUCTIONS</param-name>
    <param-value>true</param-value>
  </context-param>
  <context-param>
    <param-name>javax.faces.FACELETS_SKIP_COMMENTS</param-name>
    <param-value>true</param-value>
  </context-param>
  <context-param>
    <param-name>javax.faces.FACELETS_DECORATORS</param-name>
    <param-value>
      oracle.adfinternal.view.faces.facelets.rich.AdfTagDecorator
    </param-value>
  </context-param>
  <context-param>
    <param-name>javax.faces.FACELETS_RESOURCE_RESOLVER</param-name>
    <param-value>
      oracle.adfinternal.view.faces.facelets.rich.AdfFaceletsResourceResolver
    </param-value>
  </context-param>
  <context-param>
    <param-name>oracle.adf.view.rich.dvt.DEFAULT_IMAGE_FORMAT</param-name>
    <param-value>HTML5</param-value>
  </context-param>
  <filter>
    <filter-name>trinidad</filter-name>
    <filter-class>org.apache.myfaces.trinidad.webapp.TrinidadFilter</filter-class>
  </filter>
  <filter-mapping>
    <filter-name>trinidad</filter-name>
    <servlet-name>Faces Servlet</servlet-name>
    <dispatcher>FORWARD</dispatcher>
    <dispatcher>REQUEST</dispatcher>
    <dispatcher>ERROR</dispatcher>
  </filter-mapping>
  <mime-mapping>
    <extension>swf</extension>
    <mime-type>application/x-shockwave-flash</mime-type>
  </mime-mapping>
  <mime-mapping>
    <extension>amf</extension>
    <mime-type>application/x-amf</mime-type>
  </mime-mapping>
</web-app>
Note:
The Facelets context parameters are only created if you create a Facelets page.
In the faces-config.xml file, when you create a JSF page, JDeveloper creates an entry that defines the default render kit (used to display the components in an HTML client) for ADF Faces, as shown below.
<?xml version="1.0" encoding="windows-1252"?>
<faces-config version="2.1" xmlns="http://java.sun.com/xml/ns/javaee">
  <application>
    <default-render-kit-id>oracle.adf.rich</default-render-kit-id>
  </application>
</faces-config>
An entry in the trinidad-config.xml file defines the default skin used by the user interface (UI) components in the application, as shown in below.
<?xml version="1.0" encoding="windows-1252"?>
<trinidad-config xmlns="http://myfaces.apache.org/trinidad/config">
  <skin-family>skyros</skin-family>
                  <skin-version>v1</skin-version>
</trinidad-config>
When the page is first displayed in JDeveloper, it is displayed in the visual editor (accessed by clicking the Design tab), which allows you to view the page in a WYSIWYG environment. You can also view the source for the page in the source editor by clicking the Source tab. The Structure window located in the lower left-hand corner of JDeveloper, provides a hierarchical view of the page.
3.4.3 What You May Need to Know About Updating Your Application to Use the Facelets Engine
JSF 2.1 web applications can run using either the Facelets engine or JSP servlet engine. By default, documents with the *.jsf and *.xhtml extensions are handled by the Facelets engine, while documents with the *.jsp and *.jspx extensions are handled by the JSP engine. However, this behavior may be changed by setting the javax.faces.FACELETS_VIEW_MAPPINGS context parameter in the web.xml file. Because ADF Faces allows JSP pages to be run with the Facelets engine, you may decide that you want an existing application of JSP pages to use the Facelets engine. To do that, insert the following code into your web.xml page.
<context-param>
    <param-name>javax.faces.FACELETS_VIEW_MAPPINGS</param-name>
    <!-- Map both *.jspx and *.jsf to the Facelets engine -->
    <param-value>*.jsf; *.jspx</param-value>
  </context-param>

  <context-param>
    <param-name>javax.faces.FACELETS_SKIP_COMMENTS</param-name>
    <param-value>true</param-value>
  </context-param>

  <context-param>
    <param-name>javax.faces.FACELETS_DECORATORS</param-name>
    <param-value>
      oracle.adfinternal.view.faces.facelets.rich.AdfTagDecorator
    </param-value>
  </context-param>

  <context-param>
    <param-name>
      javax.faces.FACELETS_RESOURCE_RESOLVER
    </param-name>
    <param-value>
      oracle.adfinternal.view.faces.facelets.rich.AdfFaceletsResourceResolver
    </param-value>
  </context-param>
You then must redeploy your ADF Faces libraries.
Note that if you do change your application to use the Facelets engine, then your application will use JSF partial state saving, which is not currently compatible with ADF Faces. You will need to explicitly add the entry shown below.
 <context-param>
    <param-name>javax.faces.PARTIAL_STATE_SAVING</param-name>
    <param-value>false</param-value>
  </context-param>
Once this incompatibility is resolved, you should re-enable partial state saving by removing the entry. Check your current release notes at http://www.oracle.com/technetwork/developer-tools/jdev/documentation/index.html for the latest information on partial state saving support.
Note:
When you switch from the servlet engine to the Facelets engine, you may find certain parts of your application do not function as expected. For example, if you have any custom JSP tags, these tags will need to be reimplemented to work with the Facelets engine. For more information, refer to the ADF Faces release notes.
3.4.4 What You May Need to Know About Automatic Component Binding
Backing beans are managed beans that contain logic and properties for UI components on a JSF page (for information about managed beans, see Creating and Using Managed Beans). If when you create your JSF page you choose to automatically expose UI components by selecting one of the choices in the Page Implementation option of the Create JSF Page dialog, JDeveloper automatically creates a backing bean (or uses a managed bean of your choice) for the page. For each component you add to the page, JDeveloper then inserts a bean property for that component, and uses the binding attribute to bind component instances to those properties, allowing the bean to accept and return component instances.
Specifically, JDeveloper does the following when you use automatic component binding:
-
Creates a JavaBean using the same name as the JSF file, and places it in the
view.backingpackage (if you elect to have JDeveloper create a backing bean). -
Creates a managed bean entry in the
faces-config.xmlfile for the backing bean. By default, the managed bean name isbacking_<page_name>and the bean uses therequestscope (for information about scopes, see Object Scope Lifecycles).Note:
JDeveloper does not create managed bean property entries in the
faces-config.xmlfile. If you wish the bean to be instantiated with certain property values, you must perform this configuration in thefaces-config.xmlfile manually. See How to Configure for ADF Faces in faces-config.xml . -
On the newly created or selected bean, adds a property and accessor methods for each component tag you place on the JSF page. JDeveloper binds the component tag to that property using an EL expression as the value for its binding attribute.
-
Deletes properties and methods for any components deleted from the page.
Once the page is created and components added, you can then declaratively add method binding expressions to components that use them by double-clicking the component in the visual editor, which launches an editor that allows you to select the managed bean and method to which you want to bind the attribute. When automatic component binding is used on a page and you double-click the component, skeleton methods to which the component may be bound are automatically created for you in the page's backing bean. For example, if you add a button component and then double-click it in the visual editor, the Bind Action Property dialog displays the page's backing bean along with a new skeleton action method, as shown in Figure 3-6.
Figure 3-6 Bind Action Property Dialog
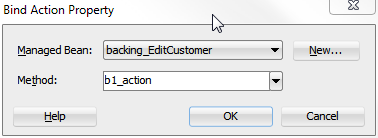
You can select from one these methods, or if you enter a new method name, JDeveloper automatically creates the new skeleton method in the page's backing bean. You must then add the logic to the method.
Note:
When automatic component binding is not used on a page, you must select an existing managed bean or create a new backing bean to create the binding.
For example, suppose you created a JSF page with the file name myfile.jsf. If you chose to let JDeveloper automatically create a default backing bean, then JDeveloper creates the backing bean as view.backing.MyFile.java, and places it in the \src directory of the ViewController project. The backing bean is configured as a managed bean in the faces-config.xml file, and the default managed bean name is backing_myfile.
The following code from a JSF page uses automatic component binding, and contains form, inputText, and button components.
<f:view>
  <af:document id="d1" binding="#{backing_myfile.d1}">
    <af:form id="f1" binding="#{backing_myfile.f1}">
      <af:inputText label="Label 1" binding="#{backing_MyFile.it1}"
                    id="inputText1"/>
      <af:button text="button 1"
                        binding="#{backing_MyFile.b1}"
                        id="b1"/>
    </af:form>
  </af:document>
</f:view>
Following is the corresponding code on the backing bean.
package view.backing;

import oracle.adf.view.rich.component.rich.RichDocument;
import oracle.adf.view.rich.component.rich.RichForm;
import oracle.adf.view.rich.component.rich.input.RichInputText;
import oracle.adf.view.rich.component.rich.nav.RichButton;

public class MyFile {
    private RichForm f1;
    private RichDocument d1;
    private RichInputText it1;
    private RichButton b1;

    public void setForm1(RichForm f1) {
        this.form1 = f1;
    }

    public RichForm getF1() {
        return f1;
    }

    public void setD1(RichDocument d1) {
        this.d1 = d1;
    }

    public RichDocument getD1() {
        return d1;
    }

    public void setIt1(RichInputText it1) {
        this.inputText1 = inputText1;
    }

    public RichInputText getInputText1() {
        return inputText1;
    }

    public void setB1(RichButton b1) {
        this.button1 = button1;
    }

    public RichButton getB1() {
        return b1;
    }

    public String b1_action() {
        // Add event code here...
        return null;
    }
}
This code, added to the faces-config.xml file, registers the page's backing bean as a managed bean.
<managed-bean>
  <managed-bean-name>backing_MyFile</managed-bean-name>
  <managed-bean-class>view.backing.MyFile</managed-bean-class>
  <managed-bean-scope>request</managed-bean-scope>
</managed-bean>
Note:
Instead of registering the managed bean in the faces-config.xml file, if you are using Facelets, you can elect to use annotations in the backing bean for registration. For information about using annotations in managed and backing beans, see the Java EE 6 tutorial at http://www.oracle.com/technetwork/java/index.html.
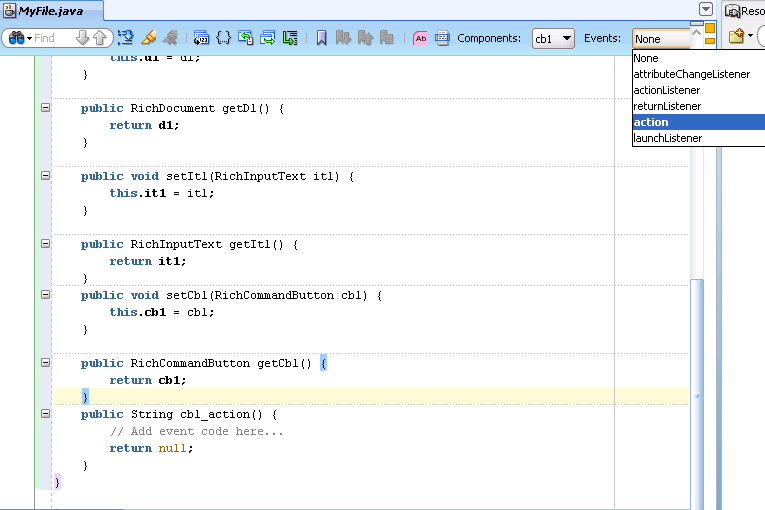
In addition, when you edit a Java file that is a backing bean for a JSF page, a method binding toolbar appears in the source editor for you to bind appropriate methods quickly and easily to selected components in the page. When you select an event, JDeveloper creates the skeleton method for the event, as shown in Figure 3-7.
Figure 3-7 You Can Declaratively Create Skeleton Methods in the Source Editor
Once you create a page, you can turn automatic component binding off or on, and you can also change the backing bean to a different Java class. Open the JSF page in the visual Editor and from the JDeveloper menu, choose Design > Page Properties. Here you can select or deselect the Auto Bind option, and change the managed bean class. Click Help for information about using the dialog.
Note:
If you turn automatic binding off, nothing changes in the binding attributes of existing bound components in the page. If you turn automatic binding on, all existing bound components and any new components that you insert are bound to the selected backing bean. If automatic binding is on and you change the bean selection, all existing bindings and new bindings are switched to the new bean.
You can always access the backing bean for a JSF page from the page editor by right-clicking the page, choosing Go to Bean, and then choosing the bean from the list of beans associated with the JSF.
3.4.5 How to Add ADF Faces Components to JSF Pages
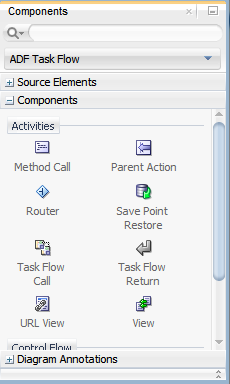
Once you have created a page, you can use the Components window to drag and drop components onto the page. JDeveloper then declaratively adds the necessary page code and sets certain values for component attributes.
Tip:
For detailed procedures and information about adding and using specific ADF Faces components, see Using Common ADF Faces Components .
Note:
You cannot use ADF Faces components on the same page as MyFaces Trinidad components (tr: tags) or other Ajax-enabled library components. You can use Trinidad HTML tags (trh:) on the same page as ADF Faces components, however you may experience some browser layout issues. You should always attempt to use only ADF Faces components to achieve your layout.
Note that your application may contain a mix of pages built using either ADF Faces or other components.
Before you begin:
It may be helpful to have an understanding of creating a page. See Creating a View Page.
To add ADF Faces components to a page:
-
In the Applications window, double-click a JSF page to open it.
-
If the Components window is not displayed, from the menu choose Window > Components. By default, the Components window is displayed in the upper right-hand corner of JDeveloper.
-
In the Components window, use the dropdown menu to choose ADF Faces.
Tip:
If the ADF Faces page is not available in the Components window, then you need to add the ADF Faces tag library to the project.
For a Facelets file:
-
Right-click the project node and choose Project Properties.
-
Select JSP Tag Libraries to add the ADF Faces library to the project. For help, click Help or press F1.
For a JSPX file:
-
Right-click inside the Components window and choose Edit Tab Libraries.
-
In the Customize Components window dialog, shuttle ADF Faces Components to Selected Libraries, and click OK.
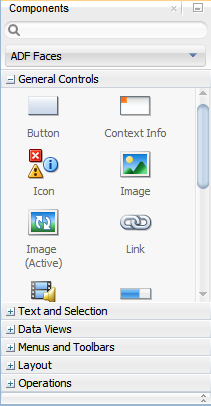
The components are contained in 6 accordion panels: General Controls (which contains components like buttons, icons, and menus), Text and Selection, Data Views (which contains components like tables and trees), Menus and Toolbars, Layout, and Operations.
Figure 3-8 shows the Components Window displaying the general controls for ADF Faces.
Figure 3-8 Components Window in JDeveloper
Description of "Figure 3-8 Components Window in JDeveloper" -
-
Select the component you wish to use and drag it onto the page.
JDeveloper redraws the page in the visual editor with the newly added component. In the visual editor, you can directly select components on the page and use the resulting context menu to add more components.
Tip:
You can also drag and drop components from the Components window into the Structure window or directly into the code in the source editor.
You can always add components by directly editing the page in the source editor. To view the page in the source editor, click the Source tab at the bottom of the window.
3.4.6 What Happens When You Add Components to a Page
When you drag and drop components from the Components window onto a JSF page, JDeveloper adds the corresponding code to the JSF page. This code includes the tag necessary to render the component, as well as values for some of the component attributes. For example, the following shows the code when you drop an Input Text and a Button component from the palette.
<af:inputText label="Label 1" id="it1"/>
<af:button text="button 1" id="b1"/>
Note:
If you chose to use automatic component binding, then JDeveloper also adds the binding attribute with its value bound to the corresponding property on the page's backing bean. See What You May Need to Know About Automatic Component Binding.
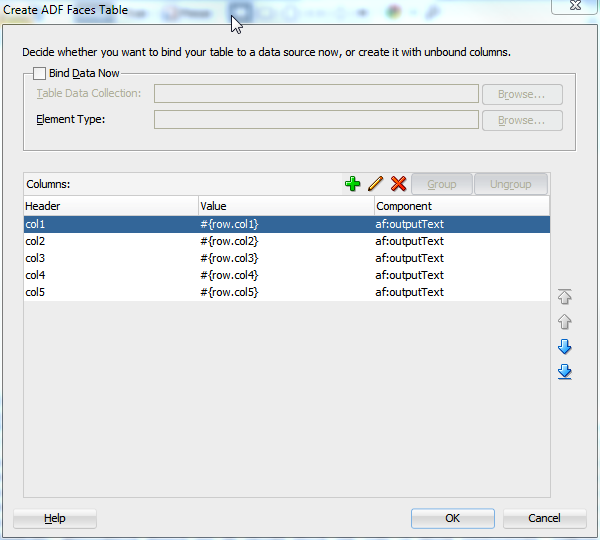
When you drop a component that contains mandatory child components (for example a table or a list), JDeveloper launches a wizard where you define the parent and also each of the child components. Figure 3-9 shows the Table wizard used to create a table component and the table's child column components.
Below is the code created when you use the wizard to create a table with three columns, each of which uses an outputText component to display data.
<af:table var="row" rowBandingInterval="0" id="t1">
  <af:column sortable="false" headerText="col1" id="c1">
    <af:outputText value="#{row.col1}" id="ot1"/>
  </af:column>
  <af:column sortable="false" headerText="col2" id="c2">
    <af:outputText value="#{row.col2}" id="ot2"/>
  </af:column>
  <af:column sortable="false" headerText="col3" id="c3">
    <af:outputText value="#{row.col3}" id="ot3"/>
  </af:column>
</af:table>
3.4.7 How to Set Component Attributes
Once you drop components onto a page you can use the Properties window (displayed by default at the bottom right of JDeveloper) to set attribute values for each component.
Tip:
If the Properties window is not displayed, choose Window > Properties from the main menu.
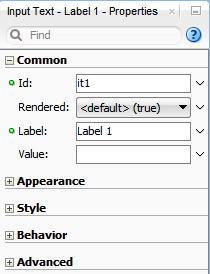
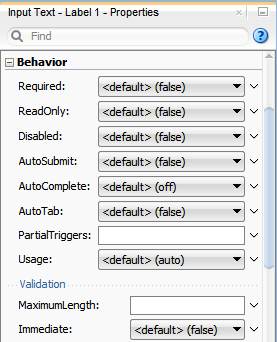
Figure 3-10 shows the Properties window displaying the attributes for an inputText component.
The Properties window has sections that group similar properties together. For example, the Properties window groups commonly used attributes for the inputText component in the Common section, while properties that affect how the component behaves are grouped together in the Behavior section. Figure 3-11 shows the Behavior section of the Properties window for an inputText component.
Figure 3-11 Behavior Section of the Properties window
Description of "Figure 3-11 Behavior Section of the Properties window"
Before you begin:
It may be helpful to have an understanding of the different options when creating a page. For information, see Creating a View Page.
To set component attributes:
3.4.8 What Happens When You Use the Properties window
When you use the Properties window to set or change attribute values, JDeveloper automatically changes the page source for the attribute to match the entered value.
Tip:
You can always change attribute values by directly editing the page in the source editor. To view the page in the source editor, click the Source tab at the bottom of the window.
3.5 Creating EL Expressions
In ADF applications, Express Language (EL) expressions provide an important mechanism for enabling the presentation layer (web pages) to communicate with the application logic (managed beans). The EL expressions are used by both JavaServer Faces technology (JSF) and JavaServer Pages (JSP) technology.
You use EL expressions throughout an ADF Faces application to bind attributes to object values determined at runtime. For example, #{UserList.selectedUsers} might reference a set of selected users, #{user.name} might reference a particular user's name, while #{user.role == 'manager'} would evaluate whether a user is a manager or not. At runtime, a generic expression evaluator returns the List, String, and boolean values of these respective expressions, automating access to the individual objects and their properties without requiring code.
At runtime, the value of certain JSF UI components (such as an inputText component or an outputText component) is determined by its value attribute. While a component can have static text as its value, typically the value attribute will contain an EL expression that the runtime infrastructure evaluates to determine what data to display. For example, an outputText component that displays the name of the currently logged-in user might have its value attribute set to the expression #{UserInfo.name}. Since any attribute of a component (and not just the value attribute) can be assigned a value using an EL expression, it's easy to build dynamic, data-driven user interfaces. For example, you could hide a component when a set of objects you need to display is empty by using a boolean-valued expression like #{not empty UserList.selectedUsers} in the UI component's rendered attribute. If the list of selected users in the object named UserList is empty, the rendered attribute evaluates to false and the component disappears from the page.
In a typical JSF application, you would create objects like UserList as a managed bean. The JSF runtime manages instantiating these beans on demand when any EL expression references them for the first time. When displaying a value, the runtime evaluates the EL expression and pulls the value from the managed bean to populate the component with data when the page is displayed. If the user updates data in the UI component, the JSF runtime pushes the value back into the corresponding managed bean based on the same EL expression. For information about creating and using managed beans, see Creating and Using Managed Beans. For information about EL expressions, see the Java EE 6 tutorial at http://www.oracle.com/technetwork/java/index.html.
Note:
When using an EL expression for the value attribute of an editable component, you must have a corresponding set method for the that component, or else the EL expression will evaluate to read-only, and no updates to the value will be allowed.
For example, say you have an inputText component (whose ID is it1) on a page, and you have it's value set to #{myBean.inputValue}. The myBean managed bean would have to have get and set method as follows, in order for the inputText value to be updated:
    public void setIt1(RichInputText it1) {
        this.it1 = it1;
    }

    public RichInputText getIt1() {
        return it1;
    }
Along with standard EL reachable objects and operands, ADF Faces provides EL function tags. These are tags that provide certain functionality that you can use within an EL expression. The format tags can be used to add parameters to String messages, and the time zone tags can be used to return time zones. For information about the format tags, see How to Use the EL Format Tags. For information about the time zone tags, see What You May Need to Know About Selecting Time Zones Without the inputDate Component.
3.5.1 How to Create an EL Expression
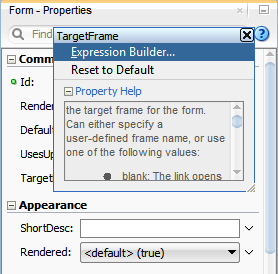
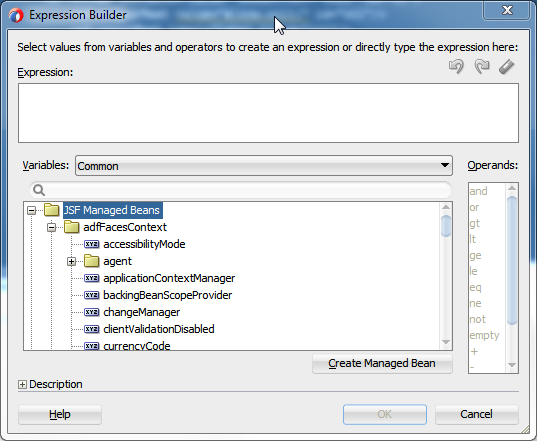
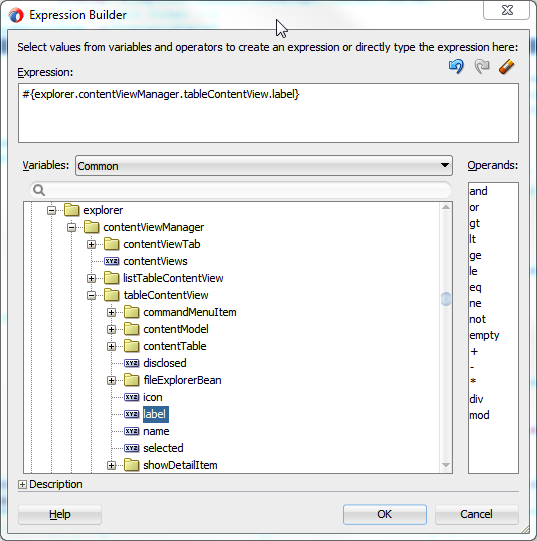
You can create EL expressions declaratively using the JDeveloper Expression Builder. You can access the builder from the Properties window.
Before you begin:
It may be helpful to have an understanding of EL expressions. See Creating EL Expressions.
To use the Expression Builder:
3.5.2 How to Use the EL Format Tags
ADF EL format tags allow you to create text that uses placeholder parameters, which can then be used as the value for any component attribute that accepts a String. At runtime, the placeholders are replaced with the parameter values.
For example, say the current user's name is stored on a managed bean, and you want to display that name within a message as the value of an outputText component. You could use the formatString tag as shown below.
<af:outputText value="#{af:formatString('The current user is: {0},
  someBean.currentUser)}" />
In this example, the formatString tag takes one parameter whose key “0," resolves to the value someBean.currentUser.
There are two different types of format tags available, formatString tags and formatNamed tags. The formatString tags use indexed parameters, while the formatNamed tags use named parameters. There are four tags for each type, each one taking a different number of parameters (up to 4). For example, the formatString2 tag takes two indexed parameters, and the formatNamed4 tag takes four named parameters.
When you use a formatNamed tag, you set both the key and the value. The following example shows a message that uses the formatNamed2 tag to display the number of files on a specific disk. This message contains two parameters.
<af:outputText value="#{af:formatNamed2(
  'The disk named {disk}, contains {fileNumber} files', 'disk', bean.disk, 'fileNumber', bean.fileNumber)}" />
3.5.3 How to Use EL Expressions Within Managed Beans
While JDeveloper creates many needed EL expressions for you, and you can use the Expression Builder to create those not built for you, there may be times when you need to access, set, or invoke EL expressions within a managed bean.
The code below shows how you can get a reference to an EL expression and return (or create) the matching object.
public static Object resolveExpression(String expression) {
  FacesContext facesContext = getFacesContext();
  Application app = facesContext.getApplication();
  ExpressionFactory elFactory = app.getExpressionFactory();
  ELContext elContext = facesContext.getELContext();
  ValueExpression valueExp =
     elFactory.createValueExpression(elContext, expression,
                                            Object.class);
     return valueExp.getValue(elContext);
 }
This code shows how you can resolve a method expression.
public static Object resloveMethodExpression(String expression,
                                             Class returnType,
                                             Class[] argTypes,
                                             Object[] argValues) {
  FacesContext facesContext = getFacesContext();
  Application app = facesContext.getApplication();
  ExpressionFactory elFactory = app.getExpressionFactory();
  ELContext elContext = facesContext.getELContext();
  MethodExpression methodExpression =
            elFactory.createMethodExpression(elContext, expression, returnType,
                                             argTypes);
    return methodExpression.invoke(elContext, argValues);
  }
The code below shows how you can set a new object on a managed bean.
public static void setObject(String expression, Object newValue) {
  FacesContext facesContext = getFacesContext();
  Application app = facesContext.getApplication();
  ExpressionFactory elFactory = app.getExpressionFactory();
  ELContext elContext = facesContext.getELContext();
  ValueExpression valueExp =
     elFactory.createValueExpression(elContext, expression,
                                     Object.class);

  //Check that the input newValue can be cast to the property type
  //expected by the managed bean.
  //Rely on Auto-Unboxing if the managed Bean expects a primitive
  Class bindClass = valueExp.getType(elContext);
 if (bindClass.isPrimitive() || bindClass.isInstance(newValue)) {
      valueExp.setValue(elContext, newValue);
  }
}
3.6 Creating and Using Managed Beans
A managed bean is created with a constructor with no arguments, a set of properties, and a set of methods that perform functions for a component. In the ADF framework, if you want to bind component values and objects to managed bean properties or to reference managed bean methods from component tags, you can use the EL syntax.
Managed beans are Java classes that you register with the application using various configuration files. When the JSF application starts up, it parses these configuration files and the beans are made available and can be referenced in an EL expression, allowing access to the beans' properties and methods. Whenever a managed bean is referenced for the first time and it does not already exist, the Managed Bean Creation Facility instantiates the bean by calling the default constructor method on the bean. If any properties are also declared, they are populated with the declared default values.
Often, managed beans handle events or some manipulation of data that is best handled at the front end. For a more complete description of how managed beans are used in a standard JSF application, see the Java EE 6 tutorial at http://www.oracle.com/technetwork/java/index.html.
Best Practice:
Use managed beans to store only bookkeeping information, for example the current user. All application data and processing should be handled by logic in the business layer of the application.
In a standard JSF application, managed beans are registered in the faces-config.xml configuration file.
Note:
If you plan on using ADF Model data binding and ADF Controller, then instead of registering managed beans in the faces-config.xml file, you may need to register them within ADF task flows. See Using a Managed Bean in a Fusion Web Application in Developing Fusion Web Applications with Oracle Application Development Framework.
3.6.1 How to Create a Managed Bean in JDeveloper
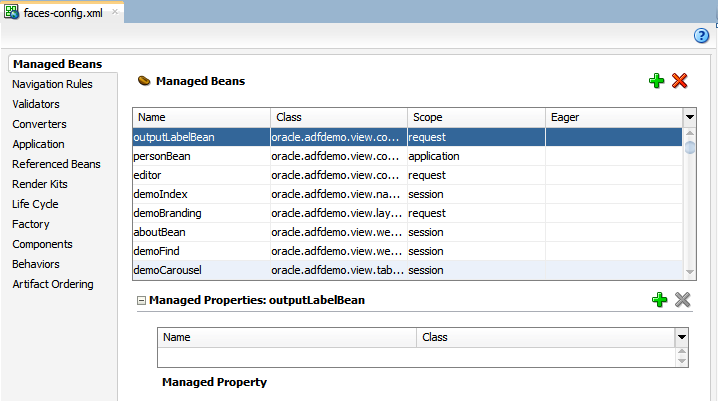
You can create a managed bean and register it with the JSF application at the same time using the overview editor for the faces-config.xml file.
Before you begin:
It may be helpful to have an understanding of managed beans. See Creating and Using Managed Beans.
To create and register a managed bean:
3.6.2 What Happens When You Use JDeveloper to Create a Managed Bean
When you create a managed bean and elect to generate the Java file, JDeveloper creates a stub class with the given name and a default constructor. Following is the code that would be added to the MyBean class stored in the view package.
package view;

public class MyBean {
    public MyBean() {
    }
}
You now must add the logic required by your page. You can then refer to that logic using an EL expression that refers to the managed-bean-name given to the managed bean. For example, to access the myInfo property on the my_bean managed bean, the EL expression would be:
#{my_bean.myInfo}
JDeveloper also adds a managed-bean element to the faces-config.xml file, as shown below.
<managed-bean>
  <managed-bean-name>my_bean</managed-bean-name>
  <managed-bean-class>view.MyBean</managed-bean-class>
  <managed-bean-scope>session</managed-bean-scope>
</managed-bean>
3.6.3 What You May Need to Know About Component Bindings and Managed Beans
To avoid issues with managed beans, if your bean needs to use component binding (through the binding attribute on the component), you must store the bean in request scope. (If your application uses the Fusion technology stack, then you must store it in backingBean scope. See Using a Managed Bean in a Fusion Web Application in Developing Fusion Web Applications with Oracle Application Development Framework.) However, there may be circumstances where you can't store the bean in request or backingBean scope. For example, there may be managed beans that are stored in session scope so that they can be deployed in a clustered environment, and therefore must implement the Serializable interface. When they are serializable, managed beans that change during a request can be distributed to other servers for fail-over. However, ADF Faces components (and JSF components in general) are not serializable. So if a serialized managed bean attempts to access a component using component binding, the bean will fail serialization because the referenced component cannot be serialized. There are also thread safety issues with components bound to serialized managed beans because ADF Faces components are not thread safe.
When you need to store a component reference to a UI component instance in a backing bean that is not using request or backingBean scope, you should store a reference to the component instance using the Trinidad ComponentReference API. The UIComponentReference.newUIComponentReference() method creates a serializable reference object that can be used to retrieve a UIComponent instance on the current page. The following shows how a managed bean might use the UIComponentReference API to get and set values for a search field.
...
private ComponentReference<UIInput> searchField;
...
public void setSearchField(UIInput searchField)
{
 if( this.searchField == null)
 this.searchField = ComponentReference.newUIComponentReference(searchField);
}

public UIInput getSearchField()
{
 return searchField ==null ? null : searchField.getComponent();
}
....
Keep the following in mind when using the UIComponentReference API:
-
The API is thread safe as long as it is called on the request thread.
-
The ADF Faces component being passed in must have an ID.
-
The reference will break if the component is moved between naming containers or if the ID on any of the ancestor naming containers has changed.
For information about the UIComponentReference API, see the Trinidad Javadoc.
3.7 Viewing ADF Faces Javadoc
The ADF Faces Javadoc provides information required to work programmatically to develop ADF Faces applications using the ADF Faces API.
Often, when you are working with ADF Faces, you will need to view the Javadoc for ADF Faces classes. You can view Javadoc from within JDeveloper.
