Localizing Oracle BI Presentation Services
As the administrator, you perform various tasks to localize Oracle BI Presentation Services.
Topics include:
Localizing the User Interface for Oracle BI Presentation Services
You can localize the user interface for Oracle BI Presentation Services, if your users speak languages other than English.
Users can select a language on the sign-in page for Oracle BI EE, and many elements of the interface are automatically displayed in the appropriate language. After signing in, users can change the language setting on the Preferences tab of the My Account dialog.
The user's setting is stored in the WEBLANGUAGE session variable. For the Oracle BI Presentation Services user interface, WEBLANGUAGE is set when a user selects a language on the sign-in page.
Note:
For Oracle BI Applications, WEBLANGUAGE is set to the language of the user's browser when a user logs in for the first time. For example, if a user with a browser language set to French logs in to Oracle BI Applications for the first time, then the value for WEBLANGUAGE is French, and the metadata is translated to French.
As the administrator, you perform various tasks to localize other elements of the user interface for Oracle BI Presentation Services, as described in the following sections:
Understanding the Directory Structure for Localizing Presentation Services
Oracle BI EE is installed with many files that control elements in the user interface and messages.
These files are installed in the messages and pages subdirectories of the ORACLE_HOME/bi/bifoundation/web/msgdb directory. To localize these elements and messages, you copy those files to the l_xx subdirectories in SDD/service_instances/service1/metadata/content/msgdb/l_xx
where SDD is the Singleton Data Directory, and _xx indicates the language extension. See Key Directories in Oracle Business Intelligence. After you have copied the files, you can modify their contents as appropriate for the language that corresponds to the subdirectory in which you have copied them.
Localizing Messages for Users' Preferred Currency
You can localize the messages that are associated with a preferred currency.
See Defining User-Preferred Currency Options Using a Static Mapping for information on working with users' preferred currencies.
In Oracle BI EE, the appropriate localized text is displayed to the user. In this example, the text is My Currency Text 1.
Specifying the Default Language for the Sign-In Page
You can change the language the user sees by overriding the language specified by their browser.
The default language in which the Presentation Services sign-in page is displayed is obtained from the user's client browser settings. The following procedure explains how to change the language.
Note:
The following procedure uses Internet Explorer 7.0 as an example. If you are using a different browser, then make the necessary substitutions.Configuring the Languages and Locales for the Sign-In Page
You can configure the languages and locales that are available to users on the sign-in page.
This ability is helpful for limiting the number of languages and locales that users can access. You use the AllowedLanguages and AllowedLocales elements in the instanceconfig.xml file to specify the available languages and locales.
Ensure that you are familiar with the information in Configuration Files before you start.
Specifying the Scaling of Numbers in Performance Tiles
In Presentation Services, you can use performance tiles to focus attention on a single piece of high-level aggregate data.
The tile can include a number such 1,000,000 or you can specify to "compress" or "scale" the value with an indicator such as 1M, for example.
To scale the number, Presentation Services searches for the scaling factors that the current locale allows, processes the number, and appends the indicator value. If no scaling factors are defined for the current locale, then no scaling is applied. Because the scaling of numbers differs by language, you can manually edit the localedefinitions.xml file to control the scaling, as described in the following procedure.
See Editing Performance Tile Views in User's Guide for Oracle Business Intelligence Enterprise Edition.
Specifying the Language in the URL
When users start Oracle BI EE by displaying the sign-in page, they can select the language as part of the sign-in process.
Users can also select a language on the Preferences tab of the My Account dialog.
If you provide users with a URL with which they can display a dashboard or other page of the application, then you can define a URL parameter as a profile attribute. Doing so dynamically sets the language of the dashboards and analyses to be consistent with the application's language setting.
For operational applications, symbolic URLs embed dashboards and analyses in the integrated environment. For Oracle BI Presentation Services, the URL parameter Lang designates the language that the web page renders.
The Lang parameter can be included in the symbolic URL that is defined in the operational application to connect to Oracle Business Intelligence. The Lang parameter is defined as a profile attribute, but when the symbolic URL is constructed at runtime, the value is set as the profile attribute LanguageCode. The next table provides examples of the parameter settings in the Symbolic URL parameters applet, including Lang.
For example, the following URL displays the sign-in page in French.
http://Server_Name:port_number/analytics/saw.dll?Dashboard&Lang=fr
| Name | Type | Path Argument Value | Append | Sequence # |
|---|---|---|---|---|
|
Cmd |
Constant |
Go |
Y |
1 |
|
Path |
Constant |
/shared/Sales/Pipeline/Overview/Top 10 Deals |
Y |
2 |
|
nQUser |
Command |
UseLoginId |
Y |
3 |
|
nQPassword |
Command |
UseLoginPassword |
Y |
4 |
|
PostRequest |
Command |
PostRequest |
Y |
5 |
|
Lang |
Profile Attribute |
LanguageCode |
Y |
6 |
Localizing Oracle BI Presentation Catalog Captions
The Oracle BI Presentation Catalog stores objects that users create, such as analyses and dashboards. Text strings hold the names and descriptions of these objects.
If you must localize text strings for the objects, then you can export the text strings from the catalog so that they can be translated. You then expose the strings when translation is complete.
This section describes the steps in the process of localizing captions:
Step 1: Understanding the Export Process
The export process requires a series of steps that must be followed in order.
The export process creates one XML file for every first-level subfolder in the shared folder, in the format foldername captions.xml, where foldername is the name of the subfolder in the shared folder. Each XML file contains the text strings for all content in the corresponding first-level folder and its subfolders.
For example, if the shared folder in the Presentation Catalog contains the first-level folders Marketing, Service, and Sales, then the export process creates three XML files:
-
marketingcaptions.xml
-
salescaptions.xml
-
servicecaptions.xml
After the content is translated, you place these folders in their corresponding location in the following directory:
SDD/service_instances/service1/metadata/content/msgdb/l_xx/captions
Where SDD is the Singleton Data Directory for example, DOMAIN_HOME/bidata (see Key Directories in Oracle Business Intelligence).
The export process not only generates new XML files, but the process also modifies the catalog, inserting the appropriate message ID for each object. Presentation Services uses those message IDs to locate the newly translated text.
Note that an error may occur when you export a folder whose name includes supplementary (extended Unicode) characters.
Step 2: Exporting Text Strings in the Catalog
The following procedure describes how to export text strings in the catalog.
Step 3: Editing Exported Strings in XML Files
When the export process is complete, deliver the output XML file to the localization team.
When editing XML files, use an editor that is designed for XML files. Ensure that you follow the encoding that is specified at the top of the XML file and that you escape special characters as appropriate. You and the localization team are responsible for resolving any errors in the translated text strings. Consider that the contents of the catalog are updated whenever objects are added, deleted, or modified.
You can make a copy of every output file for each language to be translated.
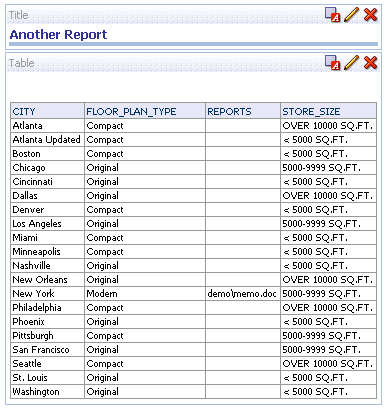
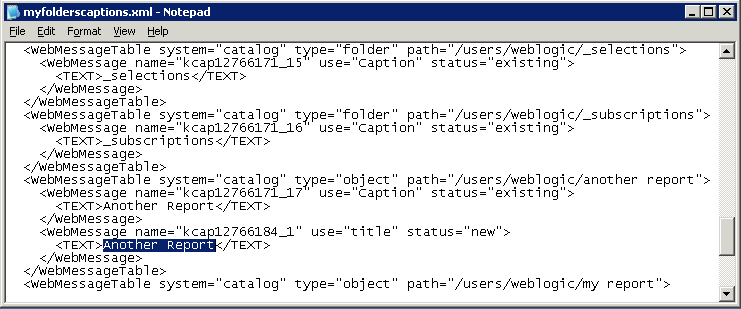
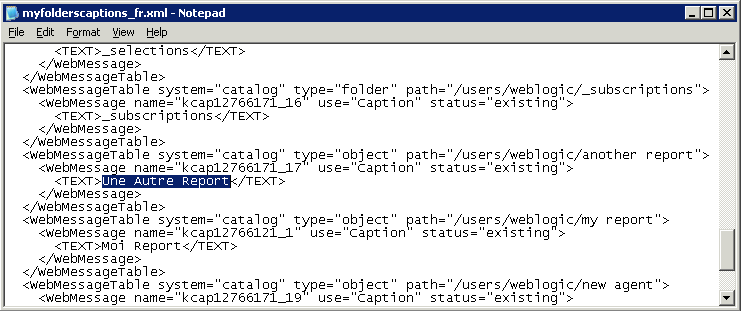
The first illustration shows an extract from an exported caption XML file before translation. The file is named myfoldercaptions.xml. The second illustration shows an extract from the file after translation. The file is named myfoldercaptions_fr.xml.
Step 4: Handling Duplicate Exported Text Strings
You might encounter an issue of having duplicate exported text strings from the catalog.
Duplicated exported text strings from the catalog happen when the Export Captions utility is run simultaneously by multiple users or if the same user runs the utility twice in less than one minute. The following procedure describes how to address duplicate captions.
The Export Captions utility is described in Step 2: Exporting Text Strings in the Catalog
Consider the following webmessages.xml file, which contains duplicate captions:
<WebMessageTable system="catalog" type="folder" path="/shared/example/A">
    <WebMessage name="kcap12790830_5" use="Caption" status="new">
        <TEXT>A Really Good Report</TEXT>
    </WebMessage>
</WebMessageTable>
<WebMessageTable system="catalog" type="folder" path="/shared/example/B">
    <WebMessage name="kcap12790830_5" use="Caption" status="new">
        <TEXT>I like this report</TEXT>
    </WebMessage>
</WebMessageTable>
<WebMessageTable system="catalog" type="folder" path="/shared/example/Copy of A">
    <WebMessage name="kcap12790830_5" use="Caption" status="new">
        <TEXT>A Really Good Report</TEXT>
    </WebMessage>
</WebMessageTable>
In this example file, Object B has an invalid duplicate message ID. Object Copy of A has a valid but duplicate message ID. You can make the following selections in the Export Captions dialog:
-
Selecting Leave alone makes no changes to the contents of the file.
-
Selecting Remove IDs generates new and unique IDs for both Object B and Object Copy of A.
-
Selecting Remove texts generates a new and unique ID for Object B and deletes the WebMessage element for Object Copy of A. While this option generally ensures fewer messages to translate, keep in mind that you now see two objects with the same name in a directory listing of the catalog in Presentation Services and in Catalog Manager.
Step 5: Exposing Text Strings in the Catalog
After you have exported the text strings for the catalog, you must expose them for users.
To move translated captions from a development environment to a production environment:
-
If the caption file:
-
Does not exist in the production environment, then simply copy it from the development environment to the production environment.
-
Does exist in the production environment, first make a backup copy of the existing file. Then open the caption file in the production environment in a text editor or XML editing tool and manually (and very carefully) insert the changes that were made in the development environment.
-
Tip for Arabic and Hebrew in Mozilla Firefox Browsers
Right-to-left languages are displayed slightly differently in Mozilla Firefox browsers.
By default, scroll bars are displayed on the right side of the Mozilla Firefox browser. If you are using the Arabic or Hebrew languages, then it is not appropriate to have the scroll bars on the right side. You can change the browser settings in Firefox such that the scroll bars are displayed on the left side.
For information about changing the layout.scrollbar.side setting, see the Firefox documentation.


