9.2 Introduction to Publishing Web Services to UDDI

You can publish web services to UDDI from a registered UDDI source and from the web services summary page for ADF and Java EE applications. Registered UDDI sources are listed in the Registered Sources and Services page, which includes all sources and services registered in a domain. The Web Services summary page lists the web services in an application.

Note:

You need to use a proxy to publish a service to UDDI, since this requires access to URLs outside of your firewall. For more information about the required proxy settings, see "Configuring the Proxy Server for UDDI".

If your services are already in Oracle Enterprise Repository (OER) then you should use the OER Exchange Utility to publish those services to Oracle Service Registry.

The following procedures describe how to publish web services to UDDI.

9.2.1 Publishing a Web Service to UDDI from a Registered Source

To publish a web service to UDDI from a registered source:

  1. Navigate to the Registered Sources and Services page as described in "Viewing Registered Sources and Web Services".
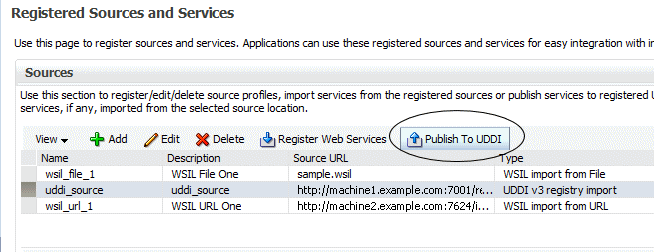
  2. Select the source row in the Sources table and then Publish to UDDI.

    Figure 9-5 Registered Sources and Services Page with Publish to UDDI Selected

    Description of Figure 9-5 follows
    Description of "Figure 9-5 Registered Sources and Services Page with Publish to UDDI Selected"
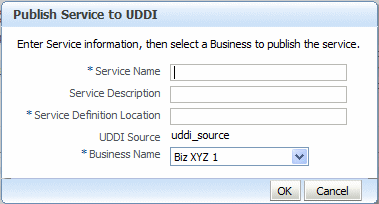
  3. In the Publish Service to UDDI window, enter the information about the service to be published:
    • Service Name is the name of the web service to be published to the UDDI registry. This field is required.

    • Service Description is a description of the selected web service.

    • Service Definition Location is the URL location of the service definition. This field is required.

    • UDDI Source is the name of the UDDI source from which the service is to be registered. This field is read only.

    • Business Name is the name of the data structure in the UDDI registry. It is assumed that the business has already been registered in the UDDI. Choose the Business name from the list. This field is required.

      Figure 9-6 Publish Service to UDDI Window from a UDDI Source

      Description of Figure 9-6 follows
      Description of "Figure 9-6 Publish Service to UDDI Window from a UDDI Source"
  4. Click OK in the Publish Service to UDDI window.

    The system verifies that the service specified has a valid WSDL and that the UDDI registry has accepted the new entry or updated an existing one. If it is successful, a confirmation message displays and the service is published to the registry. Once the service is published in the UDDI, it becomes available to be registered to a source, as described in "Registering Web Services from a UDDI Source".

    Any errors during the operation will result in an error message.

    Note that you can only register the service to a source if it uses a unique WSDL.

9.2.2 Publishing a Web Service to UDDI from an Application

To publish a web service to UDDI from an application:

  1. Navigate to the Web Services application summary page as described in "Viewing the Web Services Summary Page for an Application".
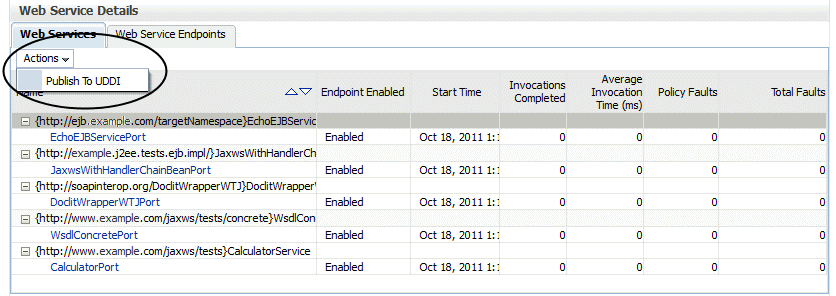
  2. From the Web Service Details section of the page, select the Web Services tab, if it is not already selected, then select the service to be published.
  3. Select Actions, then Publish to UDDI. See Figure 9-7.

    Figure 9-7 Web Services Summary Page with Publish to UDDI Selected

    Description of Figure 9-7 follows
    Description of "Figure 9-7 Web Services Summary Page with Publish to UDDI Selected"
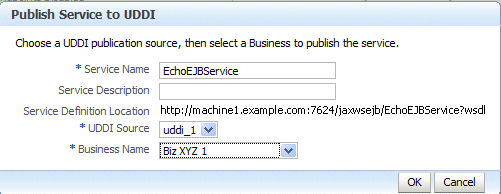
  4. In the Publish Service to UDDI dialog box (Figure 9-8), enter the information about the service to be published:
    • Service Name is the name of the web service to be published to the UDDI registry. This field is required.

    • Service Description is a description of the selected web service.

    • Service Definition Location is prepopulated with the URL location of the service definition (This field is read-only.)

    • UDDI Source is a logical name for the UDDI registry source. Choose the UDDI source from the list. This field is required.

      Note:

      The list contains the UDDI sources registered in the domain that have been enabled for publishing. For more information about registered sources, see "Introduction to Registering Web Services and Sources".

    • Business Name is the name of the data structure in the UDDI registry. It is assumed that the business has already been registered in the UDDI. Choose the business name from the list. This field is required.

    Figure 9-8 Publish Service to UDDI Dialog Box

    Description of Figure 9-8 follows
    Description of "Figure 9-8 Publish Service to UDDI Dialog Box"
  5. Click OK to connect to the external UDDI registry and register the web service.

    Upon successfully registering the service, a confirmation message displays. Any errors during the operation will result in an error message.

9.2.3 Configuring the Proxy Server for UDDI

To access URLs outside of your firewall, you must use a proxy to publish a service to UDDI.

Before starting Oracle WebLogic, you must set the Java system properties defined in Table 9-1. You can set them as environment variables, or in Oracle WebLogic startup files.


Table 9-1 Java System Properties Used to Specify the Proxy Server for UDDI

Property Description

proxySet=true

Flag that specifies that the WebLogic proxy properties should be used.

http.proxyHost=proxyHost

Name of the host computer on which the proxy server is running.

http.proxyPort=proxyPort

Port to which the proxy server is listening.

http.nonProxyHosts=hostname | hostname |...

List of hosts that should be reached directly, bypassing the proxy. Separate each host name using a | character.


For example:

set PROXY_SETTINGS="-DproxySet=true -Dhttp.proxyHost=www-proxy.example.com -Dhttp.proxyPort=80 -Dhttp.nonProxyHosts=localhost|${HOST}|*.example.com"