30 Linking Information

This chapter describes how to use the features provided through links. Links provide a way to view, access, create associations between different assets where links are available.

This chapter includes the following topics:

Permissions:

This chapter is intended for WebCenter Portal users who want to view, create, and manage links.

Such users must be granted, minimally, the portal-level permission View Pages and Content to view links. They can view shared links only for assets for which they have view permission.

Authenticated users who plan to create and manage links require the portal-level permission Customize Pages. They must have view permission on the resource. However, you might not be able to do some tasks if one or more of the following advanced permissions for links have been set:

  • Create and Delete Links

  • Create Links

  • View Links

To associate links with other assets, such as announcements, discussions, documents, events, you must have the required permissions for those assets. See Managing Roles and Permissions for a Portal in Oracle Fusion Middleware Building Portals with Oracle WebCenter Portal.

30.1 About Links

Linking gives users a means of explicitly associating two assets with each other through easy-access reference points, called links. Links assist with setting up these associations from one WebCenter Portal asset to another. For example, using links you can associate a project plan document with a list of project issues. When users access the list, they can also immediately access the project plan by clicking a link that appears on the list (Figure 30-1). Links also provide a quick way to create new assets while establishing a link at the same time.

Figure 30-1 A Link in a List Row

Description of Figure 30-1 follows
Description of "Figure 30-1 A Link in a List Row"

Links are scoped to portals. For example, the links that display in the Finance portal differ from the links that display in the Infrastructure portal, even though links are accessed from the same places in both portals. The assets to which you can link also depend on the following:

Anywhere you see a Links icon, you can create a link to both new and existing assets.

There are two Links icons that each indicate the state of the Links dialog:

Use the Link to Existing option in the Links dialog to link to existing WebCenter Portal assets, such as documents, discussion forum topics, and announcements. See Linking to Existing Assets for more information.

Use the Link to New option in the Links dialog to both create an WebCenter Portal asset and link to it in a single operation. Select Link to New to upload and link to documents, create and link to discussion forum topics, enter the URL of a web page to link to, and create and link to other types of assets. See Linking to New Assets for more information.

You can create links from announcements, discussions, events, and lists.

The items you can link to differ between the Link to New and Link to Existing lists. For example, while you can link to a new note, you cannot link to an existing note. Additionally, the items you can link to from a Home portal differ from those you can link to from a portal. Table 30-1 lists the types of assets you can link to and from.

Table 30-1 Linking to Assets

Asset Type Link to New Link to Existing Home Portal Portal

Announcement

No

Yes

No

Yes

Discussion Topic

Yes

Yes

No

Yes

Document/Wiki

Yes

Yes

Yes

Yes

Event

Yes

Yes

No

Yes

Note

Yes

No

Yes

Yes

URL

Yes

No

Yes

Yes

Given the right permissions, other users can see your links, and you can see the links of other users. What you can do with a link (such as view, create, delete) depends on your advanced permissions for Links. However, with notes, you can delete a link only if you also have delete permission for Notes.

What you can do with the linked asset is handled by the target asset's security and your permissions to work with these assets.

Links retain their originating location. For example, if you create a link on a list row, then that link appears only on that row, and not on all the other rows in the same list (Figure 30-4). Suppose you link to a project plan document from the list row that has an associated task, the link to that document appears only on that row's Links dialog (Figure 30-4). It does not display on the Links dialog associated with the other rows on the same list.

Figure 30-4 Links in a List and Rows

Description of Figure 30-4 follows
Description of "Figure 30-4 Links in a List and Rows"

Most links are also bidirectional. That is, when you create a link from a discussion to a document, a return link from the document to the discussion is automatically created. This bidirectional relationship holds for most, though not all, links. Links on notes, URLs, and list rows do not create a reciprocal link on the link target. For example, if you create a link from a document to a note, from a document to a URL, or from a list row to a document, then a reciprocal link is not created on the link target. However, a link from an entire list (rather than an individual list row) does create a reciprocal link from the target.

30.2 Working with Links Features

Many WebCenter Portal features include a linking capability that enables you to associate assets in WebCenter Portal, and with internal and external web pages. For example, the Lists page (or console) has its own link (Figure 30-5), and within lists, there are Links icon on each list and on each list row.

Figure 30-5 Link Icons on the Lists Page

Description of Figure 30-5 follows
Description of "Figure 30-5 Link Icons on the Lists Page"

You can link relevant documents, discussions, notes, web pages, events, and announcements. When viewing the details of an event, you can link to the event's agenda. In a list of project assignments, you can link to the functional and design specifications relevant to each assignment. In a discussion forum, you can link to a related discussion, document, web page, or WebCenter Portal page.

This section describes how to link one asset to another and how to access those links. It includes the following topics:

30.2.1 Linking to Existing Assets

This section describes how to use the Link to Existing option on the Links dialog to link to announcements, discussion forum topics, documents, and events currently available in your portal.

This section includes the following topics:

30.2.1.1 Opening the Links Dialog to Link to Existing Assets

To create a link to an existing asset, first go to the asset from which you want to link and open the Links dialog by clicking the Links icon. From there, the steps vary depending on the type of asset you are linking to.

To open the Links dialog:

  1. Go to the asset from which you want to link.
  2. Click the asset's (or row's) associated Links icon (Figure 30-6).

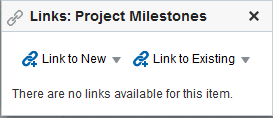
    The Links dialog (Figure 30-7) opens.

  3. From the Links dialog, select Link to Existing and then select the type of asset you want to link to.

    Note:

    The assets that are available depend on your permissions and the tools or services that are enabled. For example, if you do not have the required permissions to work with announcements or announcements are not enabled, you will not see the Announcement option. For more information, see Enabling and Disabling Tools and Services Available to a Portal in Oracle Fusion Middleware Building Portals with Oracle WebCenter Portal.

    For information about how to link to existing assets, see the following sections:

Note:

In the following procedures, Lists is used as an example of an asset from which links to existing assets are created.

30.2.1.2 Linking to an Existing Announcement

You can bring timely announcements to the most viewed areas in your portal by linking to them.

Note:

You cannot link to a new announcement.

To link to an existing announcement:

  1. Go to the asset from which you want to link to an announcement and click the Links icon.
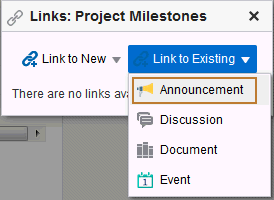
  2. From the Links dialog, select Link to Existing and then select Announcement (Figure 30-8).

    Figure 30-8 Link to an Existing Announcement

    Description of Figure 30-8 follows
    Description of "Figure 30-8 Link to an Existing Announcement"

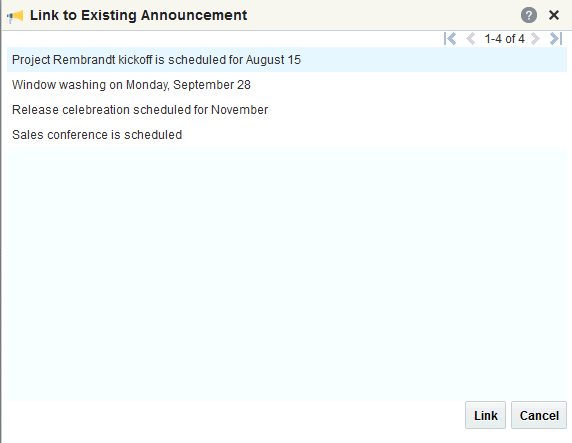
    The Link to Existing Announcement dialog opens (Figure 30-9).

    Figure 30-9 Existing Announcements

    Description of Figure 30-9 follows
    Description of "Figure 30-9 Existing Announcements"
  3. Click the announcement to which you want to link.
  4. Click Link.

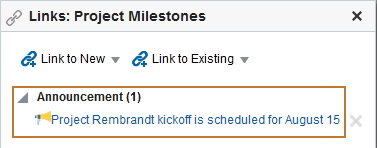
    The title of the selected announcement appears in the list of links on the Links dialog (Figure 30-10).

    Figure 30-10 Newly Added Announcement Link on Links Dialog

    Description of Figure 30-10 follows
    Description of "Figure 30-10 Newly Added Announcement Link on Links Dialog"
  5. Close the Links dialog.

    The link from the announcement topic to the list also appears in the Announcements view (Figure 30-11).

    Figure 30-11 Link to List from Announcement Topic

    Description of Figure 30-11 follows
    Description of "Figure 30-11 Link to List from Announcement Topic"

30.2.1.3 Linking to an Existing Discussion Forum Topic

Help users find answers to questions before they even ask them by linking to relevant discussion forum topics.

To link to an existing discussion forum topic:

  1. Go to the asset from which you want to link to a discussion forum message and click the Links icon.
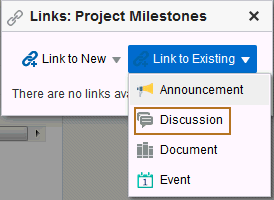
  2. From the Links dialog, select Link to Existing and then select Discussion (Figure 30-12).

    Figure 30-12 Link to an Existing Discussion

    Description of Figure 30-12 follows
    Description of "Figure 30-12 Link to an Existing Discussion"

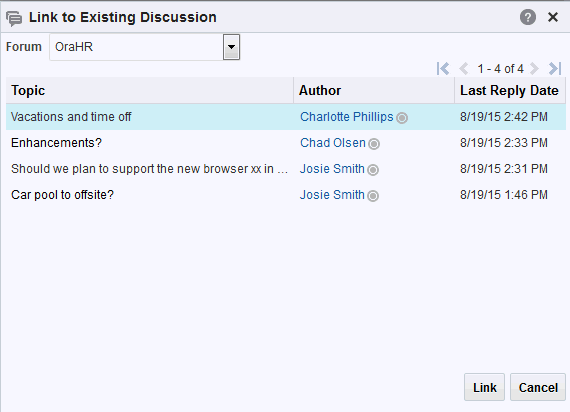
    The Link to Existing Discussion Topic opens, listing available topics (Figure 30-13). If the portal supports multiple discussion forums, then a drop-down list at the top allows you to select a different forum.

    Figure 30-13 Existing Discussion Topics

    Description of Figure 30-13 follows
    Description of "Figure 30-13 Existing Discussion Topics"
  3. Select the discussion topic to which you want to link.
  4. Click Link.

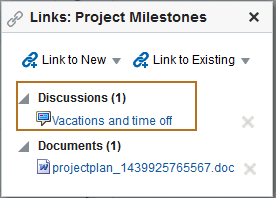
    The title of the selected discussion topic appears in the list of links on the Links dialog (Figure 30-14).

    Figure 30-14 Newly Added Discussion Topic Link on Links Dialog

    Description of Figure 30-14 follows
    Description of "Figure 30-14 Newly Added Discussion Topic Link on Links Dialog"
  5. Close the Links dialog.

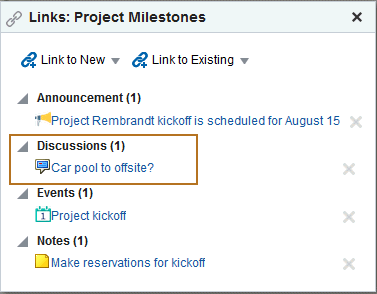
    The link from the discussion topic to the list also appears in the Discussion Forum topic view (Figure 30-15).

    Figure 30-15 Link to List from Discussion Topic

    Description of Figure 30-15 follows
    Description of "Figure 30-15 Link to List from Discussion Topic"

30.2.1.4 Linking to an Existing Document

To save users from having to search for documents in the document library, link to them directly. For example, link to a meeting's agenda directly from the meeting's event details.

To link to an existing document:

  1. Go to the asset from which you want to link to a document and click the Links icon.
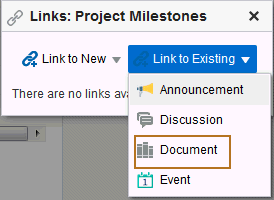
  2. From the Links dialog, select Link to Existing and then select Document (Figure 30-16).

    Figure 30-16 Link to Existing Document

    Description of Figure 30-16 follows
    Description of "Figure 30-16 Link to Existing Document"

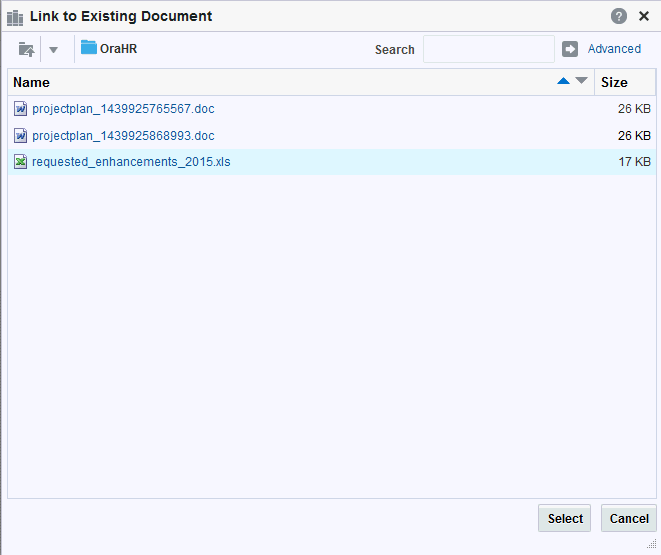
    The Link to Existing Document dialog (Figure 30-17) opens.

    Figure 30-17 Existing Documents

    Description of Figure 30-17 follows
    Description of "Figure 30-17 Existing Documents"
  3. Select the document, and then click Select.

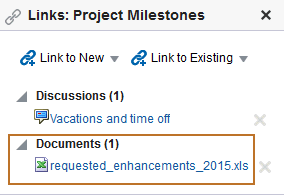
    The document link appears in the list of links on the Links dialog (Figure 30-18).

    Figure 30-18 Newly Added Document Link on the Links Dialog

    Description of Figure 30-18 follows
    Description of "Figure 30-18 Newly Added Document Link on the Links Dialog"
  4. Close the Links dialog.

30.2.1.5 Linking to an Existing Event

You can link to information about events that are relevant to the current asset. For example, you could provide a link from an issues document to an event scheduled to discuss those very issues.

To link to an existing event:

  1. Go to the asset from which you want to link to an event and click the Links icon.
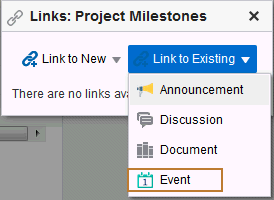
  2. From the Links dialog, select Link to Existing and then select Event (Figure 30-19).

    Figure 30-19 Link to Existing Event

    Description of Figure 30-19 follows
    Description of "Figure 30-19 Link to Existing Event"

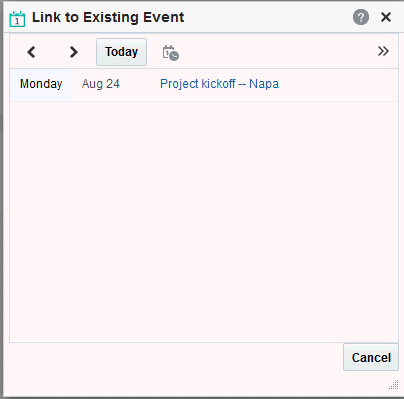
    The Link to Existing Event dialog (Figure 30-20) opens, showing the current day's events.

    Figure 30-20 Existing Events

    Description of Figure 30-20 follows
    Description of "Figure 30-20 Existing Events"
  3. Click the Previous and Next icons to go to the day of the event you want to link to, or click the Select Date icon and select the date of the event you want to link to, if you don’t see the event.
  4. Select the event to which you want to link.

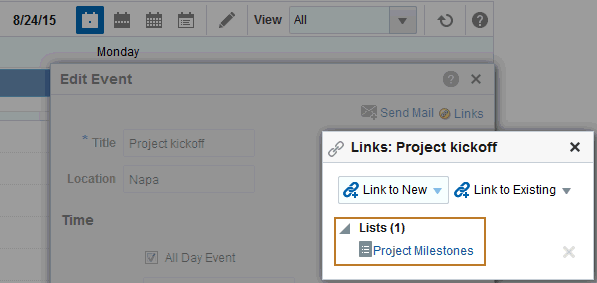
    The title of the selected event appears in the list of links in the Links dialog (Figure 30-21).

    Figure 30-21 Newly Added Event on Links Dialog

    Description of Figure 30-21 follows
    Description of "Figure 30-21 Newly Added Event on Links Dialog"
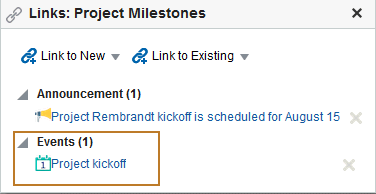
  5. Close the Links dialog.

    The link from the event to the list also appears in the Events view (Figure 30-22).

    Figure 30-22 Link to List from an Event

    Description of Figure 30-22 follows
    Description of "Figure 30-22 Link to List from an Event"

30.2.2 Linking to New Assets

When you select Link to New, you accomplish two things at the same time: you create a new asset, and you create a link to that asset. Use the Link to New option on the Links dialog to link to a new discussion forum topic, a new document, a new event, a new note, or a web page.

This section describes how to link to these types of assets. It includes the following topics:

30.2.2.1 Opening the Links Dialog to Link to a New Asset

When you want to create a link to a new asset, go to the asset from which you want to link and open the Links dialog. From there, the steps vary depending on the type of asset you are creating and linking to.

To open the Links dialog:

  1. Go to the asset from which you want to link.
  2. Click the asset's (or row's) associated Links icon (Figure 30-23).

    The Links dialog (Figure 30-24) opens.

  3. From the Links dialog, select Link to New and then select the type of asset you want to create and link to.

Note:

In the following procedures, Lists is used as an example of an asset from which links to new assets are created.

You cannot link to new announcements.

30.2.2.2 Adding and Linking to a Discussion Forum Topic

Note:

Beginning with 12c (12.2.1.3.0), Oracle WebCenter Portal has deprecated support for Jive features (announcements and discussions). If you are upgrading from a prior release, these features remain available in your existing installations that are being upgraded.

You can create a new topic thread directly from the asset that first prompted the discussion, adding a link at the same time.

To link to a new discussion forum topic:

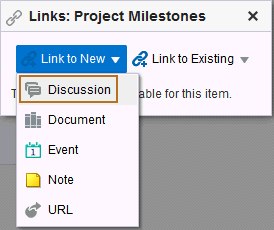
  1. Go to the asset from which you want to link to a new discussion forum topic and click the Links icon.
  2. From the Links dialog, select Link to New and then select Discussion (Figure 30-25).

    Figure 30-25 Link to New Discussion Topic

    Description of Figure 30-25 follows
    Description of "Figure 30-25 Link to New Discussion Topic"

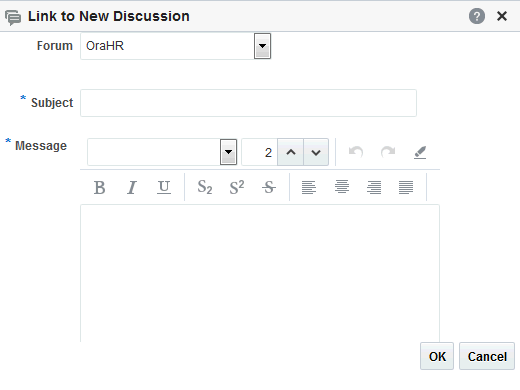
    The Link to New Discussion dialog (Figure 30-26) opens.

    Figure 30-26 Link to New Discussion Dialog

    Description of Figure 30-26 follows
    Description of "Figure 30-26 Link to New Discussion Dialog"
  3. If the portal is configured for multiple discussion forums, then in the Forum list, select the forum in which you want to create the discussion topic.
  4. In the Subject field, enter a subject for the new topic.
  5. In the Message field, enter the content.
  6. Click OK.

    The topic is added to the appropriate discussion forum for the portal, and the link is added to the Links dialog (Figure 30-27).

    Figure 30-27 Newly Created and Linked Discussion

    Description of Figure 30-27 follows
    Description of "Figure 30-27 Newly Created and Linked Discussion"
  7. Close the Links dialog.

30.2.2.3 Adding and Linking to a Document

When viewing an asset, such as a discussion forum topic, you might be aware of an informative document that would help other users. You can add the document or wiki to the document library directly from the original asset, adding a link to it at the same time.

To link to a new document:

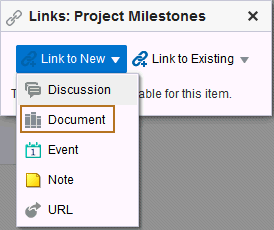
  1. Go to the asset from which you want to link to a new document and click the Links icon.
  2. From the Links dialog, select Link to New and then select Document (Figure 30-28).

    Figure 30-28 Link to New Document

    Description of Figure 30-28 follows
    Description of "Figure 30-28 Link to New Document"

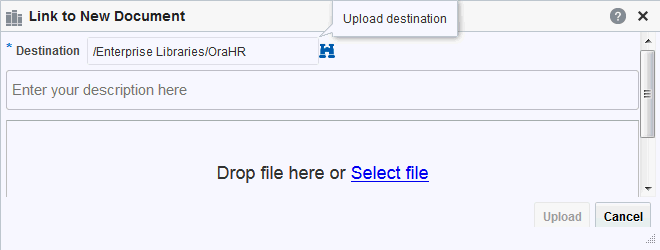
    The Link to New Document dialog (Figure 30-29) opens.

    Figure 30-29 Link to New Document Dialog

    Description of Figure 30-29 follows
    Description of "Figure 30-29 Link to New Document Dialog"
  3. Click Select File, and navigate to the location of the document you want to upload.
  4. Select the document, and click Open.
  5. Enter an optional description and change the default destination directory, if necessary. Click the Browse icon to locate a destination, if necessary.
  6. Click Upload.

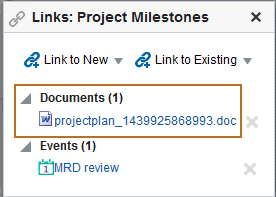
    The document is uploaded, and the link is added to the Links dialog (Figure 30-30).

    Figure 30-30 Newly Added and Linked Document

    Description of Figure 30-30 follows
    Description of "Figure 30-30 Newly Added and Linked Document"

    The location of the uploaded document depends on where you initiated the linking action. The document could be uploaded to the selected portal's document library or to the root folder of your WebCenter Portal default document repository connection.

  7. Close the Links dialog.

30.2.2.4 Adding and Linking to an Event

You can create a new event and add a link to it at the same time. For example, to schedule a meeting to address issues raised in a project, you can link the new event to the project issues list.

To add and link to a event:

  1. Go to the asset from which you want to link to a new event and click the Links icon.
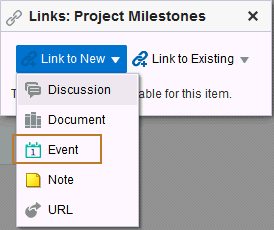
  2. From the Links dialog, select Link to New and then select Event (Figure 30-31).

    Figure 30-31 Link to New Event

    Description of Figure 30-31 follows
    Description of "Figure 30-31 Link to New Event "

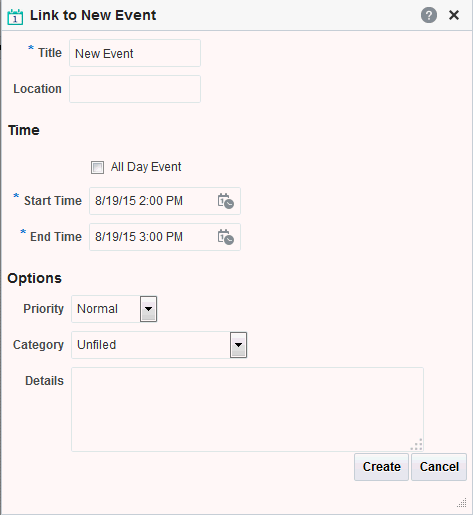
    The Link to New Event dialog (Figure 30-32) opens.

    Figure 30-32 Link to New Event Dialog

    Description of Figure 30-32 follows
    Description of "Figure 30-32 Link to New Event Dialog"
  3. Enter the title, location, and other event details.

    See Scheduling Events for more information.

  4. Click Create.

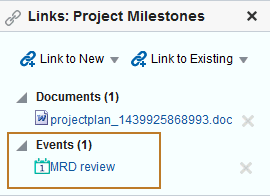
    The event is created and the link is added to the Links dialog (Figure 30-33).

    Figure 30-33 Newly Created and Linked Event

    Description of Figure 30-33 follows
    Description of "Figure 30-33 Newly Created and Linked Event"
  5. Close the Links dialog.

30.2.2.5 Adding and Linking to a Note

Create a personal note from an asset, or to add an annotation to an asset, like an online post-it note. The note is also linked to the asset, serving as a reminder whenever you view it.

To add and link to a note:

  1. Go to the asset from which you want to add and link to a note and click the Links icon.
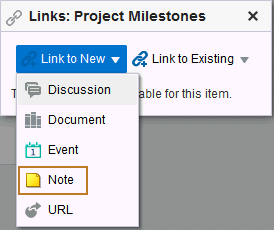
  2. From the Links dialog, select Link to New and then select Note (Figure 30-34).

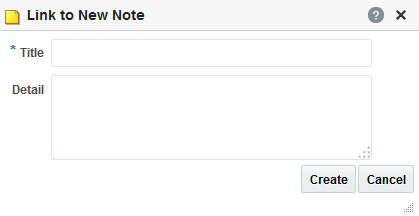
    Figure 30-34 Link to New Note

    Description of Figure 30-34 follows
    Description of "Figure 30-34 Link to New Note"

    The Link to New Note dialog (Figure 30-35) opens.

    Figure 30-35 Link to New Note Dialog

    Description of Figure 30-35 follows
    Description of "Figure 30-35 Link to New Note Dialog"
  3. In the Title field, enter a title for the note.
  4. In the Detail field, enter the note content.
  5. Click Create.

    For more information about notes, see Managing Your Notes.

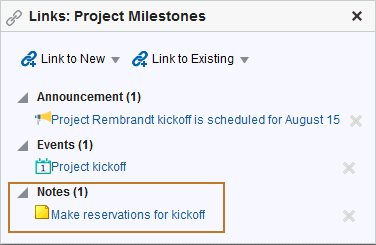
    The newly created note link is added to the Links dialog (Figure 30-36).

    Figure 30-36 Newly Created and Linked Note

    Description of Figure 30-36 follows
    Description of "Figure 30-36 Newly Created and Linked Note"
  6. Close the Links dialog.

30.2.2.6 Linking to a Web Page

From an asset, you can link to a web page to provide access to additional information.

To link to a web page:

  1. Go to the asset from which you want to link to a web page and click the Links icon.
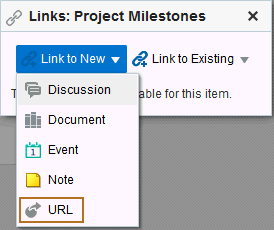
  2. From the Links dialog, select Link to New and then select URL (Figure 30-37).

    Figure 30-37 Link to New URL

    Description of Figure 30-37 follows
    Description of "Figure 30-37 Link to New URL"

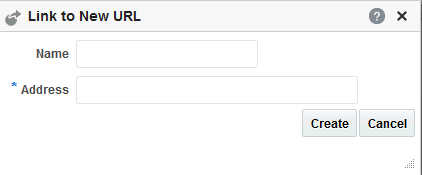
    The Link to New URL dialog (Figure 30-38) opens.

    Figure 30-38 Link to New URL Dialog

    Description of Figure 30-38 follows
    Description of "Figure 30-38 Link to New URL Dialog"
  3. In the Name field, enter a display name to use for the link.
  4. In the Address field, enter the URL of the page to which you want to link.
  5. Click Create.

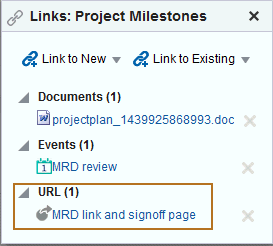
    The link is added to the Links dialog (Figure 30-39).

    Figure 30-39 Newly Created and Linked URL

    Description of Figure 30-39 follows
    Description of "Figure 30-39 Newly Created and Linked URL"
  6. Close the Links dialog.

30.2.3 Accessing Link Targets

You access link targets from the Links dialog. If links exist from an asset, it is indicated by the gold Links icon (Figure 30-40).

To access a link target:

  1. Click the Link icon (Figure 30-40) associated with the asset.

    Figure 30-40 Link Icon That Has Links

    Description of Figure 30-40 follows
    Description of "Figure 30-40 Link Icon That Has Links"
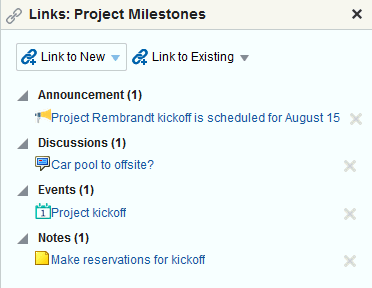
  2. Click the link you want to open on the resulting Links dialog (Figure 30-41

    Figure 30-41 Links in the Links Dialog

    Description of Figure 30-41 follows
    Description of "Figure 30-41 Links in the Links Dialog"

30.2.4 Deleting a Link

Delete a link when it is no longer useful or when it is obsolete. For example, you can delete a link to an event after the event date has passed.

To delete a link:

  1. Go to the asset associated with the link you want to delete, such as the document, list, list row, or other item for which the link was created.
  2. Click the Links icon (Figure 30-42).

    The Links dialog opens, showing a list of current links to the asset.

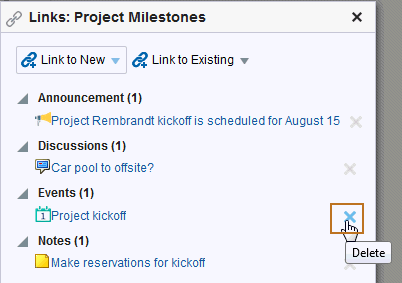
  3. Click the Delete icon next to the link you want to delete (Figure 30-43).

    Figure 30-43 Delete Icons Next to Links

    Description of Figure 30-43 follows
    Description of "Figure 30-43 Delete Icons Next to Links"

    The two assets are no longer linked. You can link the two assets again, if you wish to do so. See Linking to Existing Assets and Linking to New Assets.