2 Working with the Theme Editor
This chapter includes the following sections:
2.1 About the Theme Editor
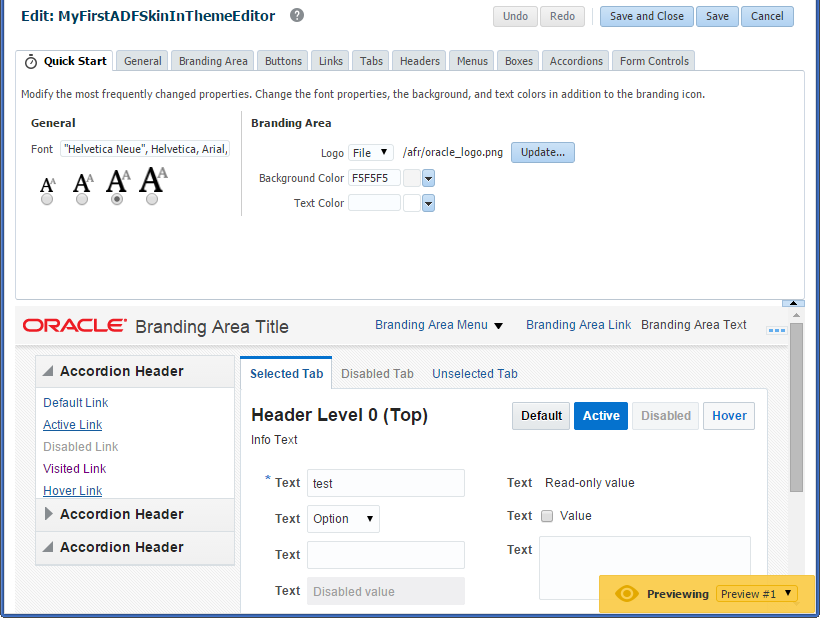
The Theme Editor helps you to define the look and feel of your web application by selecting the colors, fonts, and other style properties that you want ADF Faces components to render at runtime. The end result of this process is the creation of an ADF skin.
Note:
The Theme Editor's user interface refers to an ADF skin as a "theme".
Once you complete the creation of the theme, you can export it from the Theme Editor as an ADF skin to an ADF Library JAR file. Use this file to apply the ADF skin that you created in the Theme Editor to your web application, as described in Applying the Finished ADF Skin to Your Web Application.
If you want to customize the ADF skin further and the Theme Editor does not provide the UI controls to achieve the result you want, import the ADF Library JAR into a project in JDeveloper where you can use the design-time that JDeveloper provides or JDeveloper's source editor for the CSS source file of an ADF skin to create an ADF skin that extends from the ADF skin you created in the Theme Editor. See Adding ADF Skins from an ADF Library JAR.
Figure 2-1 Theme Editor's Quick Start Page

Description of "Figure 2-1 Theme Editor's Quick Start Page "
2.2 Setting Up and Starting the Theme Editor
Create a new application using JDeveloper’s Application from EAR File option. Deploy this new application to start an instance of the Theme Editor.
Oracle ADF delivers the Theme Editor as a web application in the following EAR file in your JDeveloper installation:
\jdeveloper_install_dir\jdeveloper\skineditor\skin-editor-webapp.ear
To use the Theme Editor, you create a new application in JDeveloper using the Application from EAR File option in JDeveloper's New Gallery and deploy the Theme Editor to the Integrated WebLogic Server. See How to Set Up the Theme Editor.
Once you create the new application with the Theme Editor in JDeveloper, you probably want to edit the application's web.xml file so that any ADF skins you create in the Theme Editor persist beyond a stop and restart of the Integrated WebLogic Server, as described in How to Persist ADF Skins Created in the Theme Editor.
After you configure the Theme Editor to persist ADF skins, you can start it, as described in How to Start the Theme Editor.
As the Theme Editor is packaged in an EAR file, you can deploy it to Integrated WebLogic Server that is installed with JDeveloper. You can also deploy it using Enterprise Manager, Oracle WebLogic Scripting Tool (WLST), or Oracle WebLogic Server Administration Console. For information about deployment options, see Deploying Fusion Web Applications in Developing Fusion Web Applications with Oracle Application Development Framework.
2.2.1 How to Set Up the Theme Editor
You set up the Theme Editor by creating a new application in JDeveloper where you import the Theme Editor from the skin-editor-webapp.ear file in the skineditor directory of your JDeveloper installation.
How to set up the Theme Editor:
-
In the main menu, choose File and then Application > New.
-
In the New Gallery, in the Items list, double-click Application from EAR file.
-
In the Application from EAR File wizard, enter the location of the EAR file or click Browse to navigate to the
skin-editor-webapp.earfile in theskineditordirectory of your JDeveloper install directory.For additional help with the wizard, click Help.
-
Click Finish.
2.2.2 How to Persist ADF Skins Created in the Theme Editor
The ready-to-use Theme Editor that Oracle ADF provides in the skin-editor-webapp.ear file in the skineditor directory of your JDeveloper install directory does not persist any ADF skins that you create if you stop and restart the Integrated WebLogic Server where you deploy the Theme Editor. You specify a file directory location in the web.xml file of the Theme Editor web application. The Theme Editor then saves ADF skins you create (and their resources) to this location so that they will be available after an Integrated WebLogic Server restart. You can view these resources in the file directory you specify, but you must export the ADF skin, as described in Exporting an ADF Skin from the Theme Editor, if you want to extend the ADF skin in JDeveloper or distribute the ADF skin for use in a web application.
To persist ADF skins created in the Theme Editor:
-
In the Applications window, double-click the web.xml file in the
skin-editorproject. -
In the source editor, add the following context initialization parameter entries:
<context-param>
 <description>Set this context parameter to file so that themes get saved to a
 temporary directory. Specify a directory location for
 oracle.adf.view.rich.SKIN_REPOSITORY_FILE_PATH to persist changes between server
 restarts.</description>
  <param-name>oracle.adf.view.rich.SKIN_REPOSITORY</param-name>
  <param-value>file</param-value>
</context-param>

<context-param>
 <description>Set this context parameter to a directory location where
 themes are saved. Use to persist changes between server restarts</description>
  <param-name>oracle.adf.view.rich.SKIN_REPOSITORY_FILE_PATH</param-name>
  <param-value>/home/user/themes</param-value>
</context-param>
-
Save and close the
web.xmlfile.
2.2.3 How to Start the Theme Editor
Start the Theme Editor by running the index.html page in the skin-editor project.
To start the Theme Editor:
-
In the Applications window, expand skin-editor, right-click index.html and choose Run.
The Create Default Domain dialog appears the first time you run an application and start a new domain in Integrated WebLogic Server. Use the dialog to define an administrator password for the new domain. Passwords you enter can be eight characters or more and must have a numeric character.
The
index.htmlpage within theskin-editorproject is the run target. When you run the page, JDeveloper starts a browser and displays the launch page of the Theme Editor. Once the Theme Editor launch page appears, you can create new ADF skins or edit existing ADF skins.Note:
The Theme Editor's user interface refers to an ADF skin as a "theme".
2.3 Exporting an ADF Skin from the Theme Editor
Export an ADF Skin from the Theme Editor so that you can distribute it for use in web applications or customize the ADF skin further using the tools provided by JDeveloper.
Once you complete the creation of an ADF skin in the Theme Editor, you may want to export it to an ADF Library JAR so that you can distribute it for use in a web application. Alternatively, you may want to edit it further using the design-time tools that JDeveloper provides for this purpose. This latter scenario may arise if you cannot achieve the look and feel you want using the controls provided by the Theme Editor. If you want to edit an ADF skin using JDeveloper's design-time tools, you import the ADF skin into JDeveloper, as described in Adding ADF Skins from an ADF Library JAR, and create a new ADF skin that extends from the ADF skin you exported from the Theme Editor.
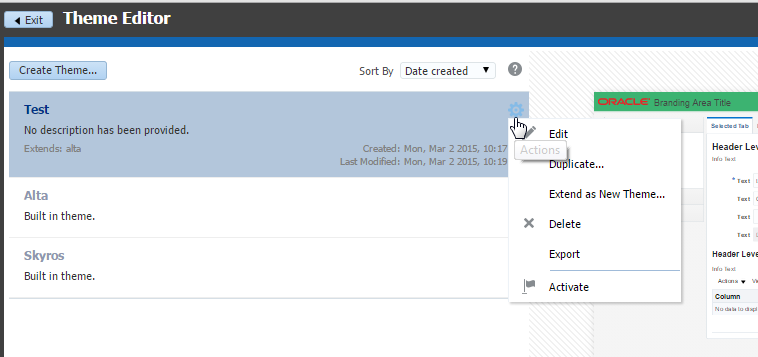
You select the theme (ADF skin) in the Theme Editor's launch page and choose Export from the menu that appears when you click the Actions button, as shown in Figure 2-2. The Theme Editor exports the ADF skin to an ADF Library JAR. This ADF Library JAR contains all required resources for the ADF skin, such as a .CSS file with entries that reflect the changes you made in the Theme Editor, images that you imported to the ADF skin, and a trinidad-skins.xml file that contains metadata describing the ADF skin.
Figure 2-2 Exporting a Theme from the Theme Editor
