7 Creating PDF Templates
This chapter describes creating PDF templates for BI Publisher.
This chapter includes the following sections:
Overview
To create a PDF template, take an existing PDF document and apply the BI Publisher markup.
Because you can use a PDF from any source, you have multiple design options. For example:
-
Design the template using any application that generates documents that can be converted to PDF, such as Microsoft Word
-
Scan a paper document to use as a template
-
Download a PDF document from a third-party website
Note:
The steps required to create a template from a third-party PDF depend on whether form fields have been added to the document. For more information, see Creating a Layout from a Predefined PDF Form.If you are designing the template, then when you have converted to PDF, the template is treated like a set background. When you mark up the template, you draw fields on top of this background. To edit the template, you must edit the original document and then convert back to PDF.
For this reason, the PDF template is not recommended for documents that require frequent updates. However, it is appropriate for forms that have a fixed template, such as invoices or purchase orders.
Requirements
To apply or edit form fields in a PDF document, you must have Adobe Acrobat Professional.
BI Publisher supports Adobe Acrobat 5.0 and later as a tool for updating the template.
BI Publisher generates the output PDF version based on the input PDF version as follows:
-
PDF version 1.4 and earlier generates PDF 1.4
-
PDF version 1.5 and later generates the same output version as the input version
Note:
BI Publisher supports the PDF 1.7 standard. For more information, see PDF Version Support.Designing the Template
To design the template you can use any desktop application that generates documents that can be converted to PDF. Or, scan in an original paper document to use as the background for the template.
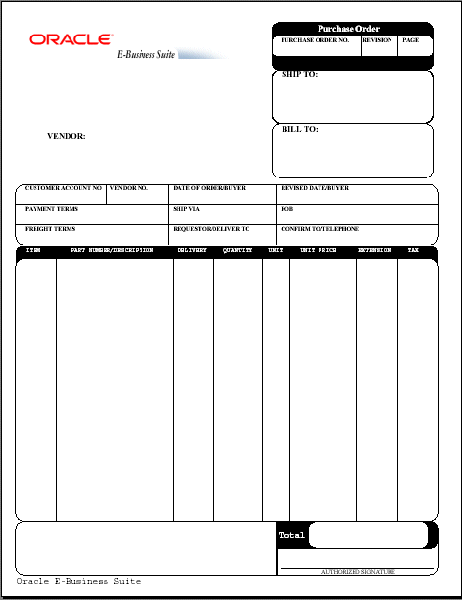
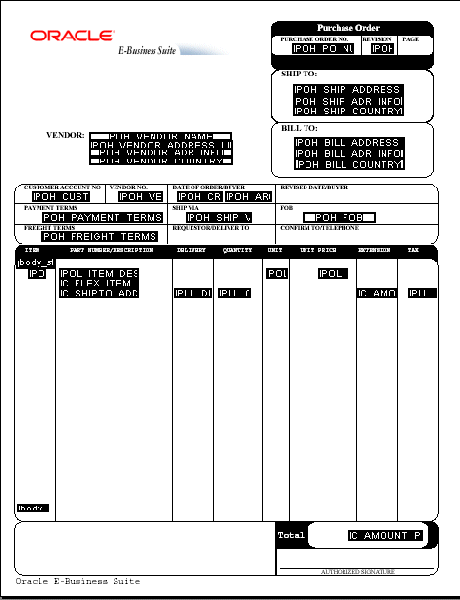
The following figure shows a template for a sample purchase order. It was designed using Microsoft Word and converted to PDF using Adobe Acrobat Distiller.
The following is the XML data that is used as input to this template:
<?xml version="1.0"?>
<POXPRPOP2>
 <G_HEADERS>
  <POH_PO_NUM>1190-1</POH_PO_NUM>
  <POH_REVISION_NUM>0</POH_REVISION_NUM>
  <POH_SHIP_ADDRESS_LINE1>3455 108th Avenue</POH_SHIP_ADDRESS_LINE1>
<POH_SHIP_ADDRESS_LINE2></POH_SHIP_ADDRESS_LINE2>
<POH_SHIP_ADDRESS_LINE3></POH_SHIP_ADDRESS_LINE3>
<POH_SHIP_ADR_INFO>Seattle, WA 98101</POH_SHIP_ADR_INFO>
<POH_SHIP_COUNTRY>United States</POH_SHIP_COUNTRY>
<POH_VENDOR_NAME>Allied Manufacturing</POH_VENDOR_NAME>
<POH_VENDOR_ADDRESS_LINE1>1145 Brokaw Road</POH_VENDOR_ADDRESS_LINE1>
<POH_VENDOR_ADR_INFO>San Jose, CA 95034</POH_VENDOR_ADR_INFO>
<POH_VENDOR_COUNTRY>United States</POH_VENDOR_COUNTRY>
<POH_BILL_ADDRESS_LINE1>90 Fifth Avenue</POH_BILL_ADDRESS_LINE1>
<POH_BILL_ADR_INFO>New York, NY 10022-3422</POH_BILL_ADR_INFO>
<POH_BILL_COUNTRY>United States</POH_BILL_COUNTRY>
<POH_BUYER>Smith, J</POH_BUYER>
<POH_PAYMENT_TERMS>45 Net (terms date + 45)</POH_PAYMENT_TERMS>
<POH_SHIP_VIA>UPS</POH_SHIP_VIA>
<POH_FREIGHT_TERMS>Due</POH_FREIGHT_TERMS>
<POH_CURRENCY_CODE>USD</POH_CURRENCY_CODE>
<POH_CURRENCY_CONVERSION_RATE></POH_CURRENCY_CONVERSION_RATE>
<LIST_G_LINES>
<G_LINES>
<POL_LINE_NUM>1</POL_LINE_NUM>
<POL_VENDOR_PRODUCT_NUM></POL_VENDOR_PRODUCT_NUM>
<POL_ITEM_DESCRIPTION>PCMCIA II Card Holder</POL_ITEM_DESCRIPTION>
<POL_QUANTITY_TO_PRINT></POL_QUANTITY_TO_PRINT>
<POL_UNIT_OF_MEASURE>Each</POL_UNIT_OF_MEASURE>
<POL_PRICE_TO_PRINT>15</POL_PRICE_TO_PRINT>
<C_FLEX_ITEM>CM16374</C_FLEX_ITEM>
<C_FLEX_ITEM_DISP>CM16374</C_FLEX_ITEM_DISP>
<PLL_QUANTITY_ORDERED>7500</PLL_QUANTITY_ORDERED>
<C_AMOUNT_PLL>112500</C_AMOUNT_PLL>
<C_AMOUNT_PLL_DISP> 112,500.00 </C_AMOUNT_PLL_DISP>
</G_LINES>
</LIST_G_LINES>
<C_AMT_POL_RELEASE_TOTAL_ROUND>312420/<C_AMT_POL_RELEASE_TOTAL_ROUND>
</G_HEADERS>
</POXPRPOP2>
Adding Markup to the Template
After you have converted a document to PDF, you define form fields that display the data from the XML input file. These form fields are placeholders for the data. The process of associating the XML data to the PDF template is the same as the process for the RTF template.
See Associating the XML Data to the Template Layout.
When you draw the form fields in Adobe Acrobat, you are drawing them on top of the template that you designed. There is not a relationship between the design elements on the template and the form fields. You therefore must place the fields exactly where you want the data to display on the template.
Creating a Placeholder
You can define a placeholder as text, a check box, or a radio button, depending on how you want the data presented.
Note:
The steps for adding a form field depend on the version of Adobe Acrobat Professional that you are using. See the Adobe documentation for the version. If you are using Adobe Acrobat 9 Pro, then from the Forms menu, select Add or Edit Fields.
Creating a Text Placeholder
Follow these steps to create a text Form Field placeholder using Adobe Acrobat 9 Pro. If you are using a different version of Adobe Acrobat Professional, then refer to the documentation for details.
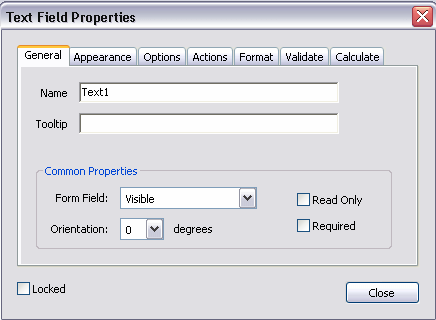
To create a text placeholder:
Supported Field Properties Options
BI Publisher supports the following options available from the Field Properties dialog box.
Note that these options are not available when you use repeating fields. For more information about these options, see the Adobe Acrobat documentation.
-
General
-
Read Only
The setting of this check box in combination with a set of configuration properties controls the read-only/updatable state of the field in the output PDF. See Setting Fields as Updatable or Read Only.
-
Required
-
Visible/Hidden
-
Orientation (in degrees)
-
-
Appearance
-
Border Settings: color, background, width, and style
-
Text Settings: color, font, size
-
Border Style
-
-
Options tab
-
Multi-line
-
Scrolling Text
-
-
Format tab - Number category options only
-
Calculate tab - all calculation functions
Creating a Check Box
A check box is used to present options from which more than one can be selected. Each check box represents a different data element. You define the value that causes the check box to display as checked.
For example, a form contains a check box listing of automobile options such as Power Steering, Power Windows, and Sunroof. Each of these represents a different element from the XML file (for example <POWER_STEERING>). If the XML file contains a value of Y for any of these fields, you want the check box to display as checked. All or none of these options may be selected.
The following describes how to create a check box field using Adobe Acrobat 9 Pro. If you are using a different version of Adobe Acrobat Professional, refer to the documentation for details.
To create a check box:
Creating a Radio Button Group
A radio button group is used to display options from which only one can be selected.
For example, the XML data file contains a field called <SHIPMENT_METHOD>. The possible values for this field are "Standard" or "Overnight". You represent this field in the form with two radio buttons, one labeled "Standard" and one labeled "Overnight". Define both radio button fields as placeholders for the <SHIPMENT_METHOD> data field. For one field, define the on state when the value is Standard. For the other, define the on state when the value is Overnight.
The following describes how to create a radio button group using Adobe Acrobat 9 Pro. If you are using a different version of Adobe Acrobat Professional, then refer to the documentation for details.
To create a radio button group:
Defining Groups of Repeating Fields
In the PDF layout, you explicitly define the area on the page that contains the repeating fields. For example, on the purchase order layout, the repeating fields should display in the block of space between the Item header row and the Total field.
To define the area to contain the group of repeating fields:
-
Insert a Text Field at the beginning of the area that is to contain the group.
-
In the Field Name dialog, enter any unique name you choose. This field is not mapped.
-
In the Tooltip field of the Text Field Properties dialog, enter the following syntax:
<?rep_field="BODY_START"?> -
Define the end of the group area by inserting a Text Field at the end of the area the that is to contain the group.
-
In the Field Name dialog, enter any unique name you choose. This field is not mapped. Note that the name you assign to this field must be different from the name you assigned to the body start field.
-
In the Tooltip field of the Text Field Properties dialog, enter the following syntax:
<?rep_field="BODY_END"?>
To define a group of repeating fields:
-
Insert a placeholder for the first element of the group.
Note:
The placement of this field in relationship to the BODY_START tag defines the distance between the repeating rows for each occurrence. See Placement of Repeating Fields.
-
For each element in the group, enter the following syntax in the Tooltip field:
<?rep_field="T1_Gn"?>where n is the number of the element in the group.
For example, the group in the sample report is laid out in three rows.
-
For the fields belonging to the row that begins with PO_LINE_NUM enter
<?rep_field="T1_G1"?> -
For the fields belonging to the row that begins with C_FLEX_ITEM_DISP enter
<?rep_field="T1_G2"?> -
For the fields belonging to the row that begins with C_SHIP_TO_ADDRESS enter
<?rep_field="T1_G3"?>
The following figure shows the entries for the Short Description/Tooltip field:
-
Repeating a PDF Template by Using the document-repeat-elementname Form Field
The document-repeat-elementname form field in a PDF template enables repeating the entire template for a specified group of data elements.
When you want to use the same PDF template for a group of data elements, set the document-repeat-elementname PDF form field to the group name of the data elements to be used in the report.
Repeating a PDF Template in a Report
If the document-repeat-elementname PDF form field is set, when you run the report, the FormProcessor utility sends the PDF template and the associated XML data to the document repeat engine. The document repeat engine repeats the PDF template for each element of the group specified by document-repeat-elementname, and generates the report.
Example 7-1 The Generating Monthly Payslips
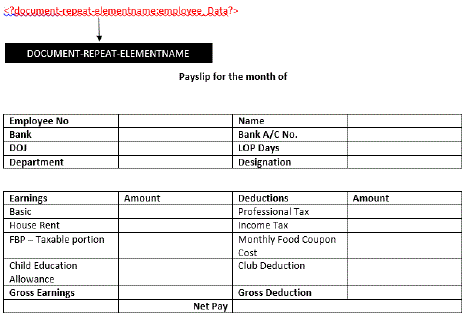
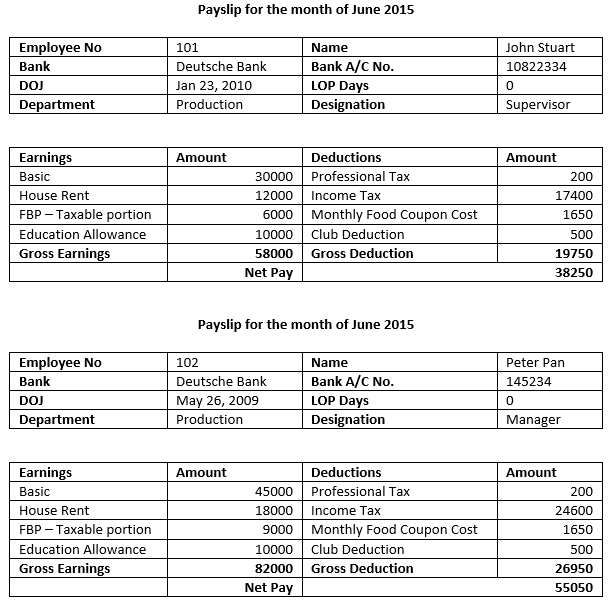
To generate the monthly payslips for each employee in a department, set the document-repeat-elementname form field as shown below to the name of the group element associated with the data of employees in the department, and provide the XML data that contains the employee_Data element to the template. The report will iterate the same template for each employee payslip.
<?set-property: document-repeat-elementname; employee_Data?>
The following figure shows the documents-repeat-elementname field entry in the PDF template.
The following figure shows the report containing the payslips of the employees.
Adding Page Numbers and Breaks
This section describes how to add the following page features to the PDF layout.
Adding Page Numbers
To add page numbers, define a field in the layout where you want the page number to appear and enter an initial value in that field.
- Decide the position on the layout where you want the page number to be displayed.
- Create a placeholder field called @pagenum@, see Creating a Text Placeholder.
- Enter a starting value for the page number in the Default field (Text Field Properties > Options tab). If the XML data includes a value for this field, then the start value that is assigned in the layout is overridden. If no start value is assigned, then it defaults to 1.
Adding Page Breaks
You can define a page break in the layout to occur after a repeatable field.
To insert a page break after the occurrence of a specific field, add the following to the syntax in the Tooltip field of the Text Field Properties dialog:
page_break="yes"
For example:
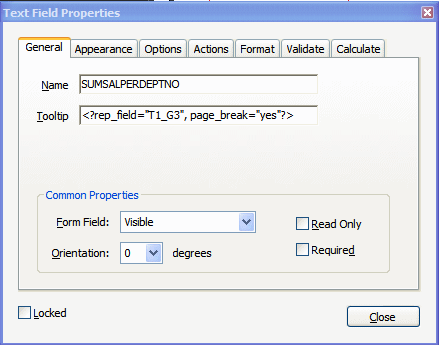
<?rep_field="T1_G3", page_break="yes"?>
The following example demonstrates inserting a page break in a layout. The XML sample contains salaries of employees by department:
<?xml version="1.0"?>
<ROOT>
  <LIST_G_DEPTNO>
    <G_DEPTNO>
      <DEPTNO>10</DEPTNO>
      <LIST_G_EMPNO>
        <G_EMPNO>
          <EMPNO>7782</EMPNO>
          <ENAME>CLARK</ENAME>
          <JOB>MANAGER</JOB>
          <SAL>2450</SAL>
        </G_EMPNO>
        <G_EMPNO>
          <EMPNO>7839</EMPNO>
          <ENAME>KING</ENAME>
          <JOB>PRESIDENT</JOB>
          <SAL>5000</SAL>
        </G_EMPNO>
        <G_EMPNO>
          <EMPNO>125</EMPNO>
          <ENAME>KANG</ENAME>
          <JOB>CLERK</JOB>
          <SAL>2000</SAL>
        </G_EMPNO>
        <G_EMPNO>
          <EMPNO>7934</EMPNO>
          <ENAME>MILLER</ENAME>
          <JOB>CLERK</JOB>
          <SAL>1300</SAL>
        </G_EMPNO>
        <G_EMPNO>
          <EMPNO>123</EMPNO>
          <ENAME>MARY</ENAME>
          <JOB>CLERK</JOB>
          <SAL>400</SAL>
        </G_EMPNO>
        <G_EMPNO>
          <EMPNO>124</EMPNO>
          <ENAME>TOM</ENAME>
          <JOB>CLERK</JOB>
          <SAL>3000</SAL>
        </G_EMPNO>
      </LIST_G_EMPNO>
      <SUMSALPERDEPTNO>9150</SUMSALPERDEPTNO>
    </G_DEPTNO>

    <G_DEPTNO>
      <DEPTNO>30</DEPTNO>
      <LIST_G_EMPNO>
        .
        .
        .

      </LIST_G_EMPNO>
      <SUMSALPERDEPTNO>9400</SUMSALPERDEPTNO>
    </G_DEPTNO>
  </LIST_G_DEPTNO>
  <SUMSALPERREPORT>29425</SUMSALPERREPORT>
</ROOT>
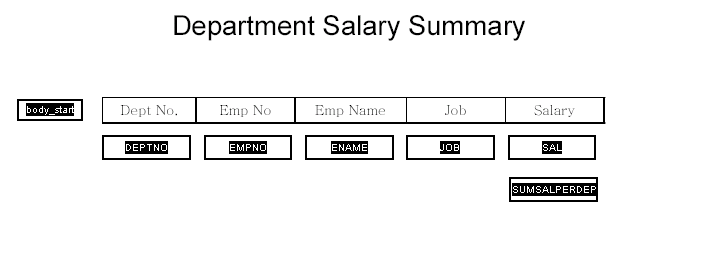
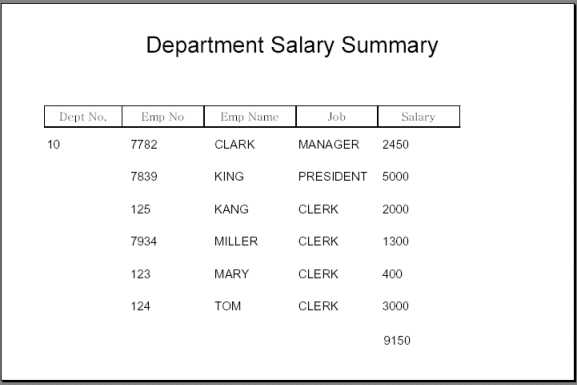
Suppose the report requirement is to display the salary information for each employee by department as shown in the following figure:
To insert a page break after each department, insert the page break syntax in the Tooltip field for the SUMSALPERDEPTNO field as follows:
<?rep_field="T1_G3", page_break="yes"?>
The Text Field Properties dialog for the field is shown in the following figure.
For a break to occur, the field must be populated with data from the XML file.
The sample report with data is shown in the following figure:
Description of the illustration GUID-E21557FB-86F8-4DBF-9094-A839440C9A8D-default.gif
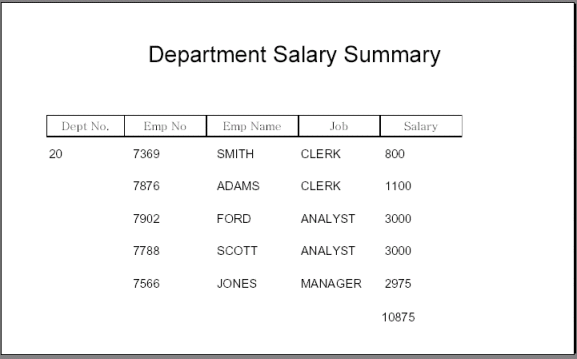
Description of the illustration GUID-C2839560-FDA7-4F87-86C4-17ABED6D2BE1-default.gif
The page breaks after each department.
Performing Calculations
Adobe Acrobat provides a calculation function in the Field Properties dialog box.
To create a field to display a calculated total on a report:
- Create a text field to display the calculated total. Give the field any Name you choose.
- In the Field Properties dialog box, select the Format tab.
- Select Number from the Category list.
- Select the Calculate tab.
- Select the radio button next to "Value is the <List of operations> of the following fields:"
- Select sum (+) from the list.
- Click the Pick... button and select the fields to be totaled.
Runtime Behavior
The following sections describe runtime behavior of PDF templates:
Placement of Repeating Fields
As already noted, the placement, spacing, and alignment of fields that you create on the layout are independent of the underlying form layout.
At runtime, BI Publisher places each repeating row of data according to calculations performed on the placement of the rows of fields that you created, as follows:
First occurrence:
The first row of repeating fields displays exactly where you have placed them on the layout.
Second occurrence, single row:
To place the second occurrence of the group, BI Publisher calculates the distance between the BODY_START tag and the first field of the first occurrence. The first field of the second occurrence of the group is placed this calculated distance below the first occurrence.
Second occurrence, multiple rows:
If the first group contains multiple rows, then the second occurrence of the group is placed the calculated distance below the last row of the first occurrence.
The distance between the rows within the group is maintained as defined in the first occurrence.
Setting Fields as Updatable or Read Only
You can make fields either read only or updatable.
When you define a field in the layout, you have the option of selecting "Read Only" for the field, as shown in the following illustration:
Regardless of what you choose at design time for the Read-Only check box, the default behavior of the PDF processing engine is to set all fields to read-only for the output PDF. You can change this behavior using the following report properties, as described in Setting Report Processing and Output Document Properties:
-
all-field-readonly
-
all-fields-readonly-asis
-
remove-pdf-fields
Note that in the first two options, you are setting a state for the field in the PDF output. The setting of individual fields can still be changed in the output using Adobe Acrobat Professional. Also note that because the fields are maintained, the data is still separate and can be extracted. In the third option, "remove-pdf-fields" the structure is flattened and no field/data separation is maintained.
To make all fields updatable:
Set the "all-field-readonly" property to "false". This sets the Read-Only state to false for all fields regardless of the individual field settings at design time.
To make all fields read only:
This is the default behavior. No settings are required.
To maintain the Read-Only check box selection for each field:
To maintain the setting of the Read Only check box on a field-by-field basis in the output PDF, set the property, all-fields-readonly-asis, to true. This property overrides the settings of all-field-readonly.
To remove all fields from the output PDF:
Set the property "remove-pdf-fields" to "true".
Overflow Data
When multiple pages are required to accommodate the occurrences of repeating rows of data, each page displays identically except for the defined repeating area, which displays the continuation of the repeating data.
For example, if the item rows of the purchase order extend past the area defined on the layout, succeeding pages displays all data from the purchase order form with the continuation of the item rows.
Creating a Layout from a Predefined PDF Form
There are many PDF forms available online that you may want to use as layouts for the report data. For example, government forms that your company is required to submit. You can use these downloaded PDF files as the report layouts, supplying the XML data at runtime to fill in the report fields.
Some of these forms already have form fields defined, some do not. See Determining If a PDF Has Form Fields Defined if you are unsure. If the PDF form already has fields defined, then you can use one of the following methods to match the form field names to the data field names:
-
Use Adobe Acrobat Professional to rename the fields in the document to match the names of the elements in the XML data file. See Using a Predefined PDF Form as a Layout by Renaming the Form Fields.
-
Use BI Publisher's Data Model Editor to rename the XML element names in the data file to match the field names in the PDF form. For information, see Structuring Data in Data Modeling Guide for Oracle Business Intelligence Publisher.
If the form fields are not already defined in the downloaded PDF, then you must create them. See Adding Markup to the Template for instructions on inserting the form field placeholders.
Determining If a PDF Has Form Fields Defined
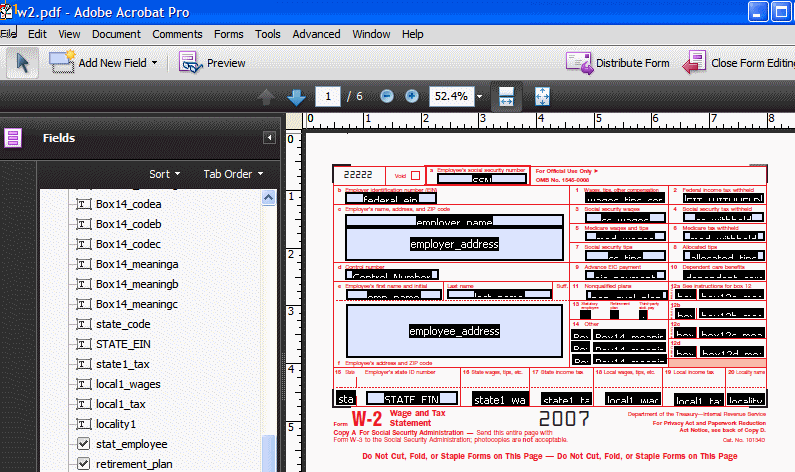
Follow these steps to determine if a PDF has form fields defined and to get a list of the field names.
- Open the document in Adobe Acrobat Professional.
- Click Highlight Fields. Form fields that exist in the document are highlighted.
- From the Form menu, select Add or Edit Fields. The field names display in the document as well as in the Fields pane.
Using a Predefined PDF Form as a Layout by Renaming the Form Fields
You can use a PDF form as a template for another form.
To use a predefined PDF form as a layout:
Using the Comb of Characters Option
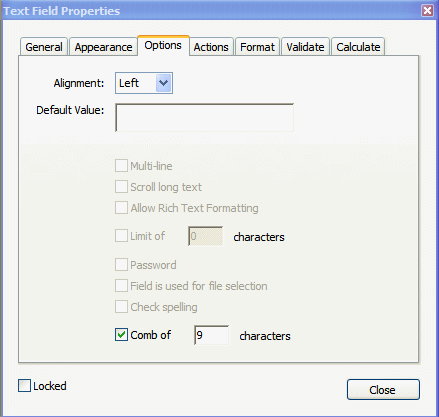
The comb of characters option for a PDF form field in Adobe Acrobat spreads the text evenly across the width of the text field.
Use this option when the form field requires the characters to be entered in specific positions, as the Routing number field shown in the following figure:
To use this feature, perform the following:
When you run the report, the characters comprising the value for the routing field will be spread across the text field as shown in the following figure:
The following figure shows how the data will display in the field when the data for the routing field does not contain the full nine characters and the Alignment option is set to left:
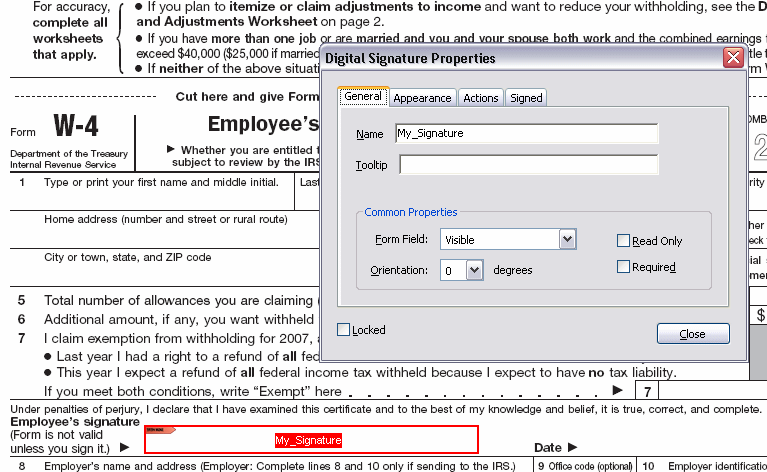
Adding or Designating a Field for a Digital Signature
Oracle BI Publisher supports digital signatures on PDF output documents. Digital signatures enable you to verify the authenticity of the documents you send and receive. Oracle BI Publisher can access the digital ID file from a central, secure location and at runtime sign the PDF output with the digital ID. The digital signature verifies the signer's identity and ensures that the document has not been altered after it was signed.
Implementing digital signature requires several tasks across the BI Publisher product. This topic describes how to add a new field or configure an existing field in the PDF template for the digital signature. For more information and a description of the other required tasks and options, see Implementing a Digital Signature in Administrator's Guide for Oracle Business Intelligence Publisher.
About Signature Field Options
For PDF templates you have these options for designating a digital signature field for the output report.
-
Add a signature field to the PDF layout.
Use this option if you want the digital signature to appear in a specific field and the PDF template does not already include a signature field. See Adding a Signature Field.
-
Use an existing signature field in the PDF template.
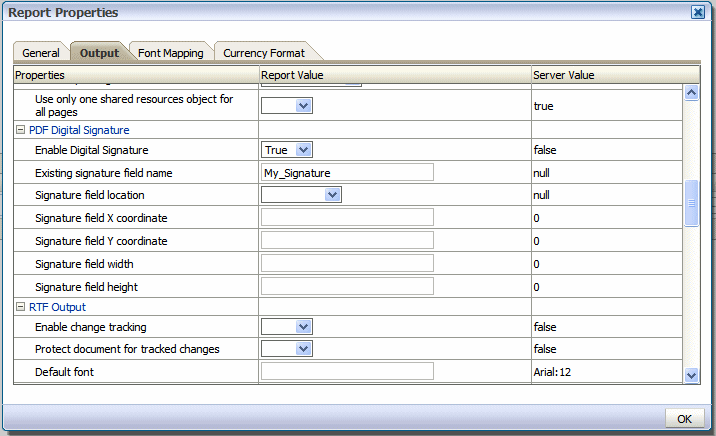
Use this option if the PDF template already includes a signature field that you want to use. To designate an existing field for the digital signature, define the field in the Runtime Configuration page. See Configuring the Report to Insert the Digital Signature at Runtime.
-
Designate the position of the digital signature on the output report by setting x and y coordinates.
Use this option if you prefer to designate the x and y coordinates for the placement of the digital signature, rather than use a signature field. You set the position using runtime properties. For information on setting these properties, see PDF Digital Signature Properties.
All three options require setting configuration properties for the report in the Report Properties page after you have uploaded the template.
PDF Template Limitations
The PDF template has a few limitations.
The PDF template does not support:
-
The field properties mentioned in Supported Field Properties Options for repeating fields.
-
Nested repeating fields.
-
Section-wise repeat. The
document-repeat-elementnamefield is used for repeating the entire template. -
Pixel control.
-
Data alignment in fields.
-
Large documents. You might experience performance issues when a document is larger than 250 MB.
To avoid these limitations, use an RTF template instead of a PDF template.
